1
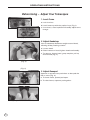
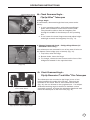
Telescope User Manual
OPERATING INSTRUCTIONS
Orascoptic® Telescopes
Getting started
With Orascoptic® Telescopes
Although your new telescopes have been fully tested and adjusted by our
factory technicians, they may need to be initially customized to your facial
anatomy. Please read the following guide to learn how to adjust and care for
your new telescopes — now and in the future. If you need help, call a trained
technician. See the back of this manual for contact information.
Table of Contents
1.
Before Using – Adjust Your Telescopes . . . . . . . . . . . . . . . . . . . . . . . . . . . . . . . . . 2
2.
Side Shields – Titanium Frames . . . . . . . . . . . . . . . . . . . . . . . . . . . . . . . . . . . . . . . 6
3.
Side Shields – Designer Sports Frames . . . . . . . . . . . . . . . . . . . . . . . . . . . . . . . . . 7
4.
Using Your Orascoptic Telescopes . . . . . . . . . . . . . . . . . . . . . . . . . . . . . . . . . . . . . 8
5.
Cleaning Instructions . . . . . . . . . . . . . . . . . . . . . . . . . . . . . . . . . . . . . . . . . . . . . . . . 8
6.
Telescope Prescription Service . . . . . . . . . . . . . . . . . . . . . . . . . . . . . . . . . . . . . . . . 8
7.
Cleaning and Refurbishing Service . . . . . . . . . . . . . . . . . . . . . . . . . . . . . . . . . . . . . 9
8.
Laser Loupe Safety Instructions . . . . . . . . . . . . . . . . . . . . . . . . . . . . . . . . . . . . . . . 9
1
OPERATING INSTRUCTIONS
Orascoptic® Telescopes
Before Using – Adjust Your Telescopes
1. Level Frame
a. Look in mirror.
b. Level frame top with the pupils of eye (Fig.1).
c. If not level, a local optician will usually adjust at no
charge.
(Fig. 1)
2. Adjust Headstrap
Use of headstrap distributes weight around head,
allowing all-day wearing comfort.
a. Loosen bead.
b. Place frames on head, tighten bead comfortably.
c. To remove, loosen bead, grasp temples, pull up
and forward (Fig. 2).
(Fig. 2)
(Fig. 3)
3. Adjust Nosepad
Squeeze or spread nose pad wires so that pad sits
flat on nose (Fig. 3).
a. To lower frame, spread pad apart.
b. To raise frame, squeeze pad together.
Titanium Frames
Rudy Project and Revolution Frame
2
OPERATING INSTRUCTIONS
Orascoptic® Telescopes
4. Check Working Distance
a. Sit in your working position and focus on operating
site (Fig. 4).
b. Have someone measure from your eye to the
operating site. Distance should match working
distance ordered.
c. If distance is incorrect, call Technical Support (see
back of manual).
* For HiRes ™ Plus Telescopes Only
If ordered working distance is close to your actual
working distance, you can fine tune the working
distance.
(Fig. 4)
* CAUTION – DO NOT make
large adjustments. The telescopes have
been factory adjusted to focus at or
near the ordered working distance.
a. Close one eye – gently turn the opposite, outer
telescope housing to focus on operating site.
b. Repeat the procedure by closing the other eye and
adjust the other telescope.
5a. Check Interpupillary Distance –
Through-the-Lens and
Through-the-Flip Telescopes
Correct
Incorrect
(Fig. 5)
When the focus is properly adjusted, the two circles that
form the field-of-view should form an ellipse (Fig. 5).
If the field is not clear, there is double vision, eye strain or
no field-of-view:
a. Reposition frame and/or telescope on your face until
there is a clear field (Fig. 6).
Note if you have raised or lowered the frame on your
face.
(Fig. 6) Raise or lower to gain clear
field-of-view
b. If the frame needs to be lowered – spread the nosepads.
c. If the frame needs to be raised – squeeze the nosepads
together.
d. 01 Standard Frame Only:
If the frame needs to be raised or lowered further, the
nosepad requires remounting (Fig.7).
e. Unscrew nosepad and move to the higher or lower
position and remount nosepad.
(Fig. 7) Three nosepad
mounting positions
(01 standard frame only)
3
OPERATING INSTRUCTIONS
Orascoptic® Telescopes
5b. Check Interpupillary Distance –
Flip-Up Telescopes
Incorrect
Correct
(Fig. 8)
a. Flip telescopes down so they touch the eyeglass lens.
b. Your eye pupil distance is preset to your measured
distance. Verify that image is correct (Fig. 8).
c. If incorrect, rotate pupil knob until you see one oval or
circular field without overlapping circles (Fig. 9).
(Fig. 9)
6a. Check Downward Angle –
Through-the-Lens and
Through-the-Flip Telescopes
Your telescopes’ downward working angle has been
preset at the factory. To check the angle:
a. Put the telescopes on and look downward at your
targeted operating site.
b. Have someone look at them from the side. They
should be able to draw an imaginary line from your
pupils through the middle of the telescopes to the
target (Fig.10).
c. If they are not aligned, raise or lower the frames as
explained in Step 5 to adjust so that the telescopes are
in alignment with the imaginary line.
d. If you require assistance, call technical support (see
back of manual).
(Fig. 10) Declination Angle
4
OPERATING INSTRUCTIONS
Orascoptic® Telescopes
Lower Hinge Screw
6b. Check Downward Angle –
Flip-Up HiRes™ Telescopes
a. Hinge Angle
A comfortable, downward angle has been preset at the
factory.
(Fig. 11)
1. In your operating position, with telescopes flipped
down, have someone look at them from the side.
They should be able to draw an imaginary line
through the middle of the telescope to the operating
site.
2. If not, loosen the lower hinge screw and adjust height
and angle to match the imaginary line (Fig. 11).
b. Change Downward Angle – Bridge Hinge Mount (01
Standard Frame Only)
Your telescopes are mounted in one of two sets of holes on
the frames center bridge (top or bottom) (Fig. 12).
1. Top holes, raise the hinge.
2. Bottom holes, lower the hinge.
3. To change, remove the two screws on the front of the
bridge and reattach in the opposite holes.
(Fig. 12)
6c. Check Downward Angle –
Flip-Up Dimension-3® and HiRes™ Plus Telescopes
(Fig.13) Oculars are mounted
on the back holes
The telescopes are mounted to the hinge in one of two
holes located at the ends of the PD bar. They may be
mounted on the “back” hole for more direct line-of-vision,
(Fig. 13), the one closest to the eyeglass lens. If a steeper
downward working angle is desired to facilitate a more
ergonomic posture, unscrew the telescope thumbnuts and
move the telescopes to the front hole (Fig. 14).
(Fig. 14) Front hole steeper angle
5
OPERATING INSTRUCTIONS
Orascoptic® Telescopes
7. Check Convergence Angle
Due to varying facial anatomy, sometimes the preset
convergence angle (Fig. 15) may not be aligned
properly with your eyes. You may see two circles, or
sometime in the future they could become misaligned.
Incorrect
a. If you have correctly performed Steps 5 and 6, and you
still experience two circles (double vision), call Technical
Support (see back of manual).
Correct
(Fig. 15) Convergence Angle
Side Shields - Titanium Frames
01
02
Victory
Open both frame temples. Place the inside channel of
the side shield over the narrow, straight metal edge of the
temple, closest to the black temple tip. Press down until
the side shield snaps into place.
Fold the temple in and slide the shield forward until it
clears the front of the frame.
Straighten the temple. The side shield should overlap the
frame front.
Repeat on the other temple.
6
OPERATING INSTRUCTIONS
Orascoptic® Telescopes
Side Shields - Designer Sports Frames
Rudy Project
Revolution
Rudy Project
2
1
Open both frame temples. Place the side shield on the
temple arm so that the short grooved channel (1) is on
the silver portion of the temple arm. The edge of the long
grooved channel will insert into the opening between the
black and silver portions of the temple arm (2).
Snap the side shield onto the temple. The side shield
should be positioned so it slightly overlaps the carrier
lens.
Repeat on the other temple.
Revolution
Open both frame temples. Slide the side shield over the
tip of the temple arm so that the temple arm is in the
grooved channel.
Slide the shield forward so that the embossed Rudy
Project emblem shows in the open shield window. The
side shield should be positioned as close as possible
to the carrier lens without overlapping.
Repeat on the other temple.
7
OPERATING INSTRUCTIONS
Orascoptic® Telescopes
Using Your Orascoptic Telescopes
Depending on the magnification level of your telescopes you could experience some
disorientation. This is normal. Some professionals begin to use the telescopes full-time and
some require a breaking-in period.
If you experience difficulty, gradually increase the length of daily use. Generally a break-in
period lasts no more than two to three weeks. Call Technical Support if you need assistance.
See back of manual.
Cleaning Instructions
Your telescopes are manufactured from the highest quality components and will provide you
with a long, useful life, with proper care. These are precision optical instruments that must be
properly cleaned and protected from rough use and improper storage. To avoid scratching the
telescope lenses, rinse the telescopes and frame under fast-running water to remove gross
debris. DO NOT SUBMERGE IN ANY LIQUID OR AN ULTRASONIC CLEANER OR DAMAGE
MAY RESULT.
You may disinfect using either a quaternary ammonium disinfectant such as CaviCide®, or a
phenol alcohol-based spray such as Lysol® brand disinfectant. Follow the label directions.
DO NOT USE AN AUTOCLAVE, CHEMICLAVE, GLUTARALDEHYDE, IODOPHOR OR ANY
OTHER STERILIZATION METHOD, OR DAMAGE MAY RESULT. If there are any questions,
please call Customer Service at the toll-free number on the back of this manual.
Finally, clean all lens surfaces with an optical lens cleaning cloth that is formulated for use with
coated lens surfaces. These cleaning cloths can be purchased at major retail chains, optical
stores and drug stores.
Telescope Prescription Service
When your eyes change, you can send your telescopes into our optical laboratory to install your
new prescription. Package your telescopes and prescription carefully. In the U.S. call technical
Support (see back of manual) to make arrangements. Ship them to the address on the back
of this manual. Outside the U.S. call your Orascoptic distributor to arrange for lens change
service. DO NOT SHIP BEFORE CALLING TO MAKE ARRANGEMENTS.
When coordinating the return of your telescope, please allow sufficient time for the installation
of your prescription. If you are sending in a through-the-lens telescope, your new prescription
needs to be installed in both the eyeglass lens and inside the telescopes. Please discuss your
schedule with Technical Support or your distributor to coordinate the return shipment of your
telescopes.
If you ever need a prescription change to your Revolution Rx Insert, there is no need to send
in your loupes for maintenance. For a nominal price, Orascoptic will make you a new insert to
accommodate your new prescription.
8
OPERATING INSTRUCTIONS
Orascoptic® Telescopes
Cleaning And Refurbishing Service
When your frame and telescopes need cleaning and refurbishing, call to arrange for timely
service. See back of manual. Optical lab technicians will clean your telescopes and frame, and
replace worn-out screws, nosepad, temple tips and headstrap. Your telescopes will look like new!
Laser Loupe Safety Instructions
If you have purchased a loupe with laser filters, please note the following:
The human eye is extremely sensitive to laser radiation. THE FAILURE TO FOLLOW
THESE INSTRUCTIONS CAN RESULT IN BLINDNESS OR OTHER SEVERE AND
PERMANENT DAMAGE TO YOUR EYES.
1.
INSPECT YOUR LASER LOUPES FOR DAMAGE AND FIT BEFORE EACH USE.
Scratched, cracked, or loose fitting loupes may permit the laser beam to reach the eye
directly and should not be used.
2.
ENSURE THE WAVELENGTH IMPRINTED ON YOUR LASER LOUPES MATCHES
THE WAVELENGTH OF THE BEAM BEING TRANSMITTED BY THE LASER YOU
ARE OPERATING. Each wavelength requires a different type of protective eyewear. If the
wavelength at which your laser operates is not the same as the wavelength imprinted on
your Laser Loupes, you must select different eyewear protection, as your Laser Loupes will
not provide any protection to your eyes.
3.
NEVER LOOK DIRECTLY INTO A LASER BEAM EVEN WHEN WEARING YOUR
LASER LOUPES. Your Laser Loupes are designed to only protect against incidental
exposure from stray or diffused reflection of the laser beam’s energy.
4.
YOUR LASER LOUPES MUST BE WORN AT ALL TIMES WHILE OPERATING YOUR
LASER.
Kerr Corporation continuously improves its products as a result of customer feedback. At time of
shipment, products may reflect improvements in appearance and function.
U.S. Technical Support: 800-369-3698
Outside the U.S. Call Your Local Distributor
9
U.S. Technical Support: 800-369-3698
Outside the U.S. Call Your Local Distributor
Kerr Corporation
3225 Deming Way, Suite 190 • Middleton, WI 53562 USA
Phone: 608-831-2555 • Fax: 608-828-5265
www.orascoptic.com
In Canada: Synca • 800-667-9622
© 2009 Kerr Corporation
U.S. Patent Numbers: 7,072,124; 6,061,189; 6,201,640
5,463,500; 6,163,413; 5,627,690 and 6,667,832
Other Patents Pending
European Union Representative
Kerr Italia S.r.l. Via Passanti, 332
I-84018 Scafati(SA), Italy
Rev. C 3/09
AO-INSTR-ZZ-1-OR