1
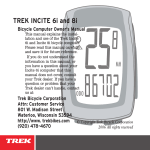
Transmitr
Owner’s Manual
Important:
Keep for future reference
This manual gives instructions on the
installation and use of the Bontrager
Transmitr/ANT+ compatible lighting
system.
Overview
Welcome to the Bontrager Transmitr/
ANT+ compatible lighting system. This
manual explains the installation and use
of the Transmitr components:
• Transmitr Remote Part Number 502865
• Ion 700 RT headlight Part Number
503062
• Flare RT taillight Part Number 438818
For additional information, please visit
Bontrager.com
This manual is written for the owner, but
requires some mechanical experience.
Some maintenance should only be
performed by the retailer, and this manual
tells you when that is.
Check for updates
For revisions to this manual and the most
current information, check our web site
at www.bontrager.com
Important:
The batteries should be fully charged
before your first use, and before any
extended use.
General installation information
These instructions are written for the
average user and require only basic
mechanical skills. The complete
procedure should take between 10 and
30 minutes, depending on how many
components of the system you choose
to install.
There are two phases to this installation:
pairing the lights to the remote, and
attaching the lights and remote to the
bike. You can do these in any order, but
it is usually easiest to pair a light to the
remote before attaching it to the bike.
NOTE: All lights must be paired in
the same continuous procedure. If
you choose to add a light later, each
component will have to be paired again at
that time.
®
If you have questions:
If after reading this manual you have
additional questions, contact your retailer
or the technical support team:
Bontrager
Attn: Customer Service
801 W. Madison Street
Waterloo, Wisconsin 53594
920.478.4678
www.bontrager.com
Trek Bicycle Corporation Ltd.
9 Sherbourne Drive, Tilbrook
Milton Keynes, MK7 8HX
United Kingdom
+44 (0)1908 360 160
[email protected]
Bontrager is a registered trademark of the Trek Bicycle Corporation
© 2015 Trek Bicycle Corporation L
i
Table of Contents
Before starting
Before starting.....................................ii
Tools needed
Compliance and safety......................iii
Phillips-head screwdriver
2.5mm hex wrench
Lithium ion battery.............................iii
1. Transmitr Remote........................... 1
1.1 How to pair the remote...............2
1.2 How to install the remote............3
1.3 How to control modes
and features...............................4
1.4 Battery power indicators
for paired lights..........................5
1.5 Transmitr Remote battery............5
1.5 Troubleshooting...........................6
What is Pairing?
2. Ion 700 RT....................................... 8
2.1 How to charge the light...............8
2.2 How to install the light.................9
2.3 How to operate the light..............9
2.4 Troubleshooting.........................10
In a single pairing session, up to seven
distinct Transmitr-enabled lights can
be paired to a single Transmitr Remote.
Once in pairing mode, the system will
automatically search each activated
light, to pair one at a time, in sequence.
Multiple lights can be paired to a single
button. The pairing process is the same
for all Transmitr enabled lights, regardless
of whether it is a headlight or taillight.
3. Flare RT......................................... 11
3.1 How to charge the light.............11
3.2 How to install the light...............12
3.3 How to operate the light............13
3.4 Turn signals...............................14
3.5 Troubleshooting.........................15
Regulatory Statements.................... 15
Warranty............................................ 16
Pairing is a process of the ANT+ protocol
(an industry standard for wireless
communication) and required to enable
the remote control of Transmitr/ANT+
lights. In the process, the remote will
recognize and remember the wireless
signal sent by an ANT+ enabled light.
Pairing with the Transmitr Remote
All pairings must be done in a single
session. If lights are added to the system
later, all lights will need to be paired to the
remote again.
Special functions
Special functions and configurations
are only available with select Bontrager
Transmitr lights designated with an ‘RT’:
• High beam
• Turn-signal
ii
Introduction
Compliance and safety
Lithium ion battery
Before installing the Transmitr system
or individual light from that system,
make sure the light complies with local
regulations and/or requirements.
Some parts of the Transmitr system use a
2900mAh or 570mAh lithium ion battery.
This is a rechargeable battery with a very
long run time (length of battery charge).
The actual run time depends on the mode
you choose to use. The batteries are
inside their lights, which can easily be
removed from the bike for recharging.
IMPORTANT:
Always consult your local traffic and
lighting laws prior to using a new lighting
product on your bicycle. While lights will
almost always improve the safety of the
rider, there are certain color, brightness,
blink-rate, and other configurations that
are not legally accepted in all locations.
WARNING A bicycle without
correct lights and reflectors
might be difficult for other
people to see, and you might
not be able to see. If you can not
see, or other people can not see
you, you could have an accident.
Make sure your lights operate
correctly and that batteries are
charged.
“To See” light
The Ion 700 RT is a “To See” light. It uses
a Cree XM-L2 LED (Light Emitting Diode).
The Ion 700 RT directs most of its light
into a 15 degree spot light, some into a
90 degree floodlight, and a small portion
illuminates the amber side lenses. This
makes the Ion 700 RT a great headlight
for primary vision when riding in low
light. It can also function as a “To Be
Seen” light when in flash mode, although
the amber side lenses do not direct a
substantial amount of light. Note that for
best results, a rider should employ BOTH
a “To See” light and a “To Be Seen” light.
Specifications:
• Ion 700 RT: 3.7Vdc, 2900mAh, 10.73Wh
• Flare RT: 3.7Vdc, 570mAh, 2.1Wh
With a full charge, the battery should
power the light as shown in each
section of the manual. This time will vary
according to mode, battery condition,
temperature, and other environmental
factors.
FlareRT only: When the battery charge
is at 5% or lower, the steady beam will
change to low battery strobe mode.
Notice: Avoid mishandling of the
batteries. These actions or others can
cause damage to or permanently disable
the batteries:
• Recharging the battery when hot, such
as when sitting in direct sunlight
• Cleaning the light with a high-pressure
washer
• Dropping or impacting the light
• Immersing the light in water
• Opening or puncturing the light
• Short-circuiting the terminals
Compliance and Safety
iii
Traveling with Lithium Ion batteries
Disposing of a battery
With a Lithium Ion battery, certain
restrictions on travel apply. If the terminals
are shorted on a Lithium Ion battery, it
can cause the battery to overheat and
possibly cause a fire. For this reason,
airlines do not allow Lithium Ion batteries
in checked baggage; you must put
Lithium Ion batteries in your carry-on.
Always check with the carrier before
traveling with Lithium Ion batteries.
Under normal conditions, this battery
should last for 300 to 400 charges. The
battery will eventually lose strength. When
the charge no longer lasts as long as it
should, please recycle the old battery.
You can find out where to do this at
call2recycle: http://www.call2recycle.org/
Extending the battery life
The Transmitr battery is a long-life
system. The expected life of the battery is
300 to 400 charges. To extend the battery
life, store it in a mostly-charged (not fullycharged) condition at room temperature,
and avoid extreme temperatures when
recharging.
Storing a battery
When not using the light for long periods
of time such as a week or more, store it
at room temperature in a dry place. Avoid
moisture, or extreme hot or cold.
Store the light with the battery in the
charged condition. Battery life will
decrease if the battery is stored in a fullydischarged condition.
This symbol on the product(s) and / or
accompanying documents means that
used electrical and electronic products
should not be mixed with general
household waste. For proper treatment,
recovery and recycling, please take this
product(s) to designated collection points.
Alternatively, in some countries you
may be able to return your products to
your local retailer upon purchase of an
equivalent new product.
Disposing of this product correctly will
help save valuable resources and prevent
any potential negative effects on human
health and the environment, which could
otherwise arise from inappropriate waste
handling.
Please contact your local authority for
further details of your nearest designated
collection point.
Penalties may be applicable for incorrect
disposal of this waste, in accordance with
your national legislation.
iv
Compliance and Safety
1. Transmitr Remote
FIGURE 1.1
Transmitr Remote
The Transmitr Remote is a convenient
collection of buttons you can mount to
your handlebar or stem. The buttons
allow you to control any Transmitr light
(designated ‘RT’) or ANT+ enabled light.
What’s in the box
These items are shown in Figure 1.2:
a. Transmitr Remote
b. 22mm handlebar adapter
c. Bracket
d. Mounting screw for bracket
e. CR2032 coin cell battery (installed)
f. Mounting screws for remote
c
Positions for the remote
d
There are several positions of the remote
from which to choose:
FIGURE 1.2
Parts included in
Transmitr Remote
package
a
b
e
• In front of handlebar (Figure 1.3)
• Behind handlebar (Figure 1.4)
• With the controls (Figure 1.5)
Your placement of the remote will depend
on your personal preference and the
clearance with the shift levers on your
handlebar.
2
f
0
CR2
3
FIGURE 1.3
Transmitr Remote in
front of handlebar
FIGURE 1.4
Transmitr Remote
behind handlebar
FIGURE 1.5
Transmitr Remote
by controls (“flat”
handlebar only)
Transmitr Remote
1
1.1 How to pair the remote
FIGURE 1.1.1
Transmitr Remote
near light
Before starting, place the remote and all
lights within a small area.
NOTE: Move 15 feet from other
Transmitr/ANT+ compatible lights to
prevent accidental pairing. If a light is
accidentally paired, start the pairing
process over.
To pair the remote
FIGURE 1.1.2
Turn on light
1. Place the light close to the Transmitr
Remote (within 15cm / 6in)
(Figure 1.1.1).
0
70
ion
2. Quick-press the power button on the
light to turn it on (Figure 1.1.2), then
quick-press to turn it off again.
NOTE: After completing this step, do
not press the power button on the light
again until pairing is complete.
3. Press-and-hold the center button on
the Transmitr Remote for at least 8
seconds. When the corner buttons
flash, release the center button.
(Figure 1.1.3).
4. While the remote searches for a light,
the center button flashes red. When the
remote finds a light, the center button on
the remote will change from red to green,
and the found light will flash.
Center button
Corner buttons
5. While the found light is still flashing,
quick-press the corner button on the
Transmitr Remote to which you would
like to pair the light. The selected
button will glow, and the found (and
paired) light will stop flashing and
turn off.
NOTE: After the pairing, the center
button on the remote will flash red until
the Transmitr Remote finds another
available light.
2
Transmitr Remote
FIGURE 1.1.3
Buttons on Transmitr
Remote
If pairing to additional lights
1.2 How to install the remote
Up to seven lights can be paired to the
Transmitr Remote at any time, but this
must be done as a single process.
After pairing the lights, install the remote.
After pairing the first light, the center
button of the remote flashes red. If the
remote finds another light, the center
button on the remote will flash green again
and the next found light will also flash.
1. Repeat Step 4 and Step 5 for each
additional light to be paired.
NOTE: After pairing is finished, pairing
any additional lights will require
that you repeat the entire pairing
procedure.
To exit pairing
1. When all lights are paired, quick-press
the center button on the remote. The
button will stop flashing and turn off.
To verify pairing
1. Quick-press the center button to turn
on all paired lights.
1. If it is not already installed, attach the
remote to the bracket with the included
screws (Figure 1.2.1).
2. Choose a location. The most common
are shown on page 1. Make sure your
chosen location does not interfere with
the operation of the controls or get
caught in the cable housing when you
turn the handlebar from side to side.
3. If you are installing the remote on a
handlebar with a 22mm diameter, place
the adapter on the handlebar.
NOTE: The adapter is not necessary
when attaching the remote near the
center of a handlebar with a 31.8mm
diameter.
4. Attach the bracket.
a
b
2. Press-and-hold the center button to
turn off all of them.
c
d
f
e
4. Press-and-hold the same button to
turn off the light.
Transmitr Remote
2
3. Turn on each light individually. Quickpress each paired button on the
remote to turn on the individual light(s).
CR2
03
FIGURE 1.2.1
Parts of Transmitr
Remote
a. Transmitr Remote
b. 22mm handlebar
adapter
c. Bracket
d. Mounting screw
for bracket
e. CR2032 coin cell
battery (installed)
f. Mounting screws
for remote
3
1.3 How to control modes
and features
Each time you quick-press a button, you
will change the mode and the remote
buttons (Figure 1.3.1) will provide an
indication of the mode and battery power
of the light.
Center button
FIGURE 1.3.1
Buttons on
Transmitr Remote
To turn on and turn off high beam
1. While the headlight(s) are turned on,
quick-press the center button on the
remote to change the light to High
mode.
2. To return to the previous mode, quickpress the center button.
If the headlights are already in High mode,
quick-press the center button to return to
the previous setting.
To configure a turn signal
Configure a turn signal according to
the light’s user manual. For the Flare RT,
see page 14.
Corner buttons
To activate a turn signal
To turn on and turn off all lights
1. Quick-press the center button.
All lights will turn on.
2. To turn off all lights, press-and-hold the
center button.
NOTE: When you press a button that is
paired to a light, the button will glow.
1. Quick-press the corresponding button.
The activated button will flash,
indicating the turn signal is turned on.
2. To turn off the turn signal, press-andrelease the button again.
To turn on and turn off
an individual light
1. Quick-press the corner button that
controls the light.
2. To turn off the light, press-and-hold the
corner button that controls the light.
To change modes of
an individual light
1. Quick-press the paired button to select
the desired mode of the corresponding
light.
NOTE: The modes will select in the
same order as the manual operation of
the light.
4
Transmitr Remote
1.4 Battery power indicators for
paired lights
If a corner button on the remote is
pressed, it will glow. At the same time, the
center button shows the battery power for
that light. Table 1 shows the meaning of
each condition of the center button.
TABLE 1. BATTERY POWER INDICATION
Center Button
Meaning
Green
More than 25%
battery power
remaining
Red
Between 5% and
25% battery power
remaining
Flashing Red
Less than 5%
battery power
remaining
1.5 Transmitr Remote battery
The battery in the Transmitr Remote is
not rechargeable. It uses a ‘coin-type’
CR2032 battery.
How to replace the battery in the
Transmitr Remote
1. Remove the screw from the underside
of the bracket, and remove the bracket
(Figure 1.3.1).
2. Remove the two screws that hold the
Transmitr Remote to the bracket, and
remove the remote.
3. With a coin, twist off the battery door.
4. Note the orientation of the battery
(+ side is visible) and remove it.
5. Install a new battery.
6. Replace the battery door.
7. Attach the Transmitr Remote to the
bracket.
8. Attach the bracket to the handlebar.
Transmitr Remote
5
1.5 Troubleshooting
Table 2 discusses possible problems with the Transmitr Remote, and provides solutions.
TABLE 2: POSSIBLE PROBLEMS AND SOLUTIONS FOR THE TRANSMITR REMOTE
Symptom
Problem
Solution
Remote is
unresponsive
Battery is not making
contact
Reinstall the battery
Battery is dead
Attempt to put the remote into
pairing mode. If no light turns on,
replace the battery
Light not ANT+
Verify that the light supports
ANT+ wireless control.
Battery in light is dead
Verify that the battery has power
by turning it on and off
The wireless transmitter in
the light is not activated
Turn the light on and off
Light too far from remote
Move the light within 15cm (6in)
of the remote
Remote is not in pairing
mode
In pairing mode, if the remote
has not found a light, the center
button flashes red. If it has found
a light, the center button flashes
green
Remote found a different
light
If the center button is flashing
green and the light has not
changed to a flashing mode,
move at least 3.3m (10ft) away
from any ANT+ lights, then restart
pairing mode
Light is unresponsive
Reset the light: hold down the
power button for 10 seconds (Ion
700 RT) or 30 seconds (Flare RT).
Turn on and off
During pairing it takes
more than 1 minute for the
remote to find a light (i.e.
Switch from Red to Green)
WiFi networks and other RT lights
can create interference and affect
pairing. Move at least 3.3m (10ft)
away from any ANT+ lights and/
or to an area with weak or no
WiFi signal then restart pairing
mode
Light won’t pair to a
remote
6
Transmitr Remote
Symptom
Problem
Solution
Remote stopped
controlling a light
Battery in light is dead
Recharge the battery
Light is too far away
Move to within 3.3m (10ft) of the
light
New pairing session
erased previous pairing
Pair all desired lights in the same
pairing session
Functional configuration of
light was changed
Perform pairing procedure again
Low battery power
Replace the battery in the remote
Remote stopped
responding when entering
or exiting standard or turn
signal mode
Pair remote again when put into a
new configuration
Transmitr Remote
7
2. Ion 700 RT
2.1 How to charge the light
The Ion 700 RT is a ‘To see’ headlight with
700 lumens of output. It can be operated
as a stand-alone headlight whether it
is paired to the Transmitr Remote or
operated by itself. The light can be placed
on the handlebar or on the helmet, or both
(Figure 2.1). Figure 2.2 shows the parts of
the light referenced in the instructions.
FIGURE 2.1
Ion 700 RT on helmet
and handlebar
Note: Bontrager
Universal Helmet
Mount Part Number
503062 optional
attachment for Ion
lights.
Power button
FIGURE 2.2
Parts of Ion 700 RT:
• Power button
• Status indicator
The Ion 700 RT comes with a full charge.
However, for the highest performance you
should charge it for 5 hours before your
first use.
To charge the light
1. Plug the micro-USB cable into the Ion
700 RT (Figure 2.1.1).
2. Plug the other end of the micro-USB
into a wall converter.
3. Plug the converter into a wall socket.
Status indicator while charging
While charging, the status indicator
will flash:
• Red: Actively charging
• Green: Charging complete
NOTE: As the battery progresses from
zero charge to full charge, the duration of
the flashes will get progressively longer.
0
70
ion
Status
indicator
What’s in the box
The Ion 700 RT includes the parts shown
in Figure 2.3:
a. Ion 700 RT
b. Sync bracket
c. Micro-USB cable
a
OR
FIGURE 2.3
Package contents of
Ion 700 RT
b
c
8
Ion 700 RT
FIGURE 2.1.1
Charging the Ion
700 RT
2.2 How to install the light
2.3 How to operate the light
The Ion 700 RT is intended to attach to
the handlebar with the sync bracket.
NOTE: The Sync bracket diameter adjusts
for use with 22.2-35mm bars.
The Ion 700 RT can be operated as a
stand-alone headlight, whether it is paired
to the Transmitr Remote or operated on
its own.
To attach with the Sync bracket
To turn on and turn off
1. L
oosen the screw at the top of the
bracket.
2. A
djust the hook to fit the handlebar,
and tighten the screw.
The Sync bracket fits handlebars with
diameters from 22.2mm to 35mm.
Marks on the adjustment hook indicate
the diameter of the handlebar
(Figure 2.2.1).
3. P
lace the bracket on your handlebar
with the hook facing up, and pull the
strap around the post until you can
attach it to the hook (Figure 2.2.2).
1. To turn on the light, quick-press the
power button. The power button glows
to show the remaining battery power
(see Table 4).
2. To turn off the light, press-and-hold the
power button.
To change mode
1. Quick-press the power button.
Each press moves to the next mode
(see Table 3).
TABLE 3. MODES OF THE ION 700 RT
Mode
Light output
4. S
lide the light into the bracket until it
clicks.
High
700 lumens
Medium
450 lumens
5. Adjust the light so that it is shining
parallel to the ground and straight back.
Low
200 lumens
Flash/150
Flash with steady
component to
reduce eye strain
Day Flash/200
Ultra-high flash and
random pattern
High Beam*
must have
remote
Brightness is
increased to 100%
with quick-press
of remote center
button, press again
returns to previous
mode
Low Battery
Strobe
When remaining
battery power
is less than 5%,
changes to strobe.
Lasts 1-2 hours.
FIGURE 2.2.1
Adjustment marks for
hook length
sync bracket
FIGURE 2.2.2
Attaching the Sync
bracket
Ion 700 RT
9
Memory-on feature
When turned on, the Ion 700 RT will
return to the last active mode.
Battery power indicators
The status indicator shows the remaining
battery power. Table 4 shows the meaning
of the colors.
TABLE 4. BATTERY POWER INDICATION
Status
indicator
Meaning
Green
More than 25% battery
power remaining
Red
Between 5% and
25% battery power
remaining
Blinking Red
Less than 5% battery
power remaining
2.4 Troubleshooting
Table 5 discusses possible problems with the Ion 700 RT, and provides solutions.
TABLE 5: POSSIBLE PROBLEMS AND SOLUTIONS FOR THE ION 700 RT
Symptom
Light won’t pair to
a remote
10
Problem
Solution
Light transmitter not
activated
Turn the light on and off
Light is too far away
Move to within 15cm (6 in) of the
remote
Light is unresponsive
Reset the light: hold down the
power button for 10 seconds. Turn
on and off
Ion 700 RT
3. Flare RT
3.1 How to charge the light
The Flare RT is a taillight with 65 peak
lumens of output. It can be operated as
a stand-alone taillight whether it is paired
to the Transmitr Remote or operated
by itself. The light can be placed on the
seat post, seat stay or a seat pack
(Figure 3.1). Figure 3.2 shows the parts
of the light referenced in the instructions.
Back pack
FIGURE 3.1
Flare RT positions
1. Plug the micro-USB cable into the
Flare RT (Figure 3.1.1).
2. Plug the other end of the cable into a
USB-A charge port.
While charging, the status indicator will
flash:
Seat stay
Light
To charge the light
Status indicator during charging
Seat post/pack
Power button
The Flare RT comes with a full charge.
However, for the highest performance you
should charge it for 2.5 hours before your
first use.
FIGURE 3.2
Parts of Flare RT:
• Power button
(with status indicator)
• Main light (“light”)
• Side lights
• Red: Actively charging
• Green: Charging has completed
NOTE: As the battery progresses from
zero charge to full charge, the duration of
the flashes will get progressively longer.
FIGURE 3.1.1
Charging the
Flare RT
Side light
What’s in the box
a. Flare RT
b. Sync bracket
c. Micro-USB cable
d. Seat stay mount
e. Seat pack clip
a
d
OR
FIGURE 3
Parts of Flare RT
e
b
c
Flare RT
11
3.2 How to install the light
To attach with the seat pack clip
You can attach the Flare RT to the bicycle
in several ways:
Attach the seat pack clip for use with seat
bags or racks.
FIGURE 3.2.2
Attaching the seat
pack clip
To attach with the Sync bracket
1. For instructions on installing, see “To
attach with the Sync bracket”, page 9.
2. Place the bracket on your seatpost
with the hook on the left (non-drive)
side of the bike, and pull the strap
around the post until you can attach it
to the hook (Figure 2.2.2, page 9).
3. Slide the light into the bracket until it
clicks (Figure 3.2.1).
4. Adjust the light so that it is shining
parallel to the ground and straight back.
NOTE: If the hook is on the left but the
light is tipped downward: Remove the
light, loosen the screw at the top of the
bracket, and rotate the platform 180
degrees. Reattach the light.
To attach with the seat stay
bracket
Use the rubber shims to attach to varying
diameter seat stays. Place bracket around
the seatstay (Figure 3.2.3) and tighten the
clamp screw until snug.
FIGURE 3.2.1
Attaching the Sync
bracket
12
Flare RT
FIGURE 3.2.3
Attaching the seat
stay bracket
3.3 How to operate the light
Memory-on feature
The Flare RT can be operated as a
standard taillight, whether it is paired
to the Transmitr Remote or operated on
its own.
When turned on, the Flare RT will return
to the last active mode.
To turn on and turn off
1. To turn on the light, quick-press the
power button.
The power button glows to show the
battery power.
2. To turn off the light, press-and-hold the
power button.
Battery power indicators
The status indicator shows the remaining
battery power. Table 7 shows the meaning
of the colors.
TABLE 7. BATTERY POWER INDICATION
Status
indicator
Meaning
Green
More than 25%
battery power
remaining
Red
Between 5% and
25% battery power
remaining
Blinking Red
Less than 5% battery
power remaining
To change mode
1. Quick-press the power button.
Each press moves to the next mode
(see Table 6).
TABLE 6. MODES OF THE FLARE RT
Mode
Light output
Daytime
Flash
65 lumen random bursts
for 5.75 hours
Nighttime
Flash
Always on with 65 lumen
short duration bursts for
23 hours
Daytime
Steady
25 lumens for 4.25 hours
Nighttime
Steady
5 lumens for 21 hours
Low
Battery
Strobe
When remaning battery
power is less than 5%,
changes to strobe. Lasts
1-2 hours.
Flare RT
13
3.4 Turn Signals
With the addition of a second Flare RT
light, you can configure the Transmitr
system to provide turn signals, with these
suggestions and requirements:
• Use only two taillights at a time
• Place each light on the same side as its
corresponding button on the remote
NOTE: Turn Signal configuration limits
the Flare RT to two specific modes:
Steady-Low (primary mode) and
Flashing (activated when turning). If the
configuration is changed, all lights must
be paired to the remote again
FIGURE 3.4.1
Flare RT turn signal
• To take a light out of turn signal
configuration, press-and-hold the
power button for 10 seconds.
NOTE: Changing the configuration
requires that all the lights in the system
be paired again.
To install Flare RT
lights as turn signals
To maximize the visibility of the turn
signals, separate the lights by installing
them on the seat stays.
1. Determine a position for the lights.
The seat-stay brackets can be placed
anywhere below the brakes, and they
should be level with each other. Make
sure the lights cannot interfere with the
brakes.
2. Attach the brackets.
3. Attach the lights.
4. Adjust the lights so that they direct the
light parallel to the ground.
To operate turn signals
To configure Flare RT
lights as turn signals
1. With the light turned off, press-andhold the power button for 10 seconds.
2. When the side lights turns on, release
the button. The configuration is now
changed.
1. Quick-press the corresponding button.
The activated button will flash,
indicating the turn signal is turned on.
2. To turn off the turn signal, press-andrelease the button again.
3. Verify that the light is in turn signal
configuration by cycling the modes
(quick-press the power button
repeatedly). There should be only two
modes: steady and flash.
4. Repeat these steps for the second
Flare RT light.
5. Follow the instructions in “How to pair
the remote”, page 2
14
Flare RT
3.5 Troubleshooting
Table 9 discusses possible problems with the Flare RT, and provides solutions.
TABLE 9: POSSIBLE PROBLEMS AND SOLUTIONS FOR THE FLARE RT
Symptom
Problem
Solution
Light won’t pair to
a remote
Light is not turned on
Turn on light
Light too far away
Place the light within 15cm (6in) of
the remote
Light is unresponsive
Reset the light: hold down the
power button for 30 seconds
Statements of Regulatory Compliance
FCC Compliance
Transmitr Remote - FCC ID: 04GTKRMTE
Ion 700 RT Head Light - FCC ID: 2ADH7I97371576
Flare RT Tail Light - FCC ID: 2ADH7Q97371576
This device complies with part 15 of the FCC Rules.
Operation is subject to the following conditions:
(1) this device may not cause harmful interference, and
(2) this device must accept any interference received,
including interference that may cause undesired operation.
NOTE: This equipment has been tested and found to
comply with the limits for a Class B digital device, pursuant
to Part 15 of the FCC Rules. These limits are designed to
provide reasonable protection against harmful interference
in a residential installation. This equipment generates uses
and can radiate radio frequency energy and, if not installed
and used in accordance with the instructions, may cause
harmful interference to radio communications. However,
there is no guarantee that interference will not occur in a
particular installation.
If this equipment does cause harmful interference to radio
or television reception, which can be determined by turning
the equipment off and on, the user is encouraged to try
to correct the interference by one or more of the following
measures:
-- Reorient or relocate the receiving antenna.
-- Increase the separation between the equipment and
receiver.
-- Connect the equipment into an outlet on a circuit
different from that to which the receiver is connected.
-- Consult the dealer or experienced radio / TV technician
for help.
NOTES:
THE MANUFACTURER IS NOT RESPONSIBLE FOR
ANY RADIO OR TV INTERFERENCE CAUSED BY
UNAUTHORIZED MODIFICATIONS TO THIS EQUIPMENT.
ANY CHANGES OR MODIFICATIONS NOT EXPRESSLY
APPROVED BY THE MANUFACTURER OF THIS DEVICE
COULD VOID THE USER’S AUTHORITY TO OPERATE
THE DEVICE.
Flare RT
15
Statements of Regulatory Compliance
Industry Canada Compliance
European Union Compliance
Bontrager Transmitr Remote - (P/N 502865),
CAN ICES-3(B)/NMB-3(B) IC: 7666A-REMOTE
Bontrager Ion 700 RT Head Light - (P/N 503062),
CAN ICES-3(B)/NMB-3(B) IC: 12468A-I97371576
Bontrager Flare RT Tail Light - (P/N 438818),
CAN ICES-3(B)/NMB-3(B) IC: 12468A-Q97371576
This device complies with Industry Canada license-exempt
RSS standard(s). Operation is subject to the following two
conditions:
(1) this device may not cause interference, and (2) this
device must accept any interference, including interference
that may cause undesired operation of the device.
Trek Bicycle Corporation and Bontrager hereby declare
that the wireless devices identified as ‘Transmitr’ (Transmitr
Remote, Flare RT, Ion700 RT) are in compliance with the
following European Directives:
• R&TTE Directive 1999/05/EC
• EMC Directive 2004/108/EC
• Low Voltage Directive 2006/95/EC
• RoHS Directive 2011/65/EU
The full text of the EU declaration of conformity is available
from your dealer, or at the following internet address:
http://www.bontrager.com/support
Leprésent appareil est conforme aux CNR d’Industrie
Canada applicable aux appareils radio. Exempts de
licence. L’exploitation est autorisée aux deux conditions
suivantes:
(1) l’appareil ne doit pas produire de brouillage, et
(2) l’utilsateur de l’appareil doit accepter tout brouillage
radioélectrque subi, meme si le brouillage est susceptible
d’en compromettre le fonctionnement.
This Bontrager Transmitr equipment complies with
FCC and IC radiation exposure limits set forth for an
uncontrolled environment. The radiated output power of
the Transmitr Wireless Device is below the Industry Canada
(IC) radio frequency exposure limits. This equipment is
in direct contact with the body of the user under normal
operating conditions. This transmitter must not be colocated or operating in conjunction with any other antenna
or transmitter.
Status of the listing in the Industry Canada’s REL
(Radio Equipment List) can be found at the following
web address: http://www.ic.gc.ca/app/sitt/reltel/srch/
nwRdSrch.do?lang=eng
Additional Canadian information on RF exposure also can
be found at the following web address:
http://www.ic.gc.ca/eic/site/smt-gst.nsf/eng/sf08792.html
Cet appareil est conforme aux limites d’exposition à
la fréquence radio (FR) d’IC et de FCC. La puissance
de sortie émise par l’appareil de sans fil Transmitr est
inférieure à la limite d’exposition aux fréquences radio
d’Industry Canada (IC). Cet appareil est en contact
direct avec l’utilisateur dans des conditions normales
d’utilisation. L’émetteur ne doit pas être co-implémenté ou
utilisé conjointement avec une autre antenne ou un autre
émetteur.
Korean Compliance
인증자 상호: 트렉바이시클 코리아
기기의 명칭: 특정소출력무선기기
(무선데이터통신시스템용 무선기기
모델명: TRANSMITR
인증자 식별부호: MSIP-CRM-D99-TRANSMITR
당해 무선기기는 전파혼신 가능성이 있으므로 인명안전과
관련된 서비스는 할 수 없습니다.
추가적인 정보나 한글 설명서는 웹사이트
www.bontrager.com 에서 확인하실 수 있습니다.
인증자 상호: 트렉바이시클 코리아
기기의 명칭: 특정소출력무선기기
(무선데이터통신시스템용 무선기기
모델명: FLARE RT
인증자 식별부호: MSIP-CRM-T3B-438818
당해 무선기기는 전파혼신 가능성이 있으므로 인명안전과
관련된 서비스는 할 수 없습니다.
추가적인 정보나 한글 설명서는 웹사이트
www.bontrager.com 에서 확인하실 수 있습니다.
인증자 상호: 트렉바이시클 코리아
기기의 명칭: 특정소출력무선기기(
무선데이터통신시스템용 무선기기
모델명: ION700 RT
인증자 식별부호: MSIP-CRM-T3B-503062
당해 무선기기는 전파혼신 가능성이 있으므로 인명안전과
관련된 서비스는 할 수 없습니다.
추가적인 정보나 한글 설명서는 웹사이트
www.bontrager.com 에서 확인하실 수 있습니다.
Ce périphérique est homologué pour l’utilisation au
Canada. Pour consulter l’entrée correspondant à l’appareil
dans la liste d’équipement radio (REL - Radio Equipment
List)d’Industry Canada rendez-vous sur:
http://www.ic.gc.ca/app/sitt/reltel/srch/nwRdSrch.
do?lang=fra
Pour des informations supplémentaires concernant
l’exposition aux RF au Canada rendezvous sur:
http://www.ic.gc.ca/eic/site/smt-gst.nsf/eng/sf08792.html
Warranty
The Bontrager Transmitr Remote, Ion 700 RT
headlight, and Flare RT taillight are covered
by a warranty. For details, visit
www.bontrager.com
16
Regulatory Statement