1
Eight. Testing Solid Density
Press <BL>, show "S" and entering test model.
1. At the first time test, make calibration please! (proposal)
2. Hanging the cradle, and putting it into the bucket which is filling with water.
Then press <TARE>, it shows “0.00g”.
3. Put the measured solid on the pan, after the data is stable, press <MODE>,
then shows “----”. Data memory is successful till balance shows the weight of
the solid.
2. Counting
Press <MODE> 3 scends till "Unit" flashing. Press <MODE> to choose “Count”.
Then press <TARE> to confirm, show “pcs”. Press <MODE>, “pcs” can be
changed from “10pcs” to “500pcs”. The larger number, the higher count
accurancy. Put the relevant goods on the balance pan, then press <TARE> to
confirm. It will show “------”. Setting Counting is done.
When the counting unit weight < 2d, it will show “no-Cou”. In this case, you
should choose several goods together as a Unit and reset.
5. Press <TARE>, exiting text model.
3. Percentage
Press <MODE> about 3 scends till "Unit" flashing. Press <MODE> to choose
“PER”. Then press <TARE> to confirm, show “100%” unit. Put the goods on the
pan and press <TARE>, the goods are set as a unit “100%”.Take away the
goods and put on other goods,it will display “###%”.
When the set goods weight what is divided by 100 is less than 2d, it cannot work
and only show “no-PER”.It should add to goods weight.
(Notice: If the solid density is less than 1 g/cm3, the liquid should be Ethyl
4.
4. Take down the solid carefully, and put it into the cradle while covered by
water totally. Until the data stable, press <MODE>, it will show the density of
that solid.
Alcohol)
Liquid (distilled water) gravity table
Tem/℃
±0.0
±0.5
10~14
1.001
1.001
15~19
1.000
1.000
20
1.000
0.999
21~24
0.999
0.999
25~27
0.998
0.998
Print
Press <MODE> about 3 scends till "Unit" flashing. Press <MODE> to choose
“Prt”. Then press <TARE> to confirm. Press <MODE> to choose “hAnd”, “AUto”
or “Contin”. And press <TARE> to confirm.
“hAnd”. (Means Printer just will print one time).
“AUto”. (Means when the objects placed on the pan is >3d, and only the value is
stable, Printer will print automatically)
“Contin” (Means no matter how heavy the object on the pan, and no matter
whether the value is stable or not, Printer will print continuously)
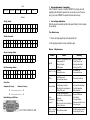
RS232 Data Frame Format:
Symbol (+/-) + Data + Unit + Last Frame
1. Data Symbol: 1 Byte ASCII: "+ " or "-"
Nine. Other Functions
1. Units Conversion
Press <MODE> about 3 seconds till "Unit" flashing. Then press <TARE> to
confirm. Press <MODE> to select units and press <TARE> to confirm.
2. Data Field: 7 Bytes ASCII: One is Decimal Point ".", which has the same position with
Display.
3. 3 Bytes ASCII: Units< 3 bits, Supplementary with Space
4. Last Frame: ENTER ASCII, 0DH, 0AH.