1
IBM Optim
Move User Manual
Version 7 Release 3
IBM Optim
Move User Manual
Version 7 Release 3
Note
Before using this information and the product it supports, read the information in Notices.
Version 7 Release 3 (September 2010)
This edition applies to version 7, release 3 of IBM Optim and to all subsequent releases and modifications until
otherwise indicated in new editions.
© Copyright IBM Corporation 1994, 2010.
US Government Users Restricted Rights – Use, duplication or disclosure restricted by GSA ADP Schedule Contract
with IBM Corp.
Contents
About the Move User Manual
. . . . . v
Organization of the Move User Manual .
.
.
.
. v
Chapter 1. Purpose of Move component
Common Elements and Utilities . . . . . .
Optim Directory and Common Optim Objects
Common Utilities . . . . . . . . . .
Optim Product and Security Options . . .
.
.
.
.
1
.
.
.
.
1
1
2
3
Chapter 2. Processing Flow . . . . . . 5
Extract Step. . . . . . . . . . . .
Extract Request . . . . . . . . .
Extract File . . . . . . . . . . .
Access Definition . . . . . . . . .
Extract Process Report . . . . . . .
Insert Step . . . . . . . . . . . .
Insert Request . . . . . . . . . .
Control File. . . . . . . . . . .
Table Maps . . . . . . . . . . .
Column Maps . . . . . . . . . .
Insert Process Report . . . . . . .
Optim Server Option . . . . . . . .
Other Actions . . . . . . . . . . .
Utilities . . . . . . . . . . . . .
Sample Database Tables . . . . . . .
Scenario 1 – A Set of Customers . . . .
Create an Extract Request. . . . . .
Create an Access Definition . . . . .
Create the Table List . . . . . . .
Narrow the Focus . . . . . . . .
Define Relationships . . . . . . .
Review the Access Definition . . . .
Save the Extract Request . . . . . .
Process the Extract Request . . . . .
Browse the Extracted Data . . . . .
Create an Insert Request . . . . . .
Edit the Table Map . . . . . . . .
Save the Insert Request . . . . . .
Process the Insert Request . . . . .
Scenario 2 – A Set of Items . . . . . .
Open the Extract Request. . . . . .
Modify the Local Access Definition . .
Select ITEMS Rows using Point and Shoot
Define Relationships . . . . . . .
Review the Access Definition . . . .
Save the Extract Request . . . . . .
Process the Extract Request . . . . .
Open the Insert Request . . . . . .
Edit the Table Map . . . . . . . .
Edit the Column Map . . . . . . .
Save the Insert Request . . . . . .
Process the Insert Request . . . . .
.
.
.
.
.
.
.
.
.
.
.
.
.
.
.
.
.
.
.
.
.
.
.
.
.
.
.
.
.
.
.
.
.
.
.
.
.
.
.
.
.
.
.
.
.
.
.
.
.
.
.
.
.
.
.
.
.
.
.
.
.
.
.
.
.
.
.
.
.
.
.
.
.
.
.
.
.
.
.
.
.
.
.
.
. 5
. 5
. 5
. 5
. 6
. 6
. 6
. 7
. 7
. 7
. 8
. 8
. 8
. 8
. 9
. 10
. 11
. 13
. 13
. 15
. 16
. 19
. 22
. 22
. 24
. 25
. 28
. 29
. 30
. 34
. 35
. 36
. 37
. 38
. 39
. 42
. 43
. 43
. 45
. 46
. 48
. 48
Chapter 3. Convert Process . . . . . . 49
Open the Convert Request Editor .
© Copyright IBM Corp. 1994, 2010
.
.
.
.
.
. 50
Create a Convert Request. . . . .
Select a Convert Request to Edit . .
Open a Convert Request dialog. . .
Convert Request Editor . . . . . .
General Tab . . . . . . . . .
Comma Separated Tab. . . . . .
Create a Comma Separated Values file
Select Join Table Dialog . . . . .
Column and Order Specification Dialog
Age Function Tab . . . . . . .
Global Aging Tab . . . . . . .
Currency Tab . . . . . . . . .
Report Options Tab . . . . . . .
Notify Tab . . . . . . . . . .
Process a Convert Request . . . . .
Schedule a Convert Request . . . .
Run a Convert Request . . . . .
Convert Request Progress Dialog . .
Convert Process Report . . . . .
.
.
.
.
.
.
.
.
.
.
.
.
.
.
.
.
.
.
.
.
.
.
.
.
.
.
.
.
.
.
.
.
.
.
.
.
.
.
.
.
.
.
.
.
.
.
.
.
.
.
.
.
.
.
.
.
.
.
.
.
.
.
.
.
.
.
.
.
.
.
.
.
.
.
.
.
50
51
51
52
54
57
58
59
61
62
65
65
67
68
68
68
68
69
70
Chapter 4. Extract Process . . . . . . 73
Open the Extract Request Editor .
Create an Extract Request . .
Select an Extract Request to Edit
Open an Extract Request dialog
Extract Request Editor . . . . .
General Tab . . . . . . .
Objects Tab . . . . . . .
Point and Shoot Tab . . . .
Variables Tab . . . . . . .
Object List Tab . . . . . .
Notify Tab . . . . . . . .
Convert Tab . . . . . . .
Process an Extract Request . . .
Schedule an Extract Process . .
Run an Extract Process Request.
Error Messages . . . . . .
Warning Messages . . . . .
Extract Request Progress Dialog
Extract Process Report . . . .
.
.
.
.
.
.
.
.
.
.
.
.
.
.
.
.
.
.
.
.
.
.
.
.
.
.
.
.
.
.
.
.
.
.
.
.
.
.
.
.
.
.
.
.
.
.
.
.
.
.
.
.
.
.
.
.
.
.
.
.
.
.
.
.
.
.
.
.
.
.
.
.
.
.
.
.
.
.
.
.
.
.
.
.
.
.
.
.
.
.
.
.
.
.
.
.
.
.
.
.
.
.
.
.
.
.
.
.
.
.
.
.
.
.
75
75
75
76
77
79
84
85
86
88
90
90
92
93
93
93
94
95
97
Chapter 5. Insert Process . . . . . . 105
Open the Insert Request Editor . . . .
Create an Insert Request. . . . . .
Select an Insert Request to Edit . . .
Open an Insert Request dialog. . . .
Insert Request Editor . . . . . . . .
General Tab . . . . . . . . . .
Insert Request Table Specification Dialog
Age Function Tab . . . . . . . .
Global Aging Tab . . . . . . . .
Currency Tab . . . . . . . . .
Report Options Tab . . . . . . .
Notify Tab . . . . . . . . . .
Process an Insert Request . . . . . .
.
.
.
.
.
.
.
.
.
.
.
.
.
.
.
.
.
.
.
.
.
.
.
.
.
.
.
.
.
.
.
.
.
.
.
.
.
.
.
106
106
107
107
108
110
114
118
120
121
122
123
123
iii
Schedule an Insert Request . . . . .
Run an Insert Request . . . . . .
Insert Request Progress Dialog . . .
Cascading Delete/Update Confirmation
Insert Process Report . . . . . . .
.
.
.
.
.
.
.
.
.
.
.
.
.
.
.
123
123
124
125
125
Run a Load Request . . . . . . .
Load Request Progress Dialog . . . .
Cascading Delete/Update Confirmation
Load Process Report . . . . . . .
.
.
.
.
.
.
.
.
Appendix. Command Line Interface
Chapter 6. Load Process . . . . . . 129
Open the Load Request Editor. . . . . . .
Create a Load Request . . . . . . . .
Resource Estimation . . . . . . . . .
Load Request Editor Options Dialog . . .
Select a Load Request to Edit . . . . . .
Open a Load Request dialog . . . . . .
Load Request Editor . . . . . . . . . .
General Tab . . . . . . . . . . . .
DB Alias Tab — DB2 . . . . . . . . .
DB Alias Tab — Oracle . . . . . . . .
DB Alias Tab — Sybase ASE . . . . . .
DB Alias Tab — SQL Server . . . . . .
DB Alias Tab — Informix . . . . . . .
DB Alias Tab - iSeries, Load Request Editor .
DB Alias Tab - Teradata, Load Request Editor
DB Alias Tab — z/OS . . . . . . . .
Age Function Tab . . . . . . . . . .
Global Aging Tab . . . . . . . . . .
Currency Tab . . . . . . . . . . .
Report Options Tab . . . . . . . . .
Notify Tab . . . . . . . . . . . .
Process a Load Request . . . . . . . . .
Schedule a Load Request . . . . . . .
iv
IBM Optim: Move User Manual
.
.
.
.
.
.
.
.
.
.
.
.
.
.
.
.
.
.
.
.
.
.
131
131
132
134
136
136
138
140
142
150
155
160
163
167
169
174
177
180
180
182
183
183
183
Extract, Insert, Load, and Convert Process Syntax
Extract, Insert, Load, and Convert Process
Command-line Keywords . . . . . . .
Override Keywords . . . . . . . . .
Restart or Retry a Process . . . . . . . .
Syntax. . . . . . . . . . . . . .
Command-line Keywords . . . . . . .
Return Codes . . . . . . . . . . . .
Examples . . . . . . . . . . . . . .
Example 1 - Run a Process Directly from the
Command Line. . . . . . . . . . .
Example 2 - Run a Scheduled Job from the
Command Line. . . . . . . . . . .
Example 3 - Run One or More Processes Using
a Parameter File . . . . . . . . . .
Example 4 - Use Overrides in Addition to the
Process Parameters . . . . . . . . .
Example 5 - Restart a Process . . . . . .
.
.
.
.
183
185
187
187
191
192
.
.
.
.
.
.
.
193
196
203
203
203
204
205
. 205
. 206
. 206
. 207
. 208
Notices . . . . . . . . . . . . . . 209
Index . . . . . . . . . . . . . . . 211
About the Move User Manual
The IBM® Optim™ solution includes the components Archive, Compare, Edit, and
Move. This User Manual provides information on how to use Move to extract sets
of relational data from one database and move them to another.
This release runs in the Microsoft Windows environment and supports the IBM
DB2®, Oracle, Sybase Adaptive Server Enterprise (ASE), Microsoft SQL Server, and
IBM Informix® database management systems. Additional database management
systems may be supported in future releases.
Organization of the Move User Manual
The information provided in this guide is organized into the following chapters:
Chapter 1, “Purpose of Move component,” on page 1
Provides general information about Move.
Chapter 2, “Processing Flow,” on page 5
Provides an overview of the steps used by Optim to migrate data.
Chapter 3, “Convert Process,” on page 49
Explains how to use a Convert Request to transform data before using
Insert or Load processing. Optim provides a consistent method for
converting and saving data to an Extract File, which serves as a source for
other processing.
Chapter 4, “Extract Process,” on page 73
Explains how to use an Extract Request to extract data from source tables
and save that data to an Extract File. Optim allows you to extract sets of
relationally intact data according to your specifications.
Chapter 5, “Insert Process,” on page 105
Explains how to use an Insert Request to insert and update data in a
destination database. Optim offers several process options to allow more
flexibility.
Chapter 6, “Load Process,” on page 129
Explains how to use Optim to transform an Extract File to the format
required by the database load utility and invoke the utility to perform the
load.
“Command Line Interface,” on page 191
Explains the use of the Command Line Interface that allows you to browse
an Extract or Control File, run one or more process requests, or run a
scheduled job, without first opening the graphical user interface.
© Copyright IBM Corp. 1994, 2010
v
vi
IBM Optim: Move User Manual
Chapter 1. Purpose of Move component
The Move component extracts, copies, and moves sets of relationally intact data
from multiple source tables to corresponding destination tables. Move handles an
arbitrarily complex data model consisting of any number of tables and
relationships and ensures a referentially intact set of data for use in application
testing, data migration, and date aging.
Move is indispensable for the following purposes:
v Creating test databases that are relationally intact subsets of an existing
production database.
v Migrating subsets of data that require data transformations as part of the
migration. This feature is especially useful for masking data used in testing
applications or to introduce altered data to the production database.
v Aging all types of date columns, regardless of initial format, and adjusting the
resulting dates to suit site-specific business rules. An extensive set of sample
definitions to handle these business rules is distributed with Move. Definitions
can be customized to accommodate organization-specific business rules.
Move is easy to use, simple in concept, yet powerful in supporting complex
database structures. Intuitive dialogs simplify data entry tasks and provide data
options for extracting relationally intact sets of data. Intelligent window handling
technology allows you to display multiple dialogs, pop-up windows, context
sensitive online help, and tutorials.
Common Elements and Utilities
To carry out its functions, Optim relies on userdefined objects as supplements to
objects defined to the database (for example, tables, primary keys, relationships,
stored procedures). These userdefined objects (collectively, Optim objects) are
stored in the Optim Directory.
Features common to all or most of the Optim components (i.e., Archive, Move,
Edit, and Compare), are explained in the Common Elements Manual.
Optim Directory and Common Optim Objects
The Optim Directory is a set of tables in which Optim tracks processing status and
stores objects needed for processing. You must use the Configuration program to
create or configure the Directory tables and stored procedures needed to access the
Directory.
Objects in the Directory that are common to Optim components include the
following:
Access Definitions
An Access Definition identifies a set of related data to be processed by
Optim. It references the database tables and their relationships, and
provides criteria to select specific rows within tables. An Access Definition
is required for an Extract Process.
Column Maps
A Column Map provides specifications needed to match columns between
© Copyright IBM Corp. 1994, 2010
1
two tables referenced in a Table Map. Also, a Column Map can be used to
transform data, age dates in tables, and exclude one or more columns from
processing. A Column Map can be referenced in a Table Map for an Insert
or Load Process.
Column Map Procedures
A Column Map Procedure facilitates data transformations in a Convert,
Insert, Load, or Restore Process that are beyond the scope of native
Column Map functions.
DB Aliases
A DB Alias provides parameters needed to connect with a specific
database. A DB Alias name is used as a high-order qualifier for an object or
table name, providing information that Optim needs to access the
appropriate database. A DB Alias is needed anytime Optim references a
database object; for example, to qualify the name of an Optim primary key,
Optim relationship, or a database table referenced in an Access Definition,
Column Map, or Table Map.
Primary Keys
Primary key columns uniquely identify each row in a database table. A
primary key can be used to create an Optim relationship, and is required
for a table that is changed by an Insert Process or a table that is visited
more than once in an Extract Process. A primary key is also required to
enable the row selection (Point and Shoot) feature for an Access Definition
or an Extract Process.
Relationships
A relationship is a defined connection between the rows of two tables that
determines the parent or child rows to be processed and the order in
which they are processed. Optim uses relationships to determine the data
to be retrieved from related tables and rely upon relationships defined to
the database, when available. However, you can also define relationships
to supplement those in the database. Generally, a relationship is needed in
a process that uses an Access Definition.
Table Maps
A Table Map identifies and matches two tables or sets of tables in an Insert
or Load Process and can exclude one or more tables from processing. A
Table Map is required for an Insert, Load, or Restore Process.
Common Utilities
This topic discusses the utilities that are common to all components of Optim.
The utilities that are common to all components of Optim are documented in the
Common Elements Manual, as follows:
v Restart/Retry. Use this utility to restart a process that terminated abnormally or
to retry a process for which all rows are not successfully processed. You can use
this utility to restart or retry an Insert, Insert/Update, or Update Process.
v Calendar. Use this utility to customize handling of dates for aging data in a
Convert, Insert, or Load Process and for scheduling process requests.
v Currency. Use this utility to customize currency conversion parameters for
Convert, Insert, or Load processes.
v Schedule. Use the Scheduler to schedule processes and monitor processing
v Browse. Use this utility to review the contents of an Archive, Extract, or Control
File.
2
IBM Optim: Move User Manual
v Export/Import. Use these utilities to copy Optim objects from one Directory to
another.
v Create. Use this utility to create database objects from definitions in an Archive
or Extract File.
Note: The Storage Profile utility is documented in the Archive User Manual.
Optim Product and Security Options
Various options are used to maintain the Optim environment. Generally, Product
Options enforce site and system requirements, while Personal Options allow you
to customize Optim for use at each workstation.
See the Installation and Configuration Guide and the Common Elements Manual for
further information.
Security options allow you to establish as many as three levels of security for using
Optim:
v Functional security allows you to control user access to the interface for
functions provided by Optim.
v Object security allows you to control access to specific objects in the Directory.
v Archive File security allows you to control access to data in Archive Files.
All security options are documented in the Installation and Configuration Guide .
Chapter 1. Purpose of Move component
3
4
IBM Optim: Move User Manual
Chapter 2. Processing Flow
Move uses a two-step process to migrate data: an Extract step and an Insert step.
v The Extract step copies data from one or more related tables in one or more
database instances to an external file called an Extract File.
v The Insert step copies data from the Extract File to one or more destination
databases. The destination tables may or may not reside in the same database as
the source tables. If the destination tables do not exist, Move generates the SQL
to create the tables.
Extract Step
The Extract Process selects data from a source (one or more tables in a database)
and copies that data to a destination (an Extract File).
To extract data, you must create an Extract Request that includes the specifications
for the data to be extracted, called the Access Definition, and the parameters for
the Extract Process. You can process the Extract Request immediately, or schedule
the process to run automatically. You can also run the Extract Process from the
command line, using overrides for specifications in the request.
Extract Request
The Extract Request Editor dialog allows you to select parameters for processing
the Extract Request. These parameters include the following:
v The Extract File, Access Definition, row limit, and items to extract: data, objects
(metadata), or both.
v Types of objects to extract: primary keys, relationships, indexes,
aliases/synonyms, functions, defaults, UDTs, packages, procedures, sequences,
triggers, views, and/or rules. (Move always extracts table and column
definitions.)
You can choose to run the Extract Request immediately or schedule the request for
later processing.
Extract File
The Extract File contains the selected relationally intact data, the object definitions,
or both. The Extract File is stored locally on the client system or on a shared file
server. After you create an Extract File, you can use the file as often as needed to
create new, or refresh existing, databases.
After you have extracted data and created an Extract File, you can browse the
contents of the file. This is useful to ensure that the contents are as expected.
Access Definition
The Access Definition governs the overall Extract Process. An Access Definition
specifies the tables, relationship traversal, and selection criteria for the data you
want to extract. You can select a named Access Definition or create a new Access
Definition for a single Extract Request.
The Access Definition enables you to:
© Copyright IBM Corp. 1994, 2010
5
v Specify the set of tables to be included in the Extract Process. You can specify
the name of a single table and request that Move provide the names of all
related tables. One table is identified as the Start Table, or table from which data
is first extracted.
v Select relationships to be traversed to extract the data. Move has default rules
for how relationships are traversed between the specified tables. You can select
from a list of all of the relationships defined to the database and to the Optim
Directory. (The relationships contained in the Directory supplement the
relationships contained in the database.)
v Define criteria for the rows to be extracted by specifying:
– Selection criteria for any selected table using SQL syntax.
– A selection of rows chosen while browsing the data (Point and Shoot).
– A sampling of rows, accomplished by extracting every nth row.
– A maximum number of rows for a single table.
– A maximum number of children per parent.
– Grouping (e.g., extract 20 customers from each of the 50 states).
v Ensure that the desired data is extracted using the Show Steps function to
review how Move will traverse the database.
Extract Process Report
An Extract Process Report is generated as part of the Extract Process. The report
contains general information and statistics about the process. The content of the
report reflects what has been extracted─data, object definitions, or both.
Insert Step
The Insert Process obtains data from an Extract File and copies that data to a
destination (one or more tables in a database). The destination can be any database
located on any server in your network, including the source database. Because the
object definitions are included in the Extract File, you can clone the original
database, if needed.
To Insert extracted data, you create an Insert Request that contains the
specifications for the Insert Process. You can process the Insert Request
immediately, or use the Insert Request as a template for applicationgenerated jobs
run from the command line, using overrides as appropriate.
Insert Request
The Insert Request Editor dialog allows you to select parameters for processing the
Insert Request, including the following:
v The Extract File that contains the data to insert.
v The Control File that tracks the process.
v The Table Map that matches tables in the Extract File to tables at the destination.
v Specifications to delete rows in target tables prior to the Insert.
You can choose to run the Insert Request immediately or schedule the request for
later processing.
Process Options
Insert If the primary key value is unique to the destination table, the new row is
added to the destination table. If the primary key value is not unique to
6
IBM Optim: Move User Manual
the destination table (the row already exists), the row is discarded. Move
uses a Control File to keep track of discarded rows so that you can review
them and possibly reprocess them later.
Update Only
If the primary key of a row in the source data matches the primary key of
a row in the destination table, the row is updated. If the primary key of a
row in the source data does not match the primary key of a row in the
destination table, the row is reported as failed.
Update/Insert
If the primary key value is unique to the destination table, the new row is
added to the destination table. If the primary key value is not unique to
the destination table (the row already exists), the row in the Extract File
replaces or updates the existing row.
Mixed Move also allows a mix of insertion methods where some tables are
inserted and others are updated.
Object Definitions
If destination tables do not exist, Move can generate the SQL to create the tables
from the object definitions contained in the Extract File─either as part of the Insert
or as a separate step. In addition to tables, other object definitions can be created.
Control File
A Control File is generated by the Insert Process to record details about the success
or failure of processing each row in the Extract File. You must specify the name of
a Control File when you create a request to Insert data.
The Control File also makes it easy to distinguish among different process requests
that use the same Extract File. If a path is not specified, Control Files are stored in
the data directory specified in Personal Options. For details on specifying the data
directory and other Personal Options, see the Common Elements Manual.
You can browse the Control File to identify problems with a process, such as rows
in the Extract File that failed to process or the cause of an unexpected termination.
Diagnostics accompany the discarded rows to identify why they were not
processed. For details on the Browse Utility, see the Common Elements Manual.
Table Maps
Table Maps match source tables to destination tables. Individual tables can be
excluded, and tables with different names can be mapped. You can use an existing
Table Map or define the Table Map along with the other specifications for the
Insert Process.
When the columns in the destination table match the columns in the source table,
Move automatically inserts the data. When the columns do not match, the
unmapped data is not inserted unless Column Maps are specified.
Column Maps
Column Maps are used to match source columns to destination columns that have
different column names, eliminate columns from the process, and most
importantly, allow the specification of values to be used to populate the destination
columns.
Chapter 2. Processing Flow
7
Values that can be used to populate a destination column include special registers,
the NULL value, literals, constants, expressions, and exit routines.
The Age function enables you to age individual columns.
The Currency function enables you to convert from one currency to another.
Insert Process Report
An Insert Process Report is generated as part of the Insert Process. The report
contains general information and statistics about the process. The report contains
details of what has been inserted─data, object definitions, or both─and what has
been discarded.
Optim Server Option
In the standard configuration, Optim operates as a client application with all
processing taking place directly on the Windows workstation. Unless the database
is installed locally, Optim uses the appropriate DBMS client software to
communicate with the remote database via a network.
The Optim Server option allows a user to define tasks on a workstation and direct
any resource-intensive data processing functions to a machine more suited to the
task. When a task requires the movement, processing or storage of very large
volumes of data, the request can be defined at the workstation in the normal way,
then directed for remote processing on a machine hosting Optim Server.
If your site has installed the Optim Server option on a machine, you can direct the
Extract Request and the Insert Request to the Optim Server for processing. The
Extract Request Editor and the Insert Request Editor each contain a box for
delegating the processing to a machine hosting Optim Server. (The other actions
available from the main menu can also be directed to a server for processing. For
additional information, refer to the chapter corresponding to each action.)
If the Optim Server option is not enabled at your site, the box on the request editor
is unavailable.
Other Actions
Optim provides other processing capabilities in addition to the Extract and Insert
Processes. These include the Load Process and Convert Process.
Load Process
The Extract File can be transformed to Load format to take advantage of
the Load Utility distributed with a database. Typically, this is used to insert
large volumes of data.
Convert Process
The data in the Extract File can be transformed based on Table Map and
Column Map specifications. This transformed data can be saved in the
same or a different Extract File. This is useful to mask source data and
create consistent, refreshable test data.
Utilities
Optim includes the following processing utilities in addition to the available
actions:
8
IBM Optim: Move User Manual
Restart
Use Restart when an Insert Process does not complete successfully. A
process can terminate unexpectedly due to resource restrictions, such as
space allocation or network failure. When you use Restart, the process
restarts from the last commit point. Move keeps track of the last
successfully committed row in the Extract File, and restarts the process
with the next row in the file.
Retry
Use Retry when an Insert Process completed, but could not be performed
for one or more rows in the Extract File. When a process cannot be
performed for a specific row, that row is marked as discarded. The Retry
Process will attempt the previous operation for the rows that were
discarded.
Calendar
Use the Calendar Utility to create calendars for date aging. A sample set of
international calendars is provided, including dates and rules, that you can
use immediately. Use the Calendar Editor to define Dates and Rules
specific for your site.
Schedule
Use the Schedule Utility to schedule processes to run at a later time. This
reduces the impact on production processing and enables you to
automatically re-execute a process at specific time intervals.
Browse Extract and Control Files
Use the Browse Utility to review Extract Files to ensure that the extracted
data is what you expected and to determine which Extract File is
appropriate for a Convert, Insert, or Load Process. Use Browse to review
Control Files to view the status of each row or to view only those rows
that had errors.
Export / Import
Use the Export and Import Utilities to migrate definitions from one Optim
Directory to another.
Create Use the Create Utility to create objects (e.g., tables, primary keys and
relationships, indexes, and views) using the object definitions in the Extract
File, without actually inserting the data.
Reset Object Cache
Use the Reset Object Cache Utility to refresh current database objects or
configuration parameters, especially when definitions are subject to
frequent change.
Sample Database Tables
Optim is distributed with sample database tables. These tables correlate with the
tables used in the examples within this manual.
The sample database tables distributed with Optim are as follows. (Table names
are prefixed with a Creator ID, which is specified at installation.)
v OPTIM_SALES
v OPTIM_MALE_RATES
v OPTIM_CUSTOMERS
v OPTIM_FEMALE_RATES
v OPTIM_ORDERS
v OPTIM_SHIP_TO
v OPTIM_DETAILS
v OPTIM_SHIP_INSTR
v OPTIM_ITEMS
v OPTIM_STATE_LOOKUP
Chapter 2. Processing Flow
9
Note: The tables used in examples in this manual do not contain the prefix
“OPTIM_” in their names.
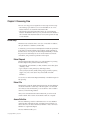
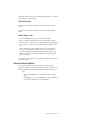
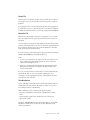
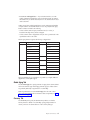
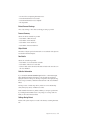
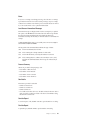
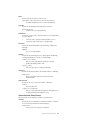
The major relationships between pairs of tables in the sample database are shown
in the following diagram. The arrows indicate the flow from parent to child.
In this diagram, the relationships between tables are represented by three-character
codes consisting of the letter "R", the first letter of the parent table, and the first
letter of the child table.
The relationships between tables are as follows:
v OPTIM_SALES is a parent of OPTIM_CUSTOMERS (relationship RSC)
v OPTIM_CUSTOMERS is a parent of OPTIM_ORDERS (relationship RCO)
v OPTIM_ORDERS is a parent of OPTIM_DETAILS (relationship ROD)
v OPTIM_ITEMS is a parent of OPTIM_DETAILS (relationship RID)
The sample database includes four additional tables:
v
OPTIM_CUSTOMERS2
v OPTIM_DETAILS2
v
OPTIM_ORDERS2
v OPTIM_ITEMS2
These four tables are distributed empty and are related in the same way as the
similarly named tables described previously. The empty tables are provided for
demonstrating the Insert Process.
For a complete description of the sample database tables, see the Installation and
Configuration Guide.
Scenario 1 – A Set of Customers
Scenario 1 guides you through the steps required to create a test database of data
from four sample tables distributed with Optim. The data in the test database will
include a sampling of customers. To create the test database, you must extract a
subset of related data from the source database and insert the data into a target
database.
Scenario 1 demonstrates how to migrate a relational set of data in two steps.
The first step describes how to specify, extract, and store a relational set of data.
10
IBM Optim: Move User Manual
v
v
v
v
An Extract Request lists the specifications for the Extract Process.
An Access Definition specifies the data to extract.
An Extract File stores the extracted set of data.
An Extract Process Report records the results of the Extract Process.
The second step describes how to insert the relational set of data into
newly-created destination tables.
v An Insert Request lists the specifications for the Insert Process.
v A Table Map specifies the destination of the data.
v The Create Utility creates new destination tables as exact copies of the original
source tables.
v The relational set of data stored in the Extract File populates the destination
tables.
v An Insert Process Report records the results of the Insert Process.
In this scenario, you will create a subset of data by extracting every tenth
CUSTOMERS row in the sample database. The subset of data will also include all
orders from the selected customers (from the ORDERS table) and the details for
those orders (from the DETAILS table). The data also includes all rows from the
ITEMS table, which is designated as a Reference Table. The extracted data will be
inserted into new database tables created during the Insert Process.
Note: If you are not authorized to create new tables, you may be unable to
complete the Insert Process in this scenario. Check with the site management for
the destination tables to use.
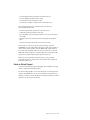
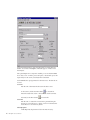
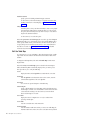
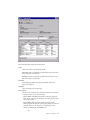
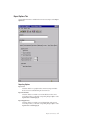
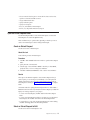
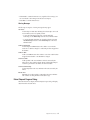
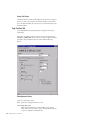
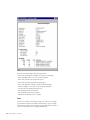
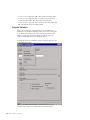
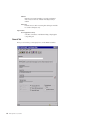
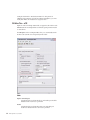
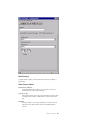
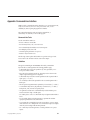
Create an Extract Request
To create an Extract Request, begin by clicking File → New → Extract from the main
window to display the Extract Request Editor.
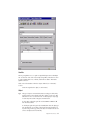
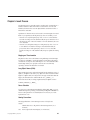
Use the Extract Request Editor to create and edit requests for extracting data from
a database. The General tab is used to name the Extract File and open the Access
Definition, in which you will list the tables that contain the desired data and define
specifications for the data in the listed tables.
Chapter 2. Processing Flow
11
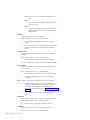
Specify a Description of the Extract Request to identify its purpose or function.
If the optional Optim Server component is installed, you can use the Server Name
box to select a server on which to process the request, or select Local to process the
request locally. For this scenario, select Local, which is the default.
Use the Extract Request Editor to specify the following parameters for the Extract
Process:
Extract File
The Extract File contains a copy of the specified source data. The default
file name extension for an Extract File is .xf. Type a name for the Extract
File.
Access Definition Options
The Access Definition defines the set of data to be extracted. An Access
Definition can be named and saved to be used again, or specified as Local
and saved as an embedded part of the Extract Request. For this scenario,
select the button labeled Local.
Note: For this scenario, all of the other Extract Process parameters are used at the
default settings. For additional information about other parameters available in an
Extract Request, see “Extract Request Editor” on page 77.
12
IBM Optim: Move User Manual
Create an Access Definition
After specifying the Extract Process parameters, you must provide an Access
Definition. The Access Definition references the tables that contain the data,
provides selection criteria for the data, and prescribes the way that relationships
between tables are traversed. In other words, an Access Definition defines the data
you want to extract and provides table specific parameters for processing.
In this scenario, you will create an Access Definition that is local or exclusive to
the current Extract Request. You will:
v Select the tables that contain the data you want to extract.
v Define selection criteria for the data—in this example, every tenth CUSTOMERS
table row is selected.
v Define the traversal path—the relationships between tables that Move traverses
and the direction in which they are traversed during the Extract Process.
v Review the traversal path to ensure the appropriate data is selected.
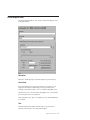
Click Tools → Edit Access Definition from the Extract Request Editor to display
the Access Definition Editor, which is used to create and edit Access Definitions.
Specify a Description of the Access Definition to identify its purpose or function.
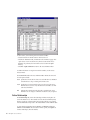
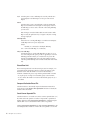
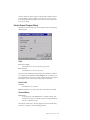
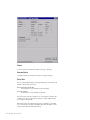
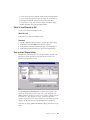
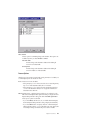
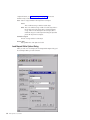
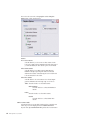
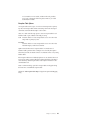
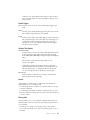
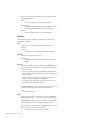
Create the Table List
Use the Tables tab of the Access Definition Editor to specify the list of tables to
include in the Extract Process.
Chapter 2. Processing Flow
13
Default Qualifier
The Default Qualifier saves time when you enter table names in the grid, or Table
List. A fully qualified table name has three parts: dbalias.creatorid.tablename. The
Default Qualifier serves as the prefix for names in the Table List that are not fully
qualified.
dbalias
Associates a user-defined name with a specific database.
creatorid
Identifies a table with the Creator ID (DB2, Informix), Schema Name
(Oracle), or Owner ID (Sybase ASE, SQL Server).
The Default Qualifier can be either dbalias or dbalias.creatorid. Generally, use a
Default Qualifier that applies to most or all tables in the Table List. For this
scenario, enter the dbalias and creatorid that correspond to the Optim sample
database tables.
Start Table
Each Extract Process begins with a Start Table, the table from which data is first
extracted, and proceeds to obtain related data from the remaining tables in the
Table List. Move automatically places the Start Table in the first line of the Table
List. If you do not specify a Start Table, the first name entered in the Table List is
the assumed Start Table.
For this scenario, type CUSTOMERS in the Start Table box. Using this Start Table,
you can create a subset of data based on a sampling of customers.
Table List
The Table List references tables from which data is extracted. When you add a
table name to the Table List, Move automatically displays the type of object
referenced by the table name and the name of the DBMS for the table.
You can use two methods to add table names to the list. One method is to type
names under the Table/View heading. An easier method, however, may be to let
Move find the tables that contain related data, using the Select Table(s) dialog.
For this scenario, use the Select Table(s) dialog to display a listing of tables related
to the Start Table. You can review the list and select tables you want to include in
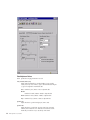
the Extract Process.
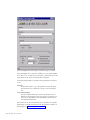
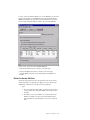
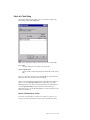
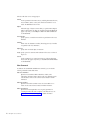
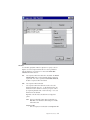
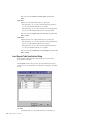
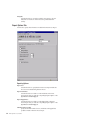
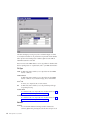
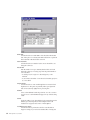
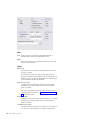
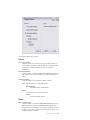
Select Tables Dialog
To display the Select Table(s) dialog, right-click the CUSTOMERS table name in the
Table List and click Add Tables in the shortcut menu. The dialog provides a list of
tables, based on the Default Qualifier.
For this scenario, limit the list to tables related to the CUSTOMERS table, and
select specific tables from the list.
v Select the Find Tables Related to Table check box, ensure the default settings
Both and All Levels are selected, and click Display.
v Locate the following tables in the list: ORDERS, DETAILS, and ITEMS. Select
each table while pressing the Ctrl key, and click Select to add the tables to the
14
IBM Optim: Move User Manual
Table List in the Access Definition.
The Table List in the Access Definition Editor is now populated with the Start
Table, CUSTOMERS, and all the tables related to the CUSTOMERS table.
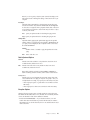
Narrow the Focus
To narrow the focus of the Access Definition, you can define limits and selection
criteria. Move provides several methods to limit the scope of the extracted data.
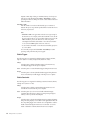
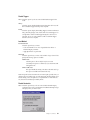
Table Specifications
Table specifications provide the display and criteria parameters for data. You can
set specifications for any table in the Table List by clicking right mouse button on
the table name and selecting a Table Specifications option from the shortcut menu.
A brief description of each option follows:
Columns
Select columns from the Start Table to display for Point and Shoot. Point
and Shoot allows you to extract specific rows from the Start Table.
Selection Criteria
Specify selection criteria for any column in a selected table. Choose AND
or OR to combine selection criteria, as required.
SQL
Select SQL to view a list of valid logical or relational operators and define
a detailed SQL Where clause as selection criteria. Use this option when
multiple conditions are required.
Sort
Sort columns in the Start Table to display for Point and Shoot.
File Attachments
Specify parameters to extract a file referenced within or associated with a
row of extracted data and include it in an Extract File.
Chapter 2. Processing Flow
15
For this scenario, Table Specifications are not used. For complete information about
Table Specifications, see the Common Elements Manual.
Reference Table
Under the heading Ref Tbl, you can select a check box to designate a table as a
Reference Table. Unless selection criteria are specified for the Reference Table, all
rows are selected from the table. The Start Table cannot be a Reference Table. For
this scenario, designate ITEMS as a Reference Table.
Extract Parms
Under the heading Extract Parms on the Table List, you can enter values under the
following subheadings to limit the number of rows to extract:
Every Nth
Enter a numerical value “N” under this heading to extract every Nth row
of the corresponding table.
Row Limit
Specify the maximum number of rows to extract from a table.
For this scenario, extract a sampling of the CUSTOMERS rows. Type the number
“10” in Every Nth for the CUSTOMERS table to select every tenth row. Leave the
Row Limit blank.
Define Relationships
After selecting the tables and specifying selection criteria for the data, you must
define the traversal path. That is, you select the relationships to be used and the
16
IBM Optim: Move User Manual
direction in which the relationships are traversed—from parent to child, from child
to parent, or in both directions—during the Extract Process.
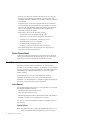
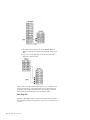
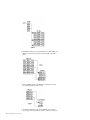
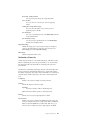
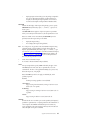
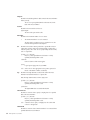
The traversal path determines the sequence in which Move selects data from tables
referenced in the Access Definition. Consider the database structure of the tables
you selected for extracting:
In this diagram, the relationships between tables are represented by three-character
codes consisting of the letter "R", the first letter of the parent table, and the first
letter of the child table.
CUSTOMERS is the Start Table, because you want to extract a subset of
CUSTOMER data. Based on the relationships between each pair of tables:
v CUSTOMERS is the parent of ORDERS (relationship RCO).
v ORDERS is the parent of DETAILS (relationship ROD).
v ITEMS is not part of a traversal path, because it is a Reference Table.
To obtain the desired set of data for this scenario, you will include relationships
RCO and ROD in the Extract Process and specify the direction in which Move
traverses them.
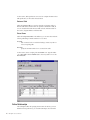
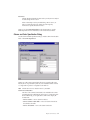
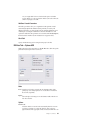
Use the options on the Relationships tab to define the traversal path for selecting
data from the tables referenced in the Access Definition. All relationships between
pairs of tables in the Table List are displayed. The parent table and the
corresponding child table in each relationship is provided.
Chapter 2. Processing Flow
17
Review Status
Each listed relationship has a status, which indicates:
New
Relationship is listed for the first time. The status of a relationship is New
the first time the list is displayed after:
v A new relationship between tables on the list is defined.
v A table is added to the list.
(After you have viewed the relationship, the status is no longer New and
is shown as blank the next time you display the Relationships tab.)
When you run the Extract Process, a warning message advises you of any
new relationships. Although you may proceed despite the warning, it may
be prudent to review the relationship usage list.
Blank Relationship is defined and is not new to the list.
Ref
Relationship is ignored because the parent or child table is a reference or
lookup table, as specified on the Tables tab.
Unknown
Relationship does not exist. This condition can occur when a change in the
Default Qualifier causes a new set of tables and relationships to be
referenced in the Access Definition. Relationships with Unknown status are
ignored during a process. To remove a relationship in Unknown status,
right-click the relationship and click Remove or Remove All Unknown in
the shortcut menu.
The Use new relationships check box is selected by default to include all
relationships with a New status in the Extract Process. If you clear this check box,
you must manually select new relationships to include them in an Extract Process.
18
IBM Optim: Move User Manual
Clearing the check box ensures that a completed Access Definition is not affected
by the addition of a new relationship.
Select Relationships
The Select column determines whether a relationship is used in the Extract
Process.
For this scenario, verify that check boxes for relationships RCO and ROD are
selected.
Specify Options 1 and 2
You can use the Options check boxes to extend the traversal path:
v Option (1) determines whether Move traverses a relationship from child to
parent and extracts a parent row for each selected child row. By default, Option
(1) is selected. As a result, this setting maintains the relational integrity of the
data.
v Option (2) determines whether additional child rows are extracted when a
parent row is extracted because of Option (1). In other words, if Move has
traversed a relationship from child to parent and extracted a parent row, all
children of that parent are extracted when Option (2) is selected. By default,
Option (2) is cleared.
For this scenario, only Option (1) is selected because no tables will be traversed
from child to parent.
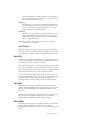
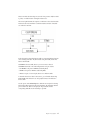
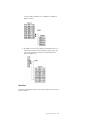
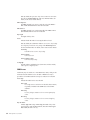
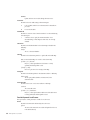
Review the Access Definition
Consider the steps performed to extract the data based on the specified
parameters, selected relationships and specifications for Options (1) and (2). The
following simplified data is displayed for each table to aid in the explanation.
Steps:
1. Every tenth CUSTOMERS row is extracted based on the sampling
factor.
2. The ORDERS rows for these CUSTOMERS rows are extracted because
of the parent to child traversal of relationship RCO.
Chapter 2. Processing Flow
19
3. The DETAILS that are related to the extracted ORDERS, ORD4 and
ORD5, are extracted by traversing the relationship ROD from parent to
child.
4. Lastly, all rows in the ITEMS table are extracted because the table is
designated as a Reference Table.
Optim provides tools in the Access Definition Editor for you to evaluate the set of
data to be extracted prior to performing the Extract Process. After specifying the
list of tables, selection criteria, Extract parameters and relationships, evaluate the
data to extract using the Tools menu in the Access Definition Editor.
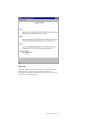
Show Steps Tool
Click Tools → Show Steps to display a narrative that describes the traversal path of
the Extract Request. Verify the traversal path to ensure that you extract the desired
set of data.
20
IBM Optim: Move User Manual
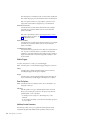
Indent Tool
Click Tools → Indent from the Access Definition Editor to display the Indented
Table Display dialog, which shows the list of tables formatted to show
relationships. The related tables are displayed with a prefix of C or P to indicate
Child table or Parent table, respectively.
Chapter 2. Processing Flow
21
Click File → Update and Return from the Access Definition Editor to update the
Access Definition and return to the Extract Request Editor.
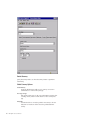
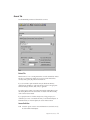
Save the Extract Request
Although you need not save an Extract Request to process it, Scenario 2 builds on
the Extract in Scenario 1. Therefore, click File → Save from the Extract Request
Editor to display the Save an Extract Request dialog.
Type a two-part name (IDENTIFIER.NAME) in the box labeled Enter pattern for
Extract Request to save the Extract Request.
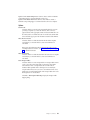
Process the Extract Request
Click File → Run from the Extract Request Editor to process the Extract Request,
and then click to continue.
22
IBM Optim: Move User Manual
The Extract Request Progress dialog is displayed while the Extract Request is
processed.
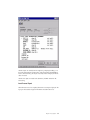
When the Extract Process is done, the Extract Process Report is displayed.
Chapter 2. Processing Flow
23
Click File → Save As to save the report or File → Print to print it.
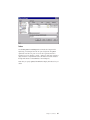
Browse the Extracted Data
You can browse the contents of the Extract File to ensure that the extracted data is
as expected. The displayed information can be viewed, but not edited.
Do the following to browse the contents of the Extract File:
v Click Utilities → Browse to open the Browse dialog.
v Click File → Last Created Extract File to open the last Extract File created.
v Double-click a table name to display the rows extracted for the particular table
in the Browse Extract File Table Data dialog.
24
IBM Optim: Move User Manual
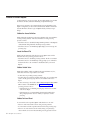
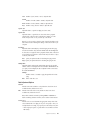
Create an Insert Request
After the referentially intact set of data is extracted and stored in the Extract File,
use the Extract File as the source to insert data using the Insert Process. The
parameters for the Insert Process are specified in an Insert Request.
In this scenario, you will create a test database using an Insert Request and
populate the database with the data in the Extract File.
Note: If you are not authorized to create new tables, you may be unable to
continue this scenario. Check with the site management for the destination tables
to use.
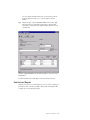
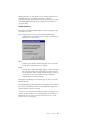
To begin the Insert Process, click File → New → Insert from the main window to
display the Insert Request Editor.
Chapter 2. Processing Flow
25
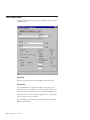
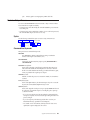
Use the Insert Request Editor to create and edit requests for inserting data into a
database. You can enter a Description to indicate the purpose or function of the
Insert Request.
If the optional Optim Server component is installed, you can use the Server Name
box to select a server on which to process the request, or select Local to process the
request locally. For this scenario, select Local, which is the default.
Use the General tab to specify parameters for the Insert Process. The other tabs are
not used.
Source File
Enter the name of the Extract File that contains the data to insert.
to select the last
For this scenario, click the Last Extract button
Extract File created. If the Scenario 1 Extract File was not the last Extract
File created, use the Browse button
to locate the file.
Control File
Enter the name of a Control File. A Control File is generated during the
Insert Process to track the success or failure of each row in the Extract File.
Control Files have a .cf extension by default.
Table Map Options
A Table Map directs the placement of data in the Insert Process by
26
IBM Optim: Move User Manual
identifying and matching tables in the source, or Extract File, with those in
the database. In addition, you can use a Table Map to exclude tables from
processing.
Table Map Options allow you to use a named Table Map that is saved and
can be used with other process requests, or a Local Table Map that is saved
as part of the Insert Request.
For this scenario, select Local to create a Local Table Map.
Always View Table Map
Use this option to open the Table Map Editor each time you run the Insert
Request. This option provides an opportunity to review the Table Map
specifications before you insert data.
For this scenario, do not select this option.
Delete Options
Delete Options let you delete rows from all or specified destination tables
or retain all rows in destination tables (no delete).
For this scenario, use the default setting No Tables to retain rows already
in the database.
Process Options
Process Options allow you to select the type of Insert Processing to be
performed and specify parameters to be used. You can insert new rows
only; insert new rows and update existing rows; or update existing rows
only. You can apply these options globally or on a table-by-table basis.
For this scenario, select Insert to insert new rows of data into the specified
tables.
Process File Attachments
Select this check box to insert file attachments specified in the Access
Definition.
Lock Tables
Select this check box to lock database tables (if authorized) to ensure that
other database activity does not interfere during processing.
For this scenario, do not select this option. Lock Tables is not applicable to
this scenario because the tables you create for the test database are new.
Commit Frequency
Specify the number of rows to process before committing the changes to
the database.
For this scenario, use the default Commit Frequency established by the
system administrator. (See the Installation and Configuration Guide.)
Discard Row Limit
Specify the maximum number of rows that can be discarded. When the
specified limit is reached and all rows in the array have been processed,
the Insert Process is cancelled.
For this scenario, use the default setting of 0 to allow an unlimited number
of discarded rows.
Disable Triggers
Specify options to disable database triggers during the Insert Process.
For this scenario, use the default setting. For complete information about
disabling triggers in an Insert Request, see “Disable Triggers” on page 116.
Chapter 2. Processing Flow
27
Disable Constraints
Specify options for disabling referential integrity constraints.
For this scenario, use the default setting. For complete information about
disabling constraints in an Insert Request, see “Disable Constraints” on
page 116.
Always Call Create
Select this option to always start the Create Utility to create or drop objects
in the destination database before inserting the data. If you do not select
the option, the Create Utility starts only when necessary to create desired
objects in the destination database.
For this scenario, do not select this option.
Note: The Age Function and Global Aging tabs are used to age data. The Report
Options tab enables you to customize the process report, and the Currency tab is
used to specify default currency conversion factors. For this scenario, the data is
not aged, the report is not customized, and currency is not converted, therefore
these tabs are not used. See “Insert Request Editor” on page 108 for detailed
information about Insert Requests.
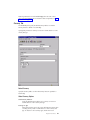
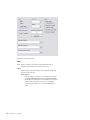
Edit the Table Map
In an Insert Process, you use a Table Map to direct the placement of data. A Table
Map matches the source tables in the Extract File to the destination tables in the
database.
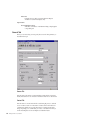
To display the Table Map Editor, click Tools → Edit Table Map from the Insert
Request Editor.
Note: If the Always View Table Map option is selected in the Insert Request
Editor, the Table Map Editor automatically displays when you run the process.
This option allows you to verify the Table Map.
Source
Displays the Extract File and Qualifier associated with the source data.
Destination
Enter the Qualifier for the destination data. For this scenario, enter the
same Destination Qualifier as the Source Qualifier.
Description
You can enter an optional description of the Table Map.
Column Map ID
Specify a default Qualifier for Column Maps used in the Table Map. Use a
Column Map to correlate source and destination columns and to transform
source data before inserting it. For this scenario, leave the box blank
because Column Maps are not used.
Server Name
Displays the name of an Optim Server or Local, to indicate where
processing will take place
Source Table
Lists the source table names in the Extract File.
Destination Table
Lists the destination table names. When you create a new Table Map, the
destination table names are the same as the source table names by default.
28
IBM Optim: Move User Manual
You can modify the destination table names. For this scenario, prefix the
destination table names with Test_ to create new tables for the test
database.
Type
Identifies the type of object in Destination Table. For this scenario, Type
will display Table for each destination table until you change the table
names. After you change the names, Type will display Unknown for each
new table name.
Click File → Update and Return from the Table Map Editor to return to the Insert
Request Editor.
For further information about Table Maps, see the Common Elements Manual.
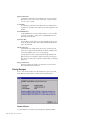
Save the Insert Request
Although you need not save an Insert Request to process it, Scenario 2 builds upon
the Insert in Scenario 1. Therefore, click File → Save from the Insert Request Editor
to display the Save an Insert Request dialog.
Chapter 2. Processing Flow
29
Type a two-part name (IDENTIFIER.NAME) in the Enter pattern for Insert
Request box to save the Insert Request. You can give the Insert Request the same
name as the Extract Request, if desired.
Process the Insert Request
To process the Insert Request, click File → Run from the Insert Request Editor.
Note: If you are not authorized to create new tables, you may be unable to
continue this scenario. Check with the site management for the destination tables
to use.
Insert Progress
The Insert Request Progress dialog is displayed while the Insert Request is
processed. The Insert Process populates the tables with the data from the Extract
File.
30
IBM Optim: Move User Manual
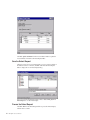
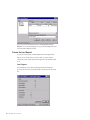
Create Utility
If the status of any table in the Table Map is Unknown, meaning it does not exist,
the Create Utility is opened. The Create Utility uses the object definitions in the
Extract File to create those objects in the database.
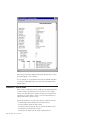
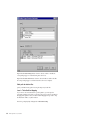
When the Create Utility is opened, the Create dialog lists all objects in the Extract
File that do not exist at the destination. Objects that do not exist at the destination
are selected for the Create Process by default, unless a conflict exists.
In this scenario, the object types PK (for Primary Key) and FK (for Foreign Key)
are in conflict. The Object Names of the Primary Keys and Foreign Keys in the
Extract File conflict with names that already exist in the database.
Note: The Create dialog may differ slightly from the example shown, depending
on the database you use. For this scenario, the Oracle version is displayed.
For this scenario, resolve the conflicts by changing the Object Name for the objects
in Conflict status. For example, insert T_ before each name, as shown below.
Chapter 2. Processing Flow
31
To create the objects, click Tools → Create All Selected Objects from the Create
dialog, or right-click and select the command from the shortcut menu.
Note: You can also create each object individually using Create Object from the
shortcut menu.
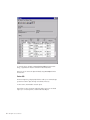
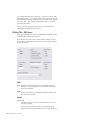
Review SQL
The Review SQL dialog is displayed by default to enable you to examine the SQL
produced to create the objects. The SQL can be edited, if necessary.
For this scenario, click Proceed to create the objects.
Note: If there are errors, the Review SQL dialog displays again. You can edit the
SQL to try to correct the problem, or abandon the Create Request.
32
IBM Optim: Move User Manual
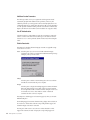
After the objects are created, the Browse SQL dialog is displayed, enabling you to
browse the SQL statements and the results of the Create Utility. Click Continue to
return to the Create dialog. The objects successfully created are displayed with the
status of Created.
After the new objects are created at the destination, click File → Close from the
Create dialog.
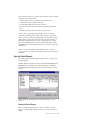
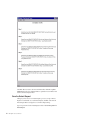
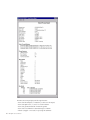
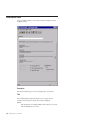
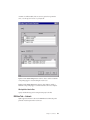
Insert Process Report
When the Insert Process has completed, the Insert Process Report is displayed. The
report provides statistics and general information about the Insert Process.
Chapter 2. Processing Flow
33
Note: The report information displayed in the sample illustration may vary from
the results displayed on your workstation.
You can optionally save or print the Insert Process Report. Click File → Save As to
save the report or File → Print to print it. To return to the Insert Request Editor,
click File → Close.
Scenario 2 – A Set of Items
In this scenario, you will use the same set of tables from the sample database that
are used for Scenario 1, but the Extract Process in Scenario 2 is more complex.
Scenario 2 also demonstrates Move's ability to transform, age, and update when
migrating the set of data. Similar to Scenario 1, Scenario 2 demonstrates how to
migrate a relational set of data in two steps.
The first step describes how to specify, extract, and store a relational set of data.
v An Extract Request lists the specifications for the Extract Process.
v An Access Definition specifies the data to extract.
v A Point and Shoot list specifies the exact rows from the Start Table to extract.
v An Extract File stores the extracted set of data.
v An Extract Process Report records the results of the Extract Process.
34
IBM Optim: Move User Manual
The second step describes how to transform data, insert the new data, and update
existing data in the destination tables.
v An Insert Request contains the specifications for the Insert Process.
v A Table Map specifies the destination of the data.
v A Column Map specifies the transformation of the data.
v The relational set of data stored in the Extract File populates the destination
tables.
v An Insert Process Report records the results of the Insert Process.
Scenario 2 directs you through the steps required to extract a set of data for
specific items, including the details and the orders for the items. To obtain the
desired set of data, you will specify the ITEMS table as the Start Table and select
specific ITEMS rows using the Point and Shoot Editor. Since the extracted set of
data must be referentially intact, this scenario will include the orders for these
items (from the ORDERS table), the customers who placed the orders (from the
CUSTOMERS table), and the DETAILS table rows for any order that contains the
selected items.
Scenario 2 uses the same destination tables created in Scenario 1. The Insert
Process in Scenario 2 also updates the destination data and uses a Column Map to
modify data.
Open the Extract Request
This scenario builds on the Extract Request created in Scenario 1. To begin, open
that Extract Request.
Click File → Open from the the main window. Double-click Extract Request in the
Identifier list box to display the list of saved Extract Requests on the Open an
Extract Request dialog. Double-click the name of the Extract Request saved from
Scenario 1.
Optim populates the Extract Request Editor with the specifications saved in
Scenario 1.
Rename the Extract Request
Before you modify the Extract Request for Scenario 2, click File → Save As to
display Save an Extract Request dialog and create a copy of the original Extract
Request.
Chapter 2. Processing Flow
35
Type a new name for the request to create a copy of the Extract Request for
Scenario 2. The original Extract Request will remain unchanged and modifications
for Scenario 2 will apply only to the new copy.
For this scenario, modify the Extract Request as follows:
v Type a new Description.
v On the General tab, type a new Extract File name.
Note: In this scenario, all the other Extract Process parameters are used at the
default settings. For additional information about other parameters available in an
Extract Request, see “Extract Request Editor” on page 77.
Modify the Local Access Definition
Click Tools → Edit Access Definition from the Extract Request Editor to display
the Access Definition Editor.
For this scenario, modify the Access Definition as follows:
v Change the Description of the Access Definition.
v On the Tables tab, clear the Every Nth column for the CUSTOMERS table.
v Clear the check box in the Ref Tbl column for the ITEMS table. (To begin the
Extract Process with rows from the ITEMS table, the ITEMS table must be
designated as the Start Table. The Start Table cannot be a Reference Table.)
36
IBM Optim: Move User Manual
v Right-click the ITEMS table and click Set as Start in the shortcut menu to
designate ITEMS as the Start Table.
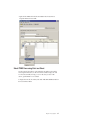
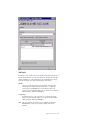
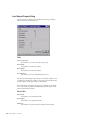
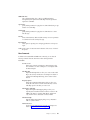
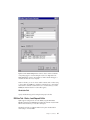
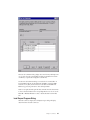
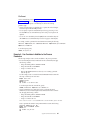
Select ITEMS Rows using Point and Shoot
Use the Point and Shoot Editor to select individual Start Table rows that will be
used to begin the Extract Process. The Point and Shoot Editor displays all of the
rows from the Start Table, allowing you to view the data you select. In this
scenario, specific ITEMS rows are selected.
To display the Point and Shoot Editor, click Tools → Edit Point and Shoot List from
the Access Definition Editor.
Chapter 2. Processing Flow
37
For this scenario, do the following in the Point and Shoot Editor:
v Select the check box in the Sel column for the first four rows.
v Click Tools → Convert to Local, and click Yes in the confirmation pop-up. This
option creates a local Point and Shoot list, which is stored with the Access
Definition only; otherwise, the Point and Shoot list is stored in the Optim
Directory.
v Click File → Update and Return to return to the Access Definition Editor.
For further information on using the Point and Shoot Editor, see the Common
Elements Manual.
The Point and Shoot tab in the Access Definition Editor indicates the Point and
Shoot list option selected:
None
Specifies that a Point and Shoot list is not used with the Access Definition.
Select this choice to drop an existing Point and Shoot list.
Local
Specifies that a local Point and Shoot list is saved as part of the Access
Definition but not saved as a file, and therefore not available to use with
other Access Definitions.
File
Indicates that a named Point and Shoot File is specified for the Access
Definition. You can change to a different Point and Shoot list, as required.
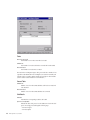
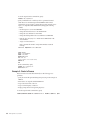
Define Relationships
On the Relationships tab, review the relationships and the traversal path to be
used in the Extract Process. The extracted set of data must be referentially intact;
therefore, for this set of data, the Extract Process begins with the rows specified
from the ITEMS table and proceeds to the related children from the DETAILS table.
To ensure that the relationships between DETAILS and ORDERS and between
ORDERS and CUSTOMERS are traversed from child to parent, select Option (1)
for these relationships. (This is the default.)
38
IBM Optim: Move User Manual
In order to retrieve the additional DETAILS rows for the ORDERS rows and extract
complete order information, select Option (2) for the relationship ROD between
ORDERS and DETAILS. This option will ensure that the Extract Process retrieves
all rows from the child table (DETAILS) related to the parent table (ORDERS).
For this scenario, do the following in the Relationships tab:
v Verify that the Select check box is selected for each relationship.
v Verify that the Option (1) check box is selected for each relationship.
v Select the Option (2) check box for the relationship between ORDERS and
DETAILS.
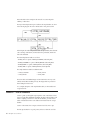
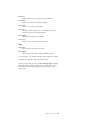
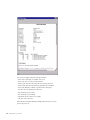
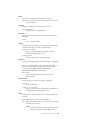
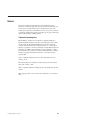
Review the Access Definition
Consider the steps performed to extract the data based on the selection criteria,
selected relationships, and specifications for Options (1) and (2). The following
simplified data is displayed for each table to aid in the explanation.
Steps:
1. The rows from the Start Table, ITEMS, are selected by Point and Shoot
to extract specific items. The specific ITEMS in this example are CH1
and CH4.
2. The DETAILS rows for these ITEMS rows are extracted because the
DETAILS are children of the previously selected ITEMS using the
relationship RID. The extracted DETAILS rows are DTL1, DTL5, and
DTL8.
Chapter 2. Processing Flow
39
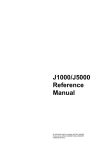
3. The ORDERS related to the extracted DETAILS rows, ORD1, ORD4 and
ORD5, are extracted by traversing the relationship ROD from child to
parent.
4. The CUSTOMERS related to the ORDERS are extracted by traversing
the relationship RCO from child to parent.
5. The additional DETAILS for the extracted ORDERS are extracted by
traversing the relationship ROD from parent to child because Option (2)
40
IBM Optim: Move User Manual
is selected. Additional DETAILS rows for ORDERS rows ORD4 and
ORD5 are extracted.
6. The ITEMS rows related to the additional extracted DETAILS rows are
extracted by traversing the relationship RID from child to parent. The
rows for CH2 and CH3 are extracted from the ITEMS table for the
additional DETAILS rows.
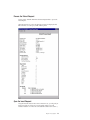
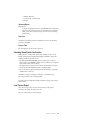
Show Steps
Click Tools → Show Steps to display a narrative that describes the traversal path of
the Extract Request.
Chapter 2. Processing Flow
41
Click File → Close to return to the Access Definition Editor. Click File → Update
and Return from the Access Definition Editor to update the Access Definition and
return to the Extract Request Editor.
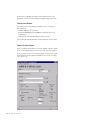
Save the Extract Request
Although you need not save an Extract Request to process it, saving an Extract
Request is recommended. To save the Extract Request, click File → Save from the
Extract Request Editor to display the Save an Extract Request dialog.
Type a two-part name for the Extract Request in the box labeled Enter pattern for
Extract Request.
42
IBM Optim: Move User Manual
Process the Extract Request
For this scenario, click File → Run from the Extract Request Editor to process the
Extract Request
When the Extract Process is done, the Extract Process Report is displayed. Click
File → Save As to save the report, or File → Print to print it.
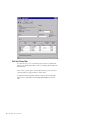
Open the Insert Request
Using the Extract file created in the Scenario 2 Extract Process, you will specify an
Insert Process that also inserts new rows and updates existing rows in the
destination database. You will use the same destination tables used in Scenario 1,
Chapter 2. Processing Flow
43
but the Scenario 2 Table Map will include a Column Map that transforms the
inserted data. Scenario 2 uses the remaining Insert Request settings from Scenario
1.
Open the Insert Request
This scenario builds on the Insert Request created in Scenario 1. To begin, open
that Insert Request.
v Click File → Open from the main window.
v Double-click Insert Request in the Identifier list to display the list of saved
Insert Requests.
v Double-click the name of the Insert Request saved from Scenario 1.
Move populates the Insert Request Editor with the specifications saved in Scenario
1.
Rename the Insert Request
Before you modify the Insert Request for Scenario 2, click File → Save As to display
the Save an Insert Request dialog and create a copy of the original Insert Request.
Type a new name to create a copy of the Insert Request for Scenario 2. The original
Insert Request will remain unchanged and modifications for Scenario 2 will apply
only to the new copy.
44
IBM Optim: Move User Manual
Type a new Description for the Insert request, and specify the following
parameters on the General tab:
Extract File
Enter the name of the Extract File that contains the data for Scenario 2. For
to specify the last Extract
this scenario, click the Last Extract button
File. If the Scenario 2 Extract File was not the last Extract File created, use
the Browse button
to locate the file.
Control File
Enter the name of a Control File. You can use the same Control File
repeatedly. If a process executes successfully, there is no particular reason
to save the Control File.
Table Map
Similar to Scenario 1, select the button labeled Local. Edit the Table Map in
the next step of this scenario.
Process Options
For this scenario, select Update/Insert to insert new rows and update
existing rows in the specified destination tables, as follows:
v If the primary key of a row in the source data does not match the primary
key of a row in the destination table, the row is inserted.
v If the primary key of a row in the source data matches the primary key
of a row in the destination table, the row is updated.
Edit the Table Map
You will use the same Table Map specifications from Scenario 1, but the Scenario 2
Table Map will include a Column Map for the ORDERS table.
To display the Table Map Editor, click Tools → Edit Table Map.
Destination
For this scenario, verify the Qualifier matches the DB Alias and Creator ID
of the test database tables created in Scenario 1.
Description
Enter a description of the Table Map.
Column Map ID
For this scenario, leave the Column Map ID box blank. A Column Map ID
is only required when the name of one or more specified Column Maps is
not fully qualified.
Destination Table Names
For this scenario, verify the destination table names match those created in
Scenario 1.
Column Map or “LOCAL”
For this scenario, specify a local Column Map. Type the word LOCAL in the
Column Map or LOCAL column for the ORDERS table. When you click
outside the grid cell, the Status column changes from Unused to
Unknown. The status is Unknown until you define the Column Map in the
next step.
Chapter 2. Processing Flow
45
Edit the Column Map
In an Insert Process, you use a Column Map to map columns of compatible data
between source and destination tables as well as to manipulate data inserted in the
destination table.
In this scenario, you will specify a Column Map that inserts a special value into a
column and defines an aging parameter for another column.
To display the Column Map Editor, right-click in the grid cell of the Table Map
Editor where you typed LOCAL and click Open Column Map in the shortcut
menu.
46
IBM Optim: Move User Manual
The Column Map Editor includes the following entries:
Source
There are two entries under the heading Source:
Extract File, which is automatically populated with the name of the Extract
File specified in the Insert Request.
Table Name, which is automatically populated with the three-part source
table name: dbalias.creatorid.tablename.
Destination
Automatically populated with the three-part destination table name:
dbalias.creatorid.tablename.
Description
Enter a description for the Column Map.
Source Column
The names of the columns in the source table are listed and can be altered
as required. For this scenario, do the following:
v Replace ORDER_SALESMAN in the Source column list by typing the
literal ‘PROMO' in single quotes. This literal value will replace the original
value for the column.
v Replace ORDER_SHIP_DATE in the Source column list with the
following Age Function that will age the shipping date by six weeks and
change the date from a two-digit year to a four-digit year format:
AGE(SF=‘YY/MM/DD',DF=‘YYYYMMDD',+6W)
where:
Chapter 2. Processing Flow
47
AGE
Invokes the Age Function.
SF=‘YY/MM/DD'
The format of the source data.
DF=‘YYYYMMDD' The format of the destination data, limited by the
data type to eight characters.
+6W
The amount by which to age the date.
Status The status of each destination column is displayed. In this scenario, the
following statuses apply:
v The ORDER_ID, CUST_ID, ORDER_DATE, FREIGHT_CHARGES, and
ORDER_POSTED_DATE columns are defined as Equal, since the data
types of the source and destination columns are identical.
v The ORDER_SALESMAN column is defined as String Literal.
v The ORDER_SHIP_DATE column is defined as Age Function.
Note: The data types in the source and destination columns must be
compatible. If not, Status indicates the discrepancy. For complete
information, see the Common Elements Manual.
Click File → Update and Return from the Column Map Editor to return to the
Table Map Editor. Then click File → Update and Return from the Table Map Editor
to return to the Insert Request Editor.
Save the Insert Request
Although you need not save an Insert Request to process it, saving an Insert
Request is recommended. If you choose to save the Insert Request, click File →
Save from the Insert Request Editor to display the Save an Insert Request dialog.
Type a two-part name (identifier.name) in the Enter pattern for Insert Request box
to save the Insert Request. You can give the Insert Request the same name as the
Extract Request, if desired.
Process the Insert Request
Click File → Run from the Insert Request Editor to begin processing the Insert
Request.
The Insert Request Progress dialog is displayed while the Insert Request is
processed. When the Insert Process is done, the Insert Process Report is displayed.
48
IBM Optim: Move User Manual
Chapter 3. Convert Process
You may want to convert data to assure data privacy or to systematically
transform data to meet your application testing requirements. You can import
converted data into a spreadsheet program, insert it into a testing database, or
restore it to a reporting database.
Use the Convert Process to transform data in an Extract File. Specifications for the
Convert Process can be stored as a Convert Request.
When you convert data in an Extract File, you can save the converted data to the
same file or as a different Extract File. Depending upon circumstances, it may be
useful to retain the original file to maintain a consistent starting point. For
example, you can create a set of Extract Files that contain the same data, aged to
different dates, by saving the output of each conversion as a separate Extract File.
Conversely, you can overwrite the original Extract File in order to mask sensitive
data. For details on creating an Extract File, see “Create an Extract Request” on
page 75.
Comma Separated Values File
Additionally, you can convert an Extract (or an Archive) File into a Comma
Separated Values (*.csv) file, which you can then import into a spreadsheet
program or a database. The Convert Request Editor allows you to select the
columns from each joined table that are to be included in the file.
Note: Rows in the Comma Separated Values file are not grouped by table name.
Instead, the rows are presented as a joined view with all selected columns listed as
a single ‘table'. Thus, a parent row is repeated for each child row.
Table Maps
Specify a Table Map in a Convert Request to match tables in the Source File to
tables in the Destination File or to exclude tables from the process. For detailed
information on using Table Maps, see the Common Elements Manual.
Column Maps
Use Column Maps in the Table Map to specify which data to convert and how it is
to be converted. For complete details on using Column Maps, see the Common
Elements Manual.
Run or Schedule
You can process a Convert Request immediately (by clicking File → Run), or you
can save and schedule the request for processing at a later time (by clicking File →
Schedule). You must save the request before it is scheduled, but it is not necessary
to save the request before it is run.
Naming Conventions
Note: The fully qualified name of a Convert Request consists of the following:
identifier.name.
© Copyright IBM Corp. 1994, 2010
49
identifier
Identifier that serves as the prefix for the Convert Request name (1 to 8
characters).
name
Name assigned to the Convert Request (1 to 12 characters).
When you create Convert Requests, it is helpful to use a logical set of naming
conventions to identify the use for each and to organize them for easy access.
Chapter Contents
This chapter explains how to create, maintain, and process a Convert Request,
including how to:
v Specify the Source File containing the data to convert and a Destination File to
contain the converted data.
v Specify the Control File to record information about the process.
v Select or create a Table Map and Column Maps to provide the specifications for
converting the data.
v Specify default parameters for date aging and currency conversions in specified
columns.
v Specify notification options.
v Run, save, and schedule a Convert Request.
v Review, save and print a Convert Process report.
Open the Convert Request Editor
Use the Convert Request Editor to create and maintain requests to convert data.
These requests are stored in the Optim Directory.
There are different ways to open the editor depending on whether you want to
create a new Convert Request or select a Convert Request to edit.
Create a Convert Request
Use this task to create a Convert Request.
About this task
Do the following to Create a Convert Request:
Procedure
1. Click File → New → Convert from the main window to open the Convert
Request Editor.
2. Specify the name of a Source File, a Control File, and a Destination Extract File.
3. Specify a Table Map:
v If you select Local, you must then click Tools → Edit Table Map to define a
Table Map.
v If you select Named, specify the name of an existing Table Map or specify a
name and click Tools → Edit Table Map to define a new Table Map.
Results
These steps are the minimum required to create a Convert Request. After you
create a request, you can run the process immediately or save the request and
50
IBM Optim: Move User Manual
schedule it. Because the options to create and modify a Convert Request are
similar, see “Convert Request Editor” on page 52 for details.
An alternate method for opening the Convert Request Editor is to click Convert
from the Actions menu in the main window. By default, the last Convert Request
you edited is shown. Your next step depends on your purpose:
v To create a new Convert Request, click File → New from the Convert Request
Editor.
v To create a new Convert Request modeled on an existing one, open the desired
Convert Request and click File → Save As from the Convert Request Editor.
v To create and store a copy of the active Convert Request and continue editing,
click File → Save Copy As from the Convert Request Editor.
Select a Convert Request to Edit
Use this task to select a Convert Request to edit.
About this task
Do the following to Select a Convert Request to Edit:
Procedure
1. Click File → Open in the main window to open the object selection dialog.
2. Double-click to select Convert Request and expand the object list.
3. Double-click the Convert Request Identifier to display a list of Convert
Requests.
4. Double-click the desired Convert Request to open the Convert Request Editor.
Open a Convert Request dialog
The Open a Convert Request dialog is divided into two areas. The object identifiers
are listed on the left and the associated objects appear on the right. The list of
objects varies depending on the identifier you select.
Specify a Pattern to limit the list of requests in the Open a Convert Request dialog.
A Convert Request name has two parts: identifier.name. The Pattern must also have
two parts. You can use the % (percent) wild card to represent one or more
characters or use the _ (underscore) wild card to represent a single character in an
Chapter 3. Convert Process
51
object definition name. (The underscore must be selected as the SQL LIKE
character on the General tab of Personal Options.)
Note: After you specify a Pattern, click Refresh to redisplay the list based on your
criteria.
Convert Request Editor
You can use the Convert Request Editor to create, modify, or delete Convert
Requests stored in the Optim Directory.
Description
Enter text to describe the purpose of the Convert Request (up to 40 characters).
Server Name
If the optional Optim Server component is installed on your network, you can
delegate resource-intensive Convert Request processing (for example, when the
source file contains a large number of tables or rows) to a machine hosting Optim
Server.
52
IBM Optim: Move User Manual
Click the down arrow to select a machine hosting Optim Server, or select Local to
process the request on the local workstation.
Note: If the Optim Server is not enabled at your site, the Server Name box is
disabled.
Tabs
The Convert Request Editor displays tabs that allow you to specify parameters and
select options to define and maintain Convert Requests.
General
Specifications for the process, including the names of the Source File, the
Control File, and the Destination Extract File. Each time you open the
editor, the General tab is shown first.
Comma Separated
Options for identifying the tables to be included in a Comma Separated
File.
Age Function
Default parameters for aging data in columns defined with an Age
function in a Column Map.
Global Aging
Default parameters for aging data in columns that have a native date data
type.
Currency
Default Currency Table and define currency conversion parameters for
columns with a native currency data type.
Report Options
Parameters for displaying errors and aging specifications on the process
report.
Notify Options for automatic email notification of the success or failure of the
process.
Menu Commands
In addition to the standard File commands, you can select the following commands
from the other menus in the Convert Request Editor.
Tools Menu
Edit Table Map
Open the Table Map Editor to create or edit a Table Map for use
with the active Convert Request only. For complete details on
creating and maintaining Table Maps, see the Common Elements
Manual.
Edit ACL
Open the Access Control List Editor to secure the Convert Request
with an Access Control List. Available when Object Security is
enabled.
Delete ACL
Delete the Access Control List securing the Convert Request.
Available for secured Convert Requests only.
Options Menu
Chapter 3. Convert Process
53
Show Aging/Show Currency
Select these commands to switch between hiding or displaying the
corresponding tab.
General Tab
To convert data, you must specify the Source File and other parameters.
Source File
The name of the Extract File that contains the data to convert.
Additionally, you can enter the name of an Archive File that you want to convert
to a Comma Separated File. If you enter an Archive File and do not select Create
Comma Separated File, an error is displayed, and you will not be able to save or
run the Convert Request.
Note: When you choose to convert an Extract File as part of an Extract Process,
Source File is automatically populated with the name of the Extract File from the
Extract Request Editor, and cannot be modified.
54
IBM Optim: Move User Manual
Control File
Enter the name of a Control File. This file is used to track the success or failure of
processing for each row in the Source File. Control Files are given a .cf extension
by default.
If you specify the name of a Control File that already exists, a dialog prompts you
to confirm that you want to overwrite the file when you run the Convert Request.
To disable this confirmation feature, you can change a setting in Personal Options.
Destination File
Enter the name of the Destination File for the converted data. To save converted
data to the original Source File, specify the path and name of the Source File, or
leave blank.
A converted file does not include any object definitions present in the Extract File.
Therefore, if the Destination File is also the Source Extract File, object definitions in
the Source File are discarded. If you want to write the Extract File to removable
media, specify the path to the desired device.
If you do not specify a path for file names, the request uses the drive and directory
defined in Personal Options as the default Data Directory.
Notes:
1. You can save converted data to the original Source File only when the Source
File is on fixed media, and the default segment size value for fixed media
(specified in Personal Options) is zero.
2. To browse a converted Extract File, right-click the Destination File and select
Browse from the shortcut menu. For details on the Browse Utility, see the
Common Elements Manual.
If you are converting an Extract (or Archive) File to a Comma Separated File, the
request adds the suffix .csv if one is not specified. Additionally, if you are
converting to a Comma Separated File, the name of the Destination File cannot
match the name of the Source File.
Table Map Options
Specify a Table Map to match tables in the Source File with destination tables or to
exclude tables in the Source File from the request. You cannot save or process a
Convert Request without a valid Table Map.
Within a Table Map, specify a Column Map for any pair of tables to:
v Map source and destination columns that are compatible, but have unlike
names.
v Specify destination column values other than the source column values.
v Ignore specific columns.
Click Tools → Edit Table Map from the Convert Request Editor to open the Table
Map Editor. For details on how to create, edit, or merge Table Maps, see the
Common Elements Manual.
Chapter 3. Convert Process
55
Local
Select this option to create a Table Map to be used only with the active
Convert Request. Local Table Maps are saved as part of the Convert
Request.
Named
Select this option to create a new Table Map or select an existing Table
Map to be used with the Convert Request. You must specify a name for
the Table Map you want to create or the name of the existing Table Map
you want to use.
Note: If changes are made to database tables since the last time a Table
Map was used, the specifications may no longer be valid, and a warning
message is displayed.
Table Map Name
Name of the new or existing Table Map to use with the Convert Request.
A Table Map name has two parts: identifier.name.
identifier
Identifier (1 to 8 characters) to identify the Table Map.
name
Name of the Table Map (1 to 12 characters).
Always View Table Map
Select this check box to open the Table Map Editor any time you save or
run a Convert Request. This option provides an opportunity to review the
Table Map specifications before you convert the data. If you clear this
check box, the Table Map Editor opens only when needed (for instance,
when the specified Table Map does not include all the tables in the Extract
File).
Discard Row Limit
The Convert Request discards rows that cannot be processed. For example, a row
is discarded when the data being inserted is not valid for the data type of the
destination column. Enter the number of rows that can be discarded, to a
maximum of 99999999. The process stops when the specified number is reached.
v To stop the process if a single row is discarded, specify 1 as the maximum.
v To set no limit to the number of rows that can be discarded, specify zero (0) or
leave blank.
Compress Destination Extract File
Select this check box to automatically compress the destination Extract File for
storage. However, if the Create Comma Separated File check box is selected, this
check box will be unavailable.
Create Comma Separated File
Select this check box to convert the Source File to a Comma Separated Values (.csv)
file, which can then be opened in a text editor or imported into a spreadsheet or
database application. When Create Comma Separated File is selected, the request
adds the suffix “.CSV” to the Destination File if a suffix is not specified.
Selecting Create Comma Separated File also adds the Comma Separated tab to the
Convert Request Editor and allows an Archive File to be specified as a Source File.
56
IBM Optim: Move User Manual
Note: Column Maps are not used to create a Comma Separated Values file. If a
Column Map is specified and you are converting to a Comma Separated Values
file, a warning message will be displayed during the Convert Process.
Include File Attachments
Select this check box to include file attachments in the destination file. File
attachments are not converted.
Comma Separated Tab
Use the Comma Separated tab to select the tables and columns to include in a
Comma Separated Values (.csv) file.
On the tab, select a Start Table from the Source File (an Extract or Archive File),
and then join any additional tables to the display. When finished, open the Modify
Column List dialog and select columns to include in the Comma Separated Values
file.
Note: The Comma Separated tab is available only when Create Comma Separated
File on the General tab is selected.
Chapter 3. Convert Process
57
Create a Comma Separated Values file
Use this task to create a Comma Separated Values file.
About this task
Do the following to create a Comma Separated Values file:
Procedure
1. On the General tab of the Convert Request Editor, select the Create Comma
Separated File check box.
v Once selected, you can change the name of the Source File to an Archive File.
v Additionally, Convert adds the suffix of .csv to the Destination File, if none is
provided.
2. Click the Comma Separated tab.
3. Click the down arrow to select the desired Start Table.
4. Right-click a table and select Add Joined Table to display the Select Join Table
dialog, which allows you to join one or more tables to the Start Table (or any
additional table, once joined).
5. On the Select Join Table dialog, select the desired tables and then click OK.
6. If more than one relationship between the two tables exists, the Select a Join
Relationship dialog is displayed. Select the desired relationship and click OK.
7. Right-click a table name and select Modify Column List to select the columns
to be included in the Comma Separated Values file.
8. Click the Run button
Separated File.
to run the Convert Request and create the Comma
Results
Select the table in the Source File (Extract or Archive File) to use as the basis for
converting data. Click the down arrow to select a table name from those in the
Source File. Once you have selected the Start Table, it is shown as the first entry in
Joined Tables.
Lists the tables in the Source File to be included in the Comma Separated Values
file. To add additional tables, right-click the name of a table in the list and select
Add Joined Table, which opens the Select Join Table dialog, allowing you to join
related tables to the list.
After you select the tables to be included in the Comma Separated Value file, you
must specify the columns in the selected tables to be included in the file.
Right-click the name of a joined table and select Modify Column List to open the
Column and Order Specification dialog. For more information, see “Column and
Order Specification Dialog” on page 61.
To expand a table in the list, click the Plus icon . The expanded list shows the
parent and child tables. To condense the list of tables, click the Minus icon .
Expanding or condensing the table list does not affect whether a table is included
in the Comma Separated Values file.
To remove an existing table, right-click the table name and select Remove Joined
Table.
58
IBM Optim: Move User Manual
Select Join Table Dialog
The Select Join Table dialog lists tables in the Source File that are related to the
table selected on the Comma Separated tab.
Table
Name of the table to which you want to join one or more related tables.
Join to Table
Lists tables in the Source File related to the current table.
Number of Relationships
Lists the number of relationships between the related table and the current
table.
Select one or more table names from the list and click OK. If a single relationship
between the tables exists, the table is joined automatically.
Note: If only one relationship exists between the current table and an eligible join
table, you can select Open Relationship from the shortcut menu to open the
Relationship Editor. If you select a join table with more than one relationship, you
can select Open Relationship from the shortcut menu on the Select a Join
Relationship dialog to open the Relationship Editor. For more information see n the
Common Elements Manual.
Specify a Relationship for Joining
If more than one relationship for a table exists for a table you want to join, you
must choose a relationship from the list on the Select a Join Relationship dialog.
Chapter 3. Convert Process
59
Join From
Name of the table to which you want to join a related table.
Join To
Name of the table selected in the Join Table dialog.
Relationship Name
The fully qualified name for a relationship consists of the following:
dbalias
Alias of the database where the child table is defined (1 to 12
characters).
creatorid
Creator ID assigned to the child table (1 to 64 characters).
tablename
Name of the child table (1 to 64 characters).
constraint
Name assigned to the relationship (1 to 64 characters).
Type
Indicates whether the relationship is generic, explicit (Optim), or defined to
a specific DBMS.
Usage Indicates whether the relationship was used to extract rows during the
Archive or Extract Process:
Used
Relationship was used to extract rows.
Ref
The Join From or Join To table is a Reference Table, and the
relationship was not used to extract rows.
Unsel The relationship was deselected in the Access Definition, so the
relationship was not used to extract rows.
60
IBM Optim: Move User Manual
Index Exists
Indicates that this relationship has been used to join the Join From and Join
To tables during a Browse session.
When a relationship is used to join tables during a Browse session, an
index is created. This index stores primary key and foreign key
information to expedite the retrieval of data.
Note: You can select Open Relationship from the shortcut menu to open the
Relationship Editor. For more information, see the Common Elements Manual.
Column and Order Specification Dialog
Use the Column and Order Specification dialog to include columns from the tables
listed on the Comma Separated tab.
Note: Rows in the Comma Separated Value file are not grouped by table name.
Instead, the rows are presented in joined view, and all selected columns are listed
as a single ‘table'. A parent row is repeated for each child row.
Table
Click the down arrow to select the name of a joined table.
Columns in Generated Row
The names of the columns (from all tables) to be included in the Comma
Separated Value file. Double-click the grid to remove a column name from
the list. Additionally, you can right-click a column name to display the
shortcut menu:
v Remove Column –– remove column from the list.
v Remove Columns in Same Table –– remove all columns from the list
that share the same table.
v Remove All Columns –– remove all columns from the list.
Chapter 3. Convert Process
61
Available Columns
The names of the available columns in the specified table. Double-click the
grid to add a column name to the Columns in Generated Row list.
Note: Columns in the specified table(s) with a Binary, Bit, BLOB, or CLOB
data type are not available for selection.
Additionally, you can right-click a column name to display the shortcut
menu:
v Add Column –– add column to the Columns in Generated Row list.
v Add All Columns –– add all columns from currently selected table to
the Columns in Generated Row list.
Age Function Tab
Use the Age Function tab to specify parameters for aging data when using the Age
function in a Column Map.
These values are applied to columns for which you specify the Age function as
AGE(DEF) or AGE(RU=DEF). These values are also used to complete the
specifications for date adjustment values in columns defined with the Age function
when the specifications are incomplete.
62
IBM Optim: Move User Manual
Date Adjustment Values
None
Specifies that an aging increment is not used.
Years, Months, Weeks, Days
Adjusts the date incrementally by the specified number of years, months,
weeks, and/or days. Use a minus (-) sign to decrement the date. The plus
(+) sign is not required to increment the date.
Years
Number of years (-2500 to +1581) to adjust the date.
Months
Number of months (-30000 to +30000) to adjust the date.
Weeks Number of weeks (-30000 to +30000) to adjust the date.
Days
Number of days (-99999 to +99999) to adjust the date.
Specific Year
Adjusts the date to a specific four-digit year (1582 to 3999).
Specific Date
Adjusts the date to a specific date. To select a date from a perpetual
calendar, click on the down arrow. Click the arrow buttons to set the
month and year. Click on a day to set the day of the month.
Chapter 3. Convert Process
63
Note: If you do not specify a date, the system (current) date displays. The
date format is based on the Regional Settings on the Control Panel of your
computer.
Base/Target
Adjusts the date incrementally by a calculated aging amount. The aging
amount is the number of days between the Base date and the Target date.
To select a base or target date from a perpetual calendar, click on the down
arrow. Click the arrow buttons to set the month and year. Click on a day to
set the day of the month.
Base
Specify an explicit start date for calculating the aging amount.
Target Specify an explicit end date for calculating the aging amount.
Multiple/Rule
Adjusts the date by applying the specified date aging rule the specified
number of times.
For example, if the rule is defined as NEXTPAYDAY and you specify 4 as
the multiple, the date is adjusted from the source date to the fourth
NEXTPAYDAY.
Multiple
Number of times (1 to 30000) to apply the specified rule for date
aging.
Rule
Name of the rule to use.
Date Adjustment Options
Calendar
Enter the name of the calendar to use by default. To select from a list of
available calendars, click the down arrow.
Rule
Enter the name of the rule to use by default. To select from a list of
available rules, click the down arrow. (You can define calendars and rules
by selecting Utilities → Calendar. For details on defining Calendars and
rules, see the Common Elements Manual.)
Century Pivot
Enter the value to use to determine the appropriate century when a date
value is defined with a twodigit year. If you do not specify a value, 65 is
used by default. For example, if you specify 55 as the Century Pivot:
v All two-digit years equal to or greater than 55 are assumed to be in the
20th century.
v All two-digit years less than 55 are assumed to be in the 21st century.
Exception Options
Select the following exception options to handle special date values when aging
data. Rather than treat these dates as errors, the dates are moved directly from the
source to the destination if the column attributes are identical.
v Process rows with invalid dates — If you select this check box, rows with
columns that contain invalid dates are processed and the results are written to
the destination. If you clear the check box, the rows are discarded and are noted
in the Control File.
64
IBM Optim: Move User Manual
v Process Rows with skipped dates — If you select this check box, rows with
columns formatted as skipped dates are processed and the results are written to
the destination. If you clear the check box, the rows are discarded and are noted
in the Control File.
At times, special values called skipped dates are used to indicate special handling
or unique conditions. To determine whether or not to skip a date, the date aging
function evaluates each date for the following:
v If a date column contains all spaces, hexadecimal zeros (low values), or
hexadecimal 'FF' (high values), the date is skipped.
v If a date column contains a skipped date value, the value is parsed based on the
specified date format or exit routine.
The date aging function recognizes the following as skipped dates:
Date Format
Y/M/D
Skipped Date Value
1999/99/99
Date Format
Y/M
1999/999
9999/99/99
9999/999
9999/12/31
1900/0
1900/0/0
2000/0
2000/0/0
0/0
0/0/0
Y
1/1/1
Y/J
Skipped Date Value
1999/999
0
M/D
9999/999
1900/0
99/99
0/0
M
2000/0/0
0/0
9999
99
0/0
D
9/9
0/0
This list is intended to be as comprehensive as possible. If you require additional
skipped dates, contact Optim Support.
Global Aging Tab
Use the Global Aging tab to specify parameters for aging data in columns defined
with a native date data type. Global Aging parameters apply to all date columns
not specifically defined by an Age function in a Column Map.
Note: The parameters shown on the Global Aging tab are the same as those
shown on the Age Function tab. For information about each parameter, see “Age
Function Tab” on page 62.
Currency Tab
Use the Currency tab to specify the default Currency Table to use when the
Currency function is defined in a Column Map. Specify global parameters for
currency conversions in columns that have a native currency data type.
Chapter 3. Convert Process
65
Default Currency
Specify the Currency Table to use when the Currency function is specified in a
Column Map.
Global Currency Options
Global Currency
Specify the default Currency Table to use for currency conversions in
columns that have a native currency data type.
From Type To Type
Enter specific currency types for the source and destination currency when
converting currency values in columns that have a native currency data
type.
Triangulate
Select this check box to convert the specified source currency to the euro
dollar, then convert the euro dollar value to the specified destination
currency.
66
IBM Optim: Move User Manual
Report Options Tab
Specify which information is included in the Convert Process Report on the Report
Options tab.
Reporting Options
Report errors
Select this check box to specify that the Convert Process Report includes
the list of errors encountered during the Convert Process.
Report Invalid Dates
Select this check box to include rows with invalid dates in the Convert
Process Report when you select the corresponding Exception Option on the
Age Function or Global Aging tab.
Report Skipped Dates
Select this check box to include rows with skipped dates in the Convert
Process Report when you select the corresponding Exception Option on the
Age Function or Global Aging tab.
Chapter 3. Convert Process
67
Maximum number per table
Specify the maximum number of errors, invalid dates and skipped dates
per table to include in the Convert Process Report.
Maximum number per run
Specify the maximum number of errors, invalid dates and skipped dates
per run to include in the Convert Process Report.
Aging Option
Report Aging Summary
Select this check box to include a summary in the Convert Process Report
of any aging parameters specified for the Convert Process. A report that
includes the Aging Summary can be printed in landscape mode only.
Notify Tab
Use the Notify tab to specify options and addresses for automatic email
notification of the success or failure of the process. The process report generated
when the process completes is automatically sent as an attachment.
Process a Convert Request
You can process a Convert Request at any time. However, if you create a new
Convert Request and want to use it again, you must save the request.
You can run a Convert Request immediately or schedule the Convert Request.
Note: Depending on how Optim is configured at your site, you may encounter a
logon prompt during processing. See the Common Elements Manual for information
about the DB Alias Connection Logon and Optim Directory Connection Logon
dialogs.
Schedule a Convert Request
To schedule a Convert Process to run once or repeatedly at a specified future time,
save the Convert Request, and click File → Schedule.
v Processing is initiated at the scheduled time; you do not review the process as it
is performed.
v If warning conditions exist, processing continues without prompting, depending
on the Stop on Error parameter you specified on the Steps tab of the Scheduling
Job dialog.
v During processing, if an error occurs, processing stops.
For details on scheduling, see the Common Elements Manual.
Run a Convert Request
To process a Convert Request immediately, select File → Run. It is not necessary to
save the Convert Request before it is run.
v Before processing begins, the request is verified. If warning conditions exist, you
can review the details in the Warnings dialog, and choose to continue or cancel
processing.
v During processing, if an error occurs, processing stops.
68
IBM Optim: Move User Manual
A progress dialog and status messages provide information while the request is
processing. When processing completes, or stops because of an error, you can
review the details in the Process Report. You can also browse the Control File to
review process details.
Convert Request Progress Dialog
When the Convert Process begins, the Convert Request Progress dialog displays
status information.
Totals
Rows to be converted:
Total number of rows in the Source File to be processed.
Rows converted:
Total number of rows that were processed.
The totals in the Convert Request Progress dialog are revised after a number of
rows (specified on the Actions tab in Personal Options) are converted for each
table, and when the conversion for one table completes and the process begins for
the next table. (See the Common Elements Manual for more information.)
Current Table
Converted
Total number of rows converted.
Failed Total number of rows that could not be converted and were discarded.
Command Button
Cancel Process
To stop the process, click Cancel Process. A confirmation dialog opens.
Click Yes to stop the process and return to the Convert Request Editor, or
click No to continue processing.
The Status Bar at the bottom of the dialog displays the name of the table being
processed or a description of the action being performed.
Chapter 3. Convert Process
69
Convert Process Report
The Convert Process generates a Convert Process Report that provides general
information and statistics about the Convert Process, as shown in the following
example.
The Convert Process Report displays the following information:
v Name of the Convert Request (or “Untitled” if you did not save the request).
v Name of the Optim Server or “(Local)”, for client workstation.
v Name of the Source File used as input to the process.
v Name of the Control File specified in the Convert Request.
v Name of the generated Destination Extract File, or Destination Extract File
segments.
v Name of the Table Map or “LOCAL”, as specified in the Convert Request.
v Indicator (“Skipped” or “Processed”) for processing file attachments.
v User ID of the user requesting the Convert Process.
v User ID of the Server for the Convert Process.
70
IBM Optim: Move User Manual
v
v
v
v
Date and time the Convert Process started.
Date and time the Convert Process completed.
Elapsed time for the Convert Process to complete.
Status of the process.
Errors
If any errors or warnings occur during processing, a list of the errors or warnings
is provided. Review the list of errors that caused processing to stop. For example,
an internal error condition exists when the process exceeds the discard row limit or
if you are not authorized to access a particular database table.
Process Summary
Statistics are provided for the converted data:
v Total number of Tables Processed.
v Total number of Rows Extracted.
v Total number of Rows Converted.
v Total number of Rows with Errors.
Row Details
Information is provided for each table:
v Number of rows extracted.
v Number of rows converted.
v Number of failed rows.
v List of tables used in the Convert Process. The tables are listed in the same order
as in the Extract File.
Save the Report
To save the report to a file, click File → Save As to open the Windows Save dialog.
Print the Report
To print the report, click File → Print to open the Windows Print dialog.
Redisplay the Report
If you close the report and want to redisplay it, click File → Redisplay Results, and
then click Current to redisplay the report from the last Convert Process run, or
click All to display a list of all retained Convert Process reports.
For information about retaining process reports, see the Common Elements Manual.
Chapter 3. Convert Process
71
72
IBM Optim: Move User Manual
Chapter 4. Extract Process
Use the Extract Process to copy a set of related rows from one or more tables and
save the rows to an external Extract File. Specifications for the Extract Process are
stored as an Extract Request.
The Extract Request specifies the set of parameters needed to extract data and
object definitions from source tables and the Extract File in which to store the
extracted information.
The Extract Process always extracts definitions for tables and columns. These
definitions are used to create the destination tables, if necessary. You can also
choose to extract other object definitions, including primary keys, relationships,
and indexes.
You use an Extract File to Convert, Extract, Insert, or Load data, and to Create
objects in a destination database. An Extract File can be used repeatedly and
simultaneously by many users.
Storage Media for Extract Files
You can create Extract Files on fixed or secondary storage media. Fixed media
include local hard drives, network drives, or servers. Examples of secondary media
include diskettes and zip disks.
Factors that influence the type of storage to use depend on your business
objectives. Specific factors to consider include:
v the cost effectiveness of each type of media
v longevity of storage required
v mandates for off-site storage, security, and resource management (time and
personnel).
For example, if quick access to Extract Files is of primary importance, you may
decide to store Extract Files on the hard disk. However, if the need for off-site
storage and portability is the primary consideration, secondary media would be
the more logical choice.
Durability of the media type could be another consideration — for Extract Files
you must retain for an extended period of time, a network storage system may be
the best choice. Conversely, tape storage might be more desirable for short-term
storage, due to the large capacity and cost-effectiveness of the media.
Secondary Media
Although Optim can create Extract Files on fixed media, you can also direct Extract
Files to secondary media, e.g., a drive for removable media or a NetApp SnapLock
device — simply by providing the path to the appropriate device with the file
name. You can also use Optim with a hierarchical storage management (HSM)
system.
You cannot directly specify a tape drive as the path in order to place an Extract
File on tape. However, you can copy Extract Files from disk to tape or other
© Copyright IBM Corp. 1994, 2010
73
secondary media using the appropriate vendor software and remove the files from
disk. (Note that you must arrange to return a file to disk for processing or
browsing.)
If your facility uses an HSM system, files can be migrated to tape or other
secondary media and removed from disk in the normal course of HSM processing.
You can transfer management of Extract Files to the Symantec VERITAS Enterprise
Vault by providing the path to the device with the file name.
Support for Secondary Media
When an Extract File is created on removable media, the capacity of the media
must be considered. If an Extract File is larger than the space on the target media,
the file must be divided into segments to allow the file to span more than one
volume. You can specify segment size values for fixed and removable media in
Personal Options. See the Common Elements Manual for further information.
Cross-Platform Compatibility
The Extract Process can access data from a variety of databases (DB2, Oracle,
Sybase ASE, SQL Server, and Informix). You can create Extract Files to move data
between the Windows and MVS™ platforms. An Extract File created with the
Optim solution for the IBM z/OS™ environment can also be used with Move. (An
Extract File created using Move, however, is not compatible with the Optim z/OS®
Solution. Use Move to move data from a Windows platform into DB2 UDB for
z/OS.)
Run or Schedule
You can process an Extract Request immediately by clicking File → Run, or you can
schedule the request for processing at a later time by clicking File → Schedule. You
must save the request before it is scheduled, but it is not necessary to save the
request before it is run.
Naming Conventions
The fully qualified name of an Extract Request consists of: identifier.name.
identifier
Identifier that serves as the prefix for the Extract Request name (1 to 8
characters).
name
Name assigned to the Extract Request (1 to 12 characters).
When you create Extract Requests, it is helpful to use a logical set of naming
conventions to identify the use for each and to organize definitions for easy access.
Section Contents
This section explains how to create, maintain, and process an Extract Request,
including how to:
v Specify the Extract File to store data.
v Select or create the Access Definition for an Extract Request.
v Select the types of objects to extract (e.g., primary keys, relationships, and
indexes).
74
IBM Optim: Move User Manual
v Choose Point and Shoot list options. A Point and Shoot list is used to select
specific rows from the Start Table to extract.
v Assign variable default values.
v Specify notification options.
v Specify Convert options.
v Run, save, and schedule an Extract Request.
v Review, save, and print the Extract Process Report.
Open the Extract Request Editor
Use the Extract Request Editor to create and maintain requests to extract data.
Extract Requests are stored in the Optim Directory.
There are different ways to open the editor, depending on whether you want to
create a new Extract Request or edit an existing Extract Request.
Create an Extract Request
Use this task to create an Extract Request.
About this task
Do the following to create an Extract Request:
Procedure
1. Click File → New → Extractfrom the main window to open the Extract Request
Editor.
2. Specify the name of an Extract File.
3. Select the type of Access Definition: Named or Local. If you select Named,
specify the name of a new or existing Access Definition.
4. Click Tools → Edit Access Definition to create or edit an Access Definition.
Results
These steps are the minimum required to create an Extract Request. After you
create a request, you can run the process immediately or save the request and
schedule it. Because the options to create an Extract Request and to modify an
Extract Request are similar, see “Extract Request Editor” on page 77 for complete
details.
An alternate method for opening the Extract Request Editor is to click Actions →
Extract from the main window. By default, the last Extract Request you edited will
display. Your next step depends on your purpose:
v To create a new Extract Request, click File → New from the Extract Request
Editor.
v To create a new Extract Request modeled on an existing one, open the desired
Extract Request and click File → Save As from the Extract Request Editor.
v To create and store a copy of the current Extract Request and continue editing,
click File → Save Copy As from the Extract Request Editor.
Select an Extract Request to Edit
Use this task to select an Extract Request to edit.
Chapter 4. Extract Process
75
About this task
Do the following to select an Extract Request to edit:
Procedure
1.
2.
3.
4.
Click File → Open from the main window to open the object selection dialog.
Double-click to select Extract Request and expand the object list.
Double-click the Extract Request Identifier to display a list of Extract Requests.
Double-click the desired Extract Request name to open the Extract Request
Editor.
Open an Extract Request dialog
The Open dialog is divided into two areas. The object identifiers are on the left
and associated objects appear on the right. The list of objects varies to reflect the
identifier you select.
You can use a Pattern to limit the list of requests in the Open dialog. An Extract
Request name consists of two parts: identifier.name. The Pattern must also have two
parts. You can use the % (percent) wild card to represent one or more characters or
use the _ (underscore) wild card to represent a single character in an object
definition name. (The underscore must be selected as the SQL LIKE character on
the General tab of Personal Options.)
Note: After you specify a Pattern, click Refresh to redisplay the list according to
your criteria.
76
IBM Optim: Move User Manual
Extract Request Editor
Use the Extract Request Editorto create, modify, or delete Extract Requests stored
in the Optim Directory.
Description
Enter text to describe the purpose of the Extract Request (up to 40 characters).
Server Name
If the optional Optim Server component is installed on your network, you can
delegate resource-intensive Extract Request processing (for example, when
extracting a large number of tables or rows) to a machine hosting Optim Server.
Click the down arrow to select a machine hosting Optim Server, or select Local to
process the request on the local workstation.
Note: If the Optim Server option is not enabled at your site, the Server Name box
is unavailable.
Tabs
The Extract Request Editor displays tabs that enable you to specify extract
parameters and select options for running Extract Requests.
Chapter 4. Extract Process
77
Each tab in the editor serves a unique purpose:
General
Provide parameters for the Extract Process, including the Extract File name,
Access Definition, items to extract, and a limit for the number of rows to
extract. The General tab is shown first.
Objects
Indicate the type of objects to extract. When you open the Extract Request
Editor for the first time, all objects are selected by default. The Objects tab
appears only when you select Objects or Both in the Items to Extract box
on the General tab.
Point and Shoot
Specify options to override the Point and Shoot specification in the Access
Definition.
Variables
Define values for substitution variables. (This tab appears only if variables
are specified in the Access Definition.)
Object List
Specify other non-related objects for extraction.
Notify Specify options for automatic email notification of the success or failure of
the process.
Convert
Specify parameters for an optional Convert Process following the Extract
Process. (This tab appears only when you select Run Convert After Extract
on the General tab.)
Menu Commands
In addition to the standard File and Edit menu commands, you can select the
following commands from the Tools menu:
Edit Access Definition
Opens the Access Definition Editor. Edit the list of tables, select
relationships, and define selection criteria in the Access Definition used to
select the data to extract. See the Common Elements Manual for further
information.
Edit Point and Shoot
Opens the Point and Shoot Editor. Create a list of Start Table rows to
extract. See the Common Elements Manual for further information.
Edit Convert Request
Opens the Convert Request Editor. You can specify parameters for
converting the Extract File at the completion of the Extract Process. See
Chapter 3, “Convert Process,” on page 49 for further information.
78
IBM Optim: Move User Manual
General Tab
Use the General tab parameters to define the data to extract.
Extract File
Enter the name of a new or existing Extract File to store the extracted data. Extract
Files have an .xf extension by default. If you want to write the Extract File to
secondary media, specify the path to the desired device.
If you do not include a path with the file name, the default Data Directory
specified in Personal Options is used. Network drives resolve to the appropriate
Universal Naming Convention (UNC) name, as applicable.
You can browse the contents of an existing Extract File by right-clicking its name
and selecting Browse from the shortcut menu. For details on the Browse Utility,
see the Common Elements Manual.
If you specify the name of a file that already exists, a dialog prompts you to
confirm that you want to overwrite the file when you run the Extract Request. To
disable this feature, see Personal Options, the Common Elements Manual.
Access Definition
Local
Select this option to create an Access Definition that is stored and can only
be used with the Extract Request.
Chapter 4. Extract Process
79
Named
Select this option to specify the name of a new or existing Access
Definition. A named Access Definition can be used with more than one
process request. The name of an Access Definition is composed of two
parts: identifier.name.
identifier
Qualifier to identify the Access Definition (1 to 8 characters).
name
Name of the Access Definition (1 to 12 characters).
An Access Definition identifies the Start Table and other tables to be traversed
during the Extract, as well as the relationships that govern traversal paths. You can
define an Access Definition to include:
v Selection criteria for one or more tables.
v A Point and Shoot list. Use Point and Shoot to select specific rows from a Start
Table to begin extracting data.
v Substitution variables to be used with selection criteria or SQL statements.
v Parameters to select rows based on values in a particular column in the Start
Table.
When you specify the name of an existing Access Definition in the Extract Request,
you can use the definition as it is, or you can edit it. If changes to database tables
have been made since the last time the Access Definition was used, the
specifications may no longer be valid. If any specification is invalid, a warning
message is displayed when you open, save, or use the Access Definition.
To edit an Access Definition, click Tools → Edit Access Definition from the Extract
Request Editor to open the Access Definition Editor. For details, see the Common
Elements Manual.
Items to Extract
Select the types of objects to extract.
Data
Extract data rows only.
Objects
Extract object definitions only.
Both
Extract data rows and object definitions.
Note: When you select Objects or Both, you must select types of objects to extract
on the Objects tab or specify explicit objects to extract on the Object List tab, or
both.
Row Limit
Maximum number of rows to extract. You can specify a row limit if you are
extracting rows by selecting Data or Both. Clear the Row Limit box to use the
maximum limit. The row limit for an Extract Process is any number from 1 to the
maximum limit specified in Product Options. For more information, see the
Installation and Configuration Guide.
80
IBM Optim: Move User Manual
Database Connections
Increase the number of concurrent database connections for the Extract Process.
Increasing database connections improves performance when processing large
quantities of data by allowing multiple threads to extract rows concurrently.
To increase the maximum number of connections, select an even number from 2 to
the site maximum as specified on the Personal Options dialog. This option is
available only if Maximum Database Connections on the Database tab of Product
Options is 2 or greater.
Note:
v For performance reasons, you can only select an even number of maximum
database connections.
v Increasing the number of database connections to process small amounts of data
may decrease performance, rather than increase it.
Run Convert after Extract
Select this check box to specify parameters for running a Convert Process
immediately following the Extract Process. When you select this check box, the
Convert tab in the Extract Request Editor is enabled. Use the Convert tab to
specify whether to use a named or local Convert Request.
The Convert Process can transform or mask data in the Extract File. To specify or
modify parameters for the Convert Process, click Tools → Edit Convert Request to
display the Convert Request Editor. See “Open the Convert Request Editor” on
page 50.
Generate Statistical Report
This check box is selected by default to include statistical information in the
Extract Process Report. For details, see “Statistical Information” on page 99.
Note: Statistical information may indicate whether you can improve performance
by overriding the default method (scan or key lookup) of accessing a table. For
details, see the Common Elements Manual.
Process File Attachments
Select this check box to extract file attachments specified in the Access Definition.
Compression Options
Select this box to choose options for compressing the Extract File or specific tables
in the Extract File. The Compression Options dialog displays:
Chapter 4. Extract Process
81
This dialog has the following options:
Compress Extract File
Select this check box to compress the Extract File. Next, select a
Compression Model.
Compression Models:
Choose the type of compression from this drop-down list:
Inline Compression
Data is compressed as it is extracted and before it is
written to the Extract File. Inline Compression has lower
I/O and shorter elapsed time for the Extract, though it
requires longer time to be connected to the database, when
compared with Post Compression.
Post Compression
Data is compressed after it is extracted and written to the
Extract File. Compared with Inline Compression, Post
Compression has a higher I/O rate and a longer elapsed
time for the Extract, though the connection to the database
is for a shorter time.
Enable Active Compression
Select this check box to perform compression on an individual table basis.
Default Table Threshold:
Specify the default threshold for compressing the tables in the
Extract File. Choose a value for the percentage of reduction in table
size that you expect compression to achieve. For example, if you
specify a value of 20, Optim compresses any table in the Extract
File that can be reduced in size by 20 percent or more. Allowable
values are 1 - 99.
Table Threshold:
Select this box to specify compression options for individual tables.
The Compression Table Threshold dialog displays:
82
IBM Optim: Move User Manual
Threshold
For each table, specify ON or OFF for compression or specify a value for
Optim to use as the compression threshold. If no value is specified for a
table, the default is to set compression on and use the Default Table
Threshold. Allowable values are:
ON
Sets compression ON for this table. This is the default. The Default
Table Threshold value is used to determine whether compression
is performed. If no value is specified for Default Table Threshold,
the table is compressed. This is the default.
OFF
Sets compression OFF for this table.
n
Sets compression ON for this table and uses this value as the
threshold. Allowable values are 1 - 99. The threshold value is the
minimum amount of reduction in size that you expect to achieve
by compressing the table. Enter a value in the range 1 - 99 to set a
threshold value for that table.
Right-click on the line next to the table name to display these
options:
Clear
Clears any Threshold column setting for this table. Use
Clear All to clear Threshold column settings for all tables
in this Extract File.
Compression Off
Turns off compression for this table. Use Compression Off
Chapter 4. Extract Process
83
All to turn off compression for all tables in this Extract
File. Selecting Compress Off All overrides any value in the
Threshold column.
Compression On
Turns on compression for this table. If Default Table
Threshold is specified, that value determines whether to
compress the table. If no Default Table Threshold is
specified, the table is compressed. Use Compression On
All to turn on compression for all tables in this Extract
File. Selecting Compression On All overrides any value in
the Threshold column.
Objects Tab
The Objects tab is displayed and objects are extracted only when you select
Objects or Both on the General tab. If so, object definitions for tables and columns
listed in the Access Definition are automatically extracted. By default, all other
objects are also extracted.
Use the Objects tab to select among the other objects to be extracted.
84
IBM Optim: Move User Manual
Objects
Common objects available for extracting. Select a check box to extract the
corresponding object. To exclude an object, clear the corresponding check box.
Extended Objects
Additional objects available for extracting. Select a check box to extract the
corresponding object. To exclude an object, clear the corresponding check box.
Select All Deselect All
Click Select All to extract all listed objects. Click Deselect All to exclude all listed
objects from the Extract Process.
Point and Shoot Tab
Use this tab to override the Point and Shoot specification in the Access Definition.
The Point and Shoot specification in the Access Definition is used by default.
For details on using Point and Shoot, see the Common Elements Manual.
Chapter 4. Extract Process
85
Start Table
The name of the Start Table designated by the Access Definition.
File Options
Select the Override AD Point and Shoot Definition check box to disregard Point
and Shoot specifications in the Access Definition. Then select one of the following:
None
Disregard any Point and Shoot specification in the Access Definition when
running the Extract Request.
Local
Use a Local Point and Shoot list when running the Extract Request. A
Local Point and Shoot list is unavailable to other process requests and
Access Definitions. To create or edit a Local Point and Shoot list, select
Local and then click Tools → Edit Point and Shoot List to display the Point
and Shoot Editor. A name for the Point and Shoot list is unnecessary
because the list is stored with the Extract Request.
File
Use an existing or new Point and Shoot List File when running the Extract
Request. This file is available to other process requests and Access
Definitions. To use an existing file or to create a new named Point and
Shoot File, select File, type a file name in the Name box, and then click
Tools → Edit Point and Shoot List to display the Point and Shoot Editor.
Name Point and Shoot files are saved in ASCII format and have a .pns
extension by default.
Variables Tab
Selection criteria define the subset of related data to extract from the list of tables
in the Access Definition. You can define explicit selection criteria in the Access
Definition, or create variables with default values that can be overridden by values
specified on the Variables tab in the Extract Request Editor. You can also choose to
be prompted for values at runtime.
The flexibility provided by using variables allows you to use the same Access
Definition for different processes.
86
IBM Optim: Move User Manual
Grid Details
Information for each variable in the Access Definition is presented in three parts on
the grid. The variable name is shown in the left column. The grid cell in the right
column is divided in two. The prompt string for the variable displays in the top
half of the cell and the value used as criteria displays in the bottom.
Variable
The list of variables defined in the Access Definition. The name of the
variable displays in italics, unless the default value is overridden by a
value entered on the Variables tab. You can modify the name of the
variable in the Access Definition Editor only. To open the Access Definition
Editor, click Tools → Edit Access Definition.
Prompt String
Text that prompts for a value at run time. You can modify the prompt
string in the Access Definition Editor only. To open the Access Definition
Editor, click Tools → Edit Access Definition.
Value The value assigned to the variable. You can right-click and select Set
Default Value to use the values assigned as defaults in the Access
Definition.
Chapter 4. Extract Process
87
Note: A value for each variable is required to perform the Extract Process.
If a default value is not specified in the Access Definition and no value is
provided on the Variables tab, you are prompted for a value at run time.
Specify Values
Assigned values must be the appropriate data type and size for the column and
must conform to the SQL syntax. For example, assume a variable named ST is
assigned to a character column containing state abbreviations. The variable
delimiter is a colon. If the variable is defined with single quotes in the Access
Definition, you must specify the value without single quotes on the Variables tab:
Access Definition
Value
':ST'
CA
If the variable is defined without single quotes in the Access Definition, you must
specify the value with single quotes on the Variables tab:
Access Definition
Value
:ST
'CA'
Note: Values are not validated until run time. Errors during processing may result
if the value is an incorrect data type or size for the column, or the resulting
specification does not conform to SQL syntax.
Always Prompt for Values at Run Time
Select the Always Prompt for Values at Run Time check box to display the
prompt string before each Extract Process is performed, regardless of whether a
value has been assigned. Clear the check box to display the prompt string only
when a value for a variable has not been assigned.
Object List Tab
Use the Object List tab to specify other non-related objects for extraction.
Note: Objects you specify on the Object List tab are extracted only when you
select Objects or Both as the items to extract on the General tab.
88
IBM Optim: Move User Manual
Qualifier
The two-part qualifier serves as a prefix to unqualified object names in the Object
List. To select from a list of the most recently used qualifiers, click the down arrow.
To select a qualifier that is not on the list, click the browse button. The Default
Qualifier consists of:
dbalias Alias of the database in which an object is defined (1 to 12 characters).
creatorid
Creator ID assigned to the object (1 to 64 characters).
Object
Type
The type of object to extract: Default, Function, Package, Procedure, Rule,
Sequence, UDT, or View. Click the grid cell to display a down arrow, then
click the down arrow to select from a list. You must specify an object type
for each entry. The last line in the grid can remain blank.
To clear entries, right-click a grid cell and select Remove or Remove All
from the shortcut menu.
To add objects, right-click a grid cell, select Add, then select the object type
from the submenu. You can drag an object name from the Select dialog to
any line in the grid. The type, name, and status are inserted in the list. You
can also add objects to the list manually.
Chapter 4. Extract Process
89
Name Name of the explicit object to extract. You cannot specify duplicate object
names for the same type object. The fully qualified object name consists of:
dbalias Identifies the database where the object resides.
creatorid
Creator ID assigned to the object.
objectname
Base object name.
Status
The status of the listed object.
Defined
Object exists in the database.
Inaccessible
Cannot connect to the database indicated by the DB Alias.
Incomplete
Object type is not specified, or the object name is not fully qualified. Select
an object type, or specify a Qualifier or a three-part object name, as
appropriate.
Pending
When you select an object type, the object is pending until you specify an
object name.
Unavailable
Object type is not supported for the specified DB Alias (DBMS type).
Unknown
Object does not exist. To create an object, use the Create Utility.
Ignore Unknown Objects
Select this check box to ignore Unknown or Unavailable objects when you run the
Extract Request. If you clear this check box, the status of all objects must be
Defined to save or run the Extract Request.
Notify Tab
Use the Notify tab to specify options and addresses for automatic e-mail
notification of the success or failure of the process. The process report generated
when the process completes is automatically sent as an attachment.
Convert Tab
Select Convert after Extract on the General tab to display the Convert tab. Use the
Convert tab to specify whether to use a named or local Convert Request.
The Convert Process can transform or mask data in an Extract File. To specify or
modify parameters for the Convert Process, click Tools → Edit Convert Request to
display the Convert Request Editor. For details, see “Open the Convert Request
Editor” on page 50.
90
IBM Optim: Move User Manual
Convert Request Options
Select one of the following options:
Local
Use a Local Convert Request with the Extract Request. (A Local Convert
Request is stored as part of the Extract Request and is unavailable to other
process requests.) To create or edit a Local Convert Request, select Local,
then click Tools → Edit Convert Request to display the Convert Request
Editor.
Named
Use an existing or new Convert Request with the Extract Request. To use
an existing Convert Request or to create a new named request, select
Named, type a name in the Convert Request Name box, and then click
Tools → Edit Convert Request to display the Convert Request Editor.
Delete Extract File if Convert fails
Select this check box to delete the Extract File created by the Extract Process when
the Convert Process does not execute successfully.
Chapter 4. Extract Process
91
Process an Extract Request
An Extract Request is run in several steps. The steps differ slightly if you schedule
the Extract to run later, rather than immediately, as explained in this topic.
Note: You may encounter a logon prompt during processing, depending on how
Optim is configured at your site. See the Common Elements Manual for information
about the DB Alias Connection Logon and Optim Directory Connection Logon
dialogs.
Validate the Access Definition
Optim validates the specifications in the Access Definition. If the Access Definition
is valid, processing continues. If the Access Definition is invalid, processing
proceeds as follows:
v If the Extract Process is scheduled, the Stop on Error parameter on the Steps tab
of the Job Details dialog determines whether processing continues.
v If the Extract Process is run immediately, Optim displays an error message and
processing stops.
Locate the Extract File
Optim locates the Extract File. If the file does not exist, Optim creates it. If the
Extract File does exist, processing proceeds as follows:
v If the Extract Process is scheduled, processing continues. The file is overwritten.
v If the Extract Process is run immediately, a dialog prompts you to confirm that
the data in the file is to be overwritten. To disable this feature, use Personal
Options.
Validate Variable Value
Optim checks whether variables are defined in the Access Definition and, if so,
verifies that valid values are provided for each variable.
v If valid values are provided, processing continues.
v If invalid values are provided (for example, the data type, size, or resulting SQL
syntax is invalid), processing stops and errors are recorded on the Process
Report.
v If values are missing or the check box labeled Always Prompt for Values at Run
Time is selected on the Variables tab (see “Variables Tab” on page 86)
processing proceeds as follows:
– If the Extract Process is scheduled, processing stops and errors are recorded
on the Process Report.
– If the Extract Process is run immediately, the Extract File Variable Values
dialog is displayed. Enter values for variables, as required, to continue
processing.
Validate Point and Shoot
If a Point and Shoot list is specified, Optim verifies that the rows are valid.
v If the rows in the Point and Shoot list are valid, processing continues.
v If a Point and Shoot list file is specified and cannot be found, processing stops.
v If the rows in a Point and Shoot list are invalid, missing, or if primary key
values in the file do not exist in the Start Table, processing proceeds as follows:
92
IBM Optim: Move User Manual
– If the Extract Process is scheduled, the Stop on Error parameter you specified
on the Steps tab of the Job Details dialog determines whether processing
continues.
– If the Extract Process is run immediately, you are prompted to specify how to
proceed. You can select to continue processing the Extract without using the
Point and Shoot list, or select to cancel the Extract.
Extract Data and Generate a Process Report
Optim performs the Extract for each table listed in the Access Definition and
generates an Extract Process Report.
v If the Extract Process is scheduled, the process proceeds when scheduled and the
report is saved to a file. Open and print the process report from the Scheduler
after the Extract completes.
v If the Extract Process is run immediately, the Extract Request Progress dialog
displays a status message as rows of data are extracted from each table. The
process report displays automatically when the Extract completes. Review and
print the report, as required.
Schedule an Extract Process
To schedule an Extract to run once at a specified future time or repeatedly at
intervals, save the Extract Request, and then click File → Schedule.
v Processing is initiated at the scheduled time; you do not review the Extract
Process as it is performed.
v If warning conditions exist, processing continues without prompting, depending
on the Stop on Error parameter you specified on the Steps tab of the Scheduling
Job dialog.
v If an error occurs during the extract, processing stops.
For details on scheduling, see the Common Elements Manual.
Run an Extract Process Request
To process an Extract Request immediately, click File → Run. It is not necessary to
save the Extract Request before it is run.
v Before processing begins, the Extract Request is verified. If errors exist, you can
review the details on the message bar at the bottom of the Extract Request
Editor.
v After the Extract Request has been verified, the process parameters are verified.
If warnings or errors exist, you can review the details in the Warnings dialog
and choose to continue or cancel the extract.
v If an error occurs during the extract, processing stops.
Error Messages
If error conditions are detected in the Access Definition or the Extract Request
when the Extract is run, processing stops and an error message is displayed. For
example, errors can occur if changes have been made to the tables since the Access
Definition was created.
Error messages, such as those listed below, appear in the message bar of the
Extract Request Editor:
Chapter 4. Extract Process
93
Duplicate Table Entries
A single table is listed in the Access Definition twice. You cannot specify a
table and one or more views or aliases of that table, or specify more than
one view or alias of a table.
No Valid Table
No valid table is specified. The list of tables in the Access Definition does
not include any valid tables. These tables may have been dropped from the
database.
Invalid WHERE Clause
An SQL WHERE Clause is invalid. Selection criteria for one or more tables
are invalid. (For example, a column used in an SQL WHERE Clause has
been dropped from the table.)
Invalid Start Table
The Start Table is invalid. This can occur when the table is dropped or the
Creator ID changed. The table is then marked as Unknown and cannot be
used as the Start Table.
Missing Primary Keys
A child table that has multiple parents does not have a primary key. The
primary key is required when the child table is related to multiple parents
to ensure that multiple copies of a row are not extracted.
A parent table does not have a primary key. Relationships defined in the
Optim Directory are not required to include a primary key for the parent
table. However, a primary key is required to enable tracking of outstanding
parent rows.
Improper Authorization
The person requesting the extract is not authorized to access data from a
table included in the Access Definition.
Warning Messages
If one or more warning conditions exist, the Warnings dialog opens to report the
details. Warning messages indicate a condition that may require attention.
Command Buttons
To command buttons are available on the Warnings dialog: Proceed and Abort.
94
IBM Optim: Move User Manual
v Click Proceed to continue the Extract Process, regardless of the warnings. (You
can review details of the warnings in the Extract Process Report.)
v Click Abort to cancel the Extract Process.
Warning Messages
The following are categories of warning messages that may appear.
New Status
A relationship is in New status indicating that a relationship is new to the
Access Definition, and is not explicitly selected.
v To view the relationship list and select or unselect individual
relationships, use the Relationships tab of the Access Definition Editor.
v To specify that New relationships are selected by default, use the Use
New Relationships check box on the Relationships tab of the Access
Definition Editor.
Unknown Relationship
A relationship is in Unknown status. This condition occurs when the
Creator ID of a table has changed or a relationship has been dropped from
the database.
Unknown Table
A table is in Unknown status. This condition occurs when a table has been
dropped from the database or the identifier has changed.
Untraversed Table
A table specified in the Access Definition will not be traversed by the
Extract Process. This condition indicates that the selected relationships do
not define a path from the Start Table to the untraversed table.
Untraversed Relationship
A relationship listed in the Access Definition will not be traversed by the
Extract.
Runstats Error
RUNSTATS has not been applied to a DB2 table in the Access Definition.
This condition can affect performance if the table is large.
Extract Request Progress Dialog
When the Extract Process begins, the Extract Request Progress dialog will display
status information about the extract.
Chapter 4. Extract Process
95
Objects
As common objects are extracted, the number of each type is displayed.
Extended Objects
As additional objects are extracted, the number of each type is displayed.
Extract Data
Rows are extracted table by table, traversing the relationships. Some tables may be
revisited as relationships are traversed.
Rows extracted from current table
The total number of rows extracted from the current table.
Total rows extracted
The total number of rows extracted from all tables.
Move revises these totals after a number of rows are extracted for each table, after
a number of seconds pass, and when the extract for one table completes and the
process begins for the next table.
Note: The frequency with which the Progress dialog is updated (i.e., the number
of rows and seconds) is specified on the Actions tab in Personal Options. (See the
Common Elements Manual for further information.)
96
IBM Optim: Move User Manual
Convert Data
Rows are converted table by table.
Rows converted in current table
The total number of rows converted in the current table.
Total rows converted
The total number of rows converted from all tables.
The totals are revised after a number of rows (specified on the Actions tab in
Personal Options) are converted for each table, and when the conversion for one
table completes and the process begins for the next table. (See the Common Elements
Manual for more information.)
Cancel Process
To stop the process, click Cancel Process. A confirmation dialog is displayed:
v To cancel the Extract Process, click Yes to return to the Extract Request Editor.
You can review the Process Report, re-enter parameters, and restart the Extract
Process.
v To continue processing, click No to close the confirmation dialog.
Status Bar
Describes the action being performed and indicates the name of the table being
processed, as applicable.
Process Time
Lists the elapsed process time for the Extract Process.
Extract Process Report
The Extract Process generates an Extract Process Report that provides general
information and statistics about the Extract Process.
Chapter 4. Extract Process
97
The Extract Process Report displays the following information:
v Name of the Extract Request (or “Untitled” if you did not save the request).
v Name of the Optim Server, or “(Local)” for a client workstation.
v Name of the generated Extract File or Extract File segments.
v Name of the Access Definition for the Extract Request or “LOCAL”.
v Indicator (“Skipped” or “Processed”) for processing file attachments.
98
IBM Optim: Move User Manual
v
v
v
v
User IDs of the user requesting the Extract Process.
Date and time the Extract Process started.
Date and time the Extract Process completed.
The elapsed time.
Extract Process Warnings
A list of any warnings or errors that occur during processing is provided.
Process Summary
Statistics for the data extracted are provided:
v Total number of Tables Processed.
v Total number of Rows Extracted.
v Total number of Rows with Errors.
v Total number of First Pass Table Rows.
Object Details
The number of objects copied to the Extract File or “Not Selected” if the object was
not selected in the Extract Request.
Row Details
Statistics for each table are provided:
v Total number of rows extracted from each table.
v Total number of failed rows for each table.
v Names of tables used in the Extract. The tables are listed in the same order as in
the Access Definition.
Statistical Information
If you selected the Generate Statistical Report check box on the Extract Request
Editor, detailed performance information for each step in the traversal path is
displayed at the end of the report. (The steps correspond to those displayed using
the Show Steps command, available from the Tools menu in the Access Definition
Editor.)
Each step consists of a Table entry, and may include one or more Relationship
entries, Primary Key entries, or DBMS Access entries.
Note: Statistical information may indicate whether you can improve performance
by overriding the default method (scan or key lookup) of accessing a table. For
details, see the Common Elements Manual.
Settings During Extract
Indicates if file system compression is used on the directory containing the Extract
File.
Chapter 4. Extract Process
99
Table
A Table entry provides general table information and the strategy used to process
key values for extracting related rows. The title line for a Table entry displays the
table name and step number. (If the table is a reference table, "Ref Table" is shown
instead of the step number.)
DBMS
Type of DBMS associated with the table.
Version
Version number of the DBMS.
Columns
Number of columns in the table.
Cycle
Indicator (Yes or No) that the table is part of a traversal cycle.
Lobs
Indicator (Yes or No) that the table contains large objects.
Est. Rows
Estimated number of rows in the table. (N/A indicates that DBMS statistics
are not available.)
Row Length
Size of the row in bytes.
DB Connections
Number of concurrent database connections used to extract data from the
table.
Select w/ UR
Indicator (Yes or No) that uncommitted rows were extracted from the
table.
PK W/Index
Number of primary key values to process; the primary key has a
supporting index.
PK WO/Index
Number of primary key values to process; the primary key does not have a
supporting index.
FK W/Index
Number of foreign key values to process; the foreign key has a supporting
index.
FK WO/Index
Number of foreign key values to process; the foreign key does not have a
supporting index.
Parent Strategy
Identifies the strategy (scan or key lookup) used to process primary key
values for extracting related rows.
Note: A scan reads all rows in a table at one time; whereas, a key lookup
locates rows using a WHERE clause to search for key values.
No Keys
No key values to process.
Only one Key
Use a key lookup, since there is only one key value to process.
100
IBM Optim: Move User Manual
KeyLookup - All Keys indexed
Use a key lookup, since all keys have supporting indexes.
Scan - No Index
Use a scan, since one or more keys do not have supporting
indexes.
Scanning due to large number of keys
Use a scan, since the number of key values to process is a
significant portion of the table.
User Forced Scan
Use a scan, as specified by the user on the Relationships tab in the
Access Definition Editor.
User Forced Key Lookup
Use a key lookup, as specified by the user on the Relationships
tab in the Access Definition Editor.
Dependent Strategy
Identifies the strategy (scan or key lookup) used to process foreign key
values for extracting related rows. (The same values shown above for
Parent Strategy are valid for Dependent Strategy.)
Where Clause
Identifies user-specified criteria, if any.
Relationship or Primary Key
A Table entry may include one or more Relationship entries, if the table is a child
table in a relationship with a previously processed table, or one or more Primary
Key entries, if the table is the parent table in a relationship with a previously
processed table.
The title line for a Relationship entry displays the name of the relationship used to
traverse from parent to child during the Extract Process, and the entry indicates
the number of foreign key values used to extract related child rows. A Primary Key
entry indicates the number of primary key values used to extract related parent
rows.
Lookup Keys
Number of key values from related rows already extracted.
Direction
Indicates the direction of the traversal path:
dependent
Traverse from parent to child for a Relationship entry.
parent Traverse from child to parent for a Primary Key entry.
Indexed
Indicator (Yes or No) that a supporting index is available.
Keys Per Cursor
Number of key values to include in the WHERE clause when using a key
lookup. For example, if the key has a single column (COL1) and Keys Per
Cursor is 5, then the WHERE clause would include “COL1 IN (?,?,?,?,?)”
and 5 key values would be processed in a single request to the DBMS.
Chapter 4. Extract Process
101
Note: By default, Move processes 1 key value at a time. You can increase
this value on the Relationships tab of the Access Definition Editor. (For
details, see the Common Elements Manual.)
DB2 Lookup Cost
The DBMS estimated cost to process a single key value, if the DBMS is
DB2 or UDB and RUNSTATS have been run for the table.
DB2 Scan Cost
The DBMS estimated cost to scan the entire table, if the DBMS is DB2 or
UDB and RUNSTATS have been run for the table.
Key Length
The length of the key value.
Access
Indicates whether the method of accessing the table was forced.
Note: By default, Move determines whether to use a scan or a key lookup.
You can specify a forced scan or key lookup on the Relationships tab of
the Access Definition Editor. For details, see the Common Elements Manual.
Not Forcing
User did not force a scan or a key lookup.
User Forced Scan
User forced a scan.
User Forced Key Lookup
User forced a key lookup.
Lookup SQL
The SQL condition, including the key column names and host variables,
used to process a single key value.
DBMS Access
A Table entry may also include one or more DBMS Access entries, which provide
information about the database access to the table. A DBMS Access entry is
provided for each SELECT statement used to process related rows in the table.
Access Type
Indicates the method used to access the table:
Cursor Scan
Use a single cursor to read all rows in the table. Selection criteria,
if specified, is included in the WHERE clause of the SELECT
statement.
PK Lookup
Use a key lookup to extract rows for one or more primary key
values.
FK Lookup
Use a key lookup to extract rows for one or more foreign key
values.
Keys Per Cursor
If Access Type is PK Lookup or FK Lookup, the number of key values
processed using a single SELECT statement. (Note that if Access Type is
Cursor Scan, this value is zero (0).)
102
IBM Optim: Move User Manual
Open Cursor
Number of times a cursor is opened for the SELECT statement.
Rows Fetched
Number of rows fetched for the SELECT statement.
Rows Written
Number of rows written to the Extract File.
Process Time
The elapsed time from when the cursor was first opened to when the
cursor was last closed for the SELECT statement.
Time in DBMS
The elapsed time spent in calls to the DBMS.
Rows Per Sec
Number of rows extracted per second of elapsed time.
Totals
Elapsed Time
The total amount of elapsed time for all steps.
Time in DBMS
The total amount of time spent in calls to the DBMS for all steps.
To save the report to a file, click File → Save As to open the Windows Save dialog.
To print the report, click File → Print to open the Print dialog.
To refer to the report after you close it, click File → Redisplay Results → Current to
redisplay the report from the last Extract Process run, or All to display a list of
retained reports. For details about retaining process reports, see the Common
Elements Manual.
Chapter 4. Extract Process
103
104
IBM Optim: Move User Manual
Chapter 5. Insert Process
Use the Insert Process to insert data stored in an Archive File or Extract File into a
destination database. If tables in the Archive or Extract File do not exist at the
destination, the Insert Process uses the object definitions stored in the Archive or
Extract File to create them.
Specifications for the Insert Process can be stored as an Insert Request to be reused.
Based on your specifications and the primary key values in each table, you can:
v Insert new rows only. If the primary key value of a row in a source table does
not match an existing row in the destination table, the process inserts the row. If
the primary key value of the source matches a row in the destination, the source
row is discarded.
v Insert new rows and update existing rows. If the primary key value of a row in
a source table does not match an existing row in the destination table, the
process inserts the row. If the primary key value of a row in a source table
matches an existing row in the destination table, the process updates the existing
data.
Mapping and Transformation
Map data from the source to the destination using Table Maps and Column Maps.
You must use a Table Map to specify the destination for the tables in the Archive
or Extract File. You may also use Column Maps for one or more destination tables.
Column Maps enable you to specify the source data for each column and,
optionally, to transform the data before it is inserted.
Long Object Names (LONs)
When inserting data from an Archive File migrated from the mainframe version of
Optim (i.e., the Optim z/OS Solution), any object names that exceed the maximum
length for an Optim client/server object of the same type are truncated. When this
happens, the truncated name is suffixed with the code “__TRUNC__”. A
128-character Creator ID, for example, might be truncated in Optim as follows:
PSTASLG_1234567890_xx__TRUNC__
Run or Schedule
You can process an Insert Request immediately by clicking File → Run, or you can
schedule the request for processing at a later time by clicking File → Schedule. You
must save the request before it is scheduled, but it is not necessary to save the
request before it is run.
Naming Conventions
The fully qualified name of an Insert Request consists of: identifier.name.
identifier
Identifier that serves as the prefix for the Insert Request name (1 to 8
characters).
name
© Copyright IBM Corp. 1994, 2010
Name assigned to the Insert Request (1 to 12 characters).
105
When you create Insert Requests, it is helpful to use a logical set of naming
conventions to identify the use for each and to organize them for easy access.
Chapter Contents
This chapter explains how to create, maintain, and process an Insert Request,
including how to:
v Specify the Source File containing the data to insert.
v Specify the Control File to record information about the process.
v Select or create a Table Map and Column Maps to map the source data to the
destination.
v Specify default parameters for date aging to adjust dates in specified columns.
v Specify parameters for converting currency in specified columns.
v Specify notification options.
v Run, save, and schedule an Insert Request.
v Review, save, and print an Insert Process Report.
Open the Insert Request Editor
Use the Insert Request Editor to create and maintain requests to insert or update
data. These requests are stored in the Optim Directory.
There are different ways to open the editor depending on whether you want to
create a new request or select a request to edit.
Create an Insert Request
Use this task to create an Insert Request.
About this task
Do the following to create an Insert Request:
Procedure
1. Click File → New → Insert from the main window to open the Insert Request
Editor.
2. Specify the name of the Source File and a Control File.
3. Specify a Table Map: If you select Local, click Tools → Edit Table Map to define
a Table Map. If you select Named, specify the name of an existing Table Map,
or specify a name and click Tools → Edit Table Map to define a new Table Map.
4. Select Process Options.
5. Specify Delete Options.
Results
These steps are the minimum required to create an Insert Request. After you create
a request, you can run the process immediately or save and schedule it. Because
the options to create and modify an Insert Request are similar, see “Insert Request
Editor” on page 108 for complete details.
An alternate method for opening the Insert Request Editor is to click Actions →
Insert from the main window. By default, the last Insert Request you edited will
display. Your next step depends on your purpose:
106
IBM Optim: Move User Manual
v To create a new Insert Request, click File → New from the Insert Request Editor.
v To create a new Insert Request modeled on an existing one, open the desired
Insert Request and click File → Save As from the Insert Request Editor.
v To create and store a copy of the active Insert Request and continue editing,
click File → Save Copy As from the Insert Request Editor.
Select an Insert Request to Edit
Use this task to select an Insert Request to edit.
About this task
Do the following to select an Insert Request to edit:
Procedure
1. Click File → Open from the main window to open the object selection dialog.
2. Double-click to select Insert Request and expand the object list.
3. Double-click the Insert Request Identifier to display a list of Insert Requests.
4. Double-click the desired Insert Request to open the Insert Request Editor.
Open an Insert Request dialog
The Open dialog is divided into two areas. The object identifiers are listed on the
left and the associated objects appear on the right. The list of objects varies
depending on the identifier you select.
Use the Enter pattern for Insert Request box to limit the list of requests in the
Open dialog. An Insert Request name consists of two parts: identifier.name. The
pattern specified also must have two parts. You can use the % (percent) wild card
to represent one or more characters, or use the _ (underscore) wild card to
represent a single character in an object definition name. (The underscore must be
selected as the SQL LIKE character on the General tab in Personal Options.)
Note: After you specify a pattern, click Refresh to redisplay the list based on your
criteria.
Chapter 5. Insert Process
107
Insert Request Editor
Use the Insert Request Editor to create, modify, or delete Insert Requests stored in
the Optim Directory.
Description
Enter text to describe the purpose of the Insert Request (up to 40 characters).
Server Name
If the optional Optim Server component is installed on your network, you can
direct resource-intensive Insert Request processing (for example, when the source
file contains a large number of tables or rows) to a machine hosting Optim Server.
Click the down arrow to select a machine hosting Optim Server, or select Local to
process the request on the local workstation.
Note: If the Optim Server machine option is not enabled at your site, the Server
Name box appears dimmed.
108
IBM Optim: Move User Manual
Tabs
The Insert Request Editor displays tabs that allow you to specify parameters and
select options to define and maintain Insert Requests. Each tab in the editor serves
a unique purpose.
General
Enter the specifications for the process, including the names of the Source
File, Control File, and Table Map. Each time you open the editor, the
General tab is shown first.
Age Function
Specify default parameters for aging data in columns defined with an Age
function in a Column Map.
Global Aging
Specify default parameters for aging data in columns that have a native
date data type.
Currency
Select a default Currency Table and define currency conversion parameters
for columns with a native currency data type.
Report Options
Enter parameters for displaying errors and aging specifications on the
process report.
Notify Specify options for automatic email notification of the success or failure of
the process.
Menu Commands
In addition to the standard File and Edit commands, you can select the following
commands from the other menus in the Insert Request Editor:
Tools
Menu
Convert to Local
When using a named Insert Request in a Restore Request, select
this command to save the Insert Request as a local request within
the Restore Request.
Edit Table Map
Opens the Table Map Editor, allowing you to create or edit a Table
Map to be used with the active Insert Request. For details on
creating and maintaining Table Maps, see the Common Elements
Manual.
Edit Table Specifications
Opens the Insert Request Table Specifications dialog allowing you
to select the tables to include in Mixed (selective) processing.
Edit Directory Map
Opens the Directory Map dialog, allowing you to map file
attachments to destination directories.
Edit ACL
Open the Access Control List Editor to secure the Insert Request
with an Access Control List. Available when Object Security is
enabled.
Chapter 5. Insert Process
109
Delete ACL
Delete the Access Control List securing the Insert Request.
Available for secured Insert Requests only.
Options Menu
Show Aging/Show Currency
Select these commands to switch between hiding or displaying the
corresponding tab.
General Tab
Before you can insert data, you must specify the source and other parameters, as
described in this topic.
Source File
Enter the name of the Archive or Extract File that contains the data to insert. By
default, Extract Files have an .xf extension and Archive Files have an .af extension.
Control File
Enter the name of a Control File. This file is used during the process to track the
success or failure of each row in the Archive or Extract File. Control Files have a
.cf extension by default. If you specify the name for an existing Control File, a
dialog will prompt you to confirm that you want to overwrite the file when you
run the Insert Request. Use Personal Options to disable this feature.
110
IBM Optim: Move User Manual
Note: You can browse the contents of an Extract, Archive or Control File by
clicking Utilities → Browse, or by rightclicking and selecting Browse from the
shortcut menu. For details on the Browse Utility, see the Common Elements Manual.
If you do not specify a path for file names, the request uses the drive and directory
defined as the default Data Directory. See the Common Elements Manual for further
information.
Table Map Options
Specify a Table Map to match tables in the Archive or Extract File with destination
tables or to exclude tables from the request. You cannot save or process an Insert
Request without a valid Table Map.
Within a Table Map, specify a Column Map for any pair of tables to:
v Map source and destination columns that are compatible, but have unlike
names.
v Specify destination column values other than the source column values.
v Ignore specific columns.
Local
Select this option to create a Table Map to be used only with the active
Insert Request. Local Table Maps are saved as part of the Insert Request.
Named
Select this option to create a new Table Map or select an existing Table
Map to be used with the Insert Request. You must specify a name for the
Table Map you want to create or the name of the existing Table Map you
want to use.
Note: If changes have been made to the database since the last time the
Table Map was used, the specifications may no longer be valid, and a
warning is displayed.
Table Map Name
Name of the new or existing Table Map to use with the Insert Request. A
Table Map name has two parts: identifier.name.
identifier
Identifier to identify the Table Map (1 to 8 characters).
name
Name of the Table Map (1 to 12 characters).
Always View Table Map
Select this check box to open the Table Map Editor any time you save or
run an Insert Request. This option provides an opportunity to review the
Table Map specifications before you insert the data. If you clear this check
box, the Table Map Editor opens only when needed (for instance, when the
specified Table Map does not include all the tables in the Archive or
Extract File).
Select Edit Table Map from the Insert Request Editor to open the Table Map
Editor. For details on how to create, edit, or merge Table Maps, see the Common
Elements Manual.
Chapter 5. Insert Process
111
Delete Options
Select options for removing all rows from specified tables before processing the
Insert Request. Delete is useful for restoring data during testing. If a row cannot be
deleted for any reason, all deleted rows up to the last commit are restored, and
insert processing stops.
All Tables
Deletes all rows from all tables before processing. If you choose this option,
you must also select a Delete Commit option. All Tables is valid only if
the Process Option selected is Insert.
Mixed Deletes all rows before processing from tables you select on the Insert
Request Table Specification dialog. To display the Insert Request Table
Specification dialog, select Tools → Edit Table Specification.
v If you choose this option, you must also select a Delete Commit option.
v All rows are deleted from tables you select in the Insert Request Table
Specification dialog. If you do not select a table, the rows in that table
are not deleted.
v If you do not select any tables, the Delete Option changes from Mixed
to No Tables.
v If you select all of the tables, the Delete Option changes from Mixed to
All Tables.
v If you specify Mixed, and then save, run, or schedule the Insert Request,
the Insert Request Table Specification dialog is displayed automatically.
Note: You cannot specify Mixed if the Process Option selected is
Insert/Update or Update Only.
No Tables
Retains all rows in all tables before processing.
The Insert Request Table Specification dialog enables you to delete all rows before
processing from selected tables.
112
IBM Optim: Move User Manual
Delete Commit
Select an option for committing changes to the database. These options are
available only when you select All Tables or Mixed.
After Each Table
Commits changes to the destination database after deleting all
rows from each selected table.
On Completion
Commits changes to the destination database after deleting all
rows from all tables or all selected tables.
Process Options
Select the type of processing to be performed. Specify parameters to lock tables, set
a commit frequency and set a discard row limit.
Insert Inserts new rows into the tables.
v If the primary key of a row in the source data does not match the primary
key of a row in the destination table, the row is inserted.
v If the primary key of a row in the source data matches the primary key
of a row in the destination table, the row is bypassed and marked as
discarded in the Control File.
Mixed Updates, Inserts, or Updates/Inserts according to your selection for each
table on the Insert Request Table Specification dialog. To display the Insert
Request Table Specification dialog, click Tools → Edit Table Specification.
Select a process option for each table.
v If you select Mixed, and then save, run, or schedule the Insert Request,
the Insert Request Table Specification dialog is displayed automatically.
v If you select Mixed and do not specify selections on the Insert Request
Table Specifications dialog, or you set all tables to the same selection, the
Process Option changes to indicate the process used for all tables.
Chapter 5. Insert Process
113
Note: You cannot select Mixed if the Delete Option specified is All
Tables.
Update Only
Updates rows in the tables. Tables must have a primary key.
v If the primary key of a row in the source data matches the primary key
of a row in the destination table, the row is updated.
v If the primary key of a row in the source data does not match the primary
key of a row in the destination table, the row is reported as failed.
Note: You cannot select Update Only if the Delete Option specified is All
Tables or Mixed.
Update/Insert
Updates and inserts rows in tables. Tables must have a primary key.
v If the primary key of a row in the source data does not match the primary
key of a row in the destination table, the row is inserted.
v If the primary key of a row in the source data matches the primary key
of a row in the destination table, the row is updated.
Note: You cannot select Update/Insert if the Delete Option specified is All
Tables or Mixed.
Insert Request Table Specification Dialog
The Insert Request Table Specification dialog enables you to select a specific
process option for each table.
Click the Update column to select a process option from the drop down list, for
each table. You can also right-click to use shortcut menu commands to set all tables
at once.
Lock Tables
Select this check box to lock each table until all rows in the Archive or
114
IBM Optim: Move User Manual
Extract File for that table are processed. Lock tables to ensure that other
database activity does not interfere with the process. However, locking
prevents other users from accessing tables involved in the process. If a site
option prevents you from locking tables, this option is disabled.
Process File Attachments
Select this check box to process file attachments included in the Archive or
Extract File. If this option is selected and the Archive or Extract File
contains file attachments, each file is restored to a location determined by
the Directory Map. The Directory Map dialog is available from the Tools
menu or opened automatically when you run the Insert Process.
Use the Directory Map dialog to control the destination for file attachments during
Insert Processing. By default, file attachments are returned to the directory from
which they were extracted. The Source column identifies the original directory
from which file attachments were extracted. The Destination column identifies the
directory where files from the corresponding source directory are placed.
You can edit both directories in the Directory Map by entering a path or using the
browse button. All source entries must be unique. If the specified source directory
does not match the original path or the source is blank, the Default Path is used
for the insert. If the Default Path is not found, the Insert Process will attempt to
insert the file into the original path. If no matching paths are found, the Insert
Process will stop before inserting any data.
Several shortcut menu commands are available. Select Remove to remove one row
of source and destination entries, or select Remove All to remove all entries. Select
Clear Column to remove all entries for the source or destination. Use Add Entries
from File to add the original paths found in the Archive or Extract File.
Commit Frequency
Enter the number of rows to process before committing the changes to the
database, up to a maximum of 999999. Clear this box to use the number
specified as the Maximum Commit Frequency in Product Options. This
option is disabled if Lock Tables is selected.
Chapter 5. Insert Process
115
Frequent commits keeps locking to a minimum, but may slow the process.
If the process ends abnormally, click Utilities → Restart/Retry to resume
processing from the last commit point. See the Common Elements Manual for
further information.
Discard Row Limit
Enter the number of rows that can be discarded, up to a maximum of
99999999. The process stops after the specified limit is reached and all rows
in the array are processed.
Note:
v Discard Row Limit is an approximate value due to array processing for
the Insert Process. For example, assume the discard limit is set to 50 and
the array supports 200 rows for a given table. If the first 50 rows fail, the
DBMS continues to process the other 150 rows in the array, before
evaluating the discard limit. (The number of rows that can be inserted
via one call to the DBMS depends on the size of the row.)
v To set no limit to the number of rows that can be discarded, specify zero
(0) or leave blank.
You can modify a request and click Utilities → Restart/Retry to resume
processing at the point where the process stopped.
Disable Triggers
The following options are supported for disabling triggers for Oracle, Informix,
SQL Server (Version 7 or later), and Sybase ASE (Version 12 or later).
Always
Select this option to disable all database triggers for the Insert Process,
re-enabling the triggers after the process completes.
Never Select this option to execute all database triggers during the Insert Process.
Prompt
Select this option to selectively disable database triggers during the Insert
Process and selectively re-enable triggers when the process is complete.
Disable Constraints
The following options are supported for disabling constraints for Oracle, Informix,
and SQL Server (Version 7 or later)
Always
Select this option to disable constraints during the Insert Process and
re-enable the constraints after the process completes.
Never Select this option if you do not want to disable referential integrity
constraints. When this option is selected, a warning message displays to
remind you when you run the Insert Request.
Prompt
Select this option to display the Disabling Trigger/Constraint Confirmation
dialog. The dialog displays a list of tables for each applicable DB Alias and
the corresponding triggers and constraints. You can rightclick to enable or
disable constraints during the Insert Process for each table. You can also
enable or disable the constraints after the Insert Process completes.
116
IBM Optim: Move User Manual
The Disabling Trigger/Constraint Confirmation dialog displays the list of tables in
the Insert Process from each specified database and tabs that contain the
corresponding database triggers and referential integrity constraints for each table.
The first grid column contains a Focus Arrow to indicate the table for which
triggers and constraints are listed. To display the corresponding triggers and
constraints for a different table, click a Focus Arrow grid cell to reposition the
arrow, or use the up/down arrows on your keyboard.
Right-click in the Status During Process column to select to enable or disable the
corresponding trigger or constraint during the Insert Process. Right-click in the
Status After Process column to select whether to enable or disable the trigger or
constraint after the Insert Process completes.
Note: For Informix, you can also select to enable constraints with or without using
a violation table. Select With Vio to enable the constraint and use a violation table.
Select No Vio to enable the constraint and not use a violation table. (If you select
Enabled, the Informix default for violation tables applies.)
Chapter 5. Insert Process
117
Always Call Create
Select this check box to start the Create Utility before the Insert Process begins, to
allow you to create or drop objects in the destination database. Clear this check
box to start the Create Utility only when necessary to create desired objects in the
destination database.
Age Function Tab
Use the Age Function tab to specify parameters for aging data when using a
Column Map.
These values are applied to columns for which you specify the Age function as
AGE(DEF) or AGE(RU=DEF). These values are also used to complete incomplete
specifications for date adjustment values in columns defined with the Age
function.
Date Adjustment Values
Select one of the following options:
None
Specifies that an aging increment is not used.
Years, Months, Weeks, Days
Adjusts dates incrementally by a specified number of years, months,
weeks, and/or days. Use a minus (-) sign to decrement the date. The plus
(+) sign is not required to increment the date.
118
IBM Optim: Move User Manual
Years
Number of years (-2500 to +1581) to adjust the date.
Months
Number of months (-30000 to +30000) to adjust the date.
Weeks Number of weeks (-30000 to +30000) to adjust the date.
Days
Number of days (-99999 to +99999) to adjust the date.
Specific Year
Adjusts the date to a specific four-digit year (1582 to 3999).
Specific Date
Adjusts the date to a specific date. To select a date from a perpetual
calendar, click on the down arrow. Click the arrow buttons to set the
month and year. Click on a day to set the day of the month.
Note: If you do not specify a date, the system (current) date displays. The
date format is based on the Regional Settings on the Control Panel of your
computer.
Base/Target
Adjusts the date incrementally by a calculated aging amount. The aging
amount is the number of days between the Base date and the Target date.
To select a base or target date from a perpetual calendar, click on the down
arrow. Click the arrow buttons to set the month and year. Click on a day to
set the day of the month.
Base
Specify an explicit start date for calculating the aging amount.
Target Specify an explicit end date for calculating the aging amount.
Multiple/Rule
Adjusts the date by applying the specified date aging rule the specified
number of times. For example, if the rule is defined as NEXTPAYDAY and
you specify 4 as the multiple, the date is adjusted from the source date to
the fourth NEXTPAYDAY.
Multiple
Number of times (1 to 30000) to apply the specified rule for date
aging.
Rule
Name of the rule to use.
Date Adjustment Options
Calendar
Enter the name of the calendar to use by default. To select from a list of
available calendars, click the down arrow.
Rule
Enter the name of the rule to use by default. To select from a list of
available rules, click the down arrow.
Note: Define calendars and rules by clicking Utilities → Calendar. For
details on defining calendars and rules, see the Common Elements Manual.
Century Pivot
Enter the value to use to determine the appropriate century when a date
value is defined with a two-digit year. If you do not specify a value, 65 is
used by default. For example, if you specify 55 as the Century Pivot, then:
v All two-digit years equal to or greater than 55 are assumed to be in the
20th century.
Chapter 5. Insert Process
119
v All two-digit years less than 55 are assumed to be in the 21st century.
Exception Options
Select the following exception options to handle special date values when aging
data. Rather than treat these dates as errors, the dates are moved directly from the
source to the destination if the column attributes are identical.
v Process rows with invalid dates — If you select this check box, rows with
columns that contain invalid dates are processed and the results are written to
the destination. If you clear the check box, the rows are discarded and are noted
in the Control File.
v Process Rows with skipped dates — If you select this check box, rows with
columns formatted as skipped dates are processed and the results are written to
the destination. If you clear the check box, the rows are discarded and are noted
in the Control File.
At times, special values called skipped dates are used to indicate special handling
or unique conditions. To determine whether or not to skip a date, the date aging
function evaluates each date for the following:
v If a date column contains all spaces, hexadecimal zeros (low values), or
hexadecimal 'FF' (high values), the date is skipped.
v If a date column contains a skipped date value, the value is parsed based on the
specified date format or exit routine.
The date aging function recognizes the following as skipped dates:
Date Format
Y/M/D
Skipped Date Value
1999/99/99
Date Format
Y/M
1999/999
9999/99/99
9999/999
9999/12/31
1900/0
1900/0/0
2000/0
2000/0/0
0/0
0/0/0
Y
1/1/1
Y/J
Skipped Date Value
1999/999
0
M/D
9999/999
1900/0
99/99
0/0
M
2000/0/0
0/0
9999
99
0/0
D
9/9
0/0
This list is intended to be as comprehensive as possible. If you require additional
skipped dates, contact Technical Support.
Global Aging Tab
Use the Global Aging tab to specify parameters for aging data in columns defined
with a native date data type. Global Aging parameters apply to all date columns
not specifically defined by an Age function in a Column Map.
120
IBM Optim: Move User Manual
Note: The parameters shown on the Global Aging tab are the same as those
shown on the Age Function tab. For information about each parameter, see “Age
Function Tab” on page 118.
Currency Tab
Use the Currency tab to specify the default Currency Table to use when the
Currency function is defined in a Column Map.
Specify global parameters for currency conversions in columns that have a native
currency data type.
Default Currency
Specify the Currency Table to use when the Currency function is specified in a
Column Map.
Global Currency Options
Global Currency Definition
Specify the default Currency Table to use for currency conversions in
columns that have a native currency data type.
From Type To Type
Enter specific currency types for the source and destination currency when
converting currency values in columns that have a native currency data
type. To select from a list of currency types, click the down arrow.
Chapter 5. Insert Process
121
Triangulate
Select this check box to convert the specified source currency to the euro
dollar, then convert the euro dollar value to the specified destination
currency.
Report Options Tab
Use this task to specify what information is included in the Insert Process Report.
Reporting Options
Report errors
Select this check box to specify that the Insert Process Report includes the
list of errors encountered during the Insert Process.
Report Invalid Dates
Select this check box to include rows with invalid dates in the Insert
Process Report when you select the corresponding Exception Option on the
Age Function or Global Aging tab.
Report Skipped Dates
Select this check box to include rows with skipped dates in the Insert
Process Report when you select the corresponding Exception Option on the
Age Function or Global Aging tab.
Maximum number per table
Specify the maximum number of errors, invalid dates and skipped dates
per table to include in the Insert Process Report.
122
IBM Optim: Move User Manual
Maximum number per run
Specify the maximum number of errors, invalid dates and skipped dates
per run to include in the Insert Process Report.
Aging Option
Report Aging Summary
Select this check box to include a summary in the Insert Process Report of
any aging parameters specified for the Insert Process. A report that
includes the Aging Summary can be printed in landscape mode only.
Notify Tab
Use the Notify tab to specify options and addresses for automatic e-mail
notification of the success or failure of the process. The process report generated
when the process completes is automatically sent as an attachment.
Process an Insert Request
You can process an Insert Request at any time, but if you create a new Insert
Request and reuse it, you must save it. You can either run an Insert Request
immediately or schedule it.
Note: Depending on how Optim is configured at your site, you may encounter a
logon prompt during processing. See the Common Elements Manual for information
on the DB Alias Connection Logon dialog, and the Optim Directory Connection
Logon dialog.
Schedule an Insert Request
To schedule an Insert Process to run once or repeatedly at a specified future time,
save the Insert Request, and then click File → Schedule.
v Processing is initiated at the scheduled time; you do not review the process as it
is performed.
v If warning conditions exist, processing continues without prompting, depending
on the Stop on Error parameter you specified on the Steps tab of the Scheduling
Job dialog.
v If an error occurs, processing stops.
For details on scheduling, see the Common Elements Manual.
Run an Insert Request
To process an Insert Request immediately, click File → Run. It is not necessary to
save the Insert Request before it is run.
v Before processing begins, the request is verified. If warning conditions exist, you
can review the parameters in the Warnings dialog and choose to continue or
cancel processing.
v During processing, if an error occurs, processing stops.
A progress dialog and status messages provide information while the request is
processing. When processing completes, or stops because of an error, you can
review the details in the Process Report. You can also browse the Control File to
review process details.
Chapter 5. Insert Process
123
Insert Request Progress Dialog
When the Insert Process begins, the Insert Request Progress dialog will display
status information about the Insert Process.
Totals
Rows to be processed
Total number of rows in the Source File to be processed.
Rows Inserted
Total number of rows that were inserted.
Rows Updated
Total number of rows that were updated.
Rows with Errors
Total number of rows from all the tables that have errors.
The totals in the Insert Request Progress dialog are revised after a number of rows
are inserted for each table, after a number of seconds pass, and when the insert for
one table completes and the process begins for the next table.
Note: The frequency with which the Progress dialog is updated (i.e., the number
of rows and seconds) is specified on the Actions tab in Personal Options. See the
Common Elements Manual for details.
Current Table
Rows Inserted
Total number of rows inserted in the table.
Rows Updated
Total number of rows updated in the table.
Failed Rows
Total number of rows that could not be inserted and were discarded.
124
IBM Optim: Move User Manual
Command Button
Cancel Process
To stop the process, click Cancel Process to open a confirmation dialog.
Then click Yes to stop the process and return to the Insert Request Editor,
or click No to continue processing.
Status Bar
Describes the action being performed and indicates the name of the table being
processed, as applicable.
Process Time
Lists the elapsed process time for the Insert Process.
Cascading Delete/Update Confirmation
Optim performs a cascading delete/update check during processing of an Insert
Request, and displays the Cascading Delete/Update Confirmation dialog if the
following conditions are true:
v The Warn on Cascade Delete/Update option in either Product or Personal
Options must be set to Runtime or Always. (See the Installation and Configuration
Guide and the Common Elements Manual.)
v All Tables or Mixed must be selected for Delete Options on the General tab of
the Insert Request Editor.
v The cascade delete or update must affect at least one table that is not explicitly
included in the Insert Process.
Click OK to continue processing the Insert Request, or click Cancel to stop
processing and return to the Insert Request Editor.
For details on the Cascading Delete/Update Confirmation dialog, see the Common
Elements Manual.
Insert Process Report
The Insert Process generates an Insert Process Report that provides general
information and statistics about the Insert Process, as shown below.
Chapter 5. Insert Process
125
The Insert Process Report displays the following information:
v Name of the Insert Request or “Untitled” if you did not save the request.
v
v
v
v
v
Name of the Optim Server or “(Local)” for client workstation.
Name of the Source file used as input to the process.
Name of the Control File specified in the Insert Request.
Name of the Table Map or LOCAL, as specified in the Insert Request.
Indicator (“Skipped” or “Processed”) for processing file attachments.
v User IDs of the user requesting the Insert Process.
v Date and time the Insert Process started.
v Date and time the Insert Process completed.
v Elapsed time for the Insert Process to complete.
Errors
If any errors or warnings occur during processing, a list of the errors or warnings
is provided. Review the list of errors that caused processing to stop. For example,
an internal error condition exists when the process exceeds the discard row limit or
if you are not authorized to access a particular database table.
126
IBM Optim: Move User Manual
Process Summary
Statistics are provided for the inserted data:
v Total number of Tables Processed.
v Total number of Rows Inserted.
v Total number of Rows Updated.
v Total number of Rows with Errors.
Row Details
Information is provided for each table:
v Number of rows inserted.
v Number of rows updated.
v Number of failed rows.
v List of tables used in the Insert Process. The tables are listed in the same order
as in the source file.
Save the Report
To save the report to a file, click File → Save As to open the Windows Save dialog.
Print the Report
To print the report, click File → Print to open the Windows Print dialog.
Redisplay the Report
If you close the report and want to view it again, click File → Redisplay Results,
and then do one of the following:
v Click Current to redisplay the report from the last Insert Process run.
v Click All to display a list of all retained Insert Process Reports.
For details about retaining process reports, see the Common Elements Manual.
Chapter 5. Insert Process
127
128
IBM Optim: Move User Manual
Chapter 6. Load Process
Use the Load Process to transform the contents of an Archive or Extract File into a
format that is appropriate for a particular DBMS loader and then, if specified, start
the corresponding database load utility.
The Load Process generates a data file in the correct format for each table in the
Archive or Extract File and an SQL file or a BAT file (Batch Execution), depending
on the DBMS, that contains the syntax necessary to start the database loader.
A Load Request contains the parameters used to prepare data for a DBMS loader
and the instructions required to process the load. Specify a Table Map in the Load
Request to map the destination for the data to load. Use optional Column Maps in
the Load Request to transform data before loading. For details, see the Common
Elements Manual.
Data to be loaded must be contained in an Archive or Extract File. You can use the
Archive or Extract Process to create the corresponding file, or use an existing
Archive or Extract File. See Chapter 4, “Extract Process,” on page 73, or see the
Archive User Manual.
Load versus Insert
Optim can move data into a database in two ways — using a Load Process or an
Insert Process. Consider the following when deciding which method to use:
v The volume of data and the speed of using the database load utility may offset
the advantages of the Insert Process.
v The data may contain referential integrity (RI) cycles that exceed the capability
of the Insert Process to insert all the data successfully.
v The database load utility requires exclusive control of the database and prevents
user access during the Load Process. The database is available to other users
while the Insert Process is performed.
v The database load utility either inserts new data or replaces existing data. The
Insert Process allows for Update/Insert processing in one step.
Process File Names
The Load Process generates the following types of files to support the database
utility load process:
v Data files — Data files contain the data you want to load, prepared in the
format appropriate for the DBMS you are using. Optim generates a data file for
each table in the Archive or Extract File. Data files are named the same as the
Archive or Extract File, but contain sequentially numbered file name extensions.
For example, an Extract File named demo.xf that contains three tables will
generate three data files named: demo.001, demo.002, and demo.003.
v Message files — Message files contain information that the database load utility
generates during the Load Process. Typically, there is one message file for the
entire Load Process. The message file is named the same as the Archive or
Extract File, but contains the extension .msg. For example, if the Extract File is
named demo.xf, the message file is named demo.msg.
© Copyright IBM Corp. 1994, 2010
129
v For DB2, an SQL file is generated with one statement for each destination table
that contains the loader syntax to manually execute the loader. The SQL file is
named the same as the Archive or Extract file, but has the extension .sql.
v For Oracle, Sybase ASE, SQL Server, and Informix, a BAT file is generated that
contains the syntax to manually execute the loader for each table. A BAT file is
generated for each DB Alias specified in the Table Map. Each BAT file resides in
the directory with the corresponding converted Load file. If you chose to
manually execute the loader, the BAT file must be edited (in Notepad, for
example) to replace a string of eight question marks with specific password
information (except Informix).
Additionally, a Format file is generated for each data file. A format file has the
same name as the corresponding data file, except that the file name extension is
different. If there are less than 500 tables to load, the format file name extension
is 500 greater numerically than the data file name extension. (For example, if
there are three data files named demo.001, demo.002, and demo.003, the
corresponding format files are named demo.501, demo.502 and demo.503,
respectively.) If there are more than five hundred tables, a more complex file
extension generation algorithm is employed.
Note: If your file server does not allow long file names of greater than 8 characters
and the Archive or Extract File has a long name, the Load Process will fail. The
best solution is to avoid using long file names for Archive or Extract Files. If
needed, you can copy and rename a file before you use it for a Load Process.
Run or Schedule
You can process a Load Request immediately by clicking File → Run, or you can
save and schedule the request for processing at a later time by clicking File →
Schedule. You must save the request before it is scheduled, but it is not necessary
to save the request before it is run.
Note: You must have authority from the SYSADM or DBA to run or schedule the
Load Process.
You can also direct the Load Process to generate the necessary files immediately,
but defer running the database load utility. If you choose not to start the database
load utility as part of the Load Request, the loader must be started manually.
Note: You cannot start the database load utility from within Optim using a
previously created set of SQL statements.
Naming Conventions
The fully qualified name of a Load Request consists of: identifier.name.
identifier
Identifier that serves as the prefix for the request name (1 to 8 characters).
name
Name assigned to the request (1 to 12 characters).
When you create Load Requests, it is helpful to use a logical set of naming
conventions to identify the use for each and to organize them for easy access.
130
IBM Optim: Move User Manual
Chapter Contents
This chapter explains how to create and maintain a Load Request, including how
to:
v Specify the Source File containing the data you want to load.
v Specify the Control File to record information about the process.
v Choose to run DBMS loaders in parallel or in sequence.
v Select or create a Table Map (and optional Column Maps) to provide more
control over the data you want to load.
v Specify default options for date aging to adjust dates in specified columns.
v Specify notification options.
v Run, save, and schedule a Load Request.
v Review, save and print the Load Process Report.
Note: For details on using a particular DBMS loader, refer to the documentation
provided with your DBMS.
Open the Load Request Editor
Use the Load Request Editor to create and maintain requests to prepare data for a
DBMS loader. These requests are stored in the Optim Directory.
There are different ways to open the editor depending on whether you want to
create a new Load Request or select an existing Load Request to edit.
Create a Load Request
Use this task to create a Load Request.
About this task
do the following to create a Load Request:
Procedure
1. Click File → New → Load from the main window to open the Load Request
Editor Options dialog.
2. Specify the Source File, Control File, and Table Map options and click OK to
display the Load Request Editor.
3. On the General tab, specify options for using the DBMS loaders.
4. On the DB Alias tab, specify options for using the specific DBMS loader.
Results
These steps are the minimum required to create a new Load Request. When you
create a new Load Request, the Load Request Editor Options dialog and the Load
Request Editor open at the same time. After you create a request, you can run the
process immediately or save and schedule the request. Because the options to
create and modify a Load Request are similar, see “Load Request Editor” on page
138 for further information.
An alternate method for opening the Load Request Editor is to click Actions →
Load from the main window. By default, the last Load Request you edited will
display. The next step depends on your purpose:
Chapter 6. Load Process
131
v To create a new Load Request, click File → New from the Load Request Editor.
v To create a new Load Request modeled on an existing one, open the desired
Load Request and click File → Save As from the Load Request Editor.
v To create and store a copy of the active Load Request and continue editing, click
File → Save Copy As from the Load Request Editor.
Resource Estimation
Optim is able to calculate the storage needed to process a Load Request. This
information can be valuable in determining when to run the load, or what options
to use. The Resource Estimator creates a report with storage estimates for each
object in a Load Request. The Resource Estimator must be run on the same
machine where the input file for the Load Request is located.
To estimate resources for a Load Request, open the Load Request Editor and click
Tools to display these options:
When you click Estimate Resources Optim calculates the amount of storage
necessary for this Load process and creates a Resource Estimation Report:
132
IBM Optim: Move User Manual
The first section of the Resource Estimation Report shows the type of request,
source file, elapsed time, and other details as in the Load Process Report. For
Chapter 6. Load Process
133
complete information, see “Load Process Report” on page 187. The Resource
Estimation Analysis section includes the following:
Status Status of storage estimated for this object in the Load request:
Passed
There is sufficient storage available to load this object.
Failed There is not sufficient storage available to load this object. If this is
the first object in the load request, there is currently insufficient
storage. If this is not the first object in the load request, there is
insufficient storage to load this object after loading the objects that
precede this object in the load request.
Estimated Storage (K)
Amount of storage needed to load this object.
Resource Name
Fully-qualified name of the object to be loaded.
Load Request Editor Options Dialog
When you create a new Load Request, the Load Request Editor Options dialog and
the Load Request Editor open at the same time.
134
IBM Optim: Move User Manual
Server Name
If the optional Optim Server is installed on your network, you can delegate
resource-intensive Load Request processing (for example, when the source file
contains a large number of tables or rows) to a machine hosting Optim Server.
Click the down arrow to select a machine hosting Optim Server, or select Local to
process the request on the local workstation.
Note: If the Optim Server machine option is not enabled at your site, the Server
Name box is unavailable.
Source File
Enter the name of the Archive or Extract File that contains the data to load. By
default, Extract Files have an .xf extension and Archive Files have an .af extension.
Control File
Enter the name of a Control File. This file is used during the process to track the
success or failure of preparing each row in the Source File. Control Files have a .cf
extension by default.
If you specify a file name that already exists, a dialog prompts you to confirm that
you want to overwrite the file when you run the Load Request. (The overwrite
confirmation dialog does NOT display when you schedule the Load Request.) To
disable this feature, use Personal Options.
Note: If you do not specify the full directory path, the process uses the path
defined as the default Data Directory in Personal Options.
You can browse the contents of an Archive, Extract or Control File by clicking
Utilities → Browse, or by right-clicking and selecting Browse from the shortcut
menu. For details on the Browse Utility, see the Common Elements Manual.
Table Map Options
Specify a Table Map to match source tables in an Archive or Extract File with
destination tables or to exclude tables in the Source File from the request. You
cannot save or process a Load Request without a valid Table Map.
Within a Table Map, specify a Column Map for any pair of tables to:
v Map source and destination columns that are compatible, but have unlike
names.
v Specify destination column values other than the source column values.
v Ignore specific columns.
Click Tools → Edit Table Map from the Load Request Editor to open the Table Map
Editor. For details on how to create, edit, or merge Table Maps, see the Common
Elements Manual.
Local
Select this option to create a Table Map to be used only with the active
Load Request. Local Table Maps are saved as part of the Load Request.
Named
Select this option to create a new Table Map or select an existing Table
Chapter 6. Load Process
135
Map to be used with the Load Request. You must specify a name for the
Table Map you want to create or the name of the existing Table Map you
want to use.
Note: If changes have been made to database tables since the last time a
Table Map was used, the specifications may no longer be valid, and a
warning message displays.
Table Map Name
Name of the new or existing Table Map to use with the Load Request. A
Table Map name has two parts: identifier.name.
identifier
Identifier to identify the Table Map (1 to 8 characters).
name
Name of the Table Map (1 to 12 characters).
Always View Table Map
Select this check box to open the Table Map Editor any time you save or
run a Load Request. This option provides an opportunity to review the
Table Map specifications before you perform the Load Process. If you clear
this check box, the Table Map Editor opens only when needed (for
instance, when the specified Table Map does not include all the tables in
the Source File).
Select a Load Request to Edit
Use this task to select a Load Request to edit.
About this task
Do the following to select a Load Request to edit:
Procedure
1.
2.
3.
4.
Click File → Open from the main window to open the object selection dialog.
Double-click to select Load Request and expand the object list.
Double-click the Load Request Identifier to display a list of Load Requests.
Double-click the desired Load Request to open the Load Request Editor.
Open a Load Request dialog
The Open dialog is divided into two areas. The object identifiers are listed on the
left and the associated objects appear on the right. The list of objects varies
depending on the identifier you select.
136
IBM Optim: Move User Manual
Pattern
Use the Enter pattern for Load Request box to limit the list of requests in the
Open dialog. A Load Request name has two parts: identifier.name. The pattern
specified also must have two parts. You can use the % (percent) wild card to
represent one or more characters or use the _ (underscore) wild card to represent a
single character in an object definition name. (The underscore must be selected as
the SQL LIKE character on the General tab of Personal Options.)
Note: After you specify a pattern, click Refresh to redisplay the list based on your
criteria.
Chapter 6. Load Process
137
Load Request Editor
Use the Load Request Editor to create, modify, or delete Load Requests stored in
the Optim Directory.
Description
Enter text to describe the purpose of the Load Request (up to 40 characters).
Tabs
The Load Request Editor displays tabs that allow you to specify necessary
parameters and select options to define and maintain Load Requests.
General
Enter specifications for running the DBMS loaders. Each time you open the
editor, the General tab is shown first.
138
IBM Optim: Move User Manual
DBMS (DB Alias)
The Load Request Editor shows a tab for each different database
management system specified in the Table Map. Enter the specifications
required for each DBMS.
Age Function
Specify default parameters for aging data in columns defined using an Age
function in a Column Map.
Global Aging
Specify default parameters for aging data in columns that have a native
date data type.
Currency
Select a default Currency Table and define currency conversion parameters
for columns with a native currency data type.
Report Options
Select options for reporting errors and aging specifications on the process
report.
Notify Specify options for automatic email notification of the success or failure of
the process.
Menu Commands
In addition to the standard File and Edit menu commands, you can select the
following commands from the other menus in the Load Request Editor:
Tools Menu
Convert to Local
When using a named Local Request in a Restore Request, select
this command to save the Load Request as a local request within
the Restore Request.
Edit Table Map
Opens the Table Map Editor to allow you to create or edit a Table
Map to be used only with the active Load Request. For details on
creating and maintaining Table Maps, see the Common Elements
Manual.
Respecify Options
Opens the Load Request Editor Options dialog to allow you to
modify the names of the Source File and Control File, as well as
Table Map options for the data you want to load.
Edit Exception Table Map
Opens the Exception Table Mapping dialog to allow you to
explicitly state what tables should be created to contain rows the
DBMS loader deems as exceptions (DB2, Oracle, and Informix
only). Informix refers to these tables as Violation Tables.
Edit Partition Map
Open the Table Partition Mapping dialog to map a Destination
Table to a Sybase Partition.
Estimate Resources
Create a Resource Estimation Report for this Load Request. For
details see “Resource Estimation” on page 132.
Chapter 6. Load Process
139
Edit ACL
Open the Access Control List Editor to secure the Load Request
with an Access Control List. Available when Object Security is
enabled.
Delete ACL
Delete the Access Control List securing the Load Request. Available
for secured Load Requests only.
Options Menu
Show Aging/Show Currency
Select these commands to switch between hiding or displaying the
corresponding tab.
General Tab
Before you can load data, you must specify how to run the DBMS load utilities.
140
IBM Optim: Move User Manual
Server Name
The workstation on which processing will take place, as specified on the Load
Request Editor Options dialog. To process on a different machine, click Tools →
Respecify Options.
Source File
The name of the Source File specified on the Load Request Editor Options dialog.
To use a different Source File, click Tools → Respecify Options.
Control File
The name of the Control File specified on the Load Request Editor Options dialog.
To use a different Control File, click Tools → Respecify Options.
Table Map Name
The Table Map specified on the Load Request Editor Options dialog. To use a
different Table Map, click Tools → Respecify Options.
Run DBMS Loaders
When more than one DB Alias is required to access tables listed in the Table Map,
indicate whether to run the DBMS loaders in parallel or in sequence.
In Parallel
Optim runs the different DBMS loaders at the same time.
In Sequence
Optim runs the different DBMS loaders one after another.
Note: This group box is disabled when the Table Map specified in the Load
Request includes tables from only one database, that is, when only one <DB
Alias> tab is displayed.
Stop on Loader error
Select this check box to stop the DBMS loader if an error occurs. When more than
one DB Alias is specified in the Table Map, and an error occurs in one DBMS
loader:
v If In Parallel is selected, processing stops for that DBMS loader, but processing
continues in all others.
v If In Sequence is selected, processing stops for that DBMS loader and all
subsequent DBMS loaders.
Stop on first conversion error
Select this check box to stop Load Request processing when a conversion error
occurs.
Clear this check box to continue processing when a conversion error occurs. Rows
in error are recorded with an error message in the Results Report. Conversion
processing continues to the end to record all possible errors.
Chapter 6. Load Process
141
If a conversion error occurs, the DBMS loader process is not initiated. See “Report
Options Tab” on page 182 to be sure that the Report errors option is selected and
that the Maximum number per table value is set high enough to account for all
possible errors.
Always Call Create
Select this check box to start the Create Utility each time before the DBMS loader
performs the load, to allow you to create or drop objects in the destination
database. Clear this check box to start the Create Utility only when necessary to
create desired objects in the destination database. See the Common Elements Manual
for further information about the Create Utility.
File Attachments
If the source file contains file attachment pseudocolumns, indicate how the Load
Process should proceed.
Fail
Fail the process.
Process as Columns
Process pseudocolumns as normal table columns. If matching columns do
not exist in the table, the pseudocolumns are ignored.
DB Alias Tab — DB2
Optim supports the DB2 loader. Use the DB Alias tab in the Load Request Editor
to define the specific parameters needed to perform the Load Process.
DB2 Remote Client Loading
When Optim loads data to DB2, the data files are created and written to a network
location accessible to both Optim and the DB2 server. The loader reads the files
from the network location and loads them to DB2. If a common network location is
not available, you can use DB2 remote client loading. Remote client loading writes
the data files to location outside the network – for example, a local Optim Server
hard drive. Optim calls the DB2 client which reads the data file and sends it to the
DB2 server for loading. Remote client loading cannot be used to load LOB data.
Since it may cause contention, use remote client loading only if there is no network
location available.
Note: DB2 has an IXF record length (row) limitation of 32K.
142
IBM Optim: Move User Manual
The DB2 Alias tab of the Load Request Editor has the following elements:
Mode
Insert Inserts the rows from the Source File into the destination tables. If primary
key values match, duplicate rows are inserted into the appropriate
Exception table if specified, or the table status becomes Check Pending.
Refer to the DB2 documentation for additional information about Check
Pending status.
Replace
Clears and replaces all of the existing rows in the destination tables with
Chapter 6. Load Process
143
the rows from the Source File. Selecting Replace enables the Replace
Options button, which opens this dialog:
Statistics
Do not collect Statistics
Select this button if you do not want to collect statistics for this
load process. Optim generates STATISTICS NO in the SQL script. If
you select this button, the other statistics options are unavailable.
Collect default Statistics
Select this button to have Optim generate STATISTICS USE
PROFILE in the SQL script. The profile defined for this table
determines the statistics collected during the load. For details refer
to the documentation for the loader.
Collect these Statistics
Select this button to choose the statistics to be collected. Optim
generates STATISTICS YES in the SQL script. You can choose:
Tables Select this check box to collect table statistics.
With Distribution
Select this check box to collect table distribution
statistics.
Indexes
Select this check box to collect index statistics.
Detailed
Select this check box to collect detailed index
statistics.
Mark as NonRecoverable
Select this check box to prevent tables from being left in an unusable state
if the Load process fails. Optim generates the NONRECOVERABLE
keyword in the SQL. NONRECOVERABLE specifies that a load transaction
144
IBM Optim: Move User Manual
is to be marked as non-recoverable, and that it will not be possible to
recover it by a subsequent rollforward operation. Refer to your loader
documentation for details.
Exception Table Options
An exception table contains copies of rows that violate unique index or primary
key rules. Each exception table includes a timestamp column and a description
column that contains the DB2 description of the violation.
Select one or both of the following options to create an exception table for each
destination table as part of database load utility processing.
Load
Select this check box to create exception tables to store rows that violate
unique index or primary key rules.
Constraints
Select this check box to create exception tables to store rows that violate
referential integrity or table check constraints.
Optim ensures that the names of exception tables do not match names of
destination tables specified in the Load Request. You can modify the exception
table names, but make sure that the names do not match the names of any existing
database tables.
If the Exception Table name is left blank, duplicate rows are discarded. The Load
Process drops existing exception tables before starting the database load utility to
ensure that newly created exception tables contain only the information for the
current database load.
Note: A confirmation dialog opens before exception tables are dropped. Change
the Creator ID to create different exception tables.
Click Tools → Edit Exception Table Map to display the Exception Table Mapping
dialog.
Chapter 6. Load Process
145
After the loader begins processing, if any data or referential integrity constraints
are violated, the discarded rows are placed in the exception table and the database
table is placed in Check Pending status. In addition, Optim issues the DB2 SET
CONSTRAINTS statement for each table.
Note: You must use the DBMS utilities to resolve any problems for database tables
that have pending status. For complete details, refer to your DBMS documentation.
File Type
ASCII For DB2 Linux, UNIX or Windows, use to import data into other DBRM
instances or EEE sites.
ASCII Delimited
For DB2 Linux, UNIX or Windows, use to import data into other DBRM
instances or EEE sites. If you select this file type, select a valid delimiter.
iSeries® IXF
For iSeries, use to import data into an iSeries instance.
IXF
For DB2 Linux, UNIX or Windows, use as the preferred import file type
for expedient processing.
Teradata ASCII
For a Teradata loader, use to import data into a Teradata instance. See “DB
Alias Tab - Teradata, Load Request Editor” on page 169.
Teradata Delimited
For a Teradata loader, use to import data into a Teradata instance. See “DB
Alias Tab - Teradata, Load Request Editor” on page 169.
Delimiter
Delimiter
You can exclude the delimiter from being scanned in character data
columns by Optim while generating the loader file. This can improve load
146
IBM Optim: Move User Manual
performance. To exclude delimiters from scanning, select any of the
following values from the Delimiter drop-down list:
X'01'
X'02'
X'03'
X'04'
X'05'
(No
(No
(No
(No
(No
Pre-scan)
Pre-scan)
Pre-scan)
Pre-scan)
Pre-scan)
Additional delimiters are supported which are scanned in character data
columns by Optim while generating the loader file. Select any of the
following values from the Delimiter drop-down list. Optim scans these
values while generating the loader file:
X'FA'
X'FB'
X'FC'
X'FD'
X'FE'
X'FF'
Save Interval
Specify whether you want the loader to commit changes to the database after
processing a specified number of rows or after each table is processed.
v To commit changes based on a number of rows, enter the number of rows up to
a maximum of 999999999.
v To commit changes after all data is loaded into a table, specify zero (0) or leave
blank. This method ensures that all data or no data is loaded.
Warning Limit
Specify the number of rows, up to a maximum of 999999999, that the loader can
discard during the Load Process. The process stops when the specified number of
rows is discarded.
v To end the process if a single row is discarded, specify 1 as the maximum.
v To set no limit to the number of rows that can be discarded, specify zero (0) or
leave blank.
Copy Options
Click Copy Options to select options to instruct the loader to make an image copy
of the input data during the Load Process. These options are specified on the Select
Copy Option dialog.
Chapter 6. Load Process
147
Note: To make an image copy, ensure that the LOGRETAIN and USEREXIT
options are set to ON in the loader. You should request an image copy if either
LOGRETAIN or USEREXIT is specified in the loader. The image copy is used to
provide forward recovery.
Do not copy
Select this option to choose not to make an image copy.
v If you do not make an image copy, the tablespace where the table
resides is placed in a backup pending state. A tablespace backup or a
full database backup is required to clear the pending status.
v If LOGRETAIN and USEREXIT are set to OFF in the loader, the
database does not provide forward recovery, and the copy image option
is ignored.
v If you restore the database to resolve pending states, you must use the
Configuration tool to apply maintenance for Optim Directory access and
DB Alias access. See the Installation and Configuration Guide for details.
Copy image to directory
Select this option to create an image copy. The load utility generates the
file names for each table based on the date and time of the load.
Note: You can specify a directory path to store the image copy. If the
directory does not exist, you can create one by responding to the prompts.
Path Name
Directory path to store the image copy. Click the browse button to
select from your system directories.
Copy image using ADSM
Select this option to create an image copy using ADSM. (For complete
information on using ADSM, refer to the DB2 documentation.)
I/O Sessions
Specify the number of I/O sessions to be used with ADSM.
The values you specify in the Copy Options dialog are profiled. Therefore, if you
always use the same specifications, it is not necessary to set copy options for each
Load Request. Click OK to retain your specifications. Click Cancel to close the
dialog, ignore changes, and return to the DB Alias tab of the Load Request Editor.
148
IBM Optim: Move User Manual
Options
Perform Load
Select this check box to run the loader immediately after file conversion
processing is complete.
Note: You can run the loader immediately only if you select IXF file type.
If you clear this check box, or select ASCII file types, the Load Process
prepares the data in the appropriate format and creates the SQL to run the
loader, but does not initiate the loader. To run the loader, you can copy the
syntax from the SQL file. Refer to your DB2 documentation.
Use Named Pipe
This option is only available when the file type is Teradata ASCII
or Teradata ACSII Delimited. See “DB Alias Tab - Teradata, Load
Request Editor” on page 169.
Delete files if Successful
Select this check box to delete the data files after the loader completes
successfully. If you select this check box, the Fast Load Confirmation
feature is unavailable.
Note: Fast Load Confirmation reduces processing time when you run a
Load Request that has run before. See “Run a Load Request” on page 183
for information.
Delete files if Failure
Select to delete the data files if the loader does not complete successfully. If
you select this check box, the Fast Load Confirmation feature is
unavailable.
Load When Source Is Empty
Select this check box to perform the load if a table to be loaded contains no
rows. If you do not select this check box, any tables in the Extract File
containing no rows will be skipped in the load phase. Using load with an
empty source table deletes rows from the target table, resulting in a clean
test environment.
Load from remote client
Select this check box to load using the DB2 LUW remote client option. The
data files are written to a location outside the DBMS server location, read
from the DB2 LUW loader client, and sent to the DBMS server. If you
select this check box, you must supply a path to the location of the data
files. Optim generates a LOAD command with the CLIENT keyword in the
SQL.
Directory Paths
Specify directory paths to the location for loader files. The files must be stored on a
drive that can be accessed by DB2 and the client as well as by workstation and
network server.
Note: If DB2 is running on a remote server and is started before Windows
connects to the network drives, you might receive a DB2 error message in the Load
Process Report that indicates the path for the file or device is not valid. The
solution is to restart DB2.
Work path for data files:
Specify workstation directory path to the location for temporary loader
Chapter 6. Load Process
149
files. The files must be stored on a drive that can be accessed by DB2 and
the client as well as by workstation and network server.
Server path for data files:
Specify network server directory paths to the location for temporary loader
files. The files must be stored on a drive that can be accessed by DB2 and
the client as well as by workstation and network server.
Server path for temporary files:
Path for temporary loader files. Optim generates TEMPFILES PATH clause
in the SQL. This is unavailable if Load from remote client is selected.
DB Alias Tab — Oracle
Optim supports the Oracle loader. Use the DB Alias tab to define the specific
parameters needed to perform the Load Process.
Mode
Insert Inserts rows from the Source File into empty destination tables. If
destination tables contain data, the loader returns an error.
Replace
Clears and replaces all of the existing rows in the destination tables with
the rows from the Source File. (Replace might be significantly more
resource-intensive than Truncate since no logging is performed.)
Append
Inserts the rows from the Source File into the destination tables. If the
primary key values match, duplicate rows are discarded or inserted into
the exception table (if specified).
Truncate
Truncate is the same as Replace but the database does not log the rows
being deleted, and Truncate requires that RI constraints are disabled.
150
IBM Optim: Move User Manual
Disable Triggers
Never Select this option if you do not want to disable database triggers for the
loader.
Always
Select this option to disable database triggers during the Load Process and
then re-enable the triggers after the process completes.
Prompt
Select this option to display the Disabling Trigger/Constraint Confirmation
dialog. This dialog displays a list of tables with all associated triggers. You
can right-click to enable or disable triggers during the Load Process for
each table. You can also select whether to enable or disable the triggers
after the Load Process completes.
Load Method
Conventional Path
Select this option when you want to:
v Load a small number of rows into a large table that has indexes or
referential integrity constraints.
v Apply SQL functions to specific data.
Direct Path
Select this option when you want to load and index a large volume of data
quickly. The following options are available:
Parallel Loads
Select this option to allows multiple load jobs to execute
concurrently. This option is available only if you select Direct Path
and Append mode.
UnRecoverable Load
This option disables the writing of the data to the Oracle redo logs.
This option is available for Direct Path loads only.
Note: Direct path load runs faster than the conventional path, especially when you
select the option for Parallel Loads. To use the direct path, the client and the server
must be running on the same platform. For complete details on which method to
use, refer to the documentation provided by Oracle.
Disable Constraints
Never Select this option when you do not want to disable referential integrity
constraints for the loader. A Constraint Non-Disablement Warning message
will display when you run the loader.
Chapter 6. Load Process
151
Always
Select this option to disable referential integrity constraints during the
Load Process and then reenable the constraints after the process
completes.
Prompt
Select this option to display the Disabling Trigger/Constraint Confirmation
dialog. This dialog displays a list of tables with all associated constraints.
You can right-click to enable or disable constraints during the Load Process
for each table. You can also select whether to enable or disable the
constraints after the Load Process completes.
Note: Options to disable triggers and constraints apply only when you select the
Perform Load option.
The Disabling Trigger/Constraint Confirmation dialog displays the list of tables in
the Load Process and tabs with the corresponding database triggers and referential
integrity constraints for each table.
The first grid column contains a Focus Arrow to indicate the table for which
triggers and constraints are listed. To display triggers and constraints for a
different table, click a Focus Arrow grid cell to reposition the arrow, or use the
up/down arrows on your keyboard.
152
IBM Optim: Move User Manual
Right-click in the Status During Process column to select to enable or disable the
corresponding trigger or constraint during the Load Process.
Right-click in the Status After Process column to select whether to enable or
disable the corresponding trigger or constraint after the Load Process completes.
Options
Perform Load
Select this check box to run the loader automatically after file conversion
processing is complete. If you clear this check box, the Load Process
prepares the data in the appropriate format and creates the BAT file to run
the loader, but does not initiate the loader. To run the loader, edit the BAT
file to include the proper password information and then run the BAT file.
Delete files if Successful
Select this check box to delete the data files after the loader completes
successfully. If you select this check box, Fast Load Confirmation is
unavailable.
Note: Fast Load Confirmation reduces processing time when you run a
Load Request that has run before. See “Process a Load Request” on page
183 for detailed information.
Delete files if Failure
Select this check box to delete the data files if the loader does not complete
successfully. If you select this check box, Fast Load Confirmation is
unavailable.
Create Exception Tables
Select this check box to create exception tables. An exception table contains
copies of rows that violate unique index or primary key rules. Optim
ensures that the names of exception tables do not match names of
destination tables specified in the Load Request. You can modify the
exception table names, however, use care to ensure that the names do not
match names of existing database tables. If the exception table name is left
blank, duplicate rows are discarded.
Click Tools → Edit Exception Table Map to display the Exception Table
Mapping dialog.
Chapter 6. Load Process
153
Inline LOBs
Select this check box to include LOBs in a data file (inline with the table
data). If this option is not selected, each LOB is loaded from a separate file
that is referenced in the Oracle loader control file.
Create Discard File
Select this check box to instruct the loader to create a discard file to use
during the Load Process.
Discard Limit
Enter the number of rows up to 999999999, that the loader can discard
during the Load Process. Processing stops when the specified number of
rows is discarded.
v To end the process if a single row is discarded, specify 1 as the
maximum.
v To set no limit to the number of rows that can be discarded, specify zero
(0) or leave blank.
Compressed Files
Select this check box to create variable length data rows instead of fixed
length data rows. This option can potentially reduce space required for
data conversion, but may slightly increase processing time.
Delimiter
Select a column delimiter from the drop-down list. To avoid a conversion
error, do not use a column delimiter that appears in any of the data being
loaded.
Commit
Specify the number of rows after which the loader commits changes to the
database, up to the limit specified in Product Options. Refer to the
Installation and Configuration Guide section on Product Options.
Load When Source Is Empty
Select this check box to perform the Load if the source file tables are
empty. For example, if you need to clear database tables of existing data
154
IBM Optim: Move User Manual
rows, use empty tables for the Load and select the option Load When
Source Is Empty. If you do not select this check box, the loader will not be
called for any empty source table.
Additional Loader Parameters
This field is provided to allow you to augment the loader arguments created
automatically by Optim with additional loader parameters, if necessary. The
additional parameters you create append to the list created by Optim, but are not
validated prior to starting the loader. Refer to Oracle documentation for valid
operands. If additional loader parameters are forced from within Product Options,
this field cannot be modified. (See the Installation and Configuration Guide.)
Work Path
Specify a default directory path for storing the temporary loader files.
DB Alias Tab — Sybase ASE
Optim supports the Sybase ASE loader. Use the DB Alias tab to define the specific
parameters needed to perform the Load Process.
Mode
Insert Insert the rows from the Source File into the destination tables. If the
primary key values match, duplicate rows are discarded or inserted into
the error file (if specified).
Replace
Clear and replace all existing rows in the destination tables with the rows
from the Source File.
Options
Perform Load
Select this check box to run the loader automatically after file conversion
processing is complete. If you clear this check box, the Load Process
prepares the data in the appropriate format and creates the BAT file to run
Chapter 6. Load Process
155
the loader, but does not initiate the loader. To run the loader, edit the BAT
file to include the proper password information and then run the BAT file.
Note: Since Sybase ASE does not accept a Replace operand for a load
request, make sure the tables are empty before you run the BAT file.
Delete files if Successful
Select this check box to delete the data files after the loader completes
successfully. If you select this check box, the Fast Load Confirmation
feature is unavailable.
Note: Fast Load Confirmation reduces processing time when you run a
Load Request that has run before. See “Process a Load Request” on page
183 for detailed information.
Delete files if Failure
Select this check box to delete the data files if the loader does not complete
successfully. If you select this check box, the Fast Load Confirmation
feature is unavailable.
Load When Source Is Empty
Select this check box to perform the load if a table to be loaded contains no
rows. If you do not select this check box, any tables in the Extract File
containing no rows will be skipped in the load phase. Using load with an
empty source table deletes rows from the target table, resulting in a clean
test environment.
Disable Triggers
For Sybase ASE (Version 12 or later), you can disable triggers:
Never Select this option to execute all database triggers during the Load Process.
Always
Select this option to disable all database triggers for the Load Process,
re-enabling the triggers after the process completes.
Prompt
Select this option to selectively disable database triggers during the Load
Process and selectively re-enable triggers when the process is complete.
Error File Options
Create Select this check box to instruct the loader to create a discard file to use
during the Load Process.
Max Errors
Enter the number of rows up to 999999999, that the loader can discard
because of errors during the Load Process. The process stops when the
specified number of rows is discarded.
v To end the process if a single row is discarded, specify 1 as the
maximum.
v To set no limit to the number of rows that can be discarded, specify zero
(0) or leave blank.
Additional Loader Parameters
This field is provided to allow you to augment the loader arguments created
automatically by Optim with additional loader parameters, if necessary. The
156
IBM Optim: Move User Manual
additional parameters you create append to the list created by Optim, but are not
validated by Optim prior to starting the loader. Refer to Sybase ASE
documentation for valid operands. If additional loader parameters are forced from
within Product Options, this field cannot be modified. (See the Installation and
Configuration Guide.)
Disable Constraints
Note: Options for disabling referential integrity constraints are applicable to SQL
Server Version 7.0 or later.
Never Select this option if you do not want to disable referential integrity
constraints for the loader. When this option is selected, a warning message
displays when you run the loader.
Always
Select this option to disable constraints during the Load Process and then
re-enable the constraints after the process completes.
Prompt
Select this option to display the Disabling Trigger/Constraint Confirmation
dialog. This dialog displays a list of tables with all associated constraints.
You can right-click to enable or disable constraints during the Load Process
for each table. You can also select whether to enable or disable the
constraints after the Load Process completes.
Note: Options to disable triggers and constraints apply only when you select the
Perform Load option.
The Disabling Trigger/Constraint Confirmation dialog displays the list of tables in
the Load Process and tabs that contain the corresponding database triggers and
referential integrity constraints for each table.
A Focus Arrow in the first grid column indicates the table for which triggers and
constraints are listed. To display the corresponding triggers and constraints for a
different table, click a Focus Arrow grid cell to reposition the arrow, or use the
up/down arrows on your keyboard.
Chapter 6. Load Process
157
Right-click the Status During Process column to select to enable or disable the
corresponding trigger or constraint during the Load Process.
Right-click the Status After Process column to select whether to enable or disable
the corresponding trigger or constraint after the Load Process completes.
Work path for interim files
Specify a default directory path for storing the temporary loader files.
Load — Table Partition Mapping
If you want to store extracted data in a specific partition, you must pass the
appropriate partition name when you run the Load process. (Contact your DBA for
the appropriate partition names.) A Table Partition Mapping dialog is used to map
the Destination Table to a Sybase Partition.
This dialog is displayed by clicking Tools → Edit Partition Map.
158
IBM Optim: Move User Manual
The Table Partition Mapping dialog includes a tab for each Sybase DB Alias in the
subject Optim Load Request. The Destination Table column lists every table
mapped within the Table Map Editor, and the Partition column is used to specify
the Sybase partition identifier or name for each table. You can specify one partition
name only for each table.
Note: Make sure the Extract File contains data only for the targeted partition,
otherwise you will receive an error from the Sybase loader.
Say, for example, you created a table called “my_publishers” that is partitioned by
list, according to the values in the state column, as indicated as follows. (Certain
entries are shown in bold for emphasis only.)
create table my_publishers
(pub_id char(4) not null,
pub_name varchar(40) null,
city varchar(20) null,
state char(2) null)
partition by list (state)
(west values ('CA', 'OR', 'WA') on seg1,
east values ('NY', 'MA') on seg2)
Chapter 6. Load Process
159
If your Extract File contains data for three states — California (CA), Oregon (OR),
and Washington (WA) — you would specify west as the Partition, as shown in the
earlier Table Partition Mapping example. Conversely, if your Extract File contained
data for two states — New York (NY) and Massachusetts (MA) — you would
specify east as the Partition.
After you specify the appropriate partition name(s), close the Table Partition
Mapping dialog to redisplay the previous dialog.
DB Alias Tab — SQL Server
Optim supports the SQL Server loader. Use the DB Alias tab to define the specific
parameters needed to perform the Load Process.
Note: SQL Server forces dates to be in a particular format. Therefore, in order to
run the request, the Client language must be the same as the language assigned to
the SQL Server User ID.
Mode
Insert Inserts the rows from the Source File into the destination tables. If the
primary key values match, duplicate rows are discarded or inserted into
the error file (if specified).
Replace
Clears all of the existing rows in the destination tables and replaces with
the rows from the Source File.
Options
Perform Load
Select this check box to run the loader automatically after file conversion
processing is complete.
If you clear this check box, the Load Process prepares the data in the
appropriate format and creates the BAT file to run the loader, but does not
160
IBM Optim: Move User Manual
initiate the loader. To run the loader, edit the BAT file to include the proper
password information and then run the BAT file.
Note: Since SQL Server does not accept a Replace operand for a load
request, you must ensure the tables are empty before you run the BAT file.
Delete files if Successful
Select this check box to delete the data files after the loader completes
successfully. If you select this check box, the Fast Load Confirmation
feature is unavailable.
Note: Fast Load Confirmation reduces processing time when you run a
Load Request that has run before. See “Process a Load Request” on page
183 for detailed information.
Delete files if Failure
Select this check box to delete the data files if the loader does not complete
successfully. If you select this check box, the Fast Load Confirmation
feature is unavailable.
Load when source is Empty
Select this check box to perform the Load if the source file tables are
empty. For example, if you need to clear database tables of existing data
rows, use empty tables for the Load and select the option Load when
source is Empty. If you do not select this check box, any empty tables in
the source file will not be loaded.
Disable Triggers
Note: Options for disabling database triggers are applicable to SQL Server Version
7.0 or later.
Never Select this option if you do not want to disable database triggers for the
loader.
Always
Select this option to disable database triggers during the Load Process and
then re-enable the triggers after the process completes.
Prompt
Select this option to display the Disabling Trigger/Constraint Confirmation
dialog. This dialog displays a list of tables with all associated triggers. You
can right-click to enable or disable triggers during the Load Process for
each table. You can also select whether to enable or disable the triggers
after the Load Process completes.
Error File Options
Create Select this check box to instruct the loader to create a discard file to use
during the Load Process.
Max Errors
Enter the number of rows up to 999999999, that the loader can discard
because of errors during the Load Process. The process stops when the
specified number of rows is discarded.
v To end the process if a single row is discarded, specify 1 as the
maximum.
v To set no limit to the number of rows that can be discarded, specify zero
(0) or leave blank.
Chapter 6. Load Process
161
Additional Loader Parameters
This field is provided to allow you to augment the loader arguments created
automatically by Optim with additional loader parameters, if necessary. The
additional parameters you create append to the list created by Optim, but are not
validated by Optim prior to starting the loader. Refer to SQL Server documentation
for valid operands. If additional loader parameters are forced from within Product
Options, this field cannot be modified. (See the Installation and Configuration Guide.)
Use NT Authentication
Select this check box to instruct Optim to supply the -T parameter to instruct the
loader to use the User ID and Password used to logon to the network. Clear the
check box to use a -U and -P parameter (UserID and Password) when starting the
loader.
Disable Constraints
Note: Options for disabling referential integrity constraints are applicable to SQL
Server Version 7.0 or later.
Never Select this option if you do not want to disable referential integrity
constraints for the loader. A Constraint Non-Disablement Warning message
will display when you run the loader.
Always
Select this option to disable constraints during the Load Process and then
re-enable the constraints after the process completes.
Prompt
Select this option to display the Disabling Trigger/Constraint Confirmation
dialog. This dialog displays a list of tables with all associated constraints.
You can right-click to enable or disable constraints during the Load Process
for each table. You can also select whether to enable or disable the
constraints after the Load Process completes.
Note: Options to disable triggers and constraints apply only when you select the
Perform Load option.
The Disabling Trigger/Constraint Confirmation dialog displays the list of tables in
the Load Process and tabs that contain the corresponding database triggers and
referential integrity constraints for each table.
The first grid column contains a Focus Arrow to indicate the table for which
triggers and constraints are listed. To display the corresponding triggers and
162
IBM Optim: Move User Manual
constraints for a different table, click a Focus Arrow grid cell to reposition the
arrow, or use the up/down arrows on your keyboard.
Right-click in the Status During Process column to select to enable or disable the
corresponding trigger or constraint during the Load Process.
Right-click in the Status After Process column to select whether to enable or
disable the corresponding trigger or constraint after the Load Process completes.
Work path for interim files
Specify a default directory path for storing the temporary loader files.
DB Alias Tab — Informix
Optim supports the Informix loader. Use the DB Alias tab to define the specific
parameters needed to perform the Load Process.
Chapter 6. Load Process
163
Mode
Insert Inserts rows from the Source File into empty destination tables. If
destination tables contain data, the loader returns an error.
Replace
Clears all of the existing rows in the destination tables and replaces with
the rows from the Source File.
Options
Perform Load
Select this check box to run the loader automatically after file conversion
processing is complete.
If you clear this check box, the Load Process prepares the data in the
appropriate format and creates the BAT file to run the loader, but does not
initiate the loader. To run the loader, edit the BAT file to include the proper
password information and then run the BAT file.
Delete files if Successful
Select this check box to delete the data files after the loader completes
successfully. If you select this check box, the Fast Load Confirmation
feature is unavailable.
Note: Fast Load Confirmation reduces processing time when you run a
Load Request that has run before. See “Process a Load Request” on page
183 for detailed information.
Delete files if Failure
Select this check box to delete the data files if the loader does not complete
successfully. If you select this check box, the Fast Load Confirmation
feature is unavailable.
Load When Source Is Empty
Select this check box to perform the load if a table to be loaded contains no
rows. If you do not select this check box, any tables in the Extract File
164
IBM Optim: Move User Manual
containing no rows will be skipped in the load phase. Using load with an
empty source table deletes rows from the target table, resulting in a clean
test environment.
Disable Triggers
Never Select this option if you do not want to disable database triggers for the
loader.
Always
Select this option to disable database triggers during the Load Process and
then re-enable the triggers after the process completes.
Prompt
Select this option to display the Disabling Trigger/Constraint Confirmation
dialog. This dialog displays a list of tables with all associated triggers. You
can right-click to enable or disable triggers during the Load Process for
each table. You can also select whether to enable or disable the triggers
after the Load Process completes.
Violation Table Options
Start Violation Table
Select this check box to issue a Start Violation Table SQL statement. Check
for previously linked violation tables and diagnostic tables by clicking
Tools → Edit Exception Table Map to display the Exception Table Mapping
dialog.
Note: The terms violation table and exception table are used
synonymously in Optim.
If linked tables are present, the Exception Table Map is automatically
populated with the table names. By default, a violation table name is the
table name with the suffix ‘_E'. (A diagnostic table name has the suffix
‘_D'.) You can change the names of the tables by over-typing them.
Delete all rows
Select this check box to delete all rows in existing violation tables and
diagnostic tables, before the Load begins.
Commit
Specify whether you want the loader to commit changes to the database by a
specified number of rows or one table at a time.
v To commit changes based on a number of rows, enter the number of rows up to
a maximum of 999999999.
v To commit changes after all data is loaded into a table, specify zero (0) or leave
blank. This method has advantages when you want to ensure that either all data
or no data is loaded.
Warning Limit
Specify the number of rows, up to a maximum of 999999999, that the loader can
discard during the Load Process. The process stops when the specified number of
rows is discarded.
v To end the process if a single row is discarded, specify 1 as the maximum.
v To set no limit to the number of rows that can be discarded, specify zero (0) or
leave blank.
Chapter 6. Load Process
165
Additional Loader Parameters
This field is provided to allow you to augment the loader arguments created
automatically by Optim with additional loader parameters, if necessary. The
additional parameters you create append to the list created by Optim, but are not
validated by Optim prior to starting the loader. Refer to Informix documentation
for valid operands. If additional loader parameters are forced from within Product
Options, this field cannot be modified. (See the Installation and Configuration Guide
for further information.)
Disable Constraints
Never Select this option if you do not want to disable referential integrity
constraints for the loader. When this option is selected, a warning message
displays when you run the loader.
Always
Select this option to disable referential integrity constraints during the
Load Process and then re-enable the constraints after the process
completes.
Prompt
Select this option to display the Disabling Trigger/Constraint Confirmation
dialog. This dialog displays a list of tables with all associated constraints.
You can right-click to enable or disable constraints during the Load Process
for each table. You can also select whether to enable or disable the
constraints after the Load Process completes.
Note: Options to disable triggers and constraints apply only when you select the
Perform Load option.
The Disabling Trigger/Constraint Confirmation dialog displays the list of tables in
the Load Process and tabs that contain the corresponding database triggers and
referential integrity constraints for each table.
The first grid column contains a Focus Arrow to indicate the table for which
triggers and constraints are listed. To display the corresponding triggers and
constraints for a different table, click a Focus Arrow grid cell to reposition the
arrow, or use the up/down arrows on your keyboard.
166
IBM Optim: Move User Manual
Right-click in the Status During Process column to select to enable or disable the
corresponding trigger or constraint during the Load Process. Right-click in the
Status After Process column to select whether to enable or disable the trigger or
constraint after the Load Process completes.
Note: For Informix, you can also select to enable constraints with or without using
a violation table. Select With Vio to enable the constraint and use a violation table.
Select No Vio to enable the constraint and not use a violation table. (If you select
Enabled, the Informix default for violation tables applies.)
Workstation Path
Specify a default directory path for storing the temporary loader files.
DB Alias Tab - iSeries, Load Request Editor
Optim supports loading data into an iSeries DBMS, using the DB2 CLIENT
IMPORT command. Use the DB Alias tab to define the parameters needed. A DB2
DB Alias must exist before you create the Load Request.
The DB Alias tab of the Load Request Editor has the options described below
when loading to an iSeries DBMS.
Chapter 6. Load Process
167
Mode
Insert Inserts rows from the Source File into empty destination tables. If
destination tables contain data, the loader returns an error. This error
occurs only if a primary key column is defined and this process attempts
to insert the same value into a table row.
Replace
Clears and replaces all of the existing rows in the destination tables with
the rows from the Source File.
Options
Perform Load
Select this check box to run the DB2 CLIENT IMPORT command
automatically after file conversion processing is complete. If you clear this
check box, the Load Process prepares the data in the appropriate format
and creates the BAT file, but does not initiate the command. To run the
command, edit the BAT file to include the proper password information
and then run the BAT file.
Delete files if Successful
Select this check box to delete the data files after the DB2 CLIENT
IMPORT command completes successfully. If you select this check box,
Fast Load Confirmation is unavailable.
Note: Fast Load Confirmation reduces processing time when you run a
Load Request that has run before. See “Process a Load Request” on page
183 for detailed information.
Delete files if Failure
Select this check box to delete the data files if the process does not
complete successfully. If you select this check box, Fast Load Confirmation
is unavailable.
Load When Source Is Empty
Select this check box to perform the load if a table to be loaded contains no
rows. If you do not select this check box, any tables in the Extract File
containing no rows will be skipped in the load phase. Using load with an
empty source table deletes rows from the target table, resulting in a clean
test environment.
File Type
ASCII For DB2 Linux, UNIX or Windows, use to import data into other DBRM
instances or EEE sites.
ASCII Delimited
For DB2 Linux, UNIX or Windows, use to import data into other DBRM
instances or EEE sites. If you select this file type, select a valid delimiter.
iSeries IXF
For iSeries, use to import data into an iSeries instance.
IXF
For DB2 Linux, UNIX or Windows, use as the preferred import file type
for expedient processing.
Teradata ASCII
For a Teradata loader, use to import data into a Teradata instance. This file
type is valid for Teradata Fast Load and Multi Load.
168
IBM Optim: Move User Manual
Teradata Delimited
For a Teradata loader, use to import data into a Teradata instance. If you
select this file type, select a valid delimiter. This file type is valid for
Teradata Fast Load and Multi Load.
Delimiter
To avoid error, the delimiter selected must not appear within the data.
Work path for interim files
Specify a default directory path for storing the temporary loader files.
DB Alias Tab - Teradata, Load Request Editor
Optim supports the Teradata Loader for both FastLoad and MultiLoad. A DB2 DB
Alias must exist before you create the Load Request. Use the DB Alias tab to
define the parameters needed.
Load using Teradata Named Pipe
Load performance may be significantly improved by using the Teradata Named
Pipe Access Module. When this option is used, the load process runs in a single
phase rather than a 2-stage process, resulting in reduced elapsed time for load
processing. As the row data is immediately loaded after conversion to a loader
format, the space requirements are also significantly reduced, when compared to
the 2-stage load process.
Optim writes the data to the named pipe, the Teradata Named Pipes Access
Module reads and then copies the data, and the data is loaded. You have the
option of writing the data to be loaded to a fallback file, in case you need to restart
the load using native Teradata utilities outside of Optim. The fallback file has an
extension of .fbf and is created in the %TEMP% or %WINDIR%\temp directory.
Optim writes data to the fallback file according to the save interval that you set.
After the load process completes, the fallback file is automatically deleted.
Use the Load tab in Personal Options to specify the Teradata Server, user ID,
password, and path to the Loader. See Personal Options in the Common Elements
Manual.
Chapter 6. Load Process
169
This panel has the following fields:
Mode
Insert Inserts rows from the Source File into empty destination tables. If
destination tables contain data, the loader returns an error.
Replace
Clears and replaces all of the existing rows in the destination tables with
the rows from the Source File.
Replace Options
Displays a dialog box with options for collecting statistics and for
generating NONRECOVERABLE keyword. NONRECOVERABLE
specifies that a load transaction is to be marked as non-recoverable,
and that it will not be possible to recover it by a subsequent
roll-forward operation. Refer to your loader documentation for
details.
170
IBM Optim: Move User Manual
Use the Replace Options dialog to select:
Statistics
Do not collect Statistics
Select this check box if you do not want to collect statistics for this load
process. Optim will generate a STATISTICS NO clause in the SQL for this
load process. For additional information, refer to your Teradata
documentation.
Collect default Statistics
Select this check box to add the STATISTICS USE PROFILE keyword to the
SQL created for this load process. Refer to your loader documentation for
details.
Collect these Statistics
Select this check box to collect statistics for tables or indexes:
Tables Select this check box to collect table statistics.
With Distribution
Collect table statistics with distribution.
Indexes
Select this check box to collect index statistics.
Detailed
Collect detailed index statistics.
Options
Mark as NonRecoverable
Select this check box to generate the NONRECOVERABLE keyword in the
SQL created for this load process. NONRECOVERABLE specifies that a
load transaction is to be marked as non-recoverable, and that it will not be
possible to recover it by a subsequent roll-forward operation. Refer to your
loader documentation for details.
Chapter 6. Load Process
171
File Type
ASCII For DB2 Linux, UNIX or Windows, use to import data into other DBRM
instances or EEE sites.
ASCII Delimited
For DB2 Linux, UNIX or Windows, use to import data into other DBRM
instances or EEE sites. If you select this file type, select a valid delimiter.
iSeries IXF
For iSeries, use to import data into an iSeries instance.
IXF
For DB2 Linux, UNIX or Windows, use as the preferred import file type
for expedient processing.
Teradata ASCII
For a Teradata loader, use to import data into a Teradata instance. This file
type is valid for Teradata FastLoad and MultiLoad.
Teradata Delimited
For a Teradata loader, use to import data into a Teradata instance. If you
select this file type, select a valid delimiter. This file type is valid for
Teradata FastLoad and MultiLoad.
Delimiter
You can exclude the delimiter from being scanned in character data
columns by Optim while generating the loader file. This can improve load
performance. To exclude delimiters from scanning, select any of the
following values from the Delimiter drop-down list:
X'01'
X'02'
X'03'
X'04'
X'05'
(No
(No
(No
(No
(No
Pre-scan)
Pre-scan)
Pre-scan)
Pre-scan)
Pre-scan)
Additional delimiters are supported which are scanned in character data
columns by Optim while generating the loader file. Select any of the
following values from the Delimiter drop-down list. Optim scans these
values while generating the loader file:
X'FA'
X'FB'
X'FC'
X'FD'
X'FE'
X'FF'
Options
Perform Load
Select this check box to run the loader automatically after file conversion
processing is complete. If you clear this check box, the Load Process
prepares the data in the appropriate format and creates the BAT file to run
the loader, but does not initiate the loader. To run the loader, edit the BAT
file to include the proper password information and then run the BAT file.
Use Named Pipe
Select this check box to use the Teradata Named Pipe Access
Module to load the data. The data to be loaded is written to the
named pipe and then submitted to the loader. This option is only
available when the DB2 LUW DB Alias references a Teradata
database and file type is Teradata ASCII or Teradata ASCII
Delimited.
172
IBM Optim: Move User Manual
Delete files if Successful
Select this check box to delete the data files after the loader completes
successfully.
v If you select this check box, Fast Load Confirmation is unavailable.
v If you select Use Named Pipe, Delete files if Successful is unavailable.
Note: Fast Load Confirmation reduces processing time when you run a
Load Request that has run before. See “Process a Load Request” on page
183 for detailed information.
Delete files if Failure
Select this check box to delete the data files if the loader does not complete
successfully.
v If you select this check box, Fast Load Confirmation is unavailable.
v If you select use Named Pipe, Delete files if Failure is unavailable.
Load When Source Is Empty
Select this check box to perform the load if a table to be loaded contains no
rows. If you do not select this check box, any table in the Extract File
containing no rows will be skipped in the load phase. Using load with an
empty source table deletes rows from the target table, resulting in a clean
test environment.
Load from remote client
This option is unavailable when loading to Teradata.
Save Interval:
Specify the interval for committing changes to the database or writing data to the
fallback file:
v If you select the check box for Use Named Pipe, the value you choose for Save
Interval controls the timing of writing data to the fallback file. Allowable values
are: after a specified number of rows or after each table.
v If you do not select the check box for Use Named Pipe, the value you choose for
Save Interval controls the timing of committing changes to the database.
Allowable values are: after a specified number of rows or after each table.
Warning Limit:
Specify the number of rows, up to a maximum of 999999999, that the loader can
discard during the Load Process. The process stops when the specified number of
rows is discarded.
v To end the process if a single row is discarded, specify 1 as the maximum.
v To set no limit to the number of rows that can be discarded, specify zero (0) or
leave blank.
Work path for interim files
Specify a default directory path for storing the temporary loader files.
Additional Loader Parameters
You can augment the loader arguments created automatically by Optim with
additional loader parameters, if necessary. The additional parameters you create
are appended to the list created by Optim, but are not validated by Optim before
Chapter 6. Load Process
173
starting the loader. Refer to Teradata documentation for valid operands. If
additional loader parameters are forced from within Product Options, you cannot
modify them. Refer to the Installation and Configuration Guide.
DB Alias Tab — z/OS
Optim can create load and SQL statement files to support the z/OS loader. Use the
DB Alias tab in the Load Request Editor to define the specific parameters needed
to create the files.
The FTP Options on the Load Request Editor allow you to automatically transfer
the files to the z/OS FTP server and optionally run the loader.
Mode
Replace entire Tablespace
Select this check box to indicate that all rows in the table space should be
deleted before the Load Process is performed.
Resume
Select this check box to indicate that existing rows in the table space
should not be deleted when the Load Process is performed.
174
IBM Optim: Move User Manual
Sysin Load Statement Options
Perform Logging during Load
Indicates whether to perform logging during the load.
Use Single Load Data File
Indicator for grouping all tables to be converted into a single data file,
instead of using an individual file for each table.
Note: You can only use a Single Load Data File when all the tables are to
be loaded in the same tablespace.
Run inline Runstats
Invokes RUNSTATS to ensure that statistical data is accurately updated.
RUNSTATS is invoked at the tablespace level and includes all tables and
indexes in the tablespace.
Produce Statistics Report
Produce report of Runstats, when Run inline Runstats is selected.
Enforce RI during Load
Indicates whether data can be loaded into dependent tables without
verification of RI constraints. Before the database can be used, RI
enforcement determines that the load has not violated RI rules. For
example, proper parents must exist for all rows inserted into a child table.
Load When Source Is Empty
Select this check box to perform the load if a table to be loaded contains no
rows. If you do not select this check box, any tables in the Extract File
containing no rows will be skipped in the load phase. Using load with an
empty source table deletes rows from the target table, resulting in a clean
test environment.
Target Code Page
Specify the target code page to use for proper character translation for the
DB2 z/OS environment.
Discard Limit
Enter the number of rows up to 999999999, that the loader can discard
during the Load Process. The process stops when the specified number of
rows is discarded.
v To end the process if a single row is discarded, specify 1 as the
maximum.
v To set no limit to the number of rows that can be discarded, specify zero
(0) or leave blank.
FTP Options
Transfer File to z/OS
Indicator for transmitting files to the FTP server after successfully
converting the row data. Select this check box to enable the remaining FTP
Options.
Submit Job on z/OS
Indicator to submit the generated JCL to z/OS after Optim transmits the
required files. The job number is provided in the Informational Messages
of the Load Process Report.
Chapter 6. Load Process
175
Note: Optim does not return any output from the actual job. You can,
however, determine the status of the job by signing onto z/OS and locating
the job in the JES spool.
Review Generated JCL
Indicator to display the Viewing File dialog to review the generated JCL
after the files have been transmitted to the z/OS machine but before the
job is submitted.
Note: This option is available only when Submit Job on zOS is selected.
Save Generated JCL on z/OS
Indicator to save the JCL to z/OS, allowing you to run the job manually.
Use FTP login from Personal Options
Indicator to use FTP login information on the Load tab in Personal Options
instead of the login information in the FTP Options.
FTP Server
Enter a TCP/IP address or z/OS FTP server name.
Port
Enter the port used by Optim to open a connection. Enter 0 to use the
default.
User ID
Enter a z/OS FTP server User ID.
Password
Enter the password for the z/OS FTP server User ID.
z/OS Dataset Qualifier
Enter the DSN qualifier(s). The dataset is prefixed with the User ID and
the qualifier(s). Use a single quote as the first character to indicate that all
datasets transmitted to z/OS are fully qualified and will not be prefixed
with the User ID.
The total length of the dataset name cannot exceed 44 characters. The last
two qualifiers of the dataset require up to 12 characters (the first 8
characters of the Extract File name and 4 characters for a unique generated
file number). For example, ‘userID.qualifier.FileName.X001.'
JCL Template
Enter the name of the file used to construct the generated JCL submitted to
z/OS.
A template file, LOADDB2.JCL, is distributed with Optim in the
RT/Samples/JCL directory. It is recommended that you copy this file to
your default data directory and modify the JCL to meet the requirements
at your site.
Work path for interim files
Specify a directory path for storing the temporary loader files on your workstation
or network server.
Viewing File
The Viewing File dialog displays the generated JCL for review. Click OK to submit
the job. If you click Cancel, the job is not submitted; however, the transmitted files
remain on the z/OS machine, and you can run the job manually.
176
IBM Optim: Move User Manual
Age Function Tab
Use the Age Function tab to specify parameters for aging data when using the Age
function in a Column Map.
These values are applied to columns for which you specify the Age function as
AGE(DEF) or AGE(RU=DEF). These values are also used to complete the
specifications for date adjustment values in columns defined with the Age function
when the specifications are incomplete.
Chapter 6. Load Process
177
Date Adjustment Values
None
Specifies that an aging increment is not used.
Years, Months, Weeks, Days
Adjusts dates incrementally by a specified number of years, months,
weeks, and/or days. Use a minus (-) sign to decrement the date. The plus
(+) sign is not required to increment the date.
Years
Number of years (-2500 to +1581) to adjust the date.
Months
Number of months (-30000 to +30000) to adjust the date.
Weeks Number of weeks (-30000 to +30000) to adjust the date.
Days
Number of days (-99999 to +99999) to adjust the date.
Specific Year
Adjusts the date to a specific four-digit year (1582 to 3999).
Specific Date
Adjusts the date to a specific date. To select a date from a perpetual
calendar, click on the down arrow. Click the arrow buttons to set the
month and year. Click on a day to set the day of the month.
178
IBM Optim: Move User Manual
Note: If you do not specify a date, the system (current) date displays. The
date format is based on the Regional Settings on the Control Panel of your
computer.
Base/Target
Adjusts the date incrementally by a calculated aging amount. The aging
amount is the number of days between the Base date and the Target date.
To select a base or target date from a perpetual calendar, click on the down
arrow. Click the arrow buttons to set the month and year. Click on a day to
set the day of the month.
Base
Specify an explicit start date for calculating the aging amount.
Target Specify an explicit end date for calculating the aging amount.
Multiple/Rule
Adjusts the date by applying the specified date aging rule the specified
number of times. For example, if the rule is defined as NEXTPAYDAY and
you specify 4 as the multiple, the date is adjusted from the source date to
the fourth NEXTPAYDAY.
Multiple
Number of times (1 to 30000) to apply the specified rule for date
aging.
Rule
Name of the rule to use.
Date Adjustment Options
Calendar
Enter the name of the calendar to use by default. To select from a list of
available calendars, click the down arrow.
Rule
Enter the name of the rule to use by default. To select from a list of
available rules, click the down arrow.
Note: Define calendars and rules by clicking Utilities → Calendar. For
details on defining calendars and rules, see the Common Elements Manual.
Century Pivot
Enter the value to use to determine the appropriate century when a date
value is defined with a two-digit year. If you do not specify a value, 65 is
used by default. For example, if you specify 55 as the Century Pivot, then:
v All two-digit years equal to or greater than 55 are assumed to be in the
20th century.
v All two-digit years less than 55 are assumed to be in the 21st century.
Exception Options
Select the following exception options to handle special date values when aging
data. Rather than treat these dates as errors, the dates are moved directly from the
source to the destination if the column attributes are identical.
v Process rows with invalid dates — If you select this check box, rows with
columns that contain invalid dates are processed and the results are written to
the destination. If you clear the check box, the rows are discarded and are noted
in the Control File.
Chapter 6. Load Process
179
v Process Rows with skipped dates — If you select this check box, rows with
columns formatted as skipped dates are processed and the results are written to
the destination. If you clear the check box, the rows are discarded and are noted
in the Control File.
At times, special values called skipped dates are used to indicate special handling
or unique conditions. To determine whether or not to skip a date, the date aging
function evaluates each date for the following:
v If a date column contains all spaces, hexadecimal zeros (low values), or
hexadecimal 'FF' (high values), the date is skipped.
v If a date column contains a skipped date value, the value is parsed based on the
specified date format or exit routine.
The date aging function recognizes the following as skipped dates:
Date Format
Y/M/D
Skipped Date Value
1999/99/99
Date Format
Y/M
1999/999
9999/99/99
9999/999
9999/12/31
1900/0
1900/0/0
2000/0
2000/0/0
0/0
0/0/0
Y
1/1/1
Y/J
Skipped Date Value
1999/999
0
M/D
9999/999
1900/0
99/99
0/0
M
2000/0/0
0/0
9999
99
0/0
D
9/9
0/0
This list is intended to be as comprehensive as possible. If you require additional
skipped dates, contact Technical Support.
Global Aging Tab
Use the Global Aging tab to specify parameters for aging data in columns defined
with a native date data type. Global Aging parameters apply to all date columns
not specifically defined by an Age function in a Column Map.
Note: The parameters shown on the Global Aging tab are the same as those
shown on the Age Function tab. For information about each parameter, see “Age
Function Tab” on page 177.
Currency Tab
Use the Currency tab to specify the default Currency Table to use when the
Currency function is defined in a Column Map.
Specify global parameters for currency conversions in columns that have a native
currency data type.
180
IBM Optim: Move User Manual
Default Currency
Specify the Currency Table to use when the Currency function is specified in a
Column Map.
Global Currency Options
Global Currency Definition
Specify the default Currency Table to use for currency conversions in
columns that have a native currency data type.
From Type To Type
Enter specific currency types for the source and destination currency when
converting currency values in columns that have a native currency data
type.
Triangulate
Select this check box to convert the specified source currency to the euro
dollar, then convert the euro dollar value to the specified destination
currency.
Chapter 6. Load Process
181
Report Options Tab
Use the Report Options tab to specify what information you want included in the
Load Process Report.
Reporting Options
Report errors
Select this check box to include a list of errors in the Load Process Report.
Report Invalid Dates
Select this check box to include rows with invalid dates in the Load
Process Report when you select the corresponding Exception Option on the
Age Function or Global Aging tab.
Report Skipped Dates
Select this check box to include rows with skipped dates in the Load
Process Report when you select the corresponding Exception Option on the
Age Function or Global Aging tab.
Maximum number per table
Specify the maximum number of errors per table to include in the Load
Process Report.
Maximum number per run
Specify the maximum number of errors per run to include in the Load
Process Report.
182
IBM Optim: Move User Manual
Aging Option
Report Aging Summary
Select this check box to include a summary of aging parameters in the
Load Process Report. A report that includes the Aging Summary can be
printed in landscape mode only.
Notify Tab
Use the Notify tab to specify options and addresses for automatic e-mail
notification of the success or failure of the process. The process report generated
when the process completes is automatically sent as an attachment.
Process a Load Request
You can process a Load Request at any time, but if you create a new Load Request
and want to reuse it, you must save the request.
You can either run a Load Request immediately or schedule it to run at some later
time.
Note: Depending on how Optim is configured at your site, you may encounter a
logon prompt during processing. See the Common Elements Manual for information
about the DB Alias Connection Logon dialog and Optim Directory Connection
Logon dialog.
Schedule a Load Request
To schedule a Load Process to run once or repeatedly at a specified future time,
save the Load Request, and then click File → Schedule.
v Processing is initiated at the scheduled time; you do not review the process as it
is performed.
v If warning conditions exist, processing continues without prompting, depending
on the Stop on Error parameter you specified on the Steps tab of the Scheduling
Job dialog.
v During processing, if an error occurs, processing stops.
For details on scheduling, see the Common Elements Manual.
Run a Load Request
To process a Load Request immediately, click File → Run. It is not necessary to save
the Load Request before it is run.
v Before processing begins, the request is verified. If warning conditions exist, you
can review the details in the Warnings dialog and choose to continue or cancel
processing.
v During processing, if an error occurs, processing stops.
A progress dialog and status messages provide information while the request is
processing. When processing completes, or stops because of an error, you can
review the details in the Process Report. You can also browse the Control File to
review process details.
Chapter 6. Load Process
183
Fast Load Confirmation
Fast Load significantly reduces processing time when you run a Load Request that
has run before. When you run the Load Request again, the Fast Load Confirmation
dialog displays if these conditions are met:
v The names of the Load Request, Source File, and Table Map (named or local)
that originally generated the DBMS loader files are the same.
v The content of the Source File has not changed since it was used to generate the
DBMS loader files.
v Any Column Maps are still assigned to the same tables.
v All DBMS loader files for each table are located on the same drive and directory
as when the files were generated.
If the Load Request, Source File, and Table Map names have changed, or the
content of the Source File has changed, Optim cannot perform Fast Load for any
table in the Load Request, and the Fast Load Confirmation dialog is not displayed.
If a Column Map name or the drive and directory for the DBMS loader files for a
given table change, Optim cannot perform Fast Load for the table, and the table
does not appear in the Fast Load Confirmation dialog.
Note: If you select Delete files if successful or Delete files if failure on the
DBMS tab in the Load Request Editor, Fast Load is not available.
184
IBM Optim: Move User Manual
The Fast Load Confirmation dialog displays the Source file name, Table Map name
or Local, and a list of the converted tables. If tables are included from more than
one DB Alias, a separate tab is displayed for each DB Alias.
Use the Fast Load Confirmation dialog to review the list of converted tables. To
reuse all DBMS loader files for the tables listed, click OK. To create new DBMS
loader files for any table, clear the check box for the table and click OK. Click
Cancel to stop processing and return to the Load Request Editor.
Note: You can right-click in the grid and select commands from the shortcut menu
to select or deselect all tables for the corresponding DB Alias. You can also use the
Select All or Deselect All buttons to select or deselect all tables for all DB Alias
tabs.
Load Request Progress Dialog
When the Load Process begins, the Load Request Progress dialog will display
status information about the Load Process.
Chapter 6. Load Process
185
Totals
Rows to be processed
Total number of rows in the Source File to be loaded.
Failed Rows
Total number of rows that could not be converted and were discarded.
Rows Converted
Total number of rows that were converted.
The totals in the Load Request Progress dialog are revised after a number of rows
(specified on the Actions tab in Personal Options) are loaded for each table, and
when the load for one table completes and the process begins for the next table.
(See the Common Elements Manual for more information.)
Current Table
Failed Rows
Number of rows from the current table that could not be converted and
were discarded.
Rows Converted
Number of rows from the current table that were converted.
Grid Details
DB Alias
Lists DB Aliases corresponding to tables to be loaded.
[Convert or Load] Status
Indicates the status of the process for each database involved in the load
process. Processing proceeds through the following steps:
v Convert in Progress
v Convert Complete
186
IBM Optim: Move User Manual
v Validating Table Map
v Now Processing: creatorid.tablename
v Complete
Command Button
Cancel Process
To stop processing during conversion, click Cancel Process. A confirmation
dialog opens. Click Yes to stop processing and return to the Load Request
Editor, or click No to continue processing. You cannot cancel processing
during loading.
Status Bar
Describes the action being performed and indicates the name of the table being
processed, as applicable.
Process Time
Lists the elapsed process time for the Load Process.
Cascading Delete/Update Confirmation
Optim performs a cascading delete/update check during processing of a Load
Request, and displays the Cascading Delete/Update Confirmation dialog if the
conditions described in this topic are true.
v The Warn on Cascade Delete/Update option in either Product or Personal
Options must be set to Runtime or Always. (See the Installation and Configuration
Guide and the Common Elements Manual.)
v The Replace mode (or Truncate mode for Oracle) and the Perform Load option
must be selected on the DB Alias tab of the Load Request Editor.
v The cascade delete or update must affect at least one table that is not explicitly
included in the Load Process.
Click OK to continue processing the Load Request, or click Cancel to stop
processing and return to the Load Request Editor.
For details on the Cascading Delete/Update Confirmation dialog, see the Common
Elements Manual.
Load Process Report
The Load Process generates a Load Process Report that provides general
information and statistics about the Load Process.
Here is an example of the Load Process Report.
Chapter 6. Load Process
187
The Load Process Report displays the following information:
v Name of the Load Request (or “Untitled” if not saved).
v Name of the Server or Local, for client workstation.
v Directory path and name of the Source File used as input to the process.
v Directory path and name of the Control File specified in the Load Request.
v
v
v
v
v
v
Name of the Table Map or LOCAL, as specified in the Load Request.
User IDs of the user requesting the Load Process.
Date and time the process started.
Date and time the process finished.
Elapsed time for the Load Process to complete.
The status of the Load Process.
Note: The Time Started, Time Finished, and Elapsed Time refer to the conversion
phase of the process only.
188
IBM Optim: Move User Manual
Errors
If any errors or warnings occur during processing, a list of the errors or warnings
is provided. Review the list of errors that caused processing to stop. For example,
an internal error condition exists when the process exceeds the discard row limit or
if you are not authorized to access a particular database table.
Load Process Informational Messages
Informational messages are displayed in the Load Process Report if you specified
FTP options on the DB Alias tab for the MVS S390 loader. Each message includes
the name of the dataset transmitted to the S390, whether the dataset was
transmitted successfully, and the table(s) for which the dataset was transmitted. For
example:
‘PSTDJH.LOAD02.fulldemo.X001' was successfully sent to FTP Server S390QA for
table PSTDSNY.PSTDJH.CUSTOMERS.
The last qualifier of the transmitted dataset indicates the type of dataset:
.Xnnn
A file in TSO Transmit/Receive format.
.Snnn
A file containing the Load SQL statement to load the table.
.Innn
A file in DB2 IXF format, received by the TSO Receive command.
.JCL
A file containing the JCL to submit to the S390. The JCL receives, loads,
and deletes the transmitted datasets. This message also indicates the job
number.
Process Summary
Statistics are provided for data preparing to load:
v Total number of Tables Processed.
v Total number of Rows Extracted.
v Total number of Rows Converted.
v Total number of Rows with Errors.
Row Details
Information is provided for each table:
v Number of extracted rows.
v Number of converted rows.
v Number of failed rows.
v List of tables used in the Load Process. The tables are listed in the same order as
in the Source File. If a table was selected on the Fast Load Confirmation dialog,
the table name is underscored.
Save the Report
To save the report to a file, click File → Save As to open the Windows Save dialog.
Print the Report
To print the report, click File → Print to open the Windows Print dialog.
Chapter 6. Load Process
189
Redisplay the Report
If you close the report and want to refer to it again, click File → Redisplay Results,
and then click Current to redisplay the report from the last Load Process run, or
click All to display a list of all retained Load Process reports. For details about
retaining process reports, see the Common Elements Manual.
190
IBM Optim: Move User Manual
Appendix. Command Line Interface
Optim provides a command line interface that allows you to run an Extract, Insert,
Load, or Convert Process, run one or more processes from a file, or run a
scheduled job, without opening the graphical user interface.
The command line interface can be run from the command line, or
automatically—in a batch file, or from another program.
Command Line Tasks
Use the command line interface to:
v Browse an Extract or Control File.
v Run an Extract, Insert, Load, or Convert Process.
v Run a scheduled job that includes several action requests.
v Run multiple processes from a file.
v Override original specifications for a process.
v Restart or retry an Insert Process.
The following sections explain and describe how to perform each type of task.
Process return codes are listed in the last section of this chapter.
Guidelines
The typical command begins with PR0CMND followed by command-line
keywords and associated arguments. The following guidelines apply:
v Command-line keywords can be specified in any order, separated by one or
more spaces without commas.
v Keywords can be specified in mixed case. (Most keywords are shown in this
chapter using bold and uppercase for emphasis.)
v Command-line keywords and associated arguments must be separated with an
equal sign (=) or a colon (:).
v An override keyword must be separated from the associated argument with a
blank space.
v The first operation argument must be prefixed by a forward slash (/) or dash (-).
v A command-line keyword may be prefixed by a forward slash (/) or a dash (-).
Example: PST, /PST, and -PST are equal keywords.
v An argument associated with a command-line keyword that includes spaces
must be enclosed in single or double quotes.
v Use double quotes to enclose a command-line keyword argument that includes a
macro.
v You can include all keywords and arguments in a parameter file and then
specify the parameter file on the command line.
v In a parameter file, command-line keywords corresponding to a process request
can be entered on one or multiple lines. You can include several process requests
in the file; each must begin with the TYPE parameter.
v Use override keywords and arguments to override specifications in a process
request.
© Copyright IBM Corp. 1994, 2010
191
v When overrides are specified for a process defined in a parameter file, the OV
keyword must follow other command-line keywords and precede the override
parameters. The first override keyword and associated argument must begin on
the following line, and each additional override must be on a separate line. The
override keyword END must follow the last override, and must also be on a
separate line.
v If you use a keyword that is inappropriate for the type of processing requested,
a fatal conflicting-parameter error may result.
v The following relational operator symbols and mnemonics are acceptable for use
in selection criteria overrides: =, <, >, <=, >=, !=, !<, !>, <>, ^=, ^<, ^>, EQ, NE,
LT, GT, LE, GE, BETWEEN, LIKE, IN, IS, NOT, NULL.
v Comments in a parameter or override file must begin on a separate line and
start with two forward slashes (//).
Syntax Conventions
The syntax conventions used to describe these statements are:
KEYWORD
Keywords are shown in uppercase for emphasis, but can be specified in
lower or mixed case.
text
Variable text is shown in lowercase italics.
()
Statement delimiter to group a series of qualifiers for a parameter.
[]
Indicates an optional parameter.
{}
Indicates a choice of two or more settings from which only one must be
selected.
|
Separates options.
Extract, Insert, Load, and Convert Process Syntax
Use the following syntax for command line processing:
General
PR0CMND /R
{ JOB=jobname | @parameterfilename
TYPE=requesttype REQUEST= identifier.name
[ OUTPUT=filename ] [ QUIET{ + | - } ] [ MONITOR{ + | - } ]
[ STOP={ N | I | W | F } ] [ SERVER=servername ]
[ PST=pstdirectory] [ OV={ overridefilename | * } ] }
Note: The argument for the OV keyword must be a text file name
(OV=overridefilename) when used on the command line. If command-line
parameters are defined in a parameter file, the OV keyword can be a text file
name, or an asterisk to indicate the parameters follow (OV=*). See “Override
Keywords” on page 196 for additional information.
Overrides - Extract Process
[
[
[
[
[
[
[
192
ADNAME identifier.adname ]
DEFQUAL dbalias.creatorid ]
PNSFILE pnsfilename.pns ]
ROWLIMIT n ]
SEL [ [ dbalias. ]cid. ]tablename columnname operator value ]
SQL [ [ dbalias. ]cid. ]tablename sqlwhereclause ]
TABEVERYNTH [ [ dbalias. ]cid. ]tablename value ]
IBM Optim: Move User Manual
[
[
[
[
TABROWLIM [ [ dbalias. ]cid. ]tablename value ]
STARTTAB [ [ dbalias. ]cid. ]tablename ]
VAR variablename value ]
XFFILE xffile.xf ]
Overrides - Insert Process
[
[
[
[
[
[
[
[
[
[
[
XFFILE xffile.xf ]
CFFILE cffile.cf ]
TMNAME identifier.tablemapname ]
COMMFREQ n ]
PROCTYPE { INS | UPDINS } ]
LOCKTABS { Y | N }]
DISROWLIM n ]
COLMAPID identifier ]
COLMAP [ [ dbalias. ]cid. ]tablename [ identifier.] colmap ]
DESTQUAL dbalias.creatorid ]
DESTTABNAME srctabname [ [ dbalias. ]cid. ]desttablename]
Overrides - Load Process
[
[
[
[
[
[
[
[
[
[
[
[
[
XFFILE xffile.xf} ]
CFFILE cffile.cf ]
TMNAME identifier.tablemapname ]
COLMAPID identifier ]
COLMAP [ [ dbalias. ]cid. ]tablename [ identifier. ]colmap ]
DESTQUAL dbalias.creatorid ]
DESTTABNAME srctabname [ [ dbalias. ]cid. ]desttablename]
MODE dbalias mode ]
PERFLOAD dbalias { Y | N } ]
DELONSUCCESS dbalias { Y | N } ]
DELONFAILURE dbalias { Y | N } ]
WORKPATH dbalias path ]
SERVPATH dbalias path ]
Overrides - Convert Process
[
[
[
[
[
[
[
[
[
SRCXFFILE xffile.xf ]
DSTXFFILE xffile.xf ]
CFFILE cffile.cf ]
TMNAME identifier.tablemapname ]
DISROWLIM n ]
COLMAPID identifier ]
COLMAP [ [ dbalias. ]cid. ]tablename [identifier. ]colmap ]
DESTQUAL dbalias.creatorid ]
DESTTABNAME srctabname [ [ dbalias. ]cid. ]desttablename]
Extract, Insert, Load, and Convert Process Command-line
Keywords
This topic discusses Extract, Insert, Load, and Convert Process command-line
keywords.
General
PR0CMND
Type PR0CMND to initiate command-line processing. Note: the character
following PR is the number 0 (zero).
/R
Command to run the specified job, process(es) specified in a parameter file,
or process specified on the command line. Specify /R or –R.
JOB
Use the JOB keyword to run a scheduled job from the command line. A
scheduled job can include one or more action requests and corresponding
overrides. Use the Scheduling Editor to define the parameters for a
scheduled job.
Appendix. Command Line Interface
193
Note: See the Common Elements Manual section on the Scheduling Editor
for additional information.
jobname
Name or description of the job (30 character maximum).
@parameterfilename
Specify @ followed by the fully qualified path and name of a text
file containing the parameters for the process(es) to be run.
parameters
Specify parameters for the process on the command line.
Parameters
Use the following parameters, whether in a parameter file or specified on the
command line, as needed:
TYPE=
Specify the type of process request. Specify TYPE= and one of the
following:
requesttype
The type of process request: Extract, Insert, Load, or Convert.
REQUEST=
Name of the action request (identifier.name).
identifier.name
The qualifier and name of the Extract, Insert, Load, or Convert
Request.
OUTPUT=
Name of the output file for the process report. Specify OUTPUT= followed
by a file name. To append the report to an existing file, place a plus sign
(+) after the file name.
v If you do not use this keyword, the report displays automatically after
each process completes. You must close the report dialog before the next
process can begin.
v If you do not specify a full directory path, the file is saved in your
default Data Directory (specified in Personal Options).
v For a UNIX or Linux environment, if this keyword and value are not
specified, the output is displayed to the console.
Note: The OUTPUT file is used for all processes in a parameter file. If you
use the keyword more than once, the last file specified is used.
filename
The output file name.
QUIET
Indicator for prompts or error dialogs during a process. Specify QUIET
directly followed by a plus ( + ) or minus ( - ) sign. (Do not insert a space.)
The QUIET indicator applies to all process requests in a parameter file. If
you use the keyword more than once, the last specification is used.
Note: For a UNIX or Linux environment, the QUIET keyword is ignored,
because prompts and error dialogs are unavailable.
+
194
IBM Optim: Move User Manual
Do not display prompts or error dialogs (default).
–
Display prompts and error dialogs. (Invoke privilege is required to
run a process that requires the display of editor interfaces. For
example, Invoke Create privilege is required to run an Insert or
Load Process that requires creating destination database tables.)
MONITOR
Indicator for the display of the Progress dialog during a process. Specify
MONITOR directly followed by a plus ( + ) or minus ( - ) sign. (Do not
insert a space.)
The MONITOR indicator applies to all process requests in a parameter
file. If you use the keyword more than once, the last specification is used.
Note: For a UNIX or Linux environment, the MONITOR keyword is
ignored, because the Progress dialog is unavailable.
+
Display the Progress dialog.
–
Do not display the Progress dialog (default).
RST
For a load process only, produces a Resource Estimation Report showing
calculated amount of storage needed to load each object in the Load
Request. Specify RST directly followed by a plus ( + ) or minus ( - ) sign.
(Do not insert a space.) For information on the Resource Estimation Report,
see “Resource Estimation” on page 132. The RST indicator applies to all
load process requests in a parameter file. If you use the keyword more
than once, the last specification is used.
+
Create a Resource Estimation Report.
-
Do not create a Resource Estimation Report (default).
STOP=
Error processing indicator. Specify STOP= followed by the type of error.
The STOP keyword can be used only in a parameter file, not on the
command line. The error code is applied immediately after a process runs,
before the next process, if any, begins.
Note: The STOP keyword does not apply to scheduled jobs, and if
specified, is ignored.
N (None)
Continue processing, regardless of errors (default).
I (Information)
Stop processing if an informational, warning, or fatal error occurs
(return code of 4 or greater).
W (Warning)
Stop processing if a warning or fatal error occurs (return code of 8
or greater).
F (Fatal)
Stop processing if a fatal error occurs (return code 12).
SERVER=
Override for the server on which to process the specified job, all request(s)
specified in a parameter file, or a request specified on the command line. A
value assigned to the SERVER command-line keyword overrides any
server specification in the action request(s). This keyword cannot be used
unless the Optim Server option is installed.
Appendix. Command Line Interface
195
servername
Name of the Optim Server on which the job is processed.
PST=
Specify the Optim Directory for the action request(s). If you do not use this
keyword, the current (default) Optim Directory is used.
pstdirectory
Name of the Optim Directory for the request.
OV=
Indicates that process overrides are specified. The argument for the OV
command-line keyword can be a text file name (OV=overridefilename) or,
when the process is defined in a parameter file, an asterisk (OV=*). When
the OV keyword is used in a parameter file, the asterisk is used to indicate
that override parameters follow on successive lines.
overridefilename
Specify the name of the text file containing the process override
arguments.
*
Specify that the process overrides are defined in the successive
lines of the parameter file.
Override Keywords
Process overrides allow you to modify certain parameters when running one or
more processes from the command line.
The following guidelines apply:
v You can specify process overrides in an override file, or as part of a parameter
file.
v An override file includes only the overrides, each on a separate line.
v When overrides are specified for a process defined in a parameter file, the
command-line keyword indicating that overrides are used (OV) must follow
other command-line keywords and precede the override parameters.
v In a parameter file, the argument for the OV command-line keyword can be a
text file name (OV=overridefilename) or an asterisk (OV=*). An asterisk indicates
that override parameters follow. The first override (keyword and associated
argument) must begin on the following line, and each additional override must
be on a separate line.
v The keyword END must be on a separate line following the last override when
overrides are specified in a parameter file using OV=*.
Override Keywords: Convert Process
This topic lists the override parameters available for a Convert Process.
SRCXFFILE
Override of the Source File for a Convert Process.
xffile.xf
Name of the Extract File to be used as the source in the Convert
Process. Provide the full path if the file is not in the default
directory.
DSTXFFILE
Override of the Destination File for a Convert Process.
xffile.xf
Name of the Extract File to be used as the destination in the
Convert Process. Provide the full path if the file is not in the
default directory.
196
IBM Optim: Move User Manual
CFFILE
Override of the Control File for a Convert Process.
cffile.cf Name of the Control File to be used in the Convert Process.
Provide the full path if the file is not in the default directory.
TMNAME
Override for the Table Map referenced by the Convert Process.
identifier.tablemap name
Two-part name of an existing Table Map.
DISROWLIM
Override for a numeric value to limit the number of rows discarded during
an Convert Request.
n
A numeric value to specify the maximum number of rows to
extract from a table. Valid values are 1 through 999999.
COLMAPID
Override for the default identifier for the Column Maps included in the
Table Map.
identifier
The 1 to 8 character identifier.
COLMAP
Override for the Column Map name for a specific table in the Table Map.
(A named Column Map can override a local Column Map.)
[ [ dbalias . ] cid . ] tablename
One, two, or three-part tablename. If tablename is not fully
qualified, the default qualifier is used.
[ identifier . ] colmap
One or two-part name of an existing Column Map.
DESTQUAL
Override for the default qualifier for the destination tables in a Table Map.
dbalias.creatorid
The two-part qualifier (DB Alias and Creator ID) for the
destination tables.
DESTTABNAME
Override for the Source 1 and Source 2 tables in a Table Map.
srctabname
The source table name.
[ [ dbalias . ] cid . ] desttablename
One, two, or three-part destination table name. If the table name is
not fully qualified, the default qualifier is used.
Override Keywords: Extract Process
This topic lists the override parameters available for an Extract Process.
ADNAME
Override for the Access Definition. A named Access Definition overrides a
local or named Access Definition in the Extract Request.
identifier.adname
Two-part name of an existing Access Definition.
Appendix. Command Line Interface
197
DEFQUAL
Override for the default qualifier for tables named in the Access Definition.
dbalias. [creatorid]
The one or two-part qualifier (DB Alias and Creator ID) for the
tables in the Access Definition.
PNSFILE
Override for the Point and Shoot file to use.
pnsfilename.pns
The name of the point and shoot file.
ROWLIMIT
Override for the maximum number of rows to extract.
n
The maximum number of rows to be extracted.
The Row Limit for an Extract Process is a number from 1 to the
maximum limit specified in Product Options.
SEL
Override for the selection criteria specified for a specific table. Selection
criteria must conform to SQL syntax and must include a column name, a
relational operator, and a value. You can specify multiple selection criteria,
each on a separate line.
[ [ dbalias . ] cid . ] tablename
One, two, or three-part tablename. If tablename is not fully
qualified, the default qualifier is used.
columnname
Name of column to which criteria applies.
operator
Logical operator appropriate for your DBMS.
value
SQL
Value or list of values appropriate for the operator, expressed as
literals or substitution variables (:variablename)
Override for the SQL statement associated with a table in the Access
Definition. Each statement must be on a separate line.
Note: The SQL statement must conform to SQL syntax.
[ [ dbalias . ] cid . ] tablename
One, two, or three-part tablename. If tablename is not fully
qualified, the default qualifier is used.
sqlwhereclause
The SQL WHERE clause associated with the table.
TABEVERYNTH
Override for a numeric value to specify a sampling factor for a specified
table in the Access Definition.
[ [ dbalias . ] cid . ] tablename
One, two, or three-part tablename. If tablename is not fully
qualified, the default qualifier is used.
value
A numeric value to specify a sampling factor for a table. Valid
values are 1 through 9999.
TABROWLIM
Override for a numeric value to limit the number of rows extracted from a
specified table in the Access Definition.
198
IBM Optim: Move User Manual
[ [ dbalias . ] cid . ] tablename
One, two, or three-part tablename. If tablename is not fully
qualified, the default qualifier is used.
value
A numeric value to specify the maximum number of rows to
extract from a table. Valid values are 1 through 99999999.
STARTTAB
Override for the name of the Start Table associated with the Access
Definition.
[ [ dbalias . ] cid. ] tablename
One, two, or three-part table name.
If the table name is not fully qualified, the default qualifier is used.
VAR
Override for the value in substitution variable used in the process.
variablename
Name of the substitution variable.
value
The corresponding value for the variable.
XFFILE
Override for the Extract File name in the Extract Request.
xffile.xf
The name of the Extract File. Provide the full path if the file is not
in the default directory.
Override Keywords: Insert Process
This topic lists the override parameters available for an Insert Process.
XFFILE
Override for the Extract File referenced by the Insert Process.
xffile.xf
The name of the Extract File. Provide the full path if the file is not
in the default directory.
CFFILE
Override for the Control File referenced by the Insert Process.
cffile.cf Name of the Control File. Provide the full path if the file is not in
the default directory.
TMNAME
Override for the Table Map referenced by the Insert Request.
identifier.tablemap name
Two-part name of an existing Table Map.
COMMFREQ
Override for the frequency for committing processed rows to the database
for the Insert Process.
n
A numeric value to specify the maximum number of rows to
extract from a table. Valid values are 1 through the maximum set
in Product Options.
PROCTYPE
Override for the type of Insert Processing to use.
INS
Insert new rows into the tables during the Insert Process.
Appendix. Command Line Interface
199
UPDINS
Update and insert rows in tables during the Insert Process.
LOCKTABS
Override for the Lock Tables setting in the Insert Request.
Y
Lock each table until all rows in the Extract File for that table are
processed.
N
Do not lock the tables.
DISROWLIM
Override for a numeric value to limit the number of rows discarded during
an Insert Request.
n
A numeric value to specify the maximum number of rows
discarded during an Insert Request. Valid values are 1 through
99999999.
COLMAPID
Override for the default identifier for the Column Maps included in the
Table Map.
identifier
The 1 to 8 character identifier.
COLMAP
Override for the Column Map name for a specific table in the Table Map.
Note: A named Column Map can override a local Column Map.
[ [ dbalias . ] cid . ] tablename
One, two, or three-part tablename. If tablename is not fully
qualified, the default qualifier is used.
[ identifier . ] colmap
One or two-part name of an existing Column Map.
DESTQUAL
Override for the default qualifier for the destination tables in a Table Map.
dbalias.creatorid
The two-part qualifier (DB Alias and Creator ID) for the
destination tables.
DESTTABNAME
Override for the Source 1 and Source 2 tables in a Table Map.
srctabname
The source table name.
[ [ dbalias . ] cid . ] desttablename
One, two, or three-part destination table name. If the table name is
not fully qualified, the default qualifier is used.
Override Keywords: Load Process
This topic lists the override parameters available for a Load Process.
XFFILE
Override for the Extract File referenced by the Load Process.
xffile.xf
The name of the Extract File. Provide the full path if the file is not
in the default directory.
200
IBM Optim: Move User Manual
CFFILE
Override for the Control File referenced by the Load Process.
cffile.cf Name of the Control File. Provide the full path if the file is not in
the default directory.
TMNAME
Override for the Table Map referenced by the Load Process.
identifier.tablemap name
Two-part name of an existing Table Map.
COLMAPID
Override for the default identifier for the Column Maps included in the
Table Map.
identifier
The 1 - 8 character identifier.
COLMAP
Override for the Column Map name for a specific table in the Table Map.
(A named Column Map can override a local Column Map.)
[ [ dbalias . ] cid . ] tablename
One, two, or three-part tablename. If tablename is not fully
qualified, the default qualifier is used.
[ identifier . ] colmap
One or two-part name of an existing Column Map.
DESTQUAL
Override for the default qualifier for the destination tables in a Table Map.
Note: If you change the DB Alias portion of the destination qualifier, you
must make the same change to all other DB Alias-specific Load-type
overrides, including: MODE, PERFLOAD, DELONSUCCESS,
DELONFAILURE, WORKPATH, and SERVPATH.
dbalias.creatorid
The two-part qualifier (DB Alias and Creator ID) for the
destination tables.
DESTTABNAME
Override for the Source 1 and Source 2 tables in a Table Map.
srctabname
The source table name.
[ [ dbalias . ] cid . ] desttablename
One, two, or three-part destination table name. If the table name is
not fully qualified, the default qualifier is used.
MODE
Override for the Loader processing mode for the database referenced by
the dbalias.
dbalias Specification used to access a particular database.
mode
Option for the Oracle Loader to insert, replace, append, or truncate
data during the Load Process.
Append
Load rows from the Source File into the destination table.
Append is only available when the DBMS is Oracle.
Appendix. Command Line Interface
201
Insert Insert rows from the Source File into empty destination
tables.
Replace
Delete all rows from the destination tables and load rows
from the Source File.
Truncate
Delete all rows from the destination tables and load rows
from the Source File. Truncate is only available when the
DBMS is Oracle.
PERFLOAD
Override for performing the load for the database.
dbalias Specification used to access a particular database.
Y
Run the loader immediately after file conversion processing is
complete.
N
The Load Process prepares the data in the appropriate format and
creates the BAT file to run the loader, but does not initiate the
loader.
DELONSUCCESS
Override to delete files for the database if the Load Process completes
successfully.
dbalias Specification used to access a particular database.
Y
Delete the data files after the loader completes successfully.
N
Do not delete the data files after the loader completes successfully.
DELONFAILURE
Override to delete files for the database referenced by the dbalias, if the
Load Process fails.
dbalias Specification used to access a particular database.
RSM
Y
Delete the data files if the loader does not complete successfully.
N
Do not delete the data files, if the loader does not complete
successfully.
Override to estimate resources necessary to process this Load Request.
Y
Estimate the resources needed to process this Load Request. If you
specify RSM Y, Optim creates a Resource Estimation Report for
each object in the Load Request. The Load Request is not
processed. For additional information see “Resource Estimation” on
page 132.
N
Do not estimate resources for this Load Request. This is the
default.
WORKPATH
Override for the workstation path to store temporary Oracle loader files.
dbalias Specification used to access a particular database.
path
Directory path for storing temporary Oracle Loader files.
SERVPATH
Override for the server path to store temporary UDB loader files.
dbalias Specification used to access a particular database.
202
IBM Optim: Move User Manual
path
Directory path for storing temporary UDB Loader files.
Restart or Retry a Process
You can use the RESTARTRETRY command to restart or retry an Insert or Delete
Process that did not complete successfully.
v If an Insert Process ends abnormally, the command restarts the process from the
last commit point.
v If an Insert Process ends normally, but a number of rows could not be processed,
the command retries the process for those rows only.
Syntax
Use the following command line syntax to restart or retry an Insert Process.
PR0CMND /RESTARTRETRY CONTROL=controlfilename
[ SERVER=servername ] [ PST=pstdirectory ]
[ OUTPUT=filename ] [ DISCARD=n ] [ COMMIT=n ]
[ QUIETx{ + | - } ]
[ MONITORx{ + | - } ]
Command-line Keywords
This topic discusses command-line keywords.
PR0CMND
Type PR0CMND to initiate command line processing. Note that the
character following PR is the number 0 (zero).
/RESTARTRETRY
Command to run the restart/retry request. Specify /RESTARTRETRY or
–RESTARTRETRY.
CONTROL=controlfilename
Name of the Control File (controlfilename) specified for the Insert Process.
The Control File identifies the Insert Request to be restored or retried. If
the file is not in the default Data Directory, provide the full directory path,
exactly as specified in the original process request.
SERVER=servername
Machine on which the process was executed. If omitted, a local machine is
assumed.
PST=pstdirectoryname
Name of the Optim Directory for the Insert Request. If you do not use this
keyword, the current (default) Optim Directory is used.
OUTPUT=filename
Name of the output file for the process report. Specify OUTPUT= followed
by a file name. To append the report to an existing file, place a plus sign
(+) after the file name.
v If you do not use this keyword, the report displays automatically after
each process completes. You must close the report dialog before the next
process can begin.
v If you do not specify a full directory path, the file is saved in your
default Data Directory (specified in Personal Options).
v For a UNIX or Linux environment, if this keyword and value are not
specified, the output is displayed to the console.
Appendix. Command Line Interface
203
DISCARD=n
Maximum number of rows (0 to 99999999) that can be discarded when you
restart/retry a process. (This value overrides the discard row limit
specified in the Insert Request.)
COMMIT=n
Frequency for committing processed rows to the database when you restart
or retry a process. Specify any number between 1 and the maximum set in
Product Options. (This value overrides the commit frequency specified in
the Insert Request.)
QUIETx
Indicator for prompts or error dialogs during a process. Specify QUIET
directly followed by a plus ( + ) or minus ( - ) sign. (Do not insert a space.)
The QUIET indicator applies to all process requests in a parameter file. If
you use the keyword more than once, the last specification is used.
Note: For a UNIX or Linux environment, the QUIET keyword is ignored,
because prompts and error dialogs are unavailable.
QUIET+
Do not display prompts or error dialogs (default).
QUIETDisplay prompts and error dialogs. (Invoke privilege is required to
run a process that requires the display of editor interfaces. For
example, Invoke Create privilege is required to retry an Insert
Process that requires creating destination database tables.)
MONITORx
Indicator for the Progress dialog during a process. Specify MONITOR
directly followed by a plus ( + ) or minus ( - ) sign. (Do not insert a space.)
The MONITOR indicator applies to all process requests in a parameter
file. If you use the keyword more than once, the last specification is used.
Note: For the UNIX or Linux environment, the MONITOR keyword is
ignored, because the Progress dialog is unavailable.
MONITOR+
Display the Progress dialog.
MONITORDo not display the Progress dialog (default).
Return Codes
In a batch file, you can direct the processing that follows the PR0CMND
processing, using the return code in the following statement:
IF ERRORLEVEL n GOTO x.
The following list explains the meaning of possible return codes:
204
0
No errors.
4
In all of the requests, the highest return code was Informational.
8
In all of the requests, the highest return code was Warning.
12
In all of the requests, the highest return code was Fatal.
IBM Optim: Move User Manual
16
There was a syntax error on the command line. A pop-up window also
displays, unless you specified Quiet+.
24
Could not open the output file specified in the Output= parameter.
Since the return code value is evaluated as equal to or greater than, query each
ERRORLEVEL in reverse order:
PR0CMND /R TYPE=EXTRACT REQUEST=identifier.name
IF ERRORLEVEL 24 GOTO Badout
IF ERRORLEVEL 16 GOTO Syntax
IF ERRORLEVEL 12 GOTO Fatal
IF ERRORLEVEL 8 GOTO Warning
IF ERRORLEVEL 4 GOTO Info
For example:
:Badout
echo The Output File could not be opened.
GOTO End
...
:End
Examples
Example 1 - Run a Process Directly from the Command Line
Use this task to run a process directly from the command line.
To run a process directly from the command line, specify the following:
PR0CMND /R
TYPE=type
REQUEST=identifier.name
PR0CMND
Type PR0CMND to begin the command line sequence. Note that the
character following PR is the number 0 (zero).
/R
Specify /R or –R to run the process.
TYPE=type
Enter the command-line keyword TYPE= and follow with EXTRACT,
INSERT, LOAD, or CONVERT.
REQUEST=identifier.name
Enter the command-line keyword REQUEST= followed by the name of the
process request.
v To run an Extract Request named MARKET.YTD and display results, specify:
PR0CMND /R
PST=PSTDEMO
TYPE=EXTRACT
REQUEST=MARKET.YTD
v To run an Extract Request named SALES.MONTHLY and add the results to an
existing output file named PLAN.TXT, specify:
PR0CMND
/R
TYPE=EXTRACT
REQUEST=SALES.MONTHLY
OUTPUT=PLAN.TXT+
v To run an Insert Request named MARKET.REFRESH, display prompts and error
dialogs during the process, and write results to an output file named
RESULTS.TXT, specify:
Appendix. Command Line Interface
205
PR0CMND
/R
TYPE=INSERT REQUEST=MARKET.REFRESH
OUTPUT=RESULTS.TXT Q-
Example 2 - Run a Scheduled Job from the Command Line
Use this task to run a scheduled job from the command line.
Note: Scheduled jobs, containing one or several action requests, can be created
using the Scheduler. See the Common Elements Manual for details.
To run a scheduled job using the command line, specify:
PR0CMND /R
JOB='jobname'
PR0CMND
Type PR0CMND to begin the command line sequence. Note that the
character following PR is the number 0 (zero).
/R
Specify /R or –R to run the specified job.
JOB=‘jobname'
Specify JOB= followed by the name of the scheduled job, as saved in the
Scheduler.
Note: Specify the job name enclosed in double or single quotes.
v To run a job named CUSTDATA and write the results to an output file named
CUSTOUT.TXT, specify:
PR0CMND
/R
JOB='CUSTDATA' OUTPUT=C:\CUSTOUT.TXT
v To run the same job and display prompts and error dialogs during the process,
specify:
PR0CMND
/R
JOB='CUSTDATA' OUTPUT=C:\CUSTOUT.TXT
QUIET-
v To run a job named PAYROLL and display information dialogs during the
process, specify:
PR0CMND
/R
JOB='PAYROLL'
OUTPUT=PAY.TXT
MONITOR+
Example 3 - Run One or More Processes Using a Parameter
File
Use this task to run one or more processes from an ASCII or text file.
To run one or more processes from an ASCII or text file, specify:
PR0CMND /R @filename
PR0CMND
Type PR0CMND to begin the command line sequence. Note that the
character following PR is the number 0 (zero).
/R
Specify /R or –R to run the process parameters specified in the parameter
file.
@filename
Enter the @ sign followed by the name of the file that contains the
parameters for the process(es) (required). If the parameter file is not in the
default Data Directory, you must specify the full directory path.
206
IBM Optim: Move User Manual
File Format
See the command line syntax in “Extract, Insert, Load, and Convert Process
Syntax” on page 192 when formatting process parameters in a text file. You can
include several action requests or scheduled jobs in the file. The following
guidelines apply:
v Specify each action request or scheduled job on a separate line in the file. Begin
each action request with the TYPE parameter.
v You can specify an optional command-line keyword to stop processing on error.
Use the STOP=errorcode commandline keyword for each process request in the
input file.
v You can also run a scheduled job. Use the JOB=jobname command-line keyword.
(The STOP=errorcode command-line keyword does not apply to scheduled jobs.)
For example, consider a parameter file named STATS.TXT containing the following:
TYPE=EXTRACT REQUEST=MONTHLY.SALES
REQUEST=SALES.YTD STOP=FATAL
STOP=WARNING TYPE=EXTRACT
REQUEST=MONTHLY.QUOTAS TYPE=INSERT
To run the requests, specify:
PR0CMND
/R
@C:\STATS.TXT
Example 4 - Use Overrides in Addition to the Process
Parameters
The following examples contain overrides in addition to the process parameters.
v Run an Extract Request named SALES.CUST from the command line, but apply
the following overrides:
– Change the default qualifier to ORACLE1.TELEM.
– Change the Start table to CUSTOMERS.
– Assign a row limit of 600 rows.
– Enter an SQL WHERE statement to select only rows containing a particular
state and zip code.
For this example, create an override file named CHANGES.TXT that contains the
following override keywords and values:
DEFQUAL ORACLE1.TELEM
STARTTAB CUSTOMERS
ROWLIMIT 600
SQL CUSTOMERS ST='NJ' AND ZIP='08540'
To run this request from the command line, specify:
PR0CMND /R
TYPE=EXTRACT
REQUEST=SALES.CUST
OV=CHANGES.TXT
v Specify command-line and override keywords in a parameter file named
LEADS.TXT, to run an Extract Request named SALES.CUST from the command
line, but apply the following overrides:
– Change the default qualifier to ORACLE1.TELEM.
– Change the Start table to CUSTOMERS.
– Assign a row limit of 600 rows.
Enter selection criteria to select CUSTOMERS with a Customer ID number greater than 1234.
Create a parameter file named C:\temp\LEADS.TXT that contains the following:
TYPE=EXTRACT REQUEST=SALES.CUST OV=*
DEFQUAL ORACLE1.TELEMSTARTTAB CUSTOMERS
ROWLIMIT 600
SEL CUSTOMERS CUST_ID>'12345'
END
Appendix. Command Line Interface
207
To run this request from the command line, specify:
PR0CMND /R
@C:\temp\LEADS.TXT
v Specify command-line and override keywords in a parameter file named
STATS.TXT to run an Extract Request named MARKET.SALES from the
command line, stop processing if a Warning message results, write the process
report to an output file named NEWSTATS.TXT, and apply the following
overrides:
– Run the request on a server named MKTSERV.
– Change the Extract File name to Y:\XF\APRLDATA.XF.
– Change the Access Definition to LISTS.APR98.
– Change the default qualifier in the Access Definition to UDB.TELEM.
– Enter the value ‘New Jersey' for a variable named STATE defined in the
Access Definition.
– Assign a row limit of 400 rows.
Create a parameter file named C:\temp\STATS.TXT that contains the
following:
TYPE=EXTRACT
REQUEST=MARKET.SALES
STOP=W OV=*
SERVER MKTSERV
XFFILE Y:\XF\APRLDATA.XF
ADNAME LISTS.APR98
DEFQUAL UDB98.TELEM
VAR STATE 'NJ'
//Other variables to use default values
ROWLIMIT 400
END
On the command line, specify:
PR0CMND /R @c:\temp\STATS.TXT
OUTPUT=NEWSTATS.TXT
Example 5 - Restart a Process
Restart an Insert Process that ended abnormally. Use the following process
parameters:
v Specify the Control File generated during Insert processing. In this example, use
TEMP.CF.
v
v
v
v
Write results to an output file named RESTART.TXT.
Assign a discard row limit of 100 rows.
Assign a commit frequency of 2000 rows.
Display prompts and error dialogs during the process.
To run this request from the command line, specify:
PR0CMND /RESTARTRETRY CONTROL=TEMP.CF OUTPUT=RESTART.TXT
208
IBM Optim: Move User Manual
DISCARD=100 COMMIT=2000
QUIET-
Notices
This manual and the software described in it are furnished under a license
agreement or nondisclosure agreement. The software and the documentation may
be used only in accordance with the terms of that agreement. No part of this
manual may be reproduced or transmitted in any form or by any means, electronic
or mechanical, including photocopying and recording, for any purpose without the
express written permission of IBM Corporation.
Trademark Acknowledgments
IBM, the IBM logo, and ibm.com are trademarks or registered trademarks of
International Business Machines Corporation in the United States, other countries,
or both. If these and other IBM trademarked terms are marked on their first
occurrence in this information with a trademark symbol (® or ™), these symbols
indicate U.S. registered or common law trademarks owned by IBM at the time this
information was published. Such trademarks may also be registered or common
law trademarks in other countries. A current list of IBM trademarks is available on
the Web at “Copyright and trademark information” at www.ibm.com/legal/
copytrade.shtml.
Linux is a registered trademark of Linus Torvalds in the United States, other
countries, or both.
Microsoft and Windows are trademarks of Microsoft Corporation in the United
States, other countries, or both.
UNIX is a registered trademark of The Open Group in the United States and other
countries.
Other company, product, or service names may be trademarks or service marks of
others.
© Copyright IBM Corp. 1994, 2010
209
210
IBM Optim: Move User Manual
Index
A
Access Definitions 5, 79, 88
table list 14
Age Function
Convert Request 62, 65
Insert Request 119
Load Request 179
Aging Amounts
Insert Request 118
Load Request 178
Archive Files
Insert Request 105, 110
Load Request 129, 135
B
Browse Extract and Control Files
24
C
Calendar
Convert Request 64
description of 2
Insert Request 119
Load Request 179
Cascade Delete/Update Option 125, 187
Century Pivot
Convert Request 64
Insert Request 119
Load Request 179
Column Map ID 45
Column Maps 45
Editor 46
Command Line Interface 191
restart/retry 203
return codes 204
run process request 205
run scheduled job 206
syntax guidelines 191
Commit Frequency
Insert Request 115
Compress Destination Extract File 56
Control Files
Convert Request 55
Extract Request 110
Insert Request 110
Load Request 135
Convert Processing
description of 49
monitor progress 69
overwrite Extract File 55
print/redisplay report 71
review process report 70
Convert Request Editor
Age Function 62
Currency 66
Date Adjustment Options 64
Date Adjustment Values 63
destination Extract File 55
discard row limit 56
© Copyright IBM Corp. 1994, 2010
Convert Request Editor (continued)
Exception Options 64
Extract and Control Files 54
Global Aging 65
Invalid Dates 64
menu commands 53
Multiple/Rule 64
Report Options 67
Skipped Dates 65
Table Map options 55
Convert Requests
Column Map 55
creating 50
editing 52
run 68
schedule 68
select 51
Table Map 49
Create Utility
select objects 31
Currency
Convert Request 66
Insert Request 121
Load Request 180
D
Database Connections 81
Date Adjustment Options
See Age Function 64
Date Adjustment Values
See Age Function 63
DB2
check pending status 146
copy options for load 147
directory paths for load 149
LOAD Process 142
log 175
Delete Options
Insert Request 112
Destination Table Names 28, 45
Discard Row Limit
Convert Request 56
Insert Request 116
E
Email Notification
See Notify 68
Environment v
Error Messages
Extract processing 93
Exception Options
See Age Function 64
Exception Tables
in a Load Request 145
naming conventions 145, 153
Extract Files
browsing 24
Convert Request 54
Extract Files (continued)
Extract Request 79
Insert Request 105, 110
Load Request 129, 135
Extract Process Report 98, 103
statistical information 99, 103
Extract Processing
cross-platform compatibility 74
description of 73, 92
error messages 93
monitor progress 96
print/redisplay report 103
review process report 98
statistical information 99, 103
warning messages 94
Extract Request Editor
Access Definition options 80
always prompt for values 88
Convert Request options 91
Email notification 90
Extract Files 79
items to extract 80
limit rows to extract 80
menu commands 78
objects to extract 85
Point and Shoot options 86
substitution variables 87
Extract Requests
create 75
description of 5
edit 77
Process Report 6
run 93
schedule 93
select 76
Start Table 86
F
Fast Load Confirmation
184
G
Global Aging
Convert Request 65
Insert Request 121
Load Request 180
I
Informix
additional loader parameters 166
disable constraints 166
disable triggers 165
discard options for load 164, 165
load processing 164
Insert Processing
description of 105
monitor progress 124
overwrite Control File 110
211
Insert Processing (continued)
print/redisplay report 127
review process report 126
Insert Request Editor
Age Function 118
Currency 121
Delete Options 112
Email Notification 123
Exception Options 120
Global Aging 121
menu commands 109
Process Options 113
Report Options 122
Source and Control Files 110
Table Map options 111
Insert Requests
Commit Frequency 115
creating 106
description of 6
editing 108
Process Report 8
Progress dialog 30
run 123
schedule 123
select 107
Invalid Dates
Convert Request 64
Insert Request 120
Load Request 179
L
load processing 167
Load Processing
description of 129
Fast Load 184
load versus insert 129
monitor progress 186
output files 129
print/redisplay report 189, 190
review process report 187
Load Request 132
storage estimate 132
Load Request Editor
Age Function 177
Currency 180
DB2 Loader 142
Email Notification 183
Exception Options 179
Exception Table Options 145
Global Aging 180
Informix Loader 164
iSeries Load 167
loader options 141
menu commands 139
Oracle Loader 150
Report Options 182
SQL Server Loader 160
Sybase ASE Loader 155
Table Map options 135
Teradata Loader 169
z/OS Loader 174
Load Requests
avoid long file names 130
creating 131
editing 134
run or schedule 130
212
IBM Optim: Move User Manual
Load Requests (continued)
run process immediately 183
schedule 183
select to edit 137
Source and Control Files 135
Lock Tables
Insert Request 114
Long Object Names 105
M
Multiple/Rule
Convert Request 64
Insert Request 119
N
Notify
Convert Request 68
Extract Request 90
Insert Request 123
Load Request 183
O
Optim Directory 1
Oracle
additional loader parameters 155
compressed files 154
disable constraints 151
disable triggers 151, 156
discard options for load 154
exception tables 153
load commit frequency 154
load processing 150
method for load 151
P
Point and Shoot
Extract Request 85
PR0CMND 191
Processes
Convert 8
Create 9
Load 8
Reschedule 9
Restart 9
Retry 9
Processing Flow 5
R
Relationships 17
Report Options
Convert Request 67
Insert Request 122
Load Request 182
Rules
Convert Request 64
Insert Request 119
S
Sample
Scenario
A Set of Customers 11
A Set of Items 35
Sample Database 9
Skipped Dates
Convert Request 65
Insert Request 120
Load Request 180
Source Column 47
Source File
Convert Request 54
Insert Request 110
Load Request 141
SQL Server
additional loader parameters 162
disable constraints 157, 162
disable triggers 161
discard options for load 161
load processing 160
Start Table 6
Extract Request 86
Statistical Information
Extract Process Report 99, 103
Status 48
Sybase ASE
additional loader parameters 156
discard options for load 156
load processing 155
T
Table Maps
always view 56, 136
Convert Request 55
Insert Request 111
always view 111
Load Request 135
Teradata
additional loader parameters
load processing 169
Traversal Path 17
U
Update/Insert
7
V
Variables
always prompt for values
default values 87
Extract Request 86
prompt string 87
SQL syntax 88
W
Warning Messages
Extract Process 94
88
173
Z
z/OS
load processing
174
Index
213
214
IBM Optim: Move User Manual
Printed in USA