1
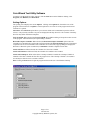
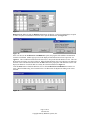
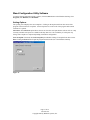
Bellatrix Systems, Inc.
Maintenance Test Station
For Windows XP
Version 1.0
User Manual
Page 1 of 19
182-0051-00
Copyright 2005 by Bellatrix Systems, Inc.
Page 2 of 19
182-0051-00
Copyright 2005 by Bellatrix Systems, Inc.
GETTING STARTED.................................................................................................................................. 4
CONTACTING TECHNICAL SUPPORT................................................................................................ 4
INSTALLING THE MAINTENANCE TEST STATION SOFTWARE ................................................ 5
SETTING UP THE MAINTENANCE TEST STATION ......................................................................... 5
COIN WIZARD TEST UTILITY SOFTWARE ....................................................................................... 6
SETTING OPTIONS ....................................................................................................................................... 6
Testing Coin Wizards ............................................................................................................................. 7
TESTING THE ST-100/200 ........................................................................................................................... 8
TESTING THE ST-110/210 ......................................................................................................................... 10
TESTING THE ST-201/211 AND ST-501/511 .............................................................................................. 12
WAND CONFIGURATION UTILITY SOFTWARE ............................................................................ 15
SETTING OPTIONS ..................................................................................................................................... 15
CONFIGURING THE WAND II...................................................................................................................... 16
HARD RESETTING THE WAND II................................................................................................................ 17
CONFIGURING THE ROUTE WIZARD ................................................................................................. 18
Page 3 of 19
182-0051-00
Copyright 2005 by Bellatrix Systems, Inc.
Getting Started
The Maintenance Test Station (MTS) is a combination of tools, hardware and software that is used to setup,
test and troubleshoot Bellatrix Coin Wizards. The Maintenance Test Station works with the following
Bellatrix Coin Wizards:
• ST-100
• ST-110
• ST-201
• ST-211
• ST-501
• ST-511
The Maintenance Test Station includes the following items:
• RS-232 Serial Cable
• Power Supply
• Maintenance Test Station
• Test Cable (for use with ST-100, ST-201/211 and ST-501/511)
• Wand Cradle with Data Link and Spring Clip
• Maintenance Test Station Software Installation CD-ROM
RS-232 Serial Cable
Power Supply
Maintenance Test
Station
Test Cable
Wand Cradle
You will also need the following items:
• Windows XP computer with CD-ROM drive and RS-232 Serial Port
• Test head or newsrack
• Coins (for testing)
• Coin Wizard User Manuals
Contacting Technical Support
Technical support is available through Bellatrix Systems, Inc. at 1-800-451-9753 Monday through Friday
from 8:00am to 5:00pm (Pacific Time).
Page 4 of 19
182-0051-00
Copyright 2005 by Bellatrix Systems, Inc.
Installing the Maintenance Test Station Software
Place the Maintenance Test Station Software Installation CD-ROM in the PC’s CD-ROM drive. If the
installation does not start automatically, click the Start button, select Run and type X:\Setup.exe in the
Open: field (X: being the drive letter of the CD Rom drive.) Click the OK button. Follow the on-screen
instructions to install the software.
The Maintenance Test Station Software includes two utilities:
• Coin Wizard Test Utility
• Wand Configuration Utility
Setting up the Maintenance Test Station
The Maintenance Test Station should be shielded from intense light when being used with Coin Wizards
equipped with Datalinks or ComLinks. Datalinks, ComLinks and wands are sensitive to bright light due to
infrared communication components.
Assembling the Maintenance Test Station:
• Install the Maintenance Test Station Software on the PC (see previous section).
• Connect the Power Supply to the back of the MTS then plug into a wall outlet. The green power
indicator light will be lit on the front of the MTS.
• Testing Coin Wizards: Connect the RS-232 Serial Cable to the PC (Com port 1, 2, 3, or 4) and to
the back of the MTS. Attach the 6 pin connector on the Test Cable to the back of the MTS (the
end of the cable marked B must be attached to the MTS). The Test Cable that ships with the
Maintenance Test Station is for use with ST-100 and ST-201/211Coin Wizards. If an adapter cable
is needed for the ST-110 or ST-501/511, contact Bellatrix.
• Programming wands: Attach the 6 pin connector on the Wand Cradle cable to the back of the
MTS.
Page 5 of 19
182-0051-00
Copyright 2005 by Bellatrix Systems, Inc.
Coin Wizard Test Utility Software
To run the Coin Wizard Test Utility software, click the Start button on the Windows desktop, select
Programs, then Bellatrix, then Wizardtest.
Setting Options
The opening screen displays the current Options. Clicking on the Options tab from other areas of the
program will return the user to Options. Selected options are saved on exit of the program and restored
each time it is opened.
Select Port: The Select Port option allows you to choose which serial communication port the software
will use. Only currently available Com ports are displayed in the drop down list. The contents of the dropdown list may differ on different computers.
Lock Group ID: When checked, the Lock Group ID option disables editing of Group ID on other screens
in this program. When unchecked, Group ID editing is enabled.
Read and Compare Cointable: When checked, the Read and Compare Cointable option causes the
Cointable to be automatically read from the Coin Wizard when the Program Settings button is clicked and
compared to the on-screen Cointable. If the Cointables are not the same, a pop-up dialog box displays the
differences. When this option is unchecked, an automatic Cointable comparison is not done.
Auto Load USA.scs: When selected, the Cointable for USA coins is loaded.
Auto Load Canada.scs: When selected, the Cointable for Canadian coins is loaded.
Auto Load Coinmap.scs: When selected, the Coinmap Cointable is loaded. The Coinmap Cointable is
identical to the USA Cointable the first time the program is run. The Coinmap Cointable is for customer
use and may be edited to create a custom Cointable.
Exit: Clicking the Exit button will quit the program and return the user to the Windows Desktop.
Figure 1
Page 6 of 19
182-0051-00
Copyright 2005 by Bellatrix Systems, Inc.
Testing Coin Wizards
To test all models of Coin Wizards, begin with these basic steps. For specific settings for each model, refer
to the consequent sections.
1.
Mount the Coin Wizard into the Test Rack. The ST-501/ST-511 should remain mounted inside of
an IMPACT newsrack.
2.
Unplug the keyswitch/ComLink/datalink from the Coin Wizard. The
keyswitch/ComLink/Datalink on an ST-501/ST-511 is not plugged directly into the Coin Wizard.
Alternately, it must be unplugged from the 6-pin pig-tailed IMPACT cable inside of the rack.
3.
Plug the Test Cable into the Coin Wizard’s keyswitch/ComLink/datalink connector. Plug the Test
Cable into the 6-pin pig-tailed connector on the IMPACT cable for an ST-501/ST-511.
4.
With the MTS software open click on the corresponding tab for the model of the Coin Wizard to
be tested and fill in the fields on it with the desired settings.
5.
Reset the Coin Wizard. The solenoid will fire. Refer to individual Coin Wizard manuals for
reset instructions.
6.
Click the Program Settings button to program the Coin Wizard.
7.
Click the Diameter Test button to perform a Diameter Test on ST-201/ST-211 and ST-501/ ST511.
8.
Test the Coin Wizard with money. A test price of US 25¢ will be used for this example. If testing
with non-US coins, follow the same procedure using the applicable currency.
An assortment of all coins that the Coin Wizard can read is recommended for this test. Suggested
coins are 3-quarters, 7-dimes, 4-nickels and, 2-dollar coins.
A. Insert one quarter into the coin slot. The solenoid will fire and the trip lever will fall,
unlatching the door. Open the rack door then close it. Repeat this test three times to verify that
the Coin Wizard is reading the quarters and opening on the set price.
B. Insert a dime and a nickel. The solenoid should not fire because the set price has not been
reached. Press the coin return button to clear the cash and retrieve the coins from the coin
return slot. If the solenoid does fire, allowing the door to be opened, the previous sale likely
was not registered. Inspect the coin accept door and magnet for damaged or missing parts.
C. Insert a second dime. The door should not open since the cash was cleared in the previous
step by pressing the coin return. If the door does open, it is likely that the coin return did not
activate. Inspect the coin return linkage for damage or missing parts.
D. Assuming that the door did not open in the previous step, insert another dime and a nickel to
total 25¢. The solenoid should fire and the door open. Open and close the door to reset the
cash to zero.
E. Again, insert two dimes and a nickel to ensure that the Coin Wizard is reading and registering
each coin. The solenoid will fire only after the last coin (total of 25¢.) Open and close the
rack door.
9.
Click the Read out Wizard button and verify that the data read matches the amount of cash and
sales that were put into the Coin Wizard.
10. Disconnect the Test Cable from the Coin Wizard and reconnect the keyswitch/ComLink/datalink.
11. Reset the Coin Wizard.
12. Insert coins again to verify that the prices are set correctly. Use additional coins to verify that the
Coin Wizard reads all denominations.
13. Remove the Coin Wizard from the test rack.
Page 7 of 19
182-0051-00
Copyright 2005 by Bellatrix Systems, Inc.
Testing the ST-100/200
To test an ST-100 or ST-200, select the ST100, 200 tab. Refer to the section Testing Coin Wizards to
properly test the Coin Wizard with coins.
If testing an ST110/100 Combo Coin Wizard, ensure that the selection jumper is in the correct position for
an ST-100. The ST-100 requires a different cable than the ST-110. Verify that the cable that is marked for
the ST-100 is being used. The end of the cable marked with a B must be connected to the MTS.
When opening the ST100, 200 screen, all buttons except Program Settings and Exit are disabled. The
Group ID (if enabled on the Options Tab), Wizard ID, Paper Price and Test Price fields should be filled
in with the values to be programmed into the Coin Wizard. When satisfied with the entered values, click
on the Program Settings button.
Figure 2
Program Settings: Clicking the Program Settings button will program the Coin Wizard with the values
set. If programming fails, a failure error will be displayed and the current screen will remain unchanged.
When programming is successful, the solenoid on the Coin Wizard will fire and the screen will update as
shown in Figure 3. The Program Settings button will have changed to Read out Wizard and the
remaining buttons will be enabled.
Page 8 of 19
182-0051-00
Copyright 2005 by Bellatrix Systems, Inc.
Read out Wizard: When clicked, the Read out Wizard button will read all cash and sales information
from the Coin Wizard. The information will be displayed in a pop-up dialog box as shown in Figure 4.
When the Done button is clicked the program returns to the initial screen in Figure 2.
Wizard Version: When clicked, the Wizard Version button will display the Coin Wizard version
information in the box above the button.
Read Cash: When clicked, the Read Cash button will display the Coin Wizard cash information in the
box above the button. A pop-up dialog box will prompt to clear the cash.
Read Error Flags: When clicked, the Read Error Flags button will read all error codes from the Coin
Wizard and display the results in the Error Flag box above the button. If an error condition is identified,
the related text in the box will be highlighted in red. If no errors are detected, the text in the box will remain
gray.
Next Wizard: When clicked, the Next Wizard button will reset the screen and the program in preparation
for programming additional Coin Wizards.
Exit: Clicking the Exit button will quit the program and return the user to the Windows Desktop.
Figure 3
Figure 4
Page 9 of 19
182-0051-00
Copyright 2005 by Bellatrix Systems, Inc.
Testing the ST-110/210
To test an ST-110/210, select the ST110, 210 tab. Refer to the section Testing Coin Wizards to properly
test the Coin Wizard with coins.
If testing an ST110/100 Combo Coin Wizard, ensure that the selection jumper is in the correct position for
an ST-110. The ST-110 requires a different cable than the ST-100. Verify that the cable that is marked for
the ST-110 is being used. The end of the cable marked with a B must be connected to the MTS.
When opening the ST110, 210 screen, all buttons except Program Settings and Exit are disabled. The
Group ID (if enabled on the Options Tab), Wizard ID, Price Tiers and Test Price fields should be filled
in with the values to be programmed into the Coin Wizard. When satisfied with the entered values, click
on the Program Settings button.
Figure 5
Program Settings: Clicking the Program Settings button will program the Coin Wizard with the values
set. If programming fails, a failure error will be displayed and the current screen will remain unchanged.
When programming is successful, the solenoid on the Coin Wizard will fire and the screen will update as
shown in Figure 6. The Program Settings button will have changed to Read out Wizard and the
remaining buttons will be enabled.
Page 10 of 19
182-0051-00
Copyright 2005 by Bellatrix Systems, Inc.
Read out Wizard: When clicked, the Read out Wizard button will read all cash and sales information
from the Coin Wizard. The information will be displayed in a pop-up dialog box as shown in Figure 4.
When the Done button is clicked the program returns to the initial screen in Figure 5.
Figure 6
Wizard Version: When clicked, the Wizard Version button will display the Coin Wizard version
information in the box above the button.
Read Cash: When clicked, the Read Cash button will display the Coin Wizard cash information in the
box above the button. A pop-up dialog box will prompt to clear the cash.
Read Error Flags: When clicked, the Read Error Flags button will read all error codes from the Coin
Wizard and display the results in the Error Flag box above the button. If an error condition is identified,
the related text in the box will be highlighted in red. If no errors are detected, the text in the box will remain
gray.
Next Wizard: When clicked, the Next Wizard button will reset the screen and the program in preparation
for programming additional Coin Wizards.
Exit: Clicking the Exit button will quit the program and return the user to the Windows Desktop.
Figure 7
Page 11 of 19
182-0051-00
Copyright 2005 by Bellatrix Systems, Inc.
Testing the ST-201/211 and ST-501/511
To test an ST-201 or ST-501, select the ST201, 501 tab. To test an ST-211 or ST-511, select the ST211,
511 tab. Refer to the section Testing Coin Wizards to properly test the Coin Wizard with coins. Verify that
the cable that is marked for the ST-201/211 is being used. The end of the cable marked with a B must be
connected to the MTS. The ST-501/511 requires a special Adapter Cable that connects to the end of the
ST-201/211 Cable.
When opening the ST201, 501 screen, all buttons except Program Settings, Load, Save and Exit are
disabled. The Read out Cointable checkbox will be enabled if the Read and Compare Cointable is not
checked in the Options tab. The Group ID (if enabled on the Options Tab), Wizard ID, Paper Price,
Detect Slugs and Test Price fields should be filled in with the values to be programmed into the Coin
Wizard. When satisfied with the entered values, click on the Program Settings button.
Load: When clicked, the Load button will display a pop-up dialog box that allows the user to browse for
and select a Cointable file. The contents of the selected file are loaded into the on-screen Cointable. The
default location for the files is the program installation folder.
Save: When clicked, the Save button will display a pop-up dialog box that allows the user to save the onscreen Cointable to a custom file or to overwrite an existing file. Unsaved changes to the on-screen
Cointable will be overwritten and lost the next time a Coin Wizard is read.
Program Settings: Clicking the Program Settings button will program the Coin Wizard with the values
set. If programming fails, a failure error will be displayed and the current screen will remain unchanged.
When programming is successful, the solenoid on the Coin Wizard will fire and the screen will update as
shown in Figure 8. The Program Settings button will have changed to Read out Wizard and the
remaining buttons will be enabled.
Read Out Cointable: Checking the Read Out Cointable checkbox will read the Cointable from the Coin
Wizard memory and load it into the on-screen Cointable when the Program Settings button is clicked. If
the checkbox is not checked on the Options tab or not checked in this screen, the Cointable is not read and
loaded. This checkbox can only be checked if the Read and Compare Cointable option is not checked on
the Options tab. It the Read and Compare Cointable box is checked on the Options tab, the Read Out
Cointable will already be selected by default.
Figure 6
Page 12 of 19
182-0051-00
Copyright 2005 by Bellatrix Systems, Inc.
If the Read and Compare Cointable option is checked on the Options tab and the Coin Wizard Cointable
is different than the on-screen Cointable, a pop-up box will display the table in the Coin Wizard with the
differences highlighted in red. See Figure 7.
Keep This Cointable: When clicked, the Keep This Cointable button will
leave the Cointable currently in the Coin Wizard as it is and load it into the
on-screen Cointable. If the new on-screen Cointable is not saved, it will be
overwritten the next time a Coin Wizard is read.
Update Wizard with Default: When clicked, the Update Wizard with
Default button will overwrite the Cointable currently in the Coin Wizard
with the default Cointable.
Update Coin Table: When clicked, the Update Coin Table button will
update the Cointable in the Coin Wizard with the on-screen Cointable.
Read out Wizard: When clicked, the Read out Wizard button will read
all data currently stored in the Coin Wizard memory. The information is
displayed in a pop-up dialog box as shown in Figure 9.
Wizard Version: When clicked, the Wizard Version button will display
the coin Wizard version in the box above the button.
Last Coin Diameter: When clicked, the Last Coin Diameter button will
display the diameter of the last coin read by the Coin Wizard.
Figure 7
Read Cash: When clicked, the Read Cash button will display the current cash total from the Coin Wizard
memory. A pop-up box will prompt the user to clear the cash from the Coin Wizard memory.
Read Error Flags: When clicked, the Read Error Flags button will read all error codes from the Coin
Wizard and display the results in the Jam Flag box above the button. If an error condition is identified, the
related text in the box will be highlighted in red. If no errors are detected, the text in the box will remain
gray.
Next Wizard: When clicked, the Next Wizard button will reset the screen and the program in preparation
for programming additional Coin Wizards.
Exit: Clicking the Exit button will quit the program and return the user to the Windows Desktop.
Figure 8
Page 13 of 19
182-0051-00
Copyright 2005 by Bellatrix Systems, Inc.
Figure 9
Diameter Test: When clicked, the Diameter Test button will display a pop-up box that displays an option
to either set up the Coin Wizard for a diameter test or quit the diameter test. See Figure 10.
Figure 10
If the user chooses the Set Wizard to read Diameters option, the program will establish communication
with the Coin Wizard. Another pop-up box will be displayed with instructions on how to proceed. See
Figure 13. The Coin Wizard solenoid will fire three times. Drop in the desired number of coins. The Coin
Wizard will record up to 30 coins in each test. When finished inserting coins, press the blue reset button on
the back of the Coin Wizard reader and click the OK button in the pop-up box. The Diameter Test box will
display the diameter of each coin that was read by the Coin Wizard shown in Figure 11.
Click the Done button to finish the Diameter Test or click Set Wizard to read Diameters to run the test
again. When finished testing, the coin table for the Coin Wizard can be adjusted according to the values
returned.
Figure 11
Page 14 of 19
182-0051-00
Copyright 2005 by Bellatrix Systems, Inc.
Wand Configuration Utility Software
To run the Wand Configuration Utility software, click the Start button on the Windows desktop, select
Programs, then Bellatrix, then WandInit.
Setting Options
The opening screen displays the current Options. Clicking on the Options tab from other areas of the
program will return the user to Options. Selected options are saved on exit of the program and restored
each time it is opened.
Select Port: The Select Port option allows the user to select the serial port that the software will use. Only
currently available serial ports are available in the drop down list. The availability of serial ports may
change from computer to computer depending on hardware configuration.
Lock Group ID: If checked, the Lock Group ID option disables editing of Group ID from other screens.
Exit: Clicking the Exit button will quit the program and return the user to the Windows Desktop.
Figure 12
Page 15 of 19
182-0051-00
Copyright 2005 by Bellatrix Systems, Inc.
Configuring the Wand II
To configure a Wand II, click on the Wand II tab.
A Wand II can be reprogrammed or reinitialized in order to change its function, ID number, Group ID
number, and edition structure or to upgrade it. Before reprogramming or reinitializing, the wand should be
reset. Follow the instructions below in the section entitled Hard Resetting the Wand II to reset it. Make
sure that Wands have been downloaded to prevent loss of data, before reprogramming or initializing.
Reprogramming a Wand II:
1. Click the Reprogram Wand button. A dialog box is displayed that prompts for the location and
filename of the firmware to be programmed into the Wand. Select only files with .S19 extensions
that have been distributed by Bellatrix. Highlight the filename and click Open or double click to
select it. A pop-up box will indicate that the program is waiting for a Wand Hello.
2.
Place the Wand in the Cradle with the nose of the wand docking to the datalink. Make sure that the
wand nose is level with the datalink nose. If necessary, use the clear plastic spacer to prop up the
back of the wand so that it doesn’t lose communication with the MTS.
3.
During programming, the busy light on the MTS will flicker and progressively higher numbers are
displayed in the pop-up box on the program screen. Wait until the wand beeps then remove it
from the cradle. The LCD display on the wand may read Programming Wait…. If it does, wait
until the wand displays the word Done. Do not push any keys or reset the wand until it displays
Done. Doing so could cause the Wand to be unusable.
4.
Hard Reset the Wand and initialize it according to the instructions below.
5.
If the Wand fails to reprogram, re-start the process by resetting it.
Figure 13
Page 16 of 19
182-0051-00
Copyright 2005 by Bellatrix Systems, Inc.
Initializing a Wand II:
1. Enter the Group ID and Wand number into the appropriate boxes. These numbers can be found on
the back of the Wand on the serial number tag. Enter the three character code for each edition in
the Editions box. Use only capital letters and numbers. These are the editions displayed on the
Wand when it is docked to the buffer.
2.
Click on the Wand-type button (Audit, Collection, Collection Recovery, or Maintenance.)
3.
Place the Wand in the Cradle with the nose of the wand docking to the datalink. Make sure that the
wand nose is level with the datalink nose. If necessary, use the clear plastic spacer to prop up the
back of the wand so that it doesn’t lose communication with the MTS.
4.
During initializing, the busy light on the MTS will flicker. The Wand will beep once if
initialization is successful, otherwise it will emit two short and one longer beep.
Load: When clicked, the Load button displays a pop-up dialog box that lets the user browse for and select
a configuration file. The contents of the selected file are loaded into the on-screen fields. The default
location for the files is the program installation folder. The default installation folder is C:\Program
Files\Bellatrix.
Save: When clicked, the Save button displays a pop-up dialog box that allows the user to save the onscreen fields to a file. Unsaved changes will be lost when the software is exited. If the changes are saved to
the filename Wandmap2.scs they will automatically be loaded each time the software is run.
Exit: Clicking the Exit button will quit the program and return the user to the Windows Desktop.
Hard Resetting the Wand II
Hard resetting the Wand II will erase all data in Wand memory including edition and price structure.
Resetting should only be done before and after reprogramming or when troubleshooting a Wand problem.
While holding down the "1" key on the Wand, run a small magnet along its left side. The datalink on the
MTS can be used for this purpose if necessary because the datalink has a magnet in its nose cone. In this
case, swipe the left side of the Wand across the nose cone of the datalink.
The Wand will emit one long beep followed by one short beep. After the short beep, quickly release the
finger from the 1 key and hold down the 5 key. The Wand will respond with two short beeps. If the Wand
doesn’t emit the two short beeps, the finger probably didn't move from the 1 key to the 5 key quickly
enough, so try again. This process may take some practice.
Page 17 of 19
182-0051-00
Copyright 2005 by Bellatrix Systems, Inc.
Configuring the Route Wizard
To configure a Route Wizard Wand, click on the Route Wizard tab.
A Route Wizard can be reinitialized to set or change prices or Group ID.
Initializing a Route Wizard:
1.
Enter the Group ID into the appropriate box. This number can be found on the back of the Wand
on the serial number tag. Enter the four price tiers into the Price boxes. These boxes are in direct
conjunction with the price positions on the rotary switch on the front of the Route Wizard Wand.
2.
Click the Initialize Wand button.
3.
Place the Route Wizard in the Wand Cradle. Use the clear plastic spacer if necessary to position
the Wand in the cradle.
4.
The Route Wizard Wand will beep once and the green LED will blink once if initialization is
successful. Otherwise, there will be no beep and the red LED will blink. If the red LED blinks,
pull the wand away and retry.
Figure 14
Load: When clicked, the Load button displays a pop-up dialog box that lets the user browse for and select
a configuration file. The contents of the selected file are loaded into the on-screen fields. The default
location for the files is the program installation folder. The default installation folder is C:\Program
Files\Bellatrix.
Save: When clicked, the Save button displays a pop-up dialog box that allows the user to save the onscreen fields to a file. Unsaved changes will be lost when the software is exited. If the changes are saved to
the filename Rwinit.txt they will automatically be loaded each time the software is run.
Exit: Clicking the Exit button will quit the program and return the user to the Windows Desktop.
Page 18 of 19
182-0051-00
Copyright 2005 by Bellatrix Systems, Inc.
NOTES
Page 19 of 19
182-0051-00
Copyright 2005 by Bellatrix Systems, Inc.