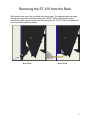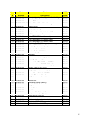
1
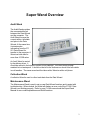
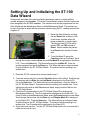
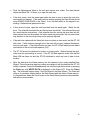
ST-100 DATA WIZARD
USER MANUAL
Full color manual can be downloaded at www.bellatrix.com
08/10/05
Contents
Page
SUPER WAND OVERVIEW
2
BUFFER BOX
3
ST-100 INSTALLATION
4
SETTING UP AND INITIALIZING
6
ERROR CODES
7
MAINTENANCE
9
TROUBLESHOOTING
12
PARTS DIAGRAM
14
PARTS LIST
15
1
Super Wand Overview
Audit Wand
The Audit Wand provides
the communication link
between the Data Wizard
and the computer. The
Audit Wand conveys the
current edition, time/date
and price to the Data
Wizard. At the same time,
it extracts sales
information from the ST201 Data Wizard for
transfer to the computer. A
Wand can hold data for
more than 10,000 sales.
An Audit Wand is carried
by the delivery driver. It
should be carried in the holster to protect it from damage. The Audit Wand is waterresistant but not waterproof. It should not be left in the sun/heat nor should it be left outside
in cold weather. The same care should be taken with a Wand as with a cell phone.
Collection Wand
A collection Wand is used to collect cash data from the Data Wizard.
Maintenance Wand
The Maintenance Wand is used to set up new Data Wizard locations and to assist with
troubleshooting. When docked, the Wand will display an error code if the ST-201 Data
Wizard is not working properly. Refer to page 7 of this manual and the Super Wand
Manual for error code explanations and Wand functions.
2
Download Buffer Box
The buffer box is usually located at the newspaper distribution point. The buffer uploads
current date, time, edition and price to the Wands. At the same time, it downloads the
sales information collected by the Wands. It stores the sales data until it is downloaded by
the computer.
Delivery personnel need to dock their Wands to the buffer box each day before delivering
their route or running maintenance routes to ensure that the Data Wizards are initialized
with the current edition, date and time.
The buffer box can store several days, sometimes weeks, of data in the event that it cannot
be downloaded on a daily basis. A UPS with surge protector should be used with the
buffer box to protect against power spikes and power outages.
3
ST-100 Installation
The ST-100 Data Wizard is designed for easy retrofit into newsracks. The ST-100 model
is specifically designed to replace stacker type mechanical coin devices.
Tools Required:
Medium size pliers
Phillips screwdriver
Flat blade screwdriver
Nut driver
1. Open the paper door and the rack
head. Remove the existing
mechanism and keyswitch assembly.
Retain the spring clip from the
keyswitch. Make sure the front of the
rack head is not bent. It may be
necessary to straighten it before
proceeding.
2. Bend the stationary latch slightly to
the right to ensure that it does not rub
on the plastic coin doors.
3. Insert the datalink through the keyswitch hole from the front of the rack head. Align the
datalink so the magnet (visible from the back) in the nose is facing toward the center of the
rack. Position the magnet towards the top on side-by-side racks. Use the spring clip to
fasten the datalink in place.
4. Remove the nylon tab from the coin path housing.
This tab holds the coin damper stationary during
transport.
5. Mount the ST-100 on the four studs in the rack
head. Lock it into place with the lock-in bracket
and wireform.
6. Make sure nothing interferes with the coin doors,
the coin deflector, or other mechanical functions.
7. The front side of the coin return slide should fit in
between the lower projections of the coin deflector.
If the slide does not fit correctly, bend the slide
edge to position it properly.
4
8. The coin return button
should have a small amount
of play before contacting the
coin return lever. The return
catch must not contact the
return door pin when the
return button is not pushed.
If it does, inspect the coin
return linkage.
9.
Open and close the rack door to check that the
door tongue operates smoothly with the Data
Wizard. The right side of the door tongue must
hold the coin retain door (door nearest the front
of the head) fully closed. Make sure the tongue
does not interfere with the coin deflector.
10.
Plug the datalink connector into the 6-pin
housing on the circuit board.
11.
Close the rack head before testing. The
datalink is light sensitive, especially from the
back. Bright light from the back or front of the data link can interfere with communication.
12.
Using a Maintenance Wand set the Mech ID and initialize the Data Wizard. Initializing the
Data Wizard with a Maintenance Wand sets the current edition and price and eliminates
the need to carry an Audit Wand. See the section on Setting up and Initializing the ST-100
for more detailed instructions on setting up the Data Wizard.
13.
With the rack door and head closed, check the operation of the ST-100 Data Wizard with
coins.
14.
Drop enough coins into the coin slot to equal the set price and verify that the rack opens.
Open and shut the paper door.
15.
Insert another coin (not a penny) that is less than the set price and pull on the door to verify
that it does not unlock on less than the set price.
16.
Press the coin return button to return the coin. Activating the coin return clears the current
cash total.
17.
Repeat steps 14-15 until satisfied that the Data Wizard is recording sales and cash
correctly.
5
Setting Up and Initializing the ST-100
Data Wizard
Clearly mark the inside of the rack head with a permanent marker or a label with the
number assigned to this location. This is the Counter/Dealer number that this location has
been assigned in the SC2000 database. This number must also be programmed into the
Data Wizard with the Maintenance Wand or Audit/Maintenance Wand. This number can
be up to five digits in length with the maximum number being 32676. Leading zeros will be
stripped off.
1. Reset the Data Wizard by shorting
the two Reset tabs at the top of the
circuit board, together with a flat
blade screwdriver or similar object.
The tabs on older ST-100s will be
labeled TP1 and TP2 instead of
Reset. Newer models may have a
blue Reset button instead of solder
tabs.
2. To set the Mech ID, press the
Function button on the Wand. Scroll
through the functions with the Enter key until Set Mech ID is displayed on the Wand
LCD. Press the Select key. The Wand will prompt for the Mech ID. Enter the
number assigned and press the Enter key. The Wand will emit a continuous beep.
Dock the Wand to the ST-100 Data Wizard. The solenoid will fire resulting in an
audible click.
3. Reset the ST-100 a second time as described in step 1.
4. To set the edition and price, press the Function button on the Wand. Scroll through
the functions with the Enter key until Init Mech is displayed on the Wand LCD.
Press the Select key. The Wand will emit a continuous beep. Dock the Wand to
the ST-100 Data Wizard. The solenoid will fire resulting in an audible click. To set
edition and price with an Audit/Maintenance Wand, simply dock the Wand to the
ST-100 Data Wizard.
5. Check the ID programmed into the ST-100 Data Wizard ID by docking the
Maintenance Wand to it. The ID number will be displayed on the Wand LCD. To
check ID with an Audit/Maintenance Wand, press the Function button on the Wand.
Scroll through the functions with the Enter key until Display Mech ID is displayed
on the Wand LCD. Press the Select key. The Wand will emit a continuous beep.
Dock the Wand to the ST-100 Data Wizard. The solenoid will fire resulting in an
audible click. The ID number will be displayed on the Wand LCD.
6. Open then close the door. Test the ST-100 Data Wizard with coins to ensure that it
reads and counts all coins.
6
Error Codes
When the Wand is docked, the Data Wizard runs through a self check sequence. If a
condition returns an error, an error code is displayed on the Wand LCD.
ERROR COMM indicates inability of the Wand to communicate with the Data Wizard.
• The Wand may have been pulled away before communication was complete. Re-dock
the Wand. If the error persists, clean the nose of the Wand with a soft cloth or Q-tip to
remove dirt.
• Datalinks are sensitive to bright light. Shield the datalink from light striking it from both
the front and the rear.
ERROR COINDOOR could indicate that the coin retain door is not closed properly. It
could also suggest that the accept door magnet is missing.
• Check for damage and/or foreign materials, including coins, that may be preventing the
door from closing properly.
• Verify that the magnet on the retain door is place. It is also possible that the magnet
has lost strength and may need replaced.
• The accept reed switch on the circuit board may be broken.
ERROR COIN DET suggests that the ST-100 is not detecting coins. This is indicated by
the coin detect reed switch being closed, usually by the magnet on the damper.
• Make sure there are no foreign materials in the coin path that may be holding the
damper down.
• Spread the counter housings and clean with compressed air. Remove any
obstructions. It may be necessary to take the counter housing apart and clean the coin
path. Do not use a screwdriver or other sharp object to remove debris. This type of tool
may cause scratching in the coin path, causing objects to become lodged more easily.
• Verify that the damper moves freely and that the damper magnet is in place. The
damper or magnet may need to be replaced.
• The coin detect reed switch on the circuit board may be broken.
ERROR SLUG: indicates that the slug detect reed switch is open. This switch is normally
held closed by the magnet on the counter housing. This magnet is held in place by a spot
of hot melt glue. If a ferrous slug passes the switch, it breaks the magnetic field and opens
it. If several slugs are inserted into the coin path, the switch may become stuck open.
• Run a valid coin through the ST-100 to close a switch that is stuck open.
• Make sure the house magnet is in place. Try pushing the magnet in or pulling it out
slightly to adjust it.
• The slug detect reed switch on the circuit board may be broken.
7
ERROR COIN RET indicates an active coin return reed switch. The coin return reed
switch is activated by the magnet on the coin return door, usually when the coin return
button is pushed.
• Check for foreign material, including coins that may prevent the coin return door from
closing properly.
• Make sure the coin return button is not partially pushed in.
• Make sure that the torsion and extension springs that are attached to the return door
and return lever are functioning properly.
ERROR PHOTOLED indicates that there is a problem reading coins. Coins are read by
shining an infrared light across the coin path through tiny holes in the housing. This light is
detected by phototransistors on the circuit board. If there is an obstruction in the coin path
or the tiny holes are blocked, the phototransistors will not detect the infrared light. This
error can be also be caused by a faulty LED circuit board or faulty phototransistors on the
main circuit board.
• Make sure there are no foreign materials in the coin path that may be blocking the
photo sensors.
• Spread the counter housings and clean with compressed air. Remove any
obstructions. It may be necessary to take the counter housing apart and clean the coin
path. Do not use a screwdriver or other sharp object to remove debris. This type of tool
may cause scratching in the coin path, causing objects to become lodged more easily.
• Replace the LED circuit board.
ERROR TIMEOUT means that the Wand has timed out and needs to be docked to the
buffer. The buffer sets a timeout period in the wand. Timeout periods will vary depending
on site configuration. Each wand must be docked to the buffer within the timeout period or
it will no longer communicate with the Data Wizards. Data will not be lost in the Wand if it
times out.
8
Routine Maintenance
Occasional cleaning of the coin path and door assemblies will prevent most problems.
Clean the counter housing twice a year or as required. Clean with compressed air or
disassemble the housing and wipe with a Windex and a soft cloth. The coin box assembly
should open freely when pressed down. Replace with new doors if needed.
Visually inspect the ST-100 Data Wizard for broken or missing parts. With the rack head
open, insert enough coins to fire the solenoid. Watch the trip lever to ensure that it falls
completely and does not catch on the door tongue.
Diagnosis and Repair
Field Repairs:
When repairing an ST-100 in the field, carry the following items with you.
• Maintenance Wand to check for the self diagnostic error codes
• Spare ST-100 in the event of un-repairable damage
• Damper
• Retain door
• Return catch
• Torsion spring
• Return lever
• Trip lever with small pushpin
• 3/8" and 1/4" nut drivers
• #2 Phillips screwdriver
• Needle nose pliers
• Reverse action tweezers
•
If the Data Wizard is able to communicate with a Wand, the data may be read out of it
and copied back into it or into a replacement after repair and testing. Using a
Maintenance Wand, press the Function key. Scroll through the functions, using the
Enter key until the LCD displays READ DATA. Press the Select key and the wand will
begin to beep.
•
Dock the Wand to the Data Wizard. The Wand will chirp as it reads the data out of the
Data Wizard into Wand memory. This procedure does not erase the data from the
Wizard; it only makes a copy of it into Wand memory. This data will remain in Wand
memory until it is overwritten by again reading data from a Data Wizard.
•
This function allows the Data Wizard to be repaired and tested without creating
extraneous data. It also allows the data to be written into another Data Wizard if the
damaged one needs to be replaced.
9
•
Dock the Maintenance Wand to the rack and monitor error codes. The wand should
display the Mech ID#. If it does, try to open the rack door.
•
If the door opens, dock the wand again while the door is open to check the coin door
reed switch and magnet. If the reed switch is working properly the Data Wizard should
return ERROR COIN DOOR on the Wand. If not, the reed switch or the magnet is not
working. Replace these parts and re-test.
•
If door does not open, open the rack head and dock the wand again. Watch the trip
lever. The solenoid fire should fire and the trip lever should fall. If the solenoid does not
fire, check the wire connections. If the solenoid does fire, but the trip lever does not fall,
there may be burrs on the pushpin, the return catch may be broken, the coin return lever
may be stuck or the door tongue may not be properly adjusted.
•
If the rack door opens with the Wand but does not return an error code, test the ST-100
with coins. If after inserting enough coins, the rack will not open, replace the damper
and coin test again. If the rack still does not open, the ST-100 will need the coin detect
reed switch on the circuit board replaced. (S4)
•
The ST-100 should be checked for broken or missing parts. Before leaving the rack,
make sure the price setting is correct. If the ST-100 was replaced, make sure that the
Mech ID# has been set and the ST-100 initialized to avoid any loss of data for that
location.
•
Write the data from the Wand memory into the repaired or the newly installed Data
Wizard. This will overwrite data from testing and replace it with the data that the ST-100
initially contained. Press the Function key and scroll through the functions by pressing
the Enter key until WRITE DATA is displayed on the Wand LCD. Press the Select
key. The Wand will begin to beep. Dock the Wand to the Data Wizard. The Wand will
chirp as it overwrites existing data in the Data Wizard with the data in Wand memory.
In circumstances where the circuit board on the Data Wizard prevents communication,
data will be unrecoverable.
10
Removing the ST-100 from the Rack
With the rack door open, the coin retain door hangs open. The triangular ramp can hang
through the tongue slot on the face of the rack. If the ST-100 is pulled upward during
removal, the ramp may be caught in the slot and broken off. The ST-100 should always be
removed with the rack door closed.
Door Open
Door Closed
11
Troubleshooting
Problem: The Newsrack Will Not Open With the Wand
Solution:
•
Turn the wand clockwise or counter-clockwise in the hand while docking for a better
communication position.
•
If the rack still does not open, open the rack head and visually inspect the datalink and
cable. Make sure that the cable is securely connected to the circuit board. Replace the
datalink if damage is detected.
•
Ensure that the front coin door closes completely when the door tongue is pushed
against it. If the coin door doesn’t close completely, the trip lever will not push the door
tongue down far enough to open the door. The door tongue may need to be adjusted.
•
The ST-100 may not communicate if bright sunlight or headlights are shining directly on
the datalink. Shade the datalink nose with your hand for a few seconds and retry
communication.
•
Make sure that the coin return door closes completely. If the coin return lever sticks and
does not slide smoothly, the door may not close, resulting in inability to communicate.
•
Check the rack for physical damage that could cause the door to malfunction.
Problem: The Rack Will Not Open With Coins.
Solution:
•
Check for damage to the rack. Open the rack and look for jammed coins around the
coin doors. Make sure that the tongue does not push on the coin deflector. This can
cause the coins to jam in the coin doors. If the rack has a gum stopper, bend it down to
prevent interference with the coin door.
•
Make sure that the lock bar does not interfere with the coin return lever.
•
Insert enough coins into the ST-100 to equal the current price. The solenoid should fire.
If the solenoid does not fire, check the battery voltage. If the battery voltage is
acceptable, the problem likely lies with either the coin detect or coin read circuit or
components.
12
Problem: The Return Catch Prevents the Trip Lever From Falling and the Door Won’t
Open
Solution:
•
The return catch is designed to touch the trip lever when it is in the up position if the
return button is pushed in. If the return lever does not return all the way forward, the
return catch will remain down and the foot may bind against the trip lever.
•
Look for anything that may bind the trip lever such as a rough edge, a loose pushpin,
binding coin return button or dirt.
Problem: The Coin Return Button Does Not Release the Coin Door
Solution:
•
•
•
Straighten the rack face if it is bent.
Replace the short coin return button with a longer one.
Bend the stationary latch about 10 degrees to the right from the rack.
13
14
Item
Part
#
Number
1 & 2 070-0081-00
3 639-0006-07
4 607-0006-08
5 & 6 070-0022-02 & 23
7 649-0006-07
8 070-0024-02
9 649-0005-10
10 070-0049-01
11 706-0002-00
12 050-0020-01
13 516-0027-01
13 516-0028-00
13 100-0010-00
14 020-0003-00
15 639-0002-05
16 630-0003-02
17 630-0004-02
18 304-0001-04
19 650-0003-00
20 317-0004-01
21 510-0003-00
22 661-0009-00
23 618-0005-00
24 660-0010-00
25 660-0002-00
26
27 660-0006-00
28 650-0002-00
29
30 603-0002-00
31 630-0005-03
32 050-0018-00
33
34 661-0002-02
35 661-0001-02
36 630-0015-01
37 615-0004-00
38 624-0001-04
Misc 651-0010-01
Misc 100-0032-02
Misc No Number
Part
Description
Counter Housing Set, Right & Left with Magnet
Mounting Plate
Cover Deflector
Return/Retain Door Set with magnet
Return Lever
Damper With Magnet
Return Catch
Trip Lever Assembly, Includes # 28
Bushing
Main PCB/LED Board Assembly
B-301 Keyswitch, 3 Position, clear
B-311 Keyswitch, 3 Position, clear
DataLink for ST-100
Lithium 'D" Cell Battery Replacement Kit
Lock-in Bracket
Extension Spring (Light)
Torsion Spring
Solenoid
Push-in Fastener, Large, (x2)
House magnet
Cable Tie, Large, (x2)
Screw, # 8 x 5/8, (x2) Type 25 PPH
Screw, machine, # 6-32 x 3/16, (x2)
Screw, Type 25, # 6 x 3/4
Screw, Type 25, # 6 x1/4, (x2) PPH
No Part
Screw, Type 25, # 6 x3/8 PPH
Push-in Fastener (Small)
No Part
Spring Clip
Extension Spring (Heavy)
Lock-in Wireform
No Part
Hook, Short
Hook, Long
Compression Spring (x2)
ESNA Nut, # 4-40 (x2)
Return Lever Insert
Metric e-ring for coin return button
DataLink for ST-100 upgrade
B-301, B-311, or B-326 key
2005
Price
$5.25
$4.75
$4.50
$3.50
$2.60
$1.40
$1.35
$1.40
$0.50
$88.50
$13.75
$13.75
$13.75
$16.00
$2.60
$0.70
$0.80
$7.45
$0.25
$0.85
$0.20
$0.15
$0.20
$0.20
$0.20
$0.20
$0.25
$0.45
$0.65
$0.30
$0.65
$0.65
$0.25
$0.25
$0.45
$0.35
$13.75
$0.30
15