1
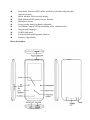
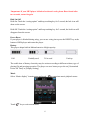
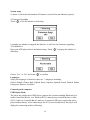
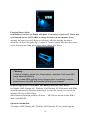
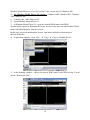
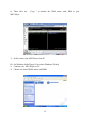
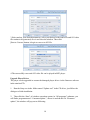
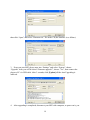
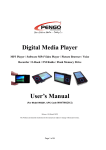
SFP 5660 MP3/MP4/WMA Player Instruction Manual Please read this manual carefully before operation. MP3/MP4/WMA Přehrávač Návod k obsluze Přečtěte si prosím tento návod ještě dříve, než začnete s přístrojem pracovat. MP3/MP4/WMA Prehrávač Návod na obsluhu Prečítajte si, prosím, tento návod ešte skôr, než začnete s prístrojom pracovať. MP3/MP4/WMA Lejátszó Használati útmutató Kérjük olvassa el ezt a használati útmutatót mielőtt a készüléket használni kezdi. Odtwarzacz MP3/MP4/WMA Instrukcja obsługi Przed rozpoczęciem używania urządzenia zapoznaj się z jego instrukcją obsługi. Contents Precautions ...................................................................................................................... 2 Characteristics.................................................................................................................. 2 Player description............................................................................................................. 3 Touch key function description: ........................................................................................ 4 Forward / backward under movie playing status: ............................................ 4 Finger Touch operation:.................................................................................................... 4 Main Menu ...................................................................................................................... 5 Basic Operation................................................................................................................ 5 Power On/Off ................................................................................................ 5 Hold On/Off................................................................................................... 6 Power Reset ................................................................................................... 6 Battery........................................................................................................... 6 Music............................................................................................................................... 6 Video ............................................................................................................................... 7 FM................................................................................................................................... 7 Photo ............................................................................................................................... 8 Text ................................................................................................................................. 8 Record ............................................................................................................................. 9 Navigation ....................................................................................................................... 9 Settings .......................................................................................................................... 10 Music Setup: ................................................................................................ 10 FM radio setup: .............................................................................................11 Record setup : ...............................................................................................11 Auto Browse: ................................................................................................11 Display setup: ...............................................................................................11 System setup ................................................................................................ 12 Languages: .................................................................................................. 12 Connecting with computer .............................................................................................. 12 USB Display Mode ...................................................................................... 12 Charging Battery Mode ................................................................................ 13 Download operation of WMA music with DRM protection to MP3-Player ...................... 13 Convert and Play Video File ........................................................................................... 17 Upgrade Player Driver.................................................................................................... 18 Troubleshooting ............................................................................................................. 20 Specifications:................................................................................................................ 21 1 Precautions This manual contains important safe measurements and correct operational information, so please read all the information carefully before you use the device in order to avoid any unexpected accidents. Do not put the player in high temperature, humidity or dust place (over 40℃), especially not in the cars with window closed in summer. Do not knock or hit the player, especially do not shake TFT screen in order to avoid TFT being damaged or displayed abnormally. Select suitable volume, turn down or stop use when you feel tingle in ears. Battery service lift may be various from different using conditions, manufacturer and manufacturing time. Do not disconnect the player abruptly during the formatting or uploading and downloading, otherwise, it will cause the program error. We will not be responsible for any obligation for any memory loss caused by product damage, repair or other reasons. Please operate correctly as per the manual. The player, no matter is powered on or not, once connected with the USB port of started computer, can be charged. Do not dismantle the player personally or use alcohol, thinner or benzene to clean the surface of the player. Do not use the player in the electronics-prohibited area, such as in the plane. Do not use the player when driving or walking in order to avoid traffic accidents. Before charging, please turn off the MP3 player, otherwise it will cause MP3 player abnormal working; Please charge in the following conditions: A. Battery electricity icon displays no electricity. B. When the system show power used up warning, C. No response with the pressing keys. D. The player show “Good-Bye” automatically. ※Our Company reserves the right for the improvement of the product. It is subject to any change on the specifications and designs without further notice! Characteristics 1.8-inch full-color TFT display (160X128) Slim design with Micro SD card slot 2 Multi music formats as MP3, WMA and WAV, good timber and real audio frequency display Movie function, full-screen play display High-definition JPEG picture browse function Microphone record Energy-saving setting, brightness adjustable Good timber, support 3D EQ surrounding effect, customized EQ Support multi languages USB2.0 high speed E-book function with bookmark function Firmware Upgradeable Player description 3 Touch key function description: “vol+/up”: Volume + and moving up “vol-/down”: Volume + and moving down “ ”: Confirm / Enter into submenu, play and pause “ ”: Short touch: Exit to superior menu / Back “ ” : Setting options under different functions, music, movie etc. “Next/Forward”: Next Long touch “Next/Forward”: Fast forward playing “Prev/backward“ : Previous Long touch “Prev/backward”: Fast backward playing Forward / backward under movie playing status: Because the touch keys are very sensitive and in order to avoid wrong operation, please pause the movie playing first if you want to forward or backward playing, then keep touching “Next/Forward” or “Prev/backward“ to get it. ! Important Note: Because touch pad keys of MP3 player is very sensitive, during using, if your fingers don't touch the keys on the correct position, sometime touch keys can't work normally. So please put your finger correctly on the keys, especially do not touch the position between any two or three keys. Static electric will also affect the touch key working, but it won't damage MP3 player. Try to touch keys more times, it will resume to work Finger Touch operation: Because the touch keypad is sensitive, it is very important for user to touch the keys in a correct way, please follow the operation as below: 4 Main Menu Basic Operation Power On/Off Long pressing the power keys for three seconds, the MP4 player will be powered on. z Long pressing the power keys for three seconds when MP4 player is on, the player will be powered off. 5 *Important: If your MP3 player is blocked or doesn’t work, please Reset it and after two seconds, restart it again. Hold On/Off Hold On: Touch the “setting option” and keep touching key for 2 second, the lock icon will show on the screen. Hold Off: Touch the “setting option” and keep touching key for 2 second, the lock icon will disappear from the screen. Power Reset If your player is blocked during using, you can use a tiny pin to press the RESET key at the bottom of MP4 player and restart the player. Battery This player adopts built-in lithium batteries of high capacity. Full Partially used To be used Used up The usable time of battery electricity may be various according to different volume, type of playing file and pressing operation. The player can save battery as per the set [Customized Power Off Time] or [Display Setting]. Music Select “Music display” in main menu and touch “ Touch “ ” key to exit to main menu. 6 ” to enter into music playback status. Video Select “Video” in main menu and touch “ Touch “ ” to enter into Video playback status. ” key to exit to main menu. FM Select “FM” in main menu and touch “ ” to enter into FM radio status. Then touch “ ” again, It will enter into FM submenu automatically first. (FM submenu includes: Manual, Auto, Mem, Preset, Del ) Touch “ ” key to select: Manu, Auto, Memo, Pres, Del and enter into FM program. Manual: Select the “Manu”, then you can scan the frequency manually station by touching the “Next/Forward” and “Prev/backward” icon. Auto: Select the “Auto scan”, it will scan FM channel and save them automatically. After auto scan complete, touch the “Next/Forward” or “Prev/backward” to select channel, 7 Memory: If you want to save FM channel, touch “ ” to exit to FM submenu and select “Mem” and touch play key to choose channel to save the FM channel. Preset: Touch “ ” to enter into “Pres” , you will see the FM channel you preset or saved before, touch “Next/Forward” and “Prev/backward” to choose the channel you prefer. Del: Delete the saved channel. There will be a window popped up to ask for confirmation of “Yes” or “No”, touch “ ” to confirm your choice. Note: In FM mode, the earphone is used as antenna, so please keeping the earphone is connected well. Photo In main menu, select “Photo” and touch “ ” icon to enter into photo browser, touch “Next/Forward” / “Prev/backward“ to see next / previous photos. Text Download TXT File Download the file and save the file as TXT format into your MP3 player. Read File Touch “ ” to enter into Text files, then short press “ touching “vol+/up” or “vol-/up “ keys. Store Bookmark 8 ” key to read. Scroll pages by When you are reading the book, touch “ ” to save the bookmark, there are total three bookmarks can be saved. Touch “ ” to confirm and save bookmark in the current page. Short touch “ ” to exit saving. Touch “Prev/backward” to save bookmark, use “vol+/up” or “vol-/up “ to select the bookmark, and then touch “ ” to confirm. Touch “Next/Forward” to load saved bookmark. Record After enter into “Record” status, you will see the interface as following: Touch “ ” to start recording and touch “ ” to complete recording and save the recorded file. After saving, it will prepare next recording again. REC Setup In Stop state of REC mode, long press [MENU] key to exit the Main interface, and enter “Setting” option, and select “record” adjust the settings among [REC Quality]/[REC Volume]. 1. REC Quality: High quality, general quality (the first one has larger REC file and better effect; the second one is in the opposite) 2. REC Volume: Five options of +1, +2, +3, +4 and +5. The higher level, the larger recorded volume. *When recording, please disconnect earphone to improve the recording effect ; *The recorded voice files can be found in Music Play menu and play to try the effect. *If the screen displays “Full Space”, it indicates that there is no space for new recorded file, please delete other files to release more space. Navigation Navigation is a resources manager which can help you to know all files in MP3 player for convenient management. You can select the music, movie or text file to enjoy it directly. 9 For example: Settings Note: Under different functions such as music playback, movie playback etc., you can touch “ ” to enter related setting options as well. Music Setup: 1) Repeat mode: Once: Stop when every one song is played over Repeat 1: Repeat a single song Folder once: Stop after finishing playing songs in one subfolders Folder Repeat: Repeat songs in subfolders All Once: Stop after playing all songs All Repeat: Repeat all songs continuously Intro: Play the first 10 seconds of songs in the current folder. Under Folder once and Folder Repeat mode, the MP3 player will recognize the songs in 10 root folders first and default play them once or repeat them continuously. If you want to play songs in other subfolders, please enter into from “Navigation” first and select songs in other subfolders and play it, then MP3 will play all songs in this folder. 2) Play mode: Order: Play music or movie one by one in order Shuffle: Play music or movie randomly 3) EQ select: Normal, 3D, Rock, Pop, Classic, Bass, Jazz, User EQ. User EQ operation: After choosing User EQ, touch “Next/Forward” “Prev/backward” key to shift to the frequency one by one (60Hz / 300Hz / 1KHz / 3KHz / 6KHZ) you want to adjust and adjust dB by “vol+/up” or “v“ key, touch “Prev/backward” ‘’Next/Forward”to shift to “Yes” or “No”, then touch “ ” to confirm or cancel. FM radio setup: 1) Stereo SW: Turn on or off the Stereo effect 2) FM Region: Choose your country or area to get better FM frequency Record setup : (please see page12 to know detailed description) Auto Browse: Including Text auto browse and Photo auto browse, there are 1 second to 5 second optional for time staying. Display setup: 1) Blight Time: Setup the backlight time of TFT screen except movie and charging status. 2) Lum: Setup the brightness level. There are 1 to 5 level to choose. The higher level, the brighter it is. 3) Backlight mode: two options of Normal and Electricity-saving modes. 11 System setup 1) About:: It shows the information of Firmware version, Date and Memory capacity. 2) Firmware Upgrading Touch “ ” to see the window as following: it reminds you whether to upgrade the firmware, it will exit if no firmware upgrading. 3) Defaulted Set Reset your MP3 player back to defaulted setting. Touch “ ” to pop up the window as following: Choose “Yes” or “No” and touch “ ” to confirm. Languages: Setup your languages of interface, there are 21 languages including: Chinese Simple, Chinese Big5, English, Korea, Japanese, Spanish, French, Deutsch, Italian, Portuguese, Russian ( Pyccknn ) Connecting with computer USB Display Mode The player has a high-speed USB2.0 port, supports the systems including Windows98 (it needs to install the driver), over Windows2K (it’s unnecessary to install the driver), Mac OS 10.3 and over, Linux Redhat 8.0 and over. It supports USB power supply and can be played without battery. After connecting to the PC (several seconds later), the player will display the connecting mode as following: 12 Charging Battery Mode If the battery is too low, the display will shows “Low battery to power off”. Please turn it off and you can use USB CABLE to charge the battery from computer. During charging, the battery icon will display as following. After the charging, the battery electricity will shows full grids (Fig.). It requires 3 hours to charge fully the battery (note: for the first two times using, please make sure to charge for 8 hours). ! Warning: 1. Before charging, please turn off mp4 player, otherwise it will cause MP3 player abnormal working; 2. If you want MP4 working during charging when connecting computer, please remove the USB disk function first from your computer Download operation of WMA music with DRM protection to MP3-Player On Window 98SE/ Window ME / Windows 2000/ Windows XP, WMA music with DRM should be transferred by Windows Media Player 9.0 and 10.0 version (10.0 version for Windows XP only) to MP3-Player Other download operation probably will cause MP3-Player can not read the WMA music with DRM file. Operation introduction: On Window 98SE/ Window ME / Windows 2000/ Windows XP, user should upgrade 13 Windows Media Player to 9.0 or 10.0 version ( 10.0 version only for Windows XP). A) On Windows Media Player 9.0 version : (Window 98SE/ Window ME / Windows 2000/ Windows XP) 1) Connect your MP3.Player to PC 2) Open Windows Media Player 9.0 3) In Windows Media Player 9.0 , open the desired WMA music with DRM System maybe request to download the license in case if user does not download the WMA music with DRM properly from the website . In this case, user need download the license from music publisher as instruction of Microsoft Website. 4) In operation windows , click “File ” “Copy” “Copy to Portable Device” 5) In the opening windows , choose the desired WMA music with DRM as step 2) And choose “Removable Disk” 14 6) Then click Icon MP3-Player “Copy ” to transfer the WMA music with DRM to your 7) Safely remove your MP3-Player from PC B) On Windows Media Player 10.0 version (Windows XP only) 1) Connect your MP3-Player to PC 2) Choose the desired WMA music with DRM 15 3) Click Right button of mouse and choose “Add to Sync list” 4) On the open windows , choose “Sync ” option 5) On “Sync ” window , choose the desired WMA music with DRM as step 2) And choose “Removable Disk” 6) Click “start Sync “ to transfer the WMA music with DRM to your MP3-Player 16 7) Safely remove your MP3-Player from PC. Convert and Play Video File This player can convert the WMV, RM, AVI, VOB or DAT into AVI video format via the attached video convert software in CD driver. 1. Click and run the program of “AV Converter.exe”, shown as follows: 2.click "add ", show dialog as follows: 17 3.Select and set your desired parameters, select your desired video/audio file and AVI video file routine to be generated, save it and close the window. Then click [Start to Convert] button, it begin to convert to AVI file. 4.The successfully converted AVI video file can be played in MP3 player. Upgrade Player Driver The player can be upgraded or resume the damaged player driver via the firmware software in the attached CD. 1. Run the Setup.exe in the folder named “Update tool” in the CD driver, just follow the dialogue to finish installation. 2. Then click the “Start” of windows operation system, in “All programs” submenu, you will find a program named “ Consumer update ”, choose it and run the file “Firmware update”, the window will pop out as following: 18 then click “Open” and select “Firmware.rfw” file in the CD (the Interface is as follows) 3. Power on your MP3 player enter into “Settings” and select “System”, choose “Upgrade” item, you will be asked “Firmware upgrade?”, choose “Yes”, then connect the player to PC via USB cable. After 3 seconds, click [Update] till the Auto Upgrading is achieved. 4. After upgrading is completed, disconnect your MP3 with computer, re-power on it, you 19 will see “System Init…”, that means MP3 player start to initialize the system. After it is completed, you will see MP3 player’s main menu again. 5. Now connect MP3 player with computer again, click this removable disk, you will see the window that asking you to format removable disk, click “Yes” and start formatting, after formatting is completed, you can download files and use it again. Note: Firmware upgrade is to improve and optimize the performance of the player. The normal work of the player would not be affected even if the firmware isn’t upgraded. The wrong operation of upgrading firmware would cause the device not to work normally! The firmware upgrade software of this player is not applied to other series of players. Troubleshooting If the player can not be played normally, please check as follows: Troubles It cannot be turned on Causes Check whether the player is powered on or not and whether the machine program is damaged or not The player is blocked Push the power switch to restart the player It can not be played Check whether the machine is powered on or not Confirm the volume is not in “0” level, check the earphone is connected well and keep the earphone clean Format the disk again It can not upload/download the Insert USB cable totally well after the Power on. Correctly file or the disk can not be install the driver again. found in computer It can not be recorded Check the enough memory and the electricity Words on display are deformed Make sure that you have selected the correct language It can not be used normally after upgrading Upgrade again in Windows 2000 20 Specifications: Items Specifications Dimensions 88×40×9.0mm (W*H*D) TFT colored display 1.8inch TFT; 65K real color 128) Language support Multiple languages Data transmission speed Supportable file format Supportable video format S/N display, Diagram (160 x High speed USB2.0 Read: 4Mbps, Write: 1Mbps Music: MP3: 8K bps – 320K bps WMA: 32K bps – 320K bps WAV; 64kbps / 256kbps Picture: JPEG .AVI (All formats should be converted to .AVI format by afforded firmware) 85dB Frequency response 20Hz-- 20KHz Max. output power 10mW + 10mW Flash memory 128MB/256MB/512MB/1GB/2GB/ 4GB Power supply 3.7V li-ion battery Usable time of battery Video play: 5 hours MP3 play: 12 hours (power save mode) Working temperature 5℃ to 40℃ Supporting operating system WIN2K/XP, Mac OS 10.4.6 Weight About 30g Accessories User’s Manual, earphone, USB cable, installation CD disk ALL INFORMATION IS SUBJECT TO BE CHANGED WITHOUT PRIOR NOTICE! 21 Recycling This symbol bears the selective sorting symbol for waste electrical and electronic equipment(WEEE). This means that this product must be handled pursuant to European Directive 2002/96/EC in order to be recycled or dismantled to minimize its impact on the environment. For further information, please contact your local or regional authorities. Electronic products not included in the selective sorting process are potentially dangerous for the environment and human health due to the presence of hazardous substances. 22