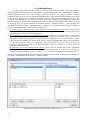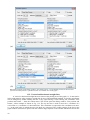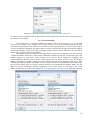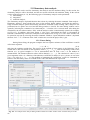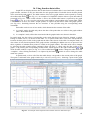
1
GraphiXT
A program for visualizing solutions of one-dimensional kinetic equations
v1.21
User‘s Manual
by Andrius Poškus
(Vilnius University, Faculty of Physics)
2015-02-23
Copyright © 2015 by Andrius Poškus
E-mail: [email protected]
Web: http://www.graphixt.com
ii
Contents
1. Introduction ................................................................................................................................................ 1
2. User interface ............................................................................................................................................. 2
3. Model functions and “free” curves............................................................................................................. 4
4. Computational programming with GraphiXT ............................................................................................ 5
4.1. Writing simple programs and displaying calculation results............................................................... 5
4.2. Lists of global and local parameters .................................................................................................. 14
4.3. Using arrays in programs................................................................................................................... 15
4.4. Using subroutines in programs.......................................................................................................... 18
4.5. Using DLL functions in programs..................................................................................................... 21
4.6. Built-in integration, summation, iteration and root finding functions............................................... 22
4.7. Runtime error handling ..................................................................................................................... 25
5. X datasets ................................................................................................................................................. 27
6. “Time cross-sections” f(x = const, t) of f(x, t) model functions................................................................ 30
7. Time limits and amount of data................................................................................................................ 31
8. Additional times ....................................................................................................................................... 34
9. Importing model data from text files........................................................................................................ 35
10. Slider bar ................................................................................................................................................ 35
11. Graphical objects.................................................................................................................................... 37
11.1. Text labels ....................................................................................................................................... 37
11.2. Vertical and horizontal straight lines............................................................................................... 38
11.3. Free-form lines ................................................................................................................................ 39
11.4. Converting free-form lines to function graphs ................................................................................ 40
12. Keyboard and mouse shortcuts............................................................................................................... 41
13. Elementary data analysis ........................................................................................................................ 42
13.1. Linear fitting.................................................................................................................................... 42
13.2. Integration ....................................................................................................................................... 43
13.3. Statistical analysis ........................................................................................................................... 45
14. Nonlinear fitting ..................................................................................................................................... 46
14.1. Elements of the theory of nonlinear fitting...................................................................................... 46
14.1.1. The used terminology and formulation of the problem ............................................................ 46
14.1.2. Choice of weight factors........................................................................................................... 47
14.1.3. The mathematical formulation of the principle of least squares .............................................. 48
14.1.4. Parameter confidence intervals................................................................................................ 49
14.1.5. The Levenberg-Marquardt method........................................................................................... 51
14.1.6. The simplex method .................................................................................................................. 51
14.2. Nonlinear fitting with GraphiXT..................................................................................................... 53
14.2.1. Definition of fitting functions.................................................................................................... 53
14.2.2. Selection of varied parameters and parameter properties ....................................................... 54
14.2.3. Definition of fitted data sets and their properties..................................................................... 55
14.2.4. General nonlinear fitting options ............................................................................................. 58
14.2.5. The fitting process .................................................................................................................... 59
15. Data smoothing....................................................................................................................................... 61
16. Using function data tables ...................................................................................................................... 65
Coding credits............................................................................................................................................... 67
1. Introduction
GraphiXT is a data analysis software and numerical computing environment. The original purpose
of GraphiXT was to facilitate study of time dependences (i.e., kinetics) of a large number of physical
quantities that are related to each other. Consequently, graphs displayed by GraphiXT are of two types:
graphs of functions f(t), whose argument is time (t), and graphs of functions f(x, t), whose arguments are
coordinate (x) and time (t). However, the actual meaning of function arguments is up to the user.
GraphiXT.exe can be used as a stand-alone program or in conjunction with plug-ins that solve kinetic
equations describing a particular physical system. Currently, there is one such plug-in, which is designed to
simulate charge carrier kinetics in multi-layer systems. That plug-in consists of two files – the function file
CarrierFunc.dll and the parameter editor file CarrierParms.exe (described in a separate user manual).
The program GraphiXT has been developed as an educational tool for the course “Numerical
simulation of charge transport processes” at the Faculty of Physics of Vilnius University. It can also be
used as a scientific research tool. Here are some features of GraphiXT:
• it is possible to create any number of “synchronized” graph windows, where the dependence of a
particular quantity or several quantities on the coordinate x at a particular moment of time t is plotted;
• the mentioned time (“current time”) can be easily changed using a special slider; it is possible to use
“animation mode”, when the program itself changes the current time with a constant rate;
• when GraphiXT is used with simulation plug-ins, the calculation results are automatically plotted
during the simulation;
• curves can be generated from user-defined equations or from user-defined DLL functions;
• a built-in compiler for computational programming, supporting multi-dimensional arrays and subroutines;
• a simple-to-use array viewer/editor;
• built-in mathematical functions, including special functions, numerical integration functions and others;
• elementary data analysis: linear fitting, integration, statistical analysis;
• nonlinear least-squares fitting and solution of systems of nonlinear algebraic equations;
• curve data can be exported to text files or imported from text files;
• plotted function data can be edited either in table format, or directly in graph windows.
Fig. 1.1. An example of the GraphiXT main window
Operating system: Windows XP SP2 or a newer Windows version. The setup procedure is
straightforward (a standard installer is used).
Further on, the f(x, t) or f(t) function values computed by the GraphiXT plug-in (such as
CarrierFunc.dll) will be referred to as “model data” or “model functions”, and the input variables used to
compute those functions will be referred to as “model parameters” (here, the term “model” means a set of
rules and relations between input parameters, coordinate x and time t that describe the simulated physical
system). GraphiXT can display time graphs of f(t) functions or coordinate graphs of f(x, t) functions
corresponding to the current time, i.e., f(x, t = const). The latter time can be smoothly varied. Then
GraphiXT displays the change of the coordinate dependence of the plotted quantity with time. Argument
values of all model time functions f(t) are equal to each other. Similarly, model coordinate x values
corresponding to the same moment of time and the same layer of the model are equal to each other. Here,
the term “layer” is used in an abstract sense: it means a set of model parameters and functions
corresponding to a defined set of x values. However, during simulation of charge carrier kinetics in a multilayer system, the mentioned abstract “layer” corresponds to a real layer of the system. In this case, the x
values have the meaning of node coordinates, with the first and last values corresponding to opposite
surfaces of that layer. In the current version of GraphiXT (v1.21), the maximum allowed number of layers
is 10. The sets of x values corresponding to different moments of time or different layers may be different.
2. User interface
The default language of the GraphiXT user interface is English. It is possible to select another
language after installing GraphiXT. This selection is done either in the dialog window that pops up when
GraphiXT is started for the first time, or later on, by clicking the language button, which is in the bottomright corner of the GraphiXT main window (see Fig. 1.1). Note: The program defaults and the information
about the currently selected language are stored in the files “GraphiXT.defaults” and “GraphiXT.lang”, which are in
the GraphiXT installation folder (usually “C:\Program Files\GraphiXT\”). Since writing to files in “C:\Program
Files\” requires administrator privileges, GraphiXT always runs with the highest permission level that it can.
Since the GraphiXT user interface is relatively simple, it is possible to start using this program
without any additional information. If a user selects an improper option, a message usually appears
informing the user about the error.
Options of all lines and objects shown in the graph window (i.e., curves, coordinate axes,
additional lines, text labels and the legend) can be changed using the context menu, which appears after
right-clicking the object. The main options of the graph can be changed using the menu “Graph options”.
The majority of the commands of that menu are also included in the graph context menu, which appears
after clicking the right mouse button anywhere in the graph window.
If the model function file and the model parameter editor are loaded, then the parameter editor is
invoked using the menu command “Simulation options / Model parameters…”, and simulation can be
started or stopped using the menu command “Start simulation” or “Stop simulation”. In order to load the
model function file, the menu command “Simulation options / Model function file…” must be selected
(this action also causes the reference to the plug-in user’s manual to be added to the help system). The
model parameter editor is loaded using the menu command “Simulation options / Parameter editor file…”.
Prior to starting simulation with the currently loaded plug-in, the user has to set the initial and final times
of simulation (the menu command “Simulation options / Time limits and amount of data…”).
Each graph window has the so-called “current time” associated with it. If the active window is a
coordinate graph window (i.e., if functions f(x, t = const) are plotted in it), then its current time is shown at
the bottom of the main window (see Fig. 1.1). If the active window is a time graph window (i.e., if
functions f(t) are plotted in it), then the limits of its time axis are shown at the bottom of the main window.
A vertical line indicating the current time (the “current time marker”) can also be shown in time graphs
(see Fig. 1.1). Regardless of the graph type, its current time can be changed by dragging the time slider,
which is at the bottom left of the main window (see Fig. 1.1). The slider limits can be changed by rightclicking on it.
It is possible to “synchronize” two or more graph windows by forcing their current times to be
equal to each other. This is achieved using checkboxes “t-sync” and “t-sync all”, which are at the bottom
of the main window (see Fig. 1.1). By checking “t-sync”, the active graph window is included into the
group of time-synchronized graph windows and the current time of that window becomes equal to the
current time of that group. By checking “t-sync all”, all graph windows of the project are synchronized.
The synchronized time graph windows “share” not only their current time, but also their time axis limits.
2
Respective X axis limits of several coordinate graph windows can be forced to be equal to each other using
checkboxes “x-sync” and “x-sync all” (see Fig. 1.1).
The checkbox “Auto”, which is to the right of the time slider (see Fig. 1.1), is used to turn on or
turn off automatic change of current time. By checking this checkbox, the current time of the active graph
and the graphs that are synchronized with it becomes equal to the time of the last point of f(t) model curves
(however, afterwards the current time of the active graph may be set to any other value). When the number
of model time values that are kept in memory changes (for example, after adding new points during
simulation, or after deleting part of the data, or after importing model data from text files), the current time
of all graph windows with the “Auto” mode turned on becomes equal to the time of the last available point
of f(t) model curves.
If the entire interval of the graph time axis belongs to the slider interval, then a change of the slider
position causes a change of the time axis limits. In other words, the time interval of the time graph “shifts”
along with the current time (if the current time is changed either by moving the slider or by entering its
value in the text box at the bottom of the main window). This change of the time limits can be either
smooth or step-like, depending on the state of the checkbox “[<-->]” (see Fig. 1.1). If it is unchecked, then
the change of the time limits is smooth, so that the difference between the current time and any one of the
two time limits stays constant. If that checkbox is checked, then the limits of the time axis don’t change
while the current time is between them. Those limits only change when the current time becomes greater
than the upper limit or less than the lower limit. In this case, the magnitude of the mentioned change is
always equal to a multiple of the difference between the upper and lower limits of the time axis.
General suggestions:
• In order to tile the windows so that they do not overlap and fill the entire area of the main window, the menu
command “Window / Tile” must be selected. The window order is determined by the order in which they were
activated prior to selecting that command: the active window will be the uppermost one in the first column; the
previously activated window will be below it, etc.
• The title of the active graph can be changed by selecting the menu command “Window / Rename…”. The same
command can also be selected in the context menu that appears after right-clicking the title bar of the graph
window.
• X or Y axis can be rescaled by double-clicking the axis, or by right-clicking it and selecting an appropriate
command from the context menu. After rescaling the X or Y axis, its limits become equal to the least value and the
greatest value of the abscissas or ordinates (respectively) of all curves plotted in the active graph window. If no
curves are plotted, or only formulas with temporary sets of X values are plotted (see Section 4.1), then the result
of rescaling the X axis depends on the graph window type: (a) in coordinate graphs (whose window icon contains
the letter “x”), the X axis limits become equal to 0 and 1; (b) in time graphs (whose window icon contains the
letter “t”), the time axis limits become equal to the simulation time limits. The simulation time limits are set in the
dialog window “Time limits and amount of data” (see Fig. 7.1), which is opened by selecting the menu command
“Simulation options / Time limits and amount of data…”. The simulation time limits are entered in text boxes
“Minimum visible time” and “Final time” (see Fig. 7.1).
• In order to make it easier to determine values of the plotted quantities from their graphs, it is recommended to turn
on auto-rescale of Y axis. This is done by right-clicking any one of the two Y axes, then selecting “Y axis
options…” in the context menu, then checking the checkboxes “rescale after a change of curves” and “rescale
after a change of current time or of X-axis limits” in the dialog window “Y axis options”. The same dialog
window can also be opened by selecting the command “Graph options / Margins and axis options…” from the
menu bar or from the graph context menu.
• The current time can be changed in three ways: (a) by dragging the time slider, which is at the bottom left of the
main window; (b) by activating any one of coordinate graphs and entering the time value into the current time edit
box (it is seen in Fig. 1.1); (c) by entering the needed value in the dialog window that is opened by selecting the
menu command “Graph options / Axis and slider limits…” (the same command can also be selected from the
graph context menu). Modification of the current time can be made more convenient when the current time
marker is shown in time graphs. In order to display the current time marker, the time graph must be activated and
the menu command “Graph options / Show current time marker” must be selected (the same command can also be
selected from the graph context menu). After selecting that command, a vertical line indicating the current time
will appear in the active time graph (it will only be visible when the current time belongs to the time axis range of
that graph). When the current time marker is visible, the current time can be changed in two additional ways: by
dragging the current time marker with the mouse or by selecting the command “Current time value and line
format…” from the current time marker’s context menu.
3
3. Model functions and “free” curves
In addition to model functions, GraphiXT can display the so-called “free” curves, which are not
associated with any model. A free curve can be created in four ways: (a) by menu command “Graph
options / Create free curves…”, (b) by drawing a free-form line and then converting it to a free curve (this
is done using the line’s context menu); (c) by importing curve data from text files (this is done using the
menu command “File / Import free curve data from text files…”); (d) by pasting the curve data from the
clipboard.
In order to be able to import free curve data from a text file, its format must conform to the
following requirements. The first non-empty line must contain column headers. Each column header must
be the name of a corresponding variable. The first variable is the independent variable (function argument),
and all subsequent variables are the dependent variables (functions of the independent variable). All nonempty lines that are below the header line must contain values of the mentioned variables, listed in the
same order as their names. The argument values must be sorted in ascending or descending order
(argument values that are exactly equal to each other are allowed, too). By default, the argument and
function names must be separated from each other by tabs, and their values must be separated from each
other either by spaces or by tabs (however, the data import dialog window has input fields for entering any
other set of separators, or for specifying that the files do not have the header line, or for specifying the
number of initial lines that must be ignored). In order to be able to paste free curve data from the clipboard,
the text data in the clipboard must conform to the same format as described above and, besides, there must
be an additional line containing the text “GraphiXT plot data” (without quotation marks) prior to the line
with column headers. This clipboard data can be formed either by copying the text from any text editor, or
by copying a GraphiXT curve using the curve’s context menu command “Copy curve” (in the latter case,
the curve format is also copied to the clipboard).
When creating, importing or pasting free curves, it is possible to “link” them to any existing
X dataset, i.e., to make their x values equal to x values of existing curves.
In addition to the usual method of accessing the curve options (by selecting the corresponding
command in the context menu), the free curves can also be accessed from the dialog window with the list
of free curves, which can be opened by selecting the menu command “Graph options / Free curves…” or
by clicking the toolbar button “ ” (see Fig. 1.1).
A curve can be “hidden” by unchecking the checkboxes “Connect points” and “Show points as
symbols” in the curve format dialog window, or by clicking the button “Hide” in the mentioned dialog
window with the list of free curves. Hidden curves are not plotted in the graph window, their names are not
shown in the legend and their data are not taken into account when rescaling the axes. However, it is still
possible to analyze the data of hidden curves (e.g., to use them for nonlinear fitting, smoothing, etc.), or to
use them in formulas. If a curve is hidden, then its options can only be accessed by opening the
corresponding list of curves (menu command “Graph options / Free curves…” or “Graph options /
Select…”).
The main differences between model functions and free curves are the following:
• Model function data do not belong to any graph window. Consequently, if a curve representing a
model function is deleted, or if the graph window containing that curve is closed, the model function
data is not lost and can be plotted again at any time. In contrast, each free curve belongs to a particular
graph window. If a free curve is deleted, or if its graph window is closed, the free curve data are lost.
• The shape of f(t) model curves is affected by the number of model time values in memory, and the
shape of f(x, t = const) model curves depends on the current time of coordinate graphs, whereas the
shape of free curves is not affected by the mentioned factors.
• The argument (t) values of all f(t) model functions are equal to each other. Similarly, argument (x)
values of all f(x, t = const) model functions, corresponding to the same layer and the same time, are
equal to each other. This means that if an argument value of a particular model function is changed,
the corresponding argument value of all other model functions changes as well. Conversely, free curve
argument values do not depend on argument values of any other functions or free curves.
• A free curve can be added to a graph window of any type (either a time graph or a coordinate graph).
For example, a free curve obtained by copying a curve representing an f(x, t = const) model function
(plotted in a coordinate graph) can be pasted into a time graph, or vice versa. Conversely, model
functions can only be plotted in a graph of the appropriate type.
4
4. Computational programming with GraphiXT
In previous sections, two types of curves that GraphiXT can display were described – model
functions (f(t) and f(x, t = const)) and free curves. The third type is the curves computed according to userdefined formulas. Here, the term “formula” means a set of computer instructions (“code”), written in the
GraphiXT programming language (which is described in Section 4.1) and defining a curve (i.e., a oneargument function). Each formula belongs to a particular graph window. A new formula can be created
using the menu command “Graph options / Create a formula…”, or the same command of the graph
context menu. An existing formula can be modified by double-clicking the corresponding curve or its
name in the legend, or by selecting the command “Formula…” in the curve’s context menu. Those actions
open the program editor window. Examples of that window are shown in Fig. 4.1.
Formulas can also be created or modified using the menu command “Formulas…”, which is
available in two menus: “Graph options” and “Programming”, or by clicking the toolbar button “ ” (see
Fig. 4.1). Then the dialog window with the list of all defined formulas is opened. A new formula can be
created by clicking the button “New…” in that dialog window. An existing formula can be modified by
selecting it in the list and then clicking the button “Edit…”. In either case, the program editor window is
opened. Note: A formula curve can be hidden in the same way as other curves, i.e., by unchecking the
checkboxes “Connect points” and “Show points as symbols” in the curve format dialog window or by
clicking the button “Hide” in the mentioned dialog window with the list of formulas (see also Section 3). If
a formula curve is hidden, it can only be accessed through the mentioned formula list.
Two types of programs can be used in GraphiXT environment – formulas and subroutines. The
main difference between a subroutine and a formula is that a subroutine is only executed when called
(invoked) programmatically from a formula or another subroutine, whereas formulas can not be referenced
programmatically (in this respect, a formula is analogous to the “main function”, which exists in many
programming languages). Up to 20 arguments can be passed to each subroutine. Each argument can be
either an expression, or an address of a variable, or a pointer to an array, or a pointer to another subroutine,
built-in function or a DLL function.
The next section will describe the main rules of writing simple programs (formulas), which do not
use subroutines or data arrays. After that, more advanced programming techniques, which involve the use
of subroutines and arrays, will be described.
4.1. Writing simple programs and displaying calculation results
User programs must be written in the GraphiXT programming language. The main rules of using
the GraphiXT programming language are described below.
Each non-empty line of a program must contain an expression (with the assignment operator or
without it). The exceptions to that rule are the lines containing only a curly brace (it may be the only
character in a line), or only the keyword “else”. Each expression may contain any number of arithmetic,
logical or comparison operations and calls to various functions. The value of the last calculated expression
is the final value of the computed function. Below is the list of standard operators, built-in functions and
special symbols that may be used in a program:
Arithmetic operators:
+
(addition),
(subtraction),
*
(multiplication),
/
(division),
^
(raising to a power),
=
(assignment of a value).
For example, the statement “a = a + 1” increases the value of the variable “a” by 1.
Comparison operators:
<
(“less than”),
<=
(“less than or equal to”),
>
(“greater than”),
>=
(“greater than or equal to”),
==
(“equal to”),
!=
(“not equal to”),
<>
(“not equal to”).
5
(a)
(b)
Fig. 4.1. Examples of the program editor window:
(a) The curve is displayed in a time graph window, and the formula contains references to f(x, t) model functions. In this
case, the x variable must be assigned a value, and abscissas of the curve points must coincide with the model time
values. In this example, the formula calculates the expression 3 ⋅ t ⋅ ln(( f ( x, t ) x =8 − 1.3 ⋅1014 ) / f ( x, t ) x =10 ) , where f is the
f(x, t) model function, whose number in the function list is 6. That function is denoted “fx6”.
(b) The curve is plotted in a coordinate graph window. The formula contains references to a f(t) model function and to a
free curve plotted in the same window, as well as comments. There is an error in one line. That line is highlighted, and
the description of the error is both in the status bar of the program editor window and in the programming tools dialog
window. In this case, modifying the x variable is not allowed, because x is the function argument, whose values are
computed automatically.
6
If a given inequality or equality is true, then the result of the comparison statement is 1, and if it is false,
then the result is 0. Although the comparison operators are most frequently used in the conditional
construct “if…else” and in the loop operator “while”, they may also be used in arithmetic expressions. For
example, if a = 3 and b = 2, then the expression “(a > b) + 1” is equivalent to the expression “1 + 1”,
because the inequality “a > b” is correct. The expression “a > b + 1” is equivalent to the expression
“3 > 3”, because, when parentheses are not used, the arithmetic operations are computed before
comparison operations (see below about operator priority). Since the inequality “3 > 3” is incorrect, the
result of the latter statement is 0.
Logical operators:
&
(logical operation “AND”, also called “conjunction”),
|
(logical operation “OR”, also called “disjunction”).
If both operands are non-zero (e.g., “(a > b) & (b > 1)” or “a/2 & −b”, when a = 3 and b = 2), then the
result of the logical operation “AND” is 1. If at least one of the operands is zero, then the result of the
logical operation “AND” is 0. The result of the logical operation “OR” is 1 when at least one operand is
non-zero. For example, if a = 3 and b = 2, the value of the expression “(b/2 > a) | (2 < a)” is 1, because the
second inequality is correct. If both operands are zero, then the result of the logical operation “OR” is 0.
Note: There is no negation operator. Instead, there is a built-in function “not(x)”, which returns 1 when
x = 0, and 0 when x ≠ 0.
Separators:
Parentheses “(” and “)”, which are used for grouping operands of binary operations, as well as for
indicating the start and the end of a function argument list or of an expression used as a condition in the
“if…else” construct or the loop operator “while” (see below about the “if…else” and “while” constructs);
curly braces “{” and “}”, which are used to denote the start and the end of a “branch” of the “if…else”
construct or of the “body” of the “while” loop operator, i.e., a sequence of statements which should be
executed when a specified condition is true (the curly braces are only needed when that sequence consists
of two or more statements);
brackets “[” and “]”, which are used for grouping operands of binary operations, as well as for indicating
the start and the end of a list of array indices;
the comma “,”, which is used to separate function arguments in function calls, or array indices in
references to arrays.
Basic built-in functions:
exp(x)
ln(x)
lg(x)
sqrt(x)
sin(x), cos(x), tg(x)
arcsin(x), arccos(x), arctg(x), arctg2(y,x)
sinh(x), cosh(x), tanh(x)
j0(x), j1(x), jn(n,x)
y0(x), y1(x), yn(n,x)
erf(x)
erfc(x)
gamma(x)
lngamma(x)
gammp(a,x)
abs(x)
max(x,y), min(x,y)
select(x,y,z)
ldexp(x,y)
fmod(x,y)
ceil(x)
floor(x)
near(x)
time()
(the exponential function),
(the natural logarithm),
(the decimal logarithm),
(the square root),
(the trigonometric functions),
(the inverse trigonometric functions),
(the hyperbolic functions),
(Bessel functions of the first kind: orders 0, 1, n, respectively),
(Bessel functions of the second kind: orders 0, 1, n, respectively),
(the error function),
(the complementary error function),
(the gamma function),
(the natural logarithm of the absolute value of the gamma function),
(the incomplete gamma function),
(the absolute value of a number),
(the larger or smaller of two values),
(if x ≠ 0, then returns y, otherwise returns z),
(x ⋅ 2y),
(the floating-point remainder of x / y),
(the smallest integer that is greater than or equal to x),
(the largest integer that is less than or equal to x),
(the integer that is closest to x),
(number of seconds elapsed since midnight, January 1, 1970),
7
clock()
counter()
counter_freq()
counter1e15()
rand()
srand(x)
Return(x)
(number of milliseconds elapsed since the start of the program),
(number of processor cycles since the computer startup or restart),
(number of processor cycles per second),
(remainder of counter() / 1015),
(a pseudorandom integer in the range 0 to 32767),
(sets the starting point for generating a series of pseudorandom
integers: the next call to rand() will start a new sequence of
pseudorandom numbers, which depends only on x; the function
srand(x) always returns zero),
(immediate termination of the current formula or subroutine,
returning the value of “x”).
Notes: 1. Functions counter(), counter_freq() and counter1e15() require presence of the high-resolution
performance counter (it is present in all modern personal computers). If that counter is absent,
those functions return −1.
2. Although the function “Return(x)” does return the value of “x”, that value can not be used in
the calling program, because any statement containing a call to “Return” will be unfinished: it
will be interrupted by that call. For example, the statement “a = exp(t) + Return(10) + sin(x)”
will be executed by first calculating the value of exp(t) and then terminating the current
program with the return value of 10. Thus, the term “sin(x)” will not be calculated, and the
value of the variable “a” will not be modified.
Advanced built-in functions:
loc(a) – memory address or sequence number of a programming object “a”, where “a” may be the name of
a variable (parameter), array, subroutine, another built-in function or a DLL function. If the argument
is an identifier of a variable or an array, then the returned value is its memory address, and if it is a
function name, then the returned value is the sequence number of that function in the set of all defined
functions.
Size(loc(a)) – number of elements of a one-dimensional array “a”;
Size2(loc(a), i) – number of elements of array “a” whose indices differ only by the value of index No. i.
Invert(loc(a)) – inversion of a square two-dimensional array (matrix) “a”. This function replaces the
original matrix with the inverse matrix and returns the determinant of the original matrix.
Find(x,loc(a),i0) – the sequence number of the largest element of a one-dimensional array “a”, whose value
is less than or equal to the value of “x”. It is assumed that elements of the array form a non-decreasing
sequence. “i0” is the number of the starting element, i.e., the location in the array where the search
starts (if i0 < 1 or if i0 exceeds the number of elements in the array, then the search starts from the
middle element of the array). The search algorithm depends on the size of array “a”: if the number of
array elements is less than 40, then array elements are checked sequentially starting from the element
No. i0, otherwise the method of repeated bisection of the index range is applied. If x is less than the
first element of the array, then the function “Find” returns zero;
Find2(x,loc(a),i0,n,m) – the extended version of the function „Find“. The meaning of the first three
arguments was explained in the previous paragraph. “n” is the number of the initial elements of array
“a” that are to be included in the search (i.e., the effect is the same as though the array “a” was
replaced by a smaller array, which consists of the initial n elements of array “a”). If n < 1 or if n
exceeds the number of elements of array “a”, then all elements of array “a” are included in the search.
The argument “m” determines the search algorithm: if m = 1, then a simple sequential search is
performed, and if m = 2, then the method of repeated bisection of the index range is applied.
Hist(loc(a),loc(b),loc(c)) calculates frequencies of values of elements of array “a” in intervals (“bins”)
defined by array “b” (the “frequency” in this context means the number of times a value belonged to a
given bin). The calculated frequencies are assigned to elements of array “c”. The values of array “b”
must be sorted in ascending order (equal values are not allowed). A value is placed into a bin if it is
less than or equal to the upper edge of that bin and greater than its lower edge. All values that are less
than or equal to the first element of array “b” are placed into the first bin, and the values that are
greater than the last element of array “b” are not counted. The function “Hist” returns the number of
elements of array “a” whose values do not exceed the value of the last element of array “b”;
Hist2(loc(a),loc(b),loc(c),n,i) – the extended version of the function “Hist”. The meaning of the first three
arguments was explained in the previous paragraph. The argument “n” is the maximum number of
8
initial elements of array “a” that must be processed, and the argument “i” indicates if elements of
array “c” should be set to zero prior to processing. If “i” is equal to zero, then elements of array “c”
are set to zero before calculating the frequencies, otherwise they are not modified initially, and they
are incremented during processing. If “i” is zero and “n” is less than 1 or greater than or equal to the
size of array “a”, then behavior of “Hist2” is identical to “Hist”.
Int(f,x,a,b) – integral of expression “f” with respect to x from a to b (e.g., “Int(1/sqrt(exp(t*x)+x),x,0,5)”).
Inti(f,x,a,1) – integral of expression “f” with respect to x from a to +∞;
Inti(f,x,a,-1) – integral of expression “f” with respect to x from −∞ to a;
Inti(f,x,a,2) – integral of expression “f” with respect to x from −∞ to +∞ (the argument “a” is not used).
Intw(f,x,a,b,w,1) – integral of expression f(x) cos(wx) with respect to x from a to b;
Intw(f,x,a,b,w,2) – integral of expression f(x) sin(wx) with respect to x from a to b.
Sum(f,i,i1,i2) – sum of terms “f” when the summation index i varies from i1 to i2 (e.g., “Sum(ln(i),i,2,10)”);
Sum2(f,t,a,b,dt) – sum of terms “f” when the summation variable t varies from a to b in increments of dt.
Iter(f,i,i1,i2) − repetition (“iteration”) of expression “f” when the iteration index i varies from i1 to i2.
Root(f,x,a,b) – root of the nonlinear equation f(x) = 0. a and b are limits of the interval that should be
searched for the root. For example, the expression “Root(sqrt(x)-1+x^3,x,0,1)” is equal to the root of
the equation x − 1 + x3 = 0 , i.e., 0.60542342357183.
For more information about built-in functions “Int”, “Inti”, “Intw”, “Sum”, “Iter” and “Root”, see Section
4.6.
Notes: 1. If the value of the array element whose number is returned by the function “Find(x,loc(a),i0)”
or “Find2(x,loc(a),i0,n,m)” occurs more than once in the array “a”, then the returned result may
correspond to any of the occurrences, depending on the values of the arguments “i0”, “n” and
“m”.
2. If elements of the array “a” do not form a non-decreasing sequence, then functions
“Find(x,loc(a),i0)” and “Find2(x,loc(a),i0,n,m)” usually return an incorrect result.
Some of the mentioned mathematical functions are special functions, which are defined as
integrals. Below are the definitions of those functions:
Bessel function of the first kind, order n:
π
1
J n ( x) = ∫ cos(nθ − x sin θ )dθ
π0
(n = 0, 1, 2, ...)
Bessel function of the second kind, order n:
π
∞
1
1
Yn ( x) = ∫ sin( x sin θ − nθ )dθ − ∫ [e nt + (−1) n e − nt ]e− x sinh t dt
π0
π0
(4.1)
(n = 0, 1, 2, ...)
(4.2)
Error function:
x
2
2
e −t dt
∫
π0
erf( x) =
(4.3)
Complementary error function:
erfc( x) = 1 − erf( x) = 1 −
2
x
∫e
π
−t 2
dt
(4.4)
0
Gamma function:
∞
Γ( x) = ∫ t x −1e −t dt
(4.5)
0
Incomplete gamma function:
γ ( a, x ) =
x
1
t a −1e −t dt
∫
Γ(a ) 0
(4.6)
9
The conditional construct “if... else”:
In the simplest case, the format of the “if…else” statement is the following:
if (expression_1) assignment_statement_1
else if (expression_2) assignment_statement_2
...
else assignment_statement_n
For example:
if (t < 3) y = 0.5
else if (t < 6) y = 2
else y = 3
The program evaluates each of the expressions in parentheses (those expressions are also called
“conditions”) until an expression with a non-zero value is encountered. Then the statement (or several
statements) corresponding to that condition are processed and control returns to the point after the if…else
statement (i.e., the subsequent conditions are not evaluated). The “else if” and “else” branches are optional;
only the initial “if” branch is required. If neither condition evaluates to a non-zero value, then the “else”
branch is executed (if it is present). The keywords “if” and “else” and assignment statements may be
written on different lines, e.g.
if (t <= 5)
y = 0.5
else
y=3
“if”, “else if” or “else” branch may consist of several statements. Then, the start and end of the statements
belonging to that branch must be indicated by curly braces, e.g.,
a=5
if (t <= a) {
b = exp(0.5*(t - a)) - 1
y = 2*b + 2
}
else { b = t - a + 1
y = 2+ln(b) }
The loop operator “while”:
In the simplest case, the format of the “while” loop operator is the following:
while (expression) assignment_statement
For example:
while (t < 3) t = t ^ 1.1
The program evaluates the assignment statement repeatedly while the expression in parentheses is non-zero
(that expression is the so-called “condition” of the loop operator). If the assignment statement must be
evaluated a predetermined number of times, then a temporary variable must be used, which is incremented
by one after each evaluation. In such a case, the “body” of the “while” operator consists of more than one
statement and curly braces must be used (they are used exactly as in the “if…else” construct). In the
following example, the factorial of the number 10 is calculated:
fact = 1
i=1
while (i <= 10) {
fact = fact * i
i=i+1
}
Note: In the above example, the last calculated expression is the comparison operation “i <= 10”. Its last
value is zero. Therefore, if those lines of code were the last lines of the program, it would return zero. In
order to ensure that the program returns the value of the factorial, an additional line is needed (for example,
it could be “a = fact”, or just “fact”).
10
Identifiers of system variables:
t–
time:
a) in time graphs, t is equal to the current value of the formula argument;
b) in coordinate graphs: if the formula argument values are equal to the stored model
coordinate values, or if the formula contains references to linearly interpolated values of
f(x, t) model functions (i.e., “FXn”), then t is equal to the stored model time value that is
closest to the current time of the graph; otherwise, t is equal to the current time of the graph;
x−
coordinate,
iPoint –
the number of the current point in the current sequence of formula argument values,
nPoints – the total number of points in the current sequence of formula argument values,
iTime –
the number of the time value:
a) in time graphs: if the formula argument values are equal to the stored model time values,
then iTime = iPoint, otherwise iTime = 0;
b) in coordinate graphs: if the formula argument values are equal to the stored model
coordinate values, or if the formula contains references to linearly interpolated values of
f(x, t) model functions (i.e., “FXn”), then iTime is equal to the number of the stored model
time value that is closest to the current time of the graph, otherwise iTime = 0;
nTimes – the number of stored model time values,
curGraph – the sequence number of the graph, to which the currently computed formula belongs. The
graph sequence number is also shown in the title bar of the graph window (see Fig. 1.1). If the
current formula is an initialization expression of a parameter or an array, then this variable is
equal to the sequence number of the active graph window;
curForm – the sequence number of the currently computed formula among all formulas that belong to the
same graph window. If the current formula is an initialization expression of a parameter or an
array, then this variable is equal to zero;
FTn –
FXn –
FCn –
the linearly interpolated value of the f(t) model function No. n (e.g., FT10),
the linearly interpolated value of the f(x, t) model function No. n (e.g., FX10),
the linearly interpolated value of the free curve No. n (e.g., FC10);
IER, AbsErr and nEval are modified in each call to any built-in integration function. Their meanings are:
the error code, estimate of the absolute error and number of integrand evaluations, respectively
(for more information about built-in integration functions, see Section 4.6). Those three
variables are set to zero before starting computation of each sequence of formula values;
NLSF:
if the formula is computed during nonlinear fitting and if the fitted dataset belongs to a free
curve, then NLSF is equal to the sequence number of that curve in the corresponding graph
window, and if the fitted dataset belongs to a model function, then NLSF is opposite to the
sequence number of that model function in the set of all model functions of the same type (f(t)
or f(x, t = const)). If the program is executed not during nonlinear fitting then NLSF = 0;
iDat and nDat are equal to the current sequence number and the total number of the fitted datasets that
correspond to the current fitting formula, respectively (only counting the datasets that are used
for fitting). If the program is executed not during nonlinear fitting, then iDat and nDat are equal
to zero;
iStart and iEnd are equal to sequence numbers of the first and last points of the subset of the fitted curve
that belongs to the current fitted dataset. If that curve is not an f(x, t) model function, then
iEnd = iStart + nPoints − 1. If that curve is an f(x, t = const) model function, then iStart and
iEnd are equal to sequence numbers of the first and last points of the subset of the fitted curve
corresponding to the current time and belonging to the current fitted dataset (if that dataset
spans two or more model time values, then iEnd < iStart + nPoints − 1, because nPoints is
calculated including the points that correspond to all model time values that are used for
fitting). If the program is executed not during nonlinear fitting, then iStart = 1, iEnd = nPoints;
iXpoint:
when fitting an f(x, t = const) model function, iXpoint is equal to the sequence number of the
current fitted data point in the subset of the fitted dataset corresponding to the current time
(counting only the points that are used for fitting). If the program is executed not during
nonlinear fitting or if the fitted curve is not an f(x, t = const) model function, then iXpoint = 0;
11
iBase –
the sequence number of the first data point of the current fitted dataset in the union of all
datasets corresponding to the current fitting function (excluding unused datasets and the points
that are not used for fitting). If the program is executed not during nonlinear fitting, then
iBase = 0.
Those identifiers, excluding “x”, may not be used on the left-hand side of the assignment operator.
Besides, the variable “x” may only be assigned values in time graphs (see Fig. 4.1).
Identifiers of variables, arrays and functions are case-insensitive. Identifiers can not be longer than
50 characters (otherwise the trailing part of the identifier, starting with character No. 51, will be ignored).
The operator priority, when it is not indicated by parentheses, is determined according to the usual
rules. The assignment operator has the lowest priority, i.e., the assignment operation is done last. The
priority of logical “AND” is higher than the priority of logical “OR” (for example, the expression
“a & b | c & d” is equivalent to “(a & b) | (c & d)”). The comparison operation priority is higher than the
logical operation priority, but lower than the arithmetic operation priority (excluding the assignment
operation). Multiplication and division priority is higher than addition and subtraction priority, and the
priority of raising to a power is higher than multiplication and division priority. Addition has the same
priority as subtraction. This means that a sequence of addition and subtraction operations will be evaluated
left to right. Similarly, multiplication has the same priority as division. The priority of function calls is
higher than the arithmetic operation priority. For example, the expression “2 * a + 3 * b*sin(x)^2” would
be evaluated in this order: first, the built-in function sin(x) is calculated, then this result is raised to the
power 2 and multiplied by 3b, then the value of 2a is added. Thus, using parentheses, the same expression
could be written as follows: “(2 * a) + (3 * b *((sin(x))^2))”.
Comment lines may be inserted into programs. Each comment line begins with “//” (see Fig. 4.1b).
For a convenient access to programming objects, as well as for defining the set of X values of an
edited formula, a dialog window “Program editor tools” is displayed when a program is being edited (see
Fig. 4.1). It can be hidden or displayed whenever a program editor window is active. In order to display the
programming tools dialog, the user has to select the menu command “Programming / Show programming
tools dialog”, or the corresponding command of the context menu of the program editor.
Below are explanations of all controls of the programming tools dialog:
• The five buttons and the drop-down list of built-in functions, which are at the top of the programming
tools dialog window (see Fig. 4.1), are used to insert a function call into the formula. Each of the
mentioned six controls corresponds to a particular function type: a f(t) model function, a f(x, t) model
function, a free curve of the current graph, a user-defined subroutine, a user-defined DLL function, or
a built-in function. By clicking any one of the mentioned five buttons, a dialog window with a
function list is opened (for more information about the lists of subroutines and DLL functions, see
Section 4.4 and Section 4.5, respectively). After selecting a function, its name will be inserted at the
current position of the text cursor.
• Clicking the button “Curve format and name” opens the dialog window where the curve format and
name are specified (the same dialog window can be opened from the curve context menu). Note: If the
edited program is a subroutine, then this button is replaced by the button “Name and formal
parameters” (see Fig. 4.13).
• The group of three option buttons (see Fig. 4.1) define the rule that must be used to calculate abscissas
of the curve points. If the top option button is selected, then the abscissa of the first point is always
equal to the lower limit of the graph X axis, and the abscissa of the last point is always equal to the
upper limit of the graph X axis (the abscissas will be re-calculated each time when the X axis range
changes). Such X datasets will be called “temporary” X datasets. If the middle option button is
selected, then the abscissas do not depend on any other data (similarly to abscissas of free curves). If
the bottom option button is selected, then the abscissas of the curve representing the current formula
coincide with the indicated set of values (which could be, for example, abscissas of a particular free
curve or formula or of a group of linked free curves and formulas). If any of the latter values is
changed, the abscissa of the corresponding point of the formula curve will change, too. Note: If the
edited program is a subroutine, then those three option buttons are absent (see Fig. 4.13).
12
• After clicking the button “Compile”, the current formula and all other modified programs are checked
for syntax errors and compiled, but the curves that depend on those programs are not recalculated.
• After clicking the button “Apply”, the current formula and all other modified programs are checked
for syntax errors, compiled and re-calculated, and the curves that depend on those programs are replotted (clicking this button is equivalent to clicking the toolbar button “ ”).
• By clicking the button “Arrays”, a dialog window with the list of all user-defined arrays is opened. In
the mentioned dialog window, new arrays can be defined, or existing arrays can be modified (for more
information about the list of arrays, see Section 4.3).
• By clicking the button “Global parameters”, a dialog window with the list of global formula
parameters is opened. [“Global parameters” are parameters that are “visible” in all programs. When
the value of a global parameter is changed, all formulas depending on that parameter are automatically
recalculated (except when the global parameter is changed by a program and some of the formulas
depending on that parameter belong to other graph windows, in which case the latter formulas must be
recalculated manually). By optimizing global parameters, it is possible to fit several data sets by
different formulas simultaneously and solve systems of nonlinear algebraic equations (see Section
14).] In the mentioned dialog window, new global parameters can be defined, or existing global
parameters can be modified (for more information about the list of parameters, see Section 4.2).
• By clicking the button “Local parameters”, a dialog window with the list of local parameters is
opened. [“Local parameters” are parameters that are “visible” in one program only. Consequently,
local parameters of different programs may have identical names.] In the mentioned dialog window,
new local parameters can be defined, or existing local parameters can be modified (for more
information about parameter lists, see Section 4.2). Note: If a local parameter identifier is the same as
a global parameter identifier, then the local parameter value is used.
In addition to global and local parameters, parameters of yet another kind are used. Those are the
model parameters, which depend on the currently loaded GraphiXT plug-in (such as the charge transport
simulator CarrierFunc.dll). Unlike global or local parameters, model parameters can not be referenced by
their identifiers in programs. However, programs can include references to model functions, which depend
on model parameters.
200
Displacement current (A/cm^2)
Conduction current (A/cm^2) (t = 1e-011)
Total current (A/cm^2)
150
100
50
0
-50
0
0.2
0.4
x, um
0.6
0.8
1
Fig. 4.2. An example of a graph corresponding to the formula of Fig. 4.1b (without the erroneous line)
13
Local, global and model parameters exist until they are removed by the user. Those parameters can
be optimized during nonlinear fitting (see Section 14 “Nonlinear fitting”). Variables that are not defined as
local or global parameters exist from the first assignment of a value to them until computing the final value
of the program. Those variables can be used for storing intermediate values (e.g., the “a” variable in
Fig. 4.1a). They can not be optimized during nonlinear fitting.
If a syntax error is found during compilation of a program, then the corresponding line of code is
highlighted, and a message with a description of the error appears in the status bar of the program editor
window and in the programming tools dialog (e.g., see Fig. 4.1b). Only the first detected error is pointed
out (after correcting it, other errors will be found, too). If there is no error message, this means that the
formula syntax is correct. The error message is also absent when the formula code is empty or filled with
comments.
An example of a graph corresponding to the formula of Fig. 4.1b is shown in Fig. 4.2 (this graph
has been obtained after removing the erroneous line “x = 8” from the formula code). In this example, the
horizontal line (“Total current”) has been calculated according to the formula Y = FT2. This is the value of
the f(t) model function No. 2 at the current moment of time (thus, by using formulas, it is possible to
display current values of time functions f(t) in coordinate graphs). The red curve (“Conduction current”) is
a free curve obtained by copying and pasting a certain f(x, t = const) model function (in the formula text of
Fig. 4.1b, this free curve is referred to as FC1). The blue curve (“Displacement current”) represents the
difference between the mentioned two functions (FT2 − FC1).
4.2. Lists of global and local parameters
The list of global or local parameters is opened by selecting the menu bar command “Programming
/ Global parameters…” or “Programming / Local parameters…”, or by selecting the same command from
the context menu of the program editor or the array editor, or by clicking the button “Global parameters” or
“Local parameters” of the programming tools dialog (see Fig. 4.1). The list of global parameters can also
be opened by clicking the toolbar button “ ” (see Fig. 4.1). The list of local parameters can only be
opened when a program editor window is active. An example of a dialog window with a list of global
parameters is shown in Fig. 4.3 (the list of local parameters has the same format). Parameter properties
(i.e., name, value and expression) can be modified in the parameter properties dialog window, which is
opened by double-clicking the corresponding item of the parameter list, or by clicking the button “Edit”, or
by selecting the command “Edit parameter…” from the parameter context menu. An example of the
parameter properties dialog window is also shown in Fig. 4.3.
Fig. 4.3. An example of a list of global parameters and a dialog window with parameter properties
14
The purpose of buttons of the parameter list dialog window is self-explanatory (see Fig. 4.3). A
group of five buttons “Copy”, “Copy All”, “Cut”, “Paste” and “Paste before” makes it possible to transfer
parameters between different projects or to rearrange the current list. A single parameter can also be
copied, pasted or cut using the keyboard shortcuts “Ctrl + C”, “Ctrl + V” and “Ctrl + X”. The difference
between “Paste” and “Paste before” is that “Paste” places the new parameter at the end of the list, while
“Paste before” places the new parameter before the currently selected one. If a parameter is selected, then
the keyboard shortcut “Ctrl + V” performs the action “Paste before”, and if there is no selected parameter,
then the keyboard shortcut “Ctrl + V” performs the action “Paste”. A parameter can be selected or
unselected by left-clicking an item of the parameter list.
Most of the buttons perform actions on the selected parameter only. There are three buttons which
perform actions on all parameters of the current list: “Delete All”, “Copy All” and “Calculate All”. After
clicking the button “Calculate All”, the parameter expressions will be evaluated in the same order in which
the parameters are listed. As evident from the example of Fig. 4.3, each parameter may depend on other
parameters of the same list. Consequently, the values assigned to parameters after clicking the button
“Calculate All” may depend on parameters’ order in the list.
Action “Calculate” of the parameter list is especially suited for some one-time or infrequent
evaluations. For example, in order to invert a user-defined square matrix “A”, a parameter must be defined
with expression “Invert(loc(A))”. Here, “Invert” is the name of the built-in function used for matrix
inversion (all built-in functions are listed in Section 4.1). Then, after calculating that parameter, it will be
assigned the value of the determinant of matrix A, and that matrix will be replaced by its inverse matrix.
After clicking the button “OK” or “Apply”, the current list of parameters is saved and all formulas
depending on those parameters are recalculated. After clicking the button “Cancel”, all unsaved changes of
the parameter list and of individual parameters are discarded and the parameter list dialog is closed.
Parameter expressions may call functions that change values of array elements or values of
parameters of the other type (i.e., expressions of global parameters may call functions that modify local
parameters of the currently edited program, and expressions of local parameters may call functions that
modify global parameters). After calculating such expressions (i.e., after clicking “Calculate” or “Calculate
All”) and then clicking “Cancel”, those changes will not be automatically cancelled. If GraphiXT
determines that parameter evaluations may involve a change of array element values or of values of
parameters of the other type, then all plotted formulas that depend on arrays or on parameters of the other
type are automatically recalculated after calculating the current parameters, and the corresponding curves
are re-plotted. However, in such a case the plotted formulas are recalculated using the old values of
parameters of the current type, which existed before opening the parameter list dialog window, or which
were saved by the most recent click on the button “Apply”. In order to re-plot formulas using the updated
parameter values, one must click the button “OK” or “Apply”.
4.3. Using arrays in programs
A data array in GraphiXT is a collection of numbers (“elements”), each selected by one or more
indices that can be computed at run time by the user program. Arrays in GraphiXT can have up to 20
dimensions (indices). A two-dimensional array, i.e., an array that has two indices, can be visualized as a
table of numbers, where the row number is equal to the value of the first index, and the column number is
equal to the value of the second index (a two-dimensional array is often called “a matrix”). Array element
values can be accessed and modified in user-defined programs. Array elements are referenced using the
format “a[i1, i2, i3, …]”, where “a” is the array name, and “i1, i2, i3” are the array indices (positive integer
numbers). For example, if “A” is a two-dimensional array, then the following statement sets the value of
the element at row 2 and column 3 equal to the sum of two elements: element at row 5 and column 10, and
element at row 20 and column 30:
A[2,3] = A[5,10] + A[20,30]
Any expression can be used instead of each array index. Value of each such expression is rounded to the
nearest integer number. For example, if “N” is a variable that was previously assigned the value 10.6, then
the following example is equivalent to the previous one:
A[2,N-8] = A[N/2,10] + A[9+N,3*N-2]
8 array data types are supported (64- or 32-bit floating point, and 32-, 16- or 8-bit signed or
unsigned integer). However, in all arithmetic operations, the array element values are converted “on the
fly” to 64-bit floating-point format.
Arrays in GraphiXT are global objects, which exist independently of user-defined programs. A
new array can be only created in the list of arrays. That list is opened using the menu bar command
“Programming / Arrays…”, or the context menu of the program editor or the array editor, or by clicking
15
Fig. 4.4. An example of a list of arrays
the button “Arrays” of the programming tools dialog (see Fig. 4.1). The list of arrays can also be opened by
” (see Fig. 4.1). An example of a dialog window with such a list is shown
clicking the toolbar button “
in Fig. 4.4. Array properties (i.e., name, dimensions, data type and initialization expression) can be
modified in the array properties dialog window, which is opened by clicking the button “Properties” or by
selecting the command “Array properties …” from the array context menu. An example of the array
properties dialog window is shown in Fig. 4.5.
The smallest allowed value of each index of a user-defined array is 1, and the largest allowed value
of each index is defined in the text box “Dimensions” of the array properties dialog (see Fig. 4.5). The
array data type is defined using nine radio buttons of the array properties dialog (see Fig. 4.5).
Array elements can be initialized at any time using an expression entered in the text box
“Expression” of the array properties dialog (see Fig. 4.5). That expression can include user-defined
identifiers of array indices and references to any programming object defined in the current project,
making possible complex initializations. Identifiers of array indices are entered in the bottom text box
“Index identifiers” (see Fig. 4.5). The default identifiers of the first three indices are “i1”, “i2” and “i3”.
For example, if the initialization expression is as shown in Fig. 4.5, then, after clicking the button
“Initialize”, the element A[2,5,3] will be assigned the value 10000 * 2 + 100 * 5 + 3 = 20503 (values of all
other elements will be calculated similarly).
Any user-defined array can be allocated or deallocated at any time, using buttons
“Deallocate / Allocate” and “Deallocate All / Allocate All” (see Fig. 4.4). When an array is deallocated, all
Fig. 4.5. An example of an array properties dialog window
16
its elements are lost, but the array object is not deleted. When an array is allocated, it is automatically
initialized using the expression that was entered in the text box “Expression” of the array properties dialog
window (see Fig. 4.5). New arrays are not allocated by default. If a user-defined program contains a
reference to an array that has not been allocated, then execution of that program would cause a runtime
error. This is one of runtime errors handled by GraphiXT (other runtime errors, which are handled by
GraphiXT, are listed in Section 4.7).
Similarly to global and local parameters, arrays can be copied from one project to another using
the five buttons “Copy”, “Copy All”, “Cut”, “Paste” and “Paste before” (see Fig. 4.4). In addition, the
array list has the “Up” and “Down” arrow buttons, which provide a more convenient way to rearrange the
list (the keyboard shortcuts are “Ctrl” + “↑” and “Ctrl” + “↓”, respectively). Another difference between
the list of parameters and the list of arrays is that changes done to the list of parameters can be cancelled,
whereas any change of the list of arrays is applied immediately and can not be undone. Accordingly, the
array list dialog window does not have the buttons “OK”, “Apply” and “Cancel”.
There are several built-in arrays, which allow access to any model data value in user-defined
programs. Similarly, any data point of any free curve or formula can be accessed. The built-in arrays are
the following:
XC[g,c,p] – X value of the data point No. “p” of free curve No. “c”, which is in the graph No. “g”,
FC[g,c,p] – Y value of the data point No. “p” of free curve No. “c”, which is in the graph No. “g”,
NFC[g] – the number of free curves in the graph No. “g”,
XF[g,c,p] – X value of the data point No. “p” of formula No. “c”, which is in the graph No. “g”,
FA[g,c,p] – Y value of the data point No. “p” of formula No. “c”, which is in the graph No. “g”,
NF[g] – the number of formulas in the graph No. “g”,
TA[t] – model time value No. “t”,
XL[n,t,x] – coordinate of node No. “x” of layer No. “n” at the moment of time No. “t”,
FT[f,t] – value of the model f(t) function No. “f”, corresponding to moment of time No. “t”,
FX[f,t,x] – value of the model f(x, t) function No. “f” at node No. “x” and at moment of time No. “t”,
LFT[f] – the sequence number of the layer corresponding to the model f(t) function No. “f”,
IFT[f] – the sequence number of the model f(t) function No. “f” inside the corresponding layer,
LFX[f] – the sequence number of the layer corresponding to the model f(x, t) function No. “f”,
IFX[f] - the sequence number of the model f(x, t) function No. “f” inside the corresponding layer,
I2FT[n,f] – the final (overall) sequence number of the f(t) function No. “f” of the layer No. “n”,
I2FX[n,f] - the final (overall) sequence number of the f(x, t) function No. “f” of the layer No. “n”,
NLFT[n] – the number of f(t) functions in the layer No. “n”,
NLFX[n] – the number of f(x, t) functions in the layer No. “n”.
All built-in arrays are read-only, i.e., user programs can not modify their elements (those arrays are
automatically modified by GraphiXT when the user changes the relevant data).
The smallest allowed value of array indices is 1. An exception to that rule is the index that means
the sequence number of a layer of the simulated system, i.e., the first index of the arrays “XL”, “I2FT”,
“I2FX”, “NLFT” and “NLFX”: the smallest allowed value of that index is 0, and the largest value is
one less than the number of layers. However, if any of the just-mentioned five arrays is used as an
argument (actual parameter) of a subroutine, then the smallest allowed value of the index of the
corresponding formal parameter is still equal to 1.
GraphiXT includes an array viewer. The array viewer allows direct access and modification of
element values of user-defined arrays. The array viewer can be opened either by clicking the button
“View” of the array list dialog window (see Fig. 4.4), or by selecting the command “Open array viewer”
from the array context menu, or by double-clicking an item of the array list box. Only allocated arrays can
be viewed using the array viewer (if an array is not allocated, then the double click opens the array
properties dialog). An example of an array view is shown in Fig. 4.6. Values of array elements can be
entered into the cells of the array view by typing or by copying and pasting. In the case of a
multidimensional array, any two indices can be chosen to be variable (those two indices are used to
number the rows and columns of the array view). The position, range of values of each index, the
maximum number of cells that can be shown in the array view and other options of the array viewer are set
in the dialog window “Array view options”, which can be opened by selecting the menu bar command
“Programming / Array view options” when an array view window is active, or by selecting the same
command from the array viewer context menu. For example, the array view of Fig. 4.6 could be produced
by setting the array view options as shown in Fig. 4.7. The variable indices are defined using the two rows
17
Fig. 4.6. An example of an array viewer window
Fig. 4.7. An example of the array view options dialog corresponding to the array view shown in Fig. 4.6
of input fields at the top of the array view options dialog. The values of constant indices are entered into
the corresponding cells of the grid control “All indices”.
4.4. Using subroutines in programs
According to Wikipedia, “a subroutine is a sequence of program instructions that perform a
specific task, packaged as a unit. This unit can then be used in programs wherever that particular task
should be performed.” When discussing subroutines, it is important to distinguish between formal and
actual parameters of a subroutine. Another definition from Wikipedia: a formal parameter is “the variable
as found in the function definition, while argument (sometimes called actual parameter) refers to the
actual value passed”. For example, let us suppose that subroutine FUNC defines the following function of
one variable: f(x) = ln(1 + x). Then the variable x, which is used in that definition, is the formal parameter
of the subroutine. Now, if there is a variable “a” defined in the calling program, then in order to calculate
the value of ln(1 + a), the subroutine FUNC must be called as follows: “FUNC(a)”. In this call, the value
of “a” is the actual parameter (or argument) of the subroutine FUNC.
In GraphiXT, each subroutine must return a value, and calls to subroutines may be used in
arithmetic expressions. In this respect, subroutines are similar to built-in functions (see Section 4.1). In
fact, subroutines are user-defined functions. As in the case of formulas, the value returned by a subroutine
is the value of the last computed expression. However, execution of a subroutine or a formula can be
terminated at any time by calling the built-in function “Return(x)”, which was described in Section 4.1.
A new subroutine can be only created in the list of subroutines. That list is opened using the menu
bar command “Programming / Subroutines…”, or the context menu of the program editor or the array
18
editor, or by clicking the button “subroutine” of the programming tools dialog (see Fig. 4.1). The list of
” (see Fig. 4.1). An example of a dialog
subroutines can also be opened by clicking the toolbar button “
window with such a list is shown in Fig. 4.8. A new subroutine can be created by clicking the button
“New” or “Insert before” (then a program editor window is opened). An existing subroutine can be edited
by clicking the button “Edit”, or by selecting the command “Edit subroutine…” from the subroutine
context menu, or by double-clicking an item of the subroutine list box.
Similarly to arrays, subroutines can be copied from one project to another using the five buttons
“Copy”, “Copy All”, “Cut”, “Paste” and “Paste before” (see Fig. 4.8). The subroutine list can be
rearranged using the “Up” and “Down” arrow buttons (the keyboard shortcuts are “Ctrl” + “↑” and
“Ctrl” + “↓”, respectively). As in the case of the list of arrays, any change to the list of subroutines is
applied immediately and can not be undone. The two buttons “Insert reference” and “Cancel” (see Fig. 4.8)
are only visible when a program editor window is active. After clicking the button “Insert reference”, a call
to the currently selected subroutine will be inserted at the cursor position in the code of the edited program,
and the dialog window with the list of subroutines will be closed. After clicking “Cancel”, the subroutine
list dialog will be closed without inserting the call to the subroutine.
The name and formal parameters of a subroutine are defined in the dialog window “Subroutine
name and formal parameters”. Its example is shown in Fig. 4.9. After creating a new subroutine, that
Fig. 4.8. An example of a list of subroutines
Fig. 4.9. An example of the dialog window “Subroutine name and formal parameters”
19
dialog window is opened automatically. The name and formal parameters of a subroutine that is being
edited can be changed by selecting the menu command “Programming / Name and formal parameters…”,
or by selecting the same command from the program editor context menu, or by clicking the button “Name
and formal parameters” of the programming tools dialog window (see Fig. 4.13). In the list of formal
parameters, comment lines are allowed. Each comment line starts with a double slash (see Fig. 4.9). If a
given argument (actual parameter) of the subroutine is the address of a variable, array or function, then the
built-in function “loc(…)” must be used when calling that subroutine. This is reflected in the list of formal
parameters (see Fig. 4.9). The rules of using the construct “loc(…)” in the list of formal parameters are
explained in the comments that are visible in Fig. 4.9. If the formal parameter is a function, then the
corresponding actual parameter must be “loc(<function name>)”. For example, if “x” and “y” are variables
(parameters), “z” is a two-dimensional array, and “g” is a three-argument subroutine, whose formal
parameters conform to the requirements stated in the fourth comment of Fig. 4.9, then the following call to
the subroutine “FUNC1” corresponding to Fig. 4.9 is allowed:
FUNC1(x, loc(y), loc(z), loc(g))
If a formal parameter is an array, then the corresponding argument (actual parameter) can be a part
of an existing array. This is achieved by specifying one or more array indices in the “loc(…)” construct
when calling the subroutine. The following convention is used: if the array used as an actual parameter has
N dimensions and the number of indices of the actual parameter is m, then the subroutine treats that
parameter as an array which has N − m + 1 dimensions and which starts from the element specified by the
indices of the actual parameter. For example, the following call to the subroutine “FUNC1” corresponding
to Fig. 4.9 is allowed:
FUNC1(x, loc(y), loc(FC[2,3]), loc(g))
As mentioned, “FC” is a three-dimensional array, whose first index means the sequence number of a graph
and the second index is the sequence number of a free curve of that graph. For example, if the subroutine
“FUNC1” contains a line “d = c[4,3]”, then that line will be equivalent to “d = FC[2,6,3]”, i.e., the
temporary variable “d” will be assigned the Y value of the third point of the free curve No. 6 of the graph
No. 2.
Recursion is allowed (“recursion” means a call of a subroutine from within the same subroutine).
However, unlike in some other programming languages (e.g., C), all instances of one subroutine share one
memory space. This means that any temporary variable that has been assigned a value in one instance of a
subroutine will have the same value in all other instances of that subroutine. The same is true of the formal
parameters, too (except when the formal parameters in question are pointers to arrays or functions): if a
subroutine is called from within the same subroutine, then the values of the formal parameters of the
calling instance of that subroutine (and of all higher-level instances of that subroutine) automatically
become equal to the argument values used in that call. For example, let us assume that subroutine
“FUNC1(a)” has a local parameter “d”, which indicates the call depth and which is initially equal to 0, and
that the first four lines of the code of that subroutine are
d=d+1
b=d
if (d < 2) FUNC1(a + 1)
d=d–1
Then, if the formal parameter “a” is initially equal to 2 (e.g., if the code of the calling formula is
“FUNC1(2)”), its value immediately after executing the third line will become 3 (because such is the value
passed to subroutine FUNC1 in the call to it from within FUNC1). The value of the temporary variable
“b”, which was initially assigned the value 1, will become equal to 2.
Notes: 1. Unlike formal parameters that are variables or pointers to variables (e.g., formal parameters
No. 1 and 2 in Fig. 4.9), formal parameters that are pointers to arrays or functions (e.g., formal
parameters No. 3 and 4 in Fig. 4.9) are not shared among different instances of one subroutine.
2. The above example shows how to track the call depth (also called “nesting level”). However,
such a method of tracking the call depth would only work if there are no runtime errors when
executing the subroutine FUNC1. After a runtime error, execution of the current instance of
FUNC1 would be terminated immediately, and the local parameter “d” would not be
decremented by 1 (for more information about runtime error handling, see Section 4.7).
20
4.5. Using DLL functions in programs
Programs may contain calls to user-defined DLL functions (“DLL” stands for “Dynamic Link
Library”). The list of all defined DLL functions is opened using the menu command “Programming / User
DLL functions…” or the programming tools dialog button “DLL” (see Fig. 4.1). An example of such a list
is shown in Fig. 4.10. A new DLL function can be defined by clicking the button “New”. Definition of an
existing DLL function can be modified by clicking the button “Edit”, or by selecting the command “Edit
function definition…” from the context menu, or by double-clicking an item of the list box. In any case,
the dialog window “DLL function definition” is opened (see Fig. 4.11). The DLL function definition
consists of the following four components:
• the DLL file name,
• the function name in the DLL file (i.e., the original name of the function),
• the identifier used when calling that function in programs (i.e., the “alias” of that function),
• the number of function arguments (0 to 20).
It is possible to choose one of two calling conventions: passing copies of the argument values to the DLL
function, or passing the argument addresses to the DLL function. In order to pass argument addresses, the
number or arguments must be entered with the minus sign. All mentioned components of the DLL function
definition are shown in the list of DLL functions (see Fig. 4.10). The number of arguments is shown in
parentheses after the original name of the function (see Fig. 4.10). In the case of a failure to load a DLL
function, three question marks would appear after its name in the list box. Note: In programs, calls to
unloadable DLL functions are treated as syntax errors.
The first argument of a DLL function is a 32-bit address of a 32-bit integer variable (that argument
is the only one that is omitted when inserting the call to that function in a program). All other arguments
must be 64-bit floating-point numbers (type “double” of the C programming language), or their 32-bit
addresses (C type “double *”). The return value of the function must be a 64-bit floating-point number.
Fig. 4.10. An example of a list of user-defined DLL functions
Fig. 4.11. An example of the dialog window “DLL function definition”
21
The mentioned 32-bit integer variable is used as the “error code”. Prior to calling the DLL
function, GraphiXT sets that variable equal to the number of all other arguments (if copies of argument
values are passed to the function), or opposite to the number of the other arguments (if argument addresses
are passed to the function). If the DLL function modifies that variable, this is interpreted as a runtime error
(for more information about runtime error handling, see Section 4.7). If the program editor is opened
immediately after such an error, then a message containing the value assigned to the error code by the DLL
function appears in the status bar of the program editor window. Thus, the error code can be used to inform
the user about the number of arguments that must be passed to the function, and about the calling
convention that must be used. In addition, the error code can be used to provide information about various
other error conditions that may occur when executing a DLL function.
Unlike the calls to subroutines and built-in functions, the calls to DLL functions do not require
usage of the construct “loc(<argument name>)” when passing argument addresses to the function (although
such usage of that construct would not be treated as a syntax error). E.g., the call to the function DLL3 of
Fig. 4.10 could look like this: “DLL3(a, b, c)” (although the syntax “DLL3(loc(a), loc(b), loc(c))” is valid,
too). However, if a DLL function that requires argument addresses is used as an argument of a subroutine,
then the corresponding formal parameter of that subroutine must be defined using the construct “loc( )” in
place of each argument of the DLL function. For example, if the function DLL3 of Fig. 4.10 is used as an
argument of a subroutine, then the corresponding formal parameter of that subroutine must be defined as
follows: “loc(f(loc( ), loc( ), loc( )))”, or, equivalently, “loc(f(loc(x), loc(y), loc(z)))”. If the function DLL1
of Fig. 4.11 is used as an argument of a subroutine, then the corresponding formal parameter must be
defined as follows: “loc(f( , , ))”, or, equivalently, “loc(f(x, y, z))”.
4.6. Built-in integration, summation, iteration and root finding functions
GraphiXT has eleven built-in integration, summation, iteration and root finding functions. Seven
of them were listed in Section 4.1. The remaining four functions (“Int2”, “Inti2”, “Intw2” and “Root2”) are
“extended” versions of the previously-mentioned functions (“Int”, “Inti”, “Intw” and “Root”) with
additional arguments, allowing more control over the computation process (the simpler versions of those
functions use default values of the additional arguments). The integration functions were taken from the
QUADPACK library for numerical integration of one-dimensional functions (that library is in public
domain, web page: http://www.netlib.org/quadpack/ ), and the nonlinear equation solver is based on one of
subroutines of the HOMPACK suite for solving nonlinear systems of equations, which is also available
from the Netlib repository (web page http://www.netlib.org/hompack/ ). Those subroutines were translated
from Fortran into C using the Fortran-to-C converter “f2c.exe” (also in public domain, web page:
http://www.netlib.org/f2c/mswin/ ). Below are short descriptions of those functions:
The function “Int” is a translated double-precision version of the Fortran subroutine QAGS (the
double-precision version is named DQAGS). According to the QUADPACK readme file, “QAGS is
an integrator based on globally adaptive interval subdivision in connection with extrapolation (de
Doncker, 1978) by the Epsilon algorithm (Wynn, 1956).”
The function “Inti” is a translated double-precision version of the Fortran subroutine QAGI (the
double-precision version is named DQAGI). According to the QUADPACK readme file, “QAGI
handles integration over infinite intervals. The infinite range is mapped onto a finite interval and then
the same strategy as in QAGS is applied.”
The function “Intw” is a translated double-precision version of the Fortran subroutine QAWO (the
double-precision version is named DQAWO). According to the QUADPACK readme file, “QAWO is
a routine for the integration of COS(OMEGA*X)*F(X) or SIN(OMEGA*X)*F(X) over a finite
interval (A,B). OMEGA is specified by the user. The rule evaluation component is based on the
modified Clenshaw-Curtis technique. An adaptive subdivision scheme is used connected with an
extrapolation procedure, which is a modification of that in QAGS and provides the possibility to deal
even with singularities in F.”
The function “Root” is a translated Fortran subroutine ROOT. According to the subroutine’s
description, which is included in the comments section of the original source code, the method used
for the solution is a combination of bisection and the secant rule.
The full list of built-in integration, summation, iteration and root finding functions is given below:
22
Int(f,x,a,b) – integral of expression “f” with respect to x from a to b (e.g., “Int(1/sqrt(exp(t*x)+x),x,0,5)”);
Int2(f,x,a,b,epsabs,epsrel,limit) – same as “Int”, but with additional arguments:
epsabs – absolute accuracy requested (default value 0),
epsrel – relative accuracy requested (default value 10−5),
limit – the maximum number of subintervals in the partition of the given integration interval (default
value 200).
Inti(f,x,a,1) – integral of expression “f” with respect to x from a to +∞;
Inti(f,x,a,-1) – integral of expression “f” with respect to x from −∞ to a;
Inti(f,x,a,2) – integral of expression “f” with respect to x from −∞ to +∞ (the argument “a” is not used);
Inti2(f,x,a,i,epsabs,epsrel,limit), where “i” is ±1 or 2 – same as “Inti”, but with additional arguments:
epsabs – absolute accuracy requested (default value 0),
epsrel – relative accuracy requested (default value 10−5),
limit – the maximum number of subintervals in the partition of the given integration interval (default
value 200).
Intw(f,x,a,b,w,1) – integral of expression f(x) cos(wx) with respect to x from a to b;
Intw(f,x,a,b,w,2) – integral of expression f(x) sin(wx) with respect to x from a to b.
Intw2(f,x,a,b,w,i,epsabs,epsrel,leniw,maxp1), where “i” is 1 or 2 – same as “Intw”, but with additional
arguments:
epsabs – absolute accuracy requested (default value 0),
epsrel – relative accuracy requested (default value 10−5),
leniw – twice the maximum number of subintervals allowed in the partition of the given integration
interval (default value 400, i.e., the default maximum number of subintervals is 200),
maxp1 – an upper bound on the number of Chebyshev moments that can be stored (default value 100).
Sum(f,i,i1,i2) – sum of terms “f” when the summation index i varies from i1 to i2 (e.g., “Sum(ln(i),i,2,10)”);
Sum2(f,t,a,b,dt) – sum of terms “f” when the summation variable t varies from a to b in increments of dt.
Iter(f,i,i1,i2) − repetition (“iteration”) of expression “f” when the iteration index i varies from i1 to i2 (the
returned value is the last calculated value of expression “f”).
Root(f,x,a,b) – root of the nonlinear equation f(x) = 0. a and b are limits of the interval that should be
searched for the root. For example, the expression “Root(sqrt(x)-1+x^3,x,0,1)” is equal to the root of
the equation x − 1 + x3 = 0 , i.e., 0.60542342357183;
Root2(f,x,a,b,RelErr,AbsErr,loc(flag)) – same as “Root”, but with additional arguments:
RelErr – relative accuracy requested (default value 10−9),
AbsErr – absolute accuracy requested (default value 10−100),
flag – the “error code”, which is modified by the function. If the equation is solved successfully,
then “flag” is assigned the value zero, otherwise it is set to an integer number from 1 to 4,
depending on the type of the difficulty that was encountered.
Argument No. 1 of all built-in integration, summation, iteration and root finding functions defines
the expression to be processed, and argument No. 2 defines the variable of integration (equation) or index
of summation, or index of iteration. The expression defined by argument No. 1 stays in scope of the calling
program, so that all previously defined variables can be used in it. The variable of integration (equation) or
index of summation takes priority over all other variables (including system variables) and it is only
“visible” in the processed expression, so that any identifier can be used in place of that variable. In
example 5 below, the value of the system variable “t” (the time value) is not affected by the summation.
Multiple integrals can be computed by defining the integrand (i.e., the integrated expression) as a
call to an integration function (see Example 2 below).
The original QUADPACK integration functions have an integer argument that serves as an “error
code”. If a difficulty is encountered during integration, then the error code is assigned a non-zero value
ranging from 1 to 6 and indicating the type of the error. In such a case, GraphiXT outputs an error message
and highlights the line of the program code where the error occurred (for more information about runtime
error handling, see Section 4.7).
Every call to any built-in integration function causes an update of the following three system
variables:
IER –
the mentioned error code,
AbsErr – estimate of the modulus of the absolute error,
nEval – number of integrand evaluations.
23
Those three variables are set to zero before starting computation of each sequence of formula values. If a
call to a built-in integration function can not be initiated (e.g., due to insufficient memory for work arrays
of the function), then the system variables “IER”, “AbsErr” and “nEval” are not modified.
Examples:
1. The integral of the function exp(−x2) ⋅ exp(−(t − x)2) with respect to x from 1 to 10:
result = Int(exp(-x*x) * exp(-(t-x)^2), x, 1, 10)
2. The double integral of a user-defined function FUNC1(a,b):
result = Int(Int(FUNC1(a,b), a,a1,a2), b,b1,b2)
3. Example of integration from 5 to +∞:
result = Inti(exp(-x*x) * exp(-(t-x)^2), x, 5, 1)
(when integrating from −∞ to a finite bound, the last argument should be -1).
4. Example of integration from −∞ to +∞ (the corresponding graph is shown in Fig. 4.12):
result = Inti(exp(-x*x) * exp(-(t-x)^2), x, 0, 2)
(in this case, argument No. 4 must be 2 and argument No. 3 can be any value).
5. The sum of products of corresponding elements in row 2 of matrix A and in column 3 of matrix B:
result = Sum(A[2,t]*B[t,3], t, 1, Size(loc(A[1,1])))
Fig. 4.12 contains an example of a graph of convolution of two functions computed using the builtin function “Inti” (Example No. 4). In this example, the convolution of two identical Gaussian functions is
computed:
∞
I (t ) =
∫ exp(− x
2
) exp(−(t − x) 2 )dx .
−∞
The result is a Gaussian function whose variance is twice the variance of the Gaussian function exp(−t2).
F1
1.2
F2
1
0.8
0.6
0.4
0.2
0
-10
-5
0
5
10
t
Fig. 4.12. An example of using the built-in function “Inti” to compute a convolution of two functions
24
4.7. Runtime error handling
A runtime error is an error that occurs during execution of a program and which can not be
anticipated at compile time. In order to minimize the risk that a runtime error in a user program will crash
the GraphiXT executable (causing loss of all unsaved GraphiXT data), GraphiXT checks for the following
types of errors at runtime:
1) out-of-bounds array indices (e.g., negative indices, or indices greater than the number returned
by the built-in function “Size2(loc(a), i)”),
2) references to un-allocated arrays,
3) abnormally long computation (e.g., due to an infinite loop),
4) infinite recursion,
5) runtime errors related to limitations of certain built-in functions,
6) runtime errors in user-defined DLL functions (see also Section 4.5).
An abnormally long computation of a formula value (such as caused by an infinite loop) is handled by
displaying a dialog window with an option to stop the computation, when a sequence of formula values is
computed longer than 2 seconds. The user can either continue waiting (that dialog will be closed
automatically after finishing the computation of the current sequence of formula values), or stop the
computation by clicking the button “Stop calculation”. After clicking the button “Stop calculation”, the
current value of the computed formula and all subsequent values in the current sequence of values are set
Fig. 4.13. An example of a runtime error
25
equal to the indeterminate number (“-1.#IND”), except during initialization of an array (in this case, values
of the current and subsequent elements of the array are not modified).
When a runtime error occurs, execution of the current program is terminated immediately. I.e., all
operations that should be normally done after the point where the error occurred are skipped. In such a
case, the value returned by that program is set equal to the indeterminate number (“-1.#IND”). If the
current program is a subroutine, then execution of the calling program continues from the instruction that
immediately follows the call to that subroutine. If the current program is a formula (i.e., if there is no
higher-level calling program), then calculation of the next value in the current sequence of values begins
(except after manual termination, as explained in the previous paragraph). If such an error occurs during
nonlinear fitting, then the fitting is interrupted with a message about an arithmetic error. Note: Integration
errors, which are indicated by a non-zero value of the error code “IER” assigned by built-in integration
functions (see Section 4.6), do not cause interruption of the program execution. However, runtime errors
that may prevent a call to a built-in integration function from being initiated are possible (e.g., insufficient
memory for work arrays of the function). After such an error, execution of the program is terminated as
described above, and system variables “IER”, “AbsErr” and “nEval” are not modified.
In the program editor window, the first runtime error that was detected in the last computed
sequence of values is shown by automatically scrolling to the corresponding line of code and highlighting
it. If the runtime error occurs in a subroutine, then the line containing the corresponding call to that
subroutine is highlighted in the code of the calling program, too (see Fig. 4.13).
26
5. X datasets
It is possible for a group of free curves and formulas to share the values of their abscissas. Such
curves are called “linked curves”, and each set of abscissa values is called an “X dataset” or an “X set”.
When an abscissa of a point is changed, the corresponding abscissas of all other curves linked to the same
X set are changed, too. When two or more free curves are pasted or imported from a text file, they are
initially linked to the same X set. Linked curves can be unlinked using the checkboxes “Unlink this curve”
or “Unlink all curves” of the curve format dialog window (that dialog window can be opened using the
curve’s context menu command “Curve format and name…”). In addition, it is possible to specify that
abscissas of skipped points must be the same for all curves linked to a particular X set (this is done using a
corresponding checkbox of the curve format dialog window). Properties of X sets can also be changed
using a menu command “Graph options / X datasets…”. After selecting that command, a dialog window
similar to the one shown in Fig. 5.1 is opened. Below are descriptions of all controls of that window.
• The top grid control contains the list of all graphs of the current project.
• After selecting a graph in the top grid control, the middle grid control is filled with information about
all X datasets belonging to that graph: X dataset identifier (“ID”), X dataset name, minimum X value
(“Min”), maximum X value (“Max”), number of values (“N”), and the asterisk in the last column if
any of the previous three parameters has been modified by the user (otherwise the last column is
empty). The parameters “Min”, “Max” and “N”, as well as the X dataset name, can be modified by
entering their values directly into corresponding cells. The ID of an X set is constructed as follows:
“t” – model time values;
“XLn” – node coordinates of the layer No. n (for example, “XL2”);
“Xn” – independent X set No. n (for example, “X10”).
• After selecting a cell or a group of cells in the X set grid, the bottom grid control is filled with IDs and
names of all free curves and formulas linked to the selected X dataset. If two or more rows have been
selected in the X set list, then the curve list contains the IDs and names of curves linked to the X set
whose name is in the X set list row containing the focus rectangle, and if there is no focus rectangle,
then the listed curves correspond to the first selected X set. Note: Formulas can be linked to any of the
three mentioned types of X sets, whereas free curves can only be linked to independent X sets.
Fig. 5.1. An example of the dialog window “X datasets”
27
Formulas can be unlinked and re-linked using the controls of the programming tools dialog window
(see Fig. 4.1), whereas free curves can not be re-linked after unlinking.
The IDs of formulas and free curves are constructed as follows:
“Fn” – formula No. n (for example, “F10”);
“FCn” – free curve No. n (for example, “FC10”).
Notes: 1. The numbers in curve IDs reflects the order in which the formulas and free curves were
created in the graph window. 2. If the selected X set is a set of model time or coordinate values (i.e., if
its ID is “t” or “XLn”), then the list of formulas linked to it is sorted in the order of increasing formula
IDs. If the selected X set is independent (i.e., if its ID is of the type “Xn”), then the row order of
formulas and free curves in the bottom grid control is the order in which they were linked to the
selected X set.
• After selecting a cell or a group of cells in the curve list, the two buttons in the bottom right corner of
this dialog window become active. The button “Unlink the selected curves” causes removal of the
selected curves from the list of curves linked to the selected X set and creation of the same number of
new X datasets, which are exact copies of the selected X set (the X set list is modified accordingly).
Note: If the selected X set is independent (i.e., if its ID is of the type “Xn”) and if there is only one
curve linked to that X set, then that curve can not be unlinked.
• The button “Delete the selected curves” causes deletion of the selected curves from the graph window.
Note: If the selected X set is independent (i.e., if its ID is of the type “Xn”), then it will be
automatically deleted after deleting the last curve linked to it.
• The button “Apply changes” becomes active when at least one number in the columns “Min”, “Max”
or “N” has been modified (i.e., when there is the asterisk in at least one cell of the column “Mod.”).
After clicking that button, the current values of each modified X set will be replaced with equidistant
values calculated on the basis of the numbers in columns “Min”, “Max” and “N”.
• If one or more X sets have been selected in the middle grid control, three other buttons in the top part
of this dialog window become active. The button “Recalculate the selected X sets” is used to
recalculate all selected X sets, regardless of whether their parameters have been modified or not. Note:
The X values can only be recalculated when the corresponding dataset is independent (i.e., with ID of
the type “Xn”) and when no free curves are linked to it (i.e., when only formulas are linked to it). If
the X dataset is a set of model time or coordinate values, then clicking the button “Recalculate the
selected X sets” only causes the three mentioned numbers to be updated (if simulation is in progress).
• The button “Delete the selected X sets” is used to delete all selected X sets, excluding the sets of
model time values and model layer coordinate values. This causes deletion of all formulas and free
curves linked to the selected X sets. Notes: 1. All free curves and formulas of the current graph,
excluding the formulas that are not linked to any X set, can be deleted by selecting all X datasets and
then clicking the button “Delete the selected X sets” (all X sets can be selected by clicking the top left
cell of the X set grid control). 2. Formulas whose abscissas correspond to the X axis range of the
graph (as in the example of Fig. 4.1b) can not be deleted by this method, because they are not linked
to any X dataset: the set of their argument values is temporary, because it depends on the X axis range
of the graph. Those formulas can only be deleted using the formula context menu or using the dialog
window with the list of formulas, which is opened by selecting the menu command “Graph options /
Formulas…” or “Programming / Formulas…”.
• The button “Properties of the selected X set…” is used to open a dialog window where all properties
of the selected X set are displayed and can be modified. An example of that dialog window is shown
in Fig. 5.2. The four editable text boxes in the top half of this dialog window provide an alternative
way to modify the parameters of the selected X dataset.
• If the checkbox “Recalculate all X values of this dataset” is checked, then the X values will be
recalculated immediately after clicking the button “OK”. Otherwise, clicking the button “OK” will
only cause the new parameter values to be copied into the X set grid control.
• If the checkbox “Abscissas of skipped points must be the same for all linked curves” is checked, then
the visible points of all free curves and formulas linked to the selected X dataset will always share the
same set of abscissas. Explanation: In general, some points may be skipped during plotting, so that the
28
Fig. 5.2. An example of the dialog window “X dataset properties”
total number of displayed points does not exceed the specified maximum number for each plotted
curve (that number can be entered in the curve format dialog window, which is opened from the curve
context menu). In such a case, when this checkbox is unchecked, the visible points of linked curves
may have different abscissas (even when the mentioned maximum number is the same for all those
curves). When there are no skipped points, the state of this checkbox has not effect on the plotted data.
• If the checkbox “Abscissas of skipped points must be the same for all linked curves” is checked, then
the maximum number of X values that will be visible in the graph window is shown in the bottom text
box. If the total number of X values in the range of the graph X axis exceeds this number, then the
program will plot every second point, or every third point, etc., so that the number of visible points for
each linked curve will never exceed the number entered in this text box.
29
6. “Time cross-sections” f(x = const, t) of f(x, t) model functions
In addition to f(t) model functions, time graphs can display the so-called “time cross-sections”
f(x = const, t) of f(x, t) model functions. Each time cross-section displays the time dependence of a
particular model quantity at a given point of the simulated system. In order to add a time cross-section or to
modify the x value of displayed time cross-sections, the command “Graph options / Select f(x=const,t)
functions…” must be selected from the main menu or the graph context menu. This action opens the dialog
window with the list of all time cross-sections plotted in the active graph. An example of such a list is
shown in Fig. 6.1. New time cross-sections are created by clicking the button “New”, entering the required
x value in the dialog window “New X value” and clicking “OK”. Then the list of all f(x, t) model functions
is opened. After selecting the required functions in that list and clicking “OK”, the list of time crosssections will be updated by adding the names of the selected functions to it. The default name of a time
cross-section is formed by inserting the x value into the original name of the f(x, t) model function (see
Fig. 6.1).
The x value of an existing time cross-section can be modified by left-clicking the corresponding
item of the time cross-section list and then clicking the button “Change X” (see Fig. 6.1). Then the new x
value must be entered in the dialog “New X value” (the same dialog window can also be opened by rightclicking the item of the list and selecting the command “Change X value…” from the context menu, or by
double-clicking the item of the list). After entering the new x value and clicking “OK”, the name of the
corresponding time cross-section will be automatically modified by inserting the new value of x into it.
When an item is selected in the list of time cross-sections, three other buttons become active:
“Insert before”, “Duplicate” and “Delete” (see Fig. 6.1). The result of clicking the button “Insert before”
differs from the result of clicking the button “New” in one respect only: the new time cross-sections will
not be appended to the end of the list, but they will be inserted before the selected item instead. By clicking
the button “Duplicate”, a time cross-section identical to the selected one will be inserted after the selected
time cross-section (then the x value of the new cross-section may be modified as required). By clicking
“Delete”, the selected time cross-section will be deleted.
If, at a given value of t, the x = const value does not coincide with any stored value of the x
argument of the selected function corresponding to that time, then the value of the time cross-section is
computed by the method of linear interpolation, using two nearest stored x values (one of them is greater
than const and the other one is less than const). The only limitation on the x = const value is that it must
belong to the definition interval of the selected function.
Each time cross-section belongs to a particular graph window. When a graph window is closed, the
time cross-sections plotted in it are lost.
Note: Curves displaying the f(x=const, t) functions can also be created using formulas (see Section 4).
Fig. 6.1. An example of the “time cross-section” definition dialog window
30
7. Time limits and amount of data
Prior to starting simulation (using the GraphiXT plug-in that solves kinetic equations, such as
CarrierFunc.dll), the user has to specify the initial and final times of simulation. This is done by selecting
the menu command “Simulation options / Time limits and amount of data…”. This action opens the dialog
window “Time limits and amount of data”. Its examples are shown in Fig. 7.1. Below are explanations of
all controls of that dialog window.
• The text box “Initial simulation time” is used to enter the time value corresponding to the initial state
of the simulated system (see Fig. 7.1a). This time can only be modified when there are no stored
model data. Otherwise, that field contains the current simulation time (see Fig. 7.1b), which can not be
changed. Notes: 1. The current simulation time should not be confused with the previously mentioned
current graph time. Those two times may be different. 2. The current simulation time is stored with
128-bit precision (two 64-bit floating point variables). This corresponds to approximately 30
significant digits. However, all displayed time values are rounded to 14 significant digits.
• The text box “Minimum visible time” is used to enter the minimum time value that should be used as
an argument of model functions corresponding to the first point visible in time graphs (i.e., the
minimum stored value of model time). If model data is already present in computer memory, then a
change of that time will only affect the stored model data when it is greater than the first stored value
of model time. Then, by clicking “OK” or “Apply”, all previous model time values will be deleted,
along with corresponding function values.
• The text box “Time of the last computed point of f(t) curves” contains the maximum stored model
time value (that time can not be edited).
• By clicking the button with the “up” arrow, which is above the text box “Time of the last computed
point of f(t) curves”, the number displayed in that box is copied to the box “Minimum visible time”.
• The text box “Time of the currently computed f(t) point” is used to enter the time value corresponding
to the next set of model function values that should be computed. If that time is less than the time of
the last computed point of f(t) curves, then, by clicking “OK” or “Apply”, all later model time values
will be deleted, along with corresponding function values. Note: The simulation plug-in can modify
the time of the currently computed f(t) point during simulation. The actual time value of the next
plotted point of f(t) curves may therefore be different from the value entered in that text box.
• The text box “Final time” is used to enter the maximum model time value. When the simulated
process time exceeds that value, simulation is automatically stopped. Then, the time of the last
computed point of f(t) curves is equal to the value entered in the text box “Final time”.
• The static text field “Number of time values in memory” displays the current number of stored model
time values, i.e., the current maximum number of points in the computed f(t) curves.
• The purpose of the static text fields “Model, curve and array data amount”, “Used memory” and
“Available physical memory” is self-explanatory.
• The button “Delete model data” is used to delete all stored model time values and associated model
function values. Depending on the state of the checkbox “Don’t delete model data corresponding to
the initial time”, the first stored time value (together with the corresponding set of function values)
may be deleted or not (see below). Note: The menu command “Simulation options / Delete model
data” serves the same purpose as this button.
• If the checkbox “Don’t delete model data corresponding to the initial time” is not checked, then, by
clicking the button “Delete model data” (or by selecting the menu command “Simulation options /
Delete model data”), all model data will be deleted (the text box “Number of time values in memory”
will contain “0”). If that checkbox is checked, then the mentioned action will cause deletion of all data
except the data corresponding to the first stored model time value (the text box “Number of time
values in memory” will contain “1”). This option is useful when simulation is intended to be done
several times starting from the same initial state, corresponding to the minimum stored time value (for
example, the initial state could be the state of thermodynamic equilibrium).
• The static text field “Computation time” contains the total processing time of the simulation. Its
format is “H : MM : SS.SSS”, where “H” is the number of hours, “MM” is the number of minutes,
and “SS.SSS” is the number of seconds and milliseconds.
• The button “= 0:00:00” is used to set the current computation time to zero. Note: The program keeps
in memory the processing time corresponding to each stored model function value. After deleting a
part of model data, the current computation time becomes equal to the last available value.
31
(a)
(b)
Fig. 7.1. Examples of the dialog window “Time limits and amount of data”: (a) when there are no stored
model data; (b) when there are stored model data
32
The group of two checkboxes and a button that is at the bottom of the dialog window “Time limits and
amount of data” is used to modify precision of f(x, t) model functions. The amount of computer memory
needed to store values of f(t) model functions is usually relatively small, and values of f(t) functions are
therefore stored with the maximum precision (8 bytes, or 64 bits). This is a precision of 15 significant
digits. Since the memory amount needed to store values of f(x, t) model functions is usually much larger, it
is sometimes necessary to find a trade-off between the memory requirements and precision. In most cases,
the default precision of 4 bytes (32 bits) is sufficient. This corresponds to 7 significant digits. If a higher
precision is needed and the available amount of physical memory is large enough, the precision may be
increased. In order to increase the precision of all f(x, t) model functions, the checkbox “All functions”
should be checked. This action doubles the memory amount needed to store each value of all f(x, t) model
functions. If the checkbox “Primary functions” is only checked, then only the precision of the primary
functions and corresponding x values is increased. The “primary” functions are the functions whose values
are used to compute all other functions of the model and to determine the evolution dynamics of the state
of the simulated system. For example, during simulation of charge carrier kinetics in a semiconductor, the
primary f(x, t) model functions are concentrations of free charge carriers and traps of all types and charge
states. The button “Set precision of f(x,t) function values…” is used to change precision of individual f(x, t)
model functions and of node coordinates of individual layers. Note: If the precision of a particular f(x, t)
model function is increased, then the precision of associated x values should be increased, too.
The current state of the simulated system, i.e., the state that corresponds to the current simulation
time, is always stored with the maximum precision, regardless of precision of stored function values.
Consequently, if simulation is carried out without deleting the data defining the current state of the
simulated system, then precision of function values would not have any effect on the simulation process.
However, if some of the last stored time values are deleted and simulation is resumed not “from the end”,
but, e.g., “from the middle”, then the initial state of the system is computed from the model function values
stored in memory, so that precision of those values may have a noticeable effect on simulation results. In
this case, the optimal option is “Primary functions”, because this would cause all function values to be
computed with the maximum precision (afterwards, the values of the “secondary” functions will be
rounded, but this rounding will not have any effect on simulation results, because the “secondary”
functions are not used to compute any other quantities).
Note: If the computer memory already contains stored model data, then an increase of precision of f(x, t) model
functions would cause an increase of the memory used to store all previous values of those functions (not
just the values that will be computed in the future). However, the actual previously computed values will not
change (thus, they will not become more “precise” in the true meaning of this word). In order to ensure that
all stored values have the same precision, the entire simulation must be repeated from the start.
33
8. Additional times
The previously described dialog window “Time limits and amount of data” makes it possible to
specify only the initial and final times of simulation. All intermediate times are computed by the currently
loaded GraphiXT plug-in that solves kinetic equations (such as the charge transport simulator
CarrierFunc.dll). However, the user may define additional time values that should be inserted into the final
set of stored model times. For example, those additional times could have the meaning of abscissas of the
measured time dependences of electric current or potential. Comparison of simulation results and
experimental data is easiest when simulation time values coincide with experimental time values. This can
be achieved using the menu command “Simulation options / Additional times…”. By selecting this
command, the dialog window “Additional times” is opened. An example of that window is shown in
Fig. 8.1. The additional times can be defined in three ways:
1) By selecting the X datasets whose values should be used as additional times. This is done by first
selecting a time graph in the list box “Graph” and then using the list box “Curve abscissa sets of the
selected graph” to select one or more X datasets.
2) By defining one or more sets of equidistant time values. Each such set consists of two or more time
values, with all intervals between any two adjacent values equal to each other. This set of values is
completely defined by three numbers: (a) the initial time, (b) the final time, (c) the number of time
values. Those three numbers are shown in the list box “Sets of equidistant time values” for each defined
set. In order to define a new set of equidistant values, or to change an existing set, or to delete an
existing set, the user has to click one of the three buttons “Add…”, “Change…” or “Delete” that are
under the mentioned list box.
3) By specifying one or more individual time values. Those values are listed in the list box “Individual
times”. In order to specify a new value, or to change an existing value, or to delete it, the user has to
click one of the three buttons “Add…”, “Change…” or “Delete” that are under the mentioned list box.
The final set of additional times, which is passed by GraphiXT to the simulation plug-in, is the union of all
sets of time values defined in the window “Additional times”.
Fig. 8.1. An example of the dialog window “Additional times”
34
9. Importing model data from text files
Model data are imported from text files using the menu command “File / Import model data from
text files…”. In order to be able to import model data from a text file, its format must conform to the
following requirements. The first non-empty line of the file must contain column headers. Each column
header must be the name of a corresponding variable. The first variable is the independent variable (i.e.,
the function argument, which could have the meaning of time or coordinate), and all subsequent variables
are the dependent variables (functions of the independent variable). All non-empty lines that are below the
header line must contain values of the mentioned variables, listed in the same order as their names. The
argument values must be sorted in ascending order (argument values that are exactly equal to each other
are allowed, too).
Values of all f(t) model functions must be in a single file. Each of the files with the f(x,t = const)
model function data must correspond to a particular time value. That value must be specified in the file
name. The file name may be a number that is equal to the time value (for example, “1.txt” or “2E-7.txt”),
or it may be any sequence of characters ending with the equality symbol and a number (for example,
“x_t=1.txt” or “LayerNo1_t=2E-7.txt”). Those files must be in one folder, which does not contain any
other files (except for the mentioned file with f(t) model function data). If the simulated system consists of
two or more layers, then the files with f(x, t) function data corresponding to different layers of the system
must be in different subfolders of that folder. The names of those subfolders must be such that after sorting
them in alphabetic order the sequence number of each subfolder is the same as the sequence number of the
corresponding layer of the system. Argument (x) values of all f(x, t = const) functions that belong to the
same layer must be equal to each other. However, the sets of x values corresponding to different times or
different layers may be different from each other.
10. Slider bar
The slider bar is at the bottom of the main window. Some elements of the slider bar depend on the
type of the active graph window – time graph or coordinate graph (see Fig. 10.1). The slider bar has the
following elements:
1. The time slider is used to change the current time of the active graph window and of all windows that
are synchronized with the active window.
2. The first of the two buttons “...” is used to open the dialog window where the time slider limits and the
time multiplier can be entered (the same dialog is opened by right-clicking the time slider). In addition,
if the current graph is a time graph, the mentioned dialog has a checkbox for selecting an option to
show the value of the current time next to the time slider or to hide it (compare Fig. 10.1a and
Fig. 10.1b).
3. The checkbox “Auto” is used to turn on or turn off the current time automatic adjustment mode. After
checking this checkbox, the current time of the active graph window and all windows that are
synchronized with it becomes equal to the time of the last point of f(t) model curves (however,
afterwards the current time may be set to any other value). Besides, when the number of stored model
time values changes (i.e., when a set of model function values is added to the model data during
simulation, or when a part of the model data is deleted, or when model data are imported from text
files), then the current time of all graphs whose “Auto” mode is turned on becomes equal to the time of
the last point of f(t) model curves.
(a)
(b)
(c)
Fig. 10.1. The slider bar: (a) when the active window is a time graph window and the value of the current time is
not shown, (b) when the active window is a time graph window and the value of the current time is shown,
(c) when the active window is a coordinate graph window
35
4. The checkbox “ [<-->]” is used to turn on or turn off step-like change of the time axis limits of the
current time graph window in response to a change of the time slider position. If the entire interval of
the graph time axis belongs to the slider interval, then a change of the slider position causes a change of
the time axis limits. In other words, the time interval of the time graph “shifts” along with the current
time (with the condition that the current time is changed either by moving the time slider or by entering
its value in the text box at the bottom of the main window). This change of the time limits can be either
smooth or step-like. If the checkbox “[<-->]” is unchecked, then the change of the time limits is
smooth, so that the difference between the current time and any one of the two time limits stays
constant. If that checkbox is checked, then the limits of the time axis don’t change while the current
time is between them. Those limits only change when the current time becomes greater than the upper
limit or less than the lower limit. In this case, the magnitude of the mentioned change is always equal
to a multiple of the difference between the upper and lower limits of the time axis.
5. Two text boxes for entering the time limits of the active time graph window and all windows that are
synchronized with it (see Fig. 10.1a and Fig. 10.1b), or one text box for entering the current time of the
active coordinate window and all windows that are synchronized with it (see Fig. 10.1c).
6. Static text field, which is only visible when the active window is a coordinate graph window (see
Fig. 10.1c). This field contains the stored model time value that is closest to the current time of the
active graph window. This field is not empty only when at least one model time value is stored in
computer memory. The indicated time value corresponds to f(x, t = const) model functions plotted in
the active coordinate graph window (i.e., it is equal to the mentioned constant const).
7. The checkbox “t-sync” for turning on or turning off the “time synchronization” mode. This is the
operation mode when current times of two or more graph windows are equal to each other. By
checking this checkbox, the active graph window is included into the group of time-synchronized
graph windows and the current time of that window becomes equal to the current time of that group.
8. The checkbox “t-sync all” is used for turning on or turning off “time synchronization” of all graph
windows of the active project.
9. The checkbox “x-sync” for turning on or turning off the “coordinate synchronization” mode. This is the
operation mode when respective X axis limits of two or more coordinate graph windows are equal to
each other. This checkbox is only enabled when the current graph is a coordinate graph (not time
graph). By checking this checkbox, the active graph window is included into the group of “coordinatesynchronized” graph windows and the X axis limits of that window become equal to respective limits
of that group.
10. The checkbox “x-sync all” is used for turning on or turning off “coordinate synchronization” of all
coordinate graph windows of the active project.
for turning on slider “animation”. In animation mode, the current time of the active
11. The button
graph window (and all windows that are time-synchronized with it) increases with a constant rate. Then
this button turns into the “Pause” button . By clicking the latter button, the slider animation is turned
off.
12. The second of the two buttons “…” is used to open the dialog window for entering the time slider
animation options, such as the average rate of slider position change, the time interval between slider
position updates (i.e., time slider “steps”) and the change of the current time corresponding to one such
step. The same dialog is opened by right-clicking the “animation speed slider”, which is described
below.
13. The animation speed slider is used to modify the rate of change of the current time in the time slider
animation mode. The leftmost position of the speed slider corresponds to the minimum speed, and the
rightmost position corresponds to the maximum speed. The default minimum speed is such that the
maximum duration of animation is 30 s, and the default maximum speed is such that the maximum
duration of animation is 1 s (those times can be changed in the mentioned dialog window of slider
animation options).
14. The button “Language” for selecting the user interface language.
36
11. Graphical objects
In addition to curves that represent various functions, each graph window can also contain objects
of the following types:
1) text labels,
2) vertical or horizontal straight lines,
3) free-form lines,
4) the legend.
The number of objects of the first three mentioned types is unlimited. There can only be one legend in each
graph window. Each of those objects can be added to a graph window at the mouse cursor position using
the graph context menu. Objects of the first three mentioned types can also be inserted using the toolbar
(the toolbar is at the top of the main window), and the legend can be inserted by
buttons
selecting the menu command “Graph options / Add legend” (in the latter case the legend will be placed at
the top right corner of the graph window). A more detailed description of the mentioned objects is given
below.
11.1. Text labels
After creating a text label by one of the mentioned methods, a text cursor (a flashing vertical line)
appears at the mouse cursor position. Then the text can be entered. The text may consist of several lines (in
order to start a new line, the “Enter” key must be pressed on the keyboard). To end text editing, the left
mouse button must be clicked outside of the text label. A text label can not be empty or consist of spaces
only (otherwise it will be automatically deleted). The text of an existing text label can be modified by
double-clicking the text label or by selecting the command “Edit text” from the text label’s context menu.
The position of a text label in the graph window can be changed by “dragging” the text label with the
mouse. The text format (i.e., font properties, color, direction, etc.) can only be changed after exiting the
text edit mode. The text format is modified by selecting the command “Text label options…” from the text
label’s context menu. This action opens the dialog window “Text label options” (examples of that window
are in Fig. 11.1). Most of the controls of that window are self-explanatory. Below are explanations of the
list boxes “Horizontal position” and “Vertical position”.
The selected (highlighted) items in the list boxes “Horizontal position” and “Vertical position”
define the change of the text label position in the graph window after changing the window dimensions or
changing axis limits or margins of the graph. The default position of a text label is such that the left edge of
the text label is at a fixed distance from the left edge of the graph window, and the top edge of the label is
at a fixed distance from the top edge of the graph window (here, the “distance” is measured in pixels).
Such position of the text label is defined by selecting the top item in the mentioned list boxes (see
Fig. 11.1a). However, such position of the text label may be unacceptable if the label is associated with
particular lines or points shown in the graph. For example, if the text label contains the title of a graph axis,
then it should be at fixed distance from that axis. If the axis title must be at the center of the axis, then the
item “Vertical central line” or “Horizontal central line” must be selected, depending on whether that axis is
X axis or Y axis, respectively.
There are two list boxes for each of the two coordinates of the text label (see Fig. 11.1). The top
list box is used when the horizontal or vertical position of the text label must not depend on the coordinate
axis limits of the graph. However, if, for example, the text label is used to present information about a
particular curve, or a particular point of a curve, then it may be desirable to make the position of the text
label dependent on the position of that curve or that point. That position (expressed as the number of pixels
from the left and top edges of the graph window) may depend on the graph axis limits. The curve or the
point in question (“the reference point”) can even become invisible if the axis limits are changed. In such a
case, the bottom list box should be used. When an item is selected in that list box, the text field “X =” or
“Y = “ displays the x or y coordinate of the reference point. That coordinate is expressed in the coordinate
axis units, i.e., in the same units in which the axis tick labels are expressed (see Fig. 11.1b). When this
option is selected, the visible distance from the reference point to the text label (expressed in pixels) will be
constant, but the absolute position of the text label in the graph window (measured in pixels from the edge
of the window) will be variable, depending on the position of the reference point. If the reference point is
not visible (i.e., if its x or y coordinate does not belong to the corresponding axis interval), then the text
label that is associated with that point is also not visible. If the bottom item is selected in the bottom list
box, then it is possible to enter the reference x or y coordinate in the text box “X =” or “Y =”.
37
(a)
(b)
Fig. 11.1. Examples of the dialog window “Text label options”. (a) The default position of the text label.
(b) The text label position is specified in units of coordinate axes of the graph
11.2. Vertical and horizontal straight lines
A vertical or horizontal straight line must intersect the plotting area of the graph, i.e., it must not be
in the graph margin. After creating a straight line by one of the mentioned methods, its position and format
can be changed by double-clicking the line or by right-clicking it and selecting the command “Line
position and format…” from the context menu. This action opens the dialog window “Line position and
format”, whose example is shown in Fig. 11.2. The top text box is used to enter the x coordinate of a
vertical line or y coordinate of a horizontal line. This coordinate is expressed in the coordinate axis units,
i.e., in the same units in which the axis tick labels are expressed. The visible position of the line in the
graph window (measured in pixels from the window edge) depends on the window dimensions and on the
38
Fig. 11.2. An example of a dialog window with properties of a vertical line
axis limits. If the coordinate of the straight line does not belong to the interval of the corresponding axis,
then that line is not shown.
11.3. Free-form lines
A “free-form line” is a polygonal chain (also called a “piecewise linear curve”), i.e., a connected
series of line segments. After creating a new free-form line by one of the mentioned methods, the first
point of that line is placed at the mouse cursor position. Then a required number of vertices may be added.
A vertex is added by clicking the left mouse button. In order to end the line, the right mouse button must be
clicked. The number of vertices can only be changed during creation of a line. Afterwards, it is possible to
change vertex positions, but not their number.
The lengths of the line segments and angles between them can be changed using the command
“Change line shape” of the line’s context menu. When that command is selected, a small square (the “line
handle”) appears on each vertex. Then positions of all vertices can be changed by “dragging” the
corresponding line handles with the mouse. After pressing the left mouse button on any one of those
handles, all handles are hidden, so that they do not interfere with precise positioning of the vertex. After
releasing the left mouse button, all handles are shown again. In order to end modification of the line shape,
the left mouse button must be clicked anywhere outside of the mentioned line handles. Note: The line
shape can also be modified by entering coordinates of the current vertex (in axis units) in the “point
dialog” window that is visible in line edit mode, or by pressing the “Ctrl” key on the keyboard and using
Fig. 11.3. An example of a dialog window with properties of a free-form line
39
the arrow keys (when the “Ctrl” key is pressed, all line handles are hidden and the current vertex is
indicated by a red cross). When the “Ctrl” key is not pressed, the left or right arrow key selects the
previous or next vertex, respectively, i.e., makes it the current vertex. [Another way to make any vertex the
current vertex is by entering the vertex number in the corresponding text box (“Point No.”) of the “point
dialog” window.] The line handle corresponding to the current vertex has a red border.
The absolute position of a free-form line in the graph window can be changed either by mousedragging it, or by left-clicking it and entering the coordinates of the current vertex in the mentioned “point
dialog” window, or by pressing the “Ctrl” key on the keyboard and using the arrow keys. In this mode, the
current vertex is indicated by a red cross (the current vertex can be changed in the same way as during
modification of line shape).
Note: The point coordinates of the curves that represent various functions can be modified in the same way
as vertex coordinates of free-form lines (see above), i.e., the same “point dialog” window is
displayed, and the same keyboard shortcuts can be used. However, values of functions and their
arguments can not be changed by dragging the plotted points with the mouse.
In order to change the free-form line format or its “reference point” for calculation of a new
position in the graph window after changing the window dimensions or axis limits, the command “Line
format and position…” must be selected in the line’s context menu (the same result is achieved by doubleclicking the line). This action opens the dialog window “Free-form line format and position”. An example
of such a window is shown in Fig. 11.3. The majority of the controls of this window are self-explanatory.
The purpose of the list boxes “Horizontal position” and “Vertical position” is the same as in the text label
options dialog window (see Section 11.1). The only difference is that the edge coordinates of the text label
are replaced by the edge coordinates of the bounding rectangle of the free-form line.
11.4. Converting free-form lines to function graphs
Although it is possible to “attach” a free-form line as a whole to a particular vertical or horizontal
line of the graph, the lengths of the line segments and angles between them do not depend on the window
dimensions or the axis limits of the graph. For example, when the graph window is increased, free-form
lines of that graph do not become bigger. This is the main difference between free-form lines and function
graphs (“curves”). However, if the x coordinates of free-form line vertices form an increasing or decreasing
sequence, then that line can be “converted” to a function curve. This is achieved by selecting the command
“Convert to a function graph” from the line’s context menu. An opposite conversion is also possible, i.e.,
any function curve can be converted to a free-form line.
Point coordinates of function curves (in axis units) are stored in memory as 64-bit floating-point
variables (this corresponds to precision of approximately 15 significant digits). Point coordinates of freeform lines (in axis units) are not stored in memory, and when they need to be displayed, the program
calculates them from the vertex pixel coordinates (i.e., coordinates expressed in terms of number of pixels
from the left and top edges of the graph window). Thus, vertex coordinates of free-form lines (in axis
units) depend on the screen resolution, and those coordinates are much less precise than point coordinates
of function graphs. This fact should be kept in mind when converting a function graph to a free-form line:
that conversion causes loss of precision.
Notes: 1. If x coordinates of vertices of a free-form line are not sorted in ascending or descending order, then that
line can not be converted to a function graph. In this case, after an attempt to convert the line to a function
graph, a warning message will appear.
2. After converting a free-form line to a function graph, the user has an option to keep the original line or to
delete it. After an opposite conversion (when a function graph is converted to a free-form line), there is no
such option: the original curve is always kept. Since the format and position of the created free-form line is
the same as format and position of the original curve, it may be at first impossible to visually distinguish
the created line from the original curve. The created free-form line can be separated from the original curve
by mouse-dragging it or by changing dimensions or axis limits of the graph window.
40
12. Keyboard and mouse shortcuts
The table below lists actions that can be performed not only using the mentioned menu commands,
but also using special key combinations and mouse.
Intended result
Actions using keyboard and mouse shortcuts
Narrowing the axis intervals
Drag the mouse with the middle button pressed
Rescaling the vertical axis (then the axis limits become
equal to the minimum and maximum values of the
plotted functions)
Double-click the left or right Y axis
Rescaling the horizontal axis (then the axis limits
become equal to the minimum and maximum argument
values of the plotted functions)
Double-click the bottom or top X axis
Rescaling both axes
Double-click any one of the four corners of the plotting
area
Editing the text of a text label
Double-click the text label
Changing the format of a function curve
Double-click the curve or its name in the legend
Changing the format of a free-form line
Double-click the line
Changing the position of a graphical object (i.e., a text
label, a line or the legend), or of a group of objects
Mouse-drag with the left mouse button pressed
Selecting a group of text labels or free-form lines
Press the left mouse button at a point in the graph
window where there are no objects and drag the mouse
Adding a text label or a free-form line to a group of
selected objects, or removing an object from the group
“Shift” + left click on the text label or the free-form line
Deleting selected text labels and free-form lines
“Delete” after selecting an object or a group of objects
Selecting a point of a function graph
Click the left mouse button on the curve or on its name
in the legend, then use the keys “→” and “←” (next or
previous point), “Home” and “End” (first and last points)
or “↑” and “↓” (previous or next curve in the list of
plotted curves)
Selecting a vertex of a free-form line
Click the left mouse button on the line, then use the keys
“→” and “←” (next or previous vertex), or “Home” and
“End” (first and last vertices)
Changing the coordinates of the selected point (vertex)
Press “Ctrl” and use the arrow keys
Copying the data and format of the selected curve or
objects
“Ctrl”+“C” after selecting a curve, an object or a group
of objects
Pasting a curve or graphical objects (i.e., creating a
curve or a group of text labels and free-form lines from
clipboard data)
“Ctrl” + “V” when neither a function curve nor a freeform line is selected (i.e., when the “point dialog”
window is not visible)
Cutting (i.e., copying and deleting) the selected curve
or objects
“Ctrl” + “X“ after selecting a curve, an object or a group
of objects
Copying the contents of the active graph window to the
clipboard in bitmap and Windows metafile formats
“Ctrl” + “C“ when neither a curve nor an object is
selected and the “point dialog” window is not visible
Opening the text editor window “Info”
“Ctrl” + “T” when neither a function curve nor a freeform line is selected (i.e., when the “point dialog”
window is not visible)
Saving the project file (the default file name extension
is .gxt)
“Ctrl“ + “S” when neither a function curve nor a freeform line is selected (i.e., when the “point dialog”
window is not visible)
41
13. Elementary data analysis
GraphiXT can be used for elementary data analysis and for nonlinear fitting. In this section, the
elementary analysis will be described, and the next section will deal with nonlinear fitting. In the current
version of the program (v1.21), the following types of elementary analysis can be performed:
1) linear fitting,
2) integration,
3) statistical analysis.
The elementary analysis of plotted function data is done by selecting the menu command “Data analysis /
Elementary analysis”, then selecting the curve in the analysis dialog window, specifying the analysis x
range and other analysis options and clicking the button “Calculate” (after clicking “OK”, analysis is not
performed, but its options are saved and the dialog window is closed). The same dialog window can be
opened by selecting the command “Curve data analysis…” from the curve’s context menu. After doing the
calculations, the text editor window “Info” with the analysis results is automatically opened (for example,
see Fig. 13.1). In addition, after linear fitting, a “free curve” representing the linear or exponential fit
function is automatically created (for example, see the dashed curve in Fig. 13.1). The “Info” window can
be opened at any time by selecting the menu command “Window / Open information window” (keyboard
shortcut “Ctrl” + “T”). Contents of the “Info” window are saved in the project file (*.gxt).
13.1. Linear fitting
During linear fitting, the program computes the least squares estimates of the coefficients A and B
of the linear equation
y = A + B ⋅ x,
(13.1)
and plots the resulting straight line. The essence of the method of least squares is the following. Let us
assume that a data set consists of the argument values x1, x2, …, xn-1, xn and corresponding values of the
function y(x). A typical example is a set of measurement data. In such a case, n is the number of
measurements. The measured function values will be denoted y1, y2, …, yn. The “theoretical” value of y at a
given argument value xk is a function of the unknown coefficients A and B (see (13.1)), hence we can write
y(xk) = y(xk; A,B) (k = 1, 2, …, n). The problem of estimating the coefficients A and B is formulated as
follows. The most likely values of A and B are the values that minimize the expression
Fig. 13.1. An example of the analysis dialog window and the text editor window “Info” with the analysis results
42
n
F ( A, B ) ≡ ∑ ⎡⎣ y ( xk ; A, B ) − yk ⎤⎦ .
2
(13.2)
k =1
Expression (13.2) is the sum of squared deviations of theoretical values from the measured ones (hence the
term “least squares”). That sum is also called “the sum of squared errors” (SSE). This expression always
has a minimum at certain values of A and B. However, even if the form of the theoretical function y(x)
correctly reflects the true relationship between the measured quantities y and x, those “optimal” values of A
and B, which correspond to the minimum SSE, do not necessarily coincide with the true values of A and B
(for example, because of measurement errors). The method of least squares only allows estimation of the
most likely values of A and B.
Everything that was stated above about the method of least squares also applies to the case when
the theoretical function is nonlinear. Regardless of the form of that function and of the number of unknown
coefficients, a SSE expression of the type (13.2) must be minimized. However, when y(x) is the linear
function (13.1), this problem can be solved analytically (i.e., A and B can be expressed using elementary
functions), but when y(x) is nonlinear, this problem can only be solved numerically (applying an iterative
procedure).
If y(x) is the linear function (13.1), then the SSE expression (13.2) can be written as follows:
n
n
n
n
n
n
k =1
k =1
k =1
k =1
k =1
k =1
F ( A, B ) ≡ ∑ ( A + Bxk − yk ) 2 = nA2 + B 2 ∑ xk2 + ∑ yk2 + 2 AB ∑ xk − 2 A∑ yk − 2 B ∑ xk yk .
(13.3)
It is known that partial derivatives of a function with respect to all arguments at a minimum point are zero.
After equating to zero the partial derivatives of the expression (13.3) with respect to A and B, we obtain a
system of two linear algebraic equations with unknowns A and B. Its solution is
n
⎛ n ⎞⎛ n
⎞
n∑ xk yk − ⎜ ∑ xk ⎟⎜ ∑ yk ⎟
⎝ k =1 ⎠⎝ k =1 ⎠ ,
(13.4)
B = k =1
2
n
⎛ n
⎞
2
n∑ xk − ⎜ ∑ xk ⎟
k =1
⎝ k =1 ⎠
n
1
B n
A = ∑ yk − ∑ xk .
(13.5)
n k =1
n k =1
The B coefficient is called the “slope” of the straight line, and the A coefficient is called the “intercept”.
The standard deviations (or “errors”) of those two coefficients are calculated according to formulas
ΔA =
Fmin ⎛
x2 ⎞
1
+
⎜
⎟,
n(n − 2) ⎝ Dx ⎠
(13.6)
Fmin
,
n(n − 2) Dx
(13.7)
ΔB =
where Fmin is the minimum value of the SSE (13.3), i.e., the value of SSE when A and B are equal to their
optimal values (13.4) and (13.5), x is the average argument value:
1 n
x = ∑ xk ,
(13.8)
n k =1
and Dx is the variance of the argument values:
n
n
∑ xk2
1
(13.9)
∑ ( xk − x )2 = k =1n − x 2 .
n k =1
The dialog window “Data analysis” contains the checkbox “Fit the natural logarithm” (see
Fig. 13.1). When that checkbox is checked, the value of y in formulas (13.1) through (13.7) is replaced
with ln(|y|), i.e., the natural logarithm of the absolute value of y, and the fit line is an exponential function
(see the dashed curve in Fig. 13.1). In such a case, only positive or only negative values of y are used
during fitting, depending on the “dominant” sign of y in the fitting range.
Dx =
13.2. Integration
The integral of a function can be computed using linear or exponential interpolation. This term
refers to the shape of an imaginary line that connects adjacent points of the function during its integration.
The method of linear interpolation (also called “the trapezoid quadrature method”) is illustrated in
43
y
Fig. 13.2 and Fig. 13.3. In this case, the points are connected by a straight line y = A + B ⋅ x. Obviously, if
in the entire integration range the integrated function is positive and superlinear (i.e., if its derivative, or
slope, increases with increasing x, as in Fig. 13.2), or negative and sublinear (i.e., its derivative decreases
with increasing x, as in Fig. 13.3), then a more accurate estimate of the integral could be expected when the
points are connected by an exponential curve y = ±exp(A + B ⋅ x). The latter method is most accurate when
the integrated function is similar to an exponential function, which approaches zero either when x → +∞
(as in Fig. 13.2 and Fig. 13.3), or when x → −∞. In other words, exponential interpolation is most accurate
when the logarithm of the absolute value of the function is similar to a linear function. If the integrand
function itself is similar to a linear function, or if in some parts of the integration range it is positive and
sublinear or negative and superlinear, then the preferred method is linear interpolation. For example, as it is
evident from Fig. 13.4, if the function is positive and sublinear, then exponential interpolation (dashed line
in Fig. 13.4) is less accurate than linear interpolation.
0
x
Fig. 13.2. Linear interpolation: points are connected with a straight line. In this example, the integral value
obtained by the method of linear interpolation is greater than the true value. Since the integrand function is
positive and superlinear (i.e., its first derivative increases with increasing x), a more accurate estimate could be
expected when points are connected with an exponential curve eA+Bx (in this example, B < 0)
x
y
0
Fig. 13.3. Linear interpolation: points are connected with a straight line. Since in this example the integrand
function is negative, the integral value is also negative, and the absolute integral value obtained by the method of
linear interpolation is greater than the true absolute value. Since the integrand function is negative and sublinear
(i.e., its first derivative decreases with increasing x), a more accurate estimate could be expected when points are
connected with a negative exponential curve −eA+Bx (in this example, B < 0)
44
y
x
0
Fig. 13.4. Linear interpolation (thin solid line) and exponential interpolation (dashed line). Since the integrand
function is positive and sublinear (i.e., its first derivative decreases with increasing x), a more accurate estimate of
the integral is obtained by applying the method of linear interpolation. In the case of exponential interpolation, the
error grows with increasing ratio of connected y values (for example, see the dashed line connecting the last two
points)
Interpolated values are computed using the points belonging to the interval of integration and the
closest points outside that interval, if available (one point near each limit of integration). In the case of
exponential interpolation, only positive or only negative values of y are used. In the latter case, if the
interval of integration contains both positive and negative y values, then GraphiXT computes both the
positive and the negative integral.
13.3. Statistical analysis
Let us assume that a data set consists of the argument values x1, x2, …, xn-1, xn and corresponding
values of the function y(x), which will be denoted y1, y2, …, yn. During statistical analysis, the program
computes the following statistical parameters:
• sum and average:
1 n
(13.10)
y = ∑ yk ,
n k =1
• variance:
1 n
1 ⎛ n 2
2⎞
( yk − y ) 2 =
Dy =
(13.11)
∑
⎜ ∑ yk − ny ⎟ ,
n − 1 k =1
n − 1 ⎝ k =1
⎠
• standard deviation of a single point:
σ y = Dy ,
(13.12)
•
standard deviation of the average:
σy =
•
σy
=
Dy
,
(13.13)
n
n
confidence intervals of the average and of the single point at confidence levels 70 %, 95 % and
99.8 %. The half-width of the confidence interval is computed by multiplying the standard
deviation (13.12) or (13.13) by the Student coefficient tα,n, corresponding to the given number of
points n and to the given confidence level α, where α = 70 %, 95 % or 99.8 %. The limits of the
confidence interval are computed from the assumption that the center of that interval coincides
with the average value. Thus, the confidence interval limits of the average value are equal to
y± = y ± tα ,nσ y ,
(13.14a)
and the confidence interval limits of a single point are equal to
y± = y ± tα ,nσ y .
(13.14b)
The program can also compute similar statistical parameters of the set of argument values x1, x2, …, xn.
45
14. Nonlinear fitting
Nonlinear least squares fitting is performed by selecting the menu command “Data analysis /
Nonlinear fitting”. This action opens the nonlinear fitting dialog window. An example of that window is
shown in Fig. 14.1. The various elements of that window are used to select fitting functions (formulas or
model functions), fitted data sets (free curves or model functions), varied parameters (global, local or
model parameters) and fitting options. The fitting process is started by clicking the button “Start fitting”.
Fig. 14.1. An example of the nonlinear fitting dialog window
Prior to instructions on using GraphiXT for nonlinear fitting, an introduction to the theory of
nonlinear fitting is presented.
14.1. Elements of the theory of nonlinear fitting
14.1.1. The used terminology and formulation of the problem
Further on, the case of two variables will only be discussed. The independent variable will be
denoted x, and the dependent variable will be denoted y. The independent variable is typically a quantity
whose value can be controlled precisely (i.e., its errors are negligible), and the dependent variable y is the
quantity that is determined empirically (“measured”) for each value of x. Unlike with the values of x, there
is frequently a large uncertainty associated with the measured values of y (for example, due to imperfection
of the measuring procedure). For brevity, the values of the dependent variable will be called responses.
The model is a function y(x) that makes it possible to predict (estimate) each response yk = y(xk) (k = 1, 2,
…, n), given the values of all parameters pi (i = 1, 2, …, m), where n is the number of responses
(measurements) and m is the number of parameters. The measured data consist of the set of values xk of the
independent variable and corresponding measured responses vk. The difference yk − vk of the k-th estimated
response and the corresponding measured response will be called the k-th error. When discussing
nonlinear fitting, it is convenient to treat the set of parameters as a one-column and m-row matrix
consisting of the parameter values pi (i = 1, 2, …, m). This column of numbers is called the parameter
vector and denoted p (further on, vectors will be denoted in lowercase, using bold italic font). The
estimated responses (hence, the errors) are functions of the parameters: yk = yk(p). The goal of fitting is
finding the optimal parameter vector p0, which minimizes the difference between the measured responses
and estimated ones. The corresponding errors yk(p0) − vk are called residual errors.
Prior to discussing methods of nonlinear fitting, it is necessary to define the concept of the
“difference between measured responses and estimated responses” precisely. This can be done using a
geometric analogy. If the set of the measured responses is treated as a point v in an n-dimensional
Euclidean space, whose Cartesian coordinates are vk (k = 1, 2, …, n), and the set of the estimated responses
46
is treated as a point y in the same space, with coordinates yk (k = 1, 2, …, n), then the “distance” between
those two points is F , where
n
F ≡ ∑ [ yk ( p) − vk ] .
2
(14.1.1)
k =1
The quantity F is called the sum of squared errors (SSE) and used as a criterion of the quality of the fit.
In order to improve the fit, one has to decrease the “distance” between the two points. Thus, the less is F,
the better is the fit. The “optimum” fit corresponds to the minimum value F0 ≡ F(p0). This definition of the
optimum fit is the basis of the method of least squares.
14.1.2. Choice of weight factors
The quality of the fit can also be characterized using the sum of squared relative errors. I.e., SSE
could be defined as
2
⎡ y ( p) − vk ⎤
F ≡ ∑⎢ k
⎥ .
vk
k =1 ⎣
⎦
n
(14.1.2)
The most general expression of the sum of squared errors F is
n
F ≡ ∑ wk2 [ yk ( p) − vk ] .
2
(14.1.3)
k =1
(14.1.1) corresponds to wk = 1, and (14.1.2) corresponds to wk = 1 / v k. The factor wk2 (k = 1, 2, … n)
before the k-th squared error is called the weight factor of that squared error. The factor wk, i.e., the square
root of the weight factor, will be called the error factor (i.e., omitting the words “weight” and “squared”).
In order to utilize the measurement data as fully as possible, the weight factors must be chosen so
as to ensure that contributions of all available points to the value of F0 are approximately equal. If the used
theoretical model is correct (i.e., if the only reason of non-perfect fit is the errors in the measured
responses), then the standard deviation of each measured response from the optimum fit line is
approximately equal to the measurement error of that point. Thus, the error factors should be inversely
proportional to the corresponding measurement errors. For example, let us assume that, as the independent
variable increases from the minimum to the maximum value, the measured responses decrease 100 times,
but their relative error stays constant (i.e., the absolute error of each measured response is proportional to
the measured value). If all error factors are equal to 1 (as in (14.1.1)), then the main contribution to the
value of F will come from the points with the maximum absolute error. In the discussed example, those are
the points corresponding to small values of the independent variable. The points with much smaller
absolute errors (in this example, those are the points that correspond to large values of the independent
variable) will have only a weak influence on the magnitude of F. Even a large relative change of those
points, which exceeds their measurement error by an order of magnitude or more, would not have a large
influence on the optimum parameter values. I.e., those points are essentially ignored. In order to avoid such
a situation, in this example it would be better to use wk = 1 / vk, because then values of all terms in the SSE
would be approximately equal. As illustrated by this example, the optimum choice of weight factors
depends on the relationship between the magnitudes and errors of the measured responses. If the absolute
error of a measured response is constant, then the SSE should be computed according to (14.1.1), and if the
measurement error is proportional to the magnitude of the measured quantity, then the SSE should be
computed according to (14.1.2).
If the measured quantity is distributed according to the Poisson distribution (e.g., the number of
particles emitted during radioactive decay of atomic nuclei), then the optimum value of the error factor wk
is 1/ vk , because in the case of the Poisson distribution the standard deviation of each point from the
corresponding statistical average is equal to the square root of that average. In this case, SSE is equal to
2
n
yk ( p) − vk ]
[
.
(14.1.4)
F ≡∑
vk
k =1
When some of the measured responses vk are zero, F can not be computed according to (14.1.2) or
(14.1.4), because then some of the terms in the SSE would have zero denominators. In such a case, a small
term may be added to νk, or the SSE may be computed according to (14.1.1).
Fig. 14.2 illustrates influence of a choice of the weight factors on fitting results in the presence of
large statistical “scatter” in the measured responses. Evidently, a correct choice of the weight factors can
improve accuracy of parameter estimates.
The parameter estimates are most accurate when the error factors are equal to inverse standard
deviations of the measured responses. The corresponding SSE is equal to
47
1
2
Netiesinio aproksimavimo rezultatai:
Model: ΔN = A ∙ exp(−λ1t) + B ∙ exp(−λ2t)
-1
λ1 = (0.0318 ± 0.0048) s ,
A = 124fitting
± 11, results:
Nonlinear
-1
= (0.00553
± 0.00056)
= 40.0
A =B
124
± 11,± 6.9,
λ1 =λ(0.0318
± 0.0048)
s−1, s .
2
parametrų
vertės: ± 0.00056) s−1.
λ = (0.00553
B =Tiksliosios
40.0 ± 6.9,
Δ
ΔnN
100
2
-1
-1
= 0.0284 s , B = 40, λ2 = 0.00481 s .
= 100, λ1 values:
TrueAparameter
A = 100, λ1 = 0.0284 s−1, B = 40, λ2 = 0,00481 s−1.
10
1
2
1
0
100
200
300
400
500
600
t, s
Fig. 14.2. The decay curve of a mixture of radioactive isotopes of silver 108Ag and 110Ag. The solid line is the
optimal theoretical curve (the model function with the optimal parameter values and their standard deviations
are given at the top of the graph). This curve was obtained by minimizing the statistical SSE, defined by
(14.1.4). The dashed lines are optimal curves corresponding to other definitions of the SSE:
1 – minimizing the absolute deviation (SSE expression (14.1.1)). Parameter values:
A = 121 ± 8, λ1 = (0.0365 ± 0.0040) s-1, B = 47.9 ± 7.4, λ2 = (0.00572 ± 0.00073) s-1,
2 – minimizing the relative deviation (SSE expression (14.1.2)). Parameter values:
A = 114 ± 32, λ1 = (0.0228 ± 0.0067) s-1, B = 27.9 ± 9.5, λ2 = (0.00508 ± 0.00080) s-1.
2
n ⎡
y ( p) − vk ⎤
(14.1.5)
F ≡ ∑⎢ k
⎥ ,
σk
k =1 ⎣
⎦
where σk is the standard deviation of the k-th measured response.
The SSE with weight factors equal to wk2 = 1/ σ k2 (i.e., the quantity (14.1.5)) is usually denoted by
the Greek letter χ (“chi”) with the superscript 2, i.e., χ2, and called “chi-squared”.
The difference between the number of fitted data points and the number of varied parameters
(n − m) is called the number of degrees of freedom. As it will become clear from the following
discussion, the quality of fit is more conveniently characterized using the ratio of the SSE and the number
of degrees of freedom. This ratio will be called “the reduced SSE” and denoted F’:
F
.
(14.1.6)
F′ ≡
n−m
Here, F is the general SSE (14.1.3). Thus, F’ is defined without any restrictions on the weight factors (any
one of the mentioned expressions of F (14.1.1) – (14.1.5) may be inserted into (14.1.6)).
14.1.3. The mathematical formulation of the principle of least squares
Since at the minimum point of a function its partial derivatives with respect to all arguments are
zero, the condition of a minimum SSE can be formulated as follows:
∂F
=0
∂pi
(i = 1, 2,..., m) .
(14.1.7)
By inserting the expression of F (14.1.3) into (14.1.7), we obtain the system of normal equations:
n
∂y
∑ wk2 ⎣⎡ yk ( p ) − vk ⎦⎤ ∂pk
k =1
=0
(i = 1, 2, …, m).
(14.1.8)
i
This is a system of m equations in m unknowns, corresponding to m optimal parameter values. This system
of equations is the mathematical formulation of the principle of least squares.
If the dependence of the estimated responses yk(p) on p is nonlinear, then equations (14.1.8) are
nonlinear, too. In such a case there is usually no analytical solution of this system of equations and it must
be solved numerically, using an iterative procedure. I.e., the point p0 in the parameter space is approached
step-by-step. The size and direction of the next “step” depends on the properties of the minimized function
F (i.e., its value and its partial derivatives with respect to all varied parameters) at the current step. One
48
such step is called iteration. Different fitting methods compute the next step differently. The choice of the
fitting method may influence the fitting time and the total number of iterations. However, the final result
(p0) does not depend on the chosen fitting method (except when the function F(p) has more than one
minimum).
14.1.4. Parameter confidence intervals
Let us assume that there is a single set of measured data and a very large number of optimal
theoretical curves obtained by repeating the same measurements at the same conditions and fitting each set
of measurement data by a given model (however, as mentioned, only one of those experimental data sets is
available). We will also assume that the model is correct (i.e., there are no systematic errors). Although all
measurements are done at the same conditions, the optimal curves corresponding to different data sets will
be different due to random measurement errors. If the SSE is computed for each theoretical curve, using
the given experimental data set, then the majority of obtained values will belong to the interval
(14.1.9)
F0 ≤ F ( p) ≤ F0 + F0′ ,
where F0 and F0′ the optimal values of the SSE and the reduced SSE corresponding to the given
experimental data set. From the definition of F' (14.1.6) it follows that
F0′ ≡
F0
.
n−m
(14.1.10)
As it will be shown below, the inequality (14.1.9) defines an m-dimensional ellipsoid whose center is at
p = p0 (that point corresponds to the given data set fitting results). If the measurement errors are distributed
normally, then the projection of that ellipsoid to each parameter axis defines the 68.3 % confidence interval
of that parameter. If the value of F0′ is known, then the width of that interval can be computed as follows.
The function F(p) is expanded in Taylor series in the vicinity of the point p0, retaining only the
zero- and second-order terms. Using the rules of matrix multiplication and addition, this expansion is
(14.1.11)
F ( p0 + s ) = F0 + s T ⋅ G ⋅ s ,
s ≡ p − p0 ,
(14.1.12)
T
where s is the transposed vector s (i.e., the row of the same numbers that compose the column s), and G is
the matrix of second derivatives of the function F(p) at p0, multiplied by 1/2. Elements of that matrix are
Gij =
1 ∂2 F
2 ∂pi ∂p j
(i, j = 1, 2, …, m).
(14.1.13)
p = p0
Inserting the expression of F(p0 + s) (14.1.11) into (14.1.9) (instead of F(p)), we obtain
(14.1.14)
s T ⋅ G ⋅ s ≤ F0′ .
The points p that satisfy this condition are inside an m-dimensional ellipsoid, whose center is at the point
p = p0 and whose projection to the i-th parameter axis is the interval
(i = 1, 2, …, m),
(14.1.15)
p0, i − si ≤ pi ≤ p0, i + si
where p0, i is the optimal value of the i-th parameter (i.e., the projection of the point p0 to the axis pi), and
(i = 1, 2, …, m),
(14.1.16)
si = || G −1 ||ii F0′ = || G −1 ||ii F0 /(n − m)
where ||G−1||ii (i = 1, 2, …, m) are the diagonal elements of the inverse matrix G−1 (the matrix G−1 is called
the variance-covariance matrix). The quantity si (i = 1, 2, …, m) is the standard deviation (or “error”) of
the optimal value of the i-th parameter. If the measurement errors of different data points are independent
and distributed normally, then the statistical distribution of each parameter is also normal. In such a case,
there is a 68.3 % probability that the true value (the statistical average) of a given parameter belongs to the
interval (14.1.15), a 95.4 % probability that it belongs to the interval p0, i − 2si ≤ pi ≤ p0, i + 2si, and a
99.7 % probability that the true value belongs to the interval p0, i − 3si ≤ pi ≤ p0, i + 3si. Thus, si is the
half-width of the 68.3 % confidence interval of the i-th parameter.
If the standard deviation σk of each measured response yk is known, then each error factor wk in the
expression (14.1.3) should be set equal to 1 / σk. Then, if the errors of all measured responses are
independent and normally distributed, the statistical average (i.e., the average over a large number of
equivalent fits, or the “ensemble average”) of each term in the sum (14.1.3) is equal to (n – m) / n, the
statistical average of the value F0 of that sum is n − m, and the statistical average of the value of F0′
(14.1.10) is 1. In this case, when n → ∞, the value of F0 corresponding to the given experimental data set
approaches n, and the corresponding value of F0′ approaches 1. However, the number of fitted points n is
frequently too small to make those statistical properties evident in the available data. Consequently, the
computed value of F0′ may deviate from 1 significantly. When n is small (and the theoretical model is
49
correct), then F0′ is usually less than 1, and the corresponding half-widths of parameter confidence
intervals (14.1.16) are less than the true values. In this case, more reliable estimates of si are obtained by
substituting 1 instead of F0′ in the expression (14.1.16). Thus, when the error factors wk are equal to 1 / σk,
the 68.3 % confidence intervals of parameter estimates should be calculated using the formula
si = || G −1 ||ii
(i = 1, 2, …, m).
(14.1.17)
The confidence intervals may only be calculated according to (14.1.16) or (14.1.17) when:
1) the theoretical model is correct,
2) errors of the measured responses are independent and distributed normally.
Then, the expression (14.1.16) is applicable for the case of any weight factors wk (with the condition that
the observed “scatter” of the measured responses around the theoretical ones correctly reflects the
statistical properties of the measured responses), and the expression (14.1.17) is applicable when
wk2 = 1/ σ k2 , where σk is the standard deviation of the k-th measured response (this corresponds to the SSE
expression (14.1.5)). The mentioned two conditions will be called “the standard conditions”. If the SSE is
defined according to (14.1.5), then a third standard condition must be added:
3) the values of σk, which are used to calculate wk, are correct.
However, it is often not known beforehand if the standard conditions are true. For example, the theoretical
model may reflect the true relation between the variables x and y only approximately, or it may be totally
wrong. Then, the obtained optimal parameter values and their confidence intervals are probably worthless.
Consequently, it is desirable to be able to test the hypothesis that the theoretical model is correct. This is
the so-called null hypothesis. The standard procedure of testing the null hypothesis is based on estimation
of the probability to obtain the value of F0 less than the one obtained during nonlinear fitting when the
standard conditions are satisfied (i.e., when all differences between the optimal theoretical curve and the
experimental data are only due to random measurement errors, which are independent and distributed
normally). This probability is easiest to compute when the weight factors are equal to wk2 = 1/ σ k2 , i.e., when
F ≡ χ2 and F0 ≡ χ02 . Then, assuming that the standard conditions are true, the statistical distribution of the
quantity F0 ≡ χ02 is well-defined and depends only on the number of degrees of freedom n − m. That
distribution is called the χ2 distribution. The number of degrees of freedom will be denoted df:
df ≡ n − m,
(14.1.18)
2
and the mentioned probability will be denoted P( χ 0 | df ) . An approximate expression of that probability is
2
χ0 / 2
⎛ df χ 2 ⎞
1
(df / 2) −1 − t
e dt ,
P( χ | df ) ≈ γ ⎜ , 0 ⎟ ≡
∫ t
2
2
(df
/
2)
Γ
⎝
⎠
0
2
0
(14.1.19)
where γ is the incomplete gamma function, which is defined by the expression (4.6). After calculating this
probability, it is compared with certain “critical” values. One of them is close to zero (for example, 0.005),
and another one is close to 1 (for example, 0.995). If P ( χ 02 | df ) < 0.005, this means that the value of χ02 is
too small: if the standard conditions were true, then the probability to obtain such a small value of χ 02
would be less than 0.005. If P ( χ 02 | df ) > 0.995, this means that the value of χ 02 is too large: if the standard
conditions were true, then the probability to obtain such a large value of χ02 would be less than
(1 − 0.995) = 0.005. It such cases, one may guess that at least one of the standard conditions is probably
false. If the value of χ 02 is too large and if it is known that the second and the third standard conditions are
satisfied, then one may conclude that the theoretical model is incorrect. If the value of χ 02 is too small, this
usually means that the values of σk used to compute the SSE are greater than the true standard deviations
(i.e., the third standard condition is not satisfied). In such a case, no conclusion can be made about
correctness of the model, because the value of P( χ 02 | df ) , which would be obtained if the correct weight
factors were used, is not known. If that probability is between 0.005 and 0.995 (i.e., neither too small nor
too large) and if it is known that the second and the third standard condition are satisfied, then one may
guess that the first standard condition is satisfied, too, i.e., that the theoretical model is correct.
The mentioned guesses may be incorrect. For example, the conclusion that the model is correct is
only based on statistical properties of the data: it is possible that the model is not suitable, but the number
of fitted points is too small or random measurement errors are much larger than discrepancies caused by
imperfections of the model, so that those discrepancies are not visible. After performing more accurate or
longer measurements, it may become evident that the model is not correct. The opposite situation is also
50
possible: analysis of nonlinear fitting results may lead to the conclusion that the model is unsuitable, when
in fact it is correct. Thus, when evaluating suitability of a theoretical model by the method of nonlinear
fitting, errors of two types are possible. A type I error occurs when a true null hypothesis is rejected. A
type II error occurs when a false null hypothesis is accepted. The probability of those errors is determined
by the mentioned critical probabilities. For example, if the critical probabilities are 0.005 and 0.995, then
probability of the type I error is 0.01 = 1 %. This means that, if the standard conditions are satisfied, then,
after doing the same set of measurements at the same conditions and fitting each experimental data set with
the same theoretical function, the value P( χ 02 | df ) will not belong to the interval [0.005, 0.995] on the
average only once in 100 times. Thus, the probability of the type I error can be decreased by decreasing the
first critical probability and increasing the second critical probability. However, if the null hypothesis is
false, then by widening the acceptance region the probability of the type II error is increased, i.e., there is
an increased risk that a false null hypothesis will not be rejected. The values of critical probabilities are
therefore chosen on the basis of a trade-off between the risks of the type I error and the type II error. The
standard values of the critical probabilities are 0.005 and 0.995 (probability of the type I error is 1 %), or
0.025 and 0.975 (probability of the type I error is 5 %).
14.1.5. The Levenberg-Marquardt method
The program GraphiXT applies two methods of nonlinear fitting – the Levenberg-Marquardt
method (“LM method”) and the simplex method. The LM method is one of the most efficient and popular
methods of nonlinear fitting. In its description that follows, the following notations will be used:
βi ≡ −
1 ∂F
,
2 ∂pi
α ij ≡
1 ∂2 F
,
2 ∂pi ∂p j
(14.1.20)
where i and j are the numbers of the varied parameters (i, j = 1, 2, ..., m). The general expressions of the αij
coefficients can be obtained by differentiating the expression of the SSE (14.1.3). By retaining only the
first derivatives in the obtained expression, the following approximate expression of αij is obtained:
n
α ij = ∑ wk2
k =1
∂yk ∂yk
.
⋅
∂pi ∂p j
(14.1.21)
Further on, the αij coefficients will be defined by the equality (14.1.21) (rather than by (14.1.20)). Using
the LM method, the increment of each parameter during each iteration is computed as follows. First, the
coefficients βi and αij are computed, then elements of the matrix ||αij|| are modified in the following way:
α ii′ ≡ α ii (1 + λ ),
(14.1.22)
α ij′ ≡ α ij (i ≠ j ),
where λ is the parameter that controls the fitting procedure. The increments of varied parameters δpi (i = 1,
..., m) in the current iteration are the solution of this system of linear equation:
m
∑ α ij′ δ p j = βi
(i = 1, 2, ..., m)
(14.1.23)
j =1
Below is the sequence of steps when applying the LM method:
Calculate the SSE F(p) corresponding to the initial parameter values.
Set λ equal to 0.001.
Compute the coefficients βi and αij.
Compute the coefficients α ij′ and solve the system of linear equations (14.1.23).
Compute the SSE F(p + δp) corresponding to the new parameter vector p + δp.
If F(p + δp) ≥ F(p), then increase λ by a factor of 10 and go back to Step 4.
If F(p + δp) < F(p), then decrease λ by a factor of 10, update the parameter vector and the SSE (i.e.,
p ← p + δp and F(p) ← F(p + δp)) and go back to Step 3.
Fitting is stopped when the SSE stops decreasing or when increments of all parameters become less than
some predefined small value.
Since application of the LM method involves computing the partial derivatives of the SSE with
respect to the parameters, the fitting functions must be smooth.
1)
2)
3)
4)
5)
6)
7)
14.1.6. The simplex method
A simplex is the geometrical figure consisting, in m dimensions, of m + 1 points (or vertices) and
all their interconnecting line segments and polygonal faces. A one-dimensional simplex is a straight line
segment. In two dimensions, a simplex is a triangle. In three dimensions, it is a tetrahedron (not necessarily
the regular tetrahedron). The first step of the simplex method of nonlinear fitting (also called the Nelder51
Simplex at the beginning of a step
Fmax
Fmin
Reflection
Reflection and expansion
Contraction
Fig. 14.3. Possible outcomes for a step in the simplex
method, when there are three varied parameters. The
simplex at the beginning of the step is shown at the top.
The simplex at the end of the step can be any one of:
(a) a reflection away from the high point (Fmax),
(b) a reflection and expansion away from the high point,
(c) a contraction along one dimension from the high
point, or (d) a contraction along all dimensions towards
the low point (Fmin).
An appropriate sequence of such steps will always
converge to a minimum of the function F.
This diagram is based on Fig. 10.4.1 of the book
Press W. H., Teukolsky S. A., Vetterling W. T.,
Flannery B. P. Numerical Recipes in C (1997).
Proportional contraction
Fmin
Mead method) is to define an initial simplex in the parameter space. In each iteration, that simplex is
modified so as to decrease the value of the SSE corresponding to a particular vertex of the simplex. The
simplex method does not use derivatives with respect to varied parameters. Hence, there are fewer
requirements for the fitting functions than in the LM method (e.g., those functions may be non-smooth).
However, when the fitting functions are smooth, the simplex method is much slower than the LM method.
All possible transformations of a three-dimensional simplex during fitting are shown in Fig. 14.3.
GraphiXT uses one of the variants of the simplex algorithm, which is described below 1.
1) Sort the values of the SSE corresponding to each vertex of the simplex in the ascending order:
Fmin = F ( p1 ) ≤ F ( p2 ) ≤ ... ≤ F ( pm +1 ) = Fmax ,
(14.1.24)
where the subscripts at “p“ are the numbers of the vertices.
2) Compute the centroid p (i.e., the arithmetic average) of all vertices except pm+1:
p=
1 m
∑ pi .
m i =1
(14.1.25)
3) Reflect the vertex pm+1 in the opposite face of the simplex, along the line pm+1 – p (see Fig. 14.3a):
pr = p + α ( p − pm +1 )
(14.1.26)
(GraphiXT uses the reflection coefficient value α = 1). If
F ( p1 ) ≤ F ( pr ) < F ( pm ) ,
(14.1.27)
then obtain a new simplex by replacing the worst point pm+1 with the reflected point pr and go to step 1.
Otherwise, if
F ( pr ) < F ( p1 ) ,
(14.1.28)
then go to step 4. If this inequality is false, then go to step 5.
4) Compute the expanded point (see Fig. 14.3b):
pe = p + γ ( p − pm +1 )
1
This simplex algorithm is described in the Wikipedia article “Nelder-Mead method “ (web page
http://en.wikipedia.org/wiki/Nelder-Mead_method ).
52
(14.1.29)
(GraphiXT uses the expansion coefficient value γ = 2). If
F ( pe ) < F ( pr ) ,
(14.1.30)
then obtain a new simplex by replacing the worst point pm+1 with the expanded point pe. Otherwise
obtain a new simplex by replacing the worst point pm+1 with the reflected point pr. Go to Step 1.
5) Compute the contracted point (see Fig. 14.3c):
pc = pm +1 + η ( p − pm +1 )
(14.1.31)
(GraphiXT uses the contraction coefficient value η = 0.5). If
F ( pc ) < F ( pm +1 ) ,
(14.1.32)
then obtain a new simplex by replacing the worst point pm+1 with the contracted point pc and go to
Step 1. Otherwise go to Step 6.
6) Shrink the entire simplex (see Fig. 14.3d) by replacing all points except the best point p1 with
pi = p1 + σ ( pi − p1 )
(i = 2, 3, ..., m + 1)
(14.1.33)
(GraphiXT uses the proportional contraction coefficient value σ = 0.5). Go to Step 1.
Fitting is stopped when the simplex dimensions become so small that the differences of SSE values
corresponding to different vertices of the simplex become less than some small predefined value, or when
the differences of parameter values corresponding to different vertices of the simplex become less than
some small predefined value.
14.2. Nonlinear fitting with GraphiXT
14.2.1. Definition of fitting functions
The nonlinear fitting dialog window is opened by selecting the menu command “Data analysis /
Nonlinear fitting”. An example of that window is shown in Fig. 14.1. When that window is opened for the
first time, all its input and information fields are empty. Then the user must define the fitting functions
whose parameters will be optimized. This is done by clicking the button “Add formula” (if parameters of a
user-defined formula will be optimized), or “Add model function” (if parameters of a physical system
simulated by the loaded plug-in will be optimized, and if the fitted datasets contain values of one or more
model functions defined by that plug-in). This action opens a dialog window with the list of all graphs of
the active project and the list of all formulas or all model functions plotted in the selected graph. Examples
of that dialog window are shown in Fig. 14.4a and Fig. 14.4b. After selecting a graph in the top list box,
the contents of the bottom list box are updated. The bottom list box contains the names of all formulas or
model functions plotted in the graph that has been selected in the top list box (although, as mentioned in
Section 3, model functions do not belong to any graph window, the model functions that are used as fitting
(a)
(b)
Fig. 14.4. Examples of the fitting function selection dialog window: (a) when the fitting function is a user-defined
formula; (b) when the fitting function is a model function
53
functions must be plotted). After selecting the fitting function in the bottom list box, the button “OK” must
be clicked. Then the names of the selected function and the corresponding graph window appear in the
columns “Function” and “Graph” of a grid control in the window “Nonlinear least squares fitting” (see
Fig. 14.1). In order to define additional fitting functions, the mentioned steps must be repeated.
14.2.2. Selection of varied parameters and parameter properties
The names, values and uncertainties of the varied (optimized) parameters are shown in the grid
control “Varied parameters” (see Fig. 14.1). This grid control has five columns:
1) “Name” – the names of optimized parameters,
2) “G/L/M” – the letter “G”, “L” or “M”, which indicates the type of the corresponding optimized
parameter: global, local or model parameter (these terms are explained in Section 4.1); in the case of
a local parameter, the graph number and formula ID are indicated beside it (see Fig. 14.1),
3) “Value” – current values of optimized parameters,
4) “Vary? ” – a checkbox, which is only checked when the corresponding parameter is varied,
5) “Uncertainty” – the half-widths of 68.3 % confidence intervals of optimized parameters.
Optimized parameters are added by clicking the button “New”, which is under the grid control “Varied
parameters”. This action opens the parameter selection dialog window. An example of this window is
presented in Fig. 14.5. This dialog window contains three list boxes. The list “Local parameters of the
selected formula” is visible only when at least one of the fitting functions listed in the window “Nonlinear
least squares fitting” is a user-defined formula with at least one local parameter defined. The contents of
the other two list boxes do not depend on the used fitting functions. The list box “Model parameters”
contains not only the names of model parameters, but also short explanations of their meanings. This list
box is visible only when a simulation plug-in has been loaded (for example, CarrierFunc.dll). The
optimized parameters must be selected in the mentioned three list boxes. After clicking “OK”, the names
and current values of those parameters will be added to corresponding columns of the grid control “Varied
parameters” (see Fig. 14.1). Each new parameter is set to be varied by default, i.e., the checkbox in the
corresponding cell of the column “Vary?” is checked. The current value of a parameter and the state of the
mentioned checkbox can be changed directly in the grid control “Varied parameters”. In addition, after
selecting a parameter in the dialog window “Nonlinear least squares fitting” (i.e., after left-clicking the
corresponding cell in any of the columns of the grid control “Varied parameters”), it becomes possible to
change the initial value or bounds of that parameter, or to turn on/off its normalization. Those properties
are shown in the group of controls “Selected parameter” on the right side of the dialog window “Nonlinear
Fig. 14.5. An example of the parameter selection dialog window
54
least squares fitting” (see Fig. 14.1). If the text box “Upper bound” or “Lower bound” is empty, then the
selected parameter is unlimited in the positive or negative direction, respectively.
Parameter normalization is a parameter transform that decreases differences between values of
different varied parameters. When those differences are very large, i.e., several orders of magnitude, then
elements of the matrix of second derivatives of the SSE (14.1.13) also differ from each other by several
orders of magnitude. This difference may cause a loss of precision when computing elements of the inverse
matrix (when the LM method is applied, the inverse matrix is computed at each iteration, because it is
needed for solving the system of linear equations (14.1.23); besides, the diagonal elements of the inverse
matrix are needed for computing half-widths of parameter confidence intervals (14.1.16) or (14.1.17)). The
normalization method depends on the parameter bounds:
1) If the parameter is unlimited in both directions, then it is normalized by dividing it by the absolute value
of its initial value. If the initial value is zero, then the parameter is not normalized (even when the
checkbox “normalize” is checked).
2) If the parameter is bounded in one direction only, then it is normalized by subtracting the value of the
bound from the current value of the parameter and then dividing this difference by the absolute value of
the initial value of the same difference. In this case, division by zero is not possible, because the initial
value of a varied parameter is not allowed to be equal to one of the bounds.
3) If the parameter is bounded in both directions, then it is normalized by subtracting the arithmetic
average of the two bounds from the current value of the parameter and then dividing the obtained
difference by “0.5 × (upper bound – lower bound)”, i.e., by the half-width of the parameter definition
interval.
Thus, if the parameter is unbounded or bounded in one direction only, then its normalized initial value is
±1. If the parameter is bounded in both directions, then its normalized initial value is always greater than
−1 and less than +1, and its normalized bounds are equal to −1 and +1.
14.2.3. Definition of fitted data sets and their properties
The names and limits of the fitted data sets are shown in the dialog window “Nonlinear least
squares fitting”, in the grid control “Fitted datasets corresponding to the selected fitting function” (see
Fig. 14.1). In order to add a new fitted dataset, the fitting function that will be used when fitting that
dataset must first be selected in the grid control “Used formulas and model functions” (by left-clicking the
corresponding row of that grid control), and then the button “Add dataset” must be clicked. This action
opens the fitted dataset selection dialog window. An example of that window is shown in Fig. 14.6. That
window contains two list boxes. The top list box contains the names of model functions, and the bottom
list box contains the names of free curves. The latter list only contains the names of the free curves that
belong to the same graph window as the selected fitting function. The list of model functions contains the
names of all f(t) model functions or all f(x, t) model functions, depending on the graph type (the model
functions that are used as fitted datasets are not required to be plotted in graph windows, unlike the model
functions that are used as fitting functions). After selecting the necessary function in the top or bottom list
box (i.e., after left-clicking the corresponding item of the list box) and clicking the button “OK”, the name
of the selected dataset will be added to the list of fitted dataset names, which are in the column “Name” of
the dataset grid control in the dialog window “Nonlinear least squares fitting” (see Fig. 14.1). The cells that
are to the right of that column contain the limits of the fitting interval. If the datasets are of the f(t) type
(model functions or free curves), then there are two numeric cells “tMin” and “tMax”, which contain the
minimum and maximum times, respectively. If the datasets are f(x, t) model functions or f(x) free curves,
then there are four numeric cells “xMin”, “xMax”, “tMin” and “tMax”, which contain the minimum and
maximum values of the coordinate, as well as the minimum and maximum times, respectively (see
Fig. 14.1). If a given fitted data set is a free curve of the type f(x), then tMin = tMax, because such a dataset
must be assigned a single time value. In order to add more fitted data sets, the mentioned steps must be
repeated. The checkbox “Use?” indicates if a given dataset (or all datasets corresponding to a given fitting
function) will be used during fitting.
After defining a new fitted dataset, its definition interval is initially unlimited, i.e., it includes all
points of that dataset. In this case, the cells “xMin”, “xMax”, “tMin” and “tMax” contain minimum and
maximum values of the coordinate and time in the given dataset. If the dataset is a free curve of the type
f(x), then the default value of its time is equal to the current time of the corresponding graph. The limits of
the fitting interval and the time values associated with f(x) free curves can be changed by clicking the
button “Dataset options…”. This action opens the fitted dataset options dialog window. An example of that
window is shown in Fig. 14.7. Below are explanations of all controls of that window:
55
Fig. 14.6. An example of the fitted dataset selection dialog window
Fig. 14.7. An example of the dialog window with options of fitted datasets
56
• The grid control at the top of the dialog window is used to select a fitted dataset. After selecting a
dataset (by left-clicking the corresponding row of the grid control), its options are automatically
shown by the controls below.
• The controls that are in the group “Fitting range of the selected dataset” define the interval of time
values of the graph window indicated in the selected cell of the column “Graph” if the selected dataset
corresponds to an f(t) model function or a free curve of the type f(t), or the interval of coordinate x
values if the selected dataset corresponds to an f(x, t) model function or a free curve of the type f(x). If
any one of the two checkboxes “Entire curve” and “Fitting range coincides with the x axis range of the
graph” is checked, then the mentioned interval is determined automatically. If neither of those
checkboxes is checked, then the interval limits must be entered in the two text boxes that are below.
• The controls that are in the group “Time of f(x) free curve” can only be activated when the selected
dataset corresponds to a free curve of the type f(x). These controls define the time value that must be
associated with the selected f(x) dataset during nonlinear fitting. If the checkbox “Current time of the
graph” is checked, then the mentioned time is determined automatically. If that checkbox is not
checked, then the time value must be entered in the text box “t =“.
• The controls that are in the group “Range of t values of f(x,t) model function” can only be activated
when the selected dataset corresponds to an f(x, t) model function. These controls are used to define
the time limits (the coordinate limits are defined using the previously mentioned controls). If any one
of the three checkboxes “All t values”, “t axis range of this graph” and “t range of this f(t) function” is
checked, then the time limits are determined automatically (in the latter two cases, it is also necessary
to select a graph or an f(t) dataset in the corresponding drop-down list). If neither of those checkboxes
is checked, then the time limits must be entered in the two text boxes that are to the right of the
checkbox “All t values”.
• A group of three checkboxes that are to the right of the text “Apply these t and x limits to” are used
when time or coordinate limits of two or more fitted datasets of the given type (i.e., f(t) model
functions or free curves, f(x, t) model functions, or f(x) free curves) must be computed according to the
same rule (specified by the previous controls). Different checkboxes correspond to different subsets of
fitted datasets of the given type (the subset is indicated near each checkbox).
• The controls that belong to the group “Error factors of the selected dataset” define the method of
computing the error factors, which are denoted wk in the SSE expression (14.1.3). The error factors
either have the same value for all points of the fitted dataset, or they are calculated using a pre-defined
formula, or they are extracted from a special dataset. Four choices are available:
1) constant error factors:
1
wk = ,
e
(14.2.1)
where e is a positive constant;
2) error factors that are inversely proportional to the absolute value of the corresponding measured
response |vk|:
1
wk =
,
(14.2.2)
f ⋅ (| vk | + e)
where f and e are positive constants (the constant e may be zero);
3) error factors that are inversely proportional to the square root of the absolute value of the
corresponding measured response |vk|:
1
,
(14.2.3)
wk =
f ⋅ | vk | +e
where f and e are positive constants (one of them may be zero);
4) error factors that are equal to inverse values of a dataset that is linked to the same X dataset as the
fitted dataset.
The four radio buttons that are on the left side of this group of controls are used to select one of the
mentioned four error factor computation methods. If one of the first three error-weighting options is
selected, then the values of the constants e and f must be entered in the text boxes “e = ” and “f = ”.
The constant e can be defined in one of two ways: by entering its value in the top one of the two text
57
boxes “e = ” (see Fig. 14.7), or by specifying that it should be equal to a predefined fraction of the
average absolute value of the measured responses corresponding to the selected fitted dataset (in the
dataset options dialog, that average value is denoted “<|y|>”). In the latter case, the mentioned fraction
must be entered in the bottom one of the two text boxes “e = ” (see Fig. 14.7). In the example of
Fig. 14.7, the constant e is computed using the second method. If the fourth error-weighting option is
selected, then the error-weighting dataset must be selected from the list that is opened by clicking the
button “Select…” (see Fig. 14.7). That list contains the names of all free curves, formulas and model
functions that are linked to the same X dataset as the fitted dataset. After selecting an error-weighting
dataset from that list, each term in the sum of squared errors will be divided by a squared value of the
element of the error-weighting dataset that corresponds to the same X value. The name of the currently
selected error-weighting dataset is shown in the text box “z =” (see Fig. 14.7).
If there are several fitted datasets, then the final (“optimal”) values of varied parameters will
be most affected by the dataset whose contribution to the overall SSE value F is greatest. If equal
values of weight factors are applied to all fitted datasets, and if y values corresponding to different
datasets differ by several orders of magnitude, then the datasets with the least y will have negligible
influence on the optimal parameter values. When the error factors defined by (14.2.2) or (14.2.3) are
used, values of the SSE terms corresponding to different fitted datasets are made more similar to each
other. Consequently, the use of those error factors makes it possible to decrease the differences
between “contributions” of different datasets to the overall SSE. However, those differences may still
be unacceptably large if different datasets contain a very different number of observations. If values of
all terms in the SSE are roughly equal, then the datasets with the largest number of points will make
up the major part of the overall SSE. In order to eliminate this effect, the checkbox “Divide SSE by
the number of points” should be checked. Then the part of the SSE corresponding to the selected
dataset will be additionally divided by the number of points of that dataset n. I.e., an additional factor
n will appear in the denominators of the expressions of error factors (14.2.1) – (14.2.3).
The two checkboxes at the bottom of this dialog window are used to specify that the same
method should be used to calculate error factors for all other fitted datasets, or for all fitted datasets
corresponding to the same fitting function. Those checkboxes can not be checked if the fourth errorweighting option has been selected.
14.2.4. General nonlinear fitting options
The dialog window of general nonlinear fitting options is opened by clicking the button “General
options…” (see Fig. 14.1). An example of that window is shown in Fig. 14.8. Below are descriptions of all
controls of that window:
• The top two text boxes are used to specify the increment of a parameter value that should be used
when computing the partial derivatives of the SSE with respect to the varied parameters. Those
derivatives are computed by the finite difference method:
∂F
∂p
≈
p = p0
F ( p0 + 0.5Δp) − F ( p0 − 0.5Δp)
.
Δp
(14.2.4)
The same method is used when computing the partial derivatives ∂yk / ∂pi (they appear in the
expression of αij (14.1.21)). Thus, in order to compute the partial derivative of the sum of squared
errors F with respect to a varied parameter p when that parameter is equal to p0, a small increment Δp
of that parameter’s value must be specified and two “auxiliary” values of SSE must be computed. One
of those two values of SSE corresponds to the parameter value that exceeds p0 by 0.5Δp, and the other
“auxiliary” SSE corresponds to the parameter value that is less than p0 by 0.5Δp. The increment Δp is
computed based on the numbers entered in the top two text boxes of the nonlinear fitting options
window (see Fig. 14.8). The first text box is used to enter the relative parameter change. The absolute
change Δp is obtained by multiplying the relative change by the current parameter value. If the
absolute change of the normalized parameter value obtained in this way is less than the number
entered in the second text box, then Δp is set equal to the latter value. Therefore, if Δp must be
constant during entire fitting, a very small number (e.g., 1e-100) must be entered in the first text box
(a zero value is not allowed). Note: the numbers entered in those two text boxes are also used when
constructing the initial simplex.
• A group of five text boxes “Ending criteria” define the conditions that have to be satisfied to stop the
fitting procedure. Fitting is stopped when the optimized parameters stop varying or when the SSE
stops decreasing. The minimum change of SSE between iterations must be specified for each of the
58
Fig. 14.8. An example of the general nonlinear fitting options dialog window
two fitting algorithms – Levenberg-Marquardt (LM) method and simplex method. The value of the
absolute change refers not to the change of SSE, but to the change of the ratio F / n, where F is the
value of the SSE and n is the total number of fitted points. When n is large, this ratio is approximately
equal to the reduced SSE (see (14.1.6)).
• The checkbox at the bottom of the nonlinear fitting options dialog window is used to select the
method of computing the confidence intervals of varied parameters. If it is checked and if χ2 < 1, then
the half-widths of parameter confidence intervals are computed according to the formula (14.1.17). If
this checkbox is not checked or if χ2 > 1, then the half-widths of parameter confidence intervals are
computed according to the formula (14.1.16). In addition, if this checkbox is checked, the probability
P( χ 2 | df ) is computed, too (see Section 14.1.4). Since the parameter confidence intervals are not used
for fitting, this option has no effect on the fitting process. Note: This checkbox can only be checked
when there are no fitted datasets whose SSE is divided by the number of points (this is one of the
options that can be specified in the previously mentioned dialog window “Fitted dataset options”).
14.2.5. The fitting process
In a general case, fitting is done in two stages. At first, a certain number of iterations are done by
the LM method, and then a certain number of iterations are done by the simplex method. Each one of those
two stages is finished when a specified maximum number of iterations of that type is reached or when the
program determines that one of the mentioned ending criteria is satisfied (see Section 14.2.4 “General
nonlinear fitting options”). The maximum number of iterations of each type is selected in two drop-down
lists that are at the bottom of the dialog window “Nonlinear least squares fitting” (see Fig. 14.1). It is also
possible to use a single fitting algorithm during the entire fitting process (this is achieved by selecting “0”
in one of the mentioned drop-down lists). Note: If the SSE has only one minimum in the m-dimensional
space of varied parameters, then the optimum values of varied parameters do not depend on the choice of
the fitting method. That choice only affects the shape of the path to that minimum that is followed in the
course of fitting, as well as the number of iterations and duration of fitting. If the SSE has more than one
minimum, then the fitting subroutine may “find” any one of them, depending on initial parameter values
and other fitting options. In this case, the minimum that was “found” may depend on the choice of the
fitting method.
After entering all fitting options that were described in Sections 14.2.1 through 14.2.4 and
selecting the number of iterations, the fitting process can be started. This is done by clicking the button
“Start fitting” (see Fig. 14.1). During fitting, that button turns into the button “Stop fitting”, which must be
clicked in order to interrupt fitting. During fitting, the current values of varied parameters, which are
shown in the column “Value” of the dialog window “Nonlinear least squares fitting”, are periodically
updated. Additional information about the fitting process is shown in six or seven static text fields, which
are at the bottom of the dialog window “Nonlinear least squares fitting”. Those text fields show:
59
the total number of fitted points (n),
the number of varied parameters (m),
the number of degrees of freedom (df = n − m),
the current iteration number,
the current value of the SSE (14.1.3) (taking into account the mentioned error factors wk),
the current value of the reduced SSE (14.1.6),
the probability to obtain the value of SSE that does not exceed its current value if the standard
conditions are satisfied, i.e., if the null hypothesis is true (the standard conditions were formulated
in Section 14.1.4).
The latter text field is only visible if the bottom checkbox of the “General nonlinear fitting options” dialog
window has been checked (see Fig. 14.8). In this case, the positions and names of the mentioned text fields
are as shown in Fig. 14.1. Otherwise, the last (seventh) text field is not visible, and the names of text fields
No. 5 and No. 6 are “Sum of squared errors (taking into account weight factors)” and “SSE / df =”,
respectively.
After stopping the fitting process, all plotted curves that depend on the varied parameters are
automatically updated. If some of varied parameters are model parameters, then the curves are updated at
each iteration. Note: Since the parameter confidence intervals can only be computed when the SSE
derivatives with respect to unknown parameters are known (see Section 14.1.4), and since the simplex
method does not use derivatives, in the case of the simplex method the parameter confidence intervals are
computed after stopping the fitting process (at this stage, the button “Stop fitting” turns into the button
“Stop computing errors”). In the case of the LM method, the confidence intervals are periodically updated
together with parameter values during fitting.
If the varied parameters include at least one model parameter, then the model functions are
recalculated at each iteration. In this case, a temporary set of additional times is used, which consists of the
time values of all fitted datasets (also see Section 8 “Additional times”). The same temporary set of
additional times is also used for computing the final model curves (when the user interrupts fitting or when
fitting is stopped automatically). After computing the final curves, the user-defined set of additional times
is restored (if it exists). If model parameters are not varied during fitting, but some of fitting functions are
formulas containing references to model functions, then model function values are not recalculated during
fitting. Consequently, the stored argument values of those model functions (i.e., model values of time t or
coordinate x) are not recalculated, too. If they do not coincide with abscissas of the points of fitted datasets,
then the model function values corresponding to those abscissas are calculated using linear interpolation.
In order to repeat the entire fitting process from the start, the initial parameter values must be
restored. This is done by clicking the button “-->”, which is under the text box “Lower bound” (see
Fig. 14.1). By clicking the button “<--“, current values of all parameters (including those that are not
visible in the dialog window “Nonlinear least squares fitting”) are copied to initial values.
After stopping the fitting process, the current fitting state (including all internal parameters of the
fitting subroutine) is saved. Consequently, after clicking the button “Start fitting” again, fitting will
continue as if it was not interrupted. The current fitting state is also written to the project file (*.gxt) by
selecting the menu command “File / Save project”. Consequently, fitting can be resumed after closing the
current GraphiXT project and then opening it again.
The current values of varied parameters and their standard deviations, as well as additional
information about the fitting process (number of iterations, value of SSE, etc.) can be copied to the text
editor window “Info” at any time by clicking the button “Copy to the “Info” window” (see Fig. 14.1).
1)
2)
3)
4)
5)
6)
7)
60
15. Data smoothing
The smoothing dialog window is opened by selecting the menu command “Data analysis /
Smoothing”. An example of that window is shown in Fig. 15.1. Below are descriptions of all controls of
that window.
• The drop-down list boxes “Graph” and “Curve” are used to select a graph window and a model function
or a free curve to be smoothed.
• The controls that belong to the group “Smoothing range” are used to define the part of the curve that
should be smoothed.
• The drop-down list box “Method” is used to select the smoothing method. In the current version of the
program (v1.21), the following three choices are available:
1) three-point smoothing,
2) exponential smoothing,
3) adaptive exponential smoothing
(those methods are described below).
• After clicking the button “Smooth”, the selected curve will be replaced by the smoothed curve and all
smoothing options will be saved. If the selected curve is an f(x, t) model function, then the smoothing
subroutine will smooth its values corresponding to all stored model time values (not just the values
corresponding to the current time of the graph). If the checkbox “Close this dialog window when
finished” is checked, then this dialog window will be closed after smoothing.
• After clicking the button “OK”, the curve is not smoothed, the smoothing dialog window is closed and
all smoothing options are saved.
• After clicking the button “Cancel”, the curve is not smoothed, the smoothing dialog window is closed
and all unsaved changes of the smoothing options are discarded.
• The group of two checkboxes “Smoothing direction” are used to specify whether the curve should be
smoothed “left to right” (i.e., in the direction of increasing argument), or in the opposite direction, or in
both directions. In the latter case, the ordinate of each point of the curve is replaced by the average of
the two values obtained using both smoothing directions.
Fig. 15.1. An example of the smoothing dialog window
61
• After smoothing, the static text fields “RMS error: before smoothing” and “after sm.” display the values
of the root-mean-square error before smoothing and after it. This quantity is defined by the formula
σ=
1 n
∑[ yi − yi −1 − a( xi − xi −1 )]2 ,
n − 2 i =2
(15.1)
where n is the number of points that are in the smoothing range, the subscript “i” is the point number, x
and y are the point abscissa and ordinate, and a is the average slope, i.e.,
y − y1
.
(15.2)
a= n
xn − x1
Those quantities are computed using the points that belong to the smoothing range and one additional
point on each side of the smoothing interval (if some points of the curve do not belong to the smoothing
interval). Since smoothing decreases fluctuations of the function values (y), the RMS error after
smoothing is usually less than the RMS error before smoothing. However, since the RMS error σ is
computed including one or two points that are outside the smoothing range, the RMS error after
smoothing may occasionally become greater than the RMS error before smoothing. This is because
smoothing may cause discontinuities at the edges of the smoothing interval.
• After smoothing, the static text fields “Average: before smoothing” and “after sm.” display the average
function value in the smoothing range before smoothing and after it. This quantity is defined by the
formula
1
y=
xn − x1
xn
∫ y( x)dx .
(15.3)
x1
This integral is computed using linear interpolation (in other words, the trapezoid quadrature method).
If only a part of the curve is smoothed, then the integration interval is slightly expanded by adding one
or two points that are outside of the smoothing interval (one additional point on each side of the
smoothing interval).
Note: If the smoothed curve is an f(x, t) model function, then the values shown in the mentioned four
static text fields correspond to the current time of the graph.
• The drop-down list box “Number of smoothing cycles” is used to specify the number of smoothing
cycles that should be done one after another. For example, if the number “10” is selected, then the final
result (after clicking the button “Smooth”) will be the same as clicking the button “Smooth” 10 times
with the number “1” selected in that drop-down list.
The other controls that are visible in the dialog window “Smoothing” depend on the selected
smoothing method. Below are descriptions of the smoothing methods and corresponding controls.
The three-point smoothing method is represented by the following three controls:
• The text box “Maximum interval between inflection points” is used to specify for how long the program
should “remember” the position of the last inflection point. This parameter is expressed as a number of
points N. If, inside a sequence of N + 1 points (beginning with the last inflection point), another
inflection point is found, then the part of the curve consisting of those two inflection points and all
points between them is smoothed, and the second mentioned inflection point becomes the starting point
of the next sequence of N + 1 points to be “tested” for inflection. Conversely, if, after scanning those N
points, no other inflection point is found, then that part of the curve is not smoothed and the program
begins the search for an inflection point to be used as a starting point of the next N + 1-point sequence.
This smoothing method is based on dividing all the points of the smoothed sequence into triplets (the
third point of each triplet coincides with the first point of the next triplet). Each of those triplets is first
replaced by three points obtained by linear fitting, then the first and third points are modified so as to
ensure that the curve remains continuous and that its integral over each triplet is the same as before
smoothing. Thus, this smoothing method does not change the integral of the smoothed function (this
can be ascertained by comparing the numbers shown in the text fields “Average: before smoothing” and
“after sm.”).
62
• The text box “Smoothed Y >” is used to enter the minimum smoothed y value (“the threshold”). If
ordinates of two points in a row are less than this threshold, then smoothing proceeds as though those
two values were equal to each other (i.e., they are not smoothed). If this text box is empty, then all y
values are smoothed.
• The static text field “Number of changed points” shows the number of points that were modified due to
three-point smoothing. Notes: 1) If the smoothed curve is an f(x, t) model function, then this text field
shows the total number of modified points corresponding to all model time values (not just the current
time). 2) If the number of smoothing cycles is greater than 1, then this text field shows the maximum
number of points modified during a single smoothing cycle.
Exponential smoothing is defined as follows:
yl +1 = α yl + (1 − α ) yl ,
(15.4a)
where yl is the value of the l-th point after smoothing (i.e., the l-th “smoothed value”), yl +1 is the l + 1-st
smoothed value, yl is the value of the l-th point before smoothing (i.e., the l-th “non-smoothed value”). The
exponential smoothing factor α is always between 0 and 1. When α is close to 1, then yl +1 ≈ yl . When α is
close to 0, then the smoothed value is close to the arithmetic average of all previous values.
The exponential smoothing method is represented by the following four controls:
• The text box “Exponential smoothing factor” is used to enter the parameter α of the formula (15.4a).
• The group of two radio buttons and a text box “Smoothing margin” is used to define the number of
initial points that are not smoothed. Those points are used to compute the initial smoothed value, i.e.,
the initial value of yl , which is used on the right-hand side of the equality (15.4a) when smoothing the
first point. The mentioned two radio buttons are used to select one of two possible methods of defining
the smoothing margin: explicit or automatic. In the case of explicit method, the value of the smoothing
margin must be entered in the text box that is to the right of the radio button “=”. In the case of
automatic method, the size of the smoothing margin will be computed automatically, using the formula
N = (2 / α) − 1 (this value is rounded to the nearest integer). Note: If two smoothing directions are
used, then the points that belong to the smoothing margin when traversed in one direction may not
belong to the smoothing margin when traversed in the opposite direction. In such a case, the ordinates
of those points are replaced by corresponding smoothed values.
• If the checkbox “Use current value” is checked, then the previous non-smoothed value yl on the righthand side of the equality (15.4a) is replaced by the current non-smoothed value yl+1, i.e., the smoothed
values are computed according to this formula:
yl +1 = α yl +1 + (1 − α ) yl .
(15.4b)
Although exponential smoothing eliminates random variations of the smoothed quantity y, it also
causes a decrease of non-random (systematic) changes. Adaptive exponential smoothing 1 is a
modification of the exponential smoothing method that addresses this shortcoming. In the case of adaptive
exponential smoothing, the smoothed values are also computed according to the formula (15.4a), but the
smoothing factor α is modified after each smoothed value so as to ensure that y reflects the systematic
change of y as closely as possible. I.e., if variation of the function y, when its argument is increased (or
decreased), becomes less random (i.e., more directional), then α is increased, and if variation of y becomes
more random, then α is decreased. The new value of α is computed as follows. After computing yl +1 , the
residual forecast error is computed:
el +1 = yl +1 − yl +1 .
(15.5)
Those errors and their absolute values are exponentially smoothed:
el +1 = β el + (1 − β )el .
(15.6a)
The new value of α is defined as
| el +1 | = β | el | + (1 − β )| el | .
(15.6b)
1
According to Trigg D. W., Leach A. G. Exponential smoothing with an adaptive response rate // Operational
Research Quarterly, vol. 18, no. 1, 1967, p. 53–59.
63
α=
| el +1 |
| el +1 |
.
(15.7)
The typical value of β is 0.1.
The method of adaptive exponential smoothing is represented by the following two text boxes:
• The text box “Adaptive smoothing parameter” is used to enter the adaptive smoothing parameter, i.e.,
the parameter β of the formulas (15.6a,b).
• The text box “Smoothing margin” is used to enter the number of initial points that are not smoothed (a
more detailed explanation of the smoothing margin is presented above).
64
16. Using function data tables
GraphiXT can display function data in table format. Each data table is associated with a particular
graph window, and there is only one data table for each graph window. Each table shows the data plotted
in the associated graph window. The table window of the active graph window can be opened by clicking
the toolbar table button
(see Fig. 1.1). An example of a GraphiXT window with two open data tables is
presented in Fig. 16.1. When a table window is active, the toolbar table button is replaced by the graph
button
(see Fig. 16.1). It is used to activate the graph window corresponding to the current table. When
a table window is active, the menu “Graph options” is replaced by the menu “Table and graph options”
(see Fig. 16.1). Switching between the two windows is also possible using the corresponding menu
commands.
Each table can be in one of two modes, which determine the contents of the table:
1) in “partial” mode, the table only shows the data of the points that are visible in the graph window
(this is the default mode),
2) in “complete” mode, all the data associated with the graph window are shown in the table.
In partial mode, the data values corresponding to the points that have been clipped or skipped, or which
belong to hidden curves, are absent in the table. I.e., in partial mode there is an exact correspondence
between the data points visible in the graph and the data values shown in the table. In complete mode, all
data values of each function plotted in the graph window (including the hidden curves) are present in the
table, regardless of whether those points are visible in the graph window. The table mode can be changed
by selecting the table window menu command “Show all data” or “Show only the data visible in the
graph”, or by clicking the corresponding toolbar button, which appears to the right of the button
or
is used to change the table mode into
when the table window is open (see Fig. 16.1). The toolbar button
“complete”. After clicking that button, it is replaced by the button , which is used to change the table
mode into “partial”.
In partial mode, a focus cell of the data table always corresponds to the current point of the graph.
That point is indicated in the graph window by a red cross (see Fig. 16.1). Selecting a point in the graph
Fig. 16.1. An example of the GraphiXT main window with two data tables open
65
causes the cells containing the corresponding x and y values to become highlighted in the table (if
necessary, the table window is automatically scrolled to ensure that those two cells are visible). And vice
versa: selecting a new cell in the table causes a change of the position of the red cross in the graph window.
In partial mode, when a point has been selected (or a cell highlighted), the so-called “point dialog window”
is visible. That window contains the x and y values of the current point, as well as the point number (see
Fig. 16.1). Notes: 1) The “point dialog” window is always visible when a point has been selected in one of
the plotted functions, regardless of whether the table window is open or not. 2) The result of pressing the
arrow keys on the keyboard depends on which window has input focus – the “point dialog” window or the
table window. If the table window has focus, then pressing an arrow key causes a corresponding adjacent
cell to become highlighted. If the point dialog window has focus, then pressing the “→” or “←” key causes
the next or the previous point of the current curve to become the current point, i.e., in this case the cell that
is below or above the current cell becomes highlighted. Pressing the “↑” or “↓” key when the point dialog
window has focus causes the previous or the next curve in the legend to become the current one, and the
current point becomes the point whose abscissa is closest to the abscissa of the point that was current
before.
The order of datasets in the data table is in general different from the order of the function names
in the legend. In the table, all datasets that share the same set of x values are next to each other.
Consequently, unlinking curves or re-linking formulas causes reordering of corresponding columns in the
table. The X dataset columns are always on the left of the y dataset columns of the curves linked to that X
dataset. If the X set is a set of model time or coordinate values, then the column with x values is followed
by the columns with values of plotted model functions that are linked to the same X dataset, followed by
the columns containing y values of formulas linked to that X dataset. In this case, the columns containing y
values of formulas linked to that X dataset are sorted in the order of creation of those formulas. If the X
dataset is independent, then the columns containing y values of free curves and formulas linked to that X
dataset are sorted in the order of their linking to that X set. I.e., the order of columns with Y values of free
curves and formulas in data tables is the same as the order of the corresponding rows in the bottom grid
control of the X dataset dialog, which is described in Section 5 (see Fig. 5.1). The X datasets are sorted as
follows: first – the model time or x values, then – independent X datasets (in the order of their creation),
and finally the temporary X sets.
Each data table has three fixed rows. The first row contains column numbers, the second row
contains dataset identifiers (IDs), and the third row contains dataset names. The dataset identifiers, which
are shown in the second row, are constructed as follows:
X dataset IDs:
“t” – model time values,
“XLn” – node coordinates of the model layer No. n (for example, “XL2”),
“Xn” – independent X set No. n (for example, “X10”),
“X” – temporary set of abscissas.
Y dataset IDs:
FTn – values of the f(t) model function No. n (e.g., FT10),
FTXn – values of the “time cross-section” f(x = const, t) of the f(x, t) model function No. n (e.g., FTX10),
FXn – values of the f(x, t = const) model function No. n (e.g., FX10),
Fn – values of the formula No. n (e.g., F10),
FCn – values of the free curve No. n (e.g., FC10).
The function data can be edited by entering values directly into non-empty cells of the data table,
or by copying and pasting. Besides, in partial mode, the current x and y values and the current point
number can be entered into the corresponding edit controls of the point dialog window. New columns are
automatically added when new curves are created. The easiest way to create new columns is by selecting
the graph or table menu command “Create free curves”. This action opens a dialog window where both the
number of new free curves and the number of points in each of them can be specified. The new curves can
be linked to existing X datasets (menu command “Create free curves and link them to an existing X set”).
66
Coding credits
The code of the program editor is based on the code included in the article “Crystal Edit – syntax coloring
text editor” by Andrei Stcherbatchenko
( http://www.codeproject.com/Articles/272/Crystal-Edit-syntax-coloring-text-editor )
The code for built-in integration functions was taken from the QUADPACK library for numerical
integration of one-dimensional functions available from Netlib ( http://www.netlib.org/quadpack/ ).
The code for built-in function Root(…) and Root2(…) was taken from the HOMPACK library for solution
of systems of nonlinear equations available from Netlib ( http://www.netlib.org/hompack/ ).
The code for built-in functions erf(x) (error function) and erfc(x) (complementary error function) was
taken from the free math library FDLIBM available from Netlib ( http://www.netlib.org/fdlibm/ ).
The code for built-in functions gamma(x) (gamma function), lngamma(x) (natural logarithm of the
absolute value of the gamma function) and gammp (x) (incomplete gamma function) is based on the code
provided in the book Press W. H., Teukolsky S. A., Vetterling W. T., Flannery B. P. Numerical Recipes in C
(1997).
The code for the function data tables, array viewer and for the grid controls in several dialog windows is
based on the code included in the article “MFC Grid control 2.27” by Chris Maunder
( http://www.codeproject.com/Articles/8/MFC-Grid-control-2-27 )
The code for the message box with custom button captions (used in the Lithuanian version of GraphiXT)
was taken from a post by Miguel Schindler on the codeguru.com website
( http://www.codeguru.com/cpp/w-p/win32/messagebox/article.php/c10873 ).
The code for the toolbar was taken in part from an article by Peter Lee on the codeguru.com website
(http://www.codeguru.com/cpp/controls/toolbar/article.php/c2537/FullFeatured-24bit-Color-Toolbar.htm )
The code for the hyperlink in the “About” dialog window was taken from an article by Chris Maunder on
the codeguru.com website
( http://www.codeguru.com/Cpp/controls/controls/hyperlinkcontrols/article.php/c2133 ).
The installer is based on the free script-driven installation system “Inno Setup” created by Jordan Russell
( http://www.jrsoftware.org/ ).
67