1
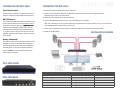
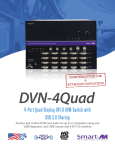
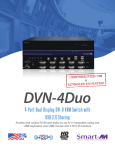
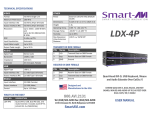
TECHNICAL SPECIFICATIONS
VIDEO
OTHER
Format
DisplayPort 1.2
Power
External 100-240 VAC/
5VDC4A @20W
Link Rate
5.4 Gbps/lane
Input Interface
(8) DisplayPort (female)
Dimensions
12” W x 1.75” H x 6“ D
Output Interface
(2) DisplayPort (female)
Weight
4 lbs
Max Resolution
Up to 3840 x 2160 @ 30Hz
Approvals
UL, CE, ROHS Compliant
DDC
FAUX transaction mode
option over Aux channel
Operating Temp.
23 to 95 °F (-5 to 35 °C)
Storage Temp.
-4-185 °F (-20-85 °C)
Input Equalization
Automatic
Humidity
Up to 95%
Bandwidth Frequency
10.2 Gbps
USB
DPN-4Duo
User Manual
WHAT’S IN THE BOX
Signal Type
USB 2.0, 1.1, and 1.0 w/
internal hub
Input Interface
(8) USB Type B (female)
Output Interface
(2) USB Type A (female) for
keyboard and mouse connection only;
(2) for USB 2.0
Transparent
PART NO.
QTY DESCRIPTION
DPN-4DUO
1
4-Port Dual-Head DisplayPort
KVM Switch with USB 2.0 and
Front Panel Push Buttons.
PS5VDC4A
1
Power Supply
User Manual
1
Designed and Manufactured in the USA
CONTROL
Front Panel
Tactile Switches
RS-232
Control @ 9600 bps
Hotkeys
Via Keyboard
Emulation
Optional
800.AVI.2131
Tel: (818) 503-6200
Fax: (818) 503-6208
11651 Vanowen St. North Hollywood, CA 91605
SmartAVI.com
4-Port Dual-Head DisplayPort 1.2 KVM
Switch with Full Keyboard and Mouse
Emulation and USB 2.0 Sharing
CONTROLLING THE DPN-4DUO
CONNECTING THE DPN-4DUO
Front Panel Control
1. Ensure that power is disconnected from DPN-4Duo.
To switch ports using the front panel, press the UP
button to navigate up and DOWN button for down.
2. Connect two DisplayPort cables and a USB cable (male-A to male-B) from each computer to their
respective input ports on the DPN-4Duo.
RS-232 Control
Use a male-to-female serial cable to connect a computer to the RS-232 port of the DPN-4Duo. Use terminal client software such as the HyperTerminal to
connect to the DPN-4Duo. Make sure to use the
standard communication mode of 9600 bps, 8, N,
1, (no flow control). This port can also be used for
software upgrade. Please refer to online manual for
more details.
3. Optionally connect RS-232 for control functions.
4. Connect the USB keyboard and mouse to the two USB ports on the right .
Note: The 2 USB ports on the right are dedicated for keyboard and mouse emulation. The 2 on the left are for
other USB peripherals (flash drives, printers, etc.)
5. Connect two DisplayPort monitor to OUT A and OUT B DisplayPort connectors on the DPN-4Duo.
6. Power on the DPN-4Duo.
INSTALLATION DIAGRAM
Hotkey Commands
The Hotkey command is a keyboard sequence used
to trigger an action on the DPN-4Duo through the
use of the keyboard connected on the USB port of
the DPN-4Duo. To activate the hotkey sequence,
press the CTRL key twice and then enter the desired hotkey commands.
DPN-4DUO FRONT
COMMANDS
DPN-4DUO REAR
HOTKEYS
RS-232 CONTROL
Switch all devices (KVM, USB 2.0, and Audio) [CTRL] [CTRL] m [port #] [ENTER]
//m
m[port #]<CR>
Switch KVM only
[CTRL] [CTRL] c [port #] [ENTER]
//cc[port #]<CR>
Switch one channel up
[CTRL] [CTRL] ▲ key
Switch one channel down
[CTRL] [CTRL] ▼ key
Reset
[CTRL] [CTRL] r [ENTER]
//rr<CR>