1
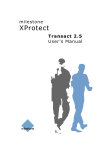
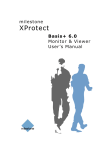
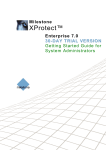
milestone
XProtect
Retail 2.2
User’s Manual
Target Audience for this Document
This document is aimed at users of Milestone XProtect Retail and provides descriptions of how to
create and use different types of queries.
The manual should be helpful to both the user who investigates known kinds of fraud or shrinkage
using existing queries, and to the advanced user who creates or adjusts queries to match new
types of fraud or shrinkage.
Note: The installation of Milestone XProtect Retail is not covered in this manual.
www.milestonesys.com
Page 2
Target Audience
Copyright, Trademarks and Important
Information
Copyright
© 2008 Milestone Systems A/S.
Trademarks
XProtect is a registered trademark of Milestone Systems A/S.
Microsoft and Windows are registered trademarks of Microsoft Corporation.
All other trademarks mentioned in this document are trademarks of their respective owners.
Disclaimer
This document is intended for general information purposes only, and due care has been taken in
its preparation.
Any risk arising from the use of this information rests with the recipient, and nothing herein should
be construed as constituting any kind of warranty.
Milestone Systems A/S reserve the right to make adjustments without prior notification.
All names of people and organizations used in this document's examples are fictitious. Any
resemblance to any actual organization or person, living or dead, is purely coincidental and
unintended.
www.milestonesys.com
Page 3
Copyright, Trademarks and …
Milestone XProtect Retail 2.2; User’s Manual
Contents
INTRODUCTION.......................................................... 5
System Requirements ........................................................................... 5
HOW TO INVESTIGATE ............................................... 6
Custom Parameters .............................................................................. 7
Query types .......................................................................................... 8
Performing a Normal Query................................................................... 8
Performing a Group By Query................................................................ 9
Drilling Down a Group By Query ........................................................ 9
Viewing Transactions and Video ......................................................... 10
Printing............................................................................................... 11
Exporting a Query Result .................................................................... 11
MANAGING QUERIES ................................................ 12
Creating a Query................................................................................. 12
Using the SQL Interface.......................................................................14
Editing a Query ................................................................................... 14
Deleting a Query ................................................................................. 15
RETAIL APPLICATION SETTINGS.............................. 16
Connecting to the Surveillance System ............................................... 16
Reloading Database Structure ............................................................ 17
www.milestonesys.com
Page 4
Contents
Milestone XProtect Retail 2.2; User’s Manual
Introduction
The Milestone XProtect Retail application is a powerful investigation tool which can help you to
pinpoint shrinkage and fraud.
With the Retail software you are able to:
•
•
•
•
Execute queries in business data to find suspicious transactions
View video matching suspicious transactions
Export recordings for video evidence
Create your own queries
System Requirements
The requirements for the Milestone XProtect Retail system are project specific and can only be
calculated based on the individual project.
www.milestonesys.com
Page 5
Introduction
Milestone XProtect Retail 2.2; User’s Manual
How to Investigate
With the Milestone XProtect Retail application you can investigate different kinds of suspicious data
to identify shrinkage and fraud. This is done by using one of the defined queries to look for
suspicious activity in the business data. Queries find transactions, which are linked to the video
recorded from by a camera at the till when the specific transaction took place.
1. Select a query in the Query list to find data that you want to investigate.
www.milestonesys.com
Page 6
How to Investigate
Milestone XProtect Retail 2.2; User’s Manual
2. Select a time span. You can either select Today, Last 48 hours, Last 7 days, Last 14 days,
Last month, Everything or From - To. When choosing From - To the From date picker and
the To date picker will be enabled and you can specify the start and end date for the query
analysis.
You can either enter the date manually in the From and To fields, or you can click the dropdown arrow to select the date from a calendar.
3. Click the Run button.
Query Parameters
If the query has been designed with parameters the Milestone Xprotect Retail application will
present you with the following dialog:
In this dialog the values of the different parameters for the query can be entered. When you have
entered all values click the OK button.
www.milestonesys.com
Page 7
How to Investigate
Milestone XProtect Retail 2.2; User’s Manual
Query types
The Milestone XProtect Retail application has two different types of queries: normal queries and
group by queries.
•
Normal queries are simple queries resulting in a set of specific transactions where each line
in the result set represents one transaction.
•
Group by queries are aggregated queries resulting in a set of records representing several
transactions.
A transaction line may be greyed out in the result set. There can be several reasons for this:
•
the Milestone surveillance system doesn’t have any video matching the transaction
•
the Retail System is not correctly connected to the Milestone surveillance system
•
no camera has been assigned to the till
Tip: You can filter out the greyed out lines by clicking in the menu View and selecting Hide
filtered rows.
Performing a Normal Query
When you perform normal queries you will see a window like this:
Every transaction is represented by a single line in the table. By clicking on a transaction line the
Milestone XProtect Retail application will show the transaction with the receipt and the matching
video (see Viewing Transactions and Video on page 10).
Note: If the Milestone XProtect Retail system is not correctly connected to the Milestone
surveillance system it is not possible to access the Video tab and clicking on a line in the result set
www.milestonesys.com
Page 8
How to Investigate
Milestone XProtect Retail 2.2; User’s Manual
will not trigger any action. (Please see Retail Application Settings on page 16 for instructions on
how to connect to the surveillance system.)
Performing a Group By Query
Performing group by queries will present you with a window like this:
When performing a group by query each line in the table represents a set of transactions. In the
example above each line in the table represents the void items made by each employee.
The Number_Of_Items column in the table shows the number of void items made by the specific
employee and the last column gives a graphical representation of the number of void items.
When clicking on a line in the group by table each transaction contained in the group will be shown
in a drill down table.
Drilling Down a Group By Query
When you drill down into an aggregated (group by) query result, the transactions found in the
group by query are presented like this:
www.milestonesys.com
Page 9
How to Investigate
Milestone XProtect Retail 2.2; User’s Manual
This window is very similar to the normal query window, where each line in the table represents a
transaction, and clicking a line will switch to the Video tab showing the specific transaction (see
Viewing Transactions and Video on page 10). The only difference between the drill down query and
the normal query is the Back button just above the table in the left side of the window. This button
will return to the group by query.
Note: If the Retail System is not correctly connected to the Milestone surveillance system it is not
possible to access the Video tab and clicking on a line in the result set will not result in any action.
(Please refer to Retail Application Settings on page 16 for instructions on setting up the connection
to the Milestone XProtect Enterprise system).
Viewing Transactions and Video
Click on the Video tab to see the each transaction with the receipt shown to the left and the
matching video to the right.
www.milestonesys.com
Page 10
How to Investigate
Milestone XProtect Retail 2.2; User’s Manual
To return to the query table click the Query tab. From the query table it is possible to access
another transaction by either clicking a different transaction in the table, or by executing another
query.
To step through the transactions in the query table click on either the previous transaction
button in the toolbar. This will change the transaction (receipt and video) in
or next transaction
the Video tab to the previous or next transaction in the query table.
Printing
To print the specific transaction from the File menu, select Print or simply click on the Print icon
in the toolbar. Alternatively create a preview of the print by selecting the Print Preview… in
the File menu, or click on the “Print Preview…” icon
in the toolbar.
Exporting a Query Result
You can export the result of all query types. The result set will be exported as a comma separated
file (csv) containing only the data shown in the table. The Export facility is accessible through the
menu File and click on Export. The export of the result set displays a Save As window from where a
location for the file can be selected.
To export the specific transaction with Video, select Video Export from the File menu. This will
open the Browse For Folder window where you select the export folder.
www.milestonesys.com
Page 11
How to Investigate
Milestone XProtect Retail 2.2; User’s Manual
Managing Queries
The management of a store can identify and minimize fraud and shrinkage by using the Milestone
XProtect Retail application. As the main sources of the shrinkage or fraud are eliminated, new kinds
of fraud and shrinkage may emerge, or it can be relevant to investigate other kinds of already
existing shrinkage or fraud. This is why you can create or edit queries in the Milestone XProtect
Retail application.
Creating a Query
1. From the Query Designer menu select New to create a new query. This will open the Query
Designer.
The Query Designer offers two ways to edit queries: the SQL interface or the graphical
interface. The SQL view is a simple text editor where the SQL text can be entered. The
graphical interface resembles the one known in Microsoft Access. Both interfaces are equal
and can be used when editing a query and any changes will automatically be reflected in
both interfaces. This step-by-step description uses the graphical interface options. See
Using the SQL Interface on page 14 for a short description of this method.
Example only. When creating a new query the Query Designer is empty. The SQL interface
pane is by default not displayed. The drill down information pane is only enabled when editing
a group by query.
2. Enter the name of the new query in the Query name text box. Use a name that describes
the functionality of the query. The name must be unique.
3. Limit the result set returned from the database to the Milestone XProtect Retail application
by entering an integer in Number of results field or set it to All. Since the dataset in the
www.milestonesys.com
Page 12
Managing Queries
Milestone XProtect Retail 2.2; User’s Manual
database is usually very large it is important to select a relatively small amount of results
to ensure that the performance of the Milestone XProtect Retail application and the SQL
server is not compromised.
4. Add the required tables by selecting Add Table from the Query Designer menu or by
clicking on the Add Table icon
in the toolbar.
This will open up an Add Table dialog:
Select the required tables, and click the Add button.
5. Tables will by default be joined based on their relations but these joins can be removed by
selecting the line connecting the two tables in the graphical representation and pressing
the Delete button.
New table joins can be added by clicking on the required field name in one table and
dragging it to equivalent field name in the adjacent table.
Note: All queries must be joined to the table mst_Transaction.
6. Select output fields by clicking in the checkbox to the left of the field name in the graphical
interface or by adding a line to the criteria table.
Note: All normal queries must have the fields TransactionId and TransDate selected as
output fields.
7. If you want to create a group by query either select Add Group By from the Query Designer
menu, or click on the Add Group By icon
in the toolbar. If not continue to next step.
This enables the drill down information section with Possible fields and the Selected fields
lists. From the Possible fields list select the information you want to include in the drill
down table. Selected information is displayed in the Selected fields list and will
automatically be generated with a group by query.
Note: To create a valid group by query, the fields TransactionId and TransDate from the
table mst_Transaction must be selected (there is no restriction on where they should be
represented in the list of selected fields).
www.milestonesys.com
Page 13
Managing Queries
Milestone XProtect Retail 2.2; User’s Manual
8. Save the query.
Using the SQL Interface
To activate the SQL interface select Pane > SQL from the Query Designer menu or click the SQL
Pane icon
in the toolbar.
This will add a text box in the bottom left corner of the Query Designer tab showing the SQL for the
query. This SQL text can be altered manually. When you have finished editing this text you can
click anywhere outside the SQL interface pane and the graphical editor will reflect the changes you
have just made.
Editing a Query
To edit an existing query, on the Query tab select the query in the Query list. Then select Edit from
the Query Designer menu. This will open the Query Designer tab.
Edit the query in the Query Designer until it fits your requirements and save it.
See also Creating a Query on page 12 for more information.
www.milestonesys.com
Page 14
Managing Queries
Milestone XProtect Retail 2.2; User’s Manual
Deleting a Query
To delete a query, on the Query tab select the query in the Query list. Then select Delete from the
Query Designer menu.
www.milestonesys.com
Page 15
Managing Queries
Milestone XProtect Retail 2.2; User’s Manual
Retail Application Settings
The setup options for the Milestone XProtect Retail application is accessible by selection Options
from the Tools menu. This will open the Options dialog with two tabs: XProtect Settings and
General Settings.
Connecting to the Surveillance System
From the XProtect Settings tab in the Options window you can setup the connection to the
Milestone XProtect Enterprise server.
Enter the URL to the XProtect Enterprise Image Server in the Host URL field.
Note: Remember to specify the port number if the Milestone XProtect Enterprise Image Server is
running on a different port than the default port (port 80). If you want to use port 8080 from the
local machine with the http protocol it could look like this: http://127.0.0.1:8080
Enter the user’s login credentials in the User name and Password fields. The user must be
configured in the Milestone XProtect Enterprise Image Server with the necessary access rights.
www.milestonesys.com
Page 16
Retail Application Settings
Milestone XProtect Retail 2.2; User’s Manual
Reloading Database Structure
On the General Settings tab you can refresh the database structure by clicking the Refresh
Database Cache button. The local cache of the database structure is reloaded. This is only
necessary when the database structure has been changed. This happens very rarely.
www.milestonesys.com
Page 17
Retail Application Settings
Milestone XProtect Retail 2.2; User’s Manual
Headquarters (Denmark):
Milestone Systems A/S
Banemarksvej 50 G,
DK-2605 Brondby, Copenhagen
Denmark
Tel.: +45 88 300 300
Fax: +45 88 300 301
The Americas:
Milestone Systems Inc.
12725 SW Millikan Way, Suite 300
Beaverton, Oregon 97005
USA
Tel.: +1 503 906 7910
Fax: +1 503 961 0221
If calling from the USA or Canada,
phone tollfree 866-2-MILESTONE
United Kingdom:
Milestone Systems UK
118 Codnor Gate, Ripley
Derbyshire DE5 9QW
England
Tel: +44 (0) 1773 570 709
Middle East:
Milestone Systems Middle East
P.O. Box 500809
DIC, Building 5 IEB, 6th floor, Office 606
Dubai, United Arab Emirates
Tel.: +971 50 8827093
Germany:
Milestone Systems DE
Am Kleefeld 6a
83527 Haag i. OB.
Germany
Tel./fax: +49 (0) 8072 442173
Singapore:
Milestone Systems Singapore
30 Robinson Road
13-03 Robinson Towers
Singapore 048456
Tel.: +65 6225 2686
Fax: +65 6225 1798
Italy:
Milestone Italia S.r.l.
Via Paisiello, 110
20092 Cinisello Balsamo
Milano, Italy
Tel: +39 02 6179 508
Fax: +39 02 6179 507
Japan:
Milestone Systems Japan
29-6, Sarugaku-cho, Shibuya-ku,
Tokyo 150-0033, Japan
Tel.: +81 (0) 3 3780 8749
Fax: +81 (0) 3 3476 4234
France:
Milestone Systems France SARL
121 rue d'Aguesseau
92100 Boulogne-Billancourt
France
www.milestonesys.com
[email protected]
www.milestonesys.com
Page 18
Milestone Office Locations