1
En
Ver. 4.1
User’s Manual
Notices
• No part of the manuals included with this prod- • Nikon will not be held liable for any damages
uct may be reproduced, transmitted, transcribed, resulting from the use of this product.
stored in a retrieval system, or translated into any • While every effort has been made to ensure that
language in any form, by any means, without the information in these manuals is accurate and
Nikon’s prior written permission.
complete, we would appreciate it were you to
• Nikon reserves the right to change the specific- bring any errors or omissions to the attention
ations of the hardware and soft ware described of the Nikon representative in your area (address
in these manuals at any time and without prior provided separately).
notice.
Package Contents
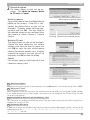
Before using this product, check that the package contains the items listed below. Contact your retailer
or local Nikon representative should you find that any of these items are missing or damaged.
• Nikon Capture 4 User’s Manual (this manual)
• Nikon Capture 4 installer CD
• User registration card (USA only)
• Nikon Capture 4 Install Guide
Trademark Information
Apple, the Apple logo, Macintosh, Mac OS, Power Macintosh, PowerBook, and FireWire are registered
trademarks of Apple Computer, Inc. Power Mac, iMac, iBook, and Finder are trademarks of Apple
Computer, Inc. Microsoft and Windows are registered trademarks of Microsoft Corporation. Internet
Explorer is a product of Microsoft Corporation. MMX and Pentium are trademarks of Intel Corpo ration. Digital DEE is a trademarked technology developed by Applied Science Fiction. CompactFlash
is a trademark of SanDisk Corporation. Photoshop is a trademark of Adobe Systems Inc. Internet is a
trademark of Digital Equipment Corporation. Netscape and Netscape Navigator are registered trademarks of Netscape Communications Corporation. All other trade names mentioned in this manual or
the other documentation provided with your Nikon product are trademarks or registered trademarks of
their respec tive holders.
Make Backup Copies
Make backup copies of important pictures before processing. Nikon will not be held liable for damages
or lost profits that may result from product malfunction.
WARNING!
Do not play the Nikon Capture 4 installer CD on audio CD equipment. Playing a CD-ROM on
an audio CD player could cause hearing loss or damage the equipment.
Table of Contents
Introduction : Before You Begin ......................................................................................................1
Overview : About This Manual .......................................................................................................2
Principal Features : Features Available in Nikon Capture 4..........................................................3
System Requirements : What You Need to Run Nikon Capture 4................................................4
Installation........................................................................................................................................5
Nikon Capture 4 Editor : Image Adjustment...................................................................................7
The Editor Window : Getting to Know Nikon Capture 4 Editor ..................................................8
Starting Nikon Capture 4 Editor ...................................................................................................... 10
Exiting Nikon Capture 4 Editor........................................................................................................ 12
Opening Image Files ....................................................................................................................... 13
Zoom.............................................................................................................................................. 18
The Bird's Eye Palette...................................................................................................................... 19
Rotating and Flipping Images..........................................................................................................20
The Information Palette .................................................................................................................. 21
Selecting a Crop ............................................................................................................................. 24
Image Adjustment : Enhancing Images........................................................................................25
White Balance ................................................................................................................................29
Advanced RAW ..............................................................................................................................35
Image Dust Off...............................................................................................................................38
Vignette Control.............................................................................................................................42
Curves ............................................................................................................................................44
The LCH Editor................................................................................................................................54
Color Booster ................................................................................................................................. 59
Color Balance ................................................................................................................................. 61
Unsharp Mask ................................................................................................................................64
Noise Reduction .............................................................................................................................67
Digital DEE......................................................................................................................................69
Fisheye Lens (Fisheye-to-Rectilinear Transform for DX 10.5 mm Fisheye Lenses) ................................... 73
Output Size and Resolution ............................................................................................................ 75
Saving and Loading Image Adjustment Settings .............................................................................78
Saving Images.................................................................................................................................79
Printing Images...............................................................................................................................84
Batch Processing.............................................................................................................................88
Nikon Capture 4 Editor Preferences : Fine-Tuning Nikon Capture 4 Editor..............................93
The General Tab .............................................................................................................................94
The Temporary Files Tab..................................................................................................................96
The Advanced Color Tab.................................................................................................................96
The Grid Lines Tab ..........................................................................................................................97
The Color Management Tab (Windows) .........................................................................................98
The Color Management Tab (Macintosh) ........................................................................................99
Nikon Capture 4 Camera Control : Capturing Photographs......................................................101
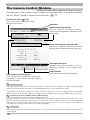
The Camera Control Window : Getting to Know Nikon Capture 4 Camera Control ............. 102
Starting Nikon Capture 4 Camera Control ....................................................................................104
Exiting Nikon Capture 4 Camera Control ...................................................................................... 107
Capturing Photographs to Disk .....................................................................................................108
Processing Photographs as They Are Captured ............................................................................. 112
Time Lapse Photography............................................................................................................... 116
The Nikon Capture 4 Camera Control Window............................................................................. 119
Custom Settings ........................................................................................................................... 132
Nikon Capture 4 Camera Control Preferences : Fine-Tuning Nikon Capture 4 Camera Control... 135
The General Tab ........................................................................................................................... 136
The Temporary Files Tab................................................................................................................ 137
The Color Management Tab ......................................................................................................... 137
i
Appendices : Technical Notes.......................................................................................................139
Appendix A : Supported Color Profiles ......................................................................................140
1. Standard RGB Profiles Supported in Nikon Capture 4................................................................ 140
2. Technical Data for RGB Profiles Supported in Nikon Capture 4 ................................................. 142
Appendix B : Color Matching in Adobe Photoshop (Version 7.0 or Later) ............................. 143
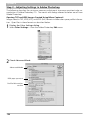
Step 1—Choosing a Monitor Profile ............................................................................................. 143
Step 2—Adjusting Settings in Adobe Photoshop .......................................................................... 146
Appendix C : Troubleshooting ....................................................................................................148
Appendix D : Glossary.................................................................................................................. 150
Index.............................................................................................................................................. 156
ii
Introduction
Before You Begin
Read this chapter before installing and using Nikon Capture 4.
Overview
Read this section for a description of how this manual is
organized and for an explanation of the symbols and conventions used.
Principal Features
Read this section for an overview of the options available in
Nikon Capture 4.
System Requirements
Before installing Nikon Capture 4, check that your computer
system meets the requirements listed in this section.
1
Overview
Overview
About This Manual
This manual has been written to help you take advantage of the many features included in
Nikon Capture 4. Be sure to read this manual thoroughly, and to keep it handy when using
Nikon Capture 4.
Symbols and Conventions
The following symbols and conventions are used in this manual:
This icon marks cautions, information that
you should read before use to prevent possible damage to your camera or computer.
This icon marks notes, information that you
should read before using this software.
This icon marks tips, additional information
you may find helpful when using this software.
This icon indicates that more information is
available elsewhere in this manual.
Menu items and button names are shown in bold.
Background Knowledge
This manual assumes knowledge of operations common to Windows and Macintosh envi ronments. Refer to the documentation provided with your computer for more information
on operations specific to your operating system.
Illustrations
This manual is for use with both Windows and Macintosh versions of Nikon Capture 4. While
the majority of the illustrations in this manual show the Windows versions, save where other wise noted the operations described apply to both operating systems. Depending on the
operating system used, dialogs and menus may differ slightly from those shown here.
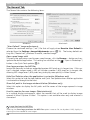
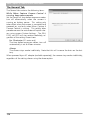
The ReadMe File
Be sure to read the ReadMe file on the Nikon Capture 4 installer CD, as it may contain impor tant information that could not be included in this manual.
Life-Long Learning
As part of Nikon’s “Life-Long Learning” commitment to ongoing product support and education, continually-updated information is available on-line at the following sites:
• For users in the U.S.A.: http://www.nikonusa.com/
• For users in Europe: http://www.europe-nikon.com/support
• For users in Asia, Oceania, the Middle East, and Africa: http://www.nikon-asia.com/
Visit these sites to keep up-to-date with the latest product information, tips, answers to frequentlyasked questions (FAQs), and general advice on digital imaging and photography. Additional information may be available from the Nikon representative in your area. See the URL below for contact
information:
http://nikonimaging.com/
2
Features Available in Nikon Capture 4
Principal Features
Features Available in Nikon Capture 4
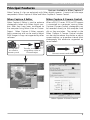
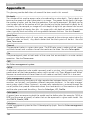
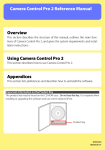
Nikon Capture 4 is for use exclusively with Nikon digital cameras. It consists of two major
components: Nikon Capture 4 Editor and Nikon Capture 4 Camera Control.
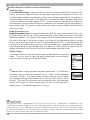
Nikon Capture 4 Editor
Nikon Capture 4 Camera Control
Nikon Capture 4 Editor is used to enhance
photographs taken with Nikon digital cameras after they have been transferred to
the computer using Nikon View or PictureProject. Nikon Capture 4 Editor supports
batch processing and can be used to adjust
RAW images in ways not supported by other
software.
When a D2H, D1-series, D100, or D70 camera
is connected to a computer running Nikon
Capture 4 Camera Control, photographs can
be recorded directly to the computer hard
disk as they are taken. The controls in the
Nikon Capture 4 Camera Control window
can be used to release the shutter or adjust
camera settings, or to perform interval timer
photography not otherwise supported on
some models.
Photographs
on camera
memory card
Transfer to computer
using Nikon View or
PictureProject
Connect camera and computer
Nikon Capture 4 Editor
Nikon Capture 4 Camera Control
3
System Requirements
System Requirements
What You Need to Run Nikon Capture 4
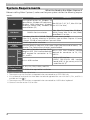
Before installing Nikon Capture 4, make sure that your system satisfies the following require ments:
Windows
Macintosh
Pre-installed versions of Windows XP
Home Edition, Windows XP Professional,
Mac OS 9.0.4*, 9.1*, 9.2*, Mac OS X (verOS
Windows 2000 Professional, Windows
sion 10.1.5 or later)
Millennium Edition (Me), Windows 98
Second Edition (SE)
iMac, iMac DV, Power Mac G3 (Blue &
CPU/Model
300 MHz Pentium or better
White), Power Mac G4 or later, iBook,
PowerBook G3 or later
• Windows, Mac OS X: 256 MB (768 MB or more recommended)
RAM
• Mac OS 9: memory allocation of 64 MB or more to Nikon Capture 4 Camera
Control, 512 MB or more to Nikon Capture 4 Editor
Hard-disk space 200 MB required for installation
Video
800 × 600 pixels or more with 16-bit color (High Color/thousands of colors). 24resolution
bit color (True Color/millions of colors) recommended.
Open Host- Controller Interface (OHCI)
Built-in IEEE 1394 (FireWire) interface
IEEE compliant IEEE 1394 inter face board or
required for connection to D1, D1X,
†
‡
1394 card required for connec tion to D1,
and D1H
D1X, and D1H
Inter face
• Built-in USB interface
• RATOC REX-PCIU3U USB interface
**
USB Built-in USB interface
board (USB 2.0; for use only with D2H
under Mac OS X) ‡
Supported cameras
D1, D1X, D1H, D2H, D100 ††, and D70
(Camera Control)
Other
CD-ROM drive required for installation
* With CarbonLib version 1.6 or later.
† The camera may not function as expected when connected to an IEEE 1394 hub.
‡ A list of boards and cards that have been tested and approved for use with the D1, D1x, and D1H is
available on-line ( 2).
** The camera may not function as expected when connected to a USB hub or keyboard.
†† Camera firmware version 2.00 or later.
4
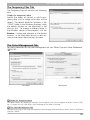
What You Need to Run Nikon Capture 4
Installation
For information on installing Nikon Capture 4, see the Nikon Capture 4 Install Guide.
Camera Control for D100 Cameras (Macintosh)
Before using Nikon Capture 4 Camera Control with a D100 digital camera under Mac OS 9 or Mac OS X,
confirm that the camera firmware is version 2.00 or later. Users of earlier versions will need to upgrade
the camera firmware before using Nikon Capture 4 Camera Control. Contact a Nikon-authorized service representative for information on firmware upgrades.
Windows XP Home Edition/Professional, Windows 2000 Professional, Mac OS X
Installing and using Nikon Capture 4 under a multi-user operating system requires Administrator privi leges. When using Nikon Capture 4, log in as:
Windows XP Home Edition/Professional
Computer administrator
Windows 2000 Professional
Administrators
Mac OS X
Admin
Mac OS 9.0
If you are using Mac OS 9.0, use the Software Update control panel to update to the latest version of
CarbonLib before beginning installation.
Third-Party Plug-Ins
Nikon Capture 4 supports third-party nik Color Efex Pro 2.0 for Nikon Capture 4 plug-ins that add a
filter palette to Tool Palette 2. More information is available on-line ( 2).
5
6
Nikon Capture 4 Editor
Image Adjustment
Nikon Capture 4 editor component contains a variety of
tools for enhancing images, including the Curves, LCH
Editor, Color Booster, Color Balance, Unsharp Mask, Noise
Reduction, Digital DEE and Fisheye Lens tools. With RAW
(NEF) images, it can be used to adjust white balance and
tone compensation, to reduce the effects of dust on the
camera image sensor, including color moiré (Image Dust
Off), and to correct for the slight darkening at the margins of
an image (vignetting) particular to the field of view of a given
lens. When RAW images are saved in NEF format, image enhancement settings are saved separately from the original
image data, allowing you to modify settings repeatedly
without degrading the quality of the original image. Nikon
Capture 4 Editor is also equipped with a batch option for
automated processing of multiple images.
This chapter details the operations that can be performed
using Nikon Capture 4 Editor. It is divided into the following
sections:
The Editor Window
Read this section for an overview of the controls in the Nikon
Capture 4 Editor window.
Image Adjustment
Read this section for instructions on enhancing images using
Nikon Capture 4 Editor.
Nikon Capture 4 Editor Preferences
Read this section for information on fine-tuning settings in
the Nikon Capture 4 Editor window.
7
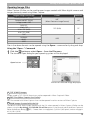
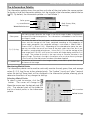
The Editor Window
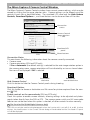
The Editor Window
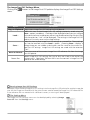
Getting to Know Nikon Capture 4 Editor
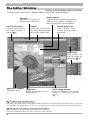
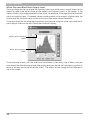
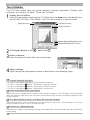
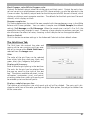
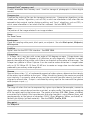
The main parts of the Nikon Capture 4 Editor window are identified below.
Menu bar
Contains the menus for
Nikon Capture 4 Editor.
Quick Tools palette
Contains tool but tons
for Nikon Capture 4
Editor ( 9).
Image window
Displays images currently opened for
editing. Any number of image windows can be open simultaneously.
Title bar
Shows the file name of
the image displayed and
the current zoom ratio.
Shooting data area
Gives photo information on the image
displayed.
Tool palettes
These palettes are
used for image enhancement ( 25).
Application window
(Windows only)
Image area
Shows the image currently
being edited.
Multi-Image window
Lists the images in the current
folder as thumbnail previews
( 15).
The Menu Bar and Quick Tools
Although many operations can be performed using both menu commands and the buttons in the Quick
Tools palette, the explanations in this manual give priority to operations performed using tool buttons.
Hiding the Tool Palettes and Quick Tools Palette
Press tab to hide or display the tools and Quick Tools palettes.
8
Getting to Know Nikon Capture 4 Editor
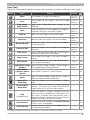
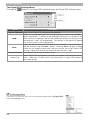
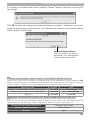
Quick Tools
The Quick Tools palette contains buttons that replicate commonly-used menu commands.
But ton
Name
Func tion
Shortcut*
Open
Click to open an image file for editing.
Ctrl + 0/
cmd + 0
13
Save
Save changes to the image in the active image
window.
Ctrl + S/
cmd + S
79
Copy Image
Adjustments
Copy current image-adjustment settings to the
clipboard.
—
78
Paste
Paste the contents of the clipboard to image enhancement settings in the active window.
Ctrl + V/
cmd + V
—
Zoom in on the image in the active window.
Ctrl + +/
cmd + +
—
Zoom out from the image in the active window.
Ctrl + –/
cmd + –
—
Zoom In
Zoom Out
Rotate the image in active window ninety degrees Ctrl+Shift+R/
shift+cmd+R
counter-clockwise.
20
Rotate 90 CW
Rotate the image in active window ninety degrees
clockwise.
Ctrl + R/
cmd + R
20
Crop Cursor
Use this tool to select the portion of the image in
the active window that will be saved.
C/C
24
Zoom Cursor
Use to zoom the image in the active window in
and out.
Z/Z
18
Hand Cursor
Use to view portions of the image not currently visible in the active window.
H/H
18
Ctrl + T/
cmd + T
15
Launch Nikon Capture 4 Camera Control.
—
101
Batch
Open the Batch dialog, where you can select a
folder of images for batch processing.
—
88
Open with
Photoshop
Open the image in the active window in Photoshop.
—
—
—
—
—
—
—
44
—
59
Rotate 90 CCW
Open Multi-Image Open the Multi-Image window, where images in
Window
the selected folder can be previewed.
Show Nikon
Capture Camera
Control
Show Original
Image Data
Help
(Windows only)
Auto Contrast
Hide the effects of changes to image adjustment
settings. This button can not be used with RAW
images taken with COOLPIX-series cameras.
When this button is clicked, a question mark appears next to the mouse pointer. Clicking on a window, menu, or button while the question mark is
displayed will open the help file to the section that
displays the function of the item clicked.
Performs the same function as the Auto Contrast
button in the Curves palette.
Performs the same function as the Auto button in
the Color Booster palette.
* Windows keyboard shortcuts are listed first, Macintosh shortcuts second.
Color Booster
9
The Editor Window
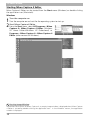
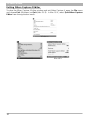
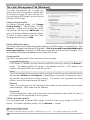
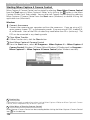
Starting Nikon Capture 4 Editor
Nikon Capture 4 Editor can be started from the Start menu (Windows) or double-clicking
the application icon (Macintosh).
Windows
1
2
Turn the computer on
Turn the computer on and wait for the operating system to start up.
Start Nikon Capture 4 Editor
From the Start menu, select All Programs > Nikon
Capture 4 > Nikon Capture 4 Editor (Windows
XP Home Edition/Windows XP Professional) or
Programs > Nikon Capture 4 > Nikon Capture 4
Editor (other versions of Windows).
Starting Image Window
In the Macintosh version of Nikon Capture 4, an empty image window is displayed when Nikon Capture
4 Editor is started by double-clicking the application icon. In the Windows version, the application
window is displayed.
10
Getting to Know Nikon Capture 4 Editor
Macintosh
1
2
Turn the computer on
Turn the computer on and wait for the operating system to start up.
Start Nikon Capture 4 Editor
Double-click the Nikon Capture 4 Editor icon (
Nikon Capture 4.
) in the folder to which you installed
No image displayed in image window
Product Key
If prompted to supply a product key when starting Nikon Capture 4 Editor or Nikon Capture 4 Camera
Control, enter the product key for Nikon Capture 4.
Other Ways of Starting the Editor
Nikon Capture 4 Editor can be started by double-clicking the Nikon Capture 4 icon ( ) in the folder
to which you installed Nikon Capture 4 (Windows, Mac OS 9). If Nikon Capture 4 was registered in
the Dock during installation, Mac OS X users will be able to start Nikon Capture 4 Editor by clicking the
Nikon Capture 4 icon ( ) in the Dock.
11
The Editor Window
Exiting Nikon Capture 4 Editor
To close the Nikon Capture 4 Editor window and exit Nikon Capture 4, open the File menu
and choose Exit (Windows) or Quit (Mac OS 9). In Mac OS X, select Quit Nikon Capture
Editor from the application menu.
Windows
Mac OS 9
12
Mac OS X
Getting to Know Nikon Capture 4 Editor
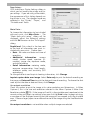
Opening Image Files
Nikon Capture 4 Editor can be used to open images created with Nikon digital cameras and
images previously saved using Nikon Capture.
Original image/saved image
Uncompressed NEF (RAW)
Compressed NEF (RAW)
Image saved in NEF
RGB-TIFF
YCbCr TIFF
16-bit TIFF (RGB)
8-bit TIFF (RGB)
FINE
NORMAL
BASIC
JPEG
Format
Ex tension
NEF
(Nikon Electronic Image Format)
.NEF
TIFF (RGB)
.TIF
JPEG
.JPG
Files in the above formats can be opened using the Open… command or by drag and drop.
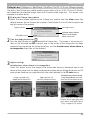
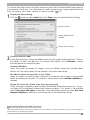
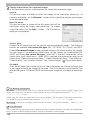
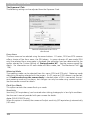
Using the “Open...” Command
1
Click the
button or select Open… from the File menu
The standard Open dialog for your operating system will be displayed.
Open but ton
Preview of selected image displayed
TIFF (CMYK) Images
Images saved in TIFF (CMYK) format can not be reopened in Nikon Capture 4 Editor.
NEF Files (Nikon Capture 3 or Earlier)
NEF files created with Nikon Capture 4 can not be opened in earlier versions of Nikon Capture.
RAW Images Created with the D1X
The default size for RAW images created with the D1x when opened in Nikon Capture 4 Editor can be
chosen using the By default, a D1X RAW file will be option in the General tab of the Nikon Capture 4
Editor Preferences dialog (
95). Choose from six megapixels (3,008 × 1,960 pixels) and ten megapixels (4,016 × 2,616).
13
The Editor Window
2
3
Locate the image file
Navigate to the drive (volume) and folder containing the file you wish to open.
Click Open
Double-click the file or select it from the files listed and click Open. The selected file will
be opened in an image window in Nikon Capture 4 Editor.
Using Drag and Drop
Images can also be opened by dragging them into the application window (Windows) or
image window (Macintosh).
Windows
Macintosh
14
Getting to Know Nikon Capture 4 Editor
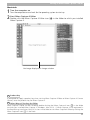
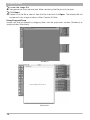
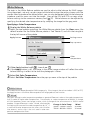
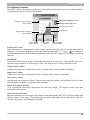
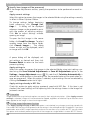
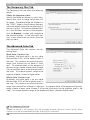
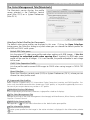
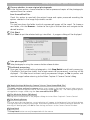
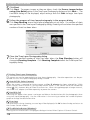
Opening the Multi-Image Window
The Multi-Image window shows the images in the selected folder as small thumbnail previews. Use the Multi-Image window to view other images while making adjustments to the
current image, or to select multiple images for editing, saving, or printing.
1
Click the
button or select Open Multi-Image Window from the File menu
The Browse For Folder dialog will be displayed.
Open Multi-Image
Window button
2
3
Select a folder
Select the folder containing images you want to view or edit.
Click OK
The Multi-Image window will open, with the images in the selected folder displayed as
thumbnails.
Multi-Image window
Lists the images in the selected
folder.
Thumbnail area
Displays the images in the selected folder as thumbnail previews.
Image area
Shows the image currently being
edited. Images are edited in the
same way as in image windows
( 25).
The Multi-Image Window
The Multi Image window can be used to display multiple images without opening them in separate image windows, reducing the amount of memory required. It is not intended as an image browser. No
more than one Multi-Image window can be open at a time. Before opening a folder in the Multi-Image
window, make sure that none of the images in the selected folder are open in image windows. If the
user attempts to open one of the images in the thumbnail list in an image window, it will be opened in
the image area of the Multi-Image window instead.
15
The Editor Window
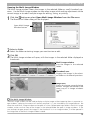
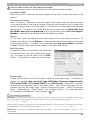
4
Select a thumbnail
The corresponding image will be displayed in the image area.
Editing Images
The image displayed in the image area can be edited in the same way as an image displayed in an image
window ( 25). Modified images are indicated by an asterisk in the thumbnail list.
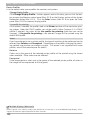
Selecting Multiple Images
To select multiple images for printing or to save under another name, click the thumbnails while pressing
the Ctrl (Windows) or command (Macintosh) key, or use the Select All Images or Select All Unsaved
Images options in the Multi-Image menu. No image will be displayed in the image area.
“Save As”
Even if the image in the Multi-Image window is saved under another name using the Save As… option,
the original will still be displayed in the image area. If this image is saved using the Save option, any
changes will be applied to the original, and the unmodified image will be lost. See “Saving Image Files”
( 82) for more information.
16
Getting to Know Nikon Capture 4 Editor
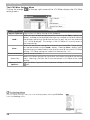
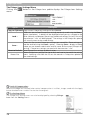
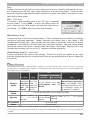
Multi-Image Window Buttons
The names and functions of the buttons in the Multi-Image window are shown in the following table:
When the thumbnail area is closed:
But ton
Name
Func tion
Back to previous folder
Return to the previous folder.
Foward to next folder
Open the next folder.
Previous Image
Next Image
Display the previous image in the image area.
Display the next image in the image area.
When the thumbnail area is open:
But ton
Name
Func tion
Select Folder
Open the Browse For Folder dialog to select a folder for
display in the Multi-Image window.
Back to previous folder
Return to the previous folder.
Foward to next folder
Open the next folder.
Sort
A menu of sort options will be displayed. Choose Sort
Key to sort images by File Name, Date of Recording,
Date Modified, File Name and Type, File Type and
Date of Recording, or File Type and Date Modified
(if File Type and Date of Recording, or File Type and
Date Modified is selected, images will be sorted by file
type in the order NEF, JPEG, and TIFF, with images of the
same file type sorted by date of recording or date of modification). Choose Sort Order to sort images in ascending
or descending order.
Change Thumbnail Size
Adjust the size of the thumbnails displayed in the MultiImage window in five steps.
The Multi-Image Menu
Although many operations can be performed using both the buttons in the Multi-Image window and
the options in the Multi-Image menu, the explanations in this manual give priority to operations performed using the buttons in the Multi-Image window.
17
The Editor Window
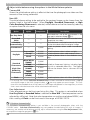
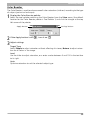
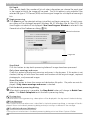
Zoom
To zoom images in and out, click the
button. The mouse pointer will change to
a magnifying glass with a “+” sign in its
center. Position the zoom cursor over the
current image and click the mouse to zoom
in one step. To zoom out one step, hold
down Alt (Windows) or option (Macintosh).
A “–” sign will appear in the center of the
zoom cursor; click the mouse to zoom out
one step. The image will be centered on
the point clicked. The current zoom ratio is
displayed in the title bar.
Zoom ratio
Scrolling the Image
If the entire image is not visible at the current
zoom ratio, the hand cursor can be used to
view other areas of the image. To activate
the hand cursor, click the
button in the
tool palette. The mouse pointer will change
to
; to scroll the image, drag the mouse in
the direction you want to go. You can also
scroll the image using the scroll bars.
Double-Clicking the
and
Buttons
Double-clicking the button displays the image at a zoom ratio of 1 : 1. To fit the image to the window
button.
(Windows) or display the entire image (Macintosh), double-click the
The Hand, Zoom and Crop Cursors
The hand, zoom, and crop cursors can not be used at the same time.
18
Getting to Know Nikon Capture 4 Editor
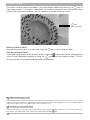
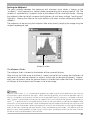
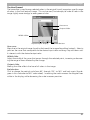
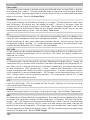
The Bird's Eye Palette
The Bird's Eye palette shows the position of the portion of the image visible in the active
image window. To display or hide the Bird's Eye palette, click the triangle in the Bird's Eye
palette title bar ( 25). By default, the Bird's Eye palette is in Tool Palette 1.
The portion of the image visible in the active image window is indicated by a red outline.
Red outline displayed
When the mouse pointer is moved over the red outline, it changes to a
cursor. Drag the
red outline over the area of the image you would like to view. The selected area will be displayed in the active image window.
19
The Editor Window
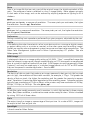
Rotating and Flipping Images
The image in the active image window can be rotated or flipped as described below.
Rotating Images
Click the
button or select 90 degrees CW from the Rotate sub-menu to rotate the image in the active window 90 degrees to the right. Click the
button or select 90 degrees
CCW from the Rotate sub-menu to rotate the image in the active window 90 degrees to
the left. To rotate the image 180 degrees, select 180 degrees from the Rotate sub-menu.
Rotate 90 CCW but ton
Image before rotation
Rotate 90 CW but ton
Image rotated ninety
degrees clockwise
Flipping Images
Use the commands in the Flip sub-menu to flip the image in the active window horizontally
or ver tically.
Rotating JPEG Images
Image files must be opened in Nikon Capture 4 Editor before being rotated. To save the changes, the
image must then be saved to disk. If the image is in JPEG format, it will be compressed when saved,
with a corresponding drop in image quality.
20
Getting to Know Nikon Capture 4 Editor
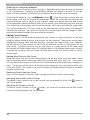
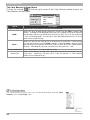
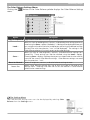
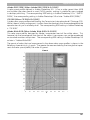
The Information Palette
The information palette shows the position and color of the pixel under the mouse pointer.
To display or hide the Information palette, click the triangle in the Information palette title bar
( 25). By default, the Information palette is in Tool Palette 1.
Color space
x-y coordinates
Red, Green, Blue,
Average
Watch Point button
Information
Color space
R, G, B, Avg
x-y coordinates
Description
The working color space for the image in the active image window is displayed at
the top of the information palette. This information is embedded in the file when
the image is saved.
The values for each of the red, green, and blue elements of the pixel under the
cursor and the average of the three, weighted according to the proper ties of
human color perception (the weighted average is calculated as (Red × 0.299) +
(Green × 0.587) + (Blue × 0.114)). Depending on the selected color space, the average may not reflect the actual luminance of the pixel under the cursor, but it can
be used as a rough guide to brightness. Values for R, G, B, and the average of the
three range from 0 to 255, with values for twelve-bit images being scaled to fit in
this range. The number on the left is the input value, or value for the color in the
original image. The value in the right is the output value, or value after any changes
in the Curves or Color Adjustment windows have been applied.
The position of the cursor in the image window, measured in pixels from the top
left corner of the image.
Monitoring Watch Points
The Information palette can be used to continually monitor the red, green, blue, and average
values (R, G, B, Avg) for up to four selected pixels. The “before” (input) and “after” (output)
values for each of these pixels will be displayed in the Information palette, allowing you to
determine the effects of any changes to settings.
Selecting Watch Points
To select a pixel to monitor, click the
button. The cursor will change to
.
Move the mouse over the desired pixel and
click. The selected pixel will be added to
the list of watch points in the Information
palette.
Point number
Delete but ton
21
The Editor Window
The pixels currently being monitored in the Information palette are shown by a
icon in
the image window. Each point is identified by a number corresponding to the point number
listed in the Information palette. You can monitor up to four pixels at a time.
icon
Point number
Moving a Watch Point
To move the watch point to a new pixel, drag the
icon in the image window.
Deleting a Watch Point
To remove a pixel from the list of watch points, click the
button next to the corresponding
listing in the Information palette, or drag the
icon out of the image window. The remaining points will be renumbered to reflect the change.
RGB and Average Values
A warning button will be displayed in the information palette at zoom ratios of less than 100%. Clicking this button will display a dialog stating that accurate RGB and average values can not obtained at
the current zoom ratio; click Yes to view the image full size.
Preferences: Advanced Color
Clicking the icon at the right end of the Information palette tool bar displays a menu from which you
can access the Advanced Color tab of the Preferences dialog (
96).
22
Getting to Know Nikon Capture 4 Editor
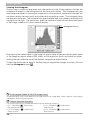
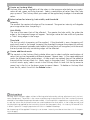
Lost Highlights and Shadows
Areas of the image in which details in the high end or low ends of the tone range may
have been lost (“lost” highlights or shadows) can be identified by locating pixels with the
maximum or minimum value for one or more channel. This information can be used when
using color balance ( 61) or adjusting the white point or black point to capture the optimal
amount of detail without sacrificing contrast ( 47).
Show Lost Highlights
When Show Lost Highlights is selected in
the Image menu, “lost” highlights (pixels
with a value of 255 for one or more channel)
are shown in color (see table below). Other
pixels are shown in black.
R
G
B
“Lost”
“Lost”
“Lost”
“Lost”
“Lost”
Not “lost”
“Lost”
Not “lost”
“Lost”
Not “lost”
“Lost”
“Lost”
“Lost”
Not “lost” Not “lost”
Not “lost”
“Lost”
Not “lost”
Not “lost” Not “lost”
“Lost”
Shown in
White
Yellow
Magenta
Cyan
Red
Green
Blue
Show Lost Shadows
When Show Lost Shadows is selected in
the Image menu, “lost” shadows (pixels
with a value of 0 for one or more channel)
are shown in color (see table below). Other
pixels are shown in white.
R
G
B
“Lost”
“Lost”
“Lost”
“Lost”
“Lost”
Not “lost”
“Lost”
Not “lost”
“Lost”
Not “lost”
“Lost”
“Lost”
“Lost”
Not “lost” Not “lost”
Not “lost”
“Lost”
Not “lost”
Not “lost” Not “lost”
“Lost”
“Highlights” displayed in image
window title bar
“Shadows” displayed in image
window title bar
Shown in
Black
Blue
Green
Red
Cyan
Magenta
Yellow
“Lost” Highlights and Shadows
Before saving images in a format other than NEF, adjust settings to avoid “losing” highlights or shadows
in large areas of the image. Information lost through editing can not be recovered once an image is
saved in a format other than NEF.
Keyboard Shortcuts
Press L to view or hide lost highlights, S to view or hide lost shadows.
23
The Editor Window
Selecting a Crop
Using the crop tool, you can select a portion of an image to be saved in a separate file. If no
selection is made, the entire image will be saved.
1
Click the
button or select Crop Cursor from the View menu
When the mouse is moved over the image area in the active window, it will change to
( ).
2
Make a selection
Drag the mouse over the image in the active window to make a selection. The area outside the selection will be masked to show that it will be cropped.
Cancelling the Current Crop
To cancel the current crop, double-click anywhere in the image window. The selection may
not be cancelled if Keep the output size is selected in the Size / Resolution palette ( 75).
Moving the Crop
To move the crop over a different part of the image, move the pointer over the crop. The
pointer will change to a
(Windows) or
cursor (Macintosh). Drag the crop to move it
to a new position.
Changing the Size of the Crop
To change the size of the current crop, move the pointer over the borders of the crop. The
pointer will change to a double arrow. Drag the borders of the crop to adjust its size. The
size of the cropped image can be adjusted in the Size/Resolution palette ( 75).
Saving a Selection
Unless the image is saved in NEF format, only the selected portion of the image will be saved. Anything
not included in the current crop will be deleted. In NEF format, the entire image is saved together with
information about the location of the current crop.
24
Enhancing Images
Image Adjustment
Enhancing Images
Before they will be ready for display or output on a monitor or printer, images captured from
the camera will usually need to be adjusted to a size and resolution appropriate to the task
at hand. Other settings, such as white balance, contrast, sharpness, luminosity, chroma, and
hue, Image Dust Off, Digital DEE, fisheye lens settings, and automatic color settings for portraits or landscapes, may also require adjustment. These adjustments are performed using
the image adjustment tool palettes.
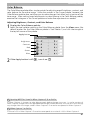
Using the Tool Palettes
To display the default tool palettes, select Show Tool Palette 1 or Show Tool Palette 2
from the View menu.
Displaying the Contents of a Tool Palette
To display or hide the contents of a tool palette, click the triangle to the left of the palette
title.
Edit Indicator
This indicator turns
green if palette settings have been modified for the image in
the active window.
Apply Button
Changes to settings only take effect
when the palette Apply button is
checked
(except in the vignette
control, Digital DEE, and fisheye
lens palettes, the Apply button is
checked by default). If the Apply
button is crossed out
, the effects of the settings in the palette
will not be visible in the image
window.
Changing Palette Order
To change the order of palettes in the tool
palette window, click a tool palette title bar
and drag it into a new position.
Settings Menu Button
Click this button to display the settings submenu, where palette
settings can be saved,
loaded, or reset.
Title bar
The Size / Resolution Palette
The Size / Resolution palette does not have an Apply button. Changes to settings in the Size / Resolution
palette are always visible in the active window.
Third-Party Plug-Ins
Nikon Capture 4 supports third-party nik Color Efex Pro 2.0 for Nikon Capture 4 plug-ins that add a
filter palette to Tool Palette 2. More information is available on-line ( 2).
25
Image Adjustment
Opening Tool Palettes in Separate Windows
Tool palettes can be opened in a separate
window by clicking the palette title and
dragging it outside the current window to
create a new tool palette window containing
only the selected palette.
Tools can be added to the new window by
dragging in additional palettes. The new
window will be added to the View menu
in Nikon Capture 4 Editor. If you close the
new window by clicking the window close
box, you can open it again by selecting the
desired palette from the View menu.
The Edit Indicator
The edit indicator turns green if palette settings have been adjusted since the image in
the active window was created (NEF) images
or last saved (other images), making it clear
at a glance which palettes have been used.
Indicator
Indicator turns
green when
settings are
adjusted
Resetting the Tool Palettes
To restore the tool palettes to their default positions, select Reset Tool Positions in the View menu.
26
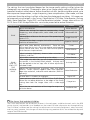
Enhancing Images
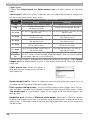
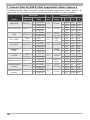
The settings that can be adjusted depend on the image quality setting in effect when the
photograph was recorded. Photographs taken at an image-quality setting of RAW can be
processed to adjust white balance, reduce the effects of dust, perform vignette control, or to
alter exposure compensation, image sharpening, tone compensation, color mode, and hue
adjustment from the settings in effect at the time the photograph was taken. All images can
be processed using the tools in the Curves, Color Balance, LCH Editor, Color Booster, Unsharp
Mask, Noise Reduction, Digital DEE, and Size/Resolution palettes. Images taken with an AF
DX 10.5 mm f2.8G fisheye Nikkor lens can also be processed to reduce distortion.
Image quality
RAW
RAW
RGB-TIFF
YCbCr-TIFF
FINE
NORMAL
BASIC
Process
Palette
Adjust white balance.
White Balance
Choose new settings for exposure compensation, image
sharpening, tone compensation, color mode, and hue ad- Advanced RAW
justment.
Reduce effects of dust on the low-pass filter protecting the
Image Dust Off
camera CCD.
Compensate for drop in marginal lumination caused by charVignette Control
ac teristics of camera lens.
Adjust tone, color balance, and contrast. There are two
Curves
distinct tools for this task: the Curves palette, which provides
precise control over tone, and the Color Balance palette,
Color Balance
which features simpler controls.
Adjust luminosity (lightness), chroma (color saturation, or
LCH Editor
vividness), and hue.
Adjust color automatically according to the subject.
Color Booster
If the image lacks definition, you can sharpen outlines using
the controls in the Unsharp Mask palette. Unsharp mask
Unsharp Mask
only be applied at the last step, after all other adjustments
have been made.
Reduce the noise common to pictures taken with digital
cameras. Nikon Capture supports color noise reduction,
Noise Reduction
edge noise reduction, and color moiré reduction (RAW images only).
Increase detail in shadows or highlights.
Digital DEE
Process pictures taken with an AF DX 10.5 mm f2.8G fisheye
Nikkor lens to reduce distortion at the edges of the frame,
Fisheye Lens
making them look like images taken with a wide-angle
lens.
Adjust the size and resolution of the image for output on a
Size/Resolution
particular device.
29
35
38
42
44
61
54
59
64
67
69
73
75
The Curves Tool and the LCH Editor
The Curves tool controls the distribution of tones in the red, green, and blue channels and in the RGB
master channel, and provides visual feedback on the amount of tone information lost through editing.
The LCH Editor is a better tool for making fine adjustments to luminosity (brightness), color saturation,
and hue; note, however, that changes to these settings may produce results that exceed the dynamic
range of the RGB channels.
27
Image Adjustment
Suggested steps for processing images are shown below.
RAW Images
Use the Advanced RAW and White Balance tools to adjust the originals.
The LCH Editor can then be used to adjust luminosity, saturation, and hue, the Curves
tool to fine-tune the distribution of tones in the red, green, blue, and master channels.
TIFF and JPEG Images
Use the LCH Editor and the Curves tool to
fine-tune luminosity, saturation, hue, and
tone distribution.
28
Use the Color Balance or Color Booster
tool for quick visual adjustments to color.
Enhancing Images
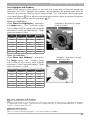
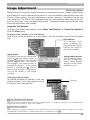
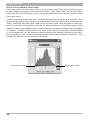
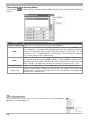
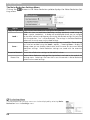
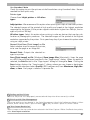
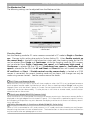
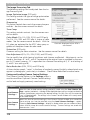
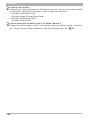
White Balance
The tools in the White Balance palette are used to adjust white balance for RAW images.
Using these tools, not only can you correct white balance when the setting chosen with the
camera failed to produce the desired effect, you can also deliberately alter white balance to
introduce a cold or warm cast into the image. Users of the D2H and D70 can copy whitebalance settings to the camera or memory card ( 32). White balance can be adjusted by
specifying the desired color temperature or by sampling the image for the gray point.
Specifying a Color Temperature
1
Display the White Balance palette
Select the tool palette containing the White Balance palette from the View menu (the
default location for the White Balance palette is Tool Palette 2) and click the triangle at
the top left corner of the palette.
Apply button
Settings menu
Pop-up menu
Slider
Color
temperature
2
If the Apply button is off ( ) , turn it on ( )
If the Apply button is off, the image in the active image window will reflect the white
balance settings in effect at the time the photograph is taken.
3
Select Set Color Temperature
Select Set Color Temperature from the pop-up menu at the top of the palette.
White Balance
White balance can be performed on RAW images only. If the image in the active window is JPEG or TIFF,
the Apply button in the White Balance palette will be grayed out and inactive.
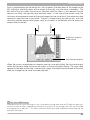
“Mired”
Any given change in color temperature produces a greater dif ference in color at low color temperatures
than it would at higher color temperatures. For example, at a color temperature of 6000 K, a change
of 100 K produces almost no change in color, while a change of the same amount at 3000 K would
produce a large difference in color. Mired, calculated by
Change in Color Temp.
Mired
multiplying the inverse of the color temperature by 10 6, is
4000 K – 3000 K = 1000 K
83 mired
a measure of color temperature that takes such variation
7000 K – 6000 K = 1000 K
24 mired
into account, and as such is the unit used in color-temperature compensation filters.
29
Image Adjustment
4
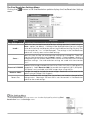
Adjust white balance using the options in the White Balance palette
Camera WB
Shows the white balance setting in effect at the time the photograph was taken and the
amount of fine-tuning performed.
New WB
The white balance setting to be applied to the captured image can be chosen from the
options listed in the table below. When Daylight, Standard Fluorescent, or High
Color Rendering Fluorescent is selected, white balance can be fine-tuned by selecting
an option from the sub-menu.
Option
Sub-menu
option
Color
temperature
Use Gray Point
—
—
—
—
—
—
—
3,000 K
Direct sunlight
Cloudy
5,200 K
6,000 K
Shade
8,000 K
Recorded
Value
Calculate
Automatically *
Incandescent
Daylight
Standard
Fluorescent
High Color
Rendering
Fluorescent
Flash
Warm White
(3000K)
3700K
Cool White
(4100K)
5000K
Daylight
(6500K)
—
Description
White balance is set to the value chosen in the
gray-point selec tion dialog (
31).
White balance is set to the value recorded when
the picture was taken.
White balance is adjusted automatically based
on the white balance of the original image.
Suited to photos taken under incandescent
lighting.
Suited to photos taken in direct sunlight.
Suited to photos taken under overcast skies.
Suited to photos taken in the shade on sunny
days.
3,000 K
3,700 K
4,100 K
5,000 K
Suited to fluorescent lighting, including lighting with a noticeable color cast. The type of
bulb can be chosen from a sub-menu of five
options.
6,500 K
5,400 K
Suited to photos taken with Nikon Speedlights.
* If a settings file in which Calculate Automatically has been selected for white balance is applied
to multiple images in the Multi Image window, a
icon may appear on some images. This indicates that the recorded value will be used until the images are opened in the image area, at which
time a new white balance value will be calculated automatically.
Fine Adjustment
Color temperature can be fine-tuned using this slider. This option is not available when
Use Gray Point or Recorded Value is selected for New WB. Color temperature can be
adjusted by ±50 mired. Note that color temperature can not be raised above 9090 K, and
that a setting of Flash can be fine-tuned in the range of 4255K–7407 K.
“Calculate Automatically”
The Calculate Automatically option is not available in the case of photographs taken with the
COOLPIX series. Calculate Automatically may not produce the desired results with all images; if
necessary, use another white balance setting, adjust white balance using the Fine Adjustment slider,
or sample the image for gray point (
31).
30
Enhancing Images
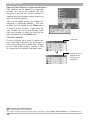
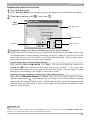
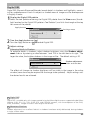
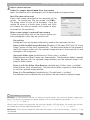
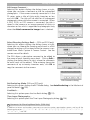
Sampling the Image for Gray Point
1
2
Select Set Gray Point
Select Set Gray Point from the pop-up menu at the top of the White Balance palette.
If the Apply button is off (
) , turn it on (
)
Apply
button
Pop-up menu
Reset button
Sliders
3
Gain values
Sample the image to choose a reference point for white balance
White balance can be defined using a single pixel or the average of the values for all pixels
in a selected area. During sampling, the values for red (R), green (G), and blue (B) for the
pixel under the cursor will be shown in the White Balance palette. Refer to these values
when selecting the point or points to be sampled.
Using a Single Point to Define White Balance
After selecting Use a single point, click Start. The cursor will take the shape of an
eyedropper ( ) when moved over the image in the active window. Click a point that
you would like to appear a neutral gray color in the final image. The new value for white
balance will be reflected in the image in the active window.
Using the Average of the Area Sampled to Define White Balance
After selecting Marquee Sample, click Start. The cursor will take the shape of an areaselection eyedropper ( ) when moved over the image in the active window; drag the
mouse over the image to select an area. White balance will be set to the average for the
selected areas, and the image in the active window will be updated to reflect the new
value for white balance.
Sample Size
The size of the area sampled with the eyedropper cursor can be set using the Dropper sample size
option in the Advanced Color tab of the Preferences dialog.
31
Image Adjustment
Gain for the red and blue channels will be adjusted based on the points sampled, changing
the slope of the red and blue tone curves and
the position of the red and blue sliders.
White balance can also be adjusted by moving the red and blue sliders or by entering a
value from 0.1 to 10 in the text boxes to their right.
Reset
Click this button to reset the red and blue curves to the default value for gain (1.0).
Red slider/Blue slider
Adjust gain by moving these sliders or entering a value from 0.1 to 10 in the text boxes
to their right.
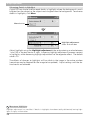
Copying White Balance to the Camera (D2H and D70 Only)
If the image in the active window is a RAW image taken with the D2H or D70, the new
white-balance value can be copied directly to one of the camera’s white-balance presets or
recorded to the camera memory card. Before copying a value to the camera, make sure the
camera is connected and turned on. Before copying a value to the memory card, remove the
card from the camera and insert it in a CF card reader or card slot.
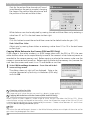
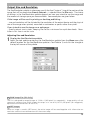
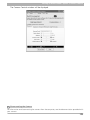
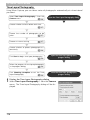
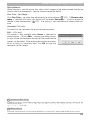
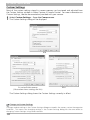
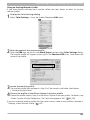
1
Select Write settings to camera… from the white balance settings menu
The dialog shown at right will be displayed. Enter a descriptive comment of up to thirty-six characters (D2H only)
and click OK.
D2H
D70
Choosing a Value for Gain
Very large and small values for gain can result in a drop in image quality.
Copying White Balance to the Camera (D2H and D70 Only)
Nikon Capture 4 Editor supports a wider range of values for gain than does the D2H or D70. When
white-balance settings are copied to the camera, values that exceed the range of the D2H or D70 will
automatically be adjusted to values supported by the camera. Choose values between 0.1 and 2 when
using the Write setting to camera option.
Gain
The values for red and blue gain chosen in the White Balance palette are multiples of the value set for
gain when the photograph was taken.
32
Enhancing Images
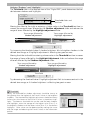
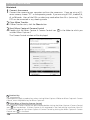
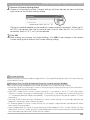
2
Choose an option
The dialog shown at right will be displayed. Click Write to camera, Write
to CF card, or Cancel.
Write to camera
Copy white balance from the White Balance
palette to the camera. If the D2H is connected, the dialog shown at right will be
displayed. Choose a preset from the popup menu and click OK. The new value for
the selected preset can be confirmed from
the camera or Nikon Capture 4 Camera
Control.
White balance preset menu
Existing comment for selected preset
Write to CF card
The dialog shown at right will be displayed.
Choose the drive containing the camera
memory card from the pop-up menu and
click OK to copy the new white-balance
value to the camera memory card. A dialog
showing the name of the new file will be
displayed; click OK to close the dialog.
Cancel
Exit without copying white balance to the
camera or memory card.
D2H
D70
“Write to Camera”
Before connecting the camera to the computer, set the USB option in the camera setup menu to PTP.
“Write to CF Card”
Nikon Capture 4 writes the new value for white balance to the folder with the highest folder number.
If this folder already contains 999 images, the camera may not recognize the file containing the new
value for white balance.
Reading White Balance from the Memory Card
For information on reading white balance values from the memory card, see the Guide to Digital Photography for the D2H or D70.
Comments (D2H only)
In addition to letters and numbers, comments can contain quotes, apostrophes, spaces, and any of the
following characters: “,” “.” “!” “?” “#” “$” “%” “&” “(” “)” “[” “]” “{” “}” “*” “+” “-” “/” “:” “;”
“<” “=” “>” “_” and “@”.
33
Image Adjustment
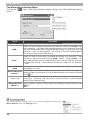
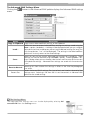
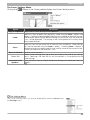
The White Balance Settings Menu
Clicking the
icon in the White Balance palette displays the White Balance Settings
menu.
Option
Description
Copy to Clipboard Copy current white balance settings to the clipboard.
Select this item to restore white balance to settings saved using the Save… option (see below). A dialog will be displayed where you can navigate to the drive
Load…
(volume) and direc tory containing the desired settings file (only files with the
extension “.nwb” will be displayed). The settings in the White Balance palette
will instantly revert to the saved settings.
Select this item to save current white balance settings to a named file. These
settings can later be recalled using the Load… option. Choosing Save… displays a dialog where you can choose a destination and file name for the current
Save…
white balance settings. White balance settings are saved with the extension
“.nwb”.
Reset to Recorded Selecting this item restores the value for white balance in ef fect at the time the
Value
photograph was taken.
If the image in the active window was taken with the D2H or D70, select this
Write settings to
option to copy white balance to a white-balance preset or the camera memory
camera…
card (
32).
Recent white balance settings files (up to four) are listed at the end of the setRecent files
tings menu. Selecting a file from the list sets the controls in White Balance
palette to the saved settings.
Advanced Color
Options…
Open the Nikon Capture 4 Editor Preferences dialog to the Advanced Color tab
(
96).
The Set tings Menu
The White Balance Settings menu can also be displayed by selecting
White Balance from the Set tings menu.
34
Enhancing Images
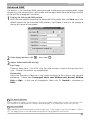
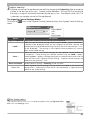
Advanced RAW
The options in the Advanced RAW palette are used to alter exposure compensation, image
sharpening, tone compensation, color mode, and hue adjustment from the settings in effect
at the time the photograph was taken.
1
Display the Advanced RAW palette
Select the tool palette containing the Advanced RAW palette from the View menu (the
default location for the Advanced RAW palette is Tool Palette 2) and click the triangle at
the top left corner of the palette.
2
3
If the Apply button is off (
) , turn it on (
)
Adjust Advanced RAW settings
Exp Comp
Choose a value from –2 to +2 EV using the slider or enter a value in the text box to its
right. Choose 0 to perform no compensation.
Sharpening
Adjust the sharpness of outlines in the image according to the scene or your personal
preference. Choose from Unchanged, None, Low, Medium Low, Normal, Medium
High or High. In the case of photographs taken with D1, Normal is equivalent to
None.
The Warning Button
A warning button appears if the image in the active window is displayed at a zoom ratio too low to allow the effects of Advanced Raw settings to be displayed. Click the button to view the warning.
Advanced RAW
Advanced RAW can be performed on RAW images only. If the image in the active window is JPEG or
TIFF, the Apply button in the Advanced Raw palette will be grayed out and inactive.
35
Image Adjustment
Tone Comp
Adjust image contrast. Choose from Unchanged, Low Contrast, Medium Low,
Normal, Medium High, High Contrast, or User-Defined Custom Curve. Because
the D1 does not store custom curves in the image file, settings of User-Defined Custom
Curve are equivalent to Normal when selected with photographs taken with the D1.
With the D1X, D1H, D2H, D100 and D70, selecting User-Defined Custom Curve restores
the tone curve in effect at the time the photograph was taken.
Color Mode
Choose a color mode for fine control over chroma, brightness, and color gamut, much
as you would choose different kinds of color film for different scenes. Choose from
Unchanged, Mode I (sRGB), Mode II (Adobe RGB), Mode III (sRGB), Mode Ia
(sRGB), or Mode IIIa (sRGB). In the case of images taken with the D1, Unchanged is
equivalent to D1 Mode (NTSC). Color mode selection is available only in the case of RAW
images taken with D1-series, D2H, D100, or D70 cameras.
Saturation
Adjust the vividness of colors. Choose from Unchanged, Moderate, Normal, or Enhanced.
Hue Adjustment
Adjusts hue without affecting brightness or saturation. Hue can be adjusted in the range
–9 ° to 9 ° in seven steps of 3 °. If red is taken as the starting color, raising hue above 0 ° (the
default setting, at which hue is unchanged) would introduce a yellow cast, making colors
that would be red at a setting of 0 ° appear increasingly orange. Lowering hue below 0 °
would introduce a blue cast, making colors that would be red at a setting of 0 ° appear increasingly purple (in the case of the D1X and D1H, –9 ° is equivalent to a camera hue setting
of 0, 0 ° to a setting of 3, and 9 ° to a setting of 6). To use the value for hue adjustment in
effect at the time the photograph was taken, turn the Hue Adjustment check box off.
The Sharpening, Tone Comp., and Color Mode Menus
In the case of images taken with D1-series, D2H, D100, or D70 cameras, the sharpening, tone compensation, and color mode settings in effect at the time the photograph was taken are marked with an
asterisk (no asterisk will be displayed if “Auto” was selected for sharpening or tone compensation).
Color Mode
Color Mode settings apply only to photographs taken with D1-series, D2H, D100, or D70 cameras.
Modes I and Ia, which are adapted to the sRGB color space, are suited to portraits that will be printed
or used “as is” with little or no modification. Mode II is adapted to the Adobe RGB color space. This
color space is capable of expressing a wider gamut of colors than sRGB, making it the preferred choice
for pictures that will be extensively processed or retouched. Modes III and IIIa, which are adapted to
the sRGB color space, are suited to nature or landscape shots that will be printed or used “as is” with
little or no modification.
Sharpening and Tone Comp Options for COOLPIX Cameras
Tone Comp > User-Defined Custom Curve and the Medium Low and Medium High options for
Sharpening and Tone Comp are not available with COOLPIX-series cameras.
Saturation
The Saturation option in Nikon Capture 4 Editor can be used to change vividness of images without
affecting hue.
36
Enhancing Images
The Advanced RAW Settings Menu
Clicking the
button in the Advanced RAW palette displays the Advanced RAW settings
menu.
Option
Description
Copy to Clipboard Copy current Advanced RAW settings to the clipboard.
Select this item to restore Advanced Raw settings to settings saved using the
Save… option (see below). A dialog will be displayed where you can navigate
Load…
to the drive (volume) and direc tory containing the desired settings file (only files
with the ex tension “.nar” will be displayed). The settings in the Advanced Raw
palette will instantly revert to the saved settings.
Select this item to save current Advanced Raw settings to a named file. These
settings can later be recalled using the Load… option. Choosing Save… disSave…
plays a dialog where you can choose a destination and file name for the current
white balance settings. Advanced Raw settings are saved with the extension
“.nar”.
Selecting this item restores the settings in effect at the time the photograph
Reset to Neutral
was taken.
Recent Advanced RAW settings files (up to four) are listed at the end of the
Recent files
settings menu. Selecting a file from the list sets the controls in Advance RAW
palette to the saved settings.
The Settings Menu
The Advanced RAW Settings menu can also be displayed by selecting Advanced RAW from the Set tings menu.
37
Image Adjustment
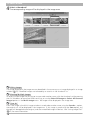
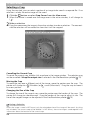
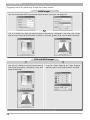
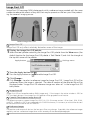
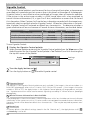
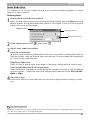
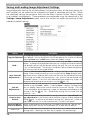
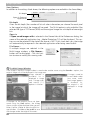
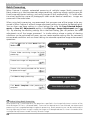
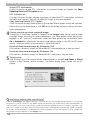
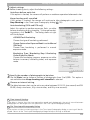
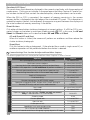
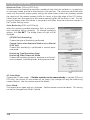
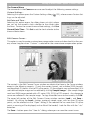
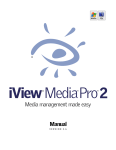
Image Dust Off
Image Dust Off compares RAW photographs with a reference image created with the same
camera to reduce the effects of any dust that may be present on the low-pass filter protecting the camera’s imaging sensor.
Before Image Dust Off
After Image Dust Off
Image Dust Off
Image Dust Off only affects relatively featureless areas of the image.
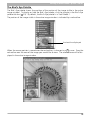
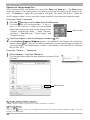
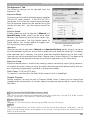
1
Display the Image Dust Off palette
Select the tool palette containing the Image Dust Off palette from the View menu (the
default location for the Image Dust Off palette is Tool Palette 2) and click the triangle at
the top left corner of the palette.
Apply button
2
3
Settings menu
Turn the Apply button on ( )
Turn the Apply button on ( ) to enable Image Dust Off.
Click Change...
Click Change... to select a reference image for Image Dust Off. Image Dust Off will be
performed when the image is selected. The date of creation of the selected file will be
displayed under “Image Dust Off reference image was taken at” in the Image Dust Off
tool palette.
Image Dust Off
Image Dust Off can be performed on RAW images only. If the image in the active window is JPEG or
TIFF, the Apply button in the Image Dust Off palette will be grayed out and inactive.
Cameras That Support Image Dust-Off
The following cameras support Image Dust Off: D1X / D1H (firmware version 1.10 or later), D2H, D100,
and D70. Image Dust Off is not supported with COOLPIX cameras, D1 cameras, or with earlier versions
of the camera firmware for the D1X and D1H.
Reference Images
The position and amount of dust on the low-pass filter may change. If possible, take reference images
regularly and use a reference image taken within one day of the selected photograph.
38
Enhancing Images
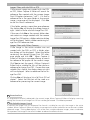
Images Taken with the D2H or D70
If the current image was created with the D2H
or D70, Nikon Capture 4 Editor will search for
reference files created with the camera Image
Dust Off option (extension “.ndf”). If it finds a
reference file in the same folder as the current
image, a message will be displayed. Click Yes
to use this file as a reference.
If the folder contains more than one reference
file, clicking Yes will display the dialog shown at
right. Select a file for use with Image Dust Off.
If the user clicks No or the current folder does
not contain an image created with the camera
Image Dust Off option, a folder selection dialog
will be displayed. Select a folder containing Image Dust Off reference data.
Images Taken with Other Cameras
If the image in the active window was not
created with the D2H or D70, a folder selection dialog will be displayed. Select the folder
containing the desired Image Dust Off reference photo and click OK. Nikon Capture 4
Editor will display a message offering to search
for reference file applies to the current image.
Click Yes to start the search; if Nikon Capture 4
Editor finds a suitable file, this will be used as a
reference for Image Dust Off. If more than one
suitable file is found, the dialog shown at right
will be displayed. Select a reference file for Image Dust Off.
Clicking No will display a list of all Dust Off ref
photos. Select the file that will be used as a
reference for processing the current image.
Excessive Dust
If a large amount of dust is detected in the current image, Nikon Capture 4 Editor will display a warning
stating that the results of Image Dust Off can not be guaranteed. Click Yes to proceed.
No Suitable Images Found
If none of the Image Dust Off reference files found is suitable for use with the image in the active
window, Nikon Capture 4 Editor will display a message to this effect and offer to use the most suitable
reference image. Clicking Yes displays a list of the most suitable reference images; select a reference
file to process the image in the active window to reduce the effects of dust.
39
Image Adjustment
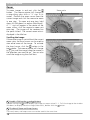
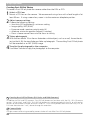
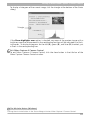
Creating Dust Off Ref Photos
To create a Dust Off ref photo for cameras other than the D2H or D70:
1
Select a CPU lens
Mount a CPU lens on the camera. We recommend using a lens with a focal length of at
least 50 mm. If using a zoom lens, zoom in to the maximum telephoto position.
2
Adjust camera settings
Choose the following settings:
• Sensitivity (ISO equivalency): minimum setting
• Image quality: NEF (RAW)
• Exposure mode: aperture-priority auto (A)
• Aperture: minimum aperture (largest f/-number)
• Focus: choose manual focus and set focus to infinity
3
Take a photograph
With the lens about 10 cm from a featureless white object, such as a wall, frame the object so that it fills the viewfinder and take a photograph. The resulting Dust Off ref photo
will be recorded as an NEF (RAW) image.
4
Transfer the photograph to the computer
Use Nikon Transfer to copy the photograph to the computer.
Creating Dust Off Ref Photos (D1-Series and D100 Cameras)
In addition to D2H and D70 cameras, Dust Off ref photos can be taken with the D1X / D1H (firmware
version 1.10 or later), and D100. Dust Off ref photos can not be created with the D1 or with earlier
versions of the camera firmware for the D1X and D1H. Dust Off ref photos taken with the D100, D1X, or
D1H have the extension “.nef”; do not change this extension.
Camera Shake
A slight amount of blurring caused by camera shake will not affect Dust Off ref photos.
40
Enhancing Images
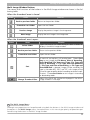
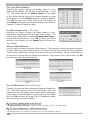
The Image Dust Off Settings Menu
Clicking the
button in the Image Dust Off palette displays the Image Dust Off Settings
menu.
Option
Description
Copy to Clipboard Copy current Image Dust Off settings to the clipboard.
Select this item to load Image Dust Off settings previously saved using the
Save… option (see below). A dialog will be displayed where you can navigate
Load…
to the drive (volume) and direc tory containing the desired settings file (only files
with the extension “.ndr” will be displayed). The settings in the Image Dust Off
palette will instantly revert to the saved settings.
Select this item to save Image Dust Off settings to a named file. These settings
can later be recalled using the Load… option. Choosing Save… displays a
dialog where you can choose a destination and file name for the current ImSave…
age Dust Off settings. Image Dust Off settings are saved with the ex tension
“.ndr”.
Clears the name of the current Image Dust Off reference file from the Image
Reset to Neutral
Dust Off palette.
Recent Image Dust Off settings files (up to four) are listed at the end of the
Recent files
settings menu. Selecting a file from the list sets the controls in Image Dust Off
palette to the saved settings.
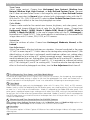
Reusing Image Dust Off Settings
Before pasting or loading Image Dust Off settings into the Image Dust Off palette for another image, be
sure that the image was created with the same camera used to record the Image Dust Off reference file.
If the reference file was created with a different camera, a warning will be displayed.
The Set tings Menu
The Image Dust Off Settings menu can also be displayed by selecting Image
Dust Off from the Set tings menu.
41
Image Adjustment
Vignette Control
The Vignette Control palette is used to correct for loss of marginal lumination, a phenomenon
associated with camera lenses that causes a drop in brightness at the edges of a photograph.
Vignette Control is most effective when performed on images taken at maximum aperture.
If the picture in the active image window is a RAW image taken with a lens equipped to
transmit distance information (i.e., a type G or D lens) mounted on a camera that can record
this information, Nikon Capture 4 will use the lens information recorded with the image to automatically select an optimal value for Vignette Control. Where lens information is not available, Vignette Control will be based on default lens characteristics. To determine whether a
given combination of lens and camera will record distance information, see the table below.
Camera
D2H, D100, D70
D1X /D1H (firmware version 1.10 or later)
D1X /D1H (firmware version 1.01 or earlier)
D1
Type G or D lens
Recorded
Recorded
Not recorded
Not recorded
Other lens
Not recorded
Not recorded
Not recorded
Not recorded
To use Vignette Control:
1
Display the Vignette Control palette
Select the tool palette containing the Vignette Control palette from the View menu (the
default location for the Vignette Control palette is Tool Palette 2) and click the triangle at
the top left corner of the palette.
Apply
button
2
Settings
menu
Turn the Apply button on ( )
Turn the Apply button on ( ) to enable Vignette control.
Vignette Control
The controls in the Vignette Control palette are only available if the image in the active window is a
RAW (NEF) photograph taken with a D1-series, D2H, D100 or D70 camera. If the image in the active
window is JPEG or TIFF, the Apply button in the Vignette Control palette will be grayed out and inactive. Vignette control can not be used to correct vignetting caused by PC Nikkor lenses or Speedlight
photography.
Where Distance Information Is Not Available
If the photograph in the active window is a RAW image taken with a lens that does not transmit distance
information to the camera or with a D1-series camera not equipped to record distance information,
Vignette Control will be based on default lens characteristics. Care may be required to prevent overcorrec tion.
Neutral.set
At factory defaults (the default settings stored in the file “Neutral.set”), the Apply button is off (
and Intensity is set to 80.
42
)
Enhancing Images
3
Adjust intensity
Vignette control can be performed manually by dragging the Intensity slider or entering
a value in the text box to its right. Choose a value between –100 and +200 according to
the drop in marginal lumination exhibited by the lens in use. The default value is 80; if 0
is selected, no vignette control will be performed.
The Vignette Control Settings Menu
icon in the Vignette Control palette displays the Vignette Control Settings
Clicking the
menu.
Option
Description
Copy to Clipboard Copy current Vignette Control settings to the clipboard.
Select this item to restore settings saved using the Save… option (see below).
A dialog will be displayed where you can navigate to the drive (volume) and
Load…
direc tory containing the desired settings file (only files with the extension “.nvc”
will be displayed). The settings in the Vignette Control palette will instantly
revert to the saved settings.
Select this item to save current settings for the Vignette Control palette to
a named file. These settings can later be recalled using the Load… option.
Save…
Choosing Save… displays a dialog where you can choose a destination and file
name for the current Vignette Control settings. Vignette Control settings are
saved with the extension “.nvc”.
Reset to Default Restores default settings. Intensity will be set to 80.
Recent Vignette Control settings files (up to four) are listed at the end of the
Recent files
settings menu. Selecting a file from the list sets the controls in Vignette Control
palette to the saved settings.
The Set tings Menu
The Vignette Control menu can also be displayed by selecting Vignette Control from the Set tings menu.
43
Image Adjustment
Curves
Although your Nikon digital camera will reproduce colors accurately if settings have been
adjusted appropriately, it will usually be necessary to adjust contrast, tone (brightness) levels,
and color balance to make maximum use of the tone range and color gamut offered by a
particular output device, such as a printer or monitor. Nikon Capture offers two tools for
performing these tasks: the Color Balance palette (see “Color Balance” later in this chapter)
and the Curves palette. Of the two, the Curves palette offers the more precise control. The
Color Balance palette is useful when, for example, you want to adjust brightness or color
balance for all pixels in the image. The Curves palette, in contrast, allows adjustments to be
made to specific por tions of the tone range, making it possible to enhance the image while
preserving detail.
Curves—an Overview
To view the Curves palette, select the tool palette containing the Curves palette from the
View menu (the default location for the Curves palette is Tool Palette 1) and click the triangle
at the top left corner of the palette. To enable the tools in the Curves palette, turn the Apply
button on ( ).
Apply button
Current channel
Histogram button
Auto Contrast button
White Point button
Curve edit display
Midpoint button
Black Point button
Reset Active Curve
Reset All Curves
The main editing tool in the Curves palette is the curve edit display, which contains a curve
showing the relationship between input (the tones in the original image) and output (how
the tones in the input will be represented in the final image). Separate curves control the
relationship between input and output for the image as a whole (the “master curve”) and for
each of the red, green, and blue color components, or “channels.” The default curve in each
case is linear, meaning that tones will be output exactly as they are input.
Opening NEF Files Saved in Nikon Capture 3.5x or Earlier
In Nikon Capture 4, changes to color balance apply before changes to curves In earlier versions of Nikon
Capture, changes to curves applied before changes to color balance, with the result that settings may
change when the images saved in Nikon Capture 3.5x or earlier are opened in Nikon Capture 4.
Preferences > Advanced Color
Auto contrast, shadow, and highlight settings can be adjusted in the Advanced Color tab of the Preferences dialog.
44
Enhancing Images
Highlights
Shadows
Input is plotted along the horizontal axis, with shadows (the dark areas of the image) to the
left, highlights (the bright areas of the image) to the right, and mid-tones in between. The
left end of the axis marks the minimum possible value for colors in the selected channel
(zero, or no color), the right end the maximum value. In the case of the master curve, the
minimum value represents areas of the input image that are a true black; the maximum value
represents areas that are a true white. Output is plotted along the vertical axis, with the
minimum possible output value (again, zero, or no color) at the bottom and the maximum
output value at the top.
Brightness of point
under cursor
Input/output display
When the cursor is moved over an image or over the curve edit display, the input and output
values for the point under the cursor are shown in the input/output display. The input value
represents the level of the pixel in the original image, the output value the level of the pixel
after any changes to the curve have been applied.
The Curve Edit Display
Although values for input and output in the Curves palette range from zero to 255 (eight-bit pre cision,
familiar to users of other image editing software), the results of any changes to curves are calculated
at a precision of sixteen bits. This allows twelve-bit RAW data to be modified without lowering the
quality of the output.
45
Image Adjustment
Viewing the Histogram
The first step in adjusting tone levels and color balance in the Curves palette is to view the
histogram displayed in the background of the curve edit display. The histogram tells you
what tones are present in the original image and in what amounts, information that you will
use when setting the black point and white point and editing curves. The histogram takes
the form of a bar graph. The horizontal axis gives the tone level, with shadows to the left and
highlights to the right. The vertical axis gives the number of pixels of each tone level found
in the image, scaled to fit in the curve edit display.
Histogram button
By assigning the darkest tones in the image an output value of zero and the brightest tones
in the image an output value of 255, blacks will be output as blacks and whites as whites,
making the most effective use of the dynamic range of the output device.
To view the distribution of tones in the final, output image after changes to curves, click and
hold the Histogram button .
The Histogram (RAW / 16 -Bit TIFF Images Only)
To reduce display times when dealing with large amounts of image data, Nikon Capture 4 may display
a histogram containing vertical lines.
Channel Selection Shortcuts
The current channel can also be selected using the following shortcuts:
• Ctrl ~ (Windows)/ ~ (Macintosh)
• Ctrl 1 (Windows)/ 1 (Macintosh)
Master channel (RGB)
Red channel
• Ctrl 2 (Windows)/ 2 (Macintosh)
• Ctrl 3 (Windows)/ 3 (Macintosh)
Green channel
Blue channel
46
Enhancing Images
Channel Selection
You can modify tones for all colors in the image using the master curve, or select any of the
red, green, and blue curves for editing using the
channel menu. The histogram shows tone levels
for the selected channel only. When the master
curve is selected, the auto-contrast button and
white-point and black-point eyedropper tools apply simultaneously to all of the red, green,
and blue curves (the master curve is unaffected). When one of the red, green, and blue
curves is selected, these controls can be used to edit the selected curve only.
Setting the White Point and Black Point
The endpoints of the curve are referred to as the “white point” and the “black point.” The
black point for a given channel represents the darkest shade (minimum value) for that color,
the white point, the brightest shade (maximum value). By default, the input and output
values for the black point are zero. The darkest shade in the input image may however be
greater than zero, with the result that a portion of the curve is dedicated to reproducing
tones not actually present in the image. Increasing the input value for the black point until
it matches the darkest shade in the image will steepen the curve, enhancing overall contrast
without causing a corresponding loss of detail in shadows. Similarly, if the original image
does not actually contain shades corresponding to the maximum value, the white point can
be lowered to match the brightest shade in the image.
There are two steps to selecting a white point and black point for the final image: choosing
the white-point and black-point input levels, and selecting output levels.
White-Point and Black-Point Input Levels
Input levels for the white point and black point can be set using any of the following three
methods:
• automatic contrast adjustment
• white-point and black-point sliders
• direct sampling using the white-point and black-point eyedropper tools
Automatic Contrast Adjustment
In automatic contrast adjustment, Nikon Capture automatically selects white and black points
that exclude a certain percentage of the brightest and darkest pixels in the image, steepening
curves for enhanced contrast (the exact percentage of pixels excluded can be specified in the
Preferences dialog;
96). By default, 0.5% of the brightest and darkest pixels are excluded,
producing a curve that makes optimal use of the output tone range while preserving details
in shadows and highlights.
To perform an auto contrast operation, click the Auto Contrast button . The white and
black points for each of the red, green, and blue channels will be modified simultaneously
and the master curve will be displayed in the Curves palette (the master curve itself is unaffected by this operation). Clicking the button with the Ctrl (Windows) or option (Macintosh)
key held down adjusts contrast only for the channel currently selected in the channel menu.
47
Image Adjustment
White-Point and Black-Point Sliders
The white-point and black-point sliders can be used to match the white and black points
to the histogram displayed in the curve edit display. While these sliders can be used to edit
curves for any channel, the best results are usually obtained when they are used to modify
the master curve.
To edit the white point or black point, click the corresponding slider once to activate it, then
drag it to the right or left (a value can also be entered directly in the text box underneath the
slider). Matching the black-point slider with the lowest input value displayed in the histogram will set the minimum output value for the selected channel to the darkest pixel actually
present in the image, steepening the curve and enhancing contrast without sacrificing detail
in shadows. Similarly, matching the white-point slider with the highest input value displayed
in the histogram will set the maximum output value for the selected channel to the brightest pixel present in the image, enhancing contrast without loss of detail in highlights. Any
changes are applied instantly to the active image.
Black-point slider
48
White-point slider
Enhancing Images
Sampling the Image for White Point or Black Point
The white point or black point can be set by directly sampling the image, allowing you to
choose the pixels that will be used to set the maximum (white point) or minimum (black
point) output value. This makes it possible to set the black point by matching it to a pixel in
the darkest part of the image containing detail you want to preserve, eliminating details in
darker areas that are not important to the final image. Similarly, you can match the white
point to a pixel in the brightest area of the image containing details important to the final image. While direct sampling can be used with any channel, it is most effective when used with
the master curve. When the master curve is selected, sampling will set the white or black
point for red, green, and blue curves simultaneously; the master curve itself is unaffected.
To sample the white point, click the White Point button
. When the cursor is moved over
the active image, it will take the shape of an eyedropper. Move the cursor over the image to
find the pixel that you want to use to set the white point, keeping an eye on pixel level display
in the Information palette to identify pixels with high input values. With the cursor over the
target pixel, click the mouse button. The input value for the selected pixel will be used as the
input value for the white point. The cursor will return to its original shape, and the image will
automatically be altered to reflect the new value for white point.
To sample the image for the black point, click the Black Point button
and move the
eyedropper cursor over the image until you find the point that you want to use to set the
minimum input value, then click the mouse button to select the black point.
Setting the White Point or Black Point for the Current Channel
By default, sampling sets the white point or black point for all channels and displays the master channel. To set the white point, midpoint, or black point for the current channel only, sample the image
while holding down the Ctrl key (Windows) or option key (Macintosh) on the keyboard. Note that
midpoint can not be sampled for a single channel; regardless of the channel currently selected in the
channel menu, sampling the image for midpoint always sets the midpoint for all channels and displays
the master channel.
49
Image Adjustment
White Point and Black Point Output Levels
Once you have set the input level for the black point and white point, output levels can be
altered to reflect the actual shade of the darkest and brightest pixels in the image. If the
darkest shade in the image represents a true black, for example, the output level for the black
point can be left at zero. If, however, darkest shade present in the image is a lighter color, the
output level for the black point can be raised to achieve more natural coloration.
The output levels for the white point and black point are set using the white-point and blackpoint output sliders on the left side of the curve edit display.
White-point output
slider
Black-point output
slider
To set the output level, click the slider once to activate it, then drag it up or down until you
have found the desired output level (the output level can also be set by entering a value directly in the text box to the left of the slider). The effects of the change will be reflected in
the active image.
50
Enhancing Images
Setting the Midpoint
The point midway between the maximum and minimum input values is known as the
“midpoint,” which represents a neutral shade corresponding to an output level of 128. The
midpoint is controlled by a midpoint slider at the bottom of the curve edit display. Moving
the midpoint slider to the left increases the brightness of mid-tones without “washing out”
highlights. Moving the slider to the right darkens mid-tones without obliterating detail in
shadows.
The midpoint can be set using the midpoint slider or by directly sampling the image using the
midpoint eyedropper tool.
Midpoint slider
The Midpoint Slider
The midpoint slider is located at the bottom of the curve edit display.
After clicking the slider once to activate it, move it to the left to increase the brightness of
mid-tones in the selected channel, or move it to the right to decrease brightness. Alterna tively, you can enter a value for gamma directly in the text box under the slider. The effects
of changes to the midpoint can be seen in the active image.
Gamma
Gamma (also written “γ”) is a fundamental property of video systems which determines the intensity
of the output signal relative to the input. When calculating gamma, the maximum possible input intensity is assigned a value of one, and the minimum possible intensity (no input) is assigned a value of
zero. Output is calculated by raising input to a power that is the inverse of the gamma value (output =
input (1/γ) ). In practical terms, raising the gamma value has the same effect as moving the midpoint slider
to the left, raising mid-tone output values and brightening the image while leaving the maximum and
minimum values untouched. Lowering the gamma value has the same effect as moving the midpoint
slider to the right, lowering mid-tone output values and darkening the image. The default value for
gamma is one, which produces a linear curve in which input and output values are the same. Gamma
can be set to any value between 0.05 and 6.00.
51
Image Adjustment
Sampling the Image for Midpoint
The midpoint can also be set by direct sampling. Regardless of the channel currently selected
in the channel menu, sampling simultaneously defines the midpoint for each of the red,
green, and blue channels while leaving the midpoint for the master curve unchanged.
To sample the midpoint, click the Midpoint button . When the cursor is moved over the
active image, it will take the shape of an eyedropper. Move the cursor over the image to find
the pixel that you want to use to set the midpoint, keeping an eye on the pixel level display
in the Information palette to identify pixels with a neutral input value (look for pixels that you
think should be a neutral gray color in the final image). With the cursor over the target pixel,
click the mouse button. The input value for the selected pixel will be used as the reference
value for the midpoint. The cursor will return to its original shape, and the image will auto matically be altered to reflect the new value for midpoint.
Editing Curves Directly
Fine adjustments can be made to brightness and contrast in specific portions of the tone
range by adding additional points to the curves for each channel. These points can be freely
adjusted by dragging them into new positions, changing the shape of the curve. Steepening the slope in a given portion of the curve will enhance contrast in that portion of the
tone range. Changing the curve so that input levels in a given portion of the tone range
are mapped to higher output levels will brighten tones in the affected tone range; similarly,
changing the curve to map input levels to lower output levels will darken tones in the affected range.
Adding New Points to the Curve
Move the cursor over the curve edit display and click once to enter curve edit mode. Move
the cursor to the position where you would like to add a new point, then click. A new point
will be added at this position and the curve will automatically be adjusted to pass through this
point. The position of the point can be adjusted by dragging it to a new location within the
curve edit display. The image in the active window will automatically be adjusted to reflect
changes to the curve.
Removing Points from the Curve
Points can be removed from the curve by dragging them out of the curve window.
Resetting the Active Curve to Linear
The default linear curve for the current channel can be restored by clicking the
the Curves palette.
button in
Resetting All Curves to Linear
To reset all curves to linear, click the
button. All curves will be reset and the RGB master
channel will be displayed in the Curve palette.
52
Enhancing Images
The Curves Settings Menu
Clicking the
button in the Curves palette displays the Curves Settings menu.
Option
Description
Copy to Clipboard Copy current Curves settings to the clipboard.
Select this item to load curves previously saved using the Save… option (see
below). A dialog will be displayed where you can navigate to the drive (volume)
Load…
and direc tory containing the desired settings file (only files with the extension
“.ncv” will be displayed). The settings in the Curves palette will instantly revert
to the saved settings.
Select this item to save curves for all channels to a named file. These settings
can later be recalled using the Load… option. Choosing Save… displays a
Save…
dialog where you can choose a destination and file name for the current curves.
Curves are saved with the ex tension “.ncv”.
Reset to Neutral Reset all curves to linear.
Recent Curves settings files (up to four) are listed at the end of the settings
Recent files
menu. Selecting a file from the list sets the controls in Curves palette to the
saved settings.
Advanced Color Open the Nikon Capture 4 Editor Preferences dialog to the Advanced Color tab
96).
Options…
(
The Set tings Menu
The Curves Settings menu can also be displayed by selecting Curves from
the Set tings menu.
53
Image Adjustment
The LCH Editor
The LCH Editor models color using three channels: Lightness (brightness), Chroma (color
saturation, or vividness), and Hue. To use the LCH Editor:
1
Display the LCH Editor
Select the tool palette containing the LCH Editor from the View menu (the default location for the LCH Editor is Tool Palette 2) and click the triangle at its top left corner.
Settings button
Apply button
Channel menu
Reset Active Channel button
Reset All Channels button
2
3
If the Apply button is off (
4
Adjust settings
Adjust settings for the selected channel as described on the following pages.
) , turn it on (
)
Select a channel
Select the desired channel from the channel menu.
Channel Selection Shortcuts
The channel can also be selected using the following shortcuts:
• Ctrl Shift 1 (Windows)/ option 1 (Macintosh): lightness channel
• Ctrl Shift 2 (Windows)/ option 2 (Macintosh): chroma channel
• Ctrl Shift 3 (Windows)/ option 3 (Macintosh): hue channel
Input and Output (Intensity) Displays
When the cursor is moved over an image or over the edit window in the LCH Editor, input and output
levels for the pixel under the cursor are shown on the curve and in the input and output displays for the
current channel.
The “Reset Active Channel” and “Reset All Channels” Buttons
Click the Reset Active Channel button to reset the active curve to linear. Click the Reset All Channels
button to reset all curves in the LCH Editor to linear.
Preferences > Advanced Color
Auto contrast, shadow, and highlight settings can be adjusted in the Advanced Color tab of the Preferences dialog.
54
Enhancing Images
The Lightness Channel
Although it affects brightness rather than color, editing luminosity has a similar effect to editing the master curve in the Curves palette.
Show Histogram button
White-point output
level slider
Auto Contrast button
Luminosity curve
Histogram
Black-point output
level slider
Black-point
input slider
Gray-point
slider
White-point
input slider
Luminosity curve
Maps luminosity in the original image (input) to the luminosity of the image after editing
(output). Any portion of the curve can be edited as described in “Curves” ( 44); steepening the curve increases the difference between light and dark areas of the image, increasing
contrast.
Histogram
Shows the distribution of pixels of different luminosities in the input. The horizontal axis corresponds to luminosity (in the range 0–255), the vertical axis to the number of pixels.
Output level sliders
Choose the maximum (white point) and minimum (black point) values for output.
Input level sliders
Choose the maximum (white point) and minimum (black point) input levels.
Gray-point slider
Set the gray point (gamma value). Moving the gray point alters the brightness of mid-tones
while preserving detail in highlights and shadows.
Show Histogram button
Click to view the luminosity distribution for the final image. Click again to view the input
luminosity distribution.
Auto Contrast button
Set the maximum and minimum input levels to exclude values for 0.5% of the brightest and
darkest pixels in the crop. The percentage of pixels excluded can be adjusted in the Advanced Color tab in the Preferences dialog.
55
Image Adjustment
The Chroma Channel
The Chroma editor is useful tool for adjusting color saturation.
Chroma curve
Output slider
Width slider
Input display
Intensity
Chroma curve
Maps chroma in the original image (input) to the chroma of the image after editing (output).
Moving a point on the curve upward makes colors in the affected portion of the color range
more vivid, while moving it downward makes the affected colors less vivid, or grayer.
Width slider
Adjust the width of the curve that passes through the selected point, increasing or decreasing the range of colors affected by the change.
Output slider
Moving the slider affects the saturation of all colors in the image.
Intensity
The amount by which the saturation of the selected point will be increased or decreased in
the output image.
56
Enhancing Images
The Hue Channel
The hue editor is used to map selected colors in the original (input) image to a specific range
of colors in the final (output) image. This can be used, for example, to make all reds in the
image slightly more orange, or even green or blue.
Hue curve
Output slider
Width slider
Input / output display
Scale button
Hue curve
Maps hue in the original image (input) to the hue of the image after editing (output). Select a
point on the curve that corresponds to the desired input color and drag it up and down until
it intersects with the desired output color.
Width slider
Adjust the width of the curve that passes through the selected point, increasing or decreasing the range of hues affected by the change.
Output slider
Moving the slider affects the hue of all colors in the image.
Scale button
Click to change the vertical scale from 60 ° through 120 ° to 180 ° and back again (the degrees in this scale refer to 360 ° color wheel). Increasing the scale increases the range of hues
visible in the display, while decreasing the scale increases precision.
57
Image Adjustment
The LCH Editor Settings Menu
Clicking the triangle
in the top right corner of the LCH Editor displays the LCH Editor
settings menu.
Option
Description
Copy to Clipboard Copy current LCH Editor settings to the clipboard.
Select this item to load settings previously saved using the Save… option (see
below). A dialog will be displayed where you can navigate to the drive (volume)
Load…
and direc tory containing the desired settings file (only files with the extension
“.nlv” will be displayed). The settings in the LCH Editor will instantly revert to
the saved settings.
Select this item to save settings for all channels to a named file. These settings
can later be recalled using the Load… option. Choosing Save… displays a diaSave…
log where you can choose a destination and file name for the current LCH Editor
settings. LCH Editor settings are saved with the ex tension “.nlv”.
Reset to Neutral Reset all curves to linear.
Recent LCH Editor settings files (up to four) are listed at the end of the settings
Recent files
menu. Selecting a file from the list sets the controls in LCH Editor to the saved
settings.
Advanced Color Open the Nikon Capture 4 Editor Preferences dialog to the Advanced Color tab
Options...
(
96).
The Set tings Menu
The LCH Editor Settings menu can also be displayed by selecting LCH Editor
from the Set tings menu.
58
Enhancing Images
Color Booster
The Color Booster is used to enhance overall color saturation (vividness) according to the type
of subject (portrait or landscape).
1
Display the Color Booster palette
Select the tool palette containing the Color Booster from the View menu (the default
location for the Color Booster palette is Tool Palette 1) and click the triangle at the top
left corner of the palette.
Apply button
2
3
If the Apply button is off (
Settings button
) , turn it on (
)
Adjust settings
Target Type
Select People to adjust saturation without affecting skin tones, Nature to adjust saturation for all colors in the image.
Level
Use the slider to adjust saturation, or a enter a value between 0 and 100 in the text box
to its right.
Auto
Optimize saturation to suit the selected subject type.
59
Image Adjustment
The Color Booster Settings Menu
Clicking the triangle
in the top right corner of the Color Booster palette displays the
Color Booster settings menu.
Option
Description
Copy to Clipboard Copy current Color Booster settings to the clipboard.
Select this item to load settings previously saved using the Save… option (see
below). A dialog will be displayed where you can navigate to the drive (volume)
Load…
and direc tory containing the desired settings file (only files with the extension
“.ncb” will be displayed). The settings in the Color Booster palette will instantly
revert to the saved settings.
Select this item to save settings for all channels to a named file. These settings
can later be recalled using the Load… option. Choosing Save… displays a diaSave…
log where you can choose a destination and file name for current Color Booster
settings. Color Booster settings are saved with the ex tension “.ncb”.
Reset to Neutral Reset Color Booster settings to default values.
Recent Color Booster settings files (up to four) are listed at the end of the setRecent files
tings menu. Selecting a file from the list sets the controls in Color Booster
palette to the saved settings.
The Set tings Menu
The Color Booster Settings menu can also be displayed by selecting Color
Booster from the Set tings menu.
60
Enhancing Images
Color Balance
The Color Balance palette offers simple controls for adjusting overall brightness, contrast, and
color balance for the entire image. Unlike the controls in the Curves palette, however, the
Color Balance palette does not allow you to make changes that affect only a portion of the
tone range. After making broad adjustments to color balance in the Color Balance palette,
examine the histogram in the Curves palette and make fine adjustments as needed.
Adjusting Brightness, Contrast, and Color Balance
1
Display the Color Balance palette
Select the tool palette containing the Color Balance palette from the View menu (the
default location for the Color Balance palette is Tool Palette 1) and click the triangle at
the top left corner of the palette.
Apply button
Brightness
Contrast
Red
Green
Blue
2
If the Apply button is off (
) , turn it on (
)
Opening NEF Files Saved in Nikon Capture 3.5x or Earlier
In Nikon Capture 4, changes to color balance apply before changes to curves. In earlier versions of
Nikon Capture, changes to curves applied before changes to color balance, with the result that settings
may change when the images saved in Nikon Capture 3.5x or earlier are opened in Nikon Capture 4.
Nikon Capture 3 or Earlier
A value of +50 in Nikon Capture 3.5 or earlier corresponds to a value of +100 in Nikon Capture 4.
61
Image Adjustment
3
Adjust brightness, contrast, and color balance
Adjust brightness, contrast, and color balance using the options in the Color Balance
palette.
Adjusting Overall Brightness
The brightness slider adjusts brightness for the entire image. Dragging the brightness
slider in the + direction brightens all the colors in the image, making the image as a whole
more white. Dragging the slider in the – direction darkens all the colors in the image,
making the image as a whole darker and less distinct. Unlike adjustments to the midpoint
in the Curves palette, this setting applies equally to shadows and highlights, producing a
flat, low-contrast image. A value for brightness between –100 and +100 can be entered
directly in the text box to the right of the slider.
Adjusting Image Contrast
Dragging the contrast slider in the + direction heightens the difference between highlights and shadows in the image, increasing contrast. Dragging the slider in the – direction decreases the difference between light and dark portions of the image, lowering
contrast. A value for contrast between –100 and +100 can be entered in the text box to
the right of the slider.
Adjusting Color Balance
While the brightness slider adjusts brightness for the image as a whole, the three colorbalance controls allow the user to adjust brightness for each color individually. For example, dragging the red slider in the + direction brightens the red portions of the image,
making the image as a whole more red. Dragging it in the – direction dims the red elements in the image, bringing out the remaining colors. A value between –100 and +100
can be entered for each color in the text box to the right of the slider.
62
Enhancing Images
The Color Balance Settings Menu
Clicking the
button in the Color Balance palette displays the Color Balance Settings
menu.
Option
Description
Copy to Clipboard Copy current Color Balance settings to the clipboard.
Select this item to load brightness, contrast, and color balance settings previously
saved using the Save… option (see below). A dialog will be displayed where you
Load…
can navigate to the drive (volume) and directory containing the desired settings
file (only files with the extension “.nca” will be displayed). The settings in the
Color Balance palette will instantly revert to the saved settings.
Select this item to save brightness, contrast, and color balance settings to a
named file. These settings can later be recalled using the Load… option.
Save…
Choosing Save… displays a dialog where you can choose a destination and file
name for the current Color Balance settings. Color Balance set tings are saved
with the ex tension “.nca”.
Reset to Neutral Resets all brightness, contrast, and color balance settings to zero.
Recent Color Balance settings files (up to four) are listed at the end of the
Recent files
settings menu. Selecting a file from the list sets the controls in Color Balance
palette to the saved settings.
The Set tings Menu
The Color Balance Settings menu can also be displayed by selecting Color
Balance from the Set tings menu.
63
Image Adjustment
Unsharp Mask
Using Unsharp Mask, the user can increase the sharpness of photographs by making edges
more distinct. Unsharp Mask works by increasing the contrast of the edges in the image
while leaving other areas untouched. The amount of sharpness is determined by three factors: intensity, halo width, and threshold.
Creating Unsharp Masks
1
Display the Unsharp Mask palette
Select the tool palette containing the Unsharp Mask palette from the View menu (the
default location for the Unsharp Mask palette is Tool Palette 1) and click the triangle at
the top left corner of the palette.
Apply button
Unsharp mask list
Delete button
Up/down arrows
Warning button
Color
2
If the Apply button is off (
) , turn it on (
)
The Warning Button
A warning button appears if the image in the active window is displayed at a zoom ratio too low to allow the effects of Unsharp Mask to be displayed. Click the button to view the warning.
64
Enhancing Images
3
Create an Unsharp Mask
Unsharp Mask can be applied to all the colors in the image or selectively to any combi nation of red, green, and blue channels. Select a combination of colors from the Color
pop-up menu. The Unsharp Mask you create will be applied only to edges in the selected
colors.
4
Select values for intensity, halo width, and threshold
Intensity
The amount the contrast of edges will be increased. Too great an intensity will degrade
your image rather than sharpening it.
Halo Width
The size of the areas that will be affected. The greater the halo width, the wider the
edges in the sharpened image will appear. Too large a value for halo width will produce
a “halo” along edges in the image.
Threshold
The limit at which sharpening will be applied. If the threshold is zero, sharpening will
apply to all pixels in the image. Increasing the threshold increases the amount of contrast
that must be present between pixels before Unsharp Mask will be applied, with the result
that only more distinctly contrasting edges will be affected.
5
Create additional masks
The controls in the Unsharp Mask palette allow you to select multiple combinations of
colors that can be sharpened to different degrees. Repeat steps 1–4 to create additional
masks for different color combinations. As new masks are created, they will be added to
the end of the Unsharp Mask list. Masks apply in the order listed. To change the order
in which masks apply, select a mask in the Unsharp Mask list and click the up arrow to
move it up in the list, or the down arrow to move it down. To delete an Unsharp Mask
from the list, select it and click the Delete button.
Unsharp Mask
Unsharp Mask sharpens edges without affecting color balance by making adjustments only to lumi nosity (brightness). The effect is the same as performing Unsharp Mask with the Luminosity channel
selected in the Adobe Photoshop Lab color model. If Unsharp Mask is applied to a single channel, such
as red, the values for ab (chrominance) are used to determine what points in the image are red, and
Unsharp Masking applied to the Luminosity channel for those points only. An intensity of around 20%
in Nikon Capture 4 is roughly equivalent to 100% in Adobe Photoshop.
No sharpening will be applied if Intensity is set to zero. Intensity must be set to at least 1% if sharpening is to apply.
65
Image Adjustment
The Unsharp Mask Settings Menu
Clicking the
button in the Unsharp Mask palette displays the Unsharp Mask Settings
menu.
Option
Description
Copy to Clipboard Copy current Unsharp Mask settings to the clipboard.
Select this item to load Unsharp Masks previously saved using the Save… option (see below). A dialog will be displayed where you can navigate to the drive
Load…
(volume) and direc tory containing the desired settings file (only files with the
extension “.num” will be displayed). The settings in the Unsharp Mask palette
will instantly revert to the saved settings.
Select this item to save Unsharp Mask settings to a named file. These settings
can later be recalled using the Load… option. Choosing Save… displays a diaSave…
log where you can choose a destination and file name for the current Unsharp
Mask settings. Unsharp Mask settings are saved with the ex tension “.num”.
Reset to Neutral Deletes all Unsharp Masks currently displayed in the Unsharp Mask palette.
Recent Unsharp Mask settings files (up to four) are listed at the end of the
Recent files
settings menu. Selecting a file from the list sets the controls in Unsharp Mask
palette to the saved settings.
The Set tings Menu
The Unsharp Mask Settings menu can also be displayed by selecting Unsharp
Mask from the Set tings menu.
66
Enhancing Images
Noise Reduction
This palette can be use to mitigate the effects of noise that sometimes appears in images
taken with digital cameras.
Reducing Noise
1
Display the Noise Reduction palette
Select the tool palette containing the Noise Reduction palette from the View menu (the
default location for the Noise Reduction palette is Tool Palette 2) and click the triangle at
the top left corner of the palette.
Apply button
Settings menu
Warning button
2
3
If the Apply button is off (
) , turn it on (
)
Adjust noise reduction options
Color Noise Reduction
To reduce noise (a mottling phenomenon that occurs principally in photographs taken at
high sensitivities), drag the slider to select a value from 0 (no noise reduction performed)
to 10 (maximum noise reduction).
Edge Noise Reduction
Check this box to reduce noise along edges in the photo, making outlines more distinct.
Color Moiré Reduction (RAW images only)
Color moiré (color interference caused by regular overlapping patterns) can be reduced
using this option. Choose the amount of compensation performed from Off, Low, Medium, or High.
4
View the results
Confirm the effects of noise reduction on the entire image and adjust settings as necessary.
The Warning Button
Color noise reduction will not be performed when the warning button is displayed. Zoom the image in
until the warning button is no longer displayed.
67
Image Adjustment
The Noise Reduction Settings Menu
Clicking the
button in the Noise Reduction palette displays the Noise Reduction Settings menu.
Option
Description
Copy to Clipboard Copy current Noise Reduction settings to the clipboard.
Select this item to load Noise Reduction settings previously saved using the
Save… option (see below). A dialog will be displayed where you can navigate
Load…
to the drive (volume) and direc tory containing the desired settings file (only files
with the extension “.nnr” will be displayed). The set tings in the Noise Reduction
palette will instantly revert to the saved settings.
Select this item to save Noise Reduction settings to a named file. These settings
can later be recalled using the Load… option. Choosing Save… displays a
Save…
dialog where you can choose a destination and file name for the current Noise
Reduction settings. Noise Reduction settings are saved with the ex tension
“.nnr”.
Reset to Neutral Resets Noise Reduction settings to their default values.
Recent Noise Reduction settings files (up to four) are listed at the end of the
Recent files
settings menu. Selecting a file from the list sets the controls in Noise Reduction
palette to the saved settings.
The Set tings Menu
The Noise Reduction Settings menu can also be displayed by selecting Noise
Reduction from the Set tings menu.
68
Enhancing Images
Digital DEE
Digital DEE (Dynamic Exposure Extender) reveals details in shadows and highlights, correcting for underexposure in back-lit subjects or shaded areas of images and for overexposure
in brightly lit areas.
1
Display the Digital DEE palette
Select the tool palette containing the Digital DEE palette from the View menu (the default location for the Digital DEE palette is Tool Palette 1) and click the triangle at the top
left corner of the palette.
Apply button
Settings menu
2
3
Turn the Apply button on ( )
Turn the Apply button on ( ) to enable Digital DEE.
Adjust settings
Enhancing Details in Shadows
To enhance details in shadows, adjust shadow brightness using the Shadow adjustment slider or by entering a value between 1 and 100 in the text box to its right. The
larger the value, the brighter shadows in the image will be. The default setting is 20.
Shadow adjustment
slider and text box
The effects of changes to shadow brightness will be visible in the image in the active
window (some time may be required for the image to be updated). Adjust settings until
the desired results are achieved.
Digital DEE
Digital DEE is available only with images created using the Nikon digital cameras supported under Nikon
Capture 4 (D1, D1X, D1H, D2H, D100, D70, and COOLPIX cameras, with the exceptions of the E100,
E300, and E600). Images must be in their original file formats.
Monotone Shadows
Shadow adjustment has no effect if details in shadows have been totally obliterated, leaving shadows
a single, uniform color.
69
Image Adjustment
Enhancing Details in Highlights
Digital DEE can also be used to reveal details in highlights where the background is much
brighter than the subject or the subject much brighter than the background. To enhance
details in highlights, click More.
More button
Highlight adjustment
slider and text box
Adjust highlights using the Highlight adjustment slider or by entering a value between
1 and 100 in the text box to its right. Increasing highlight adjustment increases contrast
in highlights, while decreasing highlight adjustment has the opposite effect. The default
value is 20.
The effects of changes to highlights will be visible in the image in the active window
(some time may be required for the image to be updated). Adjust settings until the desired results are achieved.
Monotone Highlights
Highlight adjustment has no effect if details in highlights have been totally obliterated, leaving highlights a single, uniform color.
70
Enhancing Images
Defining “Shadows” and “Highlights”
The Threshold slider in the detailed view of the “Digital DEE” panel determines the border between shadows and highlights.
Threshold slider and
text box
Moving the slider to the right or entering a higher value in the Threshold text box increases the range of tones affected by the Shadow adjustment slider and reduces the
range of tones affected by the Highlight adjustment slider.
1
Tone range affected by
Shadow adjustment
Tone range affected by
Highlight adjustment
Shadows
Highlights
254
Threshold
Try increasing the threshold value if shadow brightness fails to brighten shadows in the
desired tone range, or if highlight adjustment is affecting too great an area.
Moving the slider to the left or entering a lower value in the Threshold text box increases
the range of tones affected by the Highlight Adjustment slider and reduces the range
of tones affected by the Shadow Adjustment slider.
1
Tone range affected by
Shadow adjustment
Tone range affected by
Highlight adjustment
Shadows
Highlights
254
Threshold
Try decreasing the threshold value if highlight adjustment fails to increase contrast in the
desired tone range, or if shadow brightness is affecting too great an area.
Threshold
Ideally, the threshold for shadow adjustment should be twenty to
forty greater than the highest of the R and G values in the brightest
shadows. The threshold for highlight adjustment should be twenty
to forty less than lowest of the R and G values in the darkest highlights. To choose a threshold that can be used for both shadows
and highlights, enter the average of the highest value (R or G) in
the brightest shadows and the lowest value (R or G) in the darkest
highlights. Color values can be determined by moving the cursor
over the image and observing the R and G values in the Information
palette.
71
Image Adjustment
The Digital DEE Settings Menu
Clicking the
button in the Digital DEE palette displays the Digital DEE Settings menu.
Option
Description
Copy to Clipboard Copy current Digital DEE settings to the clipboard.
Select this item to load Digital DEE settings previously saved using the Save…
option (see below). A dialog will be displayed where you can navigate to the
Load…
drive (volume) and direc tory containing the desired settings file (only files with
the extension “.ndd” will be displayed). The settings in the Digital DEE palette
will instantly revert to the saved settings.
Select this item to save Digital DEE settings to a named file. These settings can
later be recalled using the Load… option. Choosing Save… displays a dialog
Save…
where you can choose a destination and file name for the current Digital DEE
settings. Digital DEE settings are saved with the ex tension “.ndd”.
Reset to Default Reset Digital DEE settings to default values.
Recent Digital DEE settings files (up to four) are listed at the end of the settings
Recent files
menu. Selecting a file from the list sets the controls in Digital DEE palette to
the saved settings.
The Set tings Menu
The Digital DEE Settings menu can also be displayed by selecting Digital DEE
from the Set tings menu.
72
Enhancing Images
Fisheye Lens (Fisheye-to-Rectilinear Transform for DX 10.5 mm Fisheye Lenses)
The tools in the Fisheye Lens palette modify images taken with an AF DX 10.5 mm f2.8G Nikkor fisheye lens to resemble images taken with a normal wide-angle lens. This option is not
available with other lenses.
1
Display the Fisheye Lens palette
Select the tool palette containing the Fisheye Lens palette from the View menu (the
default location for the Fisheye Lens palette is Tool Palette 2) and click the triangle at the
top left corner of the palette.
Apply button
Settings menu
Include areas where
there is no image
data check box
Fill color menu
2
Turn the Apply button on ( )
Turn the Apply button on ( ) to enable the Fisheye Lens. The image in the active window will be trimmed around a vertical area in the center of the image that has been
processed to compensate for fisheye distortion, and the Include areas where there is
no image data check box will be enabled.
3
Adjust settings
Include areas where there is no image data
Check this option to trim the image in the active area around a horizontal area in the
center of the image that has been processed to compensate for fisheye distortion and fill
areas where there are no image data with the color selected in the Fill color menu.
Image created with
supported fisheye lens
Apply button on
(vertical compensation)
Include areas where there
is no image data selected
(horizontal compensation)
Areas without image data
filled in white, light gray, dark
gray, black, red, green, blue,
cyan, magenta, or yellow
73
Image Adjustment
The Fisheye Lens Settings Menu
Clicking the
button in the Fisheye Lens palette displays the Fisheye Lens Settings
menu.
Option
Description
Copy to Clipboard Copy current Fisheye Lens settings to the clipboard.
Select this item to load Fisheye Lens settings previously saved using the Save…
option (see below). A dialog will be displayed where you can navigate to the
Load…
drive (volume) and direc tory containing the desired settings file (only files with
the extension “.nfe” will be displayed). The set tings in the Fisheye Lens palette
will instantly revert to the saved settings.
Select this item to save Fisheye Lens settings to a named file. These settings can
later be recalled using the Load… option. Choosing Save… displays a dialog
Save…
where you can choose a destination and file name for the current Fisheye Lens
settings. Fisheye Lens settings are saved with the ex tension “.nfe”.
Reset to Default Reset Fisheye Lens settings to default values.
Recent Fisheye Lens settings files (up to four) are listed at the end of the settings
Recent files
menu. Selecting a file from the list sets the controls in Fisheye Lens palette to
the saved settings.
Vertical Compensation
Because the edges are trimmed when vertical compensation is in effect, images saved with the Apply
button checked have a smaller file size than the originals.
The Set tings Menu
The Fisheye Lens Settings menu can also be displayed by selecting Fisheye
Lens from the Set tings menu.
74
Enhancing Images
Output Size and Resolution
The Size/Resolution palette is where you specify the final (“output”) size of the portion of the
image that will be saved when Save or Save as… is selected from the File menu. The choice
of settings in the Size/Resolution palette depends on how you intend to use the image and
the amount of storage space you have available. Some examples are given below.
If the image will be used in printing or desktop publishing…
…size and resolution will be dictated by the resolution of the output device and the physical
size of the image when printed, measured in centimeters or points rather than pixels.
If you intend to use the image on a web page…
…specify output size in pixels, keeping file size to a minimum for rapid downloads. Reso lution in this case is not an issue.
Adjusting Size and Resolution
1
Display the Size/Resolution palette
Select the tool palette containing the Size/Resolution palette from the View menu (the
default location for the Size/Resolution palette is Tool Palette 1) and click the triangle at
the top left corner of the palette.
RAW Image Size (D1X Only)
The D1x is designed to record images at 3,008 × 1,960 pixels (six megapixels). Image quality will not
necessarily increase when RAW images are output at a size of 4,016 × 2,616 pixels (ten megapixels,
equivalent to the dimensions of the CCD).
NEF Images
When an image is saved in NEF format, the entire image will be saved together with information on
resolution and the size and dimensions of the current crop.
75
Image Adjustment
2
Make changes to options as described below
Keep the crop
When Keep the crop is selected, you can use the mouse to adjust the size and position of the current crop as desired. If you enter a new value for height or width in the
Size/Resolution palette, the remaining dimension changes automatically to maintain a
constant height-width aspect ratio, and scale is adjusted to reflect the new dimensions
(scale can not be increased beyond 200%). If the image can not be output at the current resolution using the new dimensions, resolution will automatically be adjusted to an
appropriate value. This option is useful when you want to specify height and width after
selecting a crop.
Keep the output size
Keep the output size locks output dimensions and file size at their current values, setting the aspect ratio of the current crop according to the dimensions input in the Size/
Resolution palette. This height-width aspect ratio will be maintained when you adjust
the size of the crop in the active window, and scale will be adjusted to reflect changes
to the size of the crop (scale can not be increased beyond 200%). If the image can not
be output at the current resolution using the new dimensions, resolution will automatically be adjusted to an appropriate value. This option is useful when you want to set the
output dimensions and file size of the final image before selecting a crop.
Width/Height
The output dimensions for the current crop can be entered in these text
boxes. The units used to describe output dimensions can be chosen
from the menu to the right of the text boxes.
at
The at text box is where you enter the output resolution. This text box is
not active if the unit chosen for output size is “pixels,” when resolution
is fixed at 300 ppi. The value chosen at other settings should reflect
the resolution of the output device on which the final image is to be
printed. The units for resolution can be selected from the resolution
menu, which offers a choice of pixels per inch (ppi) or pixels per centi meter (ppcm). The default resolution is 300 ppi.
Scale/File Size
Scale (output size as a percentage of input size, maximum 200%) is displayed at the bottom of the
Size/Resolution palette, together with the uncompressed file size of the image that would be created at
current settings. File size depends on the color model (RGB or CMYK) and, in the case of RGB images,
on the pixel bit-depth that will be used when the image is saved. Separate uncompressed file sizes are
shown for CMYK and for eight-bit and sixteen-bit RGB.
76
Enhancing Images
The Size/Resolution Settings Menu
Clicking the
button in the Size/Resolution palette displays the Size/Resolution Settings
menu.
Option
Description
Copy to Clipboard Copy current Size/Resolution settings to the clipboard.
Select this item to load size and resolution settings previously saved using the
Save… option (see below). A dialog will be displayed where you can navigate
Load…
to the drive (volume) and direc tory containing the desired settings file (only files
with the extension “.nsr” will be displayed). The settings in the Size/Resolution
palette will instantly revert to the saved settings.
Select this item to save size and resolution settings to a named file. These settings can later be recalled using the Load… option. Choosing Save… displays a
dialog where you can choose a destination and file name for the current size and
Save…
resolution settings. Size and resolution settings are saved with the ex tension
“.nsr”.
Reduces RAW images created with the D1X by 74.9% to 3,008 × 1,960 pixels (six
Reset to D1X 6MP megapixels). Select Reset to 100% to restore the image to 4,016 × 2,616 pixels.
This option is only available with RAW images taken using the D1X.
Enlarges the crop to include the entire image. Resolution will be reset to the
Reset to 100%
default value of 300 ppi (118.11 ppcm).
Recent Size / Resolution settings files (up to four) are listed at the end of the
Recent files
settings menu. Selecting a file from the list sets the controls in Size / Resolution
palette to the saved settings.
The Set tings Menu
The Size/Resolution Settings menu can also be displayed by selecting Size/
Resolution from the Set tings menu.
77
Image Adjustment
Saving and Loading Image Adjustment Settings
Image adjustment settings for all tool palettes (including the status of the Apply button for
each palette) can be copied to the clipboard and saved in combined settings file. When
the combined settings are pasted or read into the Nikon Capture 4 Editor, they will apply
to all palettes simultaneously. These operations are performed using the commands in the
Settings > Image Adjustments menu, which also contains an option for restoring all tool
palettes to default settings.
Option
Description
All image adjustment settings for the image in the ac tive window are copied to
Copy to Clipboard the clipboard. You can paste them into the tool palettes for another window by
selecting Paste from the Edit menu when the window is active.
Select this item to load settings previously saved using the Save… option (see
below). A dialog will be displayed where you can navigate to the drive (volume)
Load…
and direc tory containing the desired settings file (only files with the ex tension
“.set” will be displayed). The settings in the Nikon Capture 4 Editor tool palettes
will instantly revert to the saved settings.
Choosing Save Selected Adjustments… displays the Copy Image Adjustment
dialog. Check the adjustments you want to save and click Copy to display a dialog where you can choose a destination and file name for the selected settings.
Save Selected
Adjustments… The settings are saved with the extension “.set” and can later be recalled with
the Load… option. If this file is later selected for batch processing, images will
be processed according to the settings in the file (
88, 112).
Select this item to save settings to a named file. These settings can later be
recalled using the Load… option. Choosing Save… displays a dialog where
Save All
you can choose a destination and file name for the current settings. If this file
Adjustments… is later selected for batch processing, images will be processed according to the
settings in the file (
88, 112). Combination settings files are saved with the
extension “.set”.
Select this option to restore the default settings selected for “User default” imReset to User
age adjustments in the General tab of the Nikon Capture 4 Editor Preferences
Default
dialog (
94). In the case of the default settings file (“Neutral.set”), RAW images taken with the D1X will be scaled to 100% (4,016 × 2,616 pixels).
Reset All Adjust- Resets all tool palettes to the settings in the default settings file (“Neutral.set”).
ments to Neutral Image adjustment settings in PictureProject will also be reset to defaults.
Recent image adjustment settings files (up to four) are listed at the end of the
Recent files
settings menu. Selecting a file from the list restores the saved settings.
78
Enhancing Images
Saving Images
Nikon Capture supports a variety of file formats. Images displayed in Nikon Capture can be
saved in a file format that suits the end in view. Hints for choosing a file format may be found
on the pages that follow.
Choosing a File Type
Nikon Capture 4 supports the following file types when saving images:
File type
NEF
(Nikon Electronic Image Format)
16-bit TIFF (RGB)
8-bit TIFF (RGB)
TIFF (CMYK)
JPEG
Compression
Uncompressed
Compressed
Extension
Uncompressed
.TIF
Compressed
.JPG
.NEF
Nikon Electronic Image Format (NEF)
Images saved in NEF format maintain the high quality of the original photograph; adjust ments to settings are not applied to the original image data, but are instead saved separately
in the same file. NEF images can later be opened in Nikon Capture and saved again in a
format that can be opened in other applications. As changes to settings are only applied to
the original image data when the image is saved in another format, this minimizes any loss of
image quality that may be produced when the image is edited. Save images in NEF whenever
you are unsure of how they will be used or when you want to process the original image in
a number of different ways.
NEF images created in Nikon Capture 4 can only be opened in Nikon Capture 4, or in Adobe
Photoshop 6.0 or later using the Nikon NEF filter supplied with this product. Photographs
recorded at an image quality setting of uncompressed NEF (RAW) can be compressed when
saved in NEF format (compressed RAW images are automatically saved in compressed NEF
format, and can not be saved in uncompressed NEF format).
TIFF
Use TIFF when saving images for high-quality output or publishing. Although the lack of
compression will result in larger files, image quality will be maintained at a high level. TIFF
also preserves the ICC profile and caption information. This format is supported by a wide
variety of applications on a variety of platforms.
JPEG
This file type is adequate for images that will be output at low resolution or distributed in
electronic form. Compression allows more images to be saved in the same amount of disk
space while preserving the ICC profile and caption information. Note, however, that JPEG
compression results in loss of image information that can not afterwards be restored. Save
files at the lowest compression ratio possible; if necessary, they can always be saved again at
a lower compression ratio.
79
Image Adjustment
Options for Saving Image Files
Nikon Capture offers two options for saving files: Save and Save as…. The Save option
saves the image in the same location as the original without changing the file name or format. The Save as… option lets you choose a location, file name, and format. When the
Multi-Image window is active, only the images selected in the thumbnail area are saved.
Using the “Save” Command
1
2
Click the
button or select Save from the File menu
The existing file will be over written. If the image is in JPEG format, a dialog will be displayed
where the compression ratio can be selected from
“Highest Compression Ratio,” “Good Compression Ratio,” “Good Balance,” “Good Quality,” and
“Excellent Quality.”
Save button
Confirm progress in the Save Progress window ( 83)
If the Use Save Progress Window option is not selected in the General tab of the Preferences dialog ( 95), files will be saved immediately, and the Save Progress window will
not be displayed. The Save Progress window is not available in Windows 98 SE, Windows
Me, or Mac OS 9.
Using the “Save as…” Command
1
Select Save As… from the File menu
The standard Save dialog for your operating system will be
displayed.
Save button
Images Saved in Nikon Capture 4
Images saved in Nikon Capture 4 can not be viewed on a camera.
The
Button
Clicking the
button saves any changes to the current file, overwriting the original image. The Save
dialog is not displayed.
80
Enhancing Images
2
3
4
Choose a location
Navigate to the desired drive (volume) and folder.
Choose a file type
Choose a file type (file format) from the pop-up menu. See “Choosing a File Type” (
79) for more information.
Adjust compression settings
If NEF is chosen in Step 3 when saving uncompressed RAW images, compression can be
turned on by selecting Use Compression. Uncompressed RAW images saved at this
setting will be compressed using a lossless compression algorithm. This check box is automatically enabled when a compressed RAW image is saved. Compressed RAW images
can not be saved in uncompressed format.
Use Compression is automatically selected when images are saved in JPEG format. The
compression ratio can be selected from “Highest Compression Ratio,” “Good Compression Ratio,” “Good Balance,” “Good Quality,” and “Excellent Quality.”
5
Enter a name for the file
The default file name appears in the File name text box. A new file name can be entered
if desired.
6
Click Save
If the Use Save Progress Window option is selected in the General tab of the Preferences dialog ( 95), a window will be displayed where the progess of the save operation
can be viewed while other operations are performed. If this option is not selected, files
will be saved immediately, and no progress dialog will be displayed. The Save Progress
window is not available in Windows 98 SE, Windows Me, or Mac OS 9.
File Naming Conventions
Windows: In environments that do not support long file names, the maximum length is eight charac ters; file names may not contain spaces, quotes, or any of the following characters: “\\” “/” “:” “.”
“;” “*” “?” “<“ “>” and “|”.
Where long file names are supported, the maximum length is 255 characters; file names may not contain quotes or any of the following characters: “\\” “/” “:” “.” “;” “*” “?” “<“ “>” and “|”.
Macintosh: The maximum length for Macintosh file names is thirty-one characters. Colons (“:”) are
not allowed.
NEF
NEF files created with Nikon Capture 4 can not be opened in earlier versions of Nikon Capture. Nikon
Capture 4 can however be used to open NEF images created with earlier versions of Nikon Capture.
JPEG
Image quality may drop when images are saved in JPEG format. No drop in image quality occurs when
images are saved in NEF.
Error Messages
If an invalid file name or other error is identified in the Save dialog, a message will be displayed. Adjust
settings as directed.
81
Image Adjustment
Save Options
In addition to the settings listed above, the following options are available in the Save dialog:
Bit depth
Open in External
Application
Bit depth
Gives the bit depth (the number of bits of color information per channel for each pixel
in the image) at which the image will be saved. The 16-bit option is only available if the
selected file type is TIFF format (RGB) and the original image has a bit depth of over eight
bits.
Open in
If Open saved images with is selected in the General tab of the Preferences dialog, the
name of the selected application (e.g., Adobe Photoshop 7.0) will be displayed. This option can not be selected if the chosen file format is NEF. If this check box is on, the image
will automatically be opened in the selected application after being saved to disk.
File Names…
If multiple images are selected in the
Multi-Image window, a File Names...
button will be displayed. Click this button to view or modify file-naming rules.
The Multi-Image Window
If the image in the Multi-Image window is saved under another name using the Save As… option, the
original image will still be displayed in the image area.
Image selected in
If image is saved to
thumbnail list is
current folder under
displayed in image
new name, modiarea. If image is edfied image appears
ited, asterisk (“*”)
in thumbnail list,
appears in title bar.
but original is still
displayed in image
area.
If changes to the originals have not been
saved using the Save option, the dialog
shown at right will be displayed when you exit
Nikon Capture 4 Editor or close the Multi Image Window. Click Yes or Yes to All to save
the changes under the original file names.
82
Enhancing Images
The Save Progress Window (Windows 98 SE/Windows Me/Mac OS 9 Excluded)
If the Use Save Progress Window option
is selected in the General tab of the Preferences dialog ( 95), the Save Progress window will be displayed while images are saved
(the Save Progress window is not available in
Windows 98 SE, Windows Me, or Mac OS
9). The Save Progress window shows all save
operations currently in progress, and can be
used to pause, restart, or cancel the current
task. If the Save Progress window is displayed, other operations can be performed
while images are saved.
Close when done
If this option is selected, the Save Progress window will close automatically when all images
have been saved.
Show file paths
Check this option to display file paths (volume and folder names) in the Save Progress dialog.
If this option is not selected, only file names will be displayed.
Saves
This tab lists the names and status of files that have yet to be saved.
Progress Log
Lists warnings, errors, and completed or cancelled tasks.
Pause, restart, or cancel the selected operation.
Reopen (Progress Log tab)
Reopen the selected file in an image window.
Show only erros and warning(Progress Log tab)
Check this option to display only warnings and errors in the Progress Log tab. If this option
is not selected, the Progress Log tab will also list completed operations.
Clear (Progress Log tab)
Clear the list of warnings, errors and completed or cancelled tasks from the Progress Log
tab.
The Save Progress Window
The following operations can not be performed while a save is in progress:
• Opening the “Preferences” dialog
• Exiting Nikon Capture 4 Editor.
83
Image Adjustment
Printing Images
Images can be printed directly from Nikon Capture 4 Editor to test the effects of image adjustments.
1
2
3
Open the image
Be sure the image you wish to print is open in Nikon Capture 4 Editor.
Select Print… from the File menu
The Print Layout dialog will be displayed.
Print the image
Adjust settings as described below and click Print to print the image. Click Cancel to
exit without printing.
Printer / Paper / Printable area
These text boxes display current printer settings. To change printer settings, click Page
Setup… (see below).
Printer
Paper
Displays the currently selected printer.
Displays the current paper size.
Displays the maximum dimensions of the area that can be printed per sheet at
Printable area
current printer and paper size settings.
Print preview
Check this option to display a preview of how the images will print on the currently selected printer. Click the next page button to page through the selected images.
Copies (Windows only)
Choose the number of copies that will be printed. Up to 100 copies can be printed.
In the Macintosh version, the number of copies is not displayed in the Print Layout dialog.
To specify the number of copies, click Print. A confirmation dialog will be displayed; click
Yes to proceed with printing and specify the number of copies.
84
Enhancing Images
Page Setup…
Click to display a Printer Settings dialog in
which you can modify the printer and paper settings. If you are using a Macintosh,
the appearance of this dialog depends on
the printer in use. The changes made are
reflected in the “Printer,” “Paper,” and
“Printable area” fields.
Meta Data…
To choose the information to be included
with each print, click Meta Data…. The
“Meta data print setup” dialog will be
displayed; adjust the following settings
and click OK to return to the “Print layout”
dialog.
Depth level: Put a check in the box next
to the level of information you want included with your prints. Choose from:
• Basic: file name and date and time of
recording
• Additional information: camera
model, shutter speed, aperture (f/number), image size, exposure mode,
and white balance
• Detail information: metering mode,
exposure compensation, focal length,
autofocus mode, and sensitivity (ISO
equivalency)
To change the font used to print shooting information, click Change.
Imprint capture date over image: Select Date only to print the date of recording on
the image, or Date and Time to print the date and time of recording. To choose the font
used to print the date or date and time, click Change.
Use output resolution
Check this option to print the image at its native resolution and dimensions. In Nikon
Capture 4, this is the size and resolution selected in the Nikon Capture 4 Editor Size/
Resolution palette ( 75). If the image will not fit in the printable area (see above) at the
current printer and paper size settings when you click the Print button to begin printing,
a message will be displayed warning that the image will be cropped to fit the printable
area. Choose a larger paper size or reduce the size of the image using the Size/Resolution
palette.
Use output resolution is not available when multiple images are selected.
85
Image Adjustment
Page Layout
Choose from Select layout and Select picture size and adjust options as described
below.
Select layout: When this option is selected, you can choose the number of images that
will be printed from a drop-down menu.
Page orientation
Portrait
Landscape
1 Up
One image printed in center of page
One image printed in center of page
Two pictures printed
2 Up
Two pictures printed side-by-side
one above the other
Four pictures printed in two rows of two Four pictures printed in two rows of two
2 × 2 Up
columns each
columns each
Eight pictures printed in four rows of
Eight pictures printed in two rows of
2 × 4 Up
two columns each
four columns each
Sixteen pictures printed in four rows of Sixteen pictures printed in four rows of
4 × 4 Up
four columns each
four columns each
Twenty-five pictures printed in five rows Twenty-five pictures printed in five rows
5 × 5 Up
of five columns each
of five columns each
Forty pictures printed in eight rows of
Forty pictures printed in five rows of
5 × 8 Up
five columns each
eight columns each
Image
Print page consisting solely of the following information for the selected images:
information file name, camera make and model, exposure program, date and time of creation,
list
shutter speed, aperture, and white balance.
Option
The size of the images is automatically adjusted according to the layout. Select Rotate
images to fit to rotate images to print at the largest size that will fit on the selected
paper size.
Select picture size: When this option is
selected, you can choose print size from a
drop-down list.
Rotate image(s) to fit: Check this option to automatically rotate each image so as to
minimize the unused space inside each image frame.
Print a picture multiple times: To print multiple copies of each image, check this option and select a number from between two and ten from the pull down menu. Select
The whole page to print enough copies of the image to fill the whole page at the
selected size.
Borderless print (Windows) / Eliminate white border (Macintosh): Check this option
to adjust the image size so that it fits exactly inside the red border, without leaving any
white space. If the aspect ratio of the box and the image differ, part of the image may
not be printed.
86
Enhancing Images
Use thumbnail data
Check this option to print the pictures at draft resolution using thumbnail data. Recommended for draft prints only.
Printer type
Choose from Inkjet printer or All other
types.
Inkjet printer: We recommend this option when printing on inkjet or color laser printers.
The selected images will be printed at high quality and speed at the highest resolution
supported by the printer (if the printer supports resolutions higher than 360 dpi, the images will print at 360 dpi).
All other types: Select this option when printing in color on devices that use dye-sublimation or photographic processes. The selected images will be printed at the highest
resolution supported by the printer. Print speed may drop if you choose this option when
using an inkjet printer.
Normal Print / Save [Print Image] as file
Select whether to print images on a printer,
or to save the page as an image file.
Normal Print: Outputs the selected images to a printer.
Save [Print Image] as file (Windows) / Save image files (Macintosh): Saves the page
as a JPEG file using the layout specified in the “Page Layout” dialog. When this option is
selected, the Print button in the “Page Layout” dialog will change to Save. Clicking the
Save button displays the “Save Image(s)” dialog, where you can choose a destination
folder and file name and select Quality (JPEG compression) from Maximum, High, Medium, or Low. Each page is saved as a separate file.
Setting up Your Printer
Note that the printer must be properly connected and the printer drivers correctly installed.
Printing with Color Management
The printer profile can be selected in the Color Management tab of the Preferences dialog in Nikon
Browser, Nikon Viewer, Nikon Capture 4 Editor (
98, 99), or Nikon Capture 4 Camera Control.
“Use Output Resolution”
To print images at the size and resolution selected in the Nikon Capture 4 Editor Size/Resolution palette,
select Use output resolution.
87
Image Adjustment
Batch Processing
Nikon Capture 4 supports automated processing of multiple images (batch processing).
Batch processing is used to automate image processing, capturing images, applying pre-defined image adjustment settings, and saving images to disk automatically. It is most effective when applied to a series of photographs taken under identical conditions. Images are
processed in the order taken.
When using batch processing, we recommend that you open one of the images to be processed in Nikon Capture 4 and edit image adjustment settings to produce the desired result.
You can then save these settings in a joint settings file using the Save Selected Adjustments or Save All Adjustments option in the Settings > Image Adjustment menu (
78). By selecting the resulting settings file in the Batch dialog, you can per form the same
adjustments on all the images processed. In studio settings where a variety of shooting
conditions can be replicated with ease, you can create separate settings files for commonly
encountered conditions and use these settings to automate repetitive image enhancement
operations.
Click the
button or select Batch from the
Tools menu.
89
Open the Batch dialog
Choose folder containing images for batch
processing.
89
Choose how images will be processed.
90
Choose a file naming method and file format
for processed images.
91
Click Start to begin processing.
Open the Batch progress dialog
92
Click Batch Complete when processing is
complete.
92
Close the Batch progress dialog
Before Using Batch Processing
Batch processing is used to perform the operations specified in the Image Adjustments section of the
Batch dialog on all files in a selected folder. To ensure that desired results are achieved, we recommend
processing a test image before beginning batch processing. Batch processing can not be used to adjust
settings separately for each image; instead, the images must be opened one at a time in the order taken
and separate adjustments made manually for each image.
88
Enhancing Images
This section describes how to use batch processing with files that have already been saved to
the computer’s hard disk. For information on batch processing of images captured directly
from the camera, see “Nikon Capture 4 Camera Control” ( 112).
1
Display the Batch dialog
button or select Batch from the Tools menu to displaythe Batch dialog.
Click the
Source section
Image Adjustments
section
Destination section
2
Choose a source folder
In the Source section, choose the folder containing the images to be processed. The current folder is listed in the text box. To choose a new folder, click the Browse... button
and navigate to the desired location.
Include subfolders
Check this option to process all images in any sub-folders under the specified folder.
Folders with the same names will be created in the destination folder.
Periodically check for new files in this folder
When this option is checked, Nikon Capture 4 will check for new images in the specified
folder once every ten seconds. This option is not available when Include subfolders is
checked.
Delete files from this folder after they are processed
Check this option to delete image files from the selected folder after processing. A warning dialog will be displayed before batch processing begins. This option is not available
when Use source file name is selected in the Destination section or when Use Save
Progress Window is selected in the General tab of the Preferences dialog.
Selecting Folders for Batch Processing
For improved efficiency, create two folders that are used only for batch processing, one for the orginals
and the other for processed images.
89
Image Adjustment
3
Specify how images will be processed
In the Image Adjustments section, specify the operations to be performed on each image.
Apply current settings
Select this option to process the images in the selected folder using the settings currently
in effect in Nikon Capture 4 Editor.
To change settings before beginning
batch processing, click Change Settings…. A dialog will be displayed
where an image can be opened to assist
with the process of adjusting settings.
Click No to adjust settings without
opening an image.
To open the first image in the source
folder, click Load First Image. To select
another image from the source folder,
click Choose Image….
The dialog
shown at right will be displayed; select
an image and click OK.
A pause dialog will be displayed; adjust settings as desired and then click
Resume Batch to return to the batch
processing dialog.
Apply settings in
Select this option to process the images in the selected folder using joint settings created using the Save Selected Adjustments or Save All Adjustments option in the
Settings > Image Adjustment menu ( 78; note that if Calculate Automatically is
selected for white balance in the settings file, the recorded value will be used when images are processed). When this option is selected, a joint settings file can be selected by
clicking the Browse button to its right.
Apply settings already in NEF files
Check this option to apply settings previously saved with NEF files. If this item is not
checked, the saved settings will be replacing with the settings chosen in the Image Adjustments section.
Orientation
Images processed using the batch option are saved in their original orientation. When Apply current
settings is selected, images will not be rotated or flipped, regardless of whether flips or rotations have
been applied to the image in the active image window.
Existing Image Adjustment Settings
If the Apply settings already in NEF files option is not checked, any changes to set tings stored with
files saved in NEF format will be ignored, and the settings in the selected settings file applied. If you have
processed a series of NEF images separately and want to save them all as sixteen-bit TIFF, you can check
this option and use batch processing to save all the images to a single folder in sixteen-bit TIFF format.
90
Enhancing Images
4
Choose a destination for the processed images
In the Destination section, choose options for saving the processed images.
Use source folder
When this option is selected, processed images will be saved to the same folder as the
original.
Use source file name
When this option is selected, processed images will be saved under the same name and
in the same location as the original images, although the file extension will change if the
chosen file format differs from the original. A warning will be displayed if the file name
already exists. This option can not be selected at the same time as Delete files from
this folder after they are processed, and is not available when Use Save Progress
Window is selected in the General tab of the Preferences dialog.
Save to
This text box shows the folder to which the images will be saved after processing. To
choose a new folder, click the Browse... button to the right of the text box and navigate
to the desired location. This option is not available when Use source folder is selected.
A folder with the same name will be created in the destination folder.
Next file name
This text box shows a sample of the file names that
will be used when saving the images after processing. To choose a new file name, click the Edit...
button. The File Naming dialog will be displayed.
Save as type
Choose the file format that will be used to save the processed images. The following
formats are available: Use source file type, NEF (Nikon Electronic Image Format),
TIFF Format (RGB), TIFF Format (CMYK), and JPEG Format. When NEF is selected,
compression can be chosen from a pull-down menu. When JPEG is selected, the compression ratio can be chosen from “Highest Compression Ratio,” “Good Compression
Ratio,” “Good Balance,” “Good Quality,” and “Excellent Quality.” For more information
on the options available, see “Saving Images” ( 79).
File Naming Conventions
Windows: In environments that do not support long file names, the maximum length is eight charac ters; file names may not contain spaces, quotes, or any of the following characters: “\\” “/” “:” “.”
“;” “*” “?” “<“ “>” and “|”.
Where long file names are supported, the maximum length is 255 characters; file names may not contain quotes or any of the following characters: “\\” “/” “:” “.” “;” “*” “?” “<“ “>” and “|”.
Macintosh: The maximum length for Macintosh file names is thirty-one characters. Colons (“:”) are
not allowed.
91
Image Adjustment
Bit Depth
Gives the bit depth (the number of bits of color information per channel for each pixel
in the image) at which the image will be saved. The 16-bit option is only available if the
selected file type is TIFF format (RGB) and the original image has a bit depth of over eight
bits.
5
Begin processing
Click Start to put the selected settings into effect and begin processing. A batch progress dialog will be displayed (exceptin Windows 98 SE, Windows Me, or Mac OS 9, the
Save Progress window will be displayed if Use Save Progress Window is selected in the
General tab of the Preferences dialog;
95).
Minimize button
Log area
Stop Batch
Click this button to stop batch processing before all images have been processed.
Only show warnings and errors
Check this option to display only warnings and errors in the log area. If this option is not
checked, the log will also show the names and locations of the original images, captured
photographs, and processed images.
Show file paths
Select this option to show the source and destination file paths. File paths are not displayed if Only show warnings and errors is checked.
6
Exit the batch processing dialog
When batch processing is complete, the Stop Batch button will change to Batch Complete. Click Batch Complete to exit the batch processing dialog.
The Log Area
If an error occurs during processing, a description will be displayed in the log area of the batch dialog.
Error Messages
If an invalid file name or other error is identified in the batch processing dialog, a message will be displayed. Return to the batch processing dialog and adjust settings as directed in the message.
The Minimize Button (Windows )
Clicking the minimize button in the batch processing dialog minimizes Nikon Capture 4 Editor.
92
Fine-Tuning Nikon Capture 4 Editor
Nikon Capture 4 Editor Preferences
Fine-Tuning Nikon Capture 4 Editor
To view the Preferences dialog, select Options… from the Tools menu (Windows) or select
Preferences… from the application menu (Mac OS X) or Edit menu (Mac OS 9).
Windows
Mac OS X
The Preferences dialog contains the following five tabs:
Tab
Description
General
Temporary Files
Advanced Color
Adjust application settings.
Specify the location of the folders used for temporary storage.
Set the defaults for the white and black points in the Curves window.
Grid Lines
Specify the spacing and color of the grid displayed in image windows.
Select the color profiles used by the Nikon Color Management System
Color Management
(CMS).
94
96
96
97
98
99
After making changes to preferences, click OK to save changes and return to the Nikon
Capture 4 Editor window. Click Cancel to cancel any changes to settings and return to the
Nikon Capture 4 Editor window.
Viewing Preferences
To view settings in any of the five panels, click the appropriate tab.
Tab
93
Nikon Capture 4 Editor Preferences
The General Tab
The General tab contains the following items:
Windows
Macintosh
“User Default” image adjustments
Choose the combined settings (“.set”) file that will apply when Reset to User Default is
78). The factory default setselected from the Settings > Image Adjustments menu (
tings file (“Neutral.set”) produces a neutral, unedited image.
Open saved image with
To specify the application used to open saved images, click the Browse… button and navigate to the desired application. This setting has no effect on the
(“Open in Photoshop”)
button in the Quick Tools palette (
9).
Save large previews for NEF files
Image files normally include an embedded preview 640 pixels on its longest size. If this option is checked, images saved in NEF will include a preview 1,600 pixels on its longest side,
allowing NEF images over 1,600 pixels long to display more quickly in Nikon Viewer.
Hide Tool Palettes when the application is not active (Windows only)
Select this option to hide the tool palettes and Quick Tool palette when another application
is activated and brought to the front.
Show full path in the image window title bar (Windows only)
Select this option to display the full paths and file names of the images opened in image
windows.
Use this monitor for new images (Macintosh only)
In a multiple display environment, select the monitor that will be used to display images
opened in Nikon Capture 4 Editor. This option is not available when only one monitor is
connected.
Large Previews for NEF Files
Selecting the Save large previews for NEF files option increases file size by about 1 MB, slightly increasing the time needed to save images.
94
Fine-Tuning Nikon Capture 4 Editor
Initial image window size (Macintosh only)
Choose the size at which images will be opened from one-third screen width, one-half
screen width, and two-thirds screen width.
“Open with Photoshop” Quick Tools button
Choose whether images are transferred to Photoshop eight bits at a time (Always transfers
8-bit data) or sixteen bits at a time (Transfers 16-bit data when possible) when the
button in the Quick Tools palette is clicked to open an image in Photoshop ( 9). If sixteenbit transfer is not possible when Transfers 16-bit data when possible is selected, images
will be transferred eight bits at a time.
File format for Save As
Choose the default file format for images saved using the Save As… option ( 79). Choose
from Same as original file (each image will be saved in its current format), Previous file
format (images will be saved in the last format selected), NEF, JPEG, TIFF (RGB), and TIFF
(CMYK).
By default, a D1X RAW file will be
This option controls the default size for RAW images taken with the D1X. Choose 10MP
(4016 × 2616) or 6MP (3008 × 1960).
Use Save Progress Window (save images in background)
Select this option to display the Save Progress Window while images are saved (
option can not be selected in Windows 98 SE, Windows Me, or Mac OS 9.
83). This
Use Save Progress Window
The Periodically check for new files in this folder and Delete files from this folder after they
are processed options are not available in the batch progress dialog when Use Save Progress Window is selected (
88).
Opening Files with Photoshop (Mac OS 9)
A temporary file is created each time an image is opened in Photoshop. These files are normally deleted
when the computer restarts. In Mac OS 9, however, the files are locked and cannot be deleted; instead,
they are moved to the Trash. To delete files, select Empty Trash from the Special menu in the Finder
while pressing the option key.
95
Nikon Capture 4 Editor Preferences
The Temporary Files Tab
The Temporary Files tab offers the following
option:
Folder for temporary data
Specify the folder or volume in which temporary data, such as image cache data, will
be stored. The default folder for Windows is
the “TEMP” folder in the Windows directory,
while the default volume for the Macintosh is
the start-up disk. To choose a different folder in the Windows version of the program,
click the Browse… button and navigate to
the desired location. In the Macintosh version, a new volume can be chosen from the
pop-up menu.
The Advanced Color Tab
The Advanced Color tab contains the following items:
Black Auto-Contrast clip
By default, the black point is set to a value
that excludes 0.5% of the darkest pixels in
the crop. This produces an optimal dynamic
range, with minimal loss of detail in shadows. To preserve detail at the expense of
dynamic range, choose a lower value (choose
0 to set the black point to the darkest pixel in
the crop). To increase dynamic range at the
expense of detail, choose a higher value.
White Auto-Contrast clip
By default, the white point is set to a value
that excludes 0.5% of the brightest pixels in
the crop. This produces an optimal dynamic
range, with minimal loss of detail in highlights. To preserve detail at the expense of dynamic
range, choose a lower value (choose 0 to set the white point to the brightest pixel in the
crop). To increase dynamic range at the expense of detail, choose a higher value.
The Temporary Files Tab
Changes to settings in the Temporary Files tab also apply to Nikon Capture 4 Camera Control. Nikon
Capture 4 must be restarted before changes to settings will take effect.
96
Fine-Tuning Nikon Capture 4 Editor
Black Dropper value/White Dropper value
Controls the default output values for white point and black point. Output for each channel can be set to a value between zero and 255; these settings can also be adjusted in the
Curves window. By default, output levels for the white point are 255 for each channel, which
displays as white on most computer monitors. The defaults for the black point are 0 for each
channel, which displays as black.
Dropper sample size
This setting determines the size of the area sampled with the eyedropper cursor in the White
Balance and Curves palettes. You can select a sample sizes of Point Sample (the default
setting), 3 × 3 Average, and 5 × 5 Average. When the sample size is set to 3 × 3 or 5 × 5, the
average for the pixels sampled is used. Choosing a large sample size reduces precision, but
also minimizes the effects of noise; choosing a small sample size has the opposite effect.
Reset to Default
Click this button to restore settings in the Advanced Color tab to their default values.
The Grid Lines Tab
The Grid Lines tab controls the color and
spacing of the non-printing grid lines overlaid on an image when Show Grid Lines is
selected from the Image menu.
Color
The color of the grid lines can be selected
from white, light gray, dark gray, black, red,
green, blue, cyan, magenta, and yellow.
Display grid line every
Enter a value for grid spacing in the text box.
The units for the grid can be selected from
the pop-up menu to the right of the text
box. The options available are pixels, inches,
millimeters, centimeters, picas, and points;
at settings other than pixels grid spacing can
be entered up to two decimal points.
Display n subdivisions per line
The number of subdivisions into which each grid cell will be divided. The main grid is displayed as solid lines of the color specified using the Color option, the subgrid as broken lines
of the same color.
97
Nikon Capture 4 Editor Preferences
The Color Management Tab (Windows)
The Color Management tab is where you
specify the color management profiles used
for displaying images on your monitor, editing and saving RGB images, and saving and
printing CMYK images.
Change Display Profile
To choose a display profile, click Change
Display Profile…. The Windows “Display
Properties” dialog will be displayed; open
the Settings tab and click Advanced… to
open the display adapter properties dialog.
To select a display profile, open the Color
Management tab and click Add.
Default RGB color space
The output color-space profile used when working with RGB images is displayed here. Click
Browse… to choose a new default RGB profile. If Use this instead of an embedded profile
when opening files is checked, this RGB color space profile will be used for all images. If it is
not checked, the profile embedded in each image will be used.
Printer profile
Specifies the printer profile to be used when printing images.
Use profile for printing
If this option is checked, you can choose a profile for printing by clicking the Browse…
button. The selected profile will appear in the adjacent text box. If this option is not
checked, the default RGB color space will be used.
Intent
If you have chosen to use a printer profile, the type of matching to be per formed can be
selected from Relative and Perceptual. (Depending on the profile, changing the matching method may produce no change in output. This option is not supported with some
profiles; consult the manufacturer for details.)
Relative
Colors not in the gamut of the selected printer profile will be printed using the closest
colors available. Other colors are not affected.
Perceptual
If the image contains colors not in the gamut of the selected printer profile, all colors in
the image will be compressed to fit the gamut.
CMYK separation profile
Lists the profile used to convert RGB images to CMYK when saving images in CMYK-TIFF
format. To choose a different profile, click the Browse… button.
Default Display Profile
The default Windows display profile is “NKMonitor_win.icm.“ This profile is equivalent to sRGB.
98
Fine-Tuning Nikon Capture 4 Editor
The Color Management Tab (Macintosh)
The Macintosh version displays the profile
names selected in the ColorSync control
panel (Mac OS 9) or in System Preferences
(Mac OS X).
ColorSync Default Profiles for Documents
The default color-space profiles are displayed in this area. Clicking the Open ColorSync
button opens the ColorSync dialog to a panel where you can choose the default profiles for
the RGB and CMYK color spaces.
Default RGB Color space
Lists the output ICC color-space profile used when working with RGB images. If Use this
instead of an embedded profile when opening files is checked, this RGB color space
profile will be used for all images. If it is not checked, the profile embedded in each image
will be used.
CMYK Color Separation Profile
Lists the profile used to convert RGB images to CMYK when saving images in CMYK-TIFF
format.
Open ColorSync
Opens the ColorSync control panel (OS 9) or System Preferences (OS X), where you can
choose the color profiles used.
Supported Color Profiles
Nikon Capture 4 supports only ICC (International Color Consortium) monitor and CMYK profiles. Particular care should be exercised when choosing a CMYK profile, as the profile supplied by the manu fac turer of your output device may not be an ICC profile.
Multiple Displays (Windows)
In a multiple display environment, choose a single profile suited to all displays.
The Color Management Tab
Changes to settings in the Color Management tab also apply to Nikon Browser, Nikon Viewer, and Nikon
Capture 4 Camera Control.
RGB Color-Space Profiles
See Appendix A (
140) for more information on the default color-space profiles.
The Information Palette
The color-space profile for the image in the active window is displayed in the Information palette
21).
(
99
Nikon Capture 4 Editor Preferences
Device Profiles
Lists the default color-space profiles for monitors and printers.
Change Display Profile
If the Change Display Profile… button appears next to this item, you can click the button to open the Monitor control panel (Mac OS 9) or the Displays section of the System
Preferences dialog (Mac OS X). Click the Color button (Mac OS 9) or open the Color
panel (Mac OS X) to choose a display profile.
Use profile for printing
If this option is checked, the profile listed in the Printer text box will be used when printing images. Note that CMYK profiles can not be used in Nikon Capture 4; if a CMYK
profile is selected, the status of the Use profile for printing check-box can not be
changed. If Use profile for printing is not selected, images will be printed using the
default RGB profile.
Intent
If you have chosen to use a printer profile, the type of matching to be performed can be
selected from Relative and Perceptual. (Depending on the profile, changing the matching method may produce no change in output. This option is not supported with some
profiles; consult the manufacturer for details.)
Relative
Colors not in the gamut of the selected printer profile will be printed using the closest
colors available. Other colors are not affected.
Perceptual
If the image contains colors not in the gamut of the selected printer profile, all colors in
the image will be compressed to fit the gamut.
Multiple Displays (Macintosh)
Nikon Capture 4 will identify and list the profiles for all monitors in an extended desktop display, allowing you to choose a separate profile for each monitor.
100
Nikon Capture 4
Camera Control
Capturing Photographs
Using the Camera Control component of Nikon Capture
4, you can control almost all aspects of camera operation
remotely from your computer. If Camera Control is running
when a D2H, D100, or D70 is connected, or a D1-series camera is connected and set to PC mode, pictures taken with the
camera will be stored on your computer hard disk, not the
camera memory card. The camera can be operated either
directly or using the controls in the Camera Control window.
Camera settings are displayed in Camera Control.
This chapter describes the Camera Control and Custom Settings windows. For more information on camera settings,
see the documentation provided with your camera.
The Camera Control Window
Read this section for a description of the controls in the
Nikon Capture 4 Camera Control window, as well as for
information on launching and closing the Camera Control
window, capturing photographs to disk, processing photographs as they are captured, time lapse photography, and
custom settings.
Nikon Capture 4 Camera Control Preferences
This section details the options available in the Camera
Control Preferences dialog.
101
The Camera Control Window
The Camera Control Window
Getting to Know Nikon Capture 4 Camera Control
The main parts of the Camera Control window are identified below. For more information,
see the “Nikon Capture 4 Camera Control Window” ( 119).
Connection status (
119)
Shows the status and name of any
cameras connected.
Menu bar
Download Options button
Click this button to choose a des ti nation for photographs captured from
the camera.
Camera control page selection tabs
The menus, sliders, and buttons on each
tab are used to control camera set tings.
Simulated LCD panel
Performs the same function as the information display in the camera viewfinder.
Shoot buttons
Click these buttons to take pictures.
Hide Camera Controls button
Click this button to hide the camera control panels in the Nikon Capture Camera
Control window.
Camera Control
Changes made to settings in the Nikon Capture 4 Camera Control window only apply to photographs
taken after the changes are made, not to photographs that have already been taken.
The controls in the Nikon Capture 4 Camera Control window vary with the type of camera connected.
More information on camera settings may be found in the documentation provided with your camera.
Camera Control for D100 Cameras (Macintosh)
Before using Nikon Capture 4 Camera Control with a D100 digital camera under Mac OS 9 or Mac OS X,
confirm that the camera firmware is version 2.00 or later. Users of earlier versions will need to upgrade
the camera firmware before using Nikon Capture 4 Camera Control. Contact a Nikon-authorized service representative for information on firmware upgrades.
Illustrations
Save where otherwise noted, the illustrations in this section show the dialogs displayed when the D70
is connected.
102
Getting to Know Nikon Capture 4 Camera Control
If no camera is connected when Nikon Capture 4 Camera Control is launched, a warning will
be displayed.
Click OK to close the warning and display the following window. Preferences can be adjusted using the options in the menu bar. For information on connecting the camera, see the
Nikon Capture 4 Install Guide.
Download Options button
Click this button to choose a
des tination for photographs
captured from the camera.
Before Starting Nikon Capture 4 Camera Control (D2H / D100 / D70 Cameras)
Users of D2H, D100, and D70 cameras will need to ensure that the appropriate setting is chosen for USB
option in the camera setup menu before connecting the camera to a computer running Nikon Capture 4
Camera Control. Choose a USB setting according to your computer’s operating system:
Operating system
D2H/D70
D100
Windows XP Home Edition, Windows XP Professional Choose PTP. Choose Mass Storage or PTP.
Windows 2000, Windows Me, Windows 98 SE
Choose PTP.
Choose Mass Storage.
Mac OS
Choose PTP.
Choose PTP.
Windows XP Home Edition/Professional, Windows 2000 Professional, Mac OS X
Installing, uninstalling, and using Nikon Capture 4 Camera Control under a multi-user operating system
requires Administrator privileges. When using Nikon Capture 4 Camera control, log in as:
Windows XP Home Edition/Professional
Computer administrator
Windows 2000 Professional
Administrators
Mac OS X
Admin
103
The Camera Control Window
Starting Nikon Capture 4 Camera Control
Nikon Capture 4 Camera Control can be started by selecting Show Nikon Camera Control
from the Tools menu in Nikon Capture 4 Editor, or by clicking the
button in the Nikon
Capture 4 Editor Quick Tools palette. You can also start Camera Control directly by selecting
Nikon Capture 4 Camera Control from the Start menu (Windows) or double-clicking the
application icon (Macintosh).
Windows
1
Connect the camera
Connect the camera to your computer and turn the camera on. If you are using a D1series camera, choose “PC” as the operating mode. If you are using a D100, choose P, S,
A, or M mode. Users of the D2H can select any mode other than M- UP (mirror up). The
D70 can be connected in any shooting mode.
2
3
Close Nikon Transfer
If Nikon Transfer starts, click the Close button.
Start Nikon Capture 4 Camera Control
From the Start menu, select All Programs > Nikon Capture 4 > Nikon Capture 4
Camera Control (Windows XP Home Edition/Windows XP Professional) or Programs >
Nikon Capture 4 > Nikon Capture 4 Camera Control (other Windows versions).
Product Key
If prompted to supply a product key when starting Nikon Capture 4 Editor or Nikon Capture 4 Camera
Control, enter the product key for Nikon Capture 4.
Other Ways of Starting Camera Control
Nikon Capture 4 Camera Control can be started by double-clicking the Nikon Capture 4 Camera Control
icon ( ) on the desktop.
104
Getting to Know Nikon Capture 4 Camera Control
The Camera Control window will be displayed.
Disconnecting the Camera
For information on disconnecting the camera from the computer, see the documentation provided with
your camera.
105
The Camera Control Window
Macintosh
1
Connect the camera
Connect the camera to your computer and turn the camera on. If you are using a D1series camera, choose “PC” as the operating mode. If you are using a D100, choose P, S,
A, or M mode. Users of the D2H can select any mode other than M- UP (mirror up). The
D70 can be connected in any shooting mode.
2
3
Close Nikon Transfer
If Nikon Transfer starts, click the Close button.
Start Nikon Capture 4 Camera Control
Double-click the Nikon Capture 4 Camera Control icon
installed Nikon Capture 4.
in the folder to which you
The Camera Control window will be displayed.
Product Key
If prompted to supply a product key when starting Nikon Capture 4 Editor or Nikon Capture 4 Camera
Control, enter the product key for Nikon Capture 4.
Other Ways of Starting Camera Control
Nikon Capture 4 Camera Control can be started by double-clicking the Nikon Capture 4 Camera Control
icon ( ) on the desktop. If Nikon Capture 4 was registered in the Dock during installation, Mac OS
X users will be able to start Nikon Capture 4 Camera Control by clicking the Nikon Capture 4 Camera
Control icon (
) in the Dock.
106
Getting to Know Nikon Capture 4 Camera Control
Exiting Nikon Capture 4 Camera Control
Be sure to exit Nikon Capture 4 Camera Control before disconnecting the camera.
1
Exit Nikon Capture 4 Camera Control
To close the Nikon Capture 4 Camera Control window, open the File menu and choose
Exit (Windows) or Quit (Mac OS 9). In Mac OS X, select Quit Nikon Capture Control
from the application menu.
Windows
2
Mac OS 9
Mac OS X
Disconnect the camera
For information on disconnecting your camera from the computer, see the documentation provided with your camera.
107
The Camera Control Window
Capturing Photographs to Disk
If Nikon Capture 4 Camera Control is running when a D2H, D100, or D70 is connected, or a
D1-series camera is connected with the mode dial set to PC, pictures taken with the camera
will be stored on your computer hard disk, not the camera memory card.
Connect the camera to your computer.
Start Nikon Capture 4 Camera Control.
Open the Camera Control window
104
Adjust capture options.
109
Open the Download Options dialog
Rotate images to match camera orientation.
110
Take pictures.
110
Finish shooting.
Exit Camera Control.
1
2
111
Start Nikon Capture 4 Camera Control (
Close the Camera Control window
104)
Display the Download Options dialog
Click Download Options in the Camera Control window. The dialog shown at right will be displayed.
Auto Image Rotation (D2H and D70 Only)
If On or Automatic (the default setting) is selected for the auto image rotation option in the camera
setup menu, the D2H and D70 will detect camera orientation and automatically rotate photographs as
they are taken (note that in continuous mode, the rotation applied to the first image in each burst applies to all images in the series, even if camera orientation is changed during shooting). If Off is selected,
all images will be recorded in landscape orientation regardless of how the camera is held. Images can
be rotated using the options in the Image menu.
108
Getting to Know Nikon Capture 4 Camera Control
3
Adjust capture options
Folder for images downloaded from the camera
Select the folder to which photographs will be downloaded as they are taken.
Next file name to be used
Shows how images download to the computer will be
named. To change how files are named, click Edit....
The dialog shown at right will be displayed. Using the
sample file name as a guide, enter a prefix and suf fix
and choose the starting number and number of digits
for automatic file numbering.
When a new image is received from camera
Choose the application that will be used to display captured photographs after they are saved to disk.
Do nothing
Photographs are not displayed after being saved to the computer hard disk.
Show it with the Multi Image Window (Windows XP, Windows 2000, Mac OS X only)
Nikon Capture 4 Editor starts automatically. The destination folder will be opened in
the Multi-Image window with the captured image selected in the thumbnail list and
displayed in the image area.
View with Nikon View (available only if Nikon View is installed)
Nikon Browser and Nikon Viewer start automatically. The destination folder is opened
in Nikon Browser with the captured image selected, and the captured image is displayed in Nikon Viewer.
Show it with the Nikon View Browser (available only if Nikon View is installed)
Nikon Browser starts automatically. The destination folder is opened in Nikon Browser with the captured image selected.
Show it in PictureProject (available only if PictureProject is installed)
PictureProject starts automatically and displays the most recently captured image.
File Naming Conventions
Windows: In environments that do not support long file names, the maximum length is eight charac ters; file names may not contain spaces, quotes, or any of the following characters: “\\” “/” “:” “.”
“;” “*” “?” “<“ “>” and “|”.
Where long file names are supported, the maximum length is 255 characters; file names may not contain quotes or any of the following characters: “\\” “/” “:” “.” “;” “*” “?” “<“ “>” and “|”.
Macintosh: The maximum length for Macintosh file names is thirty-one characters. Colons (“:”) are
not allowed.
109
The Camera Control Window
Attach IPTC Information
Check this option to add IPTC information to captured images and enable the Copy
Shooting Data to IPTC Caption option.
IPTC Information…
Clicking this button displays a dialog where you can select the IPTC information, including
key words and captions, that will be added to images as they are captured.
Copy Shooting Data to IPTC Caption
Check this option to copy shooting data to the caption field of images as they are captured.
After adjusting the above options, click OK to exit the dialog and apply settings to subse quent photographs.
4
Choose whether to rotate captured images
The options in the Nikon Capture 4 Camera Control Image menu can be used to rotate
captured images according to camera orientation. Use these options when taking photographs in tall (“portrait”) orientation (note that these options are not available when
On or Automatic is selected for the auto image rotation option in the D2H or D70 setup
menu). Select an option once to enable it, again to disable it.
Rotate all downloaded images by 90 degrees CCW
If this option is checked, images will be rotated 90 ° counterclockwise as they are saved.
Rotate all downloaded images by 90 degrees CW
If this option is checked, images will be rotated 90 ° clockwise as they are saved.
5
Take pictures
Take pictures using the camera shutter-release button or the AF and Shoot or Shoot
buttons in the Camera Control window. The Status dialog shown below will be displayed.
Auto Image Rotation (D2H and D70 Only)
If On or Automatic (the default setting) is selected for the auto image rotation option in the camera
setup menu, the D2H and D70 will detect camera orientation and automatically rotate photographs as
they are taken (note that in continuous mode, the rotation applied to the first image in each burst applies to all images in the series, even if camera orientation is changed during shooting). If Off is selected,
all images will be recorded in landscape orientation regardless of how the camera is held. Images can
be rotated using the options in the Image menu.
110
Getting to Know Nikon Capture 4 Camera Control
To display a histogram of the current image, click the triangle at the bottom of the Status
dialog.
Triangle
If the Show highlights over option is checked, any areas of the preview image with a
brightness over the value entered in the neighboring text box will be indicated by a flashing border. To display histograms for the red ( R), green (G), and blue (B) channels, put
a check in the corresponding box.
6
Exit Nikon Capture 4 Camera Control
To exit Nikon Capture 4 Camera Control, click the close button in the title bar of the
Nikon Capture Camera Control window.
The Minimize Button (Windows)
Clicking the minimize button in the Status dialog minimizes Nikon Capture 4 Camera Control.
111
The Camera Control Window
Processing Photographs as They Are Captured
As photographs are captured, Nikon Capture 4 Camera Control can automatically process
the images to reflect image adjustment settings in Nikon Capture 4 Editor. For information
on performing batch processing on images that have already been saved to disk, see “Batch
Processing” ( 88).
Select Live Batch from the Camera menu.
Open the Live Batch dialog
113
Choose how photographs will be processed.
113
Choose the folder that will be used to store the
photographs.
114
Choose a naming method and file format for
captured photographs.
114
Choose whether to save unmodified photo graphs separately.
115
Click Start.
115
Take photographs.
115
Open the batch progress dialog
Finish shooting.
Click Stop Batch to exit the Live Batch dialog.
115
Close the batch progress dialog
Auto Image Rotation (D2H and D70 Only)
If On or Automatic (the default setting) is selected for the auto image rotation option in the camera
setup menu, the D2H and D70 will detect camera orientation and automatically rotate photographs as
they are taken (note that in continuous mode, the rotation applied to the first image in each burst applies to all images in the series, even if camera orientation is changed during shooting). If Off is selected,
all images will be recorded in landscape orientation regardless of how the camera is held. Images can
be rotated using the options in the Image menu.
112
Getting to Know Nikon Capture 4 Camera Control
1
Display the Live Batch dialog
Select Live Batch from the Camera menu in Nikon Capture 4 Camera Control. The Live
Batch dialog will be displayed.
Image Adjustments
section
Destination section
Archive section
2
Specify how captured images will be processed
In the Image Adjustments section, specify the operations to be performed on each image.
Apply settings written by the camera
Select this option to save images exactly as captured from the camera, without applying
any of the modifications in the Nikon Capture 4 Editor tool palettes. The image will be
saved in the working (output) color space selected in the Color Management tab of the
Preferences dialog ( 98, 99).
Apply current settings from Nikon Capture Editor
Select this option to process images using the settings currently in effect in Nikon Capture
4 Editor. This option is only available when Nikon Capture 4 Editor is running.
To open Nikon Capture 4 Editor and adjust settings, click the Launch Nikon Capture
Editor button.
Apply settings in
Select this option to process the images using combination settings created using the
Save Selected Adjustments or Save All Adjustments option in the Nikon Capture 4
Editor Settings > Image Adjustment menu ( 78; note that if Calculate Automatically is selected for white balance in the settings file, the recorded value will be used
when images are processed). Click Browse… to select a combination settings file.
Live Batch Processing
Live batch processing is used to perform the operations specified in the Image Adjustments section
of the Live Batch dialog as images are captured from the camera. To ensure that desired results are
achieved, we recommend processing a test image before beginning batch processing. Batch processing
can not be used to adjust settings separately for each image; instead, the images must be opened one
at a time and separate adjustments made manually for each image.
113
The Camera Control Window
3
Choose a destination for captured images
In the Destination section, choose options for saving the processed images.
Save to
This text box shows the folder to which the images will be saved after processing. To
choose a new folder, click the Browse… button to the right of the text box and navigate
to the desired location.
Next file name
This text box shows a sample of the file names that will be
used when saving the images after processing. To choose
a new file name, click the Edit… button. The File Naming
dialog will be displayed.
Save as type
Choose the file format that will be used to save the processed images. The following
formats are available: Use source file type, NEF, TIFF (RGB), TIFF (CMYK), and JPEG.
Choose Use source file type to save captured images in the format used by the camera.
To save images in uncompressed RAW format, set the camera to uncompressed NEF
(RAW) and choose Use source file type. When NEF is selected, compression can be
chosen from a pull-down menu. When JPEG is selected, the compression ratio can be
chosen from “Highest Compression Ratio,” “Good Compression Ratio,” “Good Balance,”
“Good Quality,” and “Excellent Quality.” See “Saving Images” ( 79) for more details.
Bit depth
Gives the bit depth (the number of bits of color information per channel for each pixel
in the image) at which the image will be saved. The 16-bit option is only available if the
selected file type is TIFF format (RGB) and the original image has a bit depth of over eight
bits.
File Naming Conventions
Windows: In environments that do not support long file names, the maximum length is eight charac ters; file names may not contain spaces, quotes, or any of the following characters: “\\” “/” “:” “.”
“;” “*” “?” “<“ “>” and “|”.
Where long file names are supported, the maximum length is 255 characters; file names may not contain quotes or any of the following characters: “\\” “/” “:” “.” “;” “*” “?” “<“ “>” and “|”.
Macintosh: The maximum length for Macintosh file names is thirty-one characters. Colons (“:”) are
not allowed.
Error Messages
If an invalid file name or other error is identified in the Live Batch dialog, a message will be displayed.
Return to the Live Batch dialog and adjust settings as directed in the message.
114
Getting to Know Nikon Capture 4 Camera Control
4
Choose whether to save original photographs
In the Archive section, choose whether to save unprocessed copies of the photographs
captured from the camera.
Save Unmodified Files
Check this option to save both the original image and copies processed according the
options selected in the Image Adjustments section.
Save to
This text box shows the folder to which unprocessed images will be saved. To choose a
new folder, click the Browse… button to the right of the text box and navigate to the
desired location.
5
Click Start
Click Start to put the selected settings into effect. A progress dialog will be displayed.
6
7
Take photographs
Take photographs using the camera shutter-release button.
End batch processing
Once you have finished taking photographs, click Stop Batch to end batch processing.
If the Batch Task text box shows that images remain to be processed, a warning will be
displayed. Click Yes to exit without saving unprocessed images, or No to process and
save the images before returning to the Nikon Capture 4 Camera Control dialog.
“Apply Settings Written by Camera” Versus “Save Unmodified Files”
The Apply settings written by camera option saves images in the working (output) color space se98, 99). The working color space is
lected in the Color Management tab of the Preferences dialog (
not applied to images saved using the Save unmodified files option.
The Minimize Button (Windows )
Clicking the minimize button in the progress dialog minimizes Nikon Capture 4 Camera Control.
The Warning Button
If an error occurs during shooting, a warning button will appear at the bottom of the Live Batch dialog.
Clicking this button will display a message. End shooting and close the Live Batch dialog as directed. An
error log will be displayed; click OK to close the log and return to the Camera Control window.
Stop Batch
The Stop Batch button can only be operated with the mouse.
115
The Camera Control Window
Time Lapse Photography
Using Nikon Capture, you can take a series of photographs automatically at a time interval
you select.
Select Time Lapse Photography… from the
Camera menu.
116
Open the Time Lapse Photography dialog
Choose whether to focus before each shot.
117
Choose the number of photographs to be
taken.
117
Choose an interval setting.
117
Choose whether to process photographs automatically.
118
Click Start to begin time lapse photography.
118
Open the time-lapse photography
progress dialog
Follow the progress of time lapse photography
in the progress dialog.
118
Click Shooting Complete to exit the Time
Lapse Photography.
118
1
Close the time-lapse photography
progress dialog
Display the Time Lapse Photography dialog
Select Time Lapse Photography… from the Camera
menu. The Time Lapse Photography dialog will be displayed.
116
Getting to Know Nikon Capture 4 Camera Control
2
Adjust settings
Before shooting starts, adjust the following settings:
Autofocus before each shot
If this option is checked, the camera will perform an autofocus operation before each shot.
Keep shooting until cancelled
If this option is checked, the camera will continue to take photographs until you click
Stop Shooting in the Time Lapse Photography dialog ( 118).
Auto bracketing (D2H and D70 only)
Select this option to perform exposure, flash, or white
balance bracketing during shooting. To change bracketing options, click Set BKT.... The dialog shown at right
will be displayed.
AE/WB/Flash Bracketing
Choose the type of bracketing performed.
Change Factor when Exposure Mode is set to Manual
(D2H only)
Choose how bracketing is performed in manual
exposure mode.
D2H
Bracketing Type / Bracketing Step / Bracketing
Order / Exposure Mode
Choose the bracketing program, exposure or white
balance increment, bracketing order, and exposure
mode.
D70
3
Specify the number of photographs to be taken
Use the Shots box to choose a number of photographs from 2 to 9,999. This option is
not available when Keep shooting until cancelled is selected.
4
Choose an interval setting
The delay between shots can be set to any value between 00:00:01 (one second) and 99:
59:59 (ninety-nine hours, fifty-nine minutes, and fifty-nine seconds).
Time Interval Settings
If the delay is shorter than the time required to record each photograph, the actual interval between
photographs will be longer than that specified in the Time Lapse Photography dialog.
The Time Lapse Photography Dialog
If you make a mistake in entering settings in the Time Lapse Photography dialog, a warning will be displayed. Return to the Time Lapse Photography dialog and adjust settings as directed.
117
The Camera Control Window
5
Click Start
Click Start. To process images as they are taken, check the Process images before
saving (Live Batch) option in the Time Lapse Photography dialog and click Next.... The
Live Batch dialog will be displayed; adjust settings and click Start to begin time lapse
photography.
6
Follow the progress of time lapse photography in the progress dialog
Click Stop Shooting to end time lapse photography at any time. If a number of shots
was specified in the Time Lapse Photography dialog, shooting will end when the specified
number of shots has been taken.
7
Close the Time Lapse Photography dialog
Once the specified number of shots has been taken, the Stop Shooting button will
change to Shooting Complete. Click Shooting Complete to exit the Time Lapse Photography dialog.
During Time-Lapse Photography
The camera can not be operated during time-lapse photography. No other operations can be performed until the Time Lapse Photography dialog is closed.
Auto Off (D1-Series Cameras)
When the camera is operated on battery power and for 15 minutes has been selected for “While
Nikon Capture Camera Control is running, keep camera awake” in the General tab of the Preferences
dialog ( 136), choose a delay of fifteen minutes or less. When taking photographs at longer intervals,
use an EH-4 AC adapter (available separately) to power the camera.
Hard Disk Full
A warning will appear when space is no longer available on the destination disk for photographs taken
using time lapse photography. Use the information in the warning to reduce the number of photographs or change the destination drive.
Error Logs
If an error occurs during shooting, an error log will be displayed; click OK to close the log and return to
the Camera Control window.
The Minimize Button (Windows)
Clicking the minimize button in the progress dialog minimizes Nikon Capture 4 Camera Control.
118
Getting to Know Nikon Capture 4 Camera Control
The Nikon Capture 4 Camera Control Window
The Nikon Capture 4 Camera Control window shows current camera settings, which may be
viewed by clicking the five page selection tabs. Camera settings can be altered using the
controls in each tab as described below. The simulated LCD panel and the Hide Camera
Controls, Download Options…, and shoot buttons can be accessed from all five tabs.
Connection
status
Camera Control
page selection
tabs
Simulated LCD
panel
Shoot buttons
D70
Connection Status
This area shows the following information about the camera currently connected:
• Camera name
• Camera orientation (D2H and D70 only)
If On or Automatic (the default setting) is selected for the auto image rotation option in
the camera setup menu, camera orientation will be indicated by an icon as shown below.
No icon will be displayed if Off is selected.
Horizontal
Rotated 90 °
clockwise
Rotated 90
counterclockwise
Hide Camera Control
Click this button to hide the Camera Control panels during shooting.
Download Options
Click this button to choose a destination and file name for pictures captured from the camera ( 108).
Enable controls on the camera body (D2H and D70 only)
Check this option to enable camera controls, allowing settings to be adjusted and photographs taken directly from the D2H or D70. The camera power switch and AF-area mode
selector can not be used when this option is checked; all other controls function normally.
The Function Dial (D100 Digital Cameras Only)
The D100 can only be used to take photographs when the function dial is set to P, S, A, or M. At other
settings, the shoot buttons in the Camera Control dialog will be disabled and the simulated LCD panel
will not be displayed.
119
The Camera Control Window
Simulated LCD Panel
This panel shows the information displayed in the camera’s viewfinder, with the exception of
camera errors. Clicking on an indicator in the panel opens the Nikon Capture 4 Camera Control window to the tab that controls the selected option, where adjustments can be made.
When the D2H or D70 is connected, the amount of memory remaining in the camera
memory buffer is displayed at the right edge of the simulated LCD panel. This information is
updated at regular intervals, but temporary discrepancies may exist between the display and
the actual amount of memory remaining in the buffer.
Shoot Buttons
Click either of these buttons to take a photograph at current settings. If a D2H or D70 is connected, photos can be taken in continuous shooting mode ( 125); in this case, the AF and
Shoot and Shoot buttons will instead be labeled AF and Start and Start.
AF and Shoot / AF and Start
When this button is clicked, the camera will perform an autofocus and then release the
shutter to take a photograph.
Shoot / Start
Click this button to take a photograph. If the selected focus mode is single-servo AF, an
autofocus operation will be performed before the shutter is released.
Camera Settings That Can Not Be Adjusted from Nikon Capture
The following operations can not be performed from Nikon Capture 4 Camera Control:
Status not displayed
Status displayed
120
Operation
Camera
Burst photography (continuous shooting mode)
Continuous servo autofocus
Pressing the shutter-release button halfway to check focus
Autofocus-only operation (use AF and Shoot to perform autofocus)
Manual aperture adjustment using the lens aperture ring
Reactivating the camera after it has entered sleep mode
Depth-of-field preview
Auto bracketing
Compression options for NEF (RAW) images
Operation assigned to FUNC. button with Custom Setting f4
Remote (D70 only) and self-timer mode selection
Focus mode
Metering
Exposure mode (can be adjusted if Enable controls on camera
body is selected when D70 is connected)
Shooting mode
Shutter-speed lock
Aperture lock
Autoexposure lock
Speedlight flash-level compensation
M- UP (mirror up) mode selection
Selection of second center focus area group in group dynamic-AF mode
D1-series/D100
D1-series/D2H/D100/D70
D1-series/D2H/D100/D70
D1-series/D2H/D100/D70
D1-series/D2H
D1-series
D1-series/D2H/D100/D70
D1-series/D100
D100
D2H
D2H/ D70
D1-series/D2H/D100/D70
D1-series/D100
D100 /D70
D100
D1-series/D2H
D1-series/D2H
D1-series/D2H/D100/D70
D2H
D2H
D2H
Getting to Know Nikon Capture 4 Camera Control
The Exposure 1 Tab
The following settings can be adjusted from the
Exposure 1 tab:
Exposure Mode
This menu can be used to set the exposure mode for
D2H and D1-series cameras. If the D100 or D70 is
connected, it will show the current exposure mode,
but the exposure mode must be selected using the
camera function dial. See the camera manual for
details.
Shutter Speed
Shutter speed can only be adjusted in Manual and
Speed Priority modes, when it can be set to values
between the maximum and minimum values supported by the camera. Use high shutter speeds to
freeze motion, low shutter speeds to suggest motion by blurring moving objects.
Controls displayed when D70 is
connected
Aperture
Aperture can only be adjusted in Manual and Aperture Priority modes, when it can be set
to values between maximum and minimum aper ture (small apertures have high f-numbers,
wide aper tures low f-numbers; the actual aper tures available depend on the lens used).
Aper ture can not be controlled from Nikon Capture when Custom Setting 22 has been set to
allow aperture to be adjusted manually using the lens aperture ring (D1-series only).
Exposure Comp.
Exposure compensation is useful when shooting subjects containing sharp lighting contrasts,
or on other occasions when you want to modify the exposure value determined by the camera. Exposure compensation is available in all exposure modes.
Flash Comp. (D100 and D70 only)
This option is used to adjust the level of the camera’s built-in Speedlight.
Flexible Program
Flexible program can only be used in Program Mode, when it allows you to choose from
predetermined combinations of shutter speed and aperture appropriate to current lighting
conditions.
The Function Dial (D100 Digital Cameras Only)
The D100 can only be used to take photographs when the function dial is set to P, S, A, or M. At other
settings, the controls in the Exposure 1 tab will be disabled.
Non-CPU Lenses
See page 127 for information on the settings available with non-CPU lenses.
Bulb
At a shutter speed of Bulb, the shutter remains while the shutter release button is held down. Use the
camera shutter-release button to take photos at this setting. Clicking either of the shoot buttons will
display an error message.
121
The Camera Control Window
The Exposure 2 Tab
The following settings can be adjusted from the Exposure 2 tab.
Controls displayed when D70 is
connected
Focus Area
The focus area can be selected using the arrow buttons. D1-series, D100 and D70 cameras
offer a choice of five focus areas, the D2H eleven. In group dynamic-AF area mode (D2H
only) the selected focus-area group is displayed (the groupings used are determined by the
option selected for Custom Setting a3, Group dynamic AF). See the camera manual for
details. For information on AF-area mode and focus mode, see “The Mechanical Tab” (
126).
Metering Mode
The metering mode can be selected from this menu (D2H and D70 only). Metering mode
defaults to the option selected with the camera. If a D1-series or D100 camera is connected,
or if Enable controls on the camera body is checked when a D2H is connected, the current metering mode will be shown, but changes can only be made using camera controls.
See the camera manual for details.
Flash Sync Mode
This option controls the camera flash sync mode.
Sensitivity
Sensitivity (ISO equivalency) can be raised when taking photographs in low light conditions.
See the user’s manual provided with your camera for details.
Auto (D2H/D100/D70 only)
When this option is checked, the camera will adjust sensitivity (ISO equivalency) automatically
(ISO auto).
122
Getting to Know Nikon Capture 4 Camera Control
White Balance
White balance is used to ensure that colors which appear white when viewed directly are
white in the final photograph. See the camera manual for details.
Fine Tune… /Set Temp…
Click Fine Tune… to make fine adjustments to white balance ( 130). If Choose color
temp. is selected (D2H only), this button will be labeled Set temp…. Click this button to
choose a color temperature ( 130). Fine tuning is not available with preset white balance.
Comment (D2H only)
This field lists the comments for all white balance presets.
Edit… (D2H only)
This button is only available when Preset is selected for
white balance. Clicking Edit… displays the dialog shown
at right, where the comments for each of the white balance
presets can be edited. After entering descriptive comments
of up to thirty-six characters each, click OK to copy the
comments to the camera.
Comments (D2H Only)
In addition to letters and numbers, comments can contain quotes, apostrophes, spaces, and any of the
following characters: “,” “.” “!” “?” “#” “$” “%” “&” “(” “)” “[” “]” “{” “}” “*” “+” “-” “/” “:” “;”
“<” “=” “>” “_” and “@”.
White Balance
If desired, white balance can be used to produce an intentionally unbalanced rendering of a scene.
123
The Camera Control Window
The Storage Tab
The following settings can be adjusted from the Storage tab:
Controls displayed when D70 is
connected
Data Format
The following data formats are available: RAW (12-bit) + JPEG (8-bit) (D2H/D70 only),
RAW (12-bit), TIFF-RGB (8-bit) (D1-series/D2H/D100 only), TIFF-YCbCr (8-bit) (D1-series only), and JPEG (8-bit). This setting determines pixel bit depth and file size.
Compression
When data format is set to JPEG (8-bit), you can choose the image quality (JPEG compres sion) setting from Fine, Normal, and Basic. When RAW (12-bit) + JPEG (8-bit) is selected
with the D2H, image quality can be selected from Fine, Normal, and Basic. When RAW
(12-bit) + JPEG (8-bit) is selected with the D70, image quality is fixed at Basic.
Color
Choose from Color and Black & White (D1-series only). Black & White is not available
with the D2H, D100, or D70 or when RAW is selected for Data Format.
Image Size
Choose image size. See the camera manual for details.
RAW Compression ( D2H/D1x / D1h only)
Check this option to compress NEF (RAW) images taken at a data format setting of RAW
(12-bit) + JPEG (8-bit) (D2H only) or RAW (12-bit).
124
Getting to Know Nikon Capture 4 Camera Control
The Mechanical Tab
The following settings can be adjusted from the Mechanical tab:
Controls displayed when D70 is
connected
Shooting Mode
Sets the shooting mode for D1-series cameras connected in PC mode to Single or Continuous. Changes to this setting also apply to Custom Setting 30. Unless Enable controls on
the camera body is checked in the connection status area, the shooting mode for the D70
can be selected from Single and Continuous, while the shooting mode for D2H cameras
can be selected from Single, Continuous low speed, and Continuous high speed. If
Continuous is selected for the D70 or if Continuous low speed or Continuous high
speed is selected for the D2H, the AF and Shoot and Shoot buttons will instead be labeled
AF and Start and Start. If Enable controls on the camera body is checked or a D100
camera is connected, the current shooting mode will be shown, but changes can only be
made using camera controls. See the camera manual for details.
Self-Timer and Remote Modes
When the D2H, D70, or D100 is set to self-timer mode, or when the D70 is set to delayed remote or
quick-response remote mode, the Mechanical tab will show a shooting mode of Single, and any photographs taken with the Nikon Capture 4 Camera Control shoot but tons will be taken in single-frame
mode with no shutter-release delay. To take pictures in self-timer or remote mode, use the shutterrelease button on the camera.
Continuous Mode (D2H/D70 Cameras Only)
When the D2H or D70 is connected, the amount of memory remaining in the camera memory buffer is
displayed at the right edge of the simulated LCD panel. This information is updated at regular intervals,
but temporary discrepancies may exist between the display and the actual amount of memory remaining in the buffer.
Taking Photographs in Continuous Mode (D100 / D1-Series Only)
When a D100 is connected or a D1-series camera is in PC mode, continuous shooting can only be performed using the camera shutter-release button. The shoot buttons in the camera control window can
only be used to take one photograph at a time.
125
The Camera Control Window
Maximum Shots (D2H and D70 Only)
Use the arrows to choose the maximum number of shots that can be taken in a single burst
in continuous mode, or enter a value directly in the text box. The maximum permitted value
varies with the current image-quality setting; the value chosen should not, however, exceed
the capacity of the camera memory buffer as shown at the right edge of the LCD display.
Values larger than the capacity of the camera memory buffer will be shown in red. This setting only applies when the camera is connected, and differs from the maximum selected in
the Custom Settings menu.
Auto Bracketing (D2H and D70 only)
Select this option to perform exposure, flash, or white balance bracketing during shooting. To change bracketing
options, click Set BKT. The dialog shown at right will be
displayed.
AE/WB/Flash Bracketing
Choose the type of bracketing performed.
Change Factor when Exposure Mode is set to Manual
(D2H only)
Choose how bracketing is performed in manual exposure mode.
D2H
Bracketing Type / Bracketing Step /
Bracketing Order / Exposure Mode
Choose the bracketing program, exposure or white balance increment, bracketing order, and exposure mode.
D70
AF Area Mode
Choose the AF-area mode. If Enable controls on the camera body is checked (D2H and
D70 only), the current AF-area mode will be shown, but changes can only be made using
camera controls. See the camera manual for details.
Focus Mode
The current focus mode setting is displayed. See the camera manual for details. This setting
can not be changed from Nikon Capture.
126
Getting to Know Nikon Capture 4 Camera Control
Lens
Displays the focal length and maximum aper ture of the lens currently attached to the camera. Depending on the lens type, some information may not be displayed. If the lens focal
length or maximum aperture have been specified manually (see below), an asterisk will appear next to these values.
Edit… (D2H only)
This button is only available when a non-CPU lens is mounted
on the camera. Clicking Edit… displays the dialog shown at
right, where the lens focal length and maximum aperture can
be entered. Click OK to copy the values to the camera.
Main Battery Level
Displays the level of the main camera battery. Green indicates that the battery has enough
charge for continued operation. Yellow indicates that battery level is low; ready a fully
charged spare battery pack. Red indicates that the battery is exhausted, and that no further
photographs can be taken until the battery pack has been replaced. You may not be able to
control the camera from Nikon Capture when the battery is exhausted. Replace with a fully
charged spare battery pack or use an AC adapter (available separately).
Clock Battery Level (D1-series only)
Displays the level of the camera clock battery. Should this display turn yellow or red, have
the clock battery replaced by an authorized Nikon service representative (a fee is charged for
this service).
Non-CPU Lenses
The following restrictions apply to Nikon Capture 4 Camera Control when a non-CPU lens is mounted
on the camera (the operations listed can still be performed using the controls on the camera body; see
the camera manual for details):
D2H
Exposure
Mode
Shutter
Speed
D1-series
Can be selected from
Aperture priority
auto and
Manual.
Lens data
specified
Lens data
D100
not specified
Can not be
adjusted.
Can be selected from ApMode seerture-priority auto and
lected with
Manual.
camera displayed.*
D70
Can only be adjusted if Enable controls on the camera
body is not checked. Otherwise mode selected with camera is displayed. Photos can
only be taken in mode M.*
Can only be adjusted in manual exposure mode.
Aperture shown as Asterisk appears
Aperture shown as “f/--”. Can not be
“f/--”.
Can not be next to selected
adjusted.
adjusted.
aperture.
AF and Shoot
Can not be used.
Shoot
Can be used.†
* When non-CPU lens is attached, photos can only be taken in mode M.
† If D100 or D70 is connected and set to an exposure mode other than manual, a warning will be displayed.
Aperture
127
The Camera Control Window
The Image Processing Tab
The following settings can be adjusted from the Image Processing tab:
Image Optimize image (D70 only)
This setting controls the type of image optimization
performed. See the camera manual for details.
Sharpening
This option controls how much the camera sharpens
outlines. See the camera manual for details.
Tone Comp
This setting controls contrast. See the camera manual for details.
Color Mode (D1x, D1H, D2H, D100, and D70 only)
The D1X, D1H, D2H and D70 offer a choice of color
modes. See the camera manual for details. With the
D1, colors are optimized for the NTSC color space, regardless of the option chosen for color mode.
Controls displayed when D70 is
connected
Saturation ( D70 only)
Choose a setting for color saturation. See the camera manual for details.
Hue Adjustment (D1x, D1H, D2H, D100, and D70 only)
Use to modify hue while leaving brightness and chroma unaffected. Adjustments can be
made in the range –9 ° to 9 °, with 0 ° representing the original hues as recorded by the camera (in D1-series cameras, –9 ° is equivalent to a camera hue setting of 0, 0 ° to a setting of
3, and 9 ° to a setting of 6).
Noise Reduction (D2H, D100, and D70 only)
At slow shutter speeds, “noise” in the form of randomly-spaced, brightly-colored pixels may
appear in photographs, particularly in shadows. Check Noise Reduction to reduce noise.
Saving and Loading Camera Control Settings
The Camera Control option in the Settings menu is
used to save Nikon Capture 4 Camera Control settings
and to load and apply previously saved settings.
Option
Description
Select this item to load camera settings previously saved using the Save Camera Settings… option (see below). A dialog will be displayed where you can navigate to the drive
Load Camera
(volume) and direc tory containing the desired settings file (only files with the extension
Settings…
“.ncc” will be displayed). The settings in the Camera Control window will instantly revert
to the saved settings.
Select this item to save the settings in the Camera Control window to a named file.
These settings can later be recalled using the Load Camera Settings… option.
Save Camera
Choosing Save Camera Settings… displays a dialog where you can choose a desti Settings…
nation and file name for current camera settings. Camera settings are saved with
the ex tension “.ncc”.
128
Getting to Know Nikon Capture 4 Camera Control
The Camera Menu
The commands in the Camera menu are used to adjust the following camera settings:
Custom Settings…
Selecting this option opens the Custom Settings dialog (
tings can be adjusted.
132), where camera Custom Set-
Set Date and Time…
Selecting this option opens the dialog shown at right, where
you can set the camera’s clock calendar to the current date
and time. To view the current time and date settings, click Use
Current Date/Time. Click Set to set the clock calendar to the
time and date shown.
Edit Camera Curves…
This option is used to create a custom tone compensation curve and download it to the camera, where it applies when “Custom” is selected for the camera tone compensation option.
The controls in the Edit Camera Curves window are identical to those in the Curves window,
except in the following respects: (1) only the master channel, not individual RGB channels,
may be edited; (2) there is a limit of 20 spline points; (3) the midpoint may not be edited; (4) a
user-defined sample image can be selected by clicking Sample Image… (the sample image
must be a RAW image created with a D1-series, D2H, D100, or D70 camera). Any changes to
curves are reflected in the sample image. To copy the edited curve to the camera, click OK.
The upper left section of the Edit Camera Curves window contains Load… and Save…
buttons. By clicking the Load… button, previously stored curves, with less than 20 spline
points, can be selected via the “Open” dialog (if the selected file has more than 20 spline
points, a warning will be displayed, and no file will be loaded). Look for files with the “.ntc”
extension.
The Save… button opens the “Save As” dialog, where you can save the current curve.
129
The Camera Control Window
Fine-Tune White Balance…
Selecting this option displays the dialog shown at right,
where white balance can be fine-tuned between –3 and
+3. The value selected for Add to Auto will be added
to the white balance setting the camera chooses for auto
white balance. Clicking Reset returns all values to defaults.
Click OK to apply the current settings to the camera, or
click Cancel to discard any changes and return to the Nikon
Capture 4 Camera Control window.
Set Color Temperature… (D2H only)
Selecting this option displays the dialog shown at right,
where color temperature can be chosen from a menu. The
value chosen takes effect whenever Choose color temp. is
selected for white balance. Click OK to apply the current
settings to the camera, or click Cancel to exit without saving changes.
Measure White Balance…
Use this option to measure preset white balance. If the camera currently connected supports
multiple values for preset white balance, the setting that will be used to store the measured
value can be chosen from the pop-up menu at the top of the dialog. Adjust camera settings
as described in the section on preset white balance in the camera user’s manual and click OK
to measure a value for white balance.
D1/D100
D2H
D70
D1X /D1H
Dust Off Ref Photo (D2H and D70 only)
Choose this option to take a reference photo for Image Dust
Off. The dialog shown at right will be displayed. With the
camera lens ten centimeters (four inches) from a featureless
white object, frame the object so that it fills the viewfinder
and click OK to record an Image Dust Off reference photo.
See the camera manual for details.
Choosing a Mode (D100 and D70 Only)
The Measure White Balance… option is only available in P, S, A, and M modes.
Set Color Temperature… (D2H Cameras Only)
The desired results may not be achieved with flash or fluorescent lighting.
130
Getting to Know Nikon Capture 4 Camera Control
Edit Image Comment…
Selecting this option displays the dialog shown at right,
where you can enter a comment or title for subsequent
photographs. If the camera currently connected is in the
D1-series, enter a title of thir ty-eight characters or less
and click OK. The title will be used for all subsequent
photographs taken while the camera is connected. When
a D2H, D100, or D70 camera is connected, the title is
stored in the camera as an image comment of thirty-six
characters or less which is appended to photographs only
when the Attach comment to images box is checked.
D1-series
D2H/D100/D70
Select Shooting Set tings Bank… (D2H and D100 only)
Selecting this option displays the dialog shown at right,
where you can choose the shooting menu bank in which
changes to settings will be stored while the camera is controlled from Nikon Capture 4 Camera Control. See the
camera manual for details.
D100
The D2H allows a descriptive comment to be added to
the name of each shooting menu bank. Clicking Edit…
displays the dialog shown at right, where the comments
for each bank can be edited. After entering descriptive
comments of up to twenty characters each, click OK to
copy the comments to the camera.
D2H
Edit Comment dialog
Set Bracketing Mode (D2H and D70 only)
Selecting this option displays the BKT Mode dialog. See Auto Bracketing in the Mechanical
panel for details ( 126).
Live Batch…
Selecting this option opens the Live Batch dialog (
112).
Time Lapse Photography…
Selecting this option opens the Time Lapse Photography dialog (
116).
Comments for Shooting Menu Banks (D2H Only)
In addition to letters and numbers, comments can contain quotes, apostrophes, spaces, and any of the
following characters: “,” “.” “!” “?” “#” “$” “%” “&” “(” “)” “[” “]” “{” “}” “*” “+” “-” “/” “:” “;”
“<” “=” “>” “_” and “@”.
131
The Camera Control Window
Custom Settings
Most of the custom settings stored in camera memory can be viewed and adjusted from
the Custom Settings window in Nikon Capture 4 Camera Control. For more information on
Custom Settings, see the documentation provided with your camera.
1
Select Custom Settings… from the Camera menu
The Custom Settings dialog will be displayed.
D70
D1-series / D100 cameras
(illustration shows settings for D1X)
D2H
The Custom Settings dialog shows the Custom Settings currently in effect.
Changes to Custom Settings
Changes made to settings in the Custom Settings dialog are stored in the camera, not on the computer
hard disk. This means that changing settings in the Custom Settings dialog has the same effect as
changing Custom Settings using camera controls.
132
Getting to Know Nikon Capture 4 Camera Control
2
Choose a Custom Settings bank
Choose a Custom Settings bank (Custom Settings set) from the pop-up menu at the top
right corner or the Custom Settings dialog.
The banks available depend on the model of camera currently connected. When the D1
or D100 is connected, you have a choice of banks A or B; when the D1X, D1H, or D2H is
connected, banks A, B, C, or D can be selected.
3
Click OK
After making any changes to Custom Settings, click OK to save changes in the camera
Custom Settings bank and exit the Custom Settings dialog.
Custom Settings
Custom Settings can not be saved to a separate file. Clicking the Reset button resets all Custom Settings
to their default values.
Settings That Can Not Be Adjusted from the Custom Settings Window
The Custom Settings listed below can not be adjusted in the Custom Settings window.
• Mirror lock-up for CCD cleaning (D1-series Custom Setting 8) /Cleaning mirror up (D100 setup menu):
can only be adjusted from the camera
• RAW (NEF) image save (D1-series Custom Setting 28): if this option is set to “0” (off) when Nikon
Capture is started, a message will be displayed. Clicking OK in this dialog sets Custom Setting 28 to
“1” (uncompressed RAW image save enabled). Custom Setting 28 can only be returned to “0” from
the camera.
• ISO Auto (D100 Custom Setting 3) /ISO Boost (D1-series Custom Setting 31): can be adjusted from the
Exposure 2 tab of the Camera Control window.
• PC Shooting Mode (D1-series Custom Setting 30): this option is adjusted from the Mechanical tab of
the Camera Control window.
• Tone Compensation (D1-series Custom Setting 24) /Color Mode (D1X /D1H Custom Setting 32) /Hue
Adjustment (D1X /D1H Custom Setting 33) /Noise Reduction (D100 Custom Setting 4): can be adjusted
from the Processing tab of the Camera Control window.
133
The Camera Control Window
Custom Settings for D1-Series and D100 Cameras
Custom Settings for D1-series and D100 cameras are divided among three tabs: Page 1, Page
2, and Page 3. See the camera manual for details.
Custom Settings for D70 Cameras
Custom Settings for the D70 are divided among three tabs: Basic, Advanced 1, and Advanced
2. See the camera manual for details.
Custom Settings for D2H Cameras
The D2H allows a descriptive comment to be added
to the name of each Custom Settings bank. Clicking
Edit… displays the dialog shown at right, where the
comments for each bank can be edited. After entering descriptive comments of up to twenty characters
each, click OK to copy the comments to the camera.
Custom Settings in each bank are divided into six groups: autofocus, metering / exposure,
timers / autoexposure and autofocus lock, shooting / display, bracketing / flash, and controls.
The group can be chosen from the group menu or by clicking the Next and Prev. buttons.
Group menu
Prev. / Next
buttons
Comments (D2H Only)
In addition to letters and numbers, comments can contain quotes, apostrophes, spaces, and any of the
following characters: “,” “.” “!” “?” “#” “$” “%” “&” “(” “)” “[” “]” “{” “}” “*” “+” “-” “/” “:” “;”
“<” “=” “>” “_” and “@”.
134
Fine-Tuning Nikon Capture 4 Camera Control
Nikon Capture 4 Camera Control Preferences
Fine-Tuning Nikon Capture 4 Camera Control
To view the Preferences dialog for Nikon Capture 4 Camera Control, select Options… from
the Tools menu (Windows) or select Preferences… from the application menu (Mac OS X)
or Edit menu (Mac OS 9).
Windows
Mac OS X
The Preferences dialog contains the following three tabs:
Tab
Description
Choose the length of time the camera remains active when no operations
136
are performed.
Temporary Files
Specify the location of the folders used for temporary storage.
137
Select the color profiles used by the Nikon Color Management System
Color Management
137
(CMS).
General
After making changes to preferences, click OK to save changes and return to the Nikon
Capture 4 Camera Control window. Click Cancel to cancel any changes to settings and
return to the Nikon Capture 4 Camera Control window.
Viewing Preferences
To view settings in any of the three panels, click the appropriate tab.
Tab
135
Nikon Capture 4 Camera Control Preferences
The General Tab
The General tab contains the following items:
While Nikon Capture Camera Control is
running, keep camera awake
Set the length of time before exposure meters
turn off automatically when the camera is
running on battery power. This setting only
takes effect when the camera is connected and
powered on, and only when Nikon Capture 4
Camera Control is running. This setting takes
precedence over the auto meter off option chosen using camera Custom Settings. The D2H,
D100, and D70 will stay awake indefinitely, regardless of the setting chosen here.
for 15 minutes (D1-series only)
The time before exposure meters turn off
automatically is set to fifteen minutes.
Always
The camera stays awake indefinitely. Note that this will increase the drain on the battery.
When powered by an AC adapter (available separately), the camera stays awake indefinitely,
regardless of the setting chosen using the above option.
136
Fine-Tuning Nikon Capture 4 Camera Control
The Temporary Files Tab
The Temporary Files tab contains the following
item:
Folder for temporary data
Specify the folder or volume in which temporary data, such as image cache data, will be
stored. The default folder for Windows is the
“TEMP” folder in the Windows directory, while
the default volume for the Macintosh is the
start-up disk. To choose a different folder in
the Windows version of the program, click the
Browse… button and navigate to the desired
location. In the Macintosh version, a new volume can be chosen from the pop-up menu.
The Color Management Tab
For more information on the Color Management tab, see “Nikon Capture 4 Editor Preferences”
( 98, 99).
Windows
Macintosh
Folder for Temporary Data
The folder chosen for temporary storage in the Temporary Files tab also applies to Nikon Capture 4 Editor. Changes will only take effect after the program has been restarted.
The Color Management Tab
Changes to settings in the Color Management tab also apply to Nikon Browser, Nikon Viewer, and Nikon
Capture 4 Editor.
137
138
Appendices
Technical Notes
The appendices cover the following topics.
Appendix A: Supported Color Profiles
Read this section for a description of the RGB color-space
profiles supported under Nikon Capture 4.
Appendix B: Color Matching in Adobe Photoshop
(Version 7.0 or later)
Learn how to preserve color-space profile information when
opening images in Adobe Photoshop (version 7.0 or later).
Appendix C: Troubleshooting
Read this section for information on what to do when Nikon
Capture 4 does not function as expected.
Appendix D: Glossary
Refer to this section when you are unsure of the meanings of
the terms used in this manual.
139
Appendix A
Appendix A
Supported Color Profiles
1. Standard RGB Profiles Supported in Nikon Capture 4
1.1 Profiles with a Gamma Value of 1.8
Apple RGB (Nikon Apple RGB 4.0.0.3000)
This profile is used in desk-top publishing applications and in Adobe Photoshop versions 4.0
or earlier, and is the typical RGB profile for Macintosh monitors. The corresponding RGB
setting in Adobe Photoshop is “Apple RGB.” This profile is suitable for working with images
displayed on the Macintosh.
ColorMatch RGB (Nikon ColorMatch RGB 4.0.0.3000)
The ColorMatch profile is native to Radius PressView monitors. It has a wider gamut than
Apple RGB, with a particularly wide area devoted to the reproduction of blues. The corre sponding RGB setting in Adobe Photoshop is “Color Match RGB.”
1.2 Profiles with a Gamma Value of 2.2
sRGB (Nikon sRGB 4.0.0.3000)
This RGB profile is used in the majority of Windows monitors. It closely resembles the RGB
commonly used in color television, and is also used in the digital television broadcasting
system that is on its way to becoming the industry standard in the United States of America.
Software and hardware manufacturers use it as a default color profile and guarantee operation when it used. It is also on its way to becoming the standard for images on the web.
This profile is suited to users who plan to use their digital images “as is,” without editing or
printing them. It however suffers from the drawback of a narrow gamut with a limited area
available for reproducing blues. The corresponding RGB setting in Adobe Photoshop 5.0 and
5.5 is “sRGB,” the corresponding setting in Adobe Photoshop 6.0 “sRGB IWC61966-2.1.”
Bruce RGB (Nikon Bruce RGB 4.0.0.3000)
This color profile attempts to expand on the ColorMatch RGB gamut by defining the chroma ticity for G as lying between the values for G in the Adobe RGB and ColorMatch color-space
profiles. It was proposed by Bruce Fraser, who claims that it includes most of the colors in
the SWOP CMYK gamut. The R and B used in the Bruce RGB and Adobe RGB color-space
profiles match.
NTSC (1953) (Nikon NTSC (1953) 4.0.0.3000)
This is the color space for video defined by the National Television Standards Committee (NTSC)
in 1953 and used in early color televisions. This color space is also used in some Far-East
newspaper and printing organizations. The corresponding RGB setting in Adobe Photoshop
is “NTSC (1953).”
140
Supported Color Profiles
Adobe RGB (1998) (Nikon Adobe RGB (1998) 4.0.0.3000)
A color-space profile defined in Adobe Photoshop 5.0. It has a wider gamut than sRGB
and includes the colors found in most CMYK gamuts, making it suitable for users involved
in desktop publishing. The corresponding RGB setting in Adobe Photoshop 5.0 is “SMPTE240M,” the corresponding setting in Adobe Photoshop 5.5 or later “Adobe RGB (1998).”
CIE RGB (Nikon CIE RGB 4.0.0.3000)
A video color-space profile established by the Commission Internationale de l’Éclairage (CIE).
While it boasts a fairly wide gamut, it suffers from the drawback that the area devoted to the
reproduction of cyan is relatively small. The corresponding RGB setting in Adobe Photoshop
is “CIE RGB.”
Adobe Wide RGB (Nikon Adobe Wide RGB 4.0.0.3000)
This color-space profile, designed by Adobe, incorporates most of the visible colors. This
however has the consequence that most of the colors it can express can not be reproduced
on standard monitors and printers. The corresponding RGB setting in Adobe Photoshop 5.0
or later is “Adobe Wide RGB.”
The gamut of colors that can be expressed in the above color-space profiles is shown in the
following chromaticity (x, y) graph. The greater the area enclosed by the triangle that repre sents the color-space profile, the wider its gamut.
Gamut
141
Appendix A
2. Technical Data for RGB Profiles Supported in Nikon Capture 4
The following table shows the gamma values for profiles supported in Nikon Capture 4, together with the chromaticity values for the white point and for red, green, and blue.
Profile
White point
Color
temperature
Value
Apple RGB
6500 K (D65)
Color Match RGB
5000 K (D50 )
sRGB
6500 K (D65)
NTSC (1953)
Bruce RGB
Adobe RGB
(1998)
CIE RGB
x 0.31271591
y 0.32900148
x 0.34570292
y 0.3585386
x 0.31271591
y 0.32900148
x 0.3101
Std
Illuminant C y 0.3162
6500 K (D65)
6500 K (D65)
x 0.31271591
y 0.32900148
x 0.31271591
y 0.32900148
x 0.33333333
Std
Illuminant C y 0.33333333
Adobe Wide RGB
5000 K (D50 )
Default Windows
monitor
6500 K (D65)
x 0.34570292
y 0.3585386
x 0.31271591
y 0.32900148
x 0.34570292
Default Macintosh
5000 K (D65)
monitor
y 0.3585386
142
Chromaticity (x, y)
Gamma
value
Name
1.8
Trinitron
1.8
P22-EBU
2.2
HDTV
(CCIR 709)
2.2
NTSC
(1953)
2.2
Bruce RGB
2.2
G
B
x 0.625
0.28
0.155
y 0.34
0.595
0.07
x 0.63
0.295
0.155
y 0.34
0.605
0.077
x 0.64
0.3
0.15
y 0.33
0.6
0.06
x 0.67
0.21
0.14
y 0.33
0.71
0.08
x 0.64
0.28
0.15
y 0.33
0.65
0.06
x 0.64
0.21
0.15
0.71
0.06
Adobe
RGB (1998) y 0.33
x 0.735
0.274
0.167
y 0.265
0.717
0.009
700/525/
450 nm
x 0.735
0.115
0.157
y 0.265
0.826
0.018
HDTV
(CCIR 709)
x 0.64
0.3
0.15
y 0.33
0.6
0.06
x 0.625
0.28
0.155
y 0.34
0.595
0.07
2.2
CIE RGB
2.2
2.2
2.2
R
Trinitron
Color Matching in Adobe Photoshop (Version 7.0 or Later)
Appendix B
Color Matching in Adobe Photoshop (Version 7.0 or Later)
When an image saved in Nikon Capture 4 is opened in Adobe Photoshop, the profiles used in
Adobe Photoshop should match those used in Nikon Capture 4. If the profiles do not match,
the colors seen in Adobe Photoshop may not be the same as those in the original image. The
profiles used with Nikon Capture 4 can be used with Adobe Photoshop version 7.0 or later.
The first step is to match the Nikon Capture 4 monitor profile with that used in Adobe Photoshop (Windows only). The point to remember is that you should specify the monitor profile
for Adobe Photoshop first and then select the same profile for Nikon Capture 4. For more
information, see “Choosing a Monitor Profile”. Macintosh users will not need to perform
this step.
The next step is to save the image from Nikon Capture 4 using a format that supports inclusion of color profile information. If you save the image in TIFF, JPEG (JFIF), or JPEG (Exif),
information about the color profile used in Nikon Capture 4 will be embedded in the file, and
Adobe Photoshop will use this information to process colors appropriately when the file is
opened. For more information, see “Adjusting Settings in Adobe Photoshop” ( 146).
Step 1—Choosing a Monitor Profile
Choose a monitor profile as described below.
Creating a New Monitor Profile
If you have not yet calibrated your monitor, use Adobe Gamma to create a profile for your
monitor. Adobe Gamma is included in the standard install of Adobe Photoshop.
1
Start Adobe Gamma
Select Adobe Gamma from the system control panels or double-click the Adobe
Gamma utility icon.
ColorSync (Macintosh)
The explanation in this section assumes that ColorSync version 3.0 or later is installed on your Macintosh.
143
Appendix B
2
Create a color profile
Follow the on-screen directions to calibrate your monitor. The resulting monitor profile
will be saved in the folder listed below. Make a note of the file name.
• Windows XP / Windows 2000
Windows/system32/spool/drivers/color
• Windows Me / Windows 98 SE
Windows/System/Color
3
Choose the profile created in Step 2 for Nikon Capture 4
Choose the profile created in Step 2 as the Nikon Capture 4 monitor profile. For details,
see “Nikon Capture 4 Editor Preferences: The Color Management Tab” ( 98).
144
Color Matching in Adobe Photoshop (Version 7.0 or Later)
Using an Existing Monitor Profile
If you have already calibrated your monitor, follow the steps below to select an existing
monitor profile.
1
Display the Color Settings dialog
Select Color Settings… from the Adobe Photoshop Edit menu.
2
Note the name of the monitor profile
Open the RGB pop-up menu in the Work Spaces section of the Color Settings dialog.
The monitor profile will appear to the right of the Monitor RGB entry. Note down the
name of the profile.
3
Locate the monitor profile
The monitor profile that appeared in Step 2 will be stored in the folder listed below.
• Windows\System\Color
4
Choose the profile as the Nikon Capture 4 monitor profile
Choose the profile noted in Step 2 as the Nikon Capture 4 monitor profile. For details, see
“Nikon Capture 4 Editor Preferences: The Color Management Tab” ( 98, 99).
If you are unable to locate a profile with the correct name, create a new profile as directed in
“Creating a New Monitor Profile” ( 143).
145
Appendix B
Step 2—Adjusting Settings in Adobe Photoshop
The following describes the minimum necessary adjustments to ensure consistent color reproduction in Adobe Photoshop 7.0. The menus and dialogs referred to below are all from
Adobe Photoshop.
Opening TIFF and JPEG Images Created Using Nikon Capture 4
Images saved in TIFF, JPEG (JFIF), and JPEG (Exif) formats include color-space profile information. Open files in these formats as described below.
1
Display the Color Settings dialog
Select Color Settings… from the Adobe Photoshop Edit menu.
2
Check Advanced Mode
Advanced Mode
RGB pop-up menu
Profile Mismatches
section
146
Color Matching in Adobe Photoshop (Version 7.0 or Later)
3
Select Preserve Embedded Profiles for Color Management Policies
Select Preserve Embedded Profiles from the RGB pop-up menu in the Color Management Policies section.
4
Remove the check from Ask When Opening
Remove the check from Ask When Opening in the Profile Mismatches area of the Color
Management Policies section.
5
Close the Color Settings dialog
Click OK to close the Color Settings dialog.
At these settings, a warning may be displayed when an image is opened. To prevent the
warning being displayed again, select the appropriate option in the warning dialog.
Nikon Capture 4 and Adobe Photoshop Color Profiles
Nikon Capture 4 output profile
Adobe Photoshop profile
sRGB
(Nikon sRGB 4.0.0.3000)
sRGB
Apple RGB
(Nikon Apple RGB 4.0.0.3000)
Apple RGB
Color Match RGB
(Nikon Color Match RGB 4.0.0.3000)
Color Match RGB
Bruce RGB
(Nikon Bruce RGB 4.0.0.3000)
—
NTSC (1953)
(Nikon NTSC (1953) 4.0.0.3000)
NTSC (1953)
Adobe RGB (1998)
(Nikon Adobe RGB (1998) 4.0.0.3000)
Version 5.5 or later: Adobe RGB (1998)
Earlier versions: SMPTE-240M
CIE RGB
(Nikon CIE RGB 4.0.0.3000)
CIE RGB
Adobe Wide RGB
(Nikon Adobe Wide RGB 4.0.0.3000)
Version 5.5 or later: Adobe Wide RGB
Earlier versions: Wide Gamut RGB
147
Appendix C
Appendix C
Troubleshooting
Should you encounter problems with Nikon Capture 4, check the list on the following pages
before consulting your retailer or Nikon representative.
Nikon Capture 4 Does Not Start
Confirm that your computer system meets all of the requirements specified for using Nikon
Capture 4 (OS, memory, hard disk capacity, etc.). See “System Requirements” ( 4).
Nikon Capture 4 Does Not Recognize the Camera
Verify that Nikon Capture 4 has recognized the camera. D1-series, D2H, D100, and D70
cameras will display PC in the control panel on top of the camera.
1
Check the power switch and mode dial
• Is the camera on?
• Is the battery fully charged? To reduce the drain on the battery, we recommend that
the camera be powered by an adapter (available separately) when connected to the
computer.
• If you are using an AC adapter, is it properly connected and plugged in?
• Is the mode dial set to PC (D1-series only)?
• Is the function dial set to P, S, A, or M (D100 only)?
• Is the correct option selected in the USB menu (D2H, D100, and D70 only)? Select
PTP when connecting the D2H or D70 to a computer running Nikon Capture 4 Camera
Control. Select Mass Storage when connecting the D100 to a computer running Windows 2000 Professional, Windows Millennium Edition (Me), or Windows 98 Second
Edition (SE). When connecting the D100 to a Macintosh computer, select PTP.
2
Verify that the interface cable is properly connected
• Is the interface cable securely connected to both camera and computer?
Remember that IEEE 1394 connectors do not make a “click” when fully inserted. If the
cable is securely connected, try disconnecting the cable and reconnecting the devices
in a different order.
• Is there another peripheral connected to the IEEE 1394 bus?
Try disconnecting other IEEE 1394 devices and connecting just the computer and the
camera.
3
Are you using a recommended IEEE 1394 interface (D1-series cameras only)?
See “System Requirements” ( 4). For information on your IEEE 1394 inter face, see the
manufacturer’s web-site.
The ReadMe File
Included on the installer CD is a README file containing the most current information on Nikon Capture
4. Please read this file before installing and using Nikon Capture, as it may contain impor tant information that could not be included in this manual. Should you encounter problems with Nikon Capture 4
not covered in this section, please consult the README file for the most up-to-date information.
148
Troubleshooting
4
Is the IEEE 1394 interface board correctly registered with the system (Windows
only)?
Check whether:
• The “IEEE 1394 Bus Controller” is not displayed in the Device Manager
• The IEEE 1394 board is listed under “Other Devices” or “Unknown Devices”
• A yellow or red mark appears next to the listing for the IEEE 1394 board
If any of the above apply, the IEEE 1394 board has not been correctly registered with
the system. See the documentation provided with the board for information on device
registration.
Nikon Transfer Does Not Start
If Nikon Transfer fails to start when a supported camera is connected or a memory card
from a supported camera inserted in a card reader or PC card slot, check that the memory
card is properly inserted in the camera, card reader, or card slot, that the interface cables
are properly connected, and the camera is turned on. Note that Nikon Transfer will not
start automatically when Disable auto launch is selected in the Auto Launch tab of the
Nikon Browser or Nikon Viewer Preferences dialog. Nikon Transfer will not start when Nikon
Capture 4 Camera Control is running.
Captured Images are Too Bright, Too Dark, Washed Out, or Out of Focus
• At default settings, Nikon Capture 4 does not modify images when they are captured from
the camera. In the General tab of the Preferences dialog, verify that your images are being
captured at Nikon Capture’s default settings and not at the settings of the last image captured. See “Preferences” for more information ( 94). Alternatively, check the settings
in the Curves, Color Balance, and Unsharp Mask windows. Choose the reset option from
the Settings menu for each window, or turn the Apply button for the window off.
• Are monitor settings correctly adjusted?
Try adjusting your monitor’s contrast/brightness, color system, etc. to be sure that it is
properly set for viewing images. See the documentation provided with your monitor for
instructions on adjusting monitor settings.
149
Appendix D
Appendix D
Glossary
This glossary provides definitions of some of the terms used in this manual.
Bit depth
The number of bits used to express color, also referred to as color depth. The bit depth determines the amount of color information in an image. The greater the bit depth, the larger
the number of colors, and the finer the gradations, that can be expressed. Bit depth can be
used to refer both to the number of bits per channel and to the combined bit depth for all
channels; thus, for example, an image with a bit depth of eight bits per channel can be said
to have a bit depth of twenty-four bits. An image with a bit depth of one bit has only two
colors, typically black and white, with no gradation between the two. See also Channel.
Black Point
The input value below which all input tones are mapped to the minimum output value (by
default no color, or black). Any details darker than the black point will be lost. See also
Tone, Tone curve.
Channel
The component colors in a given color space. The RGB color space is made up of red, green,
and blue channels and a master channel that combines the three. See also Color space.
Clip
The percentage of pixels at both ends of the curve that are excluded in an auto contrast
operation. See also Tone curve.
CMS
See Color management system.
CMYK
A reflective (subtractive) color model commonly used in printing, which models color using
combinations of the three secondary colors used in printer’s ink, Cyan, Magenta and Yellow.
Because no combination of these three inks will create a true black, blacK ink is also used.
Color management system
A method of ensuring consistency of color reproduction between devices such as scanners,
monitors, and printers, and between different computer platforms. In the color management system used in Nikon Capture 4, accurate color reproduction is ensured through the
use of profiles that provide information about the characteristics of the monitor or printer
and the color space used for editing. See also ColorSync, ICC, Profile.
Color space
A general term encompassing both the model used to define color (for example, CMYK or
RGB) and the range, or gamut, of colors that can be expressed in a given color model. See
also CMYK, Gamut, RGB.
ColorSync
A color management system for Mac OS developed by Apple. See also Color management
system, ICC.
150
Glossary
CompactFlash™ memory card
A small, removable flash memory card. Used for storage of photographs in Nikon digital
cameras.
Compression
A method for reducing file sizes for storage or transmission. Compression algorithms can be
divided into “lossless” algorithms, such as LZW, in which no information is lost when files are
restored to their original size for display or editing, and “lossy” algorithms, such as JPEG, in
which some information is lost when the file is restored. See also JPEG, TIFF.
Crop
The portion of the image selected in an image window.
Curve
See Tone Curve.
Eyedropper
A tool for sampling white point, black point, or midpoint. See also Black point, Midpoint,
White point.
FireWire
Apple’s term for the IEEE 1394 interface. See IEEE 1394.
Fisheye lens
A “fisheye” lens is any lens with a view angle of 180 degrees or more. Fisheye lenses may
have a view angle of 180 degrees in all directions or only diagonally. Distortion increases
towards the edges of the picture, with little or no distortion at the center of the image. The
Fisheye Lens palette in Nikon Capture 4 can be used to reduce distortion in images taken
with an AF DX Nikkor ED 10.5 mm f/2.8G lens to create an image close to what would be
produced by an ordinary wide-angle lens.
Gamma
Gamma (also written “γ”), a fundamental property of video systems, determines the intensity
of the output signal relative to the input. When calculating gamma, the maximum possible
input intensity is assigned a value of one, and the minimum possible intensity (no input) is
assigned a value of zero. Output is calculated by raising input to the inverse of the gamma
value (output = input ( 1/γ ) ).
Gamut
The range of colors that can be expressed by a given input device (for example, scanner or
digital camera), output device (monitor or printer), or color profile. No gamut can reproduce
all of the colors seen by the human eye. The gamut of primary RGB (Red, Green, and Blue)
transmitted light displays (film transparencies and color monitors) is very different from, and
complementary to, the gamut of secondary CMYK (Cyan, Magenta, Yellow, and blacK) reflected light displays (printed materials). See also CMYK, Profile, RGB.
Gray point
See Midpoint.
151
Appendix D
Halo width
The extent of pixels around a selected central pixel affected when Unsharp Mask is applied.
Also referred to as “radius.” Increasing the halo width increases the width of edges affected
by Unsharp Mask. Excessive application of Unsharp Mask results in an undesirable halo along
edges in the image. See also Unsharp Mask.
Histogram
A bar graph showing the distribution of tones in an image. The horizontal axis shows tone
level (brightness), the vertical axis the number of pixels. The bars in the graph show the
number of pixels of a given brightness in the image. The histogram displayed in the Curves
window shows the distribution of tones for the currently selected channel, and can be used
for reference when editing curves. See also Tone, Tone curve.
ICC
The International Color Consortium, an international organization working to develop standards for color management and color management profiles. ICC profiles were developed
for the conversion of color space information between devices, and are now on their way
to becoming a global standard. ICC profiles have been proposed as an International Orga nization for Standardization (ISO) standard. See also Profile.
IEEE 1394
A high-speed transfer protocol developed by the Institute of Electrical and Electronics Engineers for connecting peripherals such as hard disks, MO drives, and digital cameras to a
computer via a cable.
JPEG
A standard graphic format designed by the Joint Photographic Experts Group. Images are
compressed using a discrete cosine transform that takes advantage of the properties of human vision, which is more sensitive to light in the lower wavelengths, to increase quantization
at lower frequencies. JPEG compression is “lossy,” meaning that information is lost when
images are compressed, leading to a drop in image quality. A lossless compression option
is also supported in some implementations. JPEG images can be compressed to as much as
100:1, though quality will be significantly reduced. At a compression ratio of 20:1, image
quality is not noticeably diminished.
LCD
Liquid Crystal Display. LCDs are notable for their thinness, lightness, and the fact that they
consume relatively little energy.
Midpoint
Controls the output level for mid-tones in the original image. See also Tone, Tone curve.
NEF
An abbreviation of Nikon Electronic Image Format, an image file format developed by Nikon
to support high-resolution, twelve-bit RAW image data. In Windows, NEF files have the extension “.nef”. NEF images can be opened and edited only in Nikon Capture. The advantage
of NEF is that while user settings such as curves and color balance are saved, they are not
applied to the original image data. NEF images may thus be edited and saved several times
without degrading or altering the original image. NEF files however require a relatively large
amount of storage space. See also RAW image.
152
Glossary
Noise
Data in an image file that are not a part of the original image, the digital equivalent of film
grain. The presence of noise is reflected in a loss in image quality. Noise appears primarily
in dark areas of the image, and can be reduced by adjusting exposure or lighting to fill in
shadows.
ppcm
pixels per centimeter, a measure of resolution. The more pixels per centimeter, the higher
the resolution. See also ppi, Resolution.
ppi
pixels per inch, a measure of resolution. The more pixels per inch, the higher the resolution.
See also ppcm, Resolution.
Preferences
Settings controlling basic operations performed by a given program, adjustable by the user.
Profile
A file defining the color characteristics of an input device such as a scanner or digital camera,
an output device such as a printer or monitor, or the color space used for editing images.
Profiles are used by color management systems to ensure consistent color reproduction. The
Nikon Color Management System used in Nikon Capture employs ICC profiles. See also
Color space, ICC.
RAW image
A photograph taken at an image quality setting of HI-RAW. “Raw,” unmodified image data
from the camera’s image sensor (charge-coupled display, or CCD) are saved in uncompressed
form at a pixel bit-depth of twelve bits per pixel. RAW images can only be opened in Nikon
Capture 4, and must be saved again in a standard image format such as TIFF or JPEG before
they can be opened in another application. See also NEF.
Resolution
The density of dots or pixels that make up an image, measured in dots per inch (dpi) or pixels
per inch (ppi); the resolution of Macintosh monitors, for example, is 72 ppi. The greater the
density of dots or pixels, the higher the resolution and the greater the capacity to express
detail. Resolution is hence the digital equivalent of film resolving power. Computer monitors
typically have a resolution of 72 ppi or 96 ppi, while printers may have resolutions of 300 dpi,
600 dpi, 1200 dpi, or 2400 dpi. See also ppcm, ppi.
RGB
An additive color model commonly used in monitors, in which light emitted in three primary
colors, Red, Green and Blue, is combined to create a wide variety of colors. White is modeled
by mixing 100% of all three colors.
Scale
The output size of an image as a percentage of the input size. At a scale of 50%, images will
be output at half their original size.
Speedlight
A brand name for Nikon flashes.
153
Appendix D
Threshold
The limit up to which Unsharp Mask will be applied. While it is generally the case that the
higher the threshold, the greater the amount of sharpening applied, the exact effect depends on other Unsharp Mask settings, such as halo width. See also Halo width, Unsharp
Mask.
Thumbnail
A small preview image, the digital equivalent of a photographic film contact sheet. Images
loaded into Nikon Capture are displayed in a thumbnail list in the Thumbnails section of the
Camera Image window.
TIFF
Tagged Image File Format, an image file format for color or grayscale images, suited to storing bit-mapped images such as digital photographs. In some implementations, TIFF supports
“lossless” LZW and packbit compression (in “lossless” compression methods, no information
is lost when the image is compressed, as opposed to “lossy” compression methods such as
JPEG, in which detail is sacrificed to achieve higher compression ratios). Images saved in TIFF
format using Nikon Capture are not compressed. See also Compression, JPEG.
Tone
Pixel brightness, measured either as the combined intensity for red, green, and blue or the
intensity of each of these colors (channels) individually. The number of tones that can be
expressed depends on the bit depth of the image; Nikon Capture 4 supports 256 tone levels
per channel at a bit depth of eight bits and 4096 tone levels per channel at a bit depth of
twelve bits (data with a bit depth of twelve bits are handled internally as sixteen-bit data).
The distribution of tones in the image can be seen in the Curves window histogram. See
also Bit depth.
Tone curve
A visual tool for editing tones, enhancing brightness and contrast in a selected portion of
the tone range. Changing the shape of the tone curve changes the mapping between input
(the tones in the original image) and output (tones as they appear after editing). The digital
equivalent of a densitometric curve. See also Tone.
Unsharp Mask
A filter for increasing the apparent sharpness of bit-mapped images. Sometimes abbreviated
as “USM.” Unsharp masks emphasize the differences in color and brightness between edges
(outlines) and the rest of the image. See also Halo width, Threshold.
USB
Universal Serial Bus. A standard for computer serial interfaces which allows automatic “plugand-play” recognition of peripheral devices and “hot plug” connection of peripherals while
the computer or device is on. Depending on the type of interface installed on the computer,
USB will operate at high speed (USB 2.0 only), with data transfer rates of up to 480 Mbps, or
full speed (USB 1.1, USB 2.0), with data transfer rates of up to 12 Mbps. For more information, consult the manufacturer.
154
Glossary
White balance
The human eye is able to adapt to changes in lighting, and consequently to humans a white
object will still look white whether viewed in direct sunlight or under overcast skies, or indoors under incandescent or fluorescent lighting. A digital camera, in contrast, must adjust
colors according to lighting if colors that appear white when viewed directly are also to appear white in the final photograph. This adjustment is called “white balance.”
White point
The input value above which all input tones are mapped to the maximum output value (the
default for the master channel is white). Any details brighter than the white point will be
lost. See also Tone, Tone curve.
155
Index
Index
A
AC adapter, 127, 136
Adobe Photoshop, 94–95,
140–141, 143–147
Adobe RGB, 141, 147
AdobeWide RGB, 141, 147
Advanced Color tab, 96–97
Advanced RAW palette, 27, 28,
35–37
Apple RGB, 140, 147
Apply button, 25
Auto contrast, 44, 47, 55, 96
Auto–contrast clip, 96, 150
B
Batch processing, 88–92. See
also Live Batch
Bird’s Eye palette, 19
Bit depth, 82, 92, 114, 150
Black point, 44, 47–50, 96–97
Bracketing, 117, 126
Brightness, 21, 55, 61–62
Bruce RGB, 140, 147
C
Camera control, 101–137
Camera menu, 129–131
Channel, 44–47, 49, 52, 54–57
Chroma, 54, 56, 59
CIE RGB, 141, 147
CMYK, 98–100
default, 98, 99
profile, 98–100
Color, 21, 36, 44–52, 54–57,
59, 61–62, 96–97, 98–100
Color Balance palette, 27, 28
61–63
Color Booster palette, 27, 28,
59–60
Color management, 98–100
ColorMatch RGB, 140, 147
Color Moire Reduction, 67
Color saturation, 36
Color space, 150
profile, 98–100, 140–141
ColorSync, 99
Color temperature, 29–30, 130
CompactFlash card. See memory card
Compression, 79, 124
Connecting a camera, 104
Contrast, 61
Contrast slider, 61–62
156
Crop, 24, 151
selection, 24
Crop cursor, 24
Curves palette, 27, 28, 44–53
Custom settings, 132–134
D
Digital DEE palette, 27, 69–72
Display profile, 98–100
E
Editing, 7–100
Eyedropper tool, 31, 44, 49, 52,
97, 151
Exposure compensation, 35,
121
F
File formats, 13, 79
File names, 82, 91, 109, 114
FireWire, 4, 151
Fisheye Lens , 27, 73–74, 151
Fisheye Lens palette, 27, 73–74
Flash sync mode, 122
Flexible program, 121
Flipping images, 20
G
Gamma, 51, 151
Gamut, 141, 151
General tab
Nikon Capture 4 Camera
Control, 136
Nikon Capture 4 Editor,
94–95
Gray point, 31–32, 55. See also
midpoint
setting, 31–32
Grid lines, 97
H
Halo width, 65, 152
Hand Cursor, 18
Highlights, 23, 45
Histogram, 44, 46, 55, 111,
129, 152
Hue, 36, 57, 128
I
ICC, 99, 152
IEEE 1394, 4, 152
Image Dust Off, 27, 38–41, 130
Image Dust Off palette, 27,
38–41
Indicator, 26
Information palette, 21–22
Installation, 5
Intensity, 42–43, 56, 65
ISO equivalency. See sensitivity
J
JPEG, 13, 20, 79, 152
L
LCD, 152
Simulated LCD panel, 119–120
LCH Editor palette, 27, 28,
54–58
Live Batch, 112–115
Luminosity, 55
M
Master curve, 44–52
Memory card, 32–33
Metering, 120, 122
Midpoint, 51–52, 152
Mired, 29
Multi-Image Window, 15–17, 82
N
NEF, 13, 79, 152
Nikon View, 3
Noise reduction, 27, 67–68,
128
Noise Reduction palette, 27,
67–68
Nikon Capture 4 Camera
Control, 101–137
Nikon Capture 4 Editor, 7–100
NTSC (1953), 140, 147
O
Open, 13–17
Original image, 9
Output size, 75–77
P
Photo information, 8
PictureProject, 3
Pixel, color of, 21
Preferences
Nikon Capture 4 Camera
Control, 135–137
Nikon Capture 4 Editor,
93–100
Printer profile, 98, 100
Printer resolution, 153
Printing images, 84–87
Profiles, 98–100, 140–147, 153
Index
R
RAW, 13, 27, 28, 124, 153. See
also NEF
Resolution, 75–77, 153
RGB, 153
color–space profile, 98–100,
140–141
default RGB profile, 98, 99
Rotating images, 20
X
x–y coordinates, 21
Z
Zoom, 18
Zoom ratio, 18
S
Save Progress Window, 83, 95
Saving images, 80–83
Scale, 75–76, 153
Sensitivity, 40, 122
Settings, saving and loading,
34, 37, 41, 43, 53, 58, 60, 63,
66, 68, 72, 74, 77, 78
Size/Resolution palette, 27,
75–77
Shadows, 23, 45
Sharpening, 35, 128. See also
unsharp mask
Shoot button, 119–120
Shooting data. See photo information
sRGB, 36, 98, 140, 147
Subdivisions, 97
System requirements, 4
T
Temporary files, 96, 137
Threshold, 64–65, 70–71, 154
Thumbnail, 15–17, 154
TIFF, 13, 27, 79, 82, 95, 154
Time lapse photography,
116–118
Title bar, 8
Tone compensation, 35–36, 128
Tool palettes, 8, 25 –28
U
Unsharp mask, 27, 64–66, 154
Unsharp Mask palette, 27,
64–66
USB, 4, 154
V
Vignette control, 27, 42–43
W
White balance, 27, 28, 29–34,
123, 130
fine–tuning, 30, 130
White Balance palette, 27, 28,
29–34
White point, 44, 47–50, 96–97
157
No reproduction in any form of this manual, in whole or in part (except for
brief quotation in critical articles or reviews), may be made without written
authorization from NIKON CORPORATION.