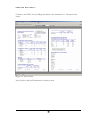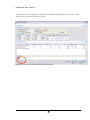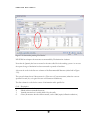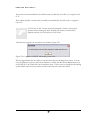
1
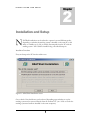
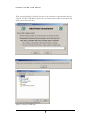
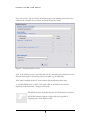
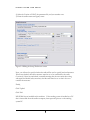
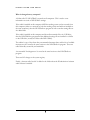
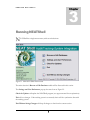
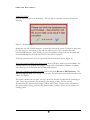
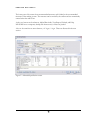
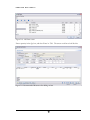
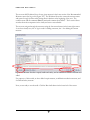
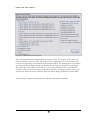
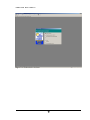
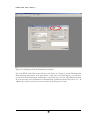
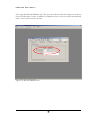
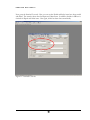
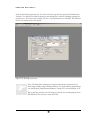
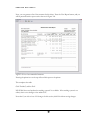
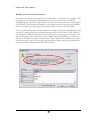
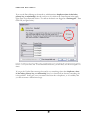
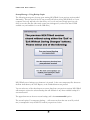
DALHOFF ASSOCIATES, LLC NEATShell User’s Manual April 28, 2007 NEATShell User’s Manual Dalhoff Associates, LLC 533 Marshall Circle, Verona Wi 53593 Phone 608.845.6551 [email protected] ii Table of Contents Chapter 1 Introduction to NEATShell 1 Chapter 2 Installation and Setup 3 Chapter 3 Running NEATShell 9 Chapter 4 User Notes 33 1 3 I N T R O D U C T I O N T O 1 Chapter N E A T S H E L L Introduction to NEATShell N EATShell mediates data transfer between your existing weatherization tracking system and NEAT. Data which are common to both applications are instantiated and passed transparently and seamlessly between the two applications. NEATShell makes it practical for the auditor, who is familiar with the building, the recommended weatherization measures, and on-site measurements (such as blower door and CO testing) to automate the data entry for audit-recommended measures and to permit direct entry for all other field measurements and recommendations. These capabilities expedite data entry while simultaneously eliminating duplicate data entry, minimizing paper records and record handling, and reducing the potential for errors Integration between weatherization audits and the National Energy Audit Tool (NEAT) • House data are instantiated in NEAT automatically if NEAT has not yet been run for that house. These data include Weatherization ID number, client name, address, house type, square footage, volume, heating fuel, and blower door readings. Thus no duplicate data entry is required, and the Weatherization ID number is used automatically for the Job Identifier in NEAT. • In addition, the totals for infiltration measure costs, health and safety measure costs, and itemized costs are passed directly to NEAT. It is no longer necessary for the auditor to manually total these and enter them into NEAT. • Costs used by the NEAT audit are automatically passed to NEAT using the costs currently used by the tracking system. When costs change in the tracking system, those costs are automatically and seamlessly updated in NEAT. Flat-rate, crew-based, or custom costs can be used. • Recommended measures are automatically passed to the tracking system using the tracking system measure identifiers. Units of measurement are automatically reconciled between the 1 I N T R O D U C T I O N T O N E A T S H E L L tracking system and audits (e.g., square-footage of insulation is automatically converted to pounds of insulation for blown cellulose measures.) • NEATShell provides a summary report of all recommended measures for a building. Connectivity • Auditors can access the tracking system data in any of three ways: 1) while connected to the tracking system computer via local area network, 2) direct access tracking system if it is installed on the same computer, 3) using a disconnected computer wherein data transfer is accomplished using a USB drive. • Auditors can conduct audits and update any data regardless of whether or not they are in contact with the tracking system computer. All data are automatically synchronized the next time the tracking system is available to the computer (or USB drive) with NEATShell. Backup copies of the major tracking system data tables are stored on the auditor’s computer. These can be accessed in the event that the tracking system computer becomes inoperable System Requirements • NEATShell is an MS Windows-based application. It has been developed and tested extensively using Windows XP. It has been demonstrated to run on Windows 98. No problems are anticipated for use on Windows 2000. • Weatherization Assistant Version 7.4.3.3 is currently supported. • Even though NEATShell reads and writes to MS ACCESS databases used in NEAT and some tracking system software, MS ACCESS is NOT required to operate NEATShell. NEATShell can be adapted to work with other audits, including the MHEA audit bundled in the Weatherization Assistant. NEATShell can be further customized to meet the particular needs of your agency. Installation and support packages are available. 2 I N S T A L L A T I O N A N D 2 Chapter S E T U P Installation and Setup N EATShell installations can be tailored to operate in several different modes, depending on whether the tracking system is installed on the same PC as the audit, or available on a LAN, or entirely disconnected from the PC with the tracking system. NEATshell is installed using a file called Setup.exe. Installation Procedure First, run Setup on the PC that the auditor uses. Figure 2.1 NEATShell Installation screen One or both of the checkboxes can be selected, depending upon whether or not the tracking system can be accessed directly from the auditors’s PC (on a LAN or if both the tracking system and audit are installed on the same computer). 3 I N S T A L L A T I O N A N D S E T U P If the second checkbox is selected, then one of the selections for data transfer must be selected. If USB or ZIP disk is selected, the user must create a folder on that drive and select it in the lower text box. Figure 2.2 Setup for USB drive 4 I N S T A L L A T I O N A N D S E T U P Now, select ‘Next’. The user will be advised that paths to the tracking system and/or the audit must be selected in the next form, the Setup/Preferences Form.. Figure 2.3 Setup/Preferences screen Next, if the tracking system is accessible from this PC, then click on the folder icon on the first line and navigate to the tracking system executable (e.g., WAMS.mdb). If the audit is installed on this PC, then continue with the following three steps: 1) tell NEATShell where to find it. Here again, click on the folder icon at the line beginning ‘Audit Executable.’ Navigate to the audit. NEATShell assumes the default directory for Weatherization Assistant. NEATShell currently supports a single audit, but is capable of supporting up to three separate audits. 5 I N S T A L L A T I O N A N D S E T U P 2) Select the Version of NEAT, the parameter file, and your weather zone. 3) Enter the auditor name and agency name. Figure 2.4 Editing the Setup/Preferences screen Next, you will need to specify whether the audit will be used to specify baseload measures. If these are checked, then these measures must be set to be considered by the audit. Conversely, if these are unchecked (essentially meaning that the user enters these along with repair and health/safety measures, then the audit must be set so that it does not consider the measures. Finally, Click ‘Update’ Click ‘Exit’ NEATShell is now installed on this machine. If the tracking system is installed on a PC that is inaccessible from the auditor computer, then repeat the process on the tracking system PC. 6 I N S T A L L A T I O N A N D S E T U P What is changed on my computer? A folder called ‘C:\NEATShell’ is created on all computers. This is used to store information on some of NEATShell’s settings. If the audit is installed on this computer AND the tracking system can be accessed from this computer (either on a network or both the tracking system and audit are installed on the same computer), then the NEATShell.exe program as well as another settings file are also added here. If the audit is installed on this computer and the auditor transfers files via a USB drive, then the NEATShell.exe program and the additional settings file are installed on a folder on the USB drive (usually in a folder called NEATShell). The auditor’s copy of the client data, recommended measures data, and the list of available measures are also stored in the same location as the NEATShell.exe program. These are called ‘client.lds, recmea.lds, and mealist.lds. An executable ‘LiveSupport.exe’ is stored at the same location as the NEATShell.exe program. There are NO changes to the system registry. Finally, a shortcut called ‘wa.lnk’ is added to the folder where the Weatherization Assistant audit software is installed. 7 I N S T A L L A T I O N A N D S E T U P 8 R U N N I N G 3 Chapter N E A T S H E L L Running NEATShell N EATShell has a single master menu, with several selections. Figure 3.1 Main NEATShell menu screen The main selection is Browse or Edit Databases which will be discussed in this section. The Settings and User Preferences pops up the same form as Figure 2.2. Check for Updates will update the NEATShell program (see support manual for an explanation). Exit will save changes. If the tracking system is connected, then it will also synchronize data with the tracking system . Exit Without Saving Changes will drop all changes to data from the current session. 9 R U N N I N G N E A T S H E L L Starting NEATShell Click the NEATShell icon on the Desktop. The user will see a number of screens similar to the following: Figure 3.2 Synchronizing During this time, NEATShell attempts to connect with the tracking system. If it finds it, then it will post any changes to the tracking system and then retrieve a new copy of the client data and recommended measures. If the tracking system is not available, it simply loads the client data and recommended measures from the data stored on the auditor’s computer. Following synchronization, the user is presented with the main menu screen (Figure 3.1). If the user is simply updating the tracking system from a USB drive, then the user selects Exit. The tracking system is now updated with changes that the auditor made and the USB drive is updated with a new copy of the client data and recommended measures. If the user is planning on running the audit, then he/she selects Browse or Edit Databases. The Materials Specification screen (Figure 3.3) is shown. This is the main screen used when add a new audit to the database. This screen is divided into two parts: the top is shows the data that are important to conducting an audit. These data are linked to the client data in the tracking system. The user can edit Weatherization ID, Structure Information, CFM50, and CO data. The user cannot add clients in this field or edit the Energy Assistance ID, phone number or address. These must be edited in the tracking system. 10 R U N N I N G N E A T S H E L L The lower part of the screen shows recommended measures, and is linked to the recommended measures of the tracking system. The measures can be entered by the auditor and are automatically entered when the audit is run. At the very bottom are four buttons, labeled Run Audit, View Report, Finished, and Help. NEATShell saves a temporary backup file whenever any of these are pushed. Also on the same line are arrow buttons, a ‘+’ sign, a ‘-‘ sign. These are discussed in the next section. Figure 3.3 Materials Specification screen 11 R U N N I N G N E A T S H E L L An Example of a Typical Session of Entering Information and Conducting an Audit During normal operation, the user would select Browse or Edit Databases from the opening screen. First, the user must find the client in the database. This can be done by clicking any of the magnifying glass icons in the Client Information section. If the client has not been assigned a Weatherization ID by the tracking system user, then the Energy Assistance ID is usually used to navigate to the correct client Figure 3.4 Searching for the client Clicking on the magnifying glass (search icon) will bring up a search screen (Figure 3.5) that allows the user to type in an identifier (in our case, this is the Energy Assistance ID). Once the correct ID has been located, click OK. Figure 3.5 Search screen 12 R U N N I N G N E A T S H E L L Next, assign a Weatherization ID if there is not already one entered. Do this by clicking in the Weatherization ID box (do not click the search icon since you are entering a new ID). When entering a new tracking system id or when changing an existing id, remember to click in the box.. If you are searching for a pre-existing id, then you would click on the search icon. The user will be presented with a screen to enter the Tracking System ID: Figure 3.6 Screen to Assign or Edit a Weatherization ID Enter a unique ID and then click ‘OK’. Notice that the ‘OK’ button is not enabled. It will remain that way until a unique Weatherization ID is entered. Next, you will see a screen asking if you want to apply the new ID to recommended measures with the old ID number. Since you are creating a new ID, click ‘Yes’. The purpose of this box is to allow the user to change a Weatherization ID, in case there was an error when it was originally entered. If measures had been entered with the incorrect ID number, and the user wants to change the ID, then clicking ‘Yes’ will assign the new ID to the recommended measures with the old ID. This way the user does not have to re-enter all of the measure data just because of an error in assigning the Weatherization ID. 13 R U N N I N G N E A T S H E L L Figure 3.7 Prompt for applying the new ID to recommended measures In case the audit had been run with the incorrect ID, the user is reminded to change the Job Identifier in NEAT: Figure 3.8 Reminder to change the Job ID in the audit 14 R U N N I N G N E A T S H E L L After the Weatherization ID is entered, the ‘Run Audit’ button is enabled. Continue entering basic house information that is required by the audit (Figure 3.9). Figure 3.9 Basic house information Now that the house information is completed, it is time to begin entering information on health and safety measures, infiltration reduction measures, and repair measures. None of these items are specifically recommended by the audit, so they must be entered by the auditor. NEATShell makes this very easy to do, and it is better to enter these now, before running the audit because NEATShell will total the costs of measures in each of these categories and enter the totals into Weatherization Assistant. Click on the ‘+’ sign in the lower right (see Figure 3.9). This pops up an Add Item search box. Type the name of the Workitem (not the measure code, which in this case is the ‘SEQ’ number). When the item has been identified, click ‘OK’. 15 R U N N I N G N E A T S H E L L Figure 3.10 Add Item screen Enter a quantity in the Qty box, and then ‘Enter’ or ‘Tab’. The screen would now look like this: Figure 3.11 Recommended Measures after adding an item 16 R U N N I N G N E A T S H E L L The user can add Workitem Notes for any given measure in the lower section of the Recommended Measures screen (the big oval in Figure 3.12). The Workitem Notes also extract the measure name and square footage from the audit, placing them in brackets at the beginning of the note. The evaluator must add all comments after the bracketed comment from NEAT. The Location Notes are taken from the components in the Audit, and are not user-editable. The user can navigate through the measures using the four arrow buttons in the lower right corner. As we have already seen, the ‘+’ sign is used for adding a measure, the ‘-‘ for deleting the current measure. Figure 3.12 Measure list after a repair, health and safety, and an infiltration reduction measure are added For purposes of this tutorial, we have added a repair measure, an infiltration reduction measure, and a health and safety measure. Now, we are ready to run the audit. Click the Run Audit button in the lower left of the screen. 17 R U N N I N G N E A T S H E L L Figure 3.13 Measure Selection Options’ The user is presented with a ‘Measure Selection Options’ screen. The purpose of this screen is to tailor the measure costs to the audit. The audit uses only a single value of cost for a measure, but costs can vary depending on the amount of the measure installed. For example, labor costs increase very little with added insulation depth, but the material cost increases in proportion to the depth. This screen allows the auditor to ‘fine tune’ the costs of the installed measures to provide better estimates of the costs for the measures installed in this dwelling. If changes are made, the user can click the Save Selections button, which will make the current settings the default for future audits. After pressing ‘Continue’, the Weatherization Assistant is automatically launched. 18 R U N N I N G N E A T S H E L L Figure 3.14 Weatherization Assistant 19 R U N N I N G N E A T S H E L L Figure 3.15 Selecting the client in Weatherization Assistant Go to the NEAT Audit. Click on the ‘Job’ box, then ‘Paste’ (or Control-V), and the Weatherization ID is pasted into the Job box. Now, press ‘Enter’ or click once on the ‘Run’ button. You will move to a record in the Weatherization Assistant that is already filled out for your client! NEATShell has passed all of the necessary house information to Weatherization Assistant and created the Job for you. In addition, the current costs of all measures have been written into Weatherization Assistant! 20 R U N N I N G N E A T S H E L L Now, select the Ducts & Infiltration tab. Here you can see that the blower door readings have already been passed to Weatherization Assistant. In addition, all infiltration measure costs have been totaled and automatically entered. There is no need to total these by hand. Figure 3.16 Ducts & Infiltration tab 21 R U N N I N G N E A T S H E L L Next, press the Itemized Costs tab. Here you can see that Health and Safety items have been totaled and added. The same has been done for Repair and Other Items. In addition, Include in SIR box is checked for Repair and Other items. Here again, all this has been done automatically. Figure 3.17 Itemized Costs tab 22 R U N N I N G N E A T S H E L L Next, click the Heating Systems tab. You will see that fuel type has been passed to Weatherization Assistant You will need to finish the heating system description on this tab, including assigning the measure costs. Note that in this example, we have a total replacement cost of $2,600. We will come back to this number later in the tutorial. Figure 3.18 Heating Systems tab Note: Weatherization Assistant has a bug that prevents the correct labor cost from being entered for high efficiency furnaces. For high efficiency replacements, you should specify ‘Replacement Mandatory’ and put in a system efficiency of 92. Due to this bug, measure costs for heating systems do not transfer properly from NEATShell, so the user has to enter these here. 23 R U N N I N G N E A T S H E L L Continue to run NEAT as usual, adding wall, window, attic, foundation, etc. Then preview the results. Figure 3.19 NEAT results Now, click close and exit Weatherization Assistant as usual. 24 R U N N I N G N E A T S H E L L At this point, you are returned to the Material Specifications of NEATShell. Notice that the ‘Run Audit’ button now says ‘Get Results’. Click it. Figure 3.20 Screen after closing Weatherization Assistant 25 R U N N I N G N E A T S H E L L Figure 3.21 Screen after pressing 'Get Results' NEATShell now imports the measures recommended by Weatherization Assistant. Note that the Quantity has been converted to the units called for in the tracking system – in our case the square footage of insulation has been converted to pounds of insulation. Also note the codes in the first two columns of the Recommended Measures (circled red in Figure 3.21). The second column shows if the measure is a (F)lat rate or (C)ustom measure (where the costs are specified for each job, as is typical for crew and contractor installations). The first column is a code for the source of information and is specified as: Code A E I O Description Audit-recommended measure Edited audit-recommended measure Inserted measure that is usually called for by the audit Other (all measures that the auditor entered, such as H&S, repair, infiltration reduction) 26 R U N N I N G N E A T S H E L L If a measure was recommended by the audit but later was edited by the auditor, it is assigned a code of ‘E’. If the auditor specifies a measure that is normally recommended by the audit, then it is assigned a code of ‘I’. For both the ‘E’ and ‘I’ codes, the user is prompted to remove or keep these measures before running the audit. Keeping the measures would result in duplicate measure if the audit called for the same measure. . After this screen appears, the user will see one similar to Figure 3.22. Figure 3.22 Comparison of NEAT and tracking system costs This message indicates that the Audit costs are $18 more than the tracking system values. In some cases, the difference is greater, and in those instances, it is likely that the Furnace Replacement costs used in NEAT do not match those in the tracking system. If this occurs, be certain that the tracking system default values are correct and be certain to enter the same values into NEAT. 27 R U N N I N G N E A T S H E L L Next, you can generate a list of the measures for this client. Press the View Report button, and you will be presented with a report such as the one in Figure 3.24. Figure 3.23 List of recommended measures Pressing the printer icon at the top will send this report to the printer. This completes the audit. Click ‘Finished’, and the ‘Exit’. NEATShell closes and updates the tracking system if it is available. If the tracking system is not online, then it saves changes to the auditor’s PC. Note that if you wish to lose ALL changes for this session, click Exit without saving changes. 28 R U N N I N G N E A T S H E L L Handling Unsuccessful Synchronizations Occasionally you may get a message that says ‘Update Error’ (see below for an example). This can happen if the exact same recommended measure (for the same house) was added to WAMS directly by somebody using WAMS at the same time that the measure was being added to NEATShell. This should never happen, as the evaluator should be the only person adding measures on the house until the paper records are handed over to the WAMS operator. It is also possible that the last time NEATShell successfully sent the data to WAMS, but the did not receive a message back from WAMS that the procedure was successful. If NEATShell is not notified by WAMS that the send was successful, it saves its own copy of the measure to try and resend the next time it synchronizes with WAMS. When NEATShell tries to resend the measure to WAMS the next time it synchronizes, it finds a duplicate in WAMS and so it causes the error message to occur. Theoretically, this should never happen, but it is possible that the communication from WAMS back to NEATShell failed. 29 R U N N I N G N E A T S H E L L If you see the Error Message as shown above, which mentions ‘duplicate values in the index, primary key, or relationship’, then all you have to do is click on the Cancel button in the upper right, where it says Reconcile Action. You will see the data is now flagged as <Unchanged>. Then Click OK (see figure below). Note that you might have to repeat this a number of times: normally when this occurs, it happens for each of the measures in that particular house – so if your house has 15 recommended measures, you will likely see this messagebox 15 times. If you get the Update Error message box and it says something other than ‘duplicate values in the index, primary key, or relationship’, then you should call me because something else is the problem. In the past, every occurrence has been due to duplicates, so it is unlikely that you will encounter a different message. 30 R U N N I N G N E A T S H E L L Startup Message – Using Backup Copies The following message may be seen upon starting NEATShell if your previous session ended abnormally. This can occur if the PC was powered off before closing NEATShell, or if your computer 'froze up' and had to be shut down, or if you do not have enough space on your drive to save the data files (this rarely occurs, but can happen if you have less than 25 MB available on your hard drive or on the USB drive). NEATShell saves a backup copy whenever it is started. It also saves temporary files whenever the Run Audit button, the View Report, or the Finished buttons are pressed. You can select any of the three buttons to restore data from your previous session: NEATShell will attempt to restore the selected backup but will fall back to any other available backup if it was unsuccessful. The upper button uses the most recent backup, and is the recommended option. The second option, Use temporary backup…, will restore any data that was saved if you had run (or attempted to run) the NEAT Audit in you previous session. 31 R U N N I N G N E A T S H E L L The third option will recover data that was used to start your previous session, but you will lose any changes you made in your last session. You can use select this option if you did not run the audit (or attempt to run the audit) in your previous session, or if you would like to lose the changes made during your previous session.. If you select the second option, but didn’t actually run the audit (or did not attempt to run the audit) in your previous session, then you might find duplicate records. This is because the temporary backup was not posted to WAMS. If there are duplicate recommended measures, then these are handled as noted in the previous section Handling Unsuccessful Synchronizations, Selecting the first button (the recommended option) will help to avoid this situation. 32 U S E R 4 Chapter N O T E S User Notes This section summarizes the user notes from the previous section. In addition, a few circumstances not mentioned earlier are covered. 1) Different components should start with different prefixes. Use a unique prefix for different types of components, such as walls, windows, doors, attics, foundations, etc. This is the default for NEAT. 2) On installation, a few new fields are added to the WAMS tables. This is transparent to the user and causes no problems in WAMS. 3) WAMS users should set 1,2,3 for the contactor/crew flags (the CRO field) in WAMS in the MATTempTemplate. This way NEATShell knows what to expect and you don't have to reenter these with each new job. 4) WAMS has been changed slightly. On the screen where non-flate-rate measures are entered, the ‘original cost’ and ‘changed cost’ lines are no longer used. The costs for non-flat-rate measures are entered on the line for the total costs. 5) NEATShell get its estimated measure costs (the ones that are sent to NEAT before an audit is run) from four columns in the MatTempTemplate: RMAT, RLAB, OMAT, and OLAB. RMAT and RLAB correspond to the per-unit (per pound or per item) flat-rate costs for materials and labor, respectively. OMAT and OLAB refer to the same costs for custom (nonflate-rate) measures. NEATShell assumes that any measure in MatTempTemplate that has an RMAT with a number other than zero or blank is a flat-rate measure (otherwise it is considered a non-flat rate measure). So, if any given measure is a flat-rate measure, you must be certain to have the costs set in RMAT (any non-zero cost), and you should have a cost (possibly zero) for RLAB. So, if any given measure is a custom (non-lat-rate measure), you must be certain to have the costs set in OMAT and OLAB (either of which could be a zero value). 33 U S E R N O T E S 6) You should enter final measure costs (after the job is completed) in WAMS as has been done in the past. You need to have updated WAMS so that the lines for original and changed costs are 'greyed out' (I think that you all have this change already). Note that the final costs can also be entered in NEATShell, in the Materials and Labor columns, if you prefer to have the auditor enter these. 7) The default MEA in the MatTempTemplate should be cleared of values like ‘N30’ for water heater measures, as these might not match the water heater type that is entered in the Client Information screen (DWH Src). 34 35