1
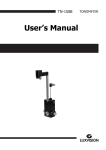
Safety instructions
Replacing the probe base
Read this manual carefully, because it contains important information on using
and servicing the tonometer.
After several months of use, dust may collect in the probe base,
affecting the probe movement. The probe base should be replaced
if the probe no longer moves smoothly.
Replacing
the batteries
• Keep this manual for future use.
Error messages:
Technical information
Press the central button to clear error messages, after which
the measurement can be repeated.
Type: TA01.
The device conforms to CE-regulations.
Dimensions: 13 – 32 mm (W) * 45 – 80 mm (H) * 230 mm (L).
Weight: 155 g (without batteries) , 250 g (4 x AA batteries).
Power supply: 4 x AA batteries.
Measurement range: 1-99 mmHg.
Accuracy of display: ±1.
Measurement accuracy: ±2,8 mmHg (5-30 mmHg), 15% (30-80 mmHg).
Display unit: Millimetre mercury (mmHg).
The serial number is on the back of the battery compartment cover.
There are no electrical connections from the tonometer to the patient.
The device has B-type electrical shock protection.
Storing/transportation environment:
Temperature +5 to +40 °C
Rel. humidity 10 to 80 % (without condensation)
The following messages may appear:
• When you have opened the package, check for any external damage or faults.
Check especially that the casing is not damaged. If you suspect that there is
something wrong with the tonometer, contact the manufacturer or
the distributor.
Unscrew the battery compartment
locking screw with a screwdriver
or a small coin.
• Use the tonometer only for measuring intraocular pressure. Any other use is
incorrect. The manufacturer cannot be held responsible for any damage arising
from improper use, or for the consequences thereof.
• Never open the casing of the tonometer, except for the battery compartment
or to change the probe base.
• bAtt ........................... the batteries are low. Replace the batteries.
• E01 ........................... The probe did not move at all.
If this error message is repeated, turn the tonometer so that the
collar faces down for a short time. If the error message is still
repeated take out the probe and replace with a new one. If the
error message continues to appear, replace the probe base.
• E02 .............................The probe did not touch the eye.
The measurement was made from too far away or the probe base
is dirty.
• The manual contains instructions for replacing batteries and changing
the probe base.
• Never use the tonometer in wet place.
• The probe base, battery compartment cover, collar and probes are so small
that a child could swallow them. Keep the tonometer out of the reach
of children.
Unscrew the probe base collar and
put it in a safe place.
Remove the battery compartment
cover.
• Do not use the device near the substances that are flammable - including
flammable anaesthetic agents.
• E03 ..............................Probe speed was too low.
The measurement was made from too far away or the tonometer
was tilted upwards too much.
• Be sure that the probe contains the small plastic round tip in front.
• E04 ..............................Probe speed was too high.
The tonometer was tilted downwards. Be sure the groove is in
the horizontal position.
• Certain microbiological agents (e.g. bacteria) can be transmitted from the
forehead support. To avoid this, the forehead support should be cleaned
regularly with a disinfectant, e.g. an alcohol solution.
• E05 ...............................The hit was too “soft”.
The probe hit the eyelid.
• Check that a clean new disposable probe is used before each measurement.
• The tonometer must not come into contact with the eye, except for the probes
for a fraction of a second during the measurement, therefore Do not bring the
tonometer into contact with the eye or push it to the eye (tip of the probe
should be 4-8mm from eye).
Remove the probe base by tilting
the tonometer downward and pull
the probe base out of the tonometer.
• The tonometer conforms to EMC requirements (IEC 60101-1-2: 2001),
but interference may occur in it if used near to (<1m) a device causing
high-intensity electromagnetic emissions (like a cellular phone).
Though the tonometer’s own electromagnetic emissions are well below
the levels in the relevant standards, they may cause interference in another
device, e.g. a sensitive sensor, nearby.
0537
CAUTION -Indicates that important operating instructions
are included in this User’s and Maintenance Manual.
Spare parts and supplies
• Probes in one-use package.
• Probe base replacement kit.
• E07 ................................”Bad bounce”.
The probe did not hit the central cornea.
Diagram of tonometer functions
Tonometer ON
Service procedures
• If the device is not to be used for a long time, removing the batteries is
recommended, as the AA batteries may leak. Removing the batteries will
not affect the subsequent functioning of the tonometer.
Ready for measurement
Old values search
00
OLD
1.18
P0 18
Turning OFF
END
00
• Replace the batteries when the <bAtt> message appears.
Put new AA batteries into the
tonometer according to figures inside
the battery compartment.
+ terminals should be down on the
display side of the tonometer (behind).
- terminals should be up on the
measurement side (the front side).
• Be sure to dispose of the one-use probes properly (e.g., in a container
for disposable needles), because they may contain micro-organisms from
the measured patient.
Put a new probe base into
the tonometer.
• Batteries, packaging materials, and probe bases must be disposed of
according to local regulations.
• Change the probe base if the probe does not move smoothly.
• There are no other service procedures that can be carried out by
the user. All other servicing and repairs must be carried out by
the manufacturer or certified service facilities.
Screw the collar in, to lock the probe
base.
www.tiolat.fi
7
8
USER’S AND MAINTENANCE MANUAL
Earlier measurement
values (0-9)
5.18
Replace the battery compartment
cover and secure it in place by
screwing it lightly with the coin or
screwdriver. Be careful not to use
excessive force when screwing
the cover in place.
9
Shutdown
P9 18
• The device can be cleaned with a damp cloth containing
desinfectant.
V2.2 12/05
Tonometer
ISO 13485:2003 certified
• E06 ................................The hit was too “hard”.
The probe hit the opening eyelid or calcification in the cornea.
Remove the old batteries.
®
FOR FUTURE VISION
Central button (measure, confirm
selecting buttons (left and right)
Final result
10
P.18
11
www.tiolat.fi
Contents
Loading a new
disposable probe
Parts of the tonometer
Introduction
1
Parts of the tonometer
2
Loading a new disposable probe
3
Turning the device on and magnetizing the probe
4
Turning the tonometer off
4
Measurement
5
Other functions
6
Accessing old measurement values
6
Changing the calibration table for different species
6
Safety instructions
7
Replacing the probe base
8
Replacing the batteries
9
Error messages
10
Service
10
Technical information
11
Spare parts and supplies
11
Diagram of tonometer functions
11
Other functions
Turning the device ON
and magnetizing the probe
Accessing old
measurement values.
Forehead support
adjustment wheel
Starting position.
Forehead support
Accurate measurement is guaranteed only
when using probes made by Tiolat Oy.
Display
Collar
Central groove
Selector button
left/right
Hold the disposable probe in your hand,
open the package, and load the probe into
the sensor base, according to the illustrations.
Measurement
button
Raise the device to the vertical operating
position, ensuring that the probe cannot fall
out of the probe base. Press the measurement button. The probe will be magnetized
by moving back and forward for a short time,
and the mechanism that prevents the probe
dropping out accidentally will start.
Introduction
The iCare-Tonometer is used in the diagnosis, follow up, and screening of
glaucoma.
Measurement
The measurement should be done without anesthetic, because an anesthetic may
reduce the tonometer reading*.
Ask the subject to relax and look straight ahead to a specific point. Bring the
tonometer near to the subject’s eye. The central groove should be in a horizontal
position. The distance from the eye to the front part of the collar is the length of
the collar. The distance should be 4-8 mm from the tip of the probe to the cornea
of the eye. If necessary, adjust the distance by turning the forehead-support
adjustment wheel.
Measure takes place by lightly pressing the measurement button. The tip of the
probe should hit the central cornea. Six measurements are made consecutively.
Press the measurement button carefully, to avoid shaking the tonometer.
After each successful measurement there is a short beep. After the six
measurements, the IOP is shown on the display after the P letter.
Grip
The iCare is based on the new patented induction based rebound
method, which allows intraocular pressure (IOP) to be measured
accurately, rapidly and without an anaesthetic.
The device is ready for measurement when
the reading 00 appears in the display.
If the display shows the message LoAd,
there is either no probe in the device, or the
probe is stuck. Check that the probe has not
dropped out, or press the function button
again.
Place the opened disposable package
against the collar component.
There is no risk of microbiological contamination, as one-use probes
are used in the measurement.
Intraocular pressure changes due to the effects of pulse, breathing,
eye movements, and body position. Because the measurement is made
handheld in fractions of a second, several measurements are needed
to obtain an accurate reading. The software is pre-programmed for six
measurements, but the result can be seen from the first successful
measurement.
Adjusting the forehead support
0537
If there is an erroneous measurement, the tonometer will beep twice and show
an error message (page 10). Press the measurement button to clear the error
message. If several erroneous measurements appear, see the section ”Error
messages” (page 10).
Turning the
tonometer OFF
Display after the measurements:
Before
After the second
measurement
After the sixth measurement.
00
2.13
P 13
If the P is blinking, it means that the standard deviation of the measurements is
greater than normal.
P_ (line down) The standard deviation of different measurements is slightly bigger
value than normally, but the effect to the result is not likely to be relevant.
ISO 13485:2003 certified
P_ (line in the middle) The standard deviation of different measurements is clearly
greater than normal, but the effect on the result is usually not relevant. A new
measurement is recommended if the IOP is more than 19 mmHg.
Battery
compartment
The forehead support can be adjusted back
and forward by turning the adjustment wheel.
This allows the correct measurement
distance to be set for each individual.
The probe in the probe base.
2
3
Press the measurement button to exit the old
values search. Old is on the display. Press either
of the selector buttons to access the other
functions (00=measurement, End=turning OFF).
Press either of the selector buttons until
the display shows End.
After the sixth measurement, the letter P appears in the display, followed by the
IOP (Intraocular pressure) reading.
Turn to the device and the probe package at
the same time, so that the probe package is
uppermost. Check that the probe has dropped
into the probe base before removing the
package.
1
Press the right or left selector button until
Old appears on the display. Then press the
measurement button. The old values can now
be scanned back and forward by pressing the
selector buttons (right= older, left=recent).
4
Press the measurement button for two
seconds - The display shows ByE and the
tonometer turns off.
The used probe is ejected from the tonometer
Be careful to dispose of the probe properly
(p.7).
_
P (line up) The standard deviation of different measurements is great and a new
measurement is recommended.
*Badouin C, Gastaud P. Influence of topical anesthesia on tonometeric values of
intraocular pressure. Ophthalmologica 1994;208:309-313
The tonometer turns off automatically after
two minutes idle time.
5
6