1
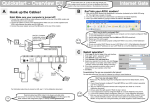
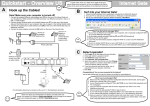
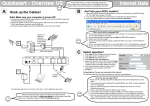
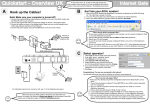
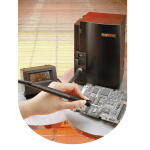
Enabling Live Communicaons at the Edge of IP Networks Mediatrix 500/600 Series Installation – SIP Thank you for choosing the Mediatrix 500/600 Series. This Quick Start will help you to properly connect all of the cables to the Mediatrix 500/600 Series and access its web interface. This document applies to the following models: Mediatrix 500 Mediatrix 502 Mediatrix 602 In most cases, the A, B, C steps will get your Mediatrix 500/600 Series up and running. If you run into problems, you can find the solution to the most common problems in the Addendum document. A Hook up the Cables! Note! Make sure your computer is turned off! The following describes how to connect the various cables to the Mediatrix 500/600 Series. See “Back View” on page 4 for a description of the back connectors and diagrams on how to use them. Before you begin, make sure that you have a working network connection. Then follow these steps to install the Mediatrix 500/ 600 Series. If you have an ADSL uplink (Mediatrix 502/602 Models): 1. a. Connect the supplied Ethernet cable between the port marked ET1 on the rear of the Mediatrix 500/600 Series and the network card on your computer. See section 3.1 in the Addendum document. b. Connect the supplied ADSL cable between the LINE port of the Mediatrix 500/600 Series and your ADSL splitter via the DSL/voice adaptor cable. c. 2. Connect the splitter to a telephone socket in your home/office. The ADSL splitter/filter separates the data and voice traffic. No micro filter is needed for the telephone connected to the splitter/filter. If you do not have an ADSL uplink (Mediatrix 500/502 Models): a. Connect the supplied Ethernet cable between the port marked ET0 on the rear of the Mediatrix 500/600 Series and your broadband or WAN connector. The WAN connector is an Ethernet connector in the wall, or on a DSL- or cable modem. b. Connect another Ethernet cable (not included) between one of the ports marked ET1-ET3 on the rear of the Mediatrix 500/600 Series and the Ethernet port on your computer. See section 4.1 in the Addendum document. 3. Connect the power adaptor and push the ON switch on the rear of the Mediatrix 500/600 Series. For information about how to connect a LAN, see section 3.1 in the Addendum document. Further help We recommend using the instructions available for all settings in the Mediatrix 500/600 Series. Simply press the at the setting you would like to change. You can also read more about your Mediatrix 500/600 Series in the always up-to-date online user manual. You access it by clicking Online User Manual on the first page on your Mediatrix 500/600 Series‘s web configuration pages, or directly at mx500-600manual.media5corp.com. B Surf into your Mediatrix 500/600 Series! 1. If you have an ADSL uplink: Wait until the ADSL Modem has established a connection (indicated by the LINE LED being lit). This may take a couple of minutes. 2. 3. 4. If you do not have an ADSL uplink: Check that the broadband link is established, indicated by the WAN LED being lit. 5. 6. Click Log in on the first page of the web interface. Turn your PC on and start your web browser (i.e. Internet Explorer or Mozilla Firefox). Surf to your Mediatrix 500/600 Series by typing its default IP Address: 192.168.0.1 Enter login “admin”, password “admin” (you should change the default password!) © 2011, Media5 Corporation Document Revision 01 Connect to the Internet! SIP Version I don’t see the built-in web page! Why? 1. 2. Do you have an Ethernet card installed in your computer, and is it properly configured? Refer to section 3.2 of the Addendum document! Are the cables correctly connected? 3. 4. 5. 6. C If you have an ADSL uplink on your unit: Both the LINE and at least one of the ET0-ET4 LEDS should be lit. If you do not have an ADSL uplink: Both the WAN and at least one of the ET1-ET3 LEDS should be lit. Reboot your PC and try again! Are your PC and web browser properly configured? Refer to 3.2 and 3.3 of the Addendum document! Do you run another DHCP Server on your LAN? Refer to 3.2.1 of the Addendum document! Do you use static IP addresses on your LAN? Refer to 3.2.2 of the Addendum document! Connect to the Internet! In most cases you can now start surfing the Internet! 1. 2. 3. 4. 5. 6. Click Network on the main menu. Select Access Type Auto in the field LINE. If you have received any service name, user name or password from your operator, enter them. Click Search. Settings for your operator are set automatically. Click Apply at the bottom of the page. Click Save permanently at the top of the page. Using Ethernet as WAN The Mediatrix 500/600 Series can be used even if you are not using ADSL. Go to the Network Settings page and choose ET0 as your WAN interface. Click the Change button and then click Apply at the bottom of the page. A new page will be shown. Click the button Save & Reboot. This will reboot the Mediatrix 500/600 Series with ET0 as WAN port. I don’t see any web pages! Why? 1. 2. 3. 4. 5. 6. 7. 8. 9. D Reboot your PC, allowing it to get fresh configuration data from your Mediatrix 500/600 Series, and try again! Reboot your Mediatrix 500/600 Series, and try again! Reboot your DSL or cable modem if you are using any. Is your firewall properly configured? Press ALT on your Mediatrix 500/600 Series repeatedly until “Hi” is displayed. Is your DSL or cable modem, if you are using any, properly configured and connected? Test your Internet connection with the built-in diagnostic test. Refer to 3.4 of the Addendum document! Is your web browser properly configured? Refer to 3.3 of the Addendum document! Is your Mediatrix 500/600 Series properly configured? Refer to 4 of the Addendum document! Have you used your Internet connection before with some other modem? In that case, disconnect that modem, and wait 3 hours before reconnecting your Mediatrix 500/600 Series. It may take that long before your ISP’s cache entries expire. Package Details The following items should be included in your box: Printed readme flyer Mediatrix 500/600 Series unit (Router+Firewall+ADSL Modem) 12 V DC power adaptor Ethernet cable ADSL splitter/filter (included for some countries only) – Units with ADSL uplink only (Mediatrix 502/602 models) ADSL cable (round) – Units with ADSL uplink only (Mediatrix 502/602 models) DSL/voice adaptor cable (included for some countries only) (Mediatrix 502/602 models) RJ11 Y-adaptor (included for some countries only) (Mediatrix 502/602 models) Phone cable (2 pcs) (Mediatrix 502/602 models) Stand If any of the items above are damaged or missing, please contact your dealer. Page 2 Installation Quick Start SIP Version Package Details SIP IP Telephony Client You can connect an ordinary (analog) phone to any of the ports PH1 and PH2 of the Mediatrix 500/600 Series. It will then be a general SIP client. You can configure the SIP client by selecting Telephony Ports on the first page of the web interface. The default SIP user names are “1111” and “2222” and they are registered to the internal SIP server of the Mediatrix 500/600 Series if not changed to a full SIP address like [email protected]. With the default configuration, you can directly use this SIP client to place SIP calls. Learn more about the possibilities with SIP and IP Telephony by clicking the link: Using SIP: Telephony, Video, Messaging... on the first page of the web interface. SIP PSTN Gateway The telephone line connected to the LINE port of the Mediatrix 500/600 Series acts as a gateway between SIP and the ordinary telephone network (PSTN). You can configure the gateway by surfing to the built-in web-pages and select ”Telephone Ports” under the ”Configuration” menu. The default SIP domain name for the gateway is ”localgw” and can be used with the SIP Switch software addition. By default, just dialling **<telephone number> from any client using the product, will use this gateway port to reach ordinary phones. With the default configuration incoming calls on the telephone line will be forwarded to the phone1 SIP address which is the default address configured for the PH1 port. Firmware The firmware in the Mediatrix 500/600 Series can be upgraded to new versions that often includes bug fixes and new features. We strongly recommend that you regularly check for updates by clicking the link Search for newer located at the first page of the web user interface. Front View 6 AD CFG DHP RST LQ TX RX Connector 7 T 5 AL ((( 4 R PH 1 PH 2 LI N E U SB ET 4 ET 3 ET 2 ET 1 W AN L 3 AI 2 SE SE T 1 Description 1. SET Press once to see firmware version. Keep pressed for 3 seconds to enter set-up mode. Then use SEL to select followed by SET and sometimes ALT. Read more about set-up mode in the Addendum document. 2. SEL Press to toggle between Line Quality, Physical ADSL speed and firewall security level. Press 2 seconds to cancel any sequence in progress by these buttons. Press 5 seconds to activate WPS (accepts a WPS enabled client.) Press 10 seconds to enable/disable wireless access point. 3. Hi/Lo/AC Show firewall security level. Read more about the display in the Addendum document. 4. CFG Settings have not been permanently saved and will be lost if the Mediatrix 500/600 Series is turned off. On: Interface is connected. Off: Interface is not used. Flashing: Data is being sent or received. 5. Interface indicators AIR – Wireless 802.11b/g USB – Indicates USB port active ET1-ET4 – Ethernet (LAN) ET0 / WAN – Ethernet (WAN - Internet) 6. PH1-PH2, LINE Red - Call in Progress. Flashing Red - Incoming or Outgoing Call. Rapidly Flashing Red - Port not available. PH1-PH2: Green - SIP Client on Phone port registered. PH1-PH2: Flashing red/green - Message Waiting. LINE: Green - ADSL connection ok, no calls through FXO port 7. ALT Press to select firewall security profile. Mediatrix 500/600 Series Page 3 End User Technical Support SIP Version Back View 1 LINE 2 PH2 3 PH1 4 ET1 ET0/WAN ET3 ET2 Connector 1. LINE 5 6 ET4 USB 7 DC ON Description Optional. This depends on the Mediatrix 500/600 Series model you have. You can connect a line to the telephone network to this port to allow your SIP phones to make and receive ordinary telephone calls through this local gateway. • Port to connect to telephone line via splitter. (ADSL) – Mediatrix 502/602 ADSL Cable DSL/VoiceAdaptor cable LINE MODEM/ PHONE DSL DSL PHONE ADSL Splitter/Filter LINE • PH2 PH1 ET0/WAN ET1 ET2 ET4 ET3 USB DC ON OR Port to connect an ordinary telephone line to (FXO port) – Mediatrix 502. LINE PH2 PH1 ET0/WAN ET1 ET2 ET4 ET3 USB DC ON DSL/VoiceAdaptor cable Phone 2. PH1, PH2 Optional. Port to connect ordinary (analog) phone or FAX (FXS-port). Connected phones will work as SIP IP clients. 3. ET0/WAN Ethernet port to connect PC. The port can also be used as an alternative Internet connection (Ethernet). Ethernet connector in wall, or in DSL or cable modem LINE PH2 PH1 ET0/WAN ET1 4. ET1-ET3 Ethernet switch to connect PC, SIP IP clients or local area network (LAN). If ADSL is used as Internet Connection, ET0 is also connected to this switch. 5. ET4 Ethernet switch to connect PC, SIP IP clients or local area network (LAN) with other IP address space than port ET1-ET3. The port can also be used as a DMZ for secure connection of servers. 6. USB USB 2.0 host port, i.e. for memory stick. 7. WIRELESS 802.11b/g (some models) Antenna for wireless connection of PC:s and SIP IP clients. Wireless Security! Activate encryption on your wireless network. Your network is vulnerable without encryption (see help text for more information). E End User Technical Support Media5 works through its partners to resolve technical support issues. All end users requiring technical support are encouraged to contact their vendor directly. Page 4 Installation Quick Start