1
US-PF-VGW 1.2
SIP or IP Telephone Client
The headset or analogue telephone connected to the EXP port, acts as a general SIP client. You can
configure the SIP client by surfing to the built-in web-pages and select “Telephone Ports” under the
“Configuration” menu.
Package Details
The following items should be included in your box:
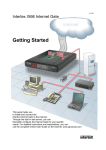
• Quickstart - overview (this document)
• Addendum to the Quickstart - Overview Sheet
• IX66 Internet Gate (firewall)
• 9,5 V DC power adaptor
• Phone cable (flat)
• Ethernet cable
• USB cable
• Headset
• Handset adaptor cable
• USB driver diskette
• Phone Y-adaptor (RJ11)
• Wireless upgrade note
Using a headset, you can also dial, answer and hang up on this page. Pressing the ATL CFG key will also
answer and hang up.
The default SIP user name is “hsphone” and it is registered to the internal SIP server of the Internet Gate
if not changed to a full SIP address like [email protected].
With the default configuration, you can directly use this SIP client to place SIP calls.
If any of the items above are damaged or missing, please contact your dealer.
–
–
–
–
–
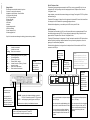
TXD
RXD
–
–
Wireless (Bluetooth or 802.11b) (option)
Universal Serial Bus
Ethernet (PC or LAN)
Ethernet (WAN - Internet)
Internet connection. (Flashing = firewall
stopped a packet)
Data is sent to the Internet.
Data is received from Internet.
The default SIP domain name for the gateway is ”localgw” and can be used with the SIP Switch software
addition. By default, just dialling *<telephone number> from any client using the product, will use this
gateway port to reach ordinary telephones.
With the default configuration, incoming calls on the telephone line will be forwarded to the SIP client
connected to the EXP port.
Interface indicators:
On:
Interface is connected.
Off:
Interface is not used.
Flashing:
Data is sent or received.
AIR
USB
ET1
ET2
WAN
SIP PSTN Gateway
The telephone line connected to the FXO port of the Internet Gate acts as a gateway between SIP and
the ordinary telephone network (PSTN). You can configure the gateway by surfing to the built-in webpages and select ”Telephone Ports” under the ”Configuration” menu.
ET2
Ethernet port to
connect to WAN
(Internet)
ON
SET
Press once to see
firmware version.
ET1
Ethernet port to
connect PC, SIPphone or local area
network (LAN).
USB
Port to connect
a PC without a
network card.
ALT CFG
Press to select firewall
security profile.
Press to pick-up /
hang-up headset.
DC
USB
ET2
ET1
EXP
PHONE
Analogue telephone port. You can
connect a telephone to this port for
using the old telephone line (the line
connected to the LINE port).
The telephone connected to this port
will not become an IP-phone.
LINE
PHONE
WIRELESS
(optional)
Read the wireless
upgrade note
about how to
install a wireless
card, creating a
wireless access
point.
Hi/Lo/AC Firewall security level
Keep pressed for 3
seconds to enter setup mode. Read more
about set-up mode in the
Addendum document.
PHO/HS Incoming call to telephone/headset connected to
EXP port. Lift receiver or press ALT CFG to answer.
RS/TS
Incoming/outgoing call in progress on LINE port.
EXP
Port to connect headset or telephone adaptor
cable. (FXS port)
LINE
Port to connect an ordinary telephone
line to. (FXO port)
Read more about display in the Addendum document.
You can connect the supplied headset to this
port and use it to make and receive SIP calls.
You can connect a line to the telephone
network to this port to allow your SIP
phones to make and receive ordinary
telephone calls through this local
gateway.
SELECT
Press to see Ethernet link speeds of ET1 and ET2.
Press and hold for 2 seconds to cancel any set-up.
Or you can connect an ordinary telephone
to it using the telephone adaptor cable. The
connected telephone will then become a SIP
IP-phone.