1
Mellanox ConnectX® EN Family PXE
User’s Manual
www.mellanox.com
Rev 1.2
NOTE:
THIS INFORMATION IS PROVIDED BY MELLANOX FOR INFORMATIONAL PURPOSES
ONLY AND ANY EXPRESS OR IMPLIED WARRANTIES, INCLUDING, BUT NOT LIMITED TO, THE IMPLIED WARRANTIES OF MERCHANTABILITY AND FITNESS FOR A
PARTICULAR PURPOSE ARE DISCLAIMED. IN NO EVENT SHALL MELLANOX BE LIABLE FOR ANY DIRECT, INDIRECT, INCIDENTAL, SPECIAL, EXEMPLARY, OR CONSEQUENTIAL DAMAGES (INCLUDING, BUT NOT LIMITED TO, PROCUREMENT OF
SUBSTITUTE GOODS OR SERVICES; LOSS OF USE, DATA, OR PROFITS; OR BUSINESS
INTERRUPTION) HOWEVER CAUSED AND ON ANY THEORY OF LIABILITY,
WHETHER IN CONTRACT, STRICT LIABILITY, OR TORT (INCLUDING NEGLIGENCE
OR OTHERWISE) ARISING IN ANY WAY OUT OF THE USE OF THIS HARDWARE, EVEN
IF ADVISED OF THE POSSIBILITY OF SUCH DAMAGE.
Mellanox Technologies
350 Oakmead Parkway, Suite 100
Sunnyvale, CA 94085
U.S.A.
www.mellanox.com
Tel: (408) 970-3400
Fax: (408) 970-3403
Mellanox Technologies, Ltd.
PO Box 586 Hermon Building
Yokneam 20692
Israel
Tel: +972-4-909-7200
Fax: +972-4-959-3245
© Copyright 2009. Mellanox Technologies, Inc. All Rights Reserved.
Mellanox®, ConnectX®, InfiniBlast®, InfiniBridge®, InfiniHost®, InfiniRISC®, InfiniScale®, and InfiniPCI® are registered
trademarks of Mellanox Technologies, Ltd.
BridgeX, PhyX and Virtual Protocol Interconnect are trademarks of Mellanox Technologies, Ltd.
All other marks and names mentioned herein may be trademarks of their respective companies.
2
Mellanox Technologies
Document Number: 3026
Mellanox ConnectX® EN Family PXE User’s Manual
Rev 1.2
Blank Page
Mellanox Technologies
3
Rev 1.2
Table of Contents
Table of Contents
4
Revision History
6
1
Overview
8
1.1
1.2
1.3
1.4
1.5
8
8
8
9
9
2
Burning the PXE ROM Image
10
2.1
10
10
10
10
10
11
2.2
3
Supported Mellanox Adapter Hardware
Supported Firmware
Tested Platforms
Package Contents
Reference Documents and Downloads
Burning the Image on ConnectX® EN / ConnectX®-2 EN
2.1.1 Prerequisites
2.1.2 Burning the Image
Updating the Image on ConnectX® EN Devices with Legacy Firmware
2.2.1 Prerequisites
2.2.2 Image Burning Procedure
DHCP
12
3.1
12
Configuring the DHCP Server
4
TFTP Server
14
5
BIOS Configuration
15
6
Operation
16
6.1
6.2
16
16
7
8
9
Command Line Interface (CLI)
18
7.1
7.2
7.3
18
18
18
18
18
19
19
19
19
19
19
19
4
Invoking the CLI
Operation
Command Reference
7.3.1 ifstat
7.3.2 ifopen net<x>
7.3.3 ifclose net<x>
7.3.4 autoboot
7.3.5 sanboot
7.3.6 echo
7.3.7 dhcp
7.3.8 help
7.3.9 exit
Diskless Machines
20
8.1
20
Example: Adding an Ethernet Driver to initrd (Linux)
iSCSI Boot
22
9.1
22
22
22
23
36
9.2
9.3
9.4
10
Prerequisites
Starting Boot
Configuring the DHCP Server to Boot From an iSCSI Target
9.1.1 Example on Linux
Configuring an iSCSI Target for a Linux Environment
iSCSI Boot Example of SLES 10 SP2 OS
Windows 2008 iSCSI Boot
WinPE
Mellanox Technologies
38
Mellanox ConnectX® EN Family PXE User’s Manual
Rev 1.2
Mellanox Technologies
5
Rev 1.2
Revision History
Printed on December 21, 2009.
Rev 1.2 (December 21, 2009)
• Added in Chapter 2,“Burning the PXE ROM Image” instructions for upgrading the image on ConnectX® EN devices with a firmware version earlier than 2.7.000
• Updated Chapter 9,“iSCSI Boot” to include Windows 2008 iSCSI Boot
Rev 1.1 (December 6, 2009)
• Added support for more ConnectX® family devices – see Section 1.1, “Supported Mellanox Adapter
Hardware,” on page 8
• Modified the firmware upgrade instructions in Chapter 2,“Burning the PXE ROM Image”
• Added Chapter 7, “Command Line Interface (CLI)” (page 18)
Rev 1.0 (February-2009)
• First release
6
Mellanox Technologies
Mellanox ConnectX® EN Family PXE User’s Manual
Rev 1.2
Mellanox Technologies
7
Rev 1.2
1
Overview
Overview
This chapter describes “Mellanox ConnectX EN PXE”, the software for Boot over Mellanox Technologies
network adapter devices supporting Ethernet. Mellanox ConnectX EN PXE enables booting kernels or operating systems (OSes) from remote servers in compliance with the PXE specification.
Mellanox ConnectX EN PXE is based on the open source project Etherboot/gPXE available at http://
www.etherboot.org.
Mellanox ConnectX EN PXE first initializes the network adapter device. Then it connects to a DHCP server
to obtain its assigned IP address and network parameters, and also to obtain the source location of the kernel/
OS to boot from. The DHCP server instructs Mellanox ConnectX EN PXE to access the kernel/OS through
a TFTP server, an iSCSI target, or other service.
The binary code is exported by the device as an expansion ROM image.
1.1
Supported Mellanox Adapter Hardware
The package supports all ConnectX® and ConnectX®-2 Network Adapter family devices and cards. Specifically, adapter products responding to the following PCI Device IDs are supported:
• Decimal 25408 (Hexadecimal: 6340)
• Decimal 25418 (Hexadecimal: 634a)
• Decimal 26418 (Hexadecimal: 6732)
• Decimal 26428 (Hexadecimal: 673c)
• Decimal 26438 (Hexadecimal: 6746)
• Decimal 25448 (Hexadecimal: 6368)
• Decimal 26448 (Hexadecimal: 6750)
• Decimal 26478 (Hexadecimal: 676e)
• Decimal 26488 (Hexadecimal: 6778)
• Decimal 25458 (Hexadecimal: 6372)
• Decimal 26458 (Hexadecimal: 675A)
1.2
Supported Firmware
These supported hardware products require the firmware package fw-25408, which is available via
www.mellanox.com > Downloads > Firmware > Customized Firmware. Check Mellanox ConnectX EN PXE
Release Notes for the appropriate firmware version.
1.3
Tested Platforms
See Mellanox ConnectX EN Family PXE Release Notes (ConnectX_EN_PXE_release_notes.txt).
8
Mellanox Technologies
Mellanox ConnectX® EN Family PXE User’s Manual
1.4
Rev 1.2
Package Contents
The ConnectX EN PXE package is provided as a tarball (.tgz extension) containing the following files:
1. A PXE ROM image file for each of the supported Mellanox network adapter devices. For example:
- ConnectX EN (PCI DevID: 25448)
CONNECTX_EN_25448_ROM-<version>.rom
Note:
Please refer to the release notes file for the exact contents.
2. A docs/ directory includes the following files:
- Mellanox_ConnectX_EN_PXE_User_Manual.pdf – this user’s manual
- ConnectX_EN_PXE_release_notes.txt – release notes
1.5
Reference Documents and Downloads
• The Mellanox Firmware Tools (MFT) package and documentation can be downloaded from www.mellanox.com > Downloads > Firmware Tools.
• The MLNX_EN Ethernet Driver and documentation can be downloaded from
www.mellanox.com > Products > Ethernet SW/Drivers > MLNX_EN Ethernet Driver
Mellanox Technologies
9
Rev 1.2
Burning the PXE ROM Image
2
Burning the PXE ROM Image
2.1
Burning the Image on ConnectX® EN / ConnectX®-2 EN
Note:
2.1.1
This section is applicable only to ConnectX® EN / ConnectX®-2 EN devices with firmware versions 2.7.000 or later. For earlier firmware versions, please follow the instructions
in Section 2.2 on page 10.
Prerequisites
1. Expansion ROM Image
The expansion ROM images are provided as part of the Mellanox ConnectX EN PXE package and are listed in
Section 1.4.
2. Firmware Burning Tools
You need to install the Mellanox Firmware Tools (MFT) package (version 2.6.0 or later) in order to burn the PXE
ROM image. To download MFT, see Firmware Tools under www.mellanox.com > Downloads.
2.1.2
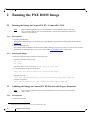
Burning the Image
To burn the composite image, perform the following steps:
1. Obtain the MST device name. Run:
mst start
mst status
The device name will be of the form: mt<dev_id>_pci{_cr0|conf0}.1
2. Create and burn the composite image. Run:
flint -dev <mst device name> brom <expansion ROM image>
Example on Linux:
flint -dev /dev/mst/mt25448_pci_cr0 brom ConnectX_EN_25448_ROM-X_X_XXX.rom
Example on Windows:
flint -dev mt25448_pci_cr0 brom ConnectX_EN_25448_ROM-X_X_XXX.rom
2.2
Updating the Image on ConnectX® EN Devices with Legacy Firmware
Note:
2.2.1
This section is applicable only to ConnectX® EN devices with firmware versions earlier
than 2.7.000.
Prerequisites
1. Firmware packages
1. Depending on the OS, the device name may be superseded with a prefix.
10
Mellanox Technologies
Mellanox ConnectX® EN Family PXE User’s Manual
Rev 1.2
The appropriate ConnectX: fw-25408 firmware .mlx package can be downloaded from Mellanox Technologies'
Web site – see www.mellanox.com > Downloads > Firmware > Customized Firmware.
2. Firmware Configuration (.ini) Files
For standard Mellanox products, .ini files are included in the firmware .mlx packages. For help in identifying the
correct .ini file of your adapter hardware, please refer to MFT User’s Manual (see Section 1.5).
3. Expansion ROM Image
The expansion ROM images are provided as part of the SW package and are listed in the release notes file:
ConnectX_EN_PXE_release_notes.txt.
4. Firmware Burning Tools
You need to install the Mellanox Firmware Tools (MFT) package (version 2.6.0 or later) in order to burn the PXE
ROM image. To download MFT, see Firmware Tools under www.mellanox.com > Downloads.
Specifically, you will be using the mlxburn tool to create and burn a composite image (from an adapter device’s
firmware and the PXE ROM image) onto the same Flash device of the adapter.
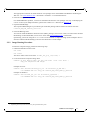
2.2.2
Image Burning Procedure
To burn the composite image, perform the following steps:
1. Obtain the MST device name. Run:
mst start
mst status
The device name will be of the form: mt<dev_id>_pci{_cr0|conf0}.1
2. Create and burn the composite image. Run:
mlxburn -d <mst device name> -fw <FW .mlx file> -conf <.ini file> \
-exp_rom <expansion ROM image>
Example on Linux:
mlxburn -dev /dev/mst/mt25448_pci_cr0 -fw fw-25408-X_X_XXX.mlx \
-conf MNEH28-XTC.ini -exp_rom ConnectX_EN_25448_ROM-X_X_XXX.rom
Example on Windows:
mlxburn -dev mt25448_pci_cr0 -fw fw-25408-X_X_XXX.mlx \
-conf MNEH28-XTC.ini -exp_rom ConnectX_EN_25448_ROM-X_X_XXX.rom
1. Depending on the OS, the device name may be superceded with a prefix.
Mellanox Technologies
11
Rev 1.2
3
DHCP
DHCP
The DHCP server plays a major role in the boot process by assigning IP addresses for ConnectX EN PXE
clients and instructs the clients where to boot from.
When the ConnectX EN PXE boot session starts, the PXE firmware attempts to bring up a ConnectX network link (port). If it succeeds to bring up a connected link, the PXE firmware communicates with the
DHCP server. The DHCP server assigns an IP address to the PXE client and provides it with the location of
the boot program.
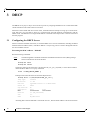
3.1
Configuring the DHCP Server
When a ConnectX EN PXE client boots, it sends the DHCP server various information, including its DHCP
hardware Ethernet address (MAC). The MAC address is 6 bytes long, and it is used to distinguish between
the various DHCP sessions.
Extracting the MAC Address – Method I
Run the following commands:
Note:
The following MFT commands assume that the Mellanox Firmware Tools (MFT) package
has been installed on the client machine.
host1# mst start
host1# mst status
The device name will be of the form: /dev/mst/mt<dev_id>_pci{_cr0|conf0}. Use this device name to
obtain the MAC address via a query command.
flint -d <MST_DEVICE_NAME> q
Example with ConnectX EN as the network adapter device:
host1# flint -d /dev/mst/mt25448_pci_cr0 q
Image type:
ConnectX
FW Version:
2.7.000
Rom Info:
type=GPXE version=1.5.5 devid=25448
Device ID:
25448
Chip Revision:
A0
Description:
Port1
Port2
MACs:
0002c90000bb
0002c90000bc
Board ID:
n/a (MT_0920110004)
VSD:
n/a
PSID:
MT_0920110004
Assuming that ConnectX EN PXE is connected via Port 1, then the MAC address is 00:02:c9:00:00:bb.
12
Mellanox Technologies
Mellanox ConnectX® EN Family PXE User’s Manual
Rev 1.2
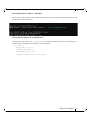
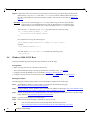
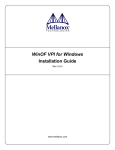
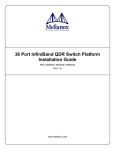
Extracting the MAC Address – Method II
The six bytes of MAC address can be captured from the display upon the boot of the ConnectX device session as shown in the figure below.
Placing MAC Addresses in /etc/dhcpd.conf
The following is an excerpt of a /etc/dhcpd.conf example file showing the format of representing a client machine for the DHCP server running on a Linux machine.
host host1 {
next-server 11.4.3.7;
filename "pxelinux.0";
fixed-address 11.4.3.130;
hardware ethernet 00:02:c9:00:00:bb;
}
Mellanox Technologies
13
Rev 1.2
4
TFTP Server
TFTP Server
If you have set the ‘filename’ parameter in your DHCP configuration to a non-empty filename, you need to
install TFTP (Trivial File Transfer Protocol). TFTP is a simple FTP-like file transfer protocol used to transfer files from the TFTP server to the boot client as part of the boot process.
14
Mellanox Technologies
Mellanox ConnectX® EN Family PXE User’s Manual
5
Rev 1.2
BIOS Configuration
The expansion ROM image presents itself to the BIOS as a boot device. As a result, the BIOS will add
“MLNX NIC <ver>” to the list of boot devices. The priority of this list can be modified through BIOS setup.
Mellanox Technologies
15
Rev 1.2
Operation
6
Operation
6.1
Prerequisites
• Make sure that your client is connected to the server(s)
• The ConnectX EN PXE image is already programmed on the adapter card – see Chapter 2
• Configure and start the DHCP server as described in Section 3.1
• Configure and start at least one of the services iSCSI target (see Section 9) and TFTP (see Section 4)
6.2
Starting Boot
Boot the client machine and enter BIOS setup to configure MLNX NIC <ver> to be the first on the boot
device priority list – see Section 5.
Note:
On dual-port network adapters, the client first attempts to boot from Port 1. If this fails, it
switches to boot from Port 2.
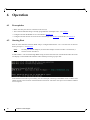
If “MLNX NIC” was selected through BIOS setup, the client will boot from ConnectX EN PXE. The client
will display ConnectX EN PXE attributes and will attempt to bring up a port link.
If the Ethernet link comes up successfully, the client attempts connecting to the DHCP server to obtain an IP
address and the source location of the kernel/OS to boot from. The client waits up to 30 seconds for a DHCP
server response.
16
Mellanox Technologies
Mellanox ConnectX® EN Family PXE User’s Manual
Rev 1.2
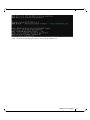
Next, ConnectX EN PXE attempts to boot as directed by the DHCP server.
Mellanox Technologies
17
Rev 1.2
Command Line Interface (CLI)
7
Command Line Interface (CLI)
7.1
Invoking the CLI
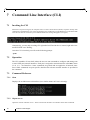
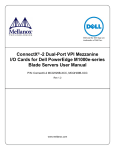
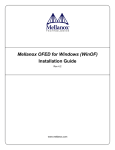
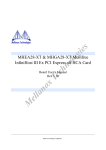
When the boot process begins, the computer starts its Power On Self Test (POST) sequence. Shortly after
completion of the POST, the user will be prompted to press CTRL-B to invoke Mellanox ConnectX EN PXE
CLI. The user has few seconds to press CTRL-B before the message disappears (see figure).
Alternatively, you may skip invoking CLI right after POST and invoke it, instead, right after ConnectX EN PXE starts booting.
Once the CLI is invoked, you will see the following prompt:
gPXE>
7.2
Operation
The CLI resembles a Linux shell, where the user can run commands to configure and manage one
or more PXE port network interfaces. Each port is assigned a network interface called neti, where
i is 0, 1, 2,...<#of interface>. Some commands are general and are applied to all network interfaces. Other commands are port specific, therefore the relevant network interface is specified in
the command.
7.3
Command Reference
7.3.1
ifstat
Displays the available network interfaces (in a similar manner to Linux’s ifconfig).
7.3.2
ifopen net<x>
Opens the network interface net<x>. The list of network interfaces is available via the ifstat command.
18
Mellanox Technologies
Mellanox ConnectX® EN Family PXE User’s Manual
7.3.3
Rev 1.2
ifclose net<x>
Closes the network interface net<x>. The list of network interfaces is available via the ifstat command.
7.3.4
autoboot
Starts the boot process from the device(s).
7.3.5
sanboot
Starts the boot process of an iSCSI target.
Example:
gPXE> sanboot iscsi:11.4.3.7::::iqn.2007-08.7.3.4.11:iscsiboot
7.3.6
echo
Echoes an environment variable.
Example:
gPXE> echo ${root-path}
7.3.7
dhcp
A network interface attempts to open the network interface and then tries to connect to and communicate with the DHCP server to obtain the IP address and filepath from which the boot will
occur.
Example:
gPXE> dhcp net1
7.3.8
help
Displays the available list of commands.
7.3.9
exit
Exits from the command line interface.
Mellanox Technologies
19
Rev 1.2
8
Diskless Machines
Diskless Machines
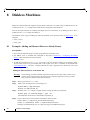
Mellanox ConnectX EN PXE supports booting diskless machines. To enable using an Ethernet driver, the
(remote) kernel or initrd image must include and be configured to load the driver.
This can be achieved either by compiling the adapter driver into the kernel, or by adding the device driver
module into the initrd image and loading it.
The Ethernet driver requires loading the following modules in the specified order (see Section 8.1 for an
example):
• mlx4_core.ko
• mlx4_en.ko
8.1
Example: Adding an Ethernet Driver to initrd (Linux)
Prerequisites
1. The ConnectX EN PXE image is already programmed on the adapter card.
2. The DHCP server is installed and configured as described in Section 3.1, “Configuring the DHCP
Server”, and connected to the client machine.
3. An initrd file.
4. To add an Ethernet driver into initrd, you need to copy the Ethernet modules to the diskless image.
Your machine needs to be pre-installed with a MLNX_EN Linux Driver (available for download from
www.mellanox.com > Products > Ethernet SW/Drivers) that is appropriate for the kernel version the
diskless image will run.
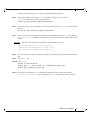
Adding the Ethernet Driver to the initrd File
Warning! The following procedure modifies critical files used in the boot procedure. It must be executed by users with expertise in the boot process. Improper application of this procedure
may prevent the diskless machine from booting.
Step 1. Back up your current initrd file.
Step 2.
Make a new working directory and change to it.
host1$ mkdir /tmp/initrd_en
host1$ cd /tmp/initrd_en
Step 3. Normally, the initrd image is zipped. Extract it using the following command:
host1$ gzip -dc <initrd image> | cpio -id
The initrd files should now be found under /tmp/initrd_en
Step 4. Create a directory for the ConnectX EN modules and copy them.
host1$ mkdir -p /tmp/initrd_en/lib/modules/mlnx_en
host1$ cd /lib/modules/`uname -r`/updates/kernel/drivers
host1$cp net/mlx4/mlx4_core.ko /tmp/initrd_en/lib/modules/mlnx_en
20
Mellanox Technologies
Mellanox ConnectX® EN Family PXE User’s Manual
Rev 1.2
host1$cp net/mlx4/mlx4_en.ko /tmp/initrd_en/lib/modules/mlnx_en
Step 5. To load the modules, you need the insmod executable. If you do not have it in your
initrd, please add it using the following command:
host1$ cp /sbin/insmod /tmp/initrd_en/sbin/
Step 6. If you plan to give your Ethernet device a static IP address, then copy ifconfig. Otherwise, skip
this step.
host1$ cp /sbin/ifconfig /tmp/initrd_en/sbin
Step 7. Now you can add the commands for loading the copied modules into the file init. Edit the file /
tmp/initrd_en/init and add the following lines at the point you wish the Ethernet driver to be
loaded.
Warning! The order of the following commands (for loading modules) is critical.
echo “loading Mellanox ConnectX EN driver”
/sbin/insmod lib/modules/mlnx_en/mlx4_core.ko
/sbin/insmod lib/modules/mlnx_en/mlx4_en.ko
Step 8. Now you can assign a static or dynamic IP address to your Mellanox ConnectX EN network interface.
Step 9.
Save the init file.
Step 10. Close initrd.
host1$ cd /tmp/initrd_en
host1$ find ./ | cpio -H newc -o > /tmp/new_initrd_en.img
host1$ gzip /tmp/new_init_en.img
Step 11. At this stage, the modified initrd (including the Ethernet driver) is ready and located at
/tmp/new_init_ib.img.gz. Copy it to the original initrd location and rename it properly.
Mellanox Technologies
21
Rev 1.2
9
iSCSI Boot
iSCSI Boot
Mellanox ConnectX EN PXE enables an iSCSI-boot of an OS (Linux or Windows) located on a remote
iSCSI target. It has a built-in iSCSI initiator which can connect to the remote iSCSI target and load from it
the kernel (and, on Linux, initrd). There are two instances of connection to the remote iSCSI target: the
first is for getting the kernel (and initrd for Linux) via ConnectX EN PXE, and the second is for loading
other parts of the OS.
Note:
Linux distributions such as SuSE Linux Enterprise Server 10 SPx and Red Hat Enterprise
Linux 5.1 can be directly installed on an iSCSI target. At the end of this direct installation,
initrd is capable to continue loading other parts of the OS on the iSCSI target. (Other distributions may also be suitable for direct installation on iSCSI targets.)
If you choose to continue loading the OS (after boot) through the adapter device driver, please verify that the
initrd image includes the adapter driver as described in Section 8.1.
9.1
Configuring the DHCP Server to Boot From an iSCSI Target
Configure DHCP as described in Section 3.1, “Configuring the DHCP Server”.
9.1.1
Example on Linux
Edit your DHCP configuration file (/etc/dhcpd.conf) and add the following lines for the machine(s) you
wish to boot from the iSCSI target:
Filename "";
option root-path "iscsi:iscsi_target_ip::::iscsi_target_iqn";
The following is an example for configuring an Ethernet device to boot from an iSCSI target:
host
host1{
filename "";
hardware ethernet 00:02:c9:00:00:bb;
option root-path "iscsi:11.4.3.7::::iqn.2007-08.7.3.4.10:iscsiboot";
}
9.2
Configuring an iSCSI Target for a Linux Environment
Prerequisites
Step 1. Make sure that an iSCSI target is installed on your server side.
Tip
You can download and install an iSCSI target from the following location:
http://sourceforge.net/project/showfiles.php?group_id=108475&package_id=117141
Step 2. Dedicate a partition on your iSCSI target on which you will later install the operating system
22
Mellanox Technologies
Mellanox ConnectX® EN Family PXE User’s Manual
Rev 1.2
Step 3. Configure your iSCSI target to work with the partition you dedicated. If, for example, you choose
partition /dev/sda5, then edit the iSCSI target configuration file /etc/ietd.conf to include the
following line under the iSCSI target iqn line:
Lun 0 Path=/dev/sda5,Type=fileio
Tip
The following is an example of an iSCSI target iqn line:
Target iqn.2007-08.7.3.4.10:iscsiboot
Step 4.
Start your iSCSI target.
Example:
host1# /etc/init.d/iscsitarget start
9.3
iSCSI Boot Example of SLES 10 SP2 OS
This section provides an example of installing the SLES 10 SP2 operating system on an iSCSI target and
booting from a diskless machine via ConnectX EN PXE. Note that the procedure described below assumes
the following:
• The client’s LAN card is recognized during installation
• The iSCSI target can be connected to the client via a LAN and a ConnectX Ethernet
Prerequisites
See Section 6.1 on page 16.
Warning! The following procedure modifies critical files used in the boot procedure. It must be executed by users with expertise in the boot process. Improper application of this procedure
may prevent the diskless machine from booting.
Procedure
Step 1. Load the SLES 10 SP2 installation disk and enter the following parameters as boot options:
netsetup=1
WithISCSI=1
Mellanox Technologies
23
Rev 1.2
iSCSI Boot
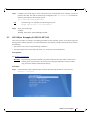
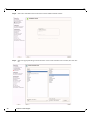
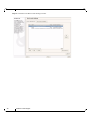
Step 2. Continue with the procedure as instructed by the installation program until the “iSCSI Initiator
Overview” window appears.
Step 3. Click the Add tab in the iSCSI Initiator Overview window. An iSCSI Initiator Discovery window
will pop up. Enter the IP Address of your iSCSI target and click Next.
24
Mellanox Technologies
Mellanox ConnectX® EN Family PXE User’s Manual
Rev 1.2
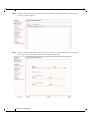
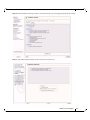
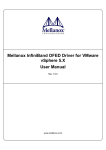
Step 4. Details of the discovered iSCSI target(s) will be displayed in the iSCSI Initiator Discovery window.
Select the target that you wish to connect to and click Connect.
Tip
If no iSCSI target was recognized, then either the target was not properly installed or no connection
was found between the client and the iSCSI target. Open a shell to ping the iSCSI target (you can
use CTRL-ALT-F2) and verify that the target is or is not accessible. To return to the (graphical)
installation screen, press CTRL-ALT-F7.
Mellanox Technologies
25
Rev 1.2
iSCSI Boot
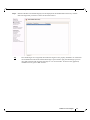
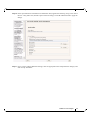
Step 5. The iSCSI Initiator Discovery window will now request authentication to access the iSCSI target.
Click Next to continue without authentication unless authentication is required.
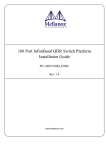
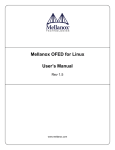
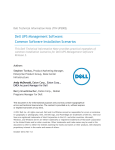
Step 6. The iSCSI Initiator Discovery window will show the iSCSI target that got connected to. Note that
the Connected column must indicate True for this target. Click Next. (See figure below.)
26
Mellanox Technologies
Mellanox ConnectX® EN Family PXE User’s Manual
Rev 1.2
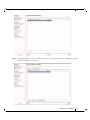
Step 7. The iSCSI Initiator Overview window will pop up. Click Toggle Start-Up to change start up from
manual to automatic. Click Finish.
Mellanox Technologies
27
Rev 1.2
iSCSI Boot
Step 8. Select New Installation then click Finish in the Installation Mode window.
Step 9. Select the appropriate Region and Time Zone in the Clock and Time Zone window, then click Finish.
28
Mellanox Technologies
Mellanox ConnectX® EN Family PXE User’s Manual
Rev 1.2
Step 10. In the Installation Settings window, click Partitioning to get the Suggested Partitioning window.
Step 11. Select Base Partition Setup on This Proposal then click Next.
Mellanox Technologies
29
Rev 1.2
iSCSI Boot
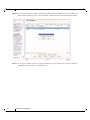
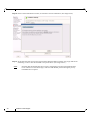
Step 12. In the Expert Partitioner window, select from the IET-VIRTUAL-DISK device the row that has its
Mount column indicating ‘swap’, then click Delete. Confirm the delete operation and click Finish.
Step 13. In the pop-up window click No to approve deleting the swap partition. You will be returned to
Installation Settings window. (See image below.)
30
Mellanox Technologies
Mellanox ConnectX® EN Family PXE User’s Manual
Rev 1.2
Step 14. Select the Expert tab and click Booting.
Mellanox Technologies
31
Rev 1.2
iSCSI Boot
Step 15. Click Edit in the Boot Loader Settings window.
32
Mellanox Technologies
Mellanox ConnectX® EN Family PXE User’s Manual
Rev 1.2
Step 16. In the Optional Kernel Command Line Parameter field, append the following string to the end of
the line: “ibft_mode=off” (include a space before the string). Click OK and then Finish to apply the
change.
Step 17. If you wish to change additional settings, click the appropriate item and perform the changes, and
click Accept when done.
Mellanox Technologies
33
Rev 1.2
iSCSI Boot
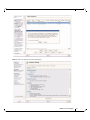
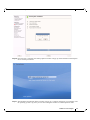
Step 18. In the Confirm Installation window, click Install to start the installation. (See image below.)
Step 19. At the end of the file copying stage, the Finishing Basic Installation window will pop up and ask for
confirming a reboot. You can click OK to skip count-down. (See image below.)
Note:
34
Assuming that the machine has been correctly configured to boot from ConnectX EN PXE
via its connection to the iSCSI target, make sure that MLNX_EN has the highest priority
in the BIOS boot sequence.
Mellanox Technologies
Mellanox ConnectX® EN Family PXE User’s Manual
Rev 1.2
Step 20. Once the boot is complete, the Startup Options window will pop up. Select SUSE Linux Enterprise
Server 10 then press Enter.
Step 21. The Hostname and Domain Name window will pop up. Continue configuring your machine until
the operating system is up, then you can start running the machine in normal operation mode.
Mellanox Technologies
35
Rev 1.2
iSCSI Boot
Step 22. (Optional) If you wish to have the second instance of connecting to the iSCSI target go through the
Ethernet driver, copy the initrd file under /boot to a new location, add the Ethernet driver into it
after the load commands of the iSCSI Initiator modules, and continue as described in Section on
page 19.
Warning! Pay extra care when changing initrd as any mistake may prevent the client machine
from booting. It is recommended to have a back-up iSCSI Initiator on a machine other
than the client you are working with, to allow for debug in case initrd gets corrupted.
Next, edit the init file (that is in the initrd zip) and look for the following string
if [ "$iSCSI_TARGET_IPADDR" ] ; then
iscsiserver="$iSCSI_TARGET_IPADDR"
fi
Now add before the string the following line:
iSCSI_TARGET_IPADDR=<Ethernet IP Address of iSCSI target>
Example:
iSCSI_TARGET_IPADDR=11.4.3.7
Also edit the file /boot/grub/menu.lst and delete the following string:
ibft_mode=off
9.4
Windows 2008 iSCSI Boot
ConnectX EN PXE supports booting Windows 2008 from an iSCSI target.
Prerequisites
• Make sure that your client is connected to the server(s)
• The ConnectX EN PXE image is already programmed on the adapter card – see Chapter 2
• Configure and start the DHCP server as described in Section 3.1 and Section 9.1
• Configure and start at least one of the services iSCSI target (see Section 9) and TFTP (see Section 4)
Booting Procedure
The following steps describe the procedure for booting Windows 2008 from an iSCSI target:
Step 1. Install Windows 2008 on a local machine as instructed on the Etherboot Web page:
http://etherboot.org/wiki/sanboot/win2k8_physical.
Step 2. Install the MLNX_EN for Windows driver available from Mellanox’s Web page: http://www.mellanox.com/
content/pages.php?pg=products_dyn&product_family=28&menu_section=35.
Step 3. Prepare an image from your installed partition. The following Web location shows how to do this using a
Linux USB key: http://etherboot.org/wiki/sanboot/transfer.
Step 4. Copy the prepared image to the iSCSI target.
Step 5. Make sure that an iSCSI target is installed on your server side.
Tip
36
You can download and install an iSCSI target from the following location:
http://sourceforge.net/project/showfiles.php?group_id=108475&package_id=117141
Mellanox Technologies
Mellanox ConnectX® EN Family PXE User’s Manual
Rev 1.2
Step 6. Configure your iSCSI target to work with the file copied in Step 4. If, for example, you choose the
file name w2k8_boot.img, then edit the iSCSI target configuration file /etc/ietd.conf to
include the following line under the iSCSI target iqn line:
Lun 0 Path=w2k8_boot.img,Type=fileio
Tip
The following is an example of an iSCSI target iqn line:
Target iqn.2007-08.7.3.4.10:iscsiboot
Mellanox Technologies
37
Rev 1.2
WinPE
10 WinPE
Mellanox ConnectX EN PXE enables WinPE boot via TFTP. For instructions on preparing a WinPE image,
please see http://etherboot.org/wiki/winpe.
38
Mellanox Technologies