1
F.A.S.T.
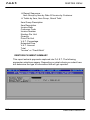
Table Of Contents
USER MANUAL
1
Table Of Contents
F.A.S.T.
1. INTRODUCTION _________________________________________________ 8
2. SYSTEM OVERVIEW _____________________________________________ 9
COMPANY INTRODUCTION________________________________________ 9
SYSTEM INTRODUCTION _________________________________________ 9
TECHNICAL SPECIFICATIONS / REQUIREMENTS ____________________ 10
SYSTEM MAIN FUNCTIONALITY ___________________________________ 11
ENHANCED FEATURES __________________________________________ 13
SUPPORT _____________________________________________________ 13
3. INSTALLATION _________________________________________________ 14
INSTALLING PERVASIVE _________________________________________ 14
INSTALLING F.A.S.T. ____________________________________________ 15
Installing F.A.S.T. on the Server ___________________________________ 15
Workstation Setup ____________________________________________ 19
Installing F.A.S.T. on the Client Workstation _________________________ 21
Installing The F.A.S.T. Process Engine _____________________________ 23
4. SYSTEM STANDARDS ___________________________________________ 24
Introduction_____________________________________________________ 24
SCREEN STANDARDS ___________________________________________ 24
System Date __________________________________________________ 24
Module Header ________________________________________________ 25
Command Line (Small Help)______________________________________ 25
License Number _______________________________________________ 25
Data Input Area________________________________________________ 25
Error Message Line_____________________________________________ 25
MENU STANDARDS _____________________________________________ 26
Introduction ___________________________________________________ 26
Menu Item Selection ____________________________________________ 27
DATA STANDARDS______________________________________________ 28
Valid Editing and Selection Keys and How They work. _________________ 28
Valid Pick List / Tag Selection Keys.________________________________ 29
Valid Function Keys ____________________________________________ 30
Alpha-Numeric Fields ___________________________________________ 30
Numeric Fields ________________________________________________ 31
Amount Fields _________________________________________________ 31
Date Fields ___________________________________________________ 31
Pick-Lists_____________________________________________________ 32
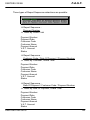
2
F.A.S.T.
Table Of Contents
Tag Selections ________________________________________________ 33
Predefined List ______________________________________________ 33
Database List _______________________________________________ 33
Data Integrity__________________________________________________ 33
Validation___________________________________________________ 33
Referential Integrity ___________________________________________ 34
SECURITY STANDARDS _________________________________________ 35
Introduction ___________________________________________________ 35
Single Login with Access I.D. ‘s ___________________________________ 35
Module Access Levels __________________________________________ 35
Number Of Concurrent Users _____________________________________ 36
LOOKUP / ENQUIRY STANDARDS _________________________________ 37
PRINTING STANDARDS __________________________________________ 38
Using Windows Laser / Ink Jet Printers _____________________________ 38
Dot Matrix Printers _____________________________________________ 39
5. ACCESSING THE SYSTEM _______________________________________ 40
LOGGING INTO WINDOWS _______________________________________ 40
LOGO AND CONTACT INFORMATION ______________________________ 41
USER LOGIN ___________________________________________________ 42
ACCESSING MODULES __________________________________________ 43
6. REFERENCE CODES ____________________________________________ 44
Introduction_____________________________________________________ 44
PAYMENT METHOD DATA MAINTENANCE __________________________ 45
SALES REP DATA MAINTENANCE _________________________________ 46
ITEM PRICE LINK MAINTENANCE__________________________________ 47
MAINTAIN LINK DESCRIPTIONS _________________________________ 47
MAINTAIN LINK RATES_________________________________________ 48
REFERENCE CODES REPORTS ___________________________________ 49
PAYMENT METHOD DATA LISTING ______________________________ 49
SALES REP DATA LISTING _____________________________________ 49
7. STOCK CONTROL ______________________________________________ 50
Introduction_____________________________________________________ 50
ITEM PRODUCT GROUP MAINTENANCE____________________________ 51
ITEM GROUP DEFINITION MAINTENANCE __________________________ 52
3
Table Of Contents
F.A.S.T.
ITEM DATA MAINTENANCE _______________________________________ 53
MAINTAIN ITEM DESCRIPTIONS _________________________________ 53
Item Pricing / Discount Structures ________________________________ 55
Item Searching ______________________________________________ 55
Item Statistical Information _____________________________________ 57
ITEM STOCK UPDATE _________________________________________ 58
Manual Stock Update _________________________________________ 58
Programmable Scanner Stock Update ____________________________ 59
ITEM INGREDIENTS / RAW MATERIALS___________________________ 60
ADDITIONAL COSTS DATA MAINTENANCE__________________________ 61
PACKAGE DATA MAINTENANCE __________________________________ 62
MAINTAIN PACKAGE DESCRIPTIONS ____________________________ 62
PACKAGE STOCK UPDATE _____________________________________ 63
STOCK CONTROL REPORTS _____________________________________ 64
ITEM DATA / STOCK LISTING ___________________________________ 64
Normal Item Listing ___________________________________________ 64
Price List ___________________________________________________ 64
Reorder Listing ______________________________________________ 65
Stock Take Listing ____________________________________________ 65
Print Labels _________________________________________________ 65
Export To Website____________________________________________ 66
Item Make-Up _______________________________________________ 66
ITEM STOCK VALUE REPORT ___________________________________ 66
ADDITIONAL COSTS DATA LISTING ______________________________ 67
PACKAGE DATA LISTING _______________________________________ 67
8. CREDITORS MENU _____________________________________________ 68
Introduction_____________________________________________________ 68
SUPPLIER DATA MAINTENANCE __________________________________ 69
ADD A SUPPLIER _____________________________________________ 69
CHANGE SUPPLIER INFORMATION ______________________________ 71
VIEW SUPPLIER INFORMATION _________________________________ 71
PURCHASES ___________________________________________________ 72
PURCHASES / ENQUIRY _______________________________________ 72
DEBIT NOTES / GOODS RETURNED _____________________________ 79
CREDITORS PAYMENTS _________________________________________ 82
CREDITORS PAYMENT MAINTENANCE ___________________________ 82
CREDITORS PAYMENT REVERSALS / ENQUIRY ___________________ 84
Cash Purchase Payment_______________________________________ 84
Account Purchase Payment ____________________________________ 85
4
F.A.S.T.
Table Of Contents
CREDITORS REPORTS __________________________________________ 87
SUPPLIER DATA LISTING_______________________________________ 87
Normal Supplier Listing ________________________________________ 87
Creditors Listing _____________________________________________ 87
CREDITORS PURCHASE SUMMARY _____________________________ 88
Supplier Report ______________________________________________ 88
Item Report _________________________________________________ 90
CREDITORS PAYMENT SUMMARY _______________________________ 91
SUPPLIER ANALYSIS __________________________________________ 93
9. DEBTORS MENU _______________________________________________ 94
Introduction_____________________________________________________ 94
CUSTOMER DATA MAINTENANCE _________________________________ 95
ADD A CUSTOMER ____________________________________________ 95
CHANGE CUSTOMER INFORMATION_____________________________ 97
VIEW CUSTOMER INFORMATION ________________________________ 98
CHANGE CUSTOMER STATUS __________________________________ 98
SET DISCOUNT STRUCTURE ___________________________________ 99
SALES ADMIN _________________________________________________ 100
QUOTATIONS _______________________________________________ 100
JOB CARDS _________________________________________________ 105
SALES ORDERS _____________________________________________ 110
INVOICES ____________________________________________________ 115
INVOICES / ENQUIRY _________________________________________ 115
CREDIT NOTES / REFUNDS____________________________________ 123
DEBTORS PAYMENTS __________________________________________ 126
DEBTORS PAYMENT MAINTENANCE____________________________ 126
DEBTORS PAYMENT REVERSALS / ENQUIRY ____________________ 128
Cash Sale Payment__________________________________________ 128
Account Sales Payment ______________________________________ 129
POINT OF SALE _______________________________________________ 131
CASH SALES ________________________________________________ 131
REFUNDS___________________________________________________ 139
CASH SALE PAYMENT REVERSAL ______________________________ 142
CASH SALE PAYMENTS _______________________________________ 144
DEBTORS REPORTS ___________________________________________ 146
CUSTOMER DATA LISTING ____________________________________ 146
Normal Customer Listing______________________________________ 146
Print Labels for Dispatch ______________________________________ 146
Debtors Listing _____________________________________________ 147
Discount Structure___________________________________________ 147
5
Table Of Contents
F.A.S.T.
DEBTORS SALES SUMMARY __________________________________ 148
Customer Report ____________________________________________ 148
Item Report ________________________________________________ 150
DEBTORS PAYMENT SUMMARY________________________________ 151
POINT OF SALE SUMMARY ____________________________________ 153
Customer Report ____________________________________________ 153
Item Report ________________________________________________ 155
CUSTOMER STATEMENTS ____________________________________ 156
10. PROCESSING / REPORTS MENU ________________________________ 158
FLOAT OPENING BALANCE______________________________________ 158
END OF DAY PROCESSING _____________________________________ 159
Creditors ____________________________________________________ 160
Debtors _____________________________________________________ 160
Daily Takings ________________________________________________ 161
MONTH END PROCESSING______________________________________ 162
Debtors _____________________________________________________ 163
General _____________________________________________________ 163
GENERAL REPORTS ___________________________________________ 164
WORKSTATION SUMMARY ____________________________________ 164
Spot Checking ______________________________________________ 164
DAILY AUDIT TRAIL___________________________________________ 165
Creditors __________________________________________________ 165
Debtors ___________________________________________________ 165
PROFIT REPORTS ___________________________________________ 166
Item Profitability Report _______________________________________ 166
Gross Profit Report __________________________________________ 167
Till Item Detail Report ________________________________________ 167
V.A.T. Split Report___________________________________________ 168
V.A.T. REPORT ______________________________________________ 169
11. UTILITIES ___________________________________________________ 170
SYSTEM DEFAULTS ____________________________________________ 170
SET GENERAL COMMENTS____________________________________ 170
SET EARLY PAYMENT DAYS ___________________________________ 170
WHO’S LOGGED IN_____________________________________________ 171
PRINTER DATA SETUP _________________________________________ 172
PRINTER DEFINITIONS _______________________________________ 172
6
F.A.S.T.
Table Of Contents
PRINTER CONFIGURATIONS___________________________________ 173
CASH REGISTER DATA SETUP __________________________________ 174
CASH REGISTER DEFINITIONS_________________________________ 174
CASH REGISTER CONFIGURATIONS____________________________ 175
USER FILE MENU ______________________________________________ 176
USER FILE MAINTENANCE ____________________________________ 176
Login File Maintenance _______________________________________ 176
User Access Rights Maintenance _______________________________ 178
CHANGE PASSWORD ________________________________________ 179
SET DEFAULT COLOURS______________________________________ 180
12. HOW TO EXIT THE SYSTEM ____________________________________ 181
13. CLEARING USERS ____________________________________________ 182
14. CRITICAL ERRORS ___________________________________________ 183
Introduction____________________________________________________ 183
Runtime Errors _________________________________________________ 183
Database Errors ________________________________________________ 185
7
F.A.S.T.
Table Of Contents
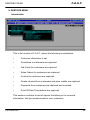
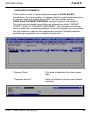
1. INTRODUCTION
This manual consists of two main components namely :
A
•
System Overview
This component describes the main features of
F.A.S.T. briefly, highlighting certain key aspects
on the functionality of the system. It will give you
a general idea of what F.A.S.T. caters for
and an
•
Operating Manual
This component is the detailed description of all
aspects of F.A.S.T.. For clarification it contains
images on every single screen within the system
and describes right down to the detail, every
significant field. This is quite a comprehensive
document, in sequence to events and procedures
that the system is designed to follow.
It is laid out in sections mainly according to
menu items as they appear in F.A.S.T. It explains
aspects surrounding the system in such a way
that if you use it while performing certain
functions it will guide you through the system. It
therefore gives you an idea of how to perform
certain functions in the system.
8
F.A.S.T.
SYSTEM OVERVIEW
2. SYSTEM OVERVIEW
COMPANY INTRODUCTION
Velocity Software Solutions has been in operation for around 18 years and is
committed to the growth of business in terms of administration and efficiency. We
provide user-friendly, practical software solutions to different types of small to
medium sized businesses that consider the aspects of computer illiteracy, which
still exists within our environment. We therefore develop applications that are
designed to provide information easily and quickly to the user in order to make
effective business decisions.
SYSTEM INTRODUCTION
It has become apparent that, in order to strengthen the business skills of the
entrepreneur and effectively strengthen business as a whole, not only within the
continent, tools are required. Along with the tools utilised for the production and
marketing of items in the market place, administrative tools are also required to
help the business owner to “keep in touch” with the financial aspects of the
venture.
F.A.S.T. has therefore been developed in consideration to these aspects to help
the business owner to quickly and efficiently attain key information about the
business in order to in turn manage the concern, without having to go through
lengthy excercises in terms of data input and retrieving information. We always say
that “The manager of a business is not an accountant or bookkeeper, so do
not try and make them that. Provide them with an easy-to-use solution to help
them to run the business”. F.A.S.T. consists of many technical components.
These components operating in combination with each other in a common
environment help to make F.A.S.T. a business management system that is user
friendly, efficient, performance oriented and capable of handling large volumes of
data with full history on-line. All updates are real-time so the instance you save
some information, it is stored in the database. It is a practical solution that helps
you to run your business and compliment your client service by helping you along
with powerful search and input modules. For example, your sales people need a
simple but effective search module to quickly identify items to either quote on,
invoice or both. They also do not need to remember a single code while using
F.A.S.T. All they have to do is to know what the item is and search accordingly. In
fact there are one of three different ways of accessing items in the system.
Searching for sales reps, clients, payment methods is as easy.
9
F.A.S.T.
SYSTEM OVERVIEW
TECHNICAL SPECIFICATIONS / REQUIREMENTS
• Unlimited number of records. All data is on-line real-time. All
history can be retrieved at a later stage.
• Minimum Hardware Requirements
: P1 Processor
1 Hard disk, 64 MB RAM, 20
GIG HARDDISK
• Operating Systems Supported
: Windows 98 /
Windows 2000/XP/NT/ME
• Networks Supported
: Microsoft TCPIP/Netware
4.15 or higher
• Hardware Devices Supported
:
Scanners
• Hand held or fixed Laser / CCD
• Programmable with download capability
Printers
• 80 Column Dot Matrix
• 40 Column Dot Matrix (Parallel / Serial) Till Slip
(with or without draw kick interface)
• Laser / Ink Jet
• Supports USB and Multiple ports concurrently
Pole Displays
• Serial Connection - POSIFLEX PD-2100/2200
Series (Noritake Emulation – SW1 Off, SW2 On)
Till Drawers
• Printer interface
• Serial Connection
The following points list the main technical features of F.A.S.T. and give
you a bit of an understanding in terms of what they do :
•
Certain confidential information such as amounts and dates are
encrypted which enable the data to be secure and efficient in
terms of size.
•
The system is developed for a multi-user network platform whether
LAN(Local Area Network), WAN(Wide Area Network) or both
concurrently and allows 300 users to be logged in simultaneously
with full record locking and user module monitoring.
10
F.A.S.T.
SYSTEM OVERVIEW
SYSTEM MAIN FUNCTIONALITY
•
Stock Control
More control in terms of identifying items and relative
pricing where entrusted staff are given responsibility to run
the operation from time to time
Value of Stock on hand
Stock Levels / Minimum reorder Levels
“Do I know that the stock I’m supposed to have on the
shelf is really there”
•
Monitoring of Purchases
Daily / Weekly / Monthly Purchases
“Who do I owe” and “How much” - CREDITORS
•
Monitoring of Sales
Daily / Weekly / Monthly Turnover
“Who owes me” and “How much” - DEBTORS
•
Profitability
What is my gross profit and are my margins enough to
cover running costs
Which products generate the most profit
Which are the fastest moving products
What times of the year are best to stock certain products
•
Monitoring and Reporting Of V.A.T.
V.A.T. report is automatically generated at month end
•
Easier and More Efficient Administration of Accounts
Debtors Listings are clear and contain sufficient
information to contact debtors when collection is done
Automatic printing of debtors statements are done at
month end
11
F.A.S.T.
SYSTEM OVERVIEW
•
Complete Security within the System
A User-ID and password is allocated to each user.
Each user can be assigned 1 of 3 access levels per
module ensuring that users with unauthorized access will
not be able to adjust confidential information.
•
Data Backup and Recovery
On-line backup procedures form part of each day-end
process. Additional CD Writing backup is an additional
option to cater for the storing of offsite data.
Recovery to any prior day is possible, providing the
hardware is reliable.
F.A.S.T. contains the following main features :
/
• Point Of Sale with Till Drawer Interface
• Does not require pre-printed
stationery
• Barcode / PLU Identification
• Pole Display Interface
• Easier Invoicing and Automatic
Statement Printing
• Full Item Analysis
• Easier Stock Control
• Easy Item lookups
• Easier Monitoring of Purchases / Sales
V.A.T.
• Full security control on user login
ID’s
• Easier Daily Cashing Up per Payment
Method
• Full Audit Trail reporting per user
• Can operate on an entry-level P1
• Automatic Daily Backups
• On-Line Credit Limit Checking
• Hand Held Scanner Interface
• Easier Profitability Reporting
• Item Pricing / Discount Structures
• 3 level item identification
Product Group / Item Group / Item
• Production/Raw Materials
Functionality
• Ability to Add Different Types of
Payment Methods
• Easier Monitoring Of Debtors
Balances
• Multiple Printer Ability – Redirection
• Multiple Payment Method Capture
Per Transaction
12
F.A.S.T.
SYSTEM OVERVIEW
ENHANCED FEATURES
The system has the ability to print to any inkjet/LaserJet type of printer
and has the ability to print your company logo on all documents that you will
correspond to your clients. Future development will include the ability to setup a profile by which you would like the system to communicate statements
to your clients. This functionality will enable the system to automatically FAX
or EMAIL statements.
F.A.S.T. is currently running in a host of businesses which include the
following diverse markets :
Food Catering Services of Mining Sites
Cellular Phone Shops
Sound System Shops
Grocery Supermarkets
Motor Car Spares and Accessories Shops
Wheel and Tyre Shops
Clothing Shops
Electrical Equipment Suppliers
Sportswear Manufacturers and Sports Equipment Suppliers
Steel Door Manufacturers
SUPPORT
Our clients benefit from a 24 hour / 7 day a week response to any queries or
problems that may occur. Telephonically we are able to identify exactly where
you are having a problem. Our help desk facilitates all packages that we
support. So as you are explaining what you are doing, our support people are
seeing a similar screen on their side. This helps us to help you. Our support
people are also well versed on all operating systems, so that we can extend
support not only to the package but also solve most network problems
telephonically. In the instances that require further investigation, we dispatch
our well trained support people to your premises in order to action a solution.
13
INSTALLATION
F.A.S.T.
3. INSTALLATION
The installation of F.A.S.T. comprises of two components. The
installation of Pervasive and the installation of the F.A.S.T. modules.
These procedures are inseparable and work in conjunction with each
other.
INSTALLING PERVASIVE
On each machine F.A.S.T. is to be run on, insert the Pervasive CD and
follow the Pervasive Installation instructions. Once installed, the following
icon will be activated on startup.
If you are running on a Windows 98 machine, copy the following
icon from the Pervasive.SQL – Other Utilities program Group, to the
Startup program group.
Installing F.A.S.T. on the Server
14
F.A.S.T.
INSTALLATION
INSTALLING F.A.S.T.
Installing F.A.S.T. on the Server
1)
Click "Start".
2)
Click "Programs".
3)
For Windows 98
Click "MS-DOS Prompt"
For Windows XP/2000/NT/ME
Click “Accessories”
Click “Command Prompt”
4)
Insert the CD into the drive. If the CD drive is D: type in
"D:" and press ENTER.
5)
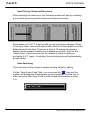
Type in "FINSTALL C:" and press ENTER.
The following screen will appear.
Press any key to continue.
15
Installing F.A.S.T. on the Server
F.A.S.T.
INSTALLATION
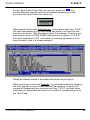
The first part of the installation of F.A.S.T. will be performed. The following
will appear.
The following screen will then appear.
Select the operating system you are installing F.A.S.T. on.
Installing F.A.S.T. on the Server
16
F.A.S.T.
INSTALLATION
If you are not sure of the operating system, on the Desktop, right click
icon and left click on properties. On this screen, you will
on the
find the operating system installed on the machine you are installing
F.A.S.T. on.
To navigate your way through the following screens. The Enter key
takes you one field forward and Esc one field back.
This screen guides you in setting up certain system configuration
parameters, the initial user and the environment for F.A.S.T. Once you
have entered the appropriate information, the last field on this screen
requests a license number. Keep the listed reference number on hand
when contacting for a license number.
17
Installing F.A.S.T. on the Server
INSTALLATION
F.A.S.T.
Fill in your company details on this screen. Notice on the CommandLine at
the top of the screen under the header, the system requires confirmation
by pressing “Y”. If you are not satisfied with the details, simply press “N” or
hit the Esc key to go back and re-enter.
The system will now proceed to set-up it’s environment. Allow this
process to complete normally without interruption as it is critical for
F.A.S.T. to operate successfully.
Installing F.A.S.T. on the Server
18
F.A.S.T.
INSTALLATION
Workstation Setup
The following screen will appear and allows you to set-up the way F.A.S.T.
will handle certain hardware devices and options for the workstation you
are running it on.
19
•
Enter “1” for “This Workstation’s I.D. Zeros will be automatically
padded in the front of the input.
•
Select “Yes” for “Bar Code Scanner” (This allows you to use the
Bar Scan Code field, for easy item look up even if you do not
use a physical bar code scanner attached to the workstation).
•
Printer 1 is for printer port “LPT1”. Select the appropriate
printer attached to this port.
•
If you have selected a dot-matrix type printer, select the
appropriate printer type from the list. If you have selected a
Windows Laser/Ink Jet type in the workstation number you
intend attaching this printer to.
•
As for Printer 2, set up the parameters for printer port “LPT2”. If
no printer is attached to this port, duplicate the parameters from
Printer 1.
•
If a Pole Display will be used for this workstation, select “Yes”
then select the communications port it is attached to.
Installing F.A.S.T. on the Server
INSTALLATION
F.A.S.T.
•
If a Till Drawer is attached to this workstation select the
appropriate option available and if necessary the attached port.
•
For your invoice printing, select the appropriate printer port
to print to.
•
If you would like the system to prompt the user whether to print
select “Yes”.
•
The same option is available for Point-Of-Sale printing.
•
To record sales rep codes and customer codes on Point-OfSale transactions select “Yes” for these options.
•
When capturing purchases from suppliers, you can also set-up
the prompt to print option.
On completing the details of the workstation, the following screen will
appear and F.A.S.T. will be ready to use.
If you are using a dot matrix serial port printer interface, the following
statement must be inserted : “mode com1=lpt1”
Windows 98 – “c:\autoexec.bat”
Windows 2000 / XP / ME / NT – “c:\windows\system32\autoexec.nt”
Restart this machine now.
Congratulations you have successfully set-up the Server for F.A.S.T.
Installing F.A.S.T. on the Server
20
F.A.S.T.
INSTALLATION
Installing F.A.S.T. on the Client Workstation
This task only needs to be done if you would like to run F.A.S.T. on
a multi-user environment, or run F.A.S.T. on more that one machine.
Working on the workstation you would like to run F.A.S.T. from. In other
words, not the server.
1)
See the section labelled INSTALLING PERVASIVE. Complete
this task firstly.
2)
Through your network neighbourhood icon, map a drive to the
server. Let’s use “F:” as the example of the mapped drive to the
server from the client workstation. If you have trouble
performing this task, consult your network administrator (the
person who installed your network).
3)
Right Click on “Start”.
4)
Left click on “Explore”.
5)
Click on the “F:” drive.
6)
Double Left Click on the “FAST” folder.
7)
Copy the following icons to this workstations Desktop.
If running on Windows 98
If running on Windows 2000 / XP / NT / ME
Double Left Click on the 2000 folder
21
Installing F.A.S.T. on the Server
INSTALLATION
8)
9)
F.A.S.T.
Close the Explorer Window.
On these icons that are now on your Desktop, Right Click on
each of them, Left click on “Properties” and select the
“Program” tab.
10)
At the start of “Cmd line:” and “Working”, insert the mapped drive
letter. For example, if “F:” is the server drive the in the F.A.S.T.
icon, “Cmd line:” should read “F:\fast\FAST.BAT” and
“Working” should read “F:\FAST”. Save the changes by pressing
“OK” (at the bottom) on each of these.
11)
icon and
Double Left Click on the
follow the instructions under the section labelled
INSTALLATION
INSTALLING F.A.S.T.
Installing F.A.S.T. on the Server
Workstation Setup
**** N.B. Ensuring that “This Workstation’s I.D.” is unique.
If you are using a dot matrix serial port printer interface, the following
statement must be inserted : “mode com1=lpt1”
Windows 98 – “c:\autoexec.bat”
Windows 2000 / XP / ME / NT – “c:\windows\system32\autoexec.nt”
12)
Restart this machine now.
Congratulations you have successfully set-up a Client Workstation for
F.A.S.T. If more are required follow the same process.
Installing F.A.S.T. on the Client Workstation
22
F.A.S.T.
INSTALLATION
Installing The F.A.S.T. Process Engine
If you have selected a Windows Laser / Ink Jet Printer on any Client
Workstation Set-Up, it is necessary to then install the F.A.S.T. Process
Engine on the Workstation that will do the relative processing of
documents.
icon.
On the installation CD you will find the
1)
Double Click on this icon.
2)
Select the defaults.
3)
Once Set-Up is complete, copy this icon from the
“F.A.S.T. Process Engine Program Group” into the “Startup”
Program Group.
4)
5)
6)
7)
8)
9)
10)
23
icon.
Run the
Ensure that on the Data Path tab, “Scan Location” is set to the
server’s drive. Also ensure that “Select A Path” points to the
path of where F.A.S.T.’s data is. So, if the Server drive is
mapped to “F:” on the Workstation where the Printer is
attached and F.A.S.T.’s data folder is “\FAST\DATA” the full
path (the green field) should read “F:\FAST\DATA”
Ensure that on the Printer tab, “Printer Font To Be Used”, you
have selected “Courier New”.
Under “Number Of Copies For”, select the desired number of
copies to print.
once complete.
Click on
Restart this machine now.
Ensure that when you restart, the process engine automatically
Starts up and that it appears as the following :
Congratulations you have successfully set-up the F.A.S.T. process
Engine. If more are required follow the same process.
Installing F.A.S.T. on the Client Workstation
SYSTEM STANDARDS
F.A.S.T.
4. SYSTEM STANDARDS
Introduction
Once you have identified what the different areas are used for
in terms of representation and capturing of data within the system as
well as the formats of how data is captured and displayed, it will
become easier for you to actually use the system in a more meaningful
way. This will also help you to get your way around the system,
navigating through the menus to the modules you wish to access in
order to perform certain functions within the system. Take some time to
fully understand this section of standards as it will benefit you in the
following sections.
SCREEN STANDARDS
System Date
The system is machine or BIOS date independent which means that it
carries its own system date. The user maintains this date. This allows
for flexibility in terms of backlog situations. Even if the physical date
has changed the system can still operate on a previous date enabling
the user to “catch up” on backlog before running an End-Of-Day or
Month End Process to actually change the system operating date.
Screen Standards
24
F.A.S.T.
SYSTEM STANDARDS
Module Header
This shows the description of the module you have accessed.
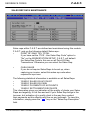
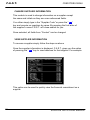
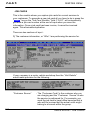
Command Line (Small Help)
This line is provided to help guide you and acts as a “small help”. If at
any time during input, you are not quite sure of what function keys are
available or what data the system is expecting you to input keep a close
eye on this line and you will be guided as to what you should do next.
The following is an example of what you are likely to see on this line
when maintaining item information from the “STOCK CONTROL” /
“ITEM DATA MAINTENANCE” / “MAINTAIN ITEM DESCRIPTIONS”
Menu option and the system has taken you to the “Item Group Code”
field :
◄─┘ Item Group Code · F1 scroll · F2 Barcode · Esc/F10 menu
License Number
This field shows your F.A.S.T. license information
Data Input Area
This is the area where data input and selections are done. When
reports are being processed and critical processes such as End-Of-Day
or Month End Processing are in progress, this area is used to display
informative messages that show you the status of these processes. On
menu screens all menu items are displayed.
Error Message Line
This is the area where error messages are displayed. The following is
an example of this : If you were to try and add an Item for which an Item
Group Code does not exist, the following error message will be
displayed on this line:
ERROR - This Item Group Code is not on file.
25
Screen Standards
SYSTEM STANDARDS
F.A.S.T.
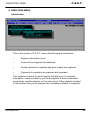
MENU STANDARDS
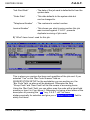
Introduction
Menus and all relevant sub menus are represented in a hierarchal
overlapped or window view. Each menu consists of very few entries as this
makes it less confusing for you to establish where you would like to get to.
The concept of this functionality is that you have certain defined inputs,
processing, configuration options and outputs(in the form of reports and
enquiries) within the system. All menus within F.A.S.T. follow this
hierarchy as a standard. You can see an exact map of how you got to a
specific menu item or what options are available under a specific one.
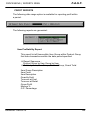
Below is an example. Notice the company name in the top right corner
of the data section. This appears only on menu screens. F.A.S.T.’s
main menu is uncluttered and contains few items. This gives you a
simple approach to using the system. Remember the key aspects of the
system as mentioned in the System Overview section.
Menu Standards
26
F.A.S.T.
SYSTEM STANDARDS
Menu Item Selection
To navigate through the menus the following keys are available:
Key
▲
│
│
▼
27
Name
Editing Function
Up Arrow
Move one position up from the current
highlighted menu option. Pressing this at the
top of the current menu will scroll you to the
bottom of that menu.
Down Arrow
AlphaNumeric
key
Alphabetic or
Numeric key
Enter ◄─┘
Enter
Esc
Escape
Move one position down from the current
highlighted menu option. Pressing this at the
bottom of the current menu will scroll you to
the top of that menu.
To get to a menu item quickly, just type the
first letter of that menu item. If you press the
same key again and another menu item that
begins with the same letter exists then the
system will automatically take you to that
next menu item. (Quick Access)
Access the current highlighted module. If
there were a sub menu from the highlighted
menu item, this sub menu would appear with
its menu items.
Exit the system or one menu back.
Menu Standards
F.A.S.T.
SYSTEM STANDARDS
DATA STANDARDS
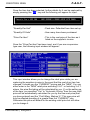
Valid Editing and Selection Keys and How They work.
All field input data is automatically converted to UPPERCASE except for
email addresses, which are automatically converted to LOWERCASE and
amount fields. This establishes uniformity within F.A.S.T. So you need not
worry whether your Caps Lock key is on or off.
The following is a table of valid editing keys you can use while
inputting data and a brief description about their functions :
Key
Name
—►
Right Arrow
◄—
Left Arrow
◄— Backspace
Backspace
Insert (Ins)
Insert
Delete (Del)
Delete
Data Standards
Editing Function
Move one position to the right. If Insert is on
using this key will automatically switch Insert
off.
Move one position to the left. If Insert is on
using this
key will automatically switch Insert off.
Clear one character to the left of the current
cursor position. On date inputs this key is
not operational.
Insert a character at the current cursor
position. On date inputs this key is not
operational.
Delete the character on the current cursor
position. On date inputs this key is not
operational.
28
F.A.S.T.
SYSTEM STANDARDS
Valid Pick List / Tag Selection Keys.
Selection items that appear in pick-lists on certain fields have
predefined descriptions (see the paragraph headed pick-lists
later on in this section).
The following is a table of valid keys for these pick lists and a brief
description about their functions :
Key
▲
│
│
▼
Alpha-Numeric
key
Name
Up Arrow
Down Arrow
Alphabetic or
Numeric key
Space Bar
29
Editing Function
Move one position up from the current
highlighted selection item. Pressing this at the
top of the current selection window will scroll
you to the bottom of that window.
Move one position down from the current
highlighted
selection item. Pressing this at the bottom of
the current selection window will scroll you to
the top of that window.
To get to a selection item quickly. Just type the
first letter of that selection item. If you press the
same key again and another selection item that
begins with the same letter exists then the
system will automatically take you to that next
selection item. (Quick Access)
Tag an item for multiple input selection
items. This is represented by an asterisk ( ).
Data Standards
F.A.S.T.
SYSTEM STANDARDS
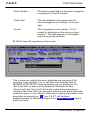
Valid Function Keys
The following is a table of valid function keys that are standard within
the system and a brief description about their functions :
Key
Name
Enter ◄─┘
Enter
Esc
Escape
F1
Scroll
F2
View/Quantity
F3
Save/Store/Update
F4
More/Price
F5
Delete
F6
Open Drawer
F7
Sort
Editing Function
Save the data input on a field and
move to the next field.
Move one field back, return to the
menu or terminate processing or
printing.
Scroll through a list of available
selections on a field.
One of the following
View detail on current field or
selection
Input Quantity on Point-Of-Sale
One of the following
Save data that was input.
Store the data that was selected
for multiple input selections.
Update “Quantity In Stock”
One of the following
View more information on item
Input Price on Point-Of-Sale
Delete the current line of input.
Open Till Drawer.
Sort the data that was input.
Automatically fill in the payment
amount.
Calculate a total for the batch data
F9
Total
that was input.
Return to the menu from whatever
F10
Menu
field the cursor is currently on.
(Quick Return).
n.b. The Esc and Enter keys are available throughout the system whereas
keys F1 through F10 are shown only when available on the current field.
F8
Full Payment
Alpha-Numeric Fields
Data Standards
30
F.A.S.T.
SYSTEM STANDARDS
Think of this as being alphabetic and numeric data. In other words all
letters and numbers on the keyboard. This data is displayed exactly as
it was entered. All alphabetic characters input are automatically
converted to uppercase. So it does not really matter whether you have
set the “Caps Lock” key on or off. These inputs are also referred to as
“alpha” in this manual.
Numeric Fields
If a particular field is numeric only, the system will not accept any data
but numeric or a decimal point or minus sign(if allowed) on that field. If
you try to input an alphabetic character on a numeric-only input field,
the system will beep and not accept this character. For a numeric-code
field for example “Sales Rep Code”. This is a 3 digit numeric input field.
If the value you need to input is “027” you do not need to input leading
zeros as the system will automatically do that for you. So all you need
to type in is “27”. Once input, the system will display the following :
“027” and hence the leading zeros are inserted automatically.
Amount Fields
An amount field can have the following format within the system :
•
Negative Monetary Value with decimal place. Valid characters
are 0-9, decimal(.) and the minus(-) sign. e.g. 7865.93
Once input the system will, depending on the type of field being
captured, automatically format and display the input data in one
of the following ways :
•
Using the above example, the following will be displayed.
7,865.93 for a monetary value
•
47.5 % for a markup percentage
Date Fields
All dates are represented in the following format within the system :
31
Data Standards
F.A.S.T.
SYSTEM STANDARDS
•
cc yy — mm — dd
cc
yy
mm
dd
Century
Year
Month
Day
The hyphen(— ) need not be input as the system will automatically
move the cursor over them as it needs to.
This format ensures that the system is century compliant.
Automatic checking in terms of the following is performed :
•
•
•
Leap Year
Number of valid days in the month
Validation on month entered
If any date error is encountered the system will display an appropriate
error message. For example if you typed in a date say, 2004/09/31, the
following error message will appear :
ERROR – 2004/09/31 : Invalid date – 30 day month.
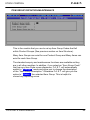
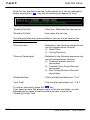
Pick-Lists
These are little pop-up windows that appear the instance the cursor
Moves to a field where you do not have the option of direct input. These
fields have pre-defined descriptions around the indicators that are set
up for them. All you have to do is select one of these predefined items.
The following is an example of one of these pop-up windows.
Data Standards
32
F.A.S.T.
SYSTEM STANDARDS
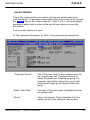
Tag Selections
These are lists of items for which multiple selections are possible. They
can have two forms. One being a predefined list of elements for which
you are able to tag multiple selections and the other being a list of
database elements for which you can also tag multiple selections. The
following are examples of these. By pressing the SPACESBAR on an
that entry TAGS it.
Predefined List
Database List
This selection list is the same format as the one above however it
Is built from database entries, not pre-defined ones. Notice that the
tagging process marks the desired elements with an asterisk ( ).
Data Integrity
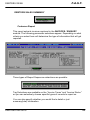
Validation
Data that is entered into the system is validated for correct input. Before
any update process occurs, the system confirms and gives you the option
of canceling the input or changes. The following is an example of a
validation prompt you will see on the Command Line.
Are all details correct Y(es) N(o)
Informative error messages are displayed on data that does not
conform to certain ruling. This is done before data is actually sent to the
database for updating.
33
Data Standards
SYSTEM STANDARDS
F.A.S.T.
Referential Integrity
The process for a critical database update performs transactiontracking type functionality to ensure that referential integrity is always
maintained throughout the system. In other words when a transaction is
captured, it is ensured that the client’s account balance as well as all
other pertinent information is always updated. Even simple checks like
the fact that you cannot delete facilities in the system because of the
possibility of cross-references to accounts. Other functionality ensures
that power failures and communication faults do not interfere with the
integrity of the database.
Data Standards
34
F.A.S.T.
SYSTEM STANDARDS
SECURITY STANDARDS
Introduction
The architecture of the system ensures that the highest level of security
is maintained throughout the use of the entire system by users. This
section covers some of this infrastructure.
Single Login with Access I.D. ‘s
Users are unable to log into the system more than once using the same
Access I.D. The system controls and monitors access by users to
ensure that someone using an Access I.D. is not allowed to use the
same Access I.D. on another workstation at the same time. This
function prevents someone from performing critical data maintenance
under someone else’s Access I.D. The system allows users control
to terminate other users from using the system by clearing their Access
I.D. As this is done, when the user who has been terminated returns
back to the menu, the system displays an error message and
immediately terminates that user from the system. F.A.S.T. prevents
a user from entering to typing in their passwords three times incorrectly
Access to the system and the initialisation of critical data maintenance
and critical processes are controlled within the system where users are
informed by messages as to what they are allowed to perform. For
example, if access to the system was attempted while an End Of Day
Process is busy running, the following error message will appear.
ERROR – END OF DAY PROCESSING in progress – access denied.
Module Access Levels
Access levels are set up per user and per module within the system.
This means that certain users can be allocated levels of access to
certain modules and different access rights to other modules. These
access rights are maintained by the designated system administrator in
the “LOGIN MAINTENANCE” module.
35
Security Standards
SYSTEM STANDARDS
F.A.S.T.
There are three main access levels incorporated for users within the
system. The following lists these levels with a description of how they
are handled.
•
1 – Full Read-Write
The user has full access to a specific module allowing that
user to maintain data relevant to that module.
•
2 – Display Only
The user has the ability to only view information in a specific
module.
•
3 – Excluded
The user is totally excluded from gaining access to a specific
module
Number Of Concurrent Users
The system allows for up to 300 users per database to be logged in at
any time. This is however controlled by your license registration. The
system checks this condition and controls this level to ensure that this
maximum value is not exceeded.
Security Standards
36
F.A.S.T.
SYSTEM STANDARDS
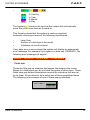
LOOKUP / ENQUIRY STANDARDS
Although F.A.S.T. checks for barcode duplication when setting up
items, while searching for items in the Creditors or Debtors modules, if
you select a barcode that has more than one reference, F.A.S.T.
will display the following screen that allows you to scroll and pin-point
the actual item to help eliminate stock variances or discrepancies. This
ensures that the code that is input is physically the same article.
In the Creditors and Debtors modules, on the item detail input screen
(typically the second screen of input), by pressing the “ F9 “ key on an
amount field or even certain alphanumeric input fields, a window will be
displayed that shows the totals of the input.
37
Using Windows Laser/Ink Jet Printers
SYSTEM STANDARDS
F.A.S.T.
PRINTING STANDARDS
All reports show your company name at the top. All Listings and
General Reports will show you the date they were generated for and
time they were generated.
Using Windows Laser / Ink Jet Printers
•
•
Listings
General Reports
F.A.S.T. will give you the following option :
By selecting “Print”, output will be directed to the default printer attached
to the workstation specified in “Printer 1 Type” on WORKSTATION SETUP
for the workstation you are working on. If you select “View”, the report will
be directed to the screen. It is not advisable to then print from this view as
the report might not be formatted correctly for the printer.
•
•
•
Purchases
Invoices
POS Till Slips
Will automatically be printed to the default printer attached to the
workstation specified, if you have selected “No” on the “Prompt To Print”
field on the module WORKSTATION SETUP for the workstation you are
working on. Otherwise you have the option of printing these documents.
•
•
•
•
•
•
•
•
•
Payments
Debit Notes
Quotations
Job Cards
Sales Orders
Credit Notes
Point-Of-Sale Refunds
End Of Day Reports
Month End Reports
Will automatically be printed to the default printer attached to the
workstation specified in “Printer 1 Type” on WORKSTATION SETUP for
the workstation you are working on.
Lookup/Enquiry Standards
38
F.A.S.T.
SYSTEM STANDARDS
For Invoicing and Statements, a template file (“TEMPLT01.bmp”) has been
supplied with the installation on the server in the “\FAST” folder on the
drive you installed F.A.S.T. on. You can edit this template to format your
company’s letter head. Make sure the this template file is in the “C:\FAST”
folder on the machine that the F.A.S.T. Process Engine runs on.
Dot Matrix Printers
•
•
Listings
General Reports
Will automatically be directed to the screen. You will then have the facility
to print a hard copy. This output will be directed to printer port 1 or LPT1.
•
•
•
Purchases
Invoices
POS Till Slips
Will automatically be printed to the default printer port specified, if you
have selected “No” on the “Prompt To Print” field on the module
WORKSTATION SETUP for the workstation you are working on.
Otherwise you have the option of printing these documents. Again the
output will be directed to default printer port specified on the module
WORKSTATION SETUP for the workstation you are working on.
•
•
•
•
•
•
•
•
•
Payments
Debit Notes
Quotations
Job Cards
Sales Orders
Credit Notes
Point-Of-Sale Refunds
End Of Day Reports
Month End Reports
Will automatically be directed to printer port 1 or LPT1.
39
Printing Standards
F.A.S.T.
SYSTEM STANDARDS
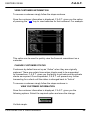
5. ACCESSING THE SYSTEM
LOGGING INTO WINDOWS
Once you’ve switched on the workstation, Windows will prompt you for
your User Name and Password. Complete these fields with the
allocated User Name and Password. If you have problems logging in,
check with your designated system administrator as to why you are
having difficulty on accessing the network. For example, the network
cable from your machine to the file server could be faulty or your User
Name or Password was entered incorrectly.
After having successfully logged into Windows, on your Windows
Desktop you should see the following icon. Either
Double-Click (LEFT Button on your mouse) on this icon
Or
Single-Click (LEFT Button on Your mouse) and then hit the Enter ◄─┘key
(on your keyboard) on this icon.
F.A.S.T.
Printing Standards
40
F.A.S.T.
ACCESSING THE SYSTEM
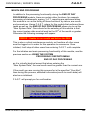
LOGO AND CONTACT INFORMATION
This is the first screen you will see. It is the entry point into F.A.S.T. It
contains the logo and contact information (top) for F.A.S.T. There is a 5
second delay here. To continue without having to wait for the pause just
press any key on the keyboard.
41
Logging into Windows
F.A.S.T.
SYSTEM STANDARDS
USER LOGIN
To proceed to F.A.S.T.’s main menu, a security screen must be
completed. If you do not have a valid Access I.D. contact your
designated system administrator. Without having completed these
details, further access to the system will not be allowed.
On completing the login screen details successfully, a welcome
message will be displayed to you.
The following table represents an input field map for this screen :
Field
Access I.D.
Password
Attributes
12 alpha
8 alpha
Description
Must be input.
Must be input.
For details on the entering of a new password see the following section:
USING THE SYSTEM
UTILITIES
USER FILE MENU
CHANGE PASSWORD
Accessing Modules
42
F.A.S.T.
REFERENCE CODES
ACCESSING MODULES
Congratulations you have successfully accessed F.A.S.T. !!!
You can now navigate your way though F.A.S.T.’s overlapped menus.
Each menu or sub menu displays six modules at a time. The main
menu is your initial navigation point. From this menu all modules are
accessible. As explained earlier, on all menu screens, your company name
appears at the top right corner of the data area of the screen.
If you are unclear of what keys are available to you for navigation
through the menus, see the following section :
SYSTEM STANDARDS
MENU STANDARDS
Menu Item Selection
Access to modules, in terms of security, is also controlled by the menu
function of the system. If your Access I.D. does not have sufficient
security equivalences to gain access to a certain module which you
have selected the following error message will appear.
ERROR – Sorry : Your status on this module is Exclude.
43
Introduction
SYSTEM STANDARDS
F.A.S.T.
6. REFERENCE CODES
Introduction
The modules listed on this menus allow you to define certain codes that
are used as cross references to items, suppliers and customers. For
example, Sales Rep information can be inserted and changed. One of the
required fields for completing an invoice is a Sales Rep code. Therefore
a cross reference link between invoices and Sales Reps will exist.
REFERENCE CODES
44
F.A.S.T.
REFERENCE CODES
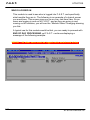
PAYMENT METHOD DATA MAINTENANCE
On installation F.A.S.T. sets up the following default payment methods:
•
AWAITING PAYMENT
•
BANK TRANSFER
•
CASH
•
CHEQUE
•
CREDIT CARD
If you require F.A.S.T. to cater for more, they are defined using this
module. For example, if your company sells vouchers and then accepts
them for payment but requires a separate total for this type of payment
you would define this type of payment here, then it will be available in any
other module within the system where required. Once you have entered a
“Payment Method” that already exists, the system will automatically switch
to “ Change “ mode and allow you to change the description of the
Payment Method. If you have typed in a “Payment Method” that does not
exist, the system will automatically switch to “ Add “ mode. The mode
switch will appear in the data section of the screen. If your access level is
set to “Display Only” on this module, the following error message will
appear and the above will not apply to data maintenance.
WARNING – Sorry : You are unauthorised for update.
To obtain a list by “Payment Method” on file, simply press the “ F1 “ key
on the “Payment Method Code” field. This list can now be enquired upon
alphabetically.
45
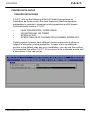
SALES REP DATA MAINTENANCE
REFERENCE CODES
F.A.S.T.
SALES REP DATA MAINTENANCE
Sales reps within F.A.S.T are defined and maintained using this module.
F.A.S.T. sets up the following default Sales reps :
•
POINT OF SALE TILL TOTAL
If you have set the “POS - Use Sales Rep Code” option to
“No” on the WORKSTATION SETUP, F.A.S.T. will default
the Sales Rep Code to this one on all Point-Of-Sale
Transactions. Otherwise you can select the Sales Rep.
•
CASH SALES
If you do not require Sales Reps to be set up, when
capturing an invoice, select this sales rep code when
required to input one.
The following statistical information is available on all Sales Reps.
•
YEARLY SALES ON ACCOUNT
•
YEARLY SALES ON CASH
•
YEARLY PAYMENTS OF ACCOUNTS
•
YEARLY SETTLEMENT DISCOUNTS
This information gives you indication of the quality of clients your Sales
Reps are targeting. It’s all fine and well if your Sales Rep brings in the
turnover, but indication of a quality client is the way they conduct
their payments as this effects cash flow on any business. To view this
information, simply press the “ F2 “ key on the “Sales Rep Description”
field.
ITEM PRICE LINK MAINTENANCE
46
F.A.S.T.
REFERENCE CODES
ITEM PRICE LINK MAINTENANCE
MAINTAIN LINK DESCRIPTIONS
Items are grouped in categories within F.A.S.T. In order to set up a
common link for items that belong to different categories, F.A.S.T.
provides you with a “Price Link Code”. This Price Link Code can be
included when setting up an item. This allows you to then automatically do
price changes across the board for just that Price Link Code. A typical
example of this is, say you import certain goods from another country.
You can set up a price Link Code as being a common code for the
currency of that country, even if the types of items belong to different
categories. When the exchange rate moves and you need to increase or
decrease the current pricing of all goods imported from that country, you
can then select the MAINTAIN LINK RATES module and easily do price
changes.
Once you have entered an “Item Price Link Code” that already exists, the
system will automatically switch to “ Change “ mode and allow you to
change the description of the Item Price Link. If you have typed in an
“Item Price Link Code” that does not exist, the system will automatically
switch to “ Add “ mode. The mode switch will appear in the data section of
the screen. To obtain a list by “Item Price Links” on file, simply press the
“ F1 “ key on the “Item Price Link Code” field. This list can now be
enquired upon alphabetically.
47
SALES REP DATA MAINTENANCE
REFERENCE CODES
F.A.S.T.
MAINTAIN LINK RATES
To do an automatic price change on any item that is linked to a specific
Price Link Code, simply select the Price Link using this module and enter
the percentage you want F.A.S.T. to either increase or decrease for the
Price Link. Once you have confirmed the input, F.A.S.T. will automatically
go through all items linked to the selected Price Link Code and adjust the
pricing relatively.
To obtain a list by “Item Price Links” on file, simply press the “ F1 “ key on
the “Item Price Link Code” field. This list can now be enquired upon
alphabetically.
ITEM PRICE LINK MAINTENANCE
48
F.A.S.T.
REFERENCE CODES
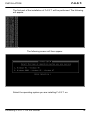
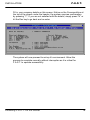
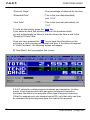
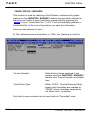
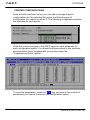
REFERENCE CODES REPORTS
The following reports are available on this menu :
PAYMENT METHOD DATA LISTING
This is a list of Payment Methods on File.
Report Sequence, Payment Method Description
Payment Method Code
Payment Method Code
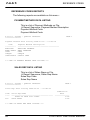
F.A.S.T. System - QUALITY PRODUCTS
===============
PAGE 1
Payment Method Data Listing 2004-01-01 : 21:43:19
Code
---------AWAITING
BANK TRANS
CASH
CHEQUE
CREDITCARD
Payment Method Description
---------------------------------------AWAITING PAYMENT
BANK TRANSFER
CASH
CHEQUE
CREDIT CARD
*** END OF PAYMENT METHOD DATA LISTING ***
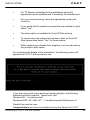
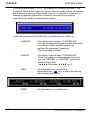
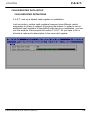
SALES REP DATA LISTING
This is a list of Sales Reps on File.
Report Sequence, Sales Rep Name
Sales Rep Code
Sales Rep Name
F.A.S.T. System - QUALITY PRODUCTS
===============
PAGE 1
Sales Rep Data Listing 2004-01-01 : 21:48:22
Code
---001
Sales Rep Name
---------------------------------------POINT OF SALE TILL TOTAL
CASH SALES
Commission
Rate
-------------0.00
0.00
*** END OF SALES REP DATA LISTING ***
49
ITEM PRICE LINK MAINTENANCE
REFERENCE CODES
F.A.S.T.
7. STOCK CONTROL
Introduction
This is the section of F.A.S.T. where item information is set up and can
be changed or removed. Items are categorised within Product Groups and
Item Groups. Information of all items such as cost and selling price or
minimum reorder levels are all found and can be added or changed using
these modules.
In addition to the product type being either a product or service, F.A.S.T.
gives you an additional parameter list for Additional Cost Codes, for
example : Labour, Transport etc.
There is a section to identify packages that do not require any cost
information but only monitoring in terms of stock levels.
Within the reports menu, listing can be generated that give you specific
Information about stock, for example, a reorder listing to see “what items
are we running low on” or “What do we need to order”. Also, what is the
value of stock on hand.
REFERENCE CODES REPORTS
50
F.A.S.T.
STOCK CONTROL
ITEM PRODUCT GROUP MAINTENANCE
Items are identified within the following Item Structure in F.A.S.T. :
PRODUCT GROUP
ITEM GROUP
ITEM DETAIL
An example of this would be :
RESALE
BISCUITS
BAKERS EET-SUM-MOR ORIGINAL
Before you identify any item detail in F.A.S.T., you have to identify
the item’s main Product Group and Item Group (Category). This is
the module where Product Groups are identified. Product Groups need
only be set up once in F.A.S.T.
The standard enquiry and maintenance functions are available as they
are in all other modules. In addition, if you select a “Product Group Code”
that has any Item Group cross references, F.A.S.T. will automatically
switch to “ Change “ mode and allow you to change the description of
the “Product Group Description”. Otherwise F.A.S.T. will give you the
option to “ Delete “ the selected Product Group. This is helpful to correct
any capturing errors.
51
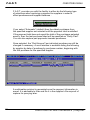
38BIntroduction
STOCK CONTROL
F.A.S.T.
ITEM GROUP DEFINITION MAINTENANCE
This is the module that you use to set up Item Group Codes that fall
within Product Groups (See previous section on Item Structure).
Many Item Groups can exist for one Product Group and Many Items can
exist for each Item Group.
The standard enquiry and maintenance functions are available as they
are in all other modules. In addition, if you select an “Item Group Code”
that has any Item Code cross references, F.A.S.T. will automatically
switch to “ Change “ mode and allow you to change the description
of the “Item Group Description”. Otherwise F.A.S.T. will give you the
option to “ Delete “ the selected Item Group. This is helpful to
correct any capturing errors.
ITEM DATA MAINTENANCE
52
F.A.S.T.
STOCK CONTROL
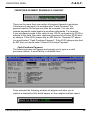
ITEM DATA MAINTENANCE
MAINTAIN ITEM DESCRIPTIONS
This is the module where items are defined and all details relative
to an item are maintained. Before entering the “Item Code”, the
“Item Group Code” must be entered. Notice that the “Product Group Code”
makes up the first two characters of the “Item Group Code”. If you enter
an “Item Group Code” and “Item Code” combination that does not exist,
F.A.S.T. will automatically switch to “ Add “ mode. If the “Item Group Code”
and “Item Code” combination does exist then, if F.A.S.T. finds any cross
references to this item, it will will automatically switch to “ Change “ mode
and allow you to change the description and all other details of the item.
Otherwise F.A.S.T. will give you the option to either “ Change “ or
“ Delete “ the selected Item. This is helpful to correct any capturing errors.
53
“Bar Scan Code”
- Can be used either for the actual bar code of an
item or a short code to help accessing of the
item. You actually do not have to remember a
single code within F.A.S.T. as it gives you the
ability to search on the name or description of
any detail. F.A.S.T. checks for duplicates and
displays warning messages for these conditions.
“List on Web Site”
- F.A.S.T. has the ability to generate data in order
for you to supply your service provider with the
latest detail of your items to update your website
with.
ITEM GROUP DEFINITION MAINTENANCE
F.A.S.T.
STOCK CONTROL
“Bin Location”
- Shelf Number.
“Price Link Code”
- The code that links items for auto price changes.
“Number Per Sale Unit” - Normally defaulted to 1.This is the pack quantity.
“Item Type”
- Either a “Product” or “Service”. A pick-list gives
you these options to choose from.
“Last/Prevs. Cost Price” - The price you last paid purchasing this item
from a supplier and the price you paid previous
to that. You can either manually change these
amounts if you do not require to use the
Creditors modules. However if you do, then
F.A.S.T. will automatically update these amounts
when you capture supplier invoices.
“Profit Marg. Markup %” - The markup percentage for the item. When this
percentage is entered, the “Theoretical” Retail
Price (Excl. V.A.T.) is calculated and displayed.
“Automatic Pricing”
- If you set this option to “Yes” the retail price of
an item will be recalculated according to the
“Profit Marg. Markup %” the next time the cost
price is input while capturing a supplier’s invoice.
“Retail Price”
- The price of an item can be input either including
or excluding V.A.T. If input including, F.A.S.T.
will automatically calculate the retail price
excluding. Notice on the above example that the
calculated markup percentage is below the
intended captured markup percentage. When
this occurs the actual markup percentage flashes
in the error colour as it is a warning guideline of
incorrect pricing of an item. Up to four decimal
places can be captured for the retail price.
“Minimum Reorder Qty” - Minimum stock level on hand
ITEM DATA MAINTENANCE
54
F.A.S.T.
STOCK CONTROL
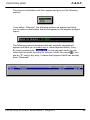
Item Pricing / Discount Structures
After capturing the retail price, the following window will pop up, allowing
you to input the pricing and/or discount structure of an item.
Each debtor in F.A.S.T. is set up with a pricing structure indicator. When
Invoicing a client, the correct price and/or discount is then pulled in as the
default price for the item. There are a total of 10 pricing structures in
addition to the standard retail price available for an item. Just like the
“Retail Price”, these amounts can be entered in either including or
excluding V.A.T. again, if including, the excluding price will automatically
be calculated.
Item Searching
There are one of three ways to access existing Items for editing.
On the “Item Group Code” field, you can press the “ F2 “ key and the
system will display the following pop-up input windows to allow you to
either scan the “Bar Scan Code” in with a hand held scanner or enter
it in.
55
ITEM DATA MAINTENANCE
STOCK CONTROL
F.A.S.T.
On the “Item Group Code” field, you can also press the “ F1 “ key
and the following selection pick-list will appear prompting you how
you would like to sort items for searching.
When searching for items Alphabetically, as you press each key, F.A.S.T.
will start close matching your keystrokes and home in on what you are
searching for by the “Item Description” field. For example, if the item you
were searching for is COKE 340ML CAN and as you typed in C O K E,
with each keystroke F.A.S.T. will search accordingly and show you the
search criteria. Here is a screen example :
Notice the Search criteria in the bottom left corner as you type in
When searching for items by Category, a scroll window listed by category
will firstly appear, once you have selected the category, an item scroll
window will appear and as you press each key, F.A.S.T. will start close
matching your keystrokes and home in on what you are searching for by
the “Item Code”.
ITEM DATA MAINTENANCE
56
F.A.S.T.
STOCK CONTROL
These scroll windows have the following other enquiry functions built in :
Scroll using Right and Left Arrow Keys - View “Retail Price” (Excl. V.A.T.)
“Last Cost Price”
“Prevs. Cost Price”
“Profit Marg. Markup %”
F4 Key
- View summary info (see below)
Item Statistical Information
The following statistical information is available on all items.
•
YEARLY PURCHASE STATISTICS
QUANTITY ON ACCOUNT
QUANTITY ON CASH
AMOUNT (Excl. V.A.T.) ON ACCOUNT
AMOUNT (Excl. V.A.T.) ON CASH
•
YEARLY SALES STATISTICS
QUANTITY ON ACCOUNT
QUANTITY ON CASH
AMOUNT (Excl. V.A.T.) ON ACCOUNT
AMOUNT (Excl. V.A.T.) ON CASH
This information helps you to plan the purchasing of an item as it gives
you a view of how long items stay in-house before moving and the relative
amounts generated from purchasing and selling accordingly. To view this
information, simply press the “ F2 “ key on the “Item Description” field.
57
ITEM DATA MAINTENANCE
STOCK CONTROL
F.A.S.T.
ITEM STOCK UPDATE
You can manually update the stock levels or automatically via a
download from a hand-held programmable scanner.
Manual Stock Update
The manual stock update screen looks identical to the
MAINTAIN ITEM DESCRIPTIONS module. Once you have selected an
item for update, you are taken directly to the “Quantity In Stock” field. If
you are scrolling through the items you can then easily change the stock
by pressing the “ F3 “. The following window will pop up showing you the
item and provide you with a “Stock Qty.” field to allow you to change the
quantity of stock on hand.
ITEM DATA MAINTENANCE
58
F.A.S.T.
STOCK CONTROL
Programmable Scanner Stock Update
The three following options are available for this type of update :
•
Stock Take
- This update replaces the current stock
quantity from the downloaded quantity
•
Stock Out
- This update subtracts the downloaded
quantity from the current stock quantity
•
Stock In
- This update adds the downloaded
quantity to the current stock quantity
With all these options an exception report (see example below)
is produced that helps you to trace problem areas in terms of
compatibility of items stored on the scanner and those set up
in F.A.S.T. A backup of the download from the scanner is generated.
F.A.S.T. protects against running the same download twice. For
example, on a stock-out or stock-in update, you do not want to run the
same download twice as this would generate incorrect stock levels.
59
ITEM DATA MAINTENANCE
STOCK CONTROL
F.A.S.T.
ITEM INGREDIENTS / RAW MATERIALS
F.A.S.T. provides you with an easy-to-use way of setting up how an
item is made up.
Basically all you have to do is specify the finished item in the
“Item Main Code”. Now specify the item that forms part of the finished
item in the “Item Sub Code” and the quantity or how much of this sub
item the finished item consists of. Think of the sub items as bulk stock
items. For each finished item this process has to be followed for each
item that goes in to making it up. When you invoice an item the rules
set up in this module are considered when F.A.S.T. updates the quantity
in stock of an item.
ITEM DATA MAINTENANCE
60
F.A.S.T.
STOCK CONTROL
ADDITIONAL COSTS DATA MAINTENANCE
As mentioned in previous sections, the type of an item can be specified.
F.A.S.T. provides an additional module to allow you to set up other types
of items and not mix them with your standard product lines. Once you have
entered an “Additional Cost Code” that already exists, the system will
automatically switch to “ Change “ mode and allow you to change the
description of the Additional Cost. If you have typed in an “Additional Cost
Code” that does not exist, the system will automatically switch to “ Add “
mode. The mode switch will appear in the data section of the screen.
To obtain a list by “Additional Costs” on file, simply press the “ F1 “ key
on the “Additional Cost Code” field. This list can now be enquired upon
alphabetically. The following statistics are available on these items can be
viewed by simply pressing the “ F2 “ key on the “Additional Cost
Description” field.
61
•
YEARLY PURCHASE STATISTICS
QUANTITY ON ACCOUNT
QUANTITY ON CASH
AMOUNT (Excl. V.A.T.) ON ACCOUNT
AMOUNT (Excl. V.A.T.) ON CASH
•
YEARLY SALES STATISTICS
QUANTITY ON ACCOUNT
QUANTITY ON CASH
AMOUNT (Excl. V.A.T.) ON ACCOUNT
AMOUNT (Excl. V.A.T.) ON CASH
PACKAGE DATA MAINTENANCE
STOCK CONTROL
F.A.S.T.
PACKAGE DATA MAINTENANCE
MAINTAIN PACKAGE DESCRIPTIONS
F.A.S.T. provides you with modules to set up and monitor packages
without any cost considerations. In other words, just to keep a stock
count of say plastic bags or pallets.
Once you have entered a “Package Code” that already exists, the
system will automatically switch to “ Change “ mode and allow you to
change the description of the Package. If you have typed in a “Package
Code” that does not exist, the system will automatically switch to “ Add “
mode. The mode switch will appear in the data section of the screen. To
obtain a list by “Package Codes” on file, simply press the “ F1 “ key on the
“Package Code” field. This list can now be enquired upon alphabetically.
PACKAGE DATA MAINTENANCE
62
F.A.S.T.
STOCK CONTROL
PACKAGE STOCK UPDATE
This module allows you to adjust the quantity in stock of existing
packages. Once you have selected a package for update, you are taken
directly to the “Adjustment Amount” field. The amount you input here will
adjust the “Quantity In Stock” field accordingly. To obtain a list by
“Package Codes” on file, simply press the “ F1 “ key on the “Package
Code” field. This list can now be enquired upon alphabetic
63
PACKAGE DATA MAINTENANCE
STOCK CONTROL
F.A.S.T.
STOCK CONTROL REPORTS
ITEM DATA / STOCK LISTING
The following reports are available on this menu :
Normal Item Listing
This is a list of all items on file. Items with low stock levels are
denoted by an asterisk ( ).
Report Sequence, Item Group Code by Item Code
Item Group Description
Bin Location
Item Code
Item Description
Minimum Reorder Quantity
Quantity In Stock
Price List
This is a price list of all items on file. Items with low stock levels
are denoted by an asterisk ( ). This report is available only to
SUPERVISOR type users.
Report Sequence, Item Group Code by Item Code
Item Group Description
Item Code
Item Description
Quantity In Stock
Retail Price Excluding V.A.T.
Retail Price Including V.A.T.
STOCK CONTROL REPORTS
64
F.A.S.T.
STOCK CONTROL
Reorder Listing
This is a list of all items on file that have stock levels lower than
The minimum reorder quantity.
Report Sequence, Item Group Code by Item Code
Item Group Description
Bin Location
Item Code
Item Description
Minimum Reorder Quantity
Quantity In Stock
Stock Take Listing
This is a list of all items on file without headers.
Report Sequence, Item Group Code by Item Code
Item Group Description
Bin Location
Item Code
Item Description
Minimum Reorder Quantity
Quantity In Stock
Print Labels
The following input screen allows you to print labels
for either all items, a specific one or a specific Item Group
Report Sequence, Item Group Code by Item Code
Item Group Code
Item Code
Item Group Description
Item Description
65
STOCK CONTROL REPORTS
STOCK CONTROL
F.A.S.T.
Export To Website
This option produces SQL type scripts for you to supply your
service provider as input into your website
Item Group Export Sequence, Item Group Description
Item Group Description
Item Export Sequence, Item Group Code by Item Code
Item Code
Item Description
Item Group Description
Retail Price Excluding V.A.T.
Number Per Sale Unit
Item Make-Up
This is a list of all items on file that are made up from other
items in specific quantities.
Report Sequence, Main Item Code by Sub Item Code
Main Item Code
Main Item Description
Sub Item Code
Sub Item Description
Quantity
ITEM STOCK VALUE REPORT
This report gives you a value of stock on hand by category based
on last cost price of items and gives you totals per category
and a grand total at the end.
Report Sequence, Item Group Code by Item Code
Totals by Item Group Code, Grand Total
Item Group Description
Item Code
Item Description
Quantity In Stock
Last Cost Price
Stock Value
STOCK CONTROL REPORTS
66
F.A.S.T.
STOCK CONTROL
ADDITIONAL COSTS DATA LISTING
This is a list of all Additional Costs on file.
Report Sequence, Additional Cost Description
Additional Cost Code
Additional Cost Description
Price
V.A.T. Percentage
PACKAGE DATA LISTING
This is a list of all Packages on file.
Report Sequence, Package Description
Packages Code
Package Description
Minimum Reorder Quantity
Quantity In Stock
67
STOCK CONTROL REPORTS
CREDITORS MENU
F.A.S.T.
8. CREDITORS MENU
Introduction
This is the section of F.A.S.T. where the following is maintained :
•
Supplier information is set
•
Invoices from suppliers are captured
•
Goods returned to suppliers and price credits are captured
•
Payments to suppliers are captured and reversed
This sections contains a host of reports that allow you to reconcile
information communicated to you from suppliers to ensure that what
you actually owe the supplier is true and correct. Other reports included
in this section help you to analyse item information relative to suppliers.
Introduction
68
F.A.S.T.
CREDITORS MENU
SUPPLIER DATA MAINTENANCE
ADD A SUPPLIER
This module is used to add suppliers.
F.A.S.T. sets up the following default Suppliers :
•
CASH PURCHASES
This supplier can be used for all CASH purchases that you
do not need to keep detail records on individually
F.A.S.T. automatically allocates a supplier code when you capture
supplier information. It is made up from the first 5 characters of the
” if none). At the end of capturing
name plus the initials(defaulted to "
the supplier information on this screen, a three digit sequence number
will be allocated to the end of the “Supplier Code” ensuring that each
supplier you capture has a unique code. For example in the above, if
“UPMARKET SUPPLIERS” was the given the code “UPMAR**000”
and you then captured another supplier say “UPMARINE SHIPPING”
then F.A.S.T. will generate the code “UPMAR**001” for
“UPMARINE SHIPPING”.
You need not remember a supplier code but rather know the name of
the supplier when accessing the supplier after it has been set up as
F.A.S.T. gives you the facility of searching alphanumerically by name.
69
SUPPLIER DATA MAINTENANCE
F.A.S.T.
CREDITORS MENU
Fields of important consideration :
“Initials”
- If left blank, it will be defaulted to two asterisks
”).
("
“V.A.T. registration No.” - F.A.S.T. checks for duplicates on this field to
prevent duplication. If duplicates are found
then the following message is displayed.
ERROR : Already on file–Check UPMAR**000(UPMARKET MANUFACTURING)
“Terms”
- Terms of Payment. This option will be the default
when capturing suppliers invoices in the
PURCHASES module.
“Sett. Discount”
- Settlement Discount. This percentage is used
when calculating the amounts for early
settlement type discounts.
“Discount”
- This is the blanket discount percentage provided
from the supplier.
“Print Detail V.A.T.”
- Two options available :
•
Included – No separate V.A.T. column
when printing purchase confirmation.
•
Separate (Default) – A separate V.A.T.
column is listed when printing purchase
confirmation.
“Statements”
- This option tells F.A.S.T. how you would like to
communicate Supplier Analysis reports to the
supplier.
SUPPLIER DATA MAINTENANCE
70
F.A.S.T.
CREDITORS MENU
CHANGE SUPPLIER INFORMATION
This module is used to change information on a supplier except
the name and initials as they are cross referenced fields.
You either simply type in the “Supplier Code” or press the “ F1 “
key and enquire on suppliers by name. By pressing the first letter of
the supplier’s name F.A.S.T. will close search for you.
Once selected, all fields from “Contact” can be changed.
VIEW SUPPLIER INFORMATION
To access a supplier simply follow the steps as above
Once the supplier information is displayed, F.A.S.T. gives you the option
of pressing the “ F2 “ key to view balances for that supplier. For example.
This option can be used to quickly view the financial commitment on a
supplier.
71
SUPPLIER DATA MAINTENANCE
F.A.S.T.
CREDITORS MENU
PURCHASES
PURCHASES / ENQUIRY
This is the module where you capture invoices from your suppliers.
To generate a new purchase all you have to do is press the “ Enter “ key
on the “Purchase Number “ field. F.A.S.T. will automatically generate a
purchase number at the end of input when you save the information.
There are three sections of input :
1) The supplier information, or “Who” I purchased from.
“Supplier Source”
- The “Supplier Code” is the supplier who is
invoicing you and the “Supplier Source” is where
the goods were collected or delivered from. For
example, head office invoices you but the actual
goods were collected from a branch of the group.
“Purchase Date”
- The date of purchase is defaulted to from the
system date.
“Terms”
- Terms of payment. This is defaulted from the
option set up on the supplier data screen.
PURCHASES / ENQUIRY
72
F.A.S.T.
CREDITORS MENU
“Order Number”
- This field must be filled in if the terms of payment
is anything but “Cash Purchase”.
“Order Date”
- This date defaults to the system date but
can be changed to, for example, the invoice
date.
“Invoice”
- This is suppliers invoice number. F.A.S.T.
checks for duplicates on this once you have
entered it. This field appears on the supplier
analysis as per the purchase.
2) “What” items did I purchase on this invoice.
This is where you capture the items, quantities and cost price of the
purchase. If you selected “Yes” on the “Bar Code Scanner” field on
WORKSTATION SETUP for the workstation you are working on, the
“Bar Code” field, as above will be displayed. Otherwise the item
“Group Code” and “Item Code” will be the means of accessing items.
Using the “Bar Code” field, you can either scan the code with a hand-held
scanner or type it in if you know it. Otherwise, by typing a few letters of the
description or pressing the “ F1 “ key, F.A.S.T. will list items
alphanumerically for selection and give you a “ Search Criteria : “ field to
easily find items.
73
PURCHASES / ENQUIRY
CREDITORS MENU
F.A.S.T.
Once the item has been selected, further details for it can be captured by
simply pressing the “ F2 “ key and the following will appear for input.
“Quantity Per Unit”
- Pack size. Defaulted from item set up.
“Quantity Of Units”
- How many have been purchased.
“Price Per Item”
- This is the cost price of the item as it
listed on the supplier’s invoice.
Once the “Price Per Item” has been input, and if you are a supervisor
type user, the following input window will appear :
This input window allows you to change the retail price while you are
capturing the suppliers invoice in the event that the cost of an item has
changed. It shows you the “CURRENT” pricing and the “NEW”. You can
either enter in the “NEW” retail price excluding V.A.T. or Including V.A.T.
where the price Excluding will be calculated for you. If, on the setting up
of the item, you specified “Yes” to “Automatic Pricing” then the new retail
price will be automatically calculated for you by the new cost price(that
you have entered) and the “Profit Marg. Markup %”. This new price will
only be effected providing it is greater than the “CURRENT” one.
Otherwise this price will default to the existing retail price but still allow
you to change it.
PURCHASES / ENQUIRY
74
F.A.S.T.
CREDITORS MENU
“Discount %age”
- The percentage of discount for the item.
“Extended Price”
- This is the line total(calculated)
excl. V.A.T.
“Line Total”
- This is the line total (calculated) incl.
V.A.T.
To void an item simply press the “ F5 “ key.
If you select an item that already exists on the purchase detail,
you will automatically be taken to that line where the item is and to the
“Quantity Of Units” field.
Once you have pressed the “ F3 “ key to save the information on the
purchase, a total summary will appear and then, if the terms of payment
is “Cash Purchase”, the following screen will appear.
3) “How Much” did I pay against this invoice.
F.A.S.T caters for multiple payment methods per transaction. In other
words, if two cheques and cash was given as payment towards a
purchase, the above is an example of this type of payment summary.
If then for example only one cheque has an RD, only that entry can then
be reversed, the entire payment does not need to be reversed.
75
PURCHASES / ENQUIRY
CREDITORS MENU
F.A.S.T.
“Payment Method”
- Selected from those set up in the
system.
“Details”
- Any details relative to the payment
method. Eg. EFT No. or cheque number.
“Amount”
- The amount of the payment method.
The decimal does not need to be
captured. The “ Del “ key on the numeric
pad on the left of the keyboard is used
for a double zero (“00”).
If the “TENDERED” amount is zero, F.A.S.T. will automatically change the
“Payment Method” to “AWAITING”.
Once the payment summary information is captured simply press the
“ F3 “ key to save the input. All information will be saved and all other
relevant information will be updated. If you selected “Yes” on the
“Prompt To Print” field for the “Purchase Printer” field under “ Purchases “
on WORKSTATION SETUP for the workstation you are working on, then
the following prompt will appear. Otherwise a confirmation of the capture
will be printed.
It is advisable to staple this confirmation printout to the original invoice
and file it in the supplier’s file as proof of capture for querying later.
PURCHASES / ENQUIRY
76
F.A.S.T.
CREDITORS MENU
To access an existing purchase, simply type in the “Purchase Number”
that was generated by F.A.S.T. or press the “ F1 “ key. The following
scroll list by Supplier Code by Date and By Purchase Number will be
displayed.
Notice the status. Any Payment or Credit Note transaction effects this
status, so you can monitor right down to the purchase level, what is
outstanding for payment and what is settled. The “ Search Criteria : “ field
helps you to quickly get to the supplier you are looking for purchases for.
If you call up an existing purchase, you then have the ability to :
77
•
CHANGE
– Providing no payment or debit note has
been captured against it or it has not been
“CANCELLED”.
You can change anything on a purchase, even
the supplier code and the system will perform the
necessary updates to “Get Everything In Order”.
•
CANCEL
– Providing no payment or debit note has
been captured against it or it has not been
“CANCELLED”.
Once Cancelled, a purchase can then only ever
be “VIEWED” or “PRINTED” and will be printed
Cancelled
” on it.
in bold with "
PURCHASES / ENQUIRY
F.A.S.T.
CREDITORS MENU
•
VIEW
– All information on a purchase.
By pressing the “ F9 “ key, a total summary as
the following will appear.
•
PRINT
– All information on a purchase.
The following PURCHASE STATUS conditions are catered for :
•
•
•
•
•
•
Unpaid
Partly Paid
Payment Reversed
Paid In Full
Settled Early
Cancelled
PURCHASES / ENQUIRY
78
F.A.S.T.
CREDITORS MENU
DEBIT NOTES / GOODS RETURNED
This module is used for capturing Credit Notes from a supplier. A new
Debit Note is generated by pressing the “ Enter “ key on “Credit Note No.”.
F.A.S.T. will automatically generate a Credit Note No. at the end of input
when you save the information.
There are two sections of input :
1) The supplier/invoice information, or “Who” is crediting me.
“Purchase Number”
- Selected from those captured in the
system only. A scroll window is available
here.
“Comments”
- The Supplier’s invoice number is
defaulted here but can be added to or
changed.
“Debit Note Type”
- Either “G.R.N.” (Goods Returned Note)
where stock quantities are updated or
“PRICE” where quantities captured do
not effect stock quantities.
Only valid purchase numbers can be used and not “Cancelled” ones.
79
DEBIT NOTES / GOODS RETURNED
CREDITORS MENU
F.A.S.T.
Items are selected as they are in capturing purchase information.
F.A.S.T. performs the following checks when you select items in this
module :
•
The item must appear on the purchase
•
The overall quantity that is captured cannot exceed more
than what was originally purchased. For example, if the original
purchase quantity was say 100 and you then captured a credit
note for 70, then again tried to capture a credit note for 40, you
will be unable to capture the last 40.
2) “What” items am I being credited for.
Scroll facilities are available here. The item must exist on the purchase.
The quantity cannot be more than what was originally purchased and the
total amount for the item cannot exceed the total purchase amount for that
item.
The amount and discount percentage that is defaulted for the item is what
was captured on the purchase. These can be changed though.
A confirmation printout is generated once this information is saved. It is
advisable to staple this document to the original credit note and file it in
the supplier’s file as proof of capture for querying later.
DEBIT NOTES / GOODS RETURNED
80
F.A.S.T.
CREDITORS MENU
If the purchase was paid, F.A.S.T. will display the following window. If the
supplier has credited your account instead of handing you a physical
payment, it would be necessary to capture a payment against the supplier
for the amount specified in the window following this module.
If you call up an existing Debit Note, you then have the ability to :
81
•
CHANGE
– Providing it has not been “CANCELLED”.
You can change anything on a debit note, even
the purchase number and the system will
perform the necessary updates to
“Get Everything In Order”.
•
CANCEL
– Providing it has not been “CANCELLED”.
Once Cancelled, a debit note can then only ever
be “VIEWED” or “PRINTED” and will be printed
Cancelled
” on it.
in bold with "
•
VIEW
– All information on a debit note.
By pressing the “ F9 “ key, a total summary as
the following will appear.
•
PRINT
– All information on a debit note.
DEBIT NOTES / GOODS RETURNED
F.A.S.T.
CREDITORS MENU
CREDITORS PAYMENTS
CREDITORS PAYMENT MAINTENANCE
This is the module where payments to suppliers are captured. Multiple
payment methods per transaction are available here as well.
“Payment Date”
- This date is defaulted from the system
date.
“Payment Type”
- The following options are available and
if “Early Settlement” is selected,
F.A.S.T. will automatically calculate the
“Sett. Disc. Tot.”
“Payment Amount”
- Gets calculated by the payment details
captured.
CREDITORS PAYMENTS
82
F.A.S.T.
CREDITORS MENU
F.A.S.T. provides you with the facility to either do the following type
of selections when capturing a payment to suppliers in order to
offset purchases and supplier balances :
If you select “Automatic” (default) then the oldest purchases from
the specified supplier are selected until the payment total is satisfied.
If the payment total does not equal the total of the purchases selected
exactly, then the last purchase listed will be specified as “Partly Paid”.
You can also capture part payments towards purchases.
Once selected, the “Paid Amount” per individual purchase can still be
changed if necessary. A scroll window is available listing the following
by supplier by date of purchase by purchase number, beginning with
the first purchase for the specified supplier.
A confirmation printout is generated once the payment information is
saved. It is advisable to then and file it in the supplier’s file as proof of
capture for querying later.
83
CREDITORS PAYMENT REVERSALS / ENQUIRY
CREDITORS MENU
F.A.S.T.
CREDITORS PAYMENT REVERSALS / ENQUIRY
There can be more than one section of payment towards a purchase.
If the terms of payment of a purchase was “Cash Purchase” the
payment section of this type can then be reversed. You can also
reverse payments made against a purchase afterwards. For example,
if you purchased goods to the value of say 100.00, and paid only 20.00 by
cheque at this time, then later captured a payment of a further 50.00 also
by cheque. If the 20.00 cheque has an RD then for “Reversal Of” above
you would select “Cash Purchase Payment”. If the 50.00 cheque also had
an RD then you would select “Account Purchase Payment”.
Cash Purchase Payment
The following screen will appear and prompt you to type in a valid
purchase number. A scroll facility is available here.
Once selected the following window will appear and allow you to
capture a description that would appear on the supplier analysis report.
CREDITORS PAYMENTS
84
F.A.S.T.
CREDITORS MENU
The following payment summary that was originally captured will
appear and allow you to select one or more payment details, if any.
By simply pressing the “ Space Bar “ on the payment detail you can
select and de-select the entry for reversal. Under the column , if you
see an “R” next to any entry, it means that payment detail has already
been “Reversed”.
Once you have selected all payment details that you need to reverse
simply press the “ F3 “ key to save the information.
Account Purchase Payment
The following scroll window will appear listing all payments by supplier
allowing you to select one.
85
CREDITORS PAYMENT REVERSALS / ENQUIRY
CREDITORS MENU
F.A.S.T.
The payment information will then appear and give you the following
options :
If you select “Reverse” the following window will appear and allow
you to capture a description that would appear on the supplier analysis
report.
The following payment summary that was originally captured will
appear and allow you to select one or more payment details, if any.
By simply pressing the “ Space Bar “ on the payment detail you can
select and de-select the entry for reversal. Under the column , if you
see an “R” next to any entry, it means that payment detail has already
been “Reversed”.
CREDITORS PAYMENT REVERSALS / ENQUIRY
86
F.A.S.T.
CREDITORS MENU
CREDITORS REPORTS
The following reports are available on this menu :
SUPPLIER DATA LISTING
Normal Supplier Listing
This report lists all suppliers in a labelled format so that you
use this use this information to label your supplier files
Report Sequence, Supplier Name by Supplier Initials
Name
Initials
Code
Physical Address
Phone Numbers
FAX Number
V.A.T. Registration Number
Creditors Listing
This report shows ageing balances per Supplier
Report Sequence, Supplier Code
Name
Phone Numbers
FAX Number
Over 120 Day Balance
120 Day Balance
90 Day Balance
60 Day Balance
30 Day Balance
Current Balance
Total Outstanding
87
CREDITORS REPORTS
CREDITORS MENU
F.A.S.T.
CREDITORS PURCHASE SUMMARY
Supplier Report
This report extracts purchases captured into F.A.S.T. The following
parameter selections appear. Depending on what criteria you select here
will determine the type of information that will get reported.
Three types of Report Sequence extractions are possible :
Tag Selections are available on the “Purchase Terms” and
“Purchase Status” so you can selectively choose specific types
of records to report on.
You can also specify whether you would like to detail or just
summary(total) information.
CREDITORS REPORTS
88
F.A.S.T.
CREDITORS MENU
Report Sequence :
Purchase Number
Totals by Grand Total
Purchase Number
Supplier Invoice Number
Purchase Date
Supplier Code
Supplier Name
Purchase Amount
Accumulated Discount
Sub Total
V.A.T. Amount
Total
Paid To Date
Credit Note Total
Status
Report Sequence :
Supplier Code / Date Of Purchase / Purchase Number
Headed by Supplier Name
Totals by Supplier showing Total Payment Due, Grand Total
Purchase Number
Supplier Invoice Number
Purchase Date
Total
Paid To Date
Credit Note Total
Status
89
CREDITORS REPORTS
CREDITORS MENU
F.A.S.T.
Report Sequence :
Date Of Purchase / Supplier Code / Purchase Number
Totals by Date, Grand Total
Purchase Number
Supplier Invoice Number
Purchase Date
Supplier Code
Supplier Name
Purchase Amount
Accumulated Discount
Sub Total
V.A.T. Amount
Total
Paid To Date
Credit Note Total
Status
Item Report
This report extracts purchases and debits notes against items captured
into F.A.S.T. It gives you an indication of costing of items by Item Group
by Item by Date by Supplier. The following parameter selections appear.
Depending on what criteria you select here will determine the type of
information that will get reported. You can specify all Suppliers by simply
leaving “Supplier Code” blank or you can specify a Supplier to report on.
CREDITORS REPORTS
90
F.A.S.T.
CREDITORS MENU
Report Sequence :
Item Group by Item by Date Of Purchase by Supplier
Totals by Item, Item Group, Grand Total
Item Group Description
Item Description
Purchase Date
Supplier Code
Purchase Number
Supplier Invoice Number
Number Per Unit
Quantity
Price Per Unit
V.A.T. Percentage
Extended Price
V.A.T. Amount
Total
“Purchase” or “Debit Note”
CREDITORS PAYMENT SUMMARY
This report extracts payments captured into F.A.S.T. The following
parameter selections appear. Depending on what criteria you select here
will determine the type of information that will get reported.
91
CREDITORS REPORTS
CREDITORS MENU
F.A.S.T.
Three types of Report Sequence extractions are possible :
Report Sequence :
Payment Number
Totals by Grand Total
Payment Number
Payment Date
Supplier Code
Supplier Name
Payment Amount
V.A.T. Amount
Status
Report Sequence :
Supplier Code / Date Of Payment / Payment Number
Totals by Supplier, Grand Total
Payment Number
Payment Date
Supplier Code
Supplier Name
Payment Amount
V.A.T. Amount
Status
Report Sequence :
Date Of Payment / Supplier Code / Payment Number
Totals by Date Of Payment, Grand Total
Payment Number
Payment Date
Supplier Code
Supplier Name
Payment Amount
V.A.T. Amount
Status
CREDITORS REPORTS
92
F.A.S.T.
CREDITORS MENU
SUPPLIER ANALYSIS
This report is useful to reconcile statements you receive from your
suppliers. It gives you a breakdown of all transactions captured
against creditors within F.A.S.T. It shows invoice numbers next to
purchases and payment details next to payment transactions to make
it easy to reconcile your account with the supplier. It also gives you a
summary of transactions and an ageing summary to help with
reconciliation of accounts.
You can select either a specific supplier or all by pressing the “ Enter “
key on “Supplier Code”. You can specify a date range for transaction
extraction as well. Below is an example of a typical supplier analysis.
93
CREDITORS REPORTS
DEBTORS MENU
F.A.S.T.
9. DEBTORS MENU
Introduction
This is the section of F.A.S.T. where the following is maintained :
•
Customer information is set
•
Quotations to customers are captured
•
Job Cards for customers are captured
•
Sales Orders for customers are captured
•
Invoices to customers are captured
•
Goods returned from customers and price credits are captured
•
Payments from customers are captured and reversed
•
Point-Of-Sale Transactions are captured
This sections contains a host of reports that allow you to reconcile
information that you communicate to your customers
Introduction
94
F.A.S.T.
DEBTORS MENU
CUSTOMER DATA MAINTENANCE
ADD A CUSTOMER
This module is used to add customers.
F.A.S.T. sets up the following default Customers :
•
POINT OF SALE TILL TOTAL
If you have set the “POS - Use Customer Code” option to
“No” on the WORKSTATION SETUP, F.A.S.T. will default
the Customer Code to this one on all Point-Of-Sale
Transactions. Otherwise you can select the Customer Code.
•
CASH SALES
This customer can be used for all CASH invoices that you
do not need to keep detail records on individually. This customer
is the default one when capturing invoices.
F.A.S.T. automatically allocates a customer code when you capture
customer information. It is made from of the first 5 characters of the
” if none). At the end of capturing
name plus the initials(defaulted to "
the customer information on this screen, a three digit sequence number
will be allocated to the end of the “Customer Code” ensuring that each
customer you capture has a unique code.
95
CUSTOMER DATA MAINTENANCE
F.A.S.T.
DEBTORS MENU
For example in the above, if “INTERNATIONAL MERCHANTS” was the
given the code “INTER**000” and you then captured another supplier say
“INTERCONTINENTAL TRADING” then F.A.S.T. will generate the code
“INTER**001” for “INTERCONTINENTAL TRADING”.
You need not remember a customer code but rather know the name of
the customer when accessing the customer after it has been set up as
F.A.S.T. gives you the facility of searching alphanumerically by name.
Fields of important consideration :
“Initials”
- If left blank, it will be defaulted to two asterisks
”).
("
“Customer Type”
- You can set up different branches for the same
organisation as customers within F.A.S.T.
In order for goods to then be transferred from
one branch to another they can be invoiced at
cost if you set this indicator to “Cost Customer”.
When items are selected for invoicing to that
customer, the cost price of an item is defaulted.
“Telephone / FAX”
- If you are using F.A.S.T.’s automatic faxing
of statements to clients then ensure that all
special characters are omitted from the fax
number being used. See the Account’s
Department Details FAX Number as an example.
“email”
- If you are using F.A.S.T.’s automatic emailing
of statements to clients then ensure that the
email address being used is a valid one.
“Pricing Structure”
- This indicator will set default price of an item
for the client according to the item pricing
structure.
“V.A.T. registration No.” - F.A.S.T. checks for duplicates on this field to
prevent duplication. If duplicates are found
then the following message is displayed.
ERROR : Already on file–Check INTER**000(INTERNATIONAL MERCHANTS)
CUSTOMER DATA MAINTENANCE
96
F.A.S.T.
DEBTORS MENU
“Credit Limit”
- F.A.S.T.’s real-time credit limit checking ensures
that the amount specified here will not be
exceeded by any sale transaction.
“Terms”
- Terms of Payment. This option will be the default
when capturing invoices in the INVOICES /
ENQUIRY module.
“Sett. Discount”
- Settlement Discount. This percentage is used
when calculating the amounts for early
settlement type discounts.
“Discount”
- This is the blanket discount percentage provided
to the customer.
“Print Detail V.A.T.”
- Two options available :
•
Included – No separate V.A.T. column
when printing purchase confirmation.
•
Separate (Default) – A separate V.A.T.
column is listed when printing purchase
confirmation.
“Statements”
- This option tells F.A.S.T. how you would like to
communicate statements, automatically
generated at month, end to the customer.
CHANGE CUSTOMER INFORMATION
This module is used to change information on a customer except
the name and initials as they are cross referenced fields.
You either simply type in the “Customer Code” or press the “ F1 “
key and enquire on customers by name. By pressing the first letter of
the customer’s name F.A.S.T. will close search for you.
Once selected, all fields from “Customer Type” can be changed.
97
CUSTOMER DATA MAINTENANCE
DEBTORS MENU
F.A.S.T.
VIEW CUSTOMER INFORMATION
To access a customer simply follow the steps as above
Once the customer information is displayed, F.A.S.T. gives you the option
of pressing the “ F2 “ key to view balances for that customer. For example.
This option can be used to quickly view the financial commitment on a
customer.
CHANGE CUSTOMER STATUS
Customers by default are set up as “Active” when they are originally
captured. There are certain times when clients need to be suspended
for transactions. F.A.S.T. gives you the facility to activate and de-activate
clients as required. Once suspended, F.A.S.T. will prevent any further
transacting for a client until the status is changed back to “Active”.
To access a customer simply follow the steps as above in
VIEW CUSTOMER INFORMATION
Once the customer information is displayed, F.A.S.T. gives you the
following options. Select the required option and save the change.
It’s that simple.
CUSTOMER DATA MAINTENANCE
98
F.A.S.T.
DEBTORS MENU
SET DISCOUNT STRUCTURE
In addition to the item pricing discount and the customer blanket
discount percentage, F.A.S.T. provides you with an item group discount
percentage so that you can give customers discounts according to the
category of items set up.
To access a customer simply follow the steps as above in
VIEW CUSTOMER INFORMATION
Once the customer information is displayed, F.A.S.T. prompts you for
the “Item Group Code” to specify the discount for. A scroll facility is
available here to locate the Item Groups if you have difficulty in
remembering the code.
Once set, this discount will be taken into consideration when invoicing
the client for the specified Item Group using the following modules :
INVOICES / ENQUIRY
CASH SALES
99
CUSTOMER DATA MAINTENANCE
F.A.S.T.
DEBTORS MENU
SALES ADMIN
QUOTATIONS
This is the module where you capture quotations to your customers.
To generate a new quotation all you have to do is press the “ Enter “
key on the “Quote Number “ field. F.A.S.T. will automatically generate
a quotation number at the end of input when you save the information.
There are two sections of input :
1) The customer information, or “Who” I am quoting.
“Customer Source”
- The “Customer Code” is the customer who you
are quoting and the “Customer Source” is where
the goods will ultimately be going. For example,
you quote head office invoices you but the actual
goods might go to a branch within the group.
“Quote Date”
- The date of quotation is defaulted to from the
system date.
“Terms”
- Terms of payment. This is defaulted from the
option set up on the customer data screen.
SALES ADMIN - QUOTATIONS
100
F.A.S.T.
DEBTORS MENU
“Local / Export”
- If you select “Export” the V.A.T. percentage used
will be defaulted to 0 % regardless as you
cannot charge V.A.T. on exports.
“Order Number”
- This field must be filled in if the terms of payment
is anything but “Cash Sales”.
“Order Date”
- This date defaults to the system date but
can be changed to.
2) “What” items am I quoting on.
This is where you capture the items, quantities and price of the quotation.
If you selected “Yes” on the “Bar Code Scanner” field on
WORKSTATION SETUP for the workstation you are working on, the
“Bar Code” field, as above will be displayed. Otherwise the item
“Group Code” and “Item Code” will be the means of accessing items.
Using the “Bar Code” field, you can either scan the code with a hand-held
scanner or type it in if you know it. Otherwise, by typing a few letters of the
description or pressing the “ F1 “ key, F.A.S.T. will list items
alphanumerically for selection and give you a “ Search Criteria : “ field to
easily find items.
101
SALES ADMIN - QUOTATIONS
DEBTORS MENU
F.A.S.T.
Once the item has been selected, further details for it can be captured by
simply pressing the “ F2 “ key and the following will appear for input.
“Quantity Per Unit”
- Pack size. Defaulted from item set up.
“Quantity Of Units”
- How many are you quoting on.
“Price Per Item”
- This is the quoted price of the item
excluding V.A.T. Up to four decimal
places can be captured for the price. It is
defaulted in the following sequence :
1) Retail Price.
2) Pricing Structure.
“Discount Percentage”
- This percentage is defaulted in the
following sequence :
1) Customer blanket discount
percentage.
2) Customer Item Group Discount
percentage.
3) Item Pricing Structure Discount
percentage.
“Extended Price”
- This is the line total(calculated)
excl. V.A.T.
“Line Total”
- This is the line total (calculated) incl.
V.A.T.
To void an item simply press the “ F5 “ key.
If you select an item that already exists on the quotation detail, you will
automatically be taken to that line where the item is and to the
“Quantity Of Units” field.
SALES ADMIN - QUOTATIONS
102
F.A.S.T.
DEBTORS MENU
Once the item detail is captured simply press the “ F3 “ key to save the
input. All information will be saved and all other relevant information will
be updated. The quotation will be printed automatically.
To access an existing quotation, simply type in the “Quote Number”
that was generated by F.A.S.T. or press the “ F1 “ key. The following
scroll list by Customer Code by Date and By Quote Number will be
displayed.
The “ Search Criteria : “ field helps you to quickly get to the customer you
are looking for quotations for.
If you call up an existing quote, you then have the ability to :
103
•
CHANGE
– You can change anything on the quote.
•
CANCEL
– Once Cancelled, a quote can then only ever
be “VIEWED” or “PRINTED” and will be printed
Cancelled
” on it.
in bold with "
SALES ADMIN - QUOTATIONS
F.A.S.T.
DEBTORS MENU
•
VIEW
– All information on a quote.
By pressing the “ F9 “ key, a total summary as
the following will appear.
•
PRINT
– All information on a quotation.
SALES ADMIN - QUOTATIONS
104
F.A.S.T.
DEBTORS MENU
JOB CARDS
This is the module where you capture job cards for current services to
your customers. To generate a new job card all you have to do is press the
“ Enter “ key on the “Job Card Number “ field. F.A.S.T. will automatically
generate a job card number at the end of input when you save the
information. Once a job card has been invoice, it cannot be invoiced
again. This eliminates duplication.
There are two sections of input :
1) The customer information, or “Who” I am performing the service for.
If your company is a motor vehicle workshop then the “Unit Details”
would make provision for the following :
“Customer Source”
105
- The “Customer Code” is the customer who you
are charging and the “Customer Source” is who
the service is performed for. For example, you
send the job card to head office because that is
who will be invoiced but the actual unit/s might
belong to a branch within the group.
SALES ADMIN – JOB CARDS
F.A.S.T.
DEBTORS MENU
“Job Card Date”
- The date of the job card is defaulted to from the
system date.
“Order Date”
- This date defaults to the system date but
can be changed to.
“Telephone Number”
- The customer’s contact number.
Invoice Number”
- This shows you what invoice number this job
was invoiced against. F.A.S.T. prevents
duplicate invoicing of job cards.
2) “What” items have I used for this job.
This is where you capture the items and quantities of the job card. If you
selected “Yes” on the “Bar Code Scanner” field on
WORKSTATION SETUP for the workstation you are working on, the
“Bar Code” field, as above will be displayed. Otherwise the item
“Group Code” and “Item Code” will be the means of accessing items.
Using the “Bar Code” field, you can either scan the code with a hand-held
scanner or type it in if you know it. Otherwise, by typing a few letters of the
description or pressing the “ F1 “ key, F.A.S.T. will list items
alphanumerically for selection and give you a “ Search Criteria : “ field to
easily find items.
SALES ADMIN – JOB CARDS
106
F.A.S.T.
DEBTORS MENU
Once the item has been selected, further details for it can be captured by
simply pressing the “ F2 “ key and the following will appear for input.
“Quantity Per Unit”
- Pack size. Defaulted from item set up.
“Quantity Of Units”
- How many did you use.
The following fields are not accessible for input on the job card but are
stored in the background
“Price Per Item”
- Defaulted in the following sequence and
can be changed when invoiced :
3) Retail Price.
4) Pricing Structure.
“Discount Percentage”
- Defaulted in the following sequence and
can be changed when invoiced :
4) Customer blanket discount
percentage.
5) Customer Item Group Discount
percentage.
6) Item Pricing Structure Discount
percentage.
“Extended Price”
- The line total(calculated) excl. V.A.T.
“Line Total”
- The line total (calculated) incl. V.A.T.
To void an item simply press the “ F5 “ key.
If you select an item that already exists on the job card detail, you will
automatically be taken to that line where the item is and to the
“Quantity Of Units” field.
107
SALES ADMIN – JOB CARDS
DEBTORS MENU
F.A.S.T.
Once the item detail is captured simply press the “ F3 “ key to save the
input. All information will be saved and all other relevant information will
be updated. The job card will be printed automatically. The detail on the
printed format of a job card will show all raw materials / ingredients
beneath the main item if any exist.
To access an existing job card, simply type in the “Job Card Number”
that was generated by F.A.S.T. or press the “ F1 “ key. The following
scroll list by Customer Code by Date and By Job Card Number will be
displayed.
The “ Search Criteria : “ field helps you to quickly get to the customer you
are looking for job cards for.
If you call up an existing job card, you then have the ability to :
•
CHANGE
– You can change anything on the job card.
•
CANCEL
– Once Cancelled, a job card can then only ever
be “VIEWED” or “PRINTED” and will be printed
Cancelled
” on it.
in bold with "
SALES ADMIN – JOB CARDS
108
F.A.S.T.
109
DEBTORS MENU
•
VIEW
– All information on a job card.
By pressing the “ F9 “ key, a total summary as
the following will appear.
•
PRINT
– All information on a job card.
SALES ADMIN – JOB CARDS
F.A.S.T.
DEBTORS MENU
SALES ORDERS
This is the module where you capture and monitor sales orders from
your customers. To generate a new sales order all you have to do is press
the “ Enter “ key on the “Sales Order No.“ field. F.A.S.T. will automatically
generate a sales order number at the end of input when you save the
information.
There are two sections of input :
1) The customer information, or “Who” I am performing the service for.
“Customer Source”
- The “Customer Code” is the customer who you
are charging and the “Customer Source” is
where the goods will ultimately be going. For
example, head office orders from you but the
actual goods might go to a branch within the
group.
“Sales Order Date”
- The date of the sales order is defaulted to from
the system date.
“Terms”
- Terms of payment. This is defaulted from the
option set up on the customer data screen.
SALES ADMIN – SALES ORDERS
110
F.A.S.T.
DEBTORS MENU
“Local / Export”
- If you select “Export” the V.A.T. percentage
used will be defaulted to 0 % regardless as
you cannot charge V.A.T. on exports.
“Order Number”
- This field must be filled in if the terms of payment
is anything but “Cash Sales”.
“Order Date”
- This date defaults to the system date but
can be changed to.
“Last Invoice”
- This shows you what invoice number was
last invoiced against the sales order.
2) “What” items is the customer ordering.
This is where you capture the items, quantities and prices on the sales
order. If you selected “Yes” on the “Bar Code Scanner” field on
WORKSTATION SETUP for the workstation you are working on, the
“Bar Code” field, as above will be displayed. Otherwise the item
“Group Code” and “Item Code” will be the means of accessing items.
Using the “Bar Code” field, you can either scan the code with a hand-held
scanner or type it in if you know it. Otherwise, by typing a few letters of the
description or pressing the “ F1 “ key, F.A.S.T. will list items
alphanumerically for selection and give you a “ Search Criteria : “ field to
easily find items.
111
SALES ADMIN – SALES ORDERS
DEBTORS MENU
F.A.S.T.
Once the item has been selected, further details for it can be captured by
simply pressing the “ F2 “ key and the following will appear for input.
“Quantity Per Unit”
- Pack size. Defaulted from item set up.
“Quantity Of Units”
- How many did the customer order.
“Price Per Item”
- This is the quoted price of the item
excluding V.A.T. Up to four decimal
places can be captured for the price. It is
defaulted in the following sequence :
5) Retail Price.
6) Pricing Structure.
“Discount Percentage”
- This percentage is defaulted in the
following sequence :
7) Customer blanket discount
percentage.
8) Customer Item Group Discount
percentage.
9) Item Pricing Structure Discount
percentage.
“Extended Price”
- This is the line total(calculated)
excl. V.A.T.
“Line Total”
- This is the line total (calculated) incl.
V.A.T.
To void an item simply press the “ F5 “ key.
If you select an item that already exists on the sales order detail, you will
automatically be taken to that line where the item is and to the
“Quantity Of Units” field.
SALES ADMIN – SALES ORDERS
112
F.A.S.T.
DEBTORS MENU
Once the item detail is captured simply press the “ F3 “ key to save the
input. All information will be saved and all other relevant information will
be updated. The sales order will be printed automatically.
To access an existing sales order, simply type in the “Sales Order No.”
that was generated by F.A.S.T. or press the “ F1 “ key. The following
scroll list by Customer Code by Date and by Sales Order Number will be
displayed.
The “ Search Criteria : “ field helps you to quickly get to the customer you
are looking for sales orders for.
If you call up an existing sales order, you then have the ability to :
113
•
CHANGE
– You can change anything on the sales order.
•
CANCEL
– Once Cancelled, a sales order can then only
ever be “VIEWED” or “PRINTED” and will be
printed in bold with
Cancelled
” on it.
"
SALES ADMIN – SALES ORDERS
F.A.S.T.
DEBTORS MENU
•
VIEW
– All information on a sales order.
By pressing the “ F9 “ key, a total summary as
the following will appear.
•
PRINT
– All information on a sales order.
SALES ADMIN – SALES ORDERS
114
F.A.S.T.
DEBTORS MENU
INVOICES
INVOICES / ENQUIRY
This is the module where you capture invoices to your customers.
To generate a new invoice all you have to do is press the “ Enter “ key
on the “Invoice Number “ field. F.A.S.T. will automatically generate an
invoice number at the end of input when you save the information.
With a new invoice, the following window will pop-up allowing you to
select one of the following options to generate the invoice from :
Here is a typical example :
The following guidelines must be considered with each option :
115
• Normal Invoice
– All information is captured manually.
• Generate From Quotation
– A valid quotation number must be
entered. The details will be filled in but
can be changed. A quotation can be
reused for invoicing as many times as
you require.
• Generate From Job Card
– A valid job card number must be
entered. The details will be filled in but
can be changed. Once invoiced, the job
card cannot be re-invoiced, but the
invoice against the job card can be
changed, providing it has not been
cancelled or a payment or credit note
has not been captured against it.
• Generate From Sales Order – A valid sales order number must be
entered. The details will be filled in but
can be changed.
INVOICES / ENQUIRY
F.A.S.T.
DEBTORS MENU
There are three sections of input :
1) The customer information, or “Who” I am invoicing.
“Customer Source”
- The “Customer Code” is the customer who you
are invoicing and the “Customer Source” is
where the goods will ultimately be going. For
example, you invoice head office as they will be
paying the account but the actual goods might
go to a branch within the group. The “Ship To”
details default to the “Customer Code” details
whereas the “Ship Via” details default to that of
the “Customer Source”.
By pressing the “ F2 “ key on the “Customer Code” field or on the
highlighted customer on the scroll window while searching for a customer,
F.A.S.T. will display the following account balance window for that
customer as a quick check before invoicing.
INVOICES / ENQUIRY
116
F.A.S.T.
DEBTORS MENU
“Invoice Date”
- The date of invoice is defaulted to from the
system date.
“Terms”
- Terms of payment. This is defaulted from the
option set up on the customer data screen.
“Local / Export”
- If you select “Export” the V.A.T. percentage used
will be defaulted to 0 % regardless as you
cannot charge V.A.T. on exports.
“Order Number”
- This field must be filled in if the terms of payment
is anything but “Cash Sales”. This field is printed
on the statement as per the invoice.
“Order Date”
- This date defaults to the system date but
can be changed to.
2) “What” items did I sell to the customer.
This is where you capture the items, quantities and cost price on the
invoice. If you selected “Yes” on the “Bar Code Scanner” field on
WORKSTATION SETUP for the workstation you are working on, the
“Bar Code” field, as above will be displayed. Otherwise the item
“Group Code” and “Item Code” will be the means of accessing items.
117
INVOICES / ENQUIRY
DEBTORS MENU
F.A.S.T.
Using the “Bar Code” field, you can either scan the code with a hand-held
scanner or type it in if you know it. Otherwise, by typing a few letters of the
description or pressing the “ F1 “ key, F.A.S.T. will list items
alphanumerically for selection and give you a “ Search Criteria : “ field to
easily find items. While scrolling through items, if you press the “ F4 “ key,
the following item additional details window will appear showing you the
price including.
Once the item has been selected, further details for it can be captured by
simply pressing the “ F2 “ key and the following will appear for input.
“Quantity Per Unit”
- Pack size. Defaulted from item set up.
“Quantity Of Units”
- How many did the customer purchase.
“Price Per Item”
- This is the selling price of the item
excluding V.A.T. Up to four decimal
places can be captured for the price. It is
defaulted in the following sequence :
7) Retail Price.
8) Pricing Structure.
On this field you have the facility of
pressing the “ F4 “ key to bring up the
pricing structure list to select a different
price to the one that is defaulted.
INVOICES / ENQUIRY
118
F.A.S.T.
DEBTORS MENU
You can also change the price here, but
if you enter a price that is below cost
F.A.S.T. will warn you accordingly.
Depending on your system configuration,
you will either not be allowed to sell for
below cost or allowed to but warned.
“Discount Percentage”
- This percentage is defaulted in the
following sequence :
10) Customer blanket discount
percentage.
11) Customer Item Group Discount
percentage.
12) Item Pricing Structure Discount
percentage.
“Extended Price”
- This is the line total(calculated)
excl. V.A.T.
“Line Total”
- This is the line total (calculated) incl.
V.A.T.
To void an item simply press the “ F5 “ key.
If you select an item that already exists on the sales order detail, you will
automatically be taken to that line where the item is and to the
“Quantity Of Units” field.
Once you have pressed the “ F3 “ key to save the information on the
invoice, a total summary will appear and then, if the terms of payment
is “Cash Sale”, the following screen will appear.
119
INVOICES / ENQUIRY
F.A.S.T.
DEBTORS MENU
3) “How Much” did the customer pay.
F.A.S.T caters for multiple payment methods per transaction. In other
words, if two cheques and cash was given as payment towards a
purchase, the above is an example of this type of payment summary.
If then for example only one cheque has an RD, only that entry can then
be reversed, the entire payment does not need to be reversed.
“Payment Method”
- Selected from those set up in the
system.
“Details”
- Any details relative to the payment
method. Eg. EFT No. or cheque number.
“Amount”
- The amount of the payment method.
The decimal does not need to be
captured. The “ Del “ key on the numeric
pad on the left of the keyboard is used
for a double zero (“00”).
If the “TENDERED” amount is zero, F.A.S.T. will automatically change the
“Payment Method” to “AWAITING”.
INVOICES / ENQUIRY
120
F.A.S.T.
DEBTORS MENU
Once the payment summary information is captured simply press the
“ F3 “ key to save the input. F.A.S.T. does on-line credit checking on
account sale transactions and does not allow customers to exceed their
credit limits set up in CUSTOMER DATA MAINTENANCE. All information
will be saved and all other relevant information will be updated. If you
selected “Yes” on the “Prompt To Print” field for the “Invoice Printer” field
under “ Sales “ on WORKSTATION SETUP for the workstation you are
working on, then the following prompt will appear. Otherwise the invoice
will be printed automatically.
To access an existing invoice, simply type in the “Invoice Number”
that was generated by F.A.S.T. or press the “ F1 “ key. The following
scroll list by Customer Code by Date and By Invoice Number will be
displayed.
Notice the status. Any Payment or Credit Note transaction effects this
status, so you can monitor right down to the invoice level, what is
outstanding for payment and what is settled. The “ Search Criteria : “ field
helps you to quickly get to the customer you are looking for invoices for.
121
INVOICES / ENQUIRY
F.A.S.T.
DEBTORS MENU
If you call up an existing invoice, you then have the ability to :
•
CHANGE
– Providing no payment or credit note has
been captured against it or it has not been
“CANCELLED”.
You can change anything on an invoice, even
the customer code and the system will perform
the necessary updates to “Get Everything In
Order”.
•
CANCEL
– Providing no payment or credit note has
been captured against it or it has not been
“CANCELLED”.
Once Cancelled, an invoice can then only ever
be “VIEWED” or “PRINTED” and will be printed
Cancelled
” on it.
in bold with "
•
VIEW
– All information on an invoice.
By pressing the “ F9 “ key, a total summary as
the following will appear.
•
PRINT
– All information on an invoice.
The following INVOICE STATUS conditions are catered for :
•
•
•
•
•
•
Unpaid
Partly Paid
Payment Reversed
Paid In Full
Settled Early
Cancelled
INVOICES / ENQUIRY
122
F.A.S.T.
DEBTORS MENU
CREDIT NOTES / REFUNDS
This module is used for capturing Credit Notes to customers for goods
captured in the INVOICES / ENQUIRY module that are either returned or
require price credits. A new Credit Note is generated by pressing the
“ Enter “ key on “Credit Note No.”. F.A.S.T. will automatically generate a
Credit Note No. at the end of input when you save the information.
There are two sections of input :
1) The customer/invoice information, or “Who” am I passing a credit for.
“Invoice Number”
- Selected from those captured in the
system using the INVOICES / ENQUIRY
module only. A scroll window is available
here.
“Credit Note Type”
- Either “G.R.N.” (Goods Returned Note)
where stock quantities are updated or
“PRICE” where quantities captured do
not effect stock quantities.
Only valid invoice numbers can be used and not “Cancelled” ones.
123
CREDIT NOTES / REFUNDS
DEBTORS MENU
F.A.S.T.
Items are selected as they are in capturing invoice information.
F.A.S.T. performs the following checks when you select items in this
module :
•
The item must appear on the invoice
•
For any item. The overall quantity that is captured cannot exceed
more than what was originally invoiced. For example, if the
original invoice quantity was say 100 and you then captured a
credit note for 70, then again tried to capture a credit note for 40,
you will be unable to capture the last 40.
2) “What” items am I crediting.
Scroll facilities are available here. The item must exist on the invoice.
The quantity cannot be more than what was originally invoiced and the
total amount for the item cannot exceed the total invoiced amount for that
item.
The amount and discount percentage that is defaulted for the item is what
was captured on the invoice. These can be changed though.
A Credit Note is printed once this information is saved.
CREDIT NOTES / REFUNDS
124
F.A.S.T.
DEBTORS MENU
If the invoice was paid, F.A.S.T. will display the following window. If the
Customer has a further balance that you need to credit, instead of handing
the customer a physical “Cash Back” payment, it would be necessary to
capture a payment against the customer’s account for the amount
specified in the window following this module.
If you call up an existing Credit Note, you then have the ability to :
125
•
CHANGE
– Providing it has not been “CANCELLED”.
You can change anything on a credit note, even
the invoice number and the system will
perform the necessary updates to
“Get Everything In Order”.
•
CANCEL
– Providing it has not been “CANCELLED”.
Once Cancelled, a credit note can then only
ever be “VIEWED” or “PRINTED” and will be
printed in bold with
Cancelled
” on it.
"
•
VIEW
– All information on a credit note.
By pressing the “ F9 “ key, a total summary as
the following will appear.
•
PRINT
– All information on a credit note.
CREDIT NOTES / REFUNDS
F.A.S.T.
DEBTORS MENU
DEBTORS PAYMENTS
DEBTORS PAYMENT MAINTENANCE
This is the module where payments from customers are captured. Multiple
payment methods per transaction are available here as well.
“Payment Date”
- This date is defaulted from the system
date.
“Payment Type”
- The following options are available and
if “Early Settlement” is selected,
F.A.S.T. will automatically calculate the
“Sett. Disc. Tot.”
“Payment Amount”
- Gets calculated by the payment details
captured.
CREDIT NOTES / REFUNDS
126
F.A.S.T.
DEBTORS MENU
F.A.S.T. provides you with the facility to either do the following type
of selections when capturing a payment from customers in order to
offset invoices and customer balances :
If you select “Automatic” (default) then the oldest invoices from
the specified customer are selected until the payment total is satisfied.
If the payment total does not equal the total of the invoices selected
exactly, then the last invoice listed will be specified as “Partly Paid”.
You can also capture part payments towards invoices.
Once selected, the “Paid Amount” per individual invoice can still be
changed if necessary. A scroll window is available listing the following
by customer by date of invoice by invoice number, beginning with
the first invoice for the specified supplier.
A payment receipt is printed once the payment information is saved.
127
DEBTORS PAYMENTS
DEBTORS MENU
F.A.S.T.
DEBTORS PAYMENT REVERSALS / ENQUIRY
There can be more than one section of payment towards an invoice.
If the terms of payment of an invoice was “Cash Sale” the payment section
of this type can then be reversed. You can also reverse payments made
against an invoice afterwards. For example, if you invoiced goods to the
value of say 100.00, and the customer paid only 20.00 by cheque at this
time, then you later captured a payment of a further 50.00 also by cheque.
If the 20.00 cheque has an RD then for “Reversal Of” above you would
select “Cash Sale Payment”. If the 50.00 cheque also had an RD then you
would select “Account Sales Payment”.
Cash Sale Payment
The following screen will appear and prompt you to type in a valid
invoice number. A scroll facility is available here.
Once selected the following window will appear and allow you to
capture a description that would appear on the customer’s statement.
DEBTORS PAYMENT REVERSALS / ENQUIRY
128
F.A.S.T.
DEBTORS MENU
The following payment summary that was originally captured will
appear and allow you to select one or more payment details, if any.
By simply pressing the “ Space Bar “on the payment detail you can
select and de-select the entry for reversal. Under the column , if you
see an “R” next to any entry, it means that payment detail has already
been “Reversed”.
Once you have selected all payment details that you need to reverse
simply press the “ F3 “ key to save the information.
Account Sales Payment
The following scroll window will appear listing all payments by customer
allowing you to select one.
129
DEBTORS PAYMENT REVERSALS / ENQUIRY
DEBTORS MENU
F.A.S.T.
The payment information will then appear and give you the following
options :
If you select “Reverse” the following window will appear and allow
you to capture a description that would appear on the customer’s
statement.
The following payment summary that was originally captured will
appear and allow you to select one or more payment details, if any.
By simply pressing the “ Space Bar “ on the payment detail you can
select and de-select the detail for reversal. Under the column , if you
see an “R” next to any entry, it means that payment detail has already
been “Reversed”.
DEBTORS PAYMENT REVERSALS / ENQUIRY
130
F.A.S.T.
DEBTORS MENU
POINT OF SALE
CASH SALES
This is the module where you capture point-of-sale transactions. If you
have a pole display device attached to the workstation, your company
name will scroll across the display until you start entering items.
To generate a new invoice all you have to do is press the “ Enter “ key
on the “Invoice Number “ field. F.A.S.T. will automatically generate an
invoice number at the end of input when you save the information.
With a new invoice, the following window will pop-up allowing you to
select one of the following options to generate the invoice from :
Here is a typical example :
The following guidelines must be considered with each option :
• Normal Invoice
– All information is captured manually.
• Generate From Quotation
– A valid quotation number must be
entered. The details will be filled in but
can be changed. A quotation can be
reused for invoicing as many times as
you require.
All transactions are defaulted to the “POINT OF SALE TILL TOTAL”
customer. However, if you selected “Yes” on the “POS – Use Customer
Code” field under “ Sales “ on WORKSTATION SETUP for the workstation
you are working, then the you will have access to input any valid customer
other than the default one.
All transactions are defaulted to the “POINT OF SALE TILL TOTAL”
sales rep. However, if you selected “Yes” on the “POS – Use Sales Rep
Code” field under “ Sales “ on WORKSTATION SETUP for the workstation
you are working, then the you will have access to input any valid sales rep
other than the default one.
131
DEBTORS PAYMENT REVERSALS / ENQUIRY
F.A.S.T.
DEBTORS MENU
There are three sections of input :
1) The customer information, or “Who” I am invoicing.
“Invoice Date”
- The date of invoice is defaulted to from the
system date.
By pressing the “ F2 “ key on the “Customer Code” field or on the
highlighted customer on the scroll window while searching for a customer,
F.A.S.T. will display the following account balance window for that
customer as a quick check before invoicing.
POINT OF SALE – CASH SALES
132
F.A.S.T.
DEBTORS MENU
2) “What” items did I sell to the customer.
This is where you capture the items, quantities and cost price on the
invoice. If you selected “Yes” on the “Bar Code Scanner” field on
WORKSTATION SETUP for the workstation you are working on, the
“Bar Code” field, as above will be displayed. Otherwise the item
“Group Code” and “Item Code” will be the means of accessing items.
•
F.A.S.T. defaults the quantity on each item here to one.
To change this press the “ F2 “ key before you select the item.
•
To change the price from the default press the “ F4 “ key before
you select the item and the following pop-up selection will appear.
This helps you to simply enter the including price if you need to
without having to calculate it.
•
To change the discount percentage from the default press the
“ F7 “ key before you select the item.
*** NB. The above three function keys are only available if you have been
set up as a SUPERVISOR type user.
133
POINT OF SALE – CASH SALES
DEBTORS MENU
F.A.S.T.
Using the “Bar Code” field, you can either scan the code with a hand-held
scanner or type it in if you know it. Otherwise, by typing a few letters of the
description or pressing the “ F1 “ key, F.A.S.T. will list items
alphanumerically for selection and give you a “ Search Criteria : “ field to
easily find items. While scrolling through items, if you press the “ F4 “ key,
the following item additional details window will appear showing you the
price including.
As you select items, if you have a pole display device attached to the
workstation, details similar to the following will appear on the display
showing the customer the item description, quantity and amount.
“Quantity Of Units”
- How many did the customer purchase.
“Price Per Item”
- This is the selling price of the item either
excluding or including V.A.T. Up to four
decimal places can be captured for the
price. It is defaulted in the following
sequence :
1) Retail Price.
2) Pricing Structure.
If you enter a price that is below cost
F.A.S.T. will warn you accordingly.
Depending on your system configuration,
you will either not be allowed to sell for
below cost or allowed to but warned.
POINT OF SALE – CASH SALES
134
F.A.S.T.
DEBTORS MENU
“Discount Percentage”
- This percentage is defaulted in the
following sequence :
1) Customer blanket discount
percentage.
2) Customer Item Group Discount
percentage.
3) Item Pricing Structure Discount
percentage.
“Extended Price”
- This is the line total(calculated)
excl. V.A.T.
“Line Total”
- This is the line total (calculated) incl.
V.A.T.
To void an item simply press the “ F5 “ key.
Unlike the INVOICE module, if you select an item that already exists on
the invoice a new entry will be generated.
Once you have pressed the “ F3 “ key to save the information on the
invoice, the following screen will appear.
3) “How Much” did the customer pay.
135
POINT OF SALE – CASH SALES
DEBTORS MENU
F.A.S.T.
If you have a pole display device attached to the workstation, details
similar to the following will appear on the display showing the customer
the sale total.
F.A.S.T caters for multiple payment methods per transaction. In other
words, if two cheques and cash was given as payment towards a
purchase, the above is an example of this type of payment summary.
If then for example only one cheque has an RD, only that entry can then
be reversed, the entire payment does not need to be reversed.
“Payment Method”
- Selected from those set up in the
system.
“Details”
- Any details relative to the payment
method. Eg. EFT No. or cheque number.
“Amount”
- The amount of the payment method.
The decimal does not need to be
captured. The “ Del “ key on the numeric
pad on the left of the keyboard is used
for a double zero (“00”).
If the “TENDERED” amount is zero, F.A.S.T. will automatically change the
“Payment Method” to “AWAITING”.
Once the payment summary information is captured simply press the
“ F3 “ key to save the input.
POINT OF SALE – CASH SALES
136
F.A.S.T.
DEBTORS MENU
If you have a pole display device attached to the workstation, details
similar to the following will appear on the display showing the customer
the payment total and change due.
All information will be saved and all other relevant information will be
updated. If you selected “Yes” on the “Prompt To Print” field for the
“POS Printer” field under “ Sales “ on WORKSTATION SETUP for the
workstation you are working on, then the following prompt will appear.
Otherwise the invoice will be printed automatically.
To access an existing invoice, simply type in the “Invoice Number”
that was generated by F.A.S.T. or press the “ F1 “ key. The following
scroll list by Customer Code by Date and by Invoice Number will be
displayed.
Notice the status. On point Of Sale transactions, F.A.S.T. does not allow
payments for less than the invoice total. The “ Search Criteria : “ field
helps you to quickly get to the customer you are looking for invoices for.
137
POINT OF SALE – CASH SALES
F.A.S.T.
DEBTORS MENU
If you call up an existing invoice, you then have the ability to :
•
VIEW
– All information on an invoice.
By pressing the “ F9 “ key, a total summary as
the following will appear.
•
PRINT
– All information on an invoice.
The following INVOICE STATUS conditions are catered for :
•
•
•
•
•
•
Unpaid
Partly Paid
Payment Reversed
Paid In Full
Settled Early
Cancelled
POINT OF SALE – CASH SALES
138
F.A.S.T.
DEBTORS MENU
REFUNDS
This module is used for capturing Refunds to customers for goods
returned captured in the CASH SALES module. A new Credit Note
is generated by pressing the “ Enter “ key on “Credit Note No.”. F.A.S.T.
will automatically generate a Credit Note No. at the end of input when you
save the information.
There are two sections of input :
1) The customer/invoice information, or “Who” am I passing a credit for.
“Invoice Number”
- Selected from those captured in the
system using the CASH SALES module
only. A scroll window is available here.
“Credit Note Type”
- Unlike the INVOICES / ENQUIRY
module, all refunds are defaulted to
“G.R.N.” (Goods Returned Note) where
stock quantities are updated. If you
require a price credit, then refund the
item/s and re-invoice it using the CASH
SALES module as this section requires
stricter control for these instances.
Only valid invoice numbers can be used and not “Cancelled” ones.
139
POINT OF SALE – REFUNDS
DEBTORS MENU
F.A.S.T.
Items are selected as they are in capturing invoice information.
F.A.S.T. performs the following checks when you select items in this
module :
•
The item must appear on the invoice
•
For any item. The overall quantity that is captured cannot exceed
more than what was originally invoiced. For example, if the
original invoice quantity was say 100 and you then captured a
credit note for 70, then again tried to capture a credit note for 40,
you will be unable to capture the last 40.
2) “What” items am I crediting.
Scroll facilities are available here. The item must exist on the invoice.
The quantity cannot be more than what was originally invoiced and the
total amount for the item cannot exceed the total invoiced amount for that
item.
The amount and discount percentage that is defaulted for the item is what
was captured on the invoice. These can be changed though.
A Credit Note is printed once this information is saved.
POINT OF SALE – REFUNDS
140
F.A.S.T.
DEBTORS MENU
F.A.S.T. will display the following window showing you how much to refund
the customer in terms of a “Cash Back” payment. If you are doing a price
credit and, it would be necessary to either use this amount shown as
payment, if it is less than or equal to the new amount or to refund the
customer the difference if it is greater than the new amount.
If you call up an existing Credit Note, you then have the ability to :
141
•
CHANGE
– Providing it has not been “CANCELLED”.
You can change anything on a credit note, even
the invoice number and the system will
perform the necessary updates to
“Get Everything In Order”.
•
CANCEL
– Providing it has not been “CANCELLED”.
Once Cancelled, a credit note can then only
ever be “VIEWED” or “PRINTED” and will be
printed in bold with
Cancelled
” on it.
"
•
VIEW
– All information on a credit note.
By pressing the “ F9 “ key, a total summary as
the following will appear.
•
PRINT
– All information on a credit note.
POINT OF SALE – REFUNDS
DEBTORS MENU
F.A.S.T.
CASH SALE PAYMENT REVERSAL
This module is used to reverse payments captured in the CASH SALES
module.
The following screen will appear and prompt you to type in a valid
invoice number. A scroll facility is available here.
Once selected the following window will appear and allow you to
capture a description that would appear on the customer’s statement.
POS – CASH SALE PAYMENT REVERSAL
142
F.A.S.T.
DEBTORS MENU
The following payment summary that was originally captured will
appear and allow you to select one or more payment details, if any.
By simply pressing the “ Space Bar “on the payment detail you can
select and de-select the entry for reversal. Under the column , if you
see an “R” next to any entry, it means that payment detail has already
been “Reversed”.
Once you have selected all payment details that you need to reverse
simply press the “ F3 “ key to save the information.
143
POS – CASH SALE PAYMENT REVERSAL
DEBTORS MENU
F.A.S.T.
CASH SALE PAYMENTS
This module is used to capture payments against CASH SALES
transactions. Say for example, a customer paid for a cash sale transaction
by cheque, then the cheque had an RD. You would then use the
CASH SALE PAYMENT REVERSAL module to reflect this situation.
The cash sale transaction would then be reflected as either “UNPAID”,
“PARTLY PAID” or “PAYMENT REVERSED”. The customer would then
have to settle this outstanding balance. Once this happens you would then
use this module to capture this subsequent payment. Multiple payment
methods per transaction are available here as well.
“Payment Date”
- This date is defaulted from the system
date.
“Payment Amount”
- Gets calculated by the payment details
captured.
POS – CASH SALE PAYMENTS
144
F.A.S.T.
DEBTORS MENU
F.A.S.T. provides you with the facility to either do the following type
of selections when capturing a payment from customers in order to
offset invoices and customer balances :
If you select “Automatic” (default) then the oldest invoices from
the specified customer are selected until the payment total is satisfied.
If the payment total does not equal the total of the invoices selected
exactly, then the last invoice listed will be specified as “Partly Paid”.
You can also capture part payments towards invoices.
Once selected, the “Paid Amount” per individual invoice can still be
changed if necessary. A scroll window is available listing the following
by customer by date of invoice by invoice number, beginning with
the first invoice for the specified supplier.
A payment receipt is printed once the payment information is saved.
145
POS – CASH SALE PAYMENTS
DEBTORS MENU
F.A.S.T.
DEBTORS REPORTS
The following reports are available on this menu :
CUSTOMER DATA LISTING
Normal Customer Listing
This report lists all customers in a labelled format so that you
use this use this information to label your customer files
Report Sequence, Customer Name by Customer Initials
Name
Initials
Code
Physical Address
Phone Numbers
FAX Number
V.A.T. Registration Number
Print Labels for Dispatch
This report requests the following input and prints labels to stick
on the containers for the articles being sent.
Report Sequence, Customer Code
Name
Physical Address
Phone Numbers
Your Company Name
Your Company’s Physical Address
Your Company’s Telephone Number
Number of Packages
Destination Address
DEBTORS REPORTS
146
F.A.S.T.
DEBTORS MENU
Debtors Listing
This report shows ageing balances per Customer
Report Sequence, Customer Code
Name
Phone Numbers
FAX Number
Over 120 Day Balance
120 Day Balance
90 Day Balance
60 Day Balance
30 Day Balance
Current Balance
Total Outstanding
Discount Structure
This report shows the discount structures of Item Groups per
Customer
Report Sequence, Customer Code, Item Group
Customer Code
Customer Name
Item Group Code
Discount Percentage
147
DEBTORS REPORTS
DEBTORS MENU
F.A.S.T.
DEBTORS SALES SUMMARY
Customer Report
This report extracts invoices captured in the INVOICES / ENQUIRY
module. The following parameter selections appear. Depending on what
criteria you select here will determine the type of information that will get
reported.
Three types of Report Sequence extractions are possible :
Tag Selections are available on the “Invoice Terms” and “Invoice Status”
so you can selectively choose specific types of records to report on.
You can also specify whether you would like to detail or just
summary(total) information.
DEBTORS REPORTS
148
F.A.S.T.
DEBTORS MENU
Report Sequence :
Invoice Number
Totals by Grand Total
Invoice Number
Invoice Date
Customer Code
Customer Name
Invoice Amount
Accumulated Discount
Sub Total
V.A.T. Amount
Total
Paid To Date
Credit Note Total
Status
Report Sequence :
Customer Code / Date Of Invoice / Invoice Number
Headed by Customer Name
Totals by Customer showing Total Payment Due, Grand Total
Invoice Number
Invoice Date
Total
Paid To Date
Credit Note Total
Status
149
DEBTORS REPORTS
DEBTORS MENU
F.A.S.T.
Report Sequence :
Date Of Invoice / Customer Code / Invoice Number
Totals by Date, Grand Total
Invoice Number
Invoice Date
Customer Code
Customer Name
Invoice Amount
Accumulated Discount
Sub Total
V.A.T. Amount
Total
Paid To Date
Credit Note Total
Status
Item Report
This report extracts invoices captured in the INVOICES / ENQUIRY
module and credit notes captured in the CREDIT NOTES / REFUNDS
module against items. It gives you an indication of selling prices of items
by Item Group by Item by Date by Customer. The following parameter
selections appear. Depending on what criteria you select here will
determine the type of information that will get reported. You can specify all
Customers by simply leaving “Customer Code” blank or you can specify a
Customer to report on. You can specify all Items by simply leaving
“Item Code” blank or you can specify an Item to report on. A scroll window
listing items by description is available here by pressing the “ F1 “ key.
This report is useful if you wanted to see all invoice sales against a
specific item if you needed to credit the item without having the original
invoice number.
DEBTORS REPORTS
150
F.A.S.T.
DEBTORS MENU
Report Sequence :
Item Group by Item by Date Of Invoice by Customer
Totals by Item, Item Group, Grand Total
Item Group Description
Item Description
Invoice Date
Customer Code
Invoice Number
Number Per Unit
Quantity
Price Per Unit
V.A.T. Percentage
Extended Price
V.A.T. Amount
Total
“Invoice” or “Credit Note”
DEBTORS PAYMENT SUMMARY
This report extracts payments captured into F.A.S.T. The following
parameter selections appear. Depending on what criteria you select here
will determine the type of information that will get reported.
151
DEBTORS REPORTS
DEBTORS MENU
F.A.S.T.
Three types of Report Sequence extractions are possible :
Report Sequence :
Payment Number
Totals by Grand Total
Payment Number
Payment Date
Customer Code
Customer Name
Payment Amount
V.A.T. Amount
Status
Report Sequence :
Customer Code / Date Of Payment / Payment Number
Totals by Customer, Grand Total
Payment Number
Payment Date
Customer Code
Customer Name
Payment Amount
V.A.T. Amount
Status
Report Sequence :
Date Of Payment / Customer Code / Payment Number
Totals by Date Of Payment, Grand Total
Payment Number
Payment Date
Customer Code
Customer Name
Payment Amount
V.A.T. Amount
Status
DEBTORS REPORTS
152
F.A.S.T.
DEBTORS MENU
POINT OF SALE SUMMARY
Customer Report
This report extracts invoices captured in the CASH SALES module. The
following parameter selections appear. Depending on what criteria you
select here will determine the type of information that will get reported.
Three types of Report Sequence extractions are possible :
Tag Selections are available on the “Invoice Terms” and “Invoice Status”
so you can selectively choose specific types of records to report on.
You can also specify whether you would like to detail or just
summary(total) information.
153
DEBTORS REPORTS
DEBTORS MENU
F.A.S.T.
Report Sequence :
Invoice Number
Totals by Grand Total
Invoice Number
Invoice Date
Customer Code
Customer Name
Invoice Amount
Accumulated Discount
Sub Total
V.A.T. Amount
Total
Paid To Date
Credit Note Total
Status
Report Sequence :
Customer Code / Date Of Invoice / Invoice Number
Headed by Customer Name
Totals by Customer showing Total Payment Due, Grand Total
Invoice Number
Invoice Date
Total
Paid To Date
Credit Note Total
Status
DEBTORS REPORTS
154
F.A.S.T.
DEBTORS MENU
Report Sequence :
Date Of Invoice / Customer Code / Invoice Number
Totals by Date, Grand Total
Invoice Number
Invoice Date
Customer Code
Customer Name
Invoice Amount
Accumulated Discount
Sub Total
V.A.T. Amount
Total
Paid To Date
Credit Note Total
Status
Item Report
This report extracts invoices captured in the CASH SALES module and
credit notes captured in the REFUNDS module under the
POINT OF SALE menu against items. It gives you an indication of selling
prices of items by Item Group by Item by Date by Customer. The following
parameter selections appear. Depending on what criteria you select here
will determine the type of information that will get reported. You can
specify all Customers by simply leaving “Customer Code” blank or you can
specify a Customer to report on. You can specify all Items by simply
leaving “Item Code” blank or you can specify an Item to report on. A scroll
window listing items by description is available here by pressing the “ F1 “
key. This report is useful if you wanted to see all invoice sales against a
specific item if you needed to credit the item without having the original
invoice number.
155
DEBTORS REPORTS
DEBTORS MENU
F.A.S.T.
Report Sequence :
Item Group by Item by Date Of Invoice by Customer
Totals by Item, Item Group, Grand Total
Item Group Description
Item Description
Invoice Date
Customer Code
Invoice Number
Number Per Unit
Quantity
Price Per Unit
V.A.T. Percentage
Extended Price
V.A.T. Amount
Total
“Invoice” or “Credit Note”
CUSTOMER STATEMENTS
Even though F.A.S.T. produces statements to customers automatically
during MONTH END PROCESSING, you can still call up statements at
any time. This report gives you a breakdown of all transactions captured
against debtors within F.A.S.T. except POINT OF SALE. It shows order
numbers next to invoices and payment details next to payment
transactions to make it easy for your customer to reconcile his account
with the you company. It prints a summary of transactions and an ageing
summary. It also prints a payment remittance for the customer to return
with payment.
DEBTORS REPORTS
156
F.A.S.T.
DEBTORS MENU
You can select either a specific customer or all by pressing the “ Enter “
key on “Customer Code”. You can specify a date range for transaction
extraction as well. Below is an example of a typical customer statements.
Payment Remittance
157
DEBTORS REPORTS
PROCESSING / REPORTS MENU
F.A.S.T.
10. PROCESSING / REPORTS MENU
FLOAT OPENING BALANCE
This module is used to record the float opening balance per workstation
Or till point. If you enter a Workstation I.D. that an opening balance has
already been captured for the day, F.A.S.T. will switch to “ Change “
mode and allow you to change the opening balance for that till point for
that day. Otherwise you will see “ Add “ at the top left corner of the data
section of the screen and will be allowed to set a float opening balance for
that till point for that day. This opening balance can be changed at any
point during the day, it doesn’t matter whether users are logged into the
system when this function is performed. This balance will be printed on
the workstation summary report and will be used to calculate the day end
float closing balance.
DEBTORS REPORTS
158
F.A.S.T.
PROCESSING / REPORTS MENU
END OF DAY PROCESSING
F.A.S.T. is machine or BIOS date independent. It allows you to control
your own system date. It does not allow you to back-date the system
date.Bearing this in mind, it requires an actual function in terms of system
date changes in order to activate a “New Day”. This module performs that
as well as many other functions in respect to the processing of data
relative to daily transactions and the like. It is a critical maintenance
module, so therefore all other users must be logged out in order for this
operation to commence. Once initiated, it will stop all other users from
entering F.A.S.T. until complete. This function must be run every working
day. Once you select this module you will see the following messages
Press any key to continue ….
WARNING : Ready To Backup Data !
F.A.S.T. will perform an automatic backup and once complete you will see
the following message.
BACKUP COMPLETE.
Press any key to continue ….
The following screen will appear.
159
END OF DAY PROCESSING
PROCESSING / REPORTS MENU
F.A.S.T.
If for example, you are running an End-Of-Day for the 7th of May 2004,
it is a Friday and your company does not open on a weekend you would
enter the following date in the “New System Date” field.
2004/05/09
In other words, your new business date.
If you were to run an End-Of-Day on the last day of the month, F.A.S.T.
Will automatically switch you to the MONTH END PROCESSING module.
The following reports are automatically printed when you run this process.
Creditors
•
•
•
•
The following reports list transactions by user and total per user
CASH PURCHASE MAINTENANCE REPORT
ACCOUNT PURCHASE MAINTENANCE REPORT
PURCHASE PAYMENT MAINTENANCE REPORT
PURCHASE PAYMENT REVERSAL REPORT
Debtors
•
•
•
•
•
•
•
•
The following reports list transactions by user and total per user
CASH SALE INVOICE MAINTENANCE REPORT
ACCOUNT SALE INVOICE MAINTENANCE REPORT
SALE PAYMENT MAINTENANCE REPORT
SALE PAYMENT REVERSAL REPORT
POINT OF SALE CASH SALE INVOICE
MAINTENANCE REPORT (This report show only user totals)
POINT OF SALE ACCOUNT SALE INVOICE
MAINTENANCE REPORT (This report show only user totals)
POINT OF SALE PAYMENT MAINTENANCE REPORT
POINT OF SALE PAYMENT REVERSAL REPORT
END OF DAY PROCESSING
160
F.A.S.T.
PROCESSING / REPORTS MENU
Daily Takings
•
WORKSTATION SUMMARY PER WORKSTATION
Gross Takings
Purchases
Sales
Cash Up Summary
Float Opening Balance
Payment Method Totals
Refunds
Float Closing Balance
This report helps you to reconcile each workstation or till point.
It shows you what and how much each workstation or till point
should have in it. This is exceptionally useful if you have a
physical cash drawer on each workstation.
•
WORKSTATION SUMMARY FOR ALL WORKSTATIONS
Gross Takings
Purchases
Sales
Cash Up Summary
Float Opening Balance
Payment Method Totals
Refunds
Float Closing Balance
This report helps you to reconcile all workstations.
It shows you what and how much all workstation or till points
collectively should have. This is exceptionally useful when you are
doing your bank deposit as it shows you a breakdown per
payment method to help you to fill in the deposit slip.
All End-Of-Day and Month End reports are saved in a date stamped
format. Sometimes you might have a printer jam or the might lose your
End-Of-Day reports. If this happens, just locate the report you wish to
reprint in the “C:\FAST\DATA” folder and send it to the printer.
161
END OF DAY PROCESSING
PROCESSING / REPORTS MENU
F.A.S.T.
MONTH END PROCESSING
In addition to the processing functionality during the END OF DAY
PROCESSING module, there are certain other functions, for example
processing of statements, ageing, V.A.T. reporting are performed when
this module is run as the timing of these functions, by nature, are month
end procedures. Hence F.A.S.T. caters for this module that performs these
tasks as well as, like END OF DAY PROCESSING allows you to set the
“New System Date”. One criteria for the selecting of this module is that
the current system date must at least be the 20th of the month or greater.
Otherwise the following message will appear.
ERROR : Unable to run month end before the 20th.
This is also a critical maintenance module, so therefore all other users
must be logged out in order for this operation to commence. Once
initiated, it will stop all other users from entering F.A.S.T. until complete.
For the initiation and main processing functionality of this module, see the
previous section on USING THE SYSTEM
PROCESSING / REPORTS MENU
END OF DAY PROCESSING
as it is virtually identical except that when entering the
“New System Date”, the new month must be greater than the current one.
If the month you are running this process for is the specified “Year End”,
then during this process, statistical information(month to month data) will
also be re-initialised.
F.A.S.T. will prompt you for confirmation.
MONTH END PROCESSING
162
F.A.S.T.
PROCESSING / REPORTS MENU
In addition to the reports printed at END OF DAY PROCESSING the
following reports are also automatically printed when you run this process.
•
Debtors
CUSTOMER STATEMENTS
•
General
V.A.T. REPORT (Below is a typical example of this report)
F.A.S.T. System
===============
V.A.T. Report For QUALITY PRODUCTS 2004-01-20 : 21:07:31
PAGE 1
Report From 2004-01-01 To 2004-01-31
PURCHASES
--------3 Purchases processed.
Total value :
(Non-Registered V.A.T. Suppliers) :
(Registered V.A.T. Suppliers) :
3,591.33
0.00
3,591.33
1 Purchase Credit Note processed.
Total value :
40.36
1 Purchase Payment processed.
Total V.A.T. deductions :
0.00
2 Purchase Payment Reversals processed.
Total V.A.T. deduction reversals :
0.00
SALES
----4 Invoices processed.
Total value :
11,113.63
Total value :
550.00
3 Invoice Payments processed.
Total V.A.T. deductions :
0.00
1 Invoice Payment Reversal processed.
Total V.A.T. deduction reversals :
0.00
2 Invoice Credit Notes processed.
-----------------------------------INPUT V.A.T.
436.08
OUTPUT V.A.T.
622.15
-----------------------------------NETT PAYABLE
186.07
====================================
163
MONTH END PROCESSING
PROCESSING / REPORTS MENU
F.A.S.T.
GENERAL REPORTS
WORKSTATION SUMMARY
Spot Checking
This report has the following options. It can be used to do a spot check on
any workstation or till point at any time during the day.
•
WORKSTATION SUMMARY PER WORKSTATION
Gross Takings
Purchases
Sales
Cash Up Summary
Float Opening Balance
Payment Method Totals
Refunds
Float Closing Balance
This report helps you to reconcile a workstation or till point.
It shows you what and how much each workstation or till point
should have in it. This is exceptionally useful if you have a
physical cash drawer on each workstation.
•
WORKSTATION SUMMARY FOR ALL WORKSTATIONS
Gross Takings
Purchases
Sales
Cash Up Summary
Float Opening Balance
Payment Method Totals
Refunds
Float Closing Balance
This report helps you to reconcile all workstations.
It shows you what and how much all workstation or till points
collectively should have. This is exceptionally useful when you are
doing your bank deposit as it shows you a breakdown per
payment method to help you to fill in the deposit slip.
GENERAL REPORTS
164
F.A.S.T.
PROCESSING / REPORTS MENU
DAILY AUDIT TRAIL
This module has a multi-report function. The following reports are
generated.
Creditors
•
•
•
•
The following reports list transactions by user and total per user
CASH PURCHASE MAINTENANCE REPORT
ACCOUNT PURCHASE MAINTENANCE REPORT
PURCHASE PAYMENT MAINTENANCE REPORT
PURCHASE PAYMENT REVERSAL REPORT
Debtors
•
•
•
•
•
•
•
•
165
The following reports list transactions by user and total per user
CASH SALE INVOICE MAINTENANCE REPORT
ACCOUNT SALE INVOICE MAINTENANCE REPORT
SALE PAYMENT MAINTENANCE REPORT
SALE PAYMENT REVERSAL REPORT
POINT OF SALE CASH SALE INVOICE
MAINTENANCE REPORT (This report show only user totals)
POINT OF SALE ACCOUNT SALE INVOICE
MAINTENANCE REPORT (This report show only user totals)
POINT OF SALE PAYMENT MAINTENANCE REPORT
POINT OF SALE PAYMENT REVERSAL REPORT
GENERAL REPORTS
PROCESSING / REPORTS MENU
F.A.S.T.
PROFIT REPORTS
The following date range option is available for reporting profit within
a period.
The following reports are generated :
Item Profitability Report
This report list all Items within Item Group within Product Group,
that have transactions within the date period specified.
Report Sequence :
Product Group by Item Group by Item
Totals by Item, Item Group, Product Group, Grand Total
Item Group Description
Item Code
Item Description
Quantity Sold
Turnover at Cost
Turnover at Retail
Gross Profit
Markup %
G.P. Percentage
GENERAL REPORTS
166
F.A.S.T.
PROCESSING / REPORTS MENU
Gross Profit Report
This report is a summary of the Item Profitability Report.
It lists all Item Groups within Product Groups that have
transactions within the date period specified.
Report Sequence :
Product Group by Item Group by Item
Totals by Item, Item Group, Product Group, Grand Total
Item Group Description
Quantity Sold
Turnover at Cost
Turnover at Retail
Gross Profit
Markup %
G.P. Percentage
Till Item Detail Report
This is a detailed report of all items by users within workstation
within date. It is exceptionally useful to verify items sold between
shifts or to do spot checks on users or till points. It can also be
used to gauge profitability per user and / or per workstation.
Report Sequence :
Date by Workstation I.D. by User by Item Group by Item
Totals by User, Workstation ID, Transaction Date, Grand Total
Item Group Description
Item Code
Item Description
Quantity Sold
Total Including V.A.T.
Turnover at Cost
Turnover at Retail
Gross Profit
Markup %
G.P. Percentage
167
GENERAL REPORTS
PROCESSING / REPORTS MENU
F.A.S.T.
V.A.T. Split Report
This is a summary report per Product Group that shows the
turnover between V.A.T.-able and non-V.A.T.-able items.
Report Sequence :
Product Group
Totals by Product Group, Grand Total
Product Group Description
No V.A.T.
With V.A.T.
Total
GENERAL REPORTS
168
F.A.S.T.
PROCESSING / REPORTS MENU
V.A.T. REPORT
You can draw a V.A.T. Report between any date range. The following
date range option is available for reporting V.A.T. within a period.
V.A.T. Reports are automatically generated during the
MONTH END PROCESSING module. The transactions selected for
this automatic one are for a single month only. You would typically
find that your bookkeeper or accountant would request V.A.T. Reporting
for a two month period. You can use this module to extract such
information.
To view a typical example of a V.A.T. Report see the following section.
USING THE SYSTEM
PROCESSING / REPORTS MENU
MONTH END PROCESSING
General
169
GENERAL REPORTS
UTILITIES
F.A.S.T.
11. UTILITIES
SYSTEM DEFAULTS
SET GENERAL COMMENTS
This module is used to set the comment details that appear on certain
documents. The following is an example of the options available to set
comments for. Each set of comments consist of 5 lines x 70 characters
each line. These comments ill appear centred at the bottom of each
document respectively.
SET EARLY PAYMENT DAYS
This module is used to set the number of days of early settlement in
respect of payments that are received within the early settlement period.
While capturing payments for debtors, if you select the “Payment type”
to be “Early Settlement”, this parameter is used when F.A.S.T. determines
whether there are invoices greater than this number of days old. If there
are, F.A.S.T. will show you a message telling you that you are unable to
capture early settlement as there are invoices outstanding greater than
the early settlement period. If you change this parameter, all previous
invoices captured against payments are left as such. The change will
take effect only from payments captured after the change. F.A.S.T. also
checks whether the dates of invoices selected for early settlement period
fall within the number of days set by this parameter.
GENERAL REPORTS
170
F.A.S.T.
UTILITIES
WHO’S LOGGED IN
This module is used to see who is logged into F.A.S.T. and specifically
what module they are in. The following is an example of a typical screen
you would see. This screen gives you an on-line, real-time view. So as
users are logging in and out of F.A.S.T. and as they are going in and
coming out of modules, you will see the “Module Status” changing showing
you this.
A typical use for this module would be that, you are ready to proceed with
END OF DAY PROCESSING yet F.A.S.T. continues displaying a
message of the following example.
ERROR – All other users must be logged out to enable end of day.
171
SYSTEM DEFAULTS
F.A.S.T.
UTILITIES
PRINTER DATA SETUP
PRINTER DEFINITIONS
F.A.S.T. sets up the following default dot matrix type printers on
Installation as these contain the most commonly used configuration
parameters in regards to character printing properties and till drawer
kick functionality used by F.A.S.T.
•
•
•
•
I.B.M. PROPRINTER / COMPATIBLE
OKI MICROLINE 184 TURBO
EPSON LX 300
EPSON TMU210 40 COLUMN WITH DRAWER INTERFACE
Certain printers however have different control sequences to others in
respect of character printing properties. In order to set up additional
printers to the default ones set up on installation, you can use this module
to accomplish this within F.A.S.T. All you have to do is allocate a code and
a description to the new printer.
PRINTER DATA SETUP
172
F.A.S.T.
UTILITIES
PRINTER CONFIGURATIONS
Once a printer has been set up, you can add or change the print
configurations of it by selecting the printer and then the type of
configuration you require to set for it. The following configuration options
are available for each printer.
Once this is done just type in the ASCII value for each parameter for
each configuration option. You should find these values in the technical
documentation that is supplied with your printer under the
“Programming Guide” section.
To save the parameters, press the “ F3 “ key and type in the number of
parameters you require to save for the configuration option.
173
PRINTER DATA SETUP
UTILITIES
F.A.S.T.
CASH REGISTER DATA SETUP
CASH REGISTER DEFINITIONS
F.A.S.T. sets up a default cash register on installation.
Just as printers, certain cash registers however have different control
sequences to others in respect of opening the drawer. In order to set up
additional cash registers to the default ones set up on installation, you can
use this module to accomplish this within F.A.S.T. All you have to do is
allocate a code and a description to the new cash register.
CASH REGISTER DATA SETUP
174
F.A.S.T.
UTILITIES
CASH REGISTER CONFIGURATIONS
Once a cash register has been set up, you can add or change the control
sequences of it by selecting the cash register and then the type of
sequence you require to set for it. The following configuration options
are available for each cash register.
Once this is done just type in the ASCII value for each parameter for
each configuration option. You should find these values in the technical
documentation that is supplied with your cash register under the
“Programming Guide” section.
To save the parameters, press the “ F3 “ key and type in the number of
parameters you require to save for the configuration option.
175
CASH REGISTER DATA SETUP
F.A.S.T.
UTILITIES
USER FILE MENU
USER FILE MAINTENANCE
This is where the maintenance of all configurations of user Access I.D.’s
are performed.
This module comprises of two input screens namely :
Login File Maintenance
User Access Rights Maintenance
It caters for the functionality of, for example, setting up new and removing
users or changing specific details pertaining to a user. Even maintaining a
user’s access rights within the system. All these functions are performed
by utilising this module.
Login File Maintenance
Once you have typed in a Login I.D. that already exists, F.A.S.T. will
prompt you as to whether you would like to either “ C(hange) “ or
“ D(elete) “ the specific I.D. If you have typed in an Access I.D. that does
not exist in the database then F.A.S.T. will prompt you as to whether you
would like to authorise a new user Access I.D. “ Y(es) “ or “ N(o) “.
A scroll facility is also made available to you on the “Login I.D.” field for
easy selection of an existing Access I.D.
CASH REGISTER DATA SETUP
176
F.A.S.T.
UTILITIES
If your Access ID has been set with a “Screen Mode” mode of “2. 43 x 80”
then your screen will appear with 43 lines and 80 columns, similar to the
following and all data relative to this screen will be visible :
177
USER FILE MAINTENANCE
F.A.S.T.
UTILITIES
User Access Rights Maintenance
This sub module allows for the allocation of user access rights within the
system. Simply navigate this menu as you would with F.A.S.T.’s normal
overlap menu structure and then select the type of access you would like
to issue to the specific user. Notice that you can select one of three
options per module per user.
USER FILE MAINTENANCE
178
F.A.S.T.
UTILITIES
CHANGE PASSWORD
This module is where password maintenance is performed. It consists of
three input fields. F.A.S.T. will prompt you to firstly type in your
“Current password”.
The F.A.S.T. will prompt you to type in the following.
If the “Current Password” or “Verify new password” fields are entered
incorrectly, F.A.S.T. will not allow you to continue to the next stage of
input. The “Verify new password” field is used to ensure that you did not
mistakenly type in an unintended password.
179
USER FILE MAINTENANCE
F.A.S.T.
UTILITIES
SET DEFAULT COLOURS
Each user set up in F.A.S.T. has the ability to change the screen default
colours. This module is where this maintenance is performed. The
following example screen shows how to set the attributes of each screen
component. Next to each listed component is the attribute number,
although all you have to do on each field is press either the
▲
│
or
│
▼
Arrow keys to change the value for the attribute you are working on.
Towards the center of the screen F.A.S.T. displays a sample screen
that is a miniature version of the actual full screen for you to see the
effects of your changes.
USER FILE MENU - CHANGE PASSWORD
180
F.A.S.T.
UTILITIES
12. HOW TO EXIT THE SYSTEM
Once you have completed all necessary tasks or are requested to exit
F.A.S.T. all you have to do is return to the main menu and simply press
the “ Esc “ key. At this point the following message will appear requesting
you of what action to take. If you press “ Y “ you will exit F.A.S.T. normally
and return to your Windows Desktop. Remember, if you do not exit
F.A.S.T. this way, the system will keep your Access I.D. status as still
logged in and you will have to clear this status. This will be covered in the
following section :
USING THE SYSTEM
CLEARING USERS
181
USER FILE MENU - SET DEFAULT COLOURS
HOW TO EXIT THE SYSTEM
F.A.S.T.
13. CLEARING USERS
This module would be used when you require to clear users after
F.A.S.T. displays the following message while trying to log in.
ERROR – Your login is already in use.
To access this module, just double-left click on the Traffic Light icon
on your Windows Desktop.
This module is used for clearing users on F.A.S.T.
You would clear users for one of three reasons namely :
The user did not exit F.A.S.T. normally
eg. Power failure or communication error.
To terminate a user from F.A.S.T.
After a restore process the critical maintenance
indicator is still set.
Once you have accessed this module, the following pick-list will appear :
If you select option “1” you would also be requested to type in the
Access I.D. you would like to clear. Once this has been completed, the
necessary action will be processed and you can then Login to F.A.S.T.
again.
How to Exit F.A.S.T.
182
F.A.S.T.
CLEARING USERS
14. CRITICAL ERRORS
Introduction
There are two categories of errors that F.A.S.T.’s functionality is designed
to handle namely :
Runtime Errors – Program or module logic errors
Database Errors – BTRIEVE errors
If any of these errors occur resulting in a direct halt to VBANK, call
support immediately as these could be critical to the operating integrity
of the system. This section lists each error within category with a brief
description as a reference when communicating with either a system
administrator or system developer.
Runtime Errors
1 - NEXT without FOR
2 - Syntax error
3 - RETURN without GOSUB
4 - Out of DATA
5 - Illegal function call
6 - Overflow
7 - Out of memory
8 - Label not defined
9 - Subscript out of range
10 - Duplicate definition
11 - Division by zero
12 - Illegal in direct mode
13 - Type mismatch
14 - Out of string space
16 - String formula too complex
17 - Cannot continue
18 - Function not defined
19 - No RESUME
20 - RESUME without error
(PRINTER ERROR)
24 - Device timeout
25 - Device fault
(PRINTER ERROR)
26 - FOR without NEXT
27 - Out of paper
29 - WHILE without WEND
30 - WEND without WHILE
33 - Duplicate label
183
Runtime Errors
HOW TO EXIT THE SYSTEM
F.A.S.T.
35 - Subprogram not defined
37 - Argument-count mismatch
38 - Array not defined
40 - Variable required
50 - FIELD overflow
51 - Internal error
52 - Bad file name or number
53 - File not found
54 - Bad file mode
55 - File already open
56 - FIELD statement active
57 - Device I/O error
(NETWORK / PRINTER ERROR)
58 - File already exists
59 - Bad record length
61 - Disk full
62 - Input past end of file
63 - Bad record number
64 - Bad file name
67 - Too many files
68 - Device unavailable (NETWORK / PRINTER ERROR)
69 - Communication-buffer overflow
70 - Permission denied
71 - Disk not ready
72 - Disk-media error
73 - Feature unavailable
74 - Rename across disks
75 - Path/File access error
(NETWORK ERROR)
76 - Path not found
(NETWORK ERROR)
How to Exit F.A.S.T.
184
F.A.S.T.
CLEARING USERS
Database Errors
1: The operation parameter is invalid
2: The application encountered an I/O error
3: The file is not open
4: The application cannot find the key value
5: The record has a key field containing a duplicate key value
6: The key number parameter is invalid
7: The key number has changed
8: The current positioning is invalid
9: The operation encountered the end-of-file
10: The key field is not modifiable
11: The specified filename is invalid
12: The MicroKernel cannot find the specified file
13: The MicroKernel could not open the extension file for an extended file
14: The MicroKernel cannot create or open the pre-image file
15: The application encountered an I/O error during pre-imaging
16: The application encountered an expansion error
18: The disk is full
19: The application encountered an unrecoverable error
20: The MicroKernel or Btrieve Requester is inactive
21: The key buffer parameter is too short
22: The data buffer parameter is too short
23: The position block parameter is not 128 bytes long
24: The page size or data buffer size is invalid
25: The application cannot create the specified file
26: The number of keys specified is invalid
27: The key position is invalid
28: The record length is invalid
29: The key length is invalid
30: The file specified is not a MicroKernel file
31: The file is already extended
32: The file cannot be extended
33: The MicroKernel cannot unload
34: The specified extension name is invalid
35: The application encountered a directory error
37: Another transaction is active
38: The MicroKernel encountered a transaction control file I/O error
39: A Begin Transaction operation must precede an End/Abort Transaction
operation
40: The file access request exceeds the maximum number of files allowed
185
Database Errors
HOW TO EXIT THE SYSTEM
F.A.S.T.
41: The MicroKernel does not allow the attempted operation
42: A file previously opened in Accelerated mode was not closed
43: The specified record address is invalid
44: The specified key path is invalid
45: The specified key flags are invalid
46: Access to the requested file is denied
47: The number of files opened exceeds the maximum allowed
48: The alternate collating sequence definition is invalid
49: The extended key type is invalid
50: The file owner is already set
51: The owner name is invalid
52: An error occurred while writing to the cache
53: The language interface version is invalid
54: The variable-length portion of the record is corrupt
55: The application specified an invalid attribute for an AUTOINCREMENT key
56: An index is incomplete
57: An expanded memory error occurred
58: The compression buffer length is too short
59: The specified file already exists
60: The specified reject count has been reached
61: The work space is too small
62: The descriptor is incorrect
63: The data buffer parameter specified on an Insert Extended operation is invalid
64: The filter limit has been reached
65: The field offset is incorrect
66: The maximum number of open databases has been exceeded
67: The MicroKernel cannot open the SQL data dictionary files
68: The MicroKernel cannot perform the RI Delete Cascade operation
69: The Delete operation specified a file that is damaged
71: There is a violation of the RI definitions
72: The MicroKernel cannot open the RI referenced file
73: The RI definition is out of sync
74: The MicroKernel aborted the transaction
76: There is a conflict on the referenced file
77: The application encountered a wait error
78: The MicroKernel detected a deadlock condition
79: A programming error occurred
80: The MicroKernel encountered a record-level conflict
81: The MicroKernel encountered a lock error
82: The MicroKernel lost positioning
Database Errors
186
F.A.S.T.
CLEARING USERS
83: The MicroKernel attempted to update or delete a record that was read outside
the transaction
84: The record or page is locked
85: The file is locked
86: The file table is full
87: The handle table is full
88: The application encountered an incompatible mode error
89: A name error occurred
90: The redirected device table is full
91: The application encountered a server error
92: The transaction table is full
93: The record lock types are incompatible
94: The application encountered a permission error
95: The session is no longer valid
96: A communications environment error occurred
97: The data buffer is too small
98: The MicroKernel detected an internal transaction error
99: The Btrieve Requester is unable to access the NetWare Runtime server
100: No cache buffers are available
101: Insufficient operating system memory is available
102: Insufficient stack space is available
103: The chunk offset is too big
104: The MicroKernel does not recognize the locale
105: The file cannot be created with Variable-tail Allocation Tables (VATs)
106: The MicroKernel cannot perform a Get Next Chunk operation
107: The application attempted to perform a chunk operation on a pre-v6.0 file
109: An unknown error was encountered either creating or accessing a semaphore
110: The MicroKernel cannot access the archival logging configuration file
111: The specified filename was not found in the archival logging configuration file
112: The specified file is in use by another client
113: The MicroKernel cannot find the archival log for the specified file
114: The archival log for the specified file is invalid
115: The MicroKernel cannot access the archival logging dump file
116: The file is owned by another Microkernel engine acting as a Gateway
130: The MicroKernel ran out of system locks
132: The file has reached its size limit
133: More than 5 concurrent users attempted to access the same data file
134: The MicroKernel cannot read the International Sorting Rule
135: The specified ISR table is corrupt or otherwise invalid
136: The MicroKernel cannot find the specified Alternate Collating Sequence in
the file
187
Database Errors
HOW TO EXIT THE SYSTEM
F.A.S.T.
138: The NULL indicator position is invalid
139: The MicroKernel has detected an unacceptable value in the key number
143: The MicroKernel cannot allow unauthorized access to files in a secure
MicroKernel database
146: Duplicate system key
147: The log segment is missing
148: A roll forward error occurred
149: SQL Trigger
160: Invalid parameters passed to MicroKernel
161: The maximum number of user count licenses has been reached
162: The client table is full.
163: The NULL indicator cannot be the last segment
169: Protocol mismatch between client cache and remote engine
170: Database login required
171: Database login failed
172: Database name not found
173: Already logged in
174: Logout failed
175: Wrong database URI format
176: File and table name not specified in URI
177: Table not in database
178: Directory not in database
1001: The lock parameter is out of range
1002: A memory allocation error occurred
1003: An invalid memory size parameter was specified
1006: The pre-image buffer parameter is out of range
1007: The files parameter is out of range
1008: The initialization parameter is invalid
1009: The transaction filename parameter is invalid
1010: An error occurred during the access of the transaction control file
1011: The compression buffer parameter is out of range
1012: Invalid /n: option
1013: The task list is full
1015: One of the pointer parameters passed to the MicroKernel is invalid
1016: The MicroKernel is already initialized
1017: The Btrieve Requester is unable to find the resource file WBTRVRES.DLL
1018: The application attempted to call the MicroKernel from a Btrieve callback
function
1019: The MicroKernel cancelled the current Btrieve operation at the request of
the application's Btrieve callback function
Database Errors
188
F.A.S.T.
CLEARING USERS
1020: Btrieve Requester Interface communications error
1021: The MicroKernel failed to initialize
1022: The MicroKernel is shutting down
2000: Internal error
2001: The memory allocation is insufficient
2003: The Requester does not allow local access to the specified file
2004: SPX is not installed
2005: An incorrect version of SPX is installed
2006: There is no available SPX connection
2007: A pointer parameter is invalid
2008: Router cannot find engine
2009: Cannot load MicroKernel Router component
2010: Thunk not possible - the Win32 MicroKernel router could not be found or is
incompatible
2011: Btrieve requester resource DLL not loaded
2012: The Btrieve requester encountered an operating system error
2200: XLT Winsock Error
2201: XLT RPC Error
2300: No more database names are defined
2301: The database name is invalid
2302: Invalid buffer length
2303: The database name must be unique; the specified database name already
exists
2304: The database type is invalid
2305: The specified path for data dictionary or data file locations is invalid
2306: DBNAMES.CFG could not be updated
2307: Cannot open DBNAMES.CFG file
2308: The specified RI flag is invalid
2309: The database is in use
2312: The bound database cannot share table data files
2313: The bound database cannot share data dictionary files
2314: Cannot create DBNAMES.CFG file
2316: Cannot create DDF files for the bound database
2324: Data dictionary files are not bound
2325: Data dictionary files are already bound
2326: Data dictionary files are bound, but do not need to be bound
2329: Data file for a table is not bound
2330: Data file for a table is bound, but does not need to be bound
189
Database Errors
HOW TO EXIT THE SYSTEM
F.A.S.T.
2331: Not allowed to change data dictionary location and change name at the
same time
2332: Not allowed to bind database and change name at the same time
2333: Not allowed to unbind database and change name at the same time
2334: Not allowed to create a data dictionary files and change name at the same
time
2335: Not allowed to change data locations and change name at the same time
2336: Not allowed to change data dictionary location and bind database at the
same time
2337: Not allowed to change data dictionary location and unbind database at the
same time
2338: Not allowed to change the dictionary location and create dictionary files at
the same time
2339: Not allowed to create data dictionary files and bind database at the same
time
2340: Not allowed to create data dictionary and unbind database at the same time
2341: Not allowed to bind database and change data locations at the same time
2342: Not allowed to unbind database and change data locations at the same time
2343: Named database general error
3000: The MicroKernel router encountered a memory allocation error
3001: Local access is unavailable to the MicroKernel router
3002: The MicroKernel router resource DLL is unavailable
3003: The MicroKernel router detected an incompatible network component
3004: The MicroKernel is not responding to the MicroKernel router
3005: The MicroKernel router encountered an operating system error
3006: The MicroKernel router detected an invalid session
3008: Invalid configuration for MicroKernel router
3009: NETinterface.DLL is not loaded
3010: NetWare API DLLs are not loaded
3011: Thunk not possible – the Win32 MicroKernel router could not be found or is
incompatible
3012: Local engine is not accessible to the MicroKernel router
3013: The remote engine is inaccessible to the MicroKernel router because the
networking component is not loaded
3014: The MicroKernel router cannot find an engine
3015: The MicroKernel router encountered an initialization error
3016: The MicroKernel router encountered an internal error
3017: Data buffer of the local engine is too small
3018: The file is already closed
3019: The MicroKernel router encountered a semaphore error
Database Errors
190
F.A.S.T.
CLEARING USERS
3020: An error occurred while loading the MicroKernel
3021: The MicroKernel router received a badly formatted data packet
3022: The MicroKernel router could not send the request to the remote engine
because the specified data buffer length resulted in a data packet object
that is too large
3023: The task table of the MicroKernel router is full
3025: Cannot load IDS client requester
3026: Incompatible IDS client requester
3027: Connection failure to IDS target server
3028: Login failure to IDS target server
3029: IDS Not Allowed
3030: Remote access not allowed
3031: Linux requester cannot connect to this server
PERVASIVE NETWORK SERVICES LAYER ERRORS
THE FOLLOWING 31XX SERIES ARE NETWORK RELATED ERRORS
3103: Server name not found by Pervasive Network Services Layer
3104: The Pervasive Network Services Layer encountered a permission error
3105: No available transport protocol for the Pervasive Network Services Layer
3106: The Pervasive Network Services Layer encountered a connection failure
3107: The Pervasive Network Services Layer is out of memory
3108: The Pervasive Network Services Layer detected an invalid session
3110: The network layer is not connected
3111: Failure during send to the target server
3112: Failure during receive from the target server
3114: The routing table of the Pervasive Network Services Layer is full
3115: Pervasive Network Services Layer encountered a transport failure
3119: No authentication context is available
3124: Pervasive Network Services Layer task table is full
3125: The Pervasive Network Services Layer was unable to resolve the Novell
Directory Services name into a NetWare server name
3126: The Pervasive Network Services Layer was unable to resolve the given
filename into a valid path
3127: Failure during send to the IDS target server
3128: Failure during receive from the IDS target server
3131: Pervasive Network Services Layer encountered an error while reconnecting
3132: Unsupported Function
4083: Component not loaded
4086: An internal error occurred. Utilities Requester receive size too small. Verify
that the correct components are loaded
191
Database Errors
HOW TO EXIT THE SYSTEM
F.A.S.T.
5000: Client requires encryption
5001: Server requires encryption
6000: Orphan Found
6002: Invalid Column
6003: Foreign Key Not Found
6005: Column Not Nullable
6006: Invalid Data Type
6007: Invalid Index Number
6008: Too Many Segments
6009: Index Name Duplicate
7001: Invalid connection handle specified
7002: NULL pointer specified
7003: Buffer was too small
7004: A general failure occurred
7005: Invalid data type specified
7006: Setting value is out of range
7007: At least one selection item is invalid
7008: Invalid sequence number
7009: Data on open files is not available
7010: Client ID is invalid
7011: Insufficient access rights
7012: Named database already exists
7013: Named database does not exist
7014: DTI not initialized
7015: File not open
7016: Dictionary files already exist
7017: Dictionary path in use
7018: Invalid DSN name
7019: DSN already exists
7020: Specified DSN does not exist
7021: Invalid open mode for DSN
7022: Component not loaded
7023: The database files cannot be deleted because they are shared with another
database
7024: Invalid Btrieve Security Policy
7064: No license obtained for the product
7065: A product has not been obtained
7101: Invalid character in the license string
7102: Illegal license type is defined
Database Errors
192
F.A.S.T.
CLEARING USERS
7108: License key length is too long
7109: No such license exists
7110: There is at least one temporary license that has already expired, and there
are no other than temporary licenses installed on the system
7111: Temporary licenses cannot be removed. The license becomes invalid after
its expiration date.
7112: License is already installed
7113: Invalid license key. Verify the provided key.
7115: Invalid product ID
7117: License key is too long
7118: The server is not running. Unable to show, apply, or remove a license.
Verify that the server is running and that network communications are
functioning.
7119: The local server is not running. Unable to show, apply, or remove a license.
7120: The license is not removable
7122: Your trial license has expired
8001: The Services DLL encountered an error while allocating memory
8002: The component ID string was not found
8003: Thunk path is not accessible to the Services DLL
8005: Interface not initialized
8006: The specified component was not found
8007: Error retrieving Win32 version information
8008: Information mismatch in component ID
8009: Required information missing in component ID
8010: Error while opening a file to retrieve component ID
8012: Required information for binding rule is missing
8013: Error locating a component
8016: Invalid instance specified
8017: Invalid version information structure
8018: Item not found by Services DLL
8019: Library not accepting interface requests
8020: Error loading component
8022: Component not initialized
8023: Invalid filename passed to Services DLL
8024: Invalid function name
8027: Required attribute missing in component ID
8030: Return buffer too small for information
8032: Component ID is invalid
8035: Invalid interface for NetWare platform
193
Database Errors
HOW TO EXIT THE SYSTEM
F.A.S.T.
8039: Invalid operating system handle specified
8040: CRC check on component ID failed
8098: Invalid column-level GRANT statement
8099: Only one user can be connected to database when altering security state
8500: An error occurred during the Smart Components initialization
8502: An error occurred when trying to locate W3UPIXYY.DLL
8503: An invalid W3UPIXYY.DLL has been found
8504: An error occurred when trying to create system semaphore
8505: An initialization error occurred when trying to establish a session with the
Workgroup engine
8506: A fatal error occurred when loading the MicroKernel
8507: No valid session was found
8508: An error occurred when attempting to enable Btrieve access
8509: A timeout occurred during the initialization of the MicroKernel
8510: A fatal error occurred when loading the Scalable SQL engine
8511: An error occurred when attempting to enable SQL access
8512: A timeout occurred during the initialization of the Scalable SQL engine
8513: An error occurred when disabling Btrieve access
8514: An error occurred when unloading the MicroKernel
8515: An error occurred when disabling SQL access
8516: An error occurred when unloading the Scalable SQL engine
8517: An error occurred when closing the session with the Workgroup engine
8518: An error occurred when attempting to allocate system memory
8519: A fatal error occurred when loading the SRDE
8520: A timeout occurred during the initialization of the SRDE module
8521: An error occurred when unloading the SRDE module
8590: An error occurred in the database manager while initializing Smart
Components Manager
8591: The database manager is already loaded
8592: Insufficient memory to load the database manager
8593: An error occurred while the database manager was creating a system thread
8594: Engine cannot be restarted
10000: You have been unexpectedly disconnected from the server
10001: You have been unexpectedly disconnected from the server
10002: You have been unexpectedly disconnected from the server
10003: You have been unexpectedly disconnected from the server
10004: You have been unexpectedly disconnected from the server
Database Errors
194
F.A.S.T.
CLEARING USERS
10005: You have been unexpectedly disconnected from the server
10006: You have been unexpectedly disconnected from the server
10007: You have been unexpectedly disconnected from the server
10008: You have been unexpectedly disconnected from the server
10009: You have been unexpectedly disconnected from the server
10010: You have been unexpectedly disconnected from the server
10011: You have been unexpectedly disconnected from the server
10012: You have been unexpectedly disconnected from the server
10013: You have been unexpectedly disconnected from the server
10014: You have been unexpectedly disconnected from the server
10015: You have been unexpectedly disconnected from the server
10016: You have been unexpectedly disconnected from the server
10017: You have been unexpectedly disconnected from the server
10018: You have been unexpectedly disconnected from the server
10019: You have been unexpectedly disconnected from the server
10020: You have been unexpectedly disconnected from the server
10021: You have been unexpectedly disconnected from the server
10022: You have been unexpectedly disconnected from the server
10023: You have been unexpectedly disconnected from the server
10024: You have been unexpectedly disconnected from the server
10025: You have been unexpectedly disconnected from the server
10026: You have been unexpectedly disconnected from the server
10027: You have been unexpectedly disconnected from the server
10028: You have been unexpectedly disconnected from the server
10029: You have been unexpectedly disconnected from the server
10030: You have been unexpectedly disconnected from the server
10031: You have been unexpectedly disconnected from the server
10032: You have been unexpectedly disconnected from the server
10033: You have been unexpectedly disconnected from the server
10034: You have been unexpectedly disconnected from the server
10035: You have been unexpectedly disconnected from the server
10036: You have been unexpectedly disconnected from the server
10037: You have been unexpectedly disconnected from the server
10038: You have been unexpectedly disconnected from the server
10039: You have been unexpectedly disconnected from the server
10040: You have been unexpectedly disconnected from the server
10041: You have been unexpectedly disconnected from the server
10042: You have been unexpectedly disconnected from the server
10043: You have been unexpectedly disconnected from the server
10044: You have been unexpectedly disconnected from the server
10045: You have been unexpectedly disconnected from the server
195
Database Errors
HOW TO EXIT THE SYSTEM
F.A.S.T.
10046: You have been unexpectedly disconnected from the server
10047: You have been unexpectedly disconnected from the server
10048: You have been unexpectedly disconnected from the server
10049: You have been unexpectedly disconnected from the server
10050: You have been unexpectedly disconnected from the server
10051: You have been unexpectedly disconnected from the server
10052: You have been unexpectedly disconnected from the server
10053: You have been unexpectedly disconnected from the server
10054: You have been unexpectedly disconnected from the server
10055: You have been unexpectedly disconnected from the server
10056: You have been unexpectedly disconnected from the server
10057: You have been unexpectedly disconnected from the server
10058: You have been unexpectedly disconnected from the server
10059: You have been unexpectedly disconnected from the server
10060: You have been unexpectedly disconnected from the server
10061: You have been unexpectedly disconnected from the server
10062: You have been unexpectedly disconnected from the server
10063: You have been unexpectedly disconnected from the server
10064: You have been unexpectedly disconnected from the server
10065: Connection attempt timed out
Database Errors
196