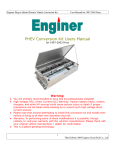
1
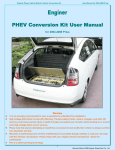
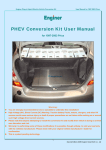
Enginer Plug-in Hybrid Electric Vehicle Add-on System User Manual for Generation 3 Prius PHEV Add-on System User Manual For Generation 3 (2010-2012) Prius 1. 2. 3. 4. 5. Warnings: You are strongly recommended to hire a qualified professional undertake this installation! High Voltage (HV) Direct Current (DC) Warning: Traction battery packs, motors, chargers, and other HV sources could cause serious injury or death if proper precautions are not taken while working on or around such high voltage direct current sources. Please note that anyone attempting to install this System and modify their vehicle is doing so at their own discretion and risk. Warranty: In performing some of these modifications it is possible though unlikely, to void your warranty with the vehicle manufacturer. Please check and confirm with your original vehicle manufacturer / dealer. This is a patent pending technology. 1 Enginer, Inc. 03 December 2011 Enginer Plug-in Hybrid Electric Vehicle Add-on System User Manual for Generation 3 Prius Attention 1. Please read this manual carefully and follow the instructions before and during installation. 2. Please never connect wires improperly and do carefully check them against the instruction for at least 3 times before switching the power on. 3. New system batteries should be charged to full and well balanced before driving. 4. Please monitor individual cell voltages and balance them regularly. 5. Please check carefully to make sure the voltage as labeled on the charger matches your input electricity source. 6. To extend battery life, the System should be charged to full each time, especially before the System is to be left unused for over 10 days. 7. To avoid possible battery failure, please turn off the BMS if the System is not to be used for over 10 days. 8. The main switch (circuit breaker) on the right hand side of the metal panel will be switched off automatically whenever current exceeds the pre-set limit (125A). In the event that this switch is turned off, you need to manually press it back on before use. You are suggested to report such errors to Enginer or your installer if this keeps happening. 9. Please switch the equipment off immediately if any damage or defect occurs. 10. Please do not disassemble the System if it is working properly and if you are not a qualified professional. 11. Charger and DC-DC converter fuses can be replaced if blown. A. Charger fuse: Fuse block of the charger is inserted in the AC plug. You can use a flat screw driver to pivot the block in the middle edge, above the fuse sign and pull it outward. B. Converter fuse: The fuse block is connected to the high voltage cord. You can open the block and replace the fuse. 2 Enginer, Inc. 03 December 2011 Enginer Plug-in Hybrid Electric Vehicle Add-on System User Manual for Generation 3 Prius Driving Techniques for Maximizing Enginer PHEV Mileage 1. Maintain steady speed at all times if possible; 2. When your desired driving speed is achieved, feather the accelerator or lifting your foot off entirely, then very lightly easing back in to maintain a steady speed of under 34 miles (or 70km) per hour. That motion activates your Prius EV feature to consume battery power only. * Tests in this driving style on Enginer Prius PHEV have shown way better than 100MPG or 100KM/2.83L, with the best factory field test outcome of 160MPG or 100KM/1.7L for accumulated test drive distance of 165KM. 3 Enginer, Inc. 03 December 2011 Enginer Plug-in Hybrid Electric Vehicle Add-on System User Manual for Generation 3 Prius User Guide Enginer Add-on System is designed for PHEV blended mode operation and therefore EV mode switch is not required although it is an option. This PHEV technology minimizes possible impact on your hybrid vehicle to preserve your original warranty. The primary goal of the System is to improve fuel efficiency / reduce gasoline consumption. The PHEV switch should be in the ON position most of the time unless the PHEV red light is ON which indicates low PHEV battery level, or unless you wish to preserve battery energy for later use. When your vehicle and Enginer PHEV switch are both on, the green indicator should also be on, meaning the System is operational. If the red light is on as well, it means low battery or System error. If the red light stays on all the time, please contact your installer or Enginer customer service via Contact Us page on www.Enginer.us. If your vehicle and PHEV switch are both on but green light is off, please check the System circuit breaker by pressing it off and on again to make sure it is engaged. If problem persists, please seek support from Enginer or your installer. Enginer Battery Management System (BMS) stores diagnostics information on an SD card inside and displays instant performance data on the dash LCD monitor. Please refer to BMS User Manual for details and, when making inquiry, provide Enginer or your installer with your SD card data. To charge the System, it is recommended to use a Gauge #14 extension cord (15A) and plug it into a standard 120VAC/220VAC power outlet with a 20A circuit breaker. Its average current is 10A @120VAC or 5A @220VAC. Once it is plugged in, the external dual color LED indicator should turn solid red. It turns green when batteries are fully charged and the charger stops automatically--No hand shut off is necessary. It takes about 5 hours to charge up from drained. Lithium-Ion batteries should be charged as often as possible even if they have not been used up. If the indicator is not on or flashing red, please check the charger fuse or contact your installer or Enginer for advice. Lithium battery needs to be charged above freezing temperature (32F/0C). If ambient temperature is under freezing point, such batteries should be warmed up before charging to avoid permanent battery damage. With a working PHEV System, the Prius Energy Monitor should stay in seven (7) green bars most of the time. If it often shows eight (8) green bars or only six (6) or fewer blue bars, please contact your installer or Enginer for advice. It is recommended to have access to a scan tool such as Scangauge and a wattage monitor like Kill-A-Watt device to monitor and optimize your driving experience with this PHEV System. 4 Enginer, Inc. 03 December 2011 Enginer Plug-in Hybrid Electric Vehicle Add-on System User Manual for Generation 3 Prius Product Overview The Enginer PHEV Add-on System is a rechargeable battery set that supplements Prius OEM battery. The System supplies stored electricity which was previously charged from an AC wall socket, providing 40 miles of electrically assisted driving distance per charge, sufficient for most daily commutes. It is safe, reliable and user-environment friendly. What is Included in this Product 2/ 4 / 8KWH Lithium-Ion batteries BMS—monitoring and balancing batteries to avoid individual cells over charge / discharge, extending battery life. 48VDC / 15A high power charger. 5KW DC / DC converter. Fire extinguisher will be activated once the inside temperature exceeds 221F—First of all, please remove the cover and pull out the blue isolation insert. Automatic DC circuit breaker—to disconnect high voltage equipment operation in the event of a high current fault. Metal mounting panel and battery holder (s). How the System Works 110VAC (USA) household electricity Enginer PHEV Add-on System Prius OEM stock battery Jointly drive Prius electric motor. Type 2KWH Lithium-Ion 4KWH Lithium-Ion 8KWH Lithium-Ion Capacity 40 AH 80 AH 160 AH Average Gas Mileage 80 mpg 80 mpg 80 mpg Mixed (EV) Range 20 (10) 40 (20) 80 (40) Charge time 3 hours 5 hours 8 hours Warranty Two-year part limited warranty applies unless extended warranty is purchased. If equipment defect occurs in normal use conditions, Enginer shall repair or replace the components only. Use this information at your own risk: Other than as specified above there is no additional warranty expressed nor implied and Enginer shall not be liable for any of your past, present, nor future actions. Even if you perform these modifications to the latter you could still damage any number of components in your vehicle causing it to no longer functional. Even if it appears to function properly, your actions may cause it to self destruct with collateral damage to surrounding properties other than your vehicle. By utilizing these ideas and instructions in an attempt to enhance national security, reduce gasoline consumption, vehicle emissions, your carbon footprint, or smog, you do so at your own risk & peril. Certifications Enginer PHEV Add-on System has been certified by FCC, CE and C-TICK. 5 Enginer, Inc. 03 December 2011 Enginer Plug-in Hybrid Electric Vehicle Add-on System User Manual for Generation 3 Prius Preparing and Assembling Enginer PHEV Add-on System Please carefully read and understand these instructions before opening the product container. Installing and Use 1. 2. 3. 4. Prepare a flat area near the end of your Prius, and cover the floor with a 5x5 feet soft and flat cloth or cardboard. The equipment / components are heavy and should be handled by two adults. Knock / pull open the wooden or carton boxes carefully. Take out all insulating foam and check inside component and accessory bags against the following list: ■ ECU signal wires (green, brown and white) ■ One switch panel with On / Off switch, red and green LED lights ■ A 6-pin phone wire ■ Converter high voltage cable (red and black cable with yellow bullet connectors) ■ Power cord for charger input ■ 2 sets of mounting screws (size M8) ■ 1 charger bumper inlet ■ 1 double-sized spanner ■ 1 thread for converter and charger ■ 3 pieces plastic clamps for connecting ECU signal wires to Prius ■ 1 metal mounting panel and square battery holding tray (s) ■ Batteries: 4KWH in 2 packs; 8KWH in 4 packs. Please make sure batteries match your order. ■ DC-DC converter is mounted on the right hand side, with a pair of red and black power cable s linking an Anderson plug to connect battery packs. A pair of HV wires (red and black) and a 6-pin cable at the other end. ■ Battery charger is mounted under the metal panel, left side of the batteries, with a gray power cable and a pair of cord (red and black) with an Anderson plug ■ BMS is mounted on the right side of the battery holding tray. ■ A Circuit breaker / main switch mounted next to the converter. ■ Fire extinguisher is attached on the middle of converter. 6 Enginer, Inc. 03 December 2011 Enginer Plug-in Hybrid Electric Vehicle Add-on System User Manual for Generation 3 Prius Figure 1: 4KWH System Structure Layout 7 Enginer, Inc. 03 December 2011 Enginer Plug-in Hybrid Electric Vehicle Add-on System User Manual for Generation 3 Prius Figure 2: 8KWH System Structure Layout 5. Wiring Check: ① Make sure circuit breaker is in the OFF position, BMS’ interfaces off; ② Charger and converter connections are appropriate, solid and firm; ③ Red cores from batteries and to circuit breaker are connected cor rectly and firmly as shown below: Figure 3: Connection of batteries (4KWH) Figure 4: Connection of batteries (8KWH) 8 Enginer, Inc. 03 December 2011 Enginer Plug-in Hybrid Electric Vehicle Add-on System User Manual for Generation 3 Prius 6. Bumper outlet for charger connection. Black wire = Live line (L); White wire = Null Line (N); Green wire = Ground Line (E). Take the charger cord through the back panel and reach to bumper inlet. You need to get your hand in from under the car and tighten the silver ring of bumper plug. 7. Install the Charger LED into the tail-light, this LED shows charger operation: Red LED: Charging at about 15A. Green LED: Fully charged 8. PHEV switch panel operation: ON:Turn on PHEV DC/DC Converter (LED Green---On; Red—Low Battery) OFF:Turn off PHEV DC/DC Converter (LED Off). 9 Enginer, Inc. 03 December 2011 Enginer Plug-in Hybrid Electric Vehicle Add-on System User Manual for Generation 3 Prius Connecting Enginer PHEV Add-on System to Your Prius Installation Time: 4 hours by professionals. Before installation, please login to Toyota Technical Website techinfo.toyota.com for Reference Instructions. ($15 for two day usage as of June 2009) if you are not familiar with the vehicle or want more detail information. Preparation Tools Required: Screw shell M6~M14 Phillips screwdriver Electric drill Installation Procedure: 1. Turn off your Prius. 2. Remove trunk interior cover on the back of the back seat to gain access to and unplug the orange service plug. 3. Remove 12V auxiliary battery negative terminal. 4. Flip down the back seat and open the panels to gain access to the OEM stock battery output terminals. 10 Enginer, Inc. 03 December 2011 Enginer Plug-in Hybrid Electric Vehicle Add-on System User Manual for Generation 3 Prius Reference: RM000002XNW00LX (for 2010 Prius) 5. Connect the System power cable to positive and negative terminals of the stock battery output power cable. 11 Enginer, Inc. 03 December 2011 Enginer Plug-in Hybrid Electric Vehicle Add-on System User Manual for Generation 3 Prius 6. Install On / Off switch panel. A. Take off the blank panel on the left hand side of your dash board B. Loosen the switch bolt, place it on through the panel hole and tighten it on the panel. After replacing the panel: 7. Hook up ECU Ignition Ready signal to on/off switch panel. Reference: X387000000801LD (for 2010 Prius) SMRG (L5-2) – Yellow: Ignition Ready (Connect to the Green wire of PHEV switch panel) E01 (L5-5) – White-Black: Ground (Connect to the Brown wire of PHEV switch panel) 1. White wire shall not be connected for 2010+ Prius 12 Enginer, Inc. 03 December 2011 Enginer Plug-in Hybrid Electric Vehicle Add-on System User Manual for Generation 3 Prius 8. Lay the 6-Pin cable and the USB cable along the side of the vehicle from front dash board to the trunk area. 9. Remove the spare tire from the spare tire well. 10. Position the battery tray in the spare tire well. Use foam material to raise the bottom if necessary. 11. Lay the large cover plate on top of the battery tray with four bolts installed. Mark up the mounting holes on the floor. 12. Drill three holes each on the two sides of the cover plate for mounting purpose. 13. Place battery packs into the battery tray in the spare tire well. Inject spray foam on the bottom of the battery tray for additional support and safety 14. Wiring: ①Insert the “R” battery 9 pins white plug into the “R” port on BMS, and the “L” one to “L” port; Turn on the BMS to make sure the green light is on. If not, the R and L BMS harness could be in reverse position ②③ 15. Put the cover plate on and connect the Anderson plug labeled “R” to the “R” (Right) battery pack, and “L” to the “L” (Left) pack; 16. Turn on the BMS to make sure the green light is on and the remote display shows data. 17. Plug the 8-pin and 2-pin wires into BMS, and the 6-pin phone wire to the converter, but do not connect the high voltage cable yet. 18. Hook up the 12V auxiliary Battery 19. Insert the orange service plug into the stock battery pack. Slide the handle to lock the service plug. If the service plug is not inserted correctly, it could trigger a trouble code in the vehicle and disable the car. 20. Start your vehicle. Use a digital volt meter to measure the high voltage cable that is going to the converter to verify the voltage and polarity of the hook up. If there is no voltage or the polarity is wrong, check the connection again. 21. Turn off the vehicle. Firmly connect the high voltage cable (red and black wires with yellow bullet connectors) with the converter output connectors; 22. Turn on the vehicle. Turn on the circuit breaker and then the Enginer PHEV switch. Verify the green light on the switch panel and green light on the converter output panel. If there is no green light, check the ECU hookup. The green wire should have 12V and the brown wire is ground. Also measure the voltage between pin 5 and pin 6 of the 6 -Pin phone connector going into the converter. There should be 12V between the pins. 23. Review remote LCD display for Vo (output voltage), Io (output current), Vi (input voltage) and Ii (input current) 23. Once the converter output is verified, turn off the vehicle and fasten the battery pack and the cover plate. 24. Put back all the removed panels. 13 Enginer, Inc. 03 December 2011 Enginer Plug-in Hybrid Electric Vehicle Add-on System User Manual for Generation 3 Prius 25. Recover back seat and trunk panels. 14 Enginer, Inc. 03 December 2011 Enginer Plug-in Hybrid Electric Vehicle Add-on System User Manual for Generation 3 Prius Your Enginer PHEV Add-on System installation is now complete. Please test the equipment in the following steps: 1. Turn the Enginer circuit breaker off. 2. Disconnect the converter high voltage output to the OEM battery (red and black wires with yellow bullet connectors). 3. Start your vehicle. 4. If the vehicle does not start with the Check Engine light on, do step 5-8. 5. Check Toyota battery orange high voltage service plug to ensure it is plug in correctly, locked and secured. 6. Check splice wires to make sure the connectivity is not compromised and the wire is correct. Splice may occasionally cut off the original wire. 7. Use scan tool to reset Error Code or disconnect the 12V battery and wait for 15 minutes to reset the Error Code. 8. Re-check your vehicle and confirm it is operational. 9. Turn on Enginer PHEV circuit breaker while keeping HV output wires disconnected. 10. Start your vehicle. 11. Check if Enginer PHEV switch panel is only green light on when the switch is at ON position. Also check the light on the converter output panel in the battery box. 12. If the green light is not on, use a meter to check if the Ignition 12V signal is 12V on the PHEV switch panel. Also check the phone cable connector on the converter side to make sure pin 5, 6 have 12V signal. 13. Check OEM battery high voltage. Pay attention to the polarity of the wire. 14. Check PHEV converter output high voltage. Pay attention to the polarity. The voltage should be 5-10V higher than the OEM battery voltage. 15. Turn off the car before connecting the converter high voltage to the OEM battery. 16. Turn on the car in Park, check PHEV battery voltage which should drop 1-5V when charging the OEM battery. 17. If the PHEV voltage drops more than 5 volts, check individual cell voltages to locate weak cell (s) that is / are significantly lower than the peer. 18. Charging batteries. 19. Wait overnight for the cells to be charged and balanced. Final Stage: Mounting Your Enginer PHEV Add-on System: A. Mark six mounting holes on the car according to size and dimension of the System’s mounting brackets. B. Drill six 14mm holes on the marked places. C. Put the well nuts in the holes. D. Put the PHEV kit on the car, and then tighten six 8mm mounting screws with washer and spring ring. Once all the above steps are completed and no defect occurs, so tighten two screws on both sides of the steel lid, you are now safe to drive your Enginer Plug-in Hybrid Electric Vehicle! Please dial Enginer Assistance Hotline at 877-886-8897 if you encounter difficulty during and after installation. Enginer appreciates your efforts to save our environment and wishes you safe and enjoyable driving with your new PHEV! 15 Enginer, Inc. 03 December 2011 Enginer Plug-in Hybrid Electric Vehicle Add-on System User Manual for Generation 3 Prius YOU INSTALLATION NOTE: Contacts US Distributor: Enginer, Inc., Michigan, USA Web: www.Enginer.us Email: [email protected] Toll Free: 877 886-8897 P.O. Box 3, Troy, MI 48099, USA Manufactured By: Enginer, Inc. Shanghai 151 Keyuan Road, Zhangjiang High-Tech Zone, Pudong District, Shanghai 201203, China. 16 Enginer, Inc. 03 December 2011