1
Technical & User Manual
Adrian Hayter
Contents
1 The System
1.1 Disease Model . . . . . . . . . . . . . . . . . . . . . . . . . . .
1
2
2 Development
2.1 Directory Structure . . .
2.2 Setting Up Eclipse . . .
2.3 Setting Up Haggle . . .
2.4 Compiling . . . . . . . .
2.5 Deployment & Execution
2.5.1 Manual Install . .
2.5.2 Automatic Install
.
.
.
.
.
.
.
2
2
3
3
4
4
4
4
3 Data Logs
3.1 diseases.db . . . . . . . . . . . . . . . . . . . . . . . . . . . . .
3.2 measurements.log . . . . . . . . . . . . . . . . . . . . . . . . .
3.3 extra.db . . . . . . . . . . . . . . . . . . . . . . . . . . . . . .
5
5
6
7
.
.
.
.
.
.
.
.
.
.
.
.
.
.
.
.
.
.
.
.
.
.
.
.
.
.
.
.
.
.
.
.
.
.
.
.
.
.
.
.
.
.
.
.
.
.
.
.
.
.
.
.
.
.
.
.
.
.
.
.
.
.
.
.
.
.
.
.
.
.
.
.
.
.
.
.
.
.
.
.
.
.
.
.
.
.
.
.
.
.
.
.
.
.
.
.
.
.
.
.
.
.
.
.
.
4 User Manual
4.1 Graphical User Interface . . . . . . . . . . . . . . .
4.2 Quitting the Application . . . . . . . . . . . . . . .
4.3 Starting the Application without Bluetooth or GPS
4.4 Manually Starting Haggle . . . . . . . . . . . . . .
1
.
.
.
.
.
.
.
.
.
.
.
.
.
.
.
.
.
.
.
.
.
.
.
.
.
.
.
.
.
.
.
.
.
.
.
.
.
.
.
.
.
.
.
.
.
.
.
.
.
.
.
.
.
.
.
.
.
.
.
8
8
9
10
11
The System
The Virtual Disease Experiment is an Android application built to run on
devices that support the haggle architecture. The application broadcasts
1
information about virtual diseases it is currently “infected” with to all devices
in range, and receiving devices are infected by these virtual diseases based on
a simple probability calculation. The application logs all incoming diseases,
and stores information regarding how they are processed. It also regularly
scans for Bluetooth and GPS, recording any Bluetooth addresses and GPS
location data in a separate log.
1.1
Disease Model
The disease model with which the spreading of diseases is simulated is a
simple SEIR model. In this model, each device is originally susceptible to
a disease. Once it is infected by another device, it becomes exposed for a
specified time. Whilst it is exposed, a device has the disease but cannot
yet infect other devices. Once the exposed duration has run out, the device becomes infectious for a specific time. Whilst it is infectious, the device
can infect other devices each disease has an associated infection probability
which indicates the likelihood that another device will be infected. Once the
infectious duration has run out the device is recovered from the disease and
cannot be reinfected.
The SEIR model can be used to simulate SI diseases by setting the exposed duration to 0 and the infectious duration to a really large number (for
example, 2000 years). SIR disease can be simulated by simply setting the
exposed duration to 0.
2
Development
2.1
Directory Structure
All code was developed using the Eclipse IDE, as this is the official Android
development environment. The Eclipse project folder for the application
contains the following files and subdirectories:
• AndroidManifest.xml is a required xml document that is compiled
into the application. It contains information that the device needs to
run the application, as well as what permissions are required by the
device, which the user confirms on installation.
• assets/ is an unused folder in the project.
2
• bin/ is a folder that contains all the binary files that are compiled
in the project. It stores all the compiled .class files, as well as the
resulting .apk file which is uploaded to the device and run to install
the final application.
• default.properties is an Eclipse file that stores information about the
project. This file should not be altered manually.
• gen/ is a folder that contains a generated R.java file, which allows an
application to reference specific GUI elements. This file should not be
altered manually.
• lib/ is a custom folder that contains the haggle.jar library, which is
included in the project and allows the application to interface to the
haggle daemon running on the device.
• res/ is a folder that contains xml files which create the GUI layout of
the application.
• src/ is a folder that contains all the source code of the application.
2.2
Setting Up Eclipse
Eclipse can be downloaded for free from http://www.eclipse.org. It runs
on all major operating systems. To develop for Android you will also need
to install the Android SDK, and the plugin for Eclipse. Google have provided a full tutorial for installing both Eclipse and the SDK, as well as
documentation on how to set up an Android Emulator if you need one:
http://developer.android.com/sdk/installing.html. It should be noted that
the Android emulator will not be able to use haggle, so if you are only trying to develop for a haggle environment, the emulator doesn’t need to be
installed. To open the project in Eclipse, use the File → Import menu, and
choose “Existing Projects into Workspace”.
2.3
Setting Up Haggle
The current build of haggle available for download (0.3) does not contain new
changes that were implemented by Erik Nordström during this project development. These changes include a fix to the JNI implementation which was
3
failing to remove references to deleted Java objects, as well as a tweak to the
Bluetooth settings, allowing a device to be in discovery mode constantly. As
such, you will need to compile the haggle source tree using a compiled version
of the Android source code. Instructions on how to do this are available on the
haggle website: http://code.google.com/p/haggle/wiki/QuickStartAndroid.
2.4
Compiling
Projects in Eclipse should compile automatically, but if this is not the case,
you can force a compilation by clicking the “Run” button (green circle with
a white arrow) in Eclipse. This will create a .apk file in the bin/ directory,
which can be installed on the phone.
2.5
2.5.1
Deployment & Execution
Manual Install
To manually install the application, first use the Android Market to download
a file manager application (there are plenty available for free). Then, open
up the Settings menu on the device and go to “Applications”; make sure
the “Unknown sources” option is checked. Next, mount the SD Card by
either extracting it and directly plugging it into your work computer, or by
connecting the Android device to the computer via USB. Copy the .apk file
that was created in the bin/ directory to the SD Card. Unmount the SD Card
and open up the file manager application on the Android device, navigating
to the SD Card, and click on the .apk file to install it. After the application
is installed, you can execute it from the standard application menu.
2.5.2
Automatic Install
Alternatively, Eclipse can install the application onto any connected device.
First, connect the Android device to your work computer via USB. Then,
click the “Run” button that was used before to build the project. A window entitled “Android Device Chooser” should appear, and will list all devices connected to the computer (including the emulator if it was installed).
Choose the correct device from the list, and click “OK”. The application
will now we installed on the device, and will automatically start running.
If you wish to manually execute it later, you can do so from the standard
application menu.
4
3
Data Logs
When the application is run for the first time, it creates a directory on the
SD Card called “VirtualDisease”, where it stores all of its data. This includes
a small database of diseases that the phone has, a log of all measurements
taken by the device, and a potentially large database of all haggle interactions
the device has taken part in.
3.1
diseases.db
This file is a CSV formatted database which stores information about all the
diseases that the device has been infected with. Each disease is separated by
a new line, and is stored with the following format:
{Disease Name},{Infector MAC },{Infection Timestamp},{Exposure Time},
{Infectious Time},{Infection Probability}
• {Disease Name} is a simple string that denotes the name of the disease,
and can be any value (provided it does not contain a comma). An
example would be COLD or FLU.
• {Infector MAC } is the Bluetooth MAC Address of the phone that
infected the device with this disease. It provides a way to keep track of
which devices infected which, as the infecting devices do not record who
they send diseases to (due to apparent limitations in haggle). A device
that is pre-infected (for purposes of starting an experiment) should
have its own MAC Address in this place, as if it had infected itself.
All colons are removed from MAC Addresses, so an example would be
00237678959F.
• {Infection Timestamp} is a timestamp in microseconds that denotes
the time at which the infection arrived on the device, as is generated
by a call to System.currentTimeMillis() in Java. It is used to calculate
when the disease is in an exposed, infectious, and eventually “cured”
state.
• {Exposure Time} is a timestamp in microseconds that denotes the
amount of time (after initial infection) that the disease is in an “exposed” state, and unable to infect other devices. If you want the dis5
ease to be infectious immediately (for testing experiments), then set
this value to 0.
• {Infectious Time} is a timestamp in microseconds that denotes the
amount of time (after the exposed state has passed) that the disease is
infectious for, and is therefore able to be transmitted to other devices.
• {Infection Probability} is double value that acts as the probability a
device will be infected with the disease. A value of 0.0 will render
the disease harmless, whilst a value of 1.0 will make it infect on every
transmit. Note that this value does not affect the actual transmissions
of the disease, which is all handled by haggle. It is perfectly possible
for two devices to be in close contact with each other, and yet have no
successful transmissions between them.
3.2
measurements.log
This file is an XML document that stores the measurements of each successful
scan the device does, including the MAC addresses that it detects when doing
a Bluetooth scan, any GPS coordinates it receives, and the time at which
the scan was done. An example of the XML is included below:
<log mac="00237678959F">
<measurement timestamp="1281632524440">
<mac>001F5BD7DD3B</mac>
<mac>58B035950083</mac>
<mac>00237679A39F</mac>
</measurement>
<measurement timestamp="1281633735823" longitude="0.0913..."
latitude="52.211..."></measurement>
<measurement timestamp="1281633824394" longitude="0.0919..."
latitude="52.212...">
<mac>00237679A39F</mac>
<mac>002567EA5AA4</mac>
<mac>0026ED2A4295</mac>
</measurement>
</log>
The root node (<log>) includes the MAC address of the device that the application is running on. The child nodes of <log> are all <measurement>
6
nodes, which always have a timestamp attribute. If GPS coordinates have
been received, then the <measurement> node will have a further two attributes, giving the longitude and latitude of the device location. If any
Bluetooth devices have been detected during the scan, they will be added as
child nodes (<mac>) of the <measurement> node. Note that if neither
GPS coordinates were received nor any MAC addresses detected, there will
not be a measurement added to the log.
3.3
extra.db
This file is a CSV formatted database of all haggle interactions that the device partakes in, and what the result of the interaction was. Each interaction
is listed on a new line, and is stored in the following format:
{Disease Name},{Incoming MAC },{Interaction Timestamp},{Interaction Result}
• {Disease Name} is a string that denotes the name of the disease sent
in the interaction. An example would be COLD or FLU.
• {Incoming MAC} is the MAC address of the device that is sending the
disease in the interaction.
• {Interaction Timestamp} is a timestamp in microseconds that denotes
the system time at which the interaction began.
• {Interaction Result} is a value (either 0, 1, or 2) that denotes the result
of the interaction. 0 indicates that the device was not infected with the
disease sent in the interaction, 1 indicates that the device was infected
with the new disease sent in the interaction, and 2 indicates that the
device was already infected with the disease sent in the interaction, and
so nothing happened.
For example, the line “FLU,00237679A39F,1281968156392,1” would indicate
that the disease FLU was sent in the interaction, by device 00237679A39F,
at time 1281968156392, and that it infected the local device (1).
7
4
User Manual
The application was designed with as much automation as possible. As such,
there isn’t much for the end-user to do (or mess up!), so this section will
focus on explaining the interface, and where things can go wrong.
4.1
Graphical User Interface
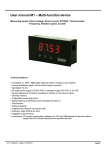
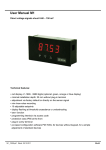
The GUI of the application is very simple and consists of a single screen
which lists information about the application run. At the very top of the
screen, the device ID (Bluetooth MAC address) is listed. This is for data
gathering purposes only, since it saves time having to look up the device
MAC address in the Settings menu.
Figure 1: The main interface of the application.
Below this is the Health status of the device. When no diseases are present
on the device, the Health status is set to“You are healthy.” However, when
one or more diseases are present, the Health status is set to “You are infected
with the following diseases:” and lists them in the format:
“{Disease Name} from {Incoming MAC } ({Disease Status})”
8
Where {Disease Name} is a string denoting the name of the disease, {Incoming
MAC } is the MAC address of the device that infected the local device with
the disease, and {Disease Status} is either “Exposed” or “Infectious”.
If the device has recovered from any diseases it was infected with, then the
Health status is set to “You have recovered from:” and lists the diseases
(along with the MAC address of the infecting device).
Finally, below the health status is the Data Collection status, which informs
the user about what the Bluetooth and GPS chips are doing. If the Bluetooth
or GPS chips are disabled on the device, the respective status will be listed
as “disabled”. Whilst the Bluetooth chip is scanning for nearby devices, its
status will be “Scanning.”, otherwise it will be “Waiting.” The GPS status
will either be “Scanning” (and will try to list the number of satellites it
is currently connected to), or will be “Temporarily Unavailable” or “Lost
Signal”, depending on what error is given by the chip.
4.2
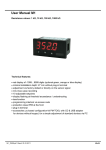
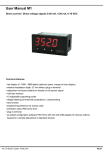
Quitting the Application
The menu button on the device allows the user to quit the application. Pressing it will bring up the following menu:
Figure 2: The “menu” screen.
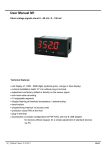
Clicking on the Quit button will bring up a warning box, which asks the user
9
whether they want to completely quit the application, or to simply put it
into the background so it is still running.
Figure 3: The quit application warning box.
It should be noted that pressing the “Home” button on the device should
also put the application into the background.
4.3
Starting the Application without Bluetooth or GPS
It is not necessary to enable Bluetooth or GPS before starting the application,
and the application will run perfectly smoothly (although no measurements
will be taken until at least one is turned on). If Bluetooth is disabled upon
application start, the application will attempt to turn it on by itself, and in
most cases it will succeed. Due to haggle running in the background, it does
not need any user permissions to turn discoverability mode on.
With GPS disabled, the application will redirect the user to the Location
Settings screen, and ask the user via a popup message to enable GPS. There
is no current way of automating this, and the user does not need to enable
GPS for the application to work properly, so they can simply press “back”
at this stage if they want. If GPS is required, the end user will need to make
sure the “Use GPS satellites” checkbox is ticked, before pressing “back” to
go back to the application main screen.
10
Figure 4: The GPS enable screen.
4.4
Manually Starting Haggle
Haggle does not automatically start when the device boots, but should start
when the application runs. However, if it does not, you may need to manually
start the daemon. To do this, connect the device via USB to a computer with
the Android SDK installed. Navigate using a command-line interface to the
sdk/tools/ directory, and run the program “adb shell”. It should connect to
the shell running on the connected device. Once connected, run the command
“haggle&” and then exit the shell. Haggle will now be running on the device.
11