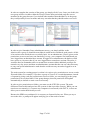
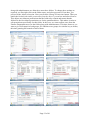
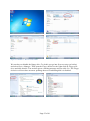
1
Course Name: M. Sc. in Computer Science (Conversion)
Module Name: Introduction to Hardware and Software
Module Code: COMP41140
Lecturer: Mr. Tom Brett
Assignment Details: Create a User Manual outlining the steps involved in a
number of tasks such as virtualisation, setting up an operating system,
networking, remote connectivity and system restoration
Due Date: 25th February 2013
Submitted Date: 25th February 2013
Abstract: The purpose of this user manual is to outline and explain the
reasons for taking particular steps when completing given tasks while also
guiding the user through the main steps by the use of modified screenshots
and written procedures
Author/Student Name: Mr. Michael Kelly
Student Number: 12253058
Page 1 of 81
Table of Contents
List of Figures........................................................................................3
List of Acronyms ...................................................................................6
Introduction ...........................................................................................7
Task A.1 - Installing Windows with Partitions .....................................9
Task A.2 - Updates and Antivirus .......................................................15
Task A.3 - Users, Groups and Security ...............................................22
Task A.4 - Remote Connectivity .........................................................37
Task A.5 - Network .............................................................................43
Task A.6 - Performance.......................................................................46
Task A.7 - Email Accounts .................................................................49
Task A.8 - System Restore Setup and Testing ....................................53
Task A.9 - System Registry.................................................................58
Task A.10 - Driver Compatibility .......................................................60
Task B.1 - IIS and Linux Debian Installation .....................................61
Task B.2 - Users and user account structures on Linux Debian .........71
Task B.3 - Install open source products on Linux Debian..................76
Bibliography ........................................................................................80
Page 2 of 81
List of Figures
Figure 1 - Windows 7 - How to check account types ................................................................ 8
Figure 2 - How to enter Boot Menu ......................................................................................... 10
Figure 3 - VMware Fusion - VM Settings Menu ..................................................................... 10
Figure 4 - Windows 7 Installation - Installation Type ............................................................. 11
Figure 5 - Windows 7 Installation - Selecting Installation Location and Creating Partitioned
HDD ......................................................................................................................................... 11
Figure 6 - Windows 7 Installation - Resulting Partitioned HDD............................................. 12
Figure 7 - Windows 7 - System Menu ..................................................................................... 13
Figure 8 - Windows 7 - How to change the Workgroup Settings ............................................ 13
Figure 9 - Windows 7 - How to Setup a Domain or Workgroup Wizard ................................ 14
Figure 10 - Windows 7 - How to verify that you have joined a Workgroup ........................... 14
Figure 11 - Windows 7 - How to get to Windows Update in the Control Panel ..................... 15
Figure 12 - Windows 7 - How to install Windows Updates .................................................... 16
Figure 13 - Windows 7 - How to check if your system is up to date....................................... 16
Figure 14 - Windows 7 - How to open Action Center ............................................................. 17
Figure 15 - Windows 7 - Action Center................................................................................... 17
Figure 16 - Windows 7 - Security Providers ........................................................................... 18
Figure 17 - Windows 7 - Downloading and Installing Windows Security Essentials antivirus
software .................................................................................................................................... 18
Figure 18 - Windows 7 - Downloading and Installing Windows Security Essentials antivirus
software (continued) ................................................................................................................ 19
Figure 19 - Windows 7 - Microsoft Security Essentials Home ............................................... 19
Figure 20 - Windows 7 - Microsoft Security Essentials - How to update ............................... 20
Figure 21 - Windows 7 - Microsoft Security Essentials - Scheduled scan .............................. 20
Figure 22 - Windows 7 - Checking Windows Firewall status ................................................. 21
Figure 23 - Windows 7 - How to access Local Security Policy - Account Policy options ..... 22
Figure 24 - Windows 7 - Account Policy options.................................................................... 23
Figure 25 - Windows 7 - Password Policy and Account Lockout Policy options ................... 23
Figure 26 - Windows 7 - How to open Computer Management.............................................. 24
Figure 27 - Windows 7 - Computer Management - Local Users and Groups ......................... 24
Figure 28 - Windows 7 - Computer Management - Create new user within Local Users and
Groups ...................................................................................................................................... 25
Figure 29 - Windows 7 - Computer Management - How to add user to group ....................... 25
Figure 30 - Windows 7 - Computer Management - How to create a group ............................ 26
Figure 31 - Windows 7 - Computer Management - Adding user to a group ........................... 26
Figure 32 - Windows 7 - Computer Management - Adding user to a group (using advanced
option) ...................................................................................................................................... 26
Figure 33 - Windows 7 - Computer Management - How to create a group ............................ 27
Figure 34 - Windows 7 - How to format a partition/HDD ...................................................... 28
Figure 35 - Windows 7 - How to format a partition/HDD ...................................................... 28
Figure 36 - Hierarchical Folder Structure ................................................................................ 28
Figure 37 - Windows 7 - How to create a new folder .............................................................. 29
Figure 38 - Windows 7 - How to edit NTFS Security Settings ............................................... 29
Figure 39 - Windows 7 - Edit NTFS Security Settings for partition ....................................... 30
Figure 40 - Windows 7 - Edit NTFS Security Settings for partition (continued) .................... 31
Figure 41 - Windows 7 - Edit NTFS Security Settings for partition ....................................... 31
Figure 42 - Windows 7 - Edit NTFS Security Settings for department specific folder ........... 32
Figure 43 - Windows 7 - Edit NTFS Security Settings for user specific folder ...................... 33
Page 3 of 81
Figure 44 - Windows 7 - Edit NTFS Security Settings for user specific folder (continued) ... 34
Figure 45 - Windows 7 - Edit NTFS Security Settings for user specific folder ...................... 34
Figure 46 - Windows 7 - Typical dialogue box stating that you don't have the required NTFS
permissions .............................................................................................................................. 34
Figure 47 - Windows 7 - How to find and open hosts file ....................................................... 35
Figure 48 - Windows 7 - Editing hosts file .............................................................................. 35
Figure 49 - Windows 7 - How to test that hosts file is doing what you want it to do ............. 36
Figure 50 - Windows 7 - How to all remote access ................................................................. 37
Figure 51 - Windows 7 - How to all remote access (continued) ............................................. 38
Figure 52 - Windows 7 - How to change remote desktop port to non-default port ................. 38
Figure 53 - Windows 7 - How to change remote desktop port to non-default port (continued)
.................................................................................................................................................. 39
Figure 54 - Windows 7 - How to create a new inbound rule for Windows Firewall............... 39
Figure 55 - Windows 7 - How to create a New Inbound Rule for Windows Firewall ............ 40
Figure 56 - Windows 7 - How to create a New Inbound Rule for Windows Firewall
(continued) ............................................................................................................................... 41
Figure 57 - Windows 7 - How to connect to another computer using Remote Desktop ......... 41
Figure 58 - Windows 7 - How to connect to another computer using Remote Desktop
(continued) ............................................................................................................................... 42
Figure 59 - Windows 7 - How to assign a static IP address .................................................... 43
Figure 60 - Windows 7 - How to assign a static IP address (continued) ................................. 44
Figure 61 - Linux Debian - How to ping ................................................................................. 44
Figure 62 - Windows 7 - How to ping ..................................................................................... 45
Figure 63 - Windows 7 - How to run benchmark .................................................................... 46
Figure 64 - Windows 7 - How to customise the paging file setup ........................................... 47
Figure 65 - Windows 7 - Results of modifying paging files.................................................... 48
Figure 66 - Windows 7 - Results of modifying paging files.................................................... 48
Figure 67 - Windows 7 - How to download Windows Live Essentials ................................... 49
Figure 68 - Windows 7 - How to open Downloads ................................................................. 50
Figure 69 - Windows 7 - How to install Windows Live Essentials ......................................... 50
Figure 70 - Windows 7 - How to install Windows Live Essentials (continued) ..................... 51
Figure 71 - Windows 7 - Windows Live Mail setup ............................................................... 52
Figure 72 - Windows 7 - How to create a restore point ........................................................... 53
Figure 73 - Windows 7 - How to configure system restore ..................................................... 54
Figure 74 - Windows 7 - How to change the computer name ................................................. 54
Figure 75 - Windows 7 - How to create a folder ..................................................................... 55
Figure 76 - Windows 7 - How to disable a hardware device ................................................... 56
Figure 77 - Windows 7 - How to restore to a specified restore point ...................................... 56
Figure 78 - Windows 7 - How to restore to a specified restore point (continued) .................. 57
Figure 79 - Windows 7 - Create a folder ................................................................................. 58
Figure 80 - Windows 7 - How to make a backup of the System Registry ............................... 58
Figure 81 - Windows 7 - How to make a backup of the System Registry (continued) ........... 59
Figure 82 - Windows 7 - Registry Editor folders .................................................................... 59
Figure 83 - Windows 7 - How to prevent unsigned drivers from being installed ................... 60
Figure 85 - Windows 7 - How to enable Internet Information Services (IIS) ......................... 62
Figure 86 - Windows 7 - Where to find Internet Information Services once it's installed ...... 63
Figure 87 - Setting up a VM in VMware Workstation ............................................................ 64
Figure 88 - Setting up a VM in VMware Workstation ............................................................ 65
Figure 89 - Linux Debian Installation - Language, location and keyboard options ................ 66
Figure 90 - Linux Debian Installation - Configuring networks and users ............................... 67
Page 4 of 81
Figure 91 - Linux Debian Installation - Configuring partitions ............................................... 68
Figure 92 - Linux Debian Installation - Configuring package manager and selecting software
to install.................................................................................................................................... 69
Figure 93 - Linux Debian Installation - Finalising installation................................................ 70
Figure 94 - Linux Debian - How to add user to the sudo group .............................................. 71
Figure 95 - Linux Debian - How to open Terminal ................................................................. 72
Figure 96 - Linux Debian - How to add a user ........................................................................ 73
Figure 97 - Linux Debian - How to add user to group............................................................. 74
Figure 98 - Linux Debian - How to make user an administrator ............................................. 74
Figure 99 - Linux Debian - How to make user an administrator (continued).......................... 75
Figure 100 - Linux Debian - How to create a folder................................................................ 75
Figure 101 - Linux Debian - How to edit folder permissions .................................................. 75
Figure 102 - Linux Debian - How to install Thunderbird ........................................................ 76
Figure 103 - Linux Debian - How to install Thunderbird ........................................................ 77
Figure 104 - Linux Debian - How to setup account in Thunderbird ....................................... 77
Figure 105 - Linux Debian - How to add application launcher in Application menu ............. 77
Figure 106 - Linux Debian - How to add application launcher in Application menu
(continued) ............................................................................................................................... 78
Figure 107 - Linux Debian - How to install software .............................................................. 78
Figure 108 - Linux Debian - How to install software .............................................................. 79
Figure 109 - Linux Debian - How to view installed software (note that GIMP came preinstalled)................................................................................................................................... 79
Page 5 of 81
List of Acronyms
CD-ROM
CLI
FAT
GUI
HDD
IE
IMAP
ISO
ISP
MS-DOS
NTFS
OS
POP
SP
SMTM
SSD
VM
Compact Disk Read Only Memory
Command Line Interface
File Allocation Table
Graphical User Interface
Hard Disk Drive
Internet Explorer
Internet Message Access Protocol
CD/DVD/Blu-ray disc stored as an archive file
Internet Service Provider
Microsoft Disk Operating System
New Technology File System
Operating System
Post Office Protocol
Service Pack
Simple Mail Transfer Protocol
Solid State Drive
Virtual Machine
Page 6 of 81
Introduction
The purpose of this assignment is to give me an understanding of hardware and software by
increasing my practical knowledge and skills in relation to both. In order to do this, it is
required that I create two Virtual Machines (VMs). The first VM is to use any Microsoft
Windows Operating System (OS), while the second is to specifically use Linux Debian as the
OS. A number of tasks are to be carried out on each VM as outlined in the Table of contents
on page 2. This paper is the resulting user’s manual that I have created. It documents in detail
all of the steps necessary to complete each task, along with the benefits of taking these steps
and when they may be justified.
The host machine on which these VMs were created was Mac OS X, Version 10.8.2, Build
12C60. The hypervisor which was used to create these VMs was VMware Fusion
Professional, Version 5.0.2 (900491).
Note that if I explain an acronym once, it will not be repeated again and only the acronym
will be used following on from that (as above). For ease of use, I have included a list of all
the acronyms used on page 6. Also, all screenshots have been converted from .png to .jpg in
order to reduce file sizes, and they have been cropped and labelled appropriately. A full list of
figures has been compiled on pages three to five.
Please note that in order to complete many of these tasks you must be logged in as an
administrator. If not, you may be prompted to enter administrator account details from time to
time. You are advised to sign in as an administrator now. To do this, follow the steps
described below. Screenshots of the steps are included after each explanation.
Firstly, open the start menu by clicking on the lowest point on the left hand side of the screen
and type ‘user’. In the search results User Accounts will appear. You must left-click on this to
open User Accounts. An interface will then appear displaying which user you are logged in
as. Below the name on the account, you can see your account type. There are three types of
accounts in Windows 7; administrator, standard and guest. Depending on the user type,
freedom of access to certain functions such as system settings or secured folders may be
restricted. For further information on user accounts, see Microsoft Windows (User Accounts
FAQ, 2012).
If you are not logged in as an administrator, you can check who the administrator is by
selecting Manage another account. Here you will find a list of all the users of the computer.
If you require more extensive access than you currently have, you can check who is an
administrator and request that they change your account type to administrator. If you do not
recognise the name on the administrator account, contact the owner of the computer. Note
that this process of changing account types will be discussed in more detail in Task A.3.
Page 7 of 81
Figure 1 - Windows 7 - How to check account types
Note that screenshots are generally provided following the explanations so if you find it hard
to follow the explanations, look at the screenshots and see if you can figure it out that way.
Also, any search terms have been surrounded by inverted commas, e.g. ‘sample search’ and
buttons/applications are in iconic letters so they are easier to apprehend.
Page 8 of 81
Task A.1 - Installing Windows with Partitions
The OS being used for Machine 1 is Windows 7 Professional 64-bit SP1-U (this means that
there is no need to update to Service Pack 1 (SP1) as it is already installed). The system
requirements are as follows:
‘1 gigahertz (GHz) or faster 32-bit (x86) or 64-bit (x64) processor
1 gigabyte (GB) RAM (32-bit) or 2 GB RAM (64-bit)
16 GB available hard disk space (32-bit) or 20 GB (64-bit)
DirectX 9 graphics device with WDDM 1.0 or higher driver’ (Microsoft Windows, 2013)
These are the minimum requirements recommended by Microsoft. Within the VM for
machine 1, 170GB of hard disk drive (HDD) space will be allocated for the VM altogether;
15GB for each of the 6 members of the company and 50GB for the OS and additional
software that the company may require. It is better to overestimate than underestimate. This
caters for the case where the company wants to upgrade its OS. If the new OS requires more
HDD space then this should allow for the additional capacity required. Also, if there is a
problem with the OS, the user files do not have to be touched while the OS is being
reinstalled, i.e. the OS system files are isolated from the users’ files (which should still be
backed up as an additional precaution). Updates to the OS are also catered for. There will be
a residual of 30GB which will be stored on the user partition for either Administrative
purposes or to provide for extra employees. 4GB RAM will be used to ensure that it allows
for all of the software that may need to run on top of the OS.
As a requirement of the assignment, one of the partitions is to be used for the installation of
the OS and files, and is to use a file system accessible by other operating systems to include
MS-DOS (Microsoft Disk Operating System) based utilities for diagnostic purposes. The file
system determines the length of filenames and how files are managed. The OS determines the
file system that is used. Windows 7 uses NTFS (New Technology File System) as its default
file system, and this cannot be changed. As a result, this requirement cannot be fulfilled. MSDOS based utilities are performed on FAT (File Allocation Table) file systems only. For this
to work, a previous version of Windows would have to be used, e.g. Windows XP (which uses
FAT32).
If you are installing this as your primary OS on your physical machine, you will have to
restart your computer and edit the boot sequence by pressing the F12 key when prompted.
This will vary from computer to computer but it is one of the first screens to appear when you
turn on the computer. As you can see in the screenshot below, if you press F12 it will bring
you into the Boot Menu.
Page 9 of 81
Figure 2 - How to enter Boot Menu
From here, you can select where you want to boot the computer from. If you have the CD
inserted for the OS you want to install, you select CD-ROM Drive. It is also possible to boot
from a USB key or a network. By default, computers usually boot from the HDD where the
OS comes pre-installed and pre-configured. Once you boot from the CD-ROM Drive and
enter the installation process, the same steps will apply (just skip the next paragraph and
screenshot).
There are three sections to the installation of a VM while using VMware Fusion Professional
as the hypervisor. These are Introduction, Windows Easy Install and Finish. When you are
within the Windows Easy Install section, because the virtual HDD has to be partitioned, you
should not select Windows Easy Install or fill in any details. Then within the Finish section,
in order to customise the hardware settings of the VM, you must select Customize Settings.
Within this, you should change the RAM and HDD options so that the specifications are as
outlined above (see option menus to select in screenshot below). Ensure that you select the
option to Split into 2GB files within the Hard Disc (SCSI) option menu. This option results in
the use of thin provisioning (i.e. the VM grows as the files grow). While this is not as stable
as thick provisioning, it is more suitable for a VM such as this where user’s files will grow
over time and may never reach their full capacity.
Figure 3 - VMware Fusion - VM Settings Menu
Page 10 of 81
When you power on the VM, the Windows 7 Installation begins (once you have the .iso file
or the disc is inserted). The first few sections of the Windows 7 Installation are user intuitive.
However, within the fourth section, you must select the Custom (advanced) option as the
installation type (see screenshot below). This is necessary in order to partition the HDD.
Figure 4 - Windows 7 Installation - Installation Type
When you go into this menu, the following screen appears:
Figure 5 - Windows 7 Installation - Selecting Installation Location and Creating Partitioned HDD
Within this, you must select the Drive options (advanced) as highlighted above in order for
the partitioning options to appear. Within these you select New, followed by 122880MB
(120GB) as the partition size. Note however, that Windows, as a safety feature to ensure that
all Windows features work properly, creates a separate partition for system files when you
want to create a partition (this comes as a warning when you press apply). This takes 100MB
from the partition you are creating. Hence, if you want exactly 120GB for the user files you
must create a partition of 122980MB. This, however, means that the OS drive will be left
with only 49.9GB space so it depends on your preferences and needs. Realistically, it is only
100MB so it does not make much of a difference (unless you want drives to be rounded
numbers!).
The following screenshot displays the resulting partitions that should have been created. Note
that the OS will be installed on the partition that you have selected/highlighted.
Page 11 of 81
Figure 6 - Windows 7 Installation - Resulting Partitioned HDD
When you click next, the installation process proceeds. This takes some time to complete.
Once it finishes, you enter a username and a computer name. You are then given an option to
set a password for the account (recommended). The next menu gives you an option to
activate Windows with a product key over the internet. You can then set up Windows Update,
edit time and date settings and select your network. All of these settings can be edited or
enabled within Windows itself. It depends on your preferences whether you choose to edit
them now or later but you should complete them at some stage. Note that partitions can also
be managed in the Computer Management section of the computer. However, if you installed
the OS on a partition, you cannot change that partition without it having an effect on the OS.
Workgroups are peer-to-peer networks. Computers can act as clients or servers for the other
computers on the network. They are used for very small networks which have less than ten
computers. They require a lot more workload than client server networks as each user has to
be set up on every machine (as opposed to each user being stored on the server and
computers accessing the server). Company security policies are also more difficult to
implement because, again, the policies have to be implemented on each computer
individually. However they are more cost effective and when used in the right environment
can work very well. The alternative to a peer-to-peer network is a client-server network. For
further information on this, see Toms Hardware (Client/Server Versus Peer Networks, 2011).
In order to assign the machine to WORKGROUP-M-KEL you go into the System menu. This
can be opened by right-clicking Computer and selecting Properties, as shown in the
following screenshot.
Page 12 of 81
Figure 7 - Windows 7 - System Menu
In order to edit the workgroup settings, you must select Change settings within the Computer
name, domain, and workgroup settings. This is shown in the following screenshot.
Figure 8 - Windows 7 - How to change the Workgroup Settings
This opens up the System Properties. Within the Computer Name tab, you select Network ID
as shown in the above screenshot. This allows you to join a domain or workgroup. This
brings up a wizard that guides you through the process of changing or joining a workgroup
and domain (an example of how to setup a workgroup is provided in the screenshots below).
Page 13 of 81
Figure 9 - Windows 7 - How to Setup a Domain or Workgroup Wizard
Note that you must restart the computer following this process in order for it to process the
change. After restarting, you can check that the computer actually joined the workgroup by
going back into the System menu again (right-click Computer and select Properties) and
checking if the workgroup you joined is there (as shown below).
Figure 10 - Windows 7 - How to verify that you have joined a Workgroup
For further information on partitioning Windows, see Meyers (2012, p. 486-489). To create
partitions within the Disk Management utility, see Stanek (Create a New Partition on a
Windows 7 Hard Disk, 2009).
Page 14 of 81
Task A.2 - Updates and Antivirus
Windows Updates are necessary in order to prevent and fix any problems with the OS. Like
any software, it is prone to bugs. The more the software is used and feedback given, the more
the software provider can find and fix these bugs. In certain circumstances, they provide
Service Pack updates. These are essentially packs with multiple tested bug fixes in one pack.
You can get OS discs with these SP’s on the discs. This means that you do not have to install
that particular SP (as with the version used in the previous section). By using Windows
Update, you automatically get the latest security and other important updates, such as
performance improvements (including SP updates). With some of these updates, the user has
to interact with Windows Update. For example, if Internet Explorer (IE) is updated to a new
version and there are different terms of service than those which applied to the previous
version, then you must go through the wizard and accept any conditions as appropriate.
Basically, updates help maintain the stability of the OS. Hence, they are also the reason
companies are forced to update their OS’s. Microsoft offers OS support only for a certain
specified period of time. For example, this quote is taken from the Microsoft website:
‘Support for Windows XP is ending on April 8, 2014. If you're running this version after
support ends, you won't get security updates for Windows.’ (Microsoft Windows, 2013) In
order to set up Automatic Windows Updates, you should follow the steps outlined below:
Firstly, you must go into the Control Panel (this is in the start menu). Within this, you must
go into System and Security and then Windows Update (as highlighted in the screenshots
below).
Figure 11 - Windows 7 - How to get to Windows Update in the Control Panel
Within the Windows Update window, the following screen appears:
Page 15 of 81
Figure 12 - Windows 7 - How to install Windows Updates
If there are updates to install, you can click on the Install updates in order to install them.
Usually (but not in some cases), after the updates are installed, you must restart the computer
(but not in some cases). Windows will notify you if you must restart the computer. As
mentioned earlier, you must sometimes complete an update wizard. An example of such is
shown in the screenshot to the right. There are many options on the left hand side of the
screen where you can check for updates, and change the settings which control how the
updates are installed, etc. When all of the most recent updates are completed, the following
screen appears:
Figure 13 - Windows 7 - How to check if your system is up to date
This screen indicates that for the moment, all of the available updates have been installed.
However, new updates are often released, so in order to ensure that you have the most up to
date system, you should have Automatic Updates enabled.
It is recommended that you install all of the Windows Updates before any other software is
installed. This is to ensure that the system is stable and that no two programs are being
installed at the same time, e.g. a security update and antivirus software. For further
information on Windows Update, see Microsoft Windows (User Accounts FAQ, 2012).
In order to install Microsoft Security Essentials Antivirus software, it first has to be
downloaded from the internet. Microsoft has a list of security providers listed on their
website. You can view these within the Microsoft website (shown later in this section). To
Page 16 of 81
view your options, you can go into the Control Panel and open Action Center (as highlighted
in the screenshot below).
Figure 14 - Windows 7 - How to open Action Center
Within the Action Center, you can view the status of many of the system’s security settings
(once they are enabled). For example, in the screenshot, you can see that Windows did not
find antivirus software on this computer. There is then an option to find a program online.
This is what you click to find a list of security providers.
Figure 15 - Windows 7 - Action Center
You can only see a very small minority of the security providers below (there are
approximately 34 in total). The one we are going to install is Microsoft Security Essentials.
Therefore you should select that, download it (save it locally) and then install it.
Page 17 of 81
Figure 16 - Windows 7 - Security Providers
The installation process is like any other software that you install.
Figure 17 - Windows 7 - Downloading and Installing Windows Security Essentials antivirus software
Page 18 of 81
Figure 18 - Windows 7 - Downloading and Installing Windows Security Essentials antivirus software (continued)
The next thing you need to ensure is that the antivirus software is up to date. To do this, you
open Microsoft Security Essentials and open the Home tab (it automatically opens). Within
this, you can see if the software is up to date. If everything is green, it is an indication that
everything is up to date and that you are protected.
Figure 19 - Windows 7 - Microsoft Security Essentials Home
If it is not up to date, you need to open the Update tab (next to the Home tab) and select
Update.
Page 19 of 81
Figure 20 - Windows 7 - Microsoft Security Essentials - How to update
In order to set up a scheduled scan, you should open the Settings tab in Microsoft Security
Essentials. Within this, you can choose a scan type, day of scan, and time of scan. Then there
are options to allow the latest definitions to be installed before running the scan, an option to
run the scan only if the computer is not in use, and an option to limit the use of the CPU to a
certain percentage. Having the first one selected is probably the most important.
Figure 21 - Windows 7 - Microsoft Security Essentials - Scheduled scan
If you want to check that Windows Firewall is active, you should open the Action Center.
Note that there is an icon in the notifications area of the home screen of every Windows 7
computer specifically for the Action Center. When you open the Action Center, you can
check the status of Windows Firewall within the Security tab. This is highlighted in the
screenshot below. It is important to keep Windows Firewall active at all times in order to
protect your computer from being accessed by hackers and malicious software through your
network/internet.
Page 20 of 81
Figure 22 - Windows 7 - Checking Windows Firewall status
For further information on Windows Firewall, see Microsoft Windows (User Accounts FAQ,
2012).
Page 21 of 81
Task A.3 - Users, Groups and Security
Depending on the company IT security policy, you can edit the user accounts so that they
must change passwords after a certain period. Passwords must contain certain characters and
must be a certain length, etc. In order to access these settings, you open the Local Security
Policy Section within the Administrative Tools (see screenshots below).
Figure 23 - Windows 7 - How to access Local Security Policy - Account Policy options
It is within the Account Policies section that you can implement some of the security policies
of the company. As you can see below, there are two options; Password Policy and Account
Lockout Policy options.
Page 22 of 81
Figure 24 - Windows 7 - Account Policy options
Within each, you can simply edit the settings if you so wish and cater for the company where
necessary. Below, the system is set up so that passwords must be changed every 30 days,
must be 8 characters or more and must meet complexity requirements (i.e. must contain a
number(s), character(s) and letter(s)). In relation to the account lockout policy, if the user
enters 3 invalid logins, he/she will not be able to retry for another 15 minutes. This stops
brute force attacks achieving any success, as after 3 attempts, they will be locked out of the
system for 15 minutes.
Figure 25 - Windows 7 - Password Policy and Account Lockout Policy options
There are a number of steps required in order to set up user and group accounts. You must
first set up the user accounts, as there is no point having groups with no users in them! In
order to access the user accounts and edit them, you must go into Computer Management.
This is done by right-clicking Computer and selecting Manage.
Page 23 of 81
Figure 26 - Windows 7 - How to open Computer Management
Within the Computer Management options, you select Local User and Groups within the
System Tools. In order to edit the user first, you should double click on Users.
Figure 27 - Windows 7 - Computer Management - Local Users and Groups
The Users section contains a list of all the users of the computer. These include all of the
accounts, even if some accounts are disabled (these are indicated by an arrow pointing down).
For example, the Administrator and Guest accounts are disabled in the screenshot (although
you might have difficulty seeing it as the screenshot is very small). Disabling accounts is a
very useful feature because if someone takes some time out from their job, the administrator
can disable their account until they return to work. This prevents anybody from logging into
their account when they are absent.
In order to add a new user, you should right-click on the screen (where there is a blank
section) and select New User. This opens a wizard box where you enter the users details
(username, full name, description and password). A very useful feature is the option to have
the user change his/her password at next login. This means that you can give him/her a
temporary password, and he/she can change it to his/her own personal password when he/she
first logs in. It is best practice to create unique temporary passwords for every user. This way
there can be no interference with the user setup.
Page 24 of 81
Figure 28 - Windows 7 - Computer Management - Create new user within Local Users and Groups
There are a number of ways to add users to groups. Since we are currently within the User
tab, one method is to right-click on a certain user and click Properties. Within these
properties, you select the Member Of tab. Here, you can see all of the groups to which a
particular user is a part of. In the bottom left corner, there is an option to add them to another
group, or remove them from an existing group. See the screenshots below for illustration.
Figure 29 - Windows 7 - Computer Management - How to add user to group
Now that we have created users, it is time to create groups. As in the previous section, you
select Local User and Groups, but then you select Groups instead of Users. Within this
window, you can see all of the current groups. In order to create a new group, you should
right-click and select New Group. You input the group details (name, description) and then
add members.
Page 25 of 81
Figure 30 - Windows 7 - Computer Management - How to create a group
In order to add user(s) to the group, you type their name(s) into the box, and then click Check
Names. If you have entered the name(s) in the correct format, they will underline themselves
(as highlighted in the screenshots below). You must separate the names by a semi-colon (;).
Figure 31 - Windows 7 - Computer Management - Adding user to a group
If you are unsure of their name, you can access the advanced menu in order to try and find
them. Simply click the Advanced… option on the bottom left side of the box. Within this, put
in the necessary details (object types and location), and click Find Now. All of the users will
now appear in the search results and you can select any of these (as shown below).
Figure 32 - Windows 7 - Computer Management - Adding user to a group (using advanced option)
Page 26 of 81
In order to complete the creation of the group, you simply click Create. Once you do this, the
new group will be viewable within the Groups. Ensure that you include only the correct
members in the group because if you include other members that shouldn’t be in the group,
they could possibly access locations and carry out tasks that they should not have access to.
Figure 33 - Windows 7 - Computer Management - How to create a group
In order to give Samantha Grace administrator access, you simply add her to the
Administrators group. It should be noted that it would not be considered good practice if this
is her main accout which she uses on a daily basis. As an administrator, you are given cerain
permissions to access and carry out functions. Lets say, your computer was hacked and you
were logged into an administrators account. If logged in as administrator, the hacker would
have access to a lot more then if you were logged into a normal user account. Therefore, it
would be best for Samantha to have a normal user account with no additinal previliges for
normal every day access and then an administrators account that she can use when necessary
to carry out special administrative tasks that she could not carry out unless logged in as an
administrator.
The main reason for creating groups is so that it is easier to give permissions to access certain
files and folders. For example, if you have a group of 5 users of a certain department, instead
of separately giving each user permission to access a folder, you can simply give the group
permission to access that folder. If the group changes, then the permission will update
automatically to include or omit a user as necessary.
In order to give permissions to folders, you must use the NTFS file system. The main
difference between this and previous file systems is that it provides security. While you can
restrict access remotely (i.e. between two computers in a network) with FAT32, it does not
allow you to restrict them locally as well.
Because the HDD was partitioned, it is necessary to format it before use. When you try to
access the drive, a prompt will appear notifying you of the need to format.
Page 27 of 81
Figure 34 - Windows 7 - How to format a partition/HDD
This prompt gives you the option to format the partition. When you click Format Disk, there
are various format options. These allow you to select the file system you want to use, the
allocation size and a label for the drive. There is then an option for a Quick Format. This
removes files and folders from the partition but does not scan for bad sectors. It is the scan
for bad sectors which is most time-consuming when carrying out a full format. Therefore, if
you know the volume has no bad sectors, there is no need to do a full format and you will
save time. If in doubt, it is advisable to do a full format.
Figure 35 - Windows 7 - How to format a partition/HDD
Now that the partition is formatted, we can create the necessary folder format and give
permissions as required. The first thing we have to do is create a folder structure. The
following is a tree diagram of the folder structure.
IS
Department
Samantha
Grace
Rachel
Mathews
Finance
Department
Sam Smith
Paul Daniels
Figure 36 - Hierarchical Folder Structure
Page 28 of 81
HR
Department
Stephanie
Brown
Francis
Brennan
In order to implement this structure, we need to create 3 folders, each containing 2 internal
folders, which include names as illustrated above. To create a folder, you simply click New
Folder on the bar as shown in the screenshot below.
Figure 37 - Windows 7 - How to create a new folder
You can then name the folders appropriately. As can be seen in the second screenshot above,
many folders can be created within a drive/folder. The next thing that has to be done is set the
security on each folder. The best way to implement security that requires access to be
restricted from both remote and local access is to use NTFS file permissions (as discussed
earlier). We are going to start with the overall partition that we created earlier. To use the
NTFS security features in Windows 7, you right click on the folder and select Properties.
Within the Properties, you go to the Security tab.
Figure 38 - Windows 7 - How to edit NTFS Security Settings
Within the Security tab, you can select Edit to change the permissions associated with that
folder/file. There are then a number of steps required in order to implement the required
security features. The easiest thing to do is remove all of the current users/groups within the
Security tab as these are mainly configured by Windows. As we created and modified our
own groups, we do not have to use these Windows configured users/groups. After removing
all of the users/groups, click on Add. Within the next tab, click the Advanced button on the
bottom left hand side. You will then be able to search all of the users, groups and built-in
Windows groups. In this case, we want to give 4 groups access to the folder; Administrators,
IS department, Finance department and HR Department. These groups include all of the users
Page 29 of 81
associated with the three departments which we created earlier along with all administrators.
Therefore, we need to select Object Types followed by Groups only. We then select the four
groups mentioned above and click OK.
Figure 39 - Windows 7 - Edit NTFS Security Settings for partition
Page 30 of 81
Figure 40 - Windows 7 - Edit NTFS Security Settings for partition (continued)
We can then edit certain permissions for each group as required. In order to do this, we need
to select the group from the Security tab of the Properties panel and click Edit. Here, we are
able to edit all of the permissions available with NTFS file system. In the case of these
groups, we give the Administrators group full control and leave the other groups as the
default setting of Read & execute, List folder contents and Read. This means that users
within these groups cannot modify or write the folders contained within.
Figure 41 - Windows 7 - Edit NTFS Security Settings for partition
Next, we must edit the NTFS Security permissions of the folders within the partition. In this
section, we have three folders, one for each department. Only members of the department,
Page 31 of 81
along with administrators are allowed to enter these folders. To change these settings as
required, you first right click on the folder name, and select properties. From here, you
proceed to the Advanced section. Next you click the Change Permissions button. Then you
untick the Include inheritable permissions from the object’s parent box and select Remove.
This deletes any inherent permissions that the folder may contain and means that the
folder/file does not inherit permissions set for the partitioned drive. This makes it easier to
edit permissions specifically for this folder. In this case, we want to allow users from the
Finance Department access to the folder along with Administrators. This time, however, we
want to give full control to both groups. We add these two groups in a similar way as before,
this time granting full control to both of them.
Figure 42 - Windows 7 - Edit NTFS Security Settings for department specific folder
Page 32 of 81
The next thing that needs to be done is to edit the permissions for the individual users. These
permissions work in the same way as granting folder access to the groups. This time,
however, we grant access to Administrators group and the specific user only. The example
below deals with Paul Daniel’s folder.
Figure 43 - Windows 7 - Edit NTFS Security Settings for user specific folder
Page 33 of 81
Figure 44 - Windows 7 - Edit NTFS Security Settings for user specific folder (continued)
You can edit the permissions afterwards if you need to. You can see exactly what groups and
users can enter that folder along with what permissions they have. The illustration below
shows that the user Paul Daniels has Full control of the account, along with the
Administrators group as required.
Figure 45 - Windows 7 - Edit NTFS Security Settings for user specific folder
The following is a screenshot of the message a user gets if he/she tries to open a folder that
he/she does not have permission to open. If he/she presses continue, he/she must login as an
administrator to gain permission and enter the folder.
Figure 46 - Windows 7 - Typical dialogue box stating that you don't have the required NTFS permissions
Page 34 of 81
There are number of ways to block access to website. For a small business, the easiest way to
do this is to modify the host file or use third party software (e.g. OpenDNS or eDexter) on
each computer. In a medium to large business environment, websites are usually blocked on
the network level using a proxy server. Anyone that connects into the network will have
blacklisted websites blocked. Each individual PC does not have to be modified individually.
Websites can be blocked by their IP address and their web address.
In this case, as this is a small business, we will modify the hosts file. The hosts file is located
in the following folder: C:\Windows\System32\drivers\etc. To edit it, double-click on it and
select to open it with Notepad. Within Notepad you can edit the hosts file and redirect any
pages you want by adding in settings at the bottom:
Figure 47 - Windows 7 - How to find and open hosts file
For example, if
‘74.125.24.94 www.facebook.com
127.0.0.1
twitter.com
127.0.0.1
instagram.com
74.125.24.94 www.ping.com’
is added in at the bottom www.facebook.com and www.ping.com are re-directed to the IP
address 74.125.24.94. This is the IP address of Google. Twitter.com and instagram.com will
be redirected to 127.0.0.1 (localhost). To disable a specific entry, you simply put a # before it,
e.g. # 127.0.0.1 twitter.com. In this case, twitter will now work as usual.
Figure 48 - Windows 7 - Editing hosts file
Page 35 of 81
You can test this by pinging the addresses in command or trying to access them in any web
browser.
Figure 49 - Windows 7 - How to test that hosts file is doing what you want it to do
For further information about users, groups and security, see Meyers (2012, p. 1336-1338).
Page 36 of 81
Task A.4 - Remote Connectivity
In order to use Remote Desktop Connection you must first make sure that the computer to
which you are being connected has enabled remote access. To enable access, you search for
‘remote’ in the Start Menu and click on Allow remote access to your computer. This opens up
the Remote tab of the System Properties. Within this window, there are three options. In this
case we are going to select the third option as we are using Windows Remote Desktop which
has Network Level Authentication (NLA) built into it. In some cases, however, you may be
required to use the second option, e.g. if you are using third party software. NLA means that
the person who is remotely accessing the computer must authenticate themselves before
being able to access the computer (i.e. they must enter a username and password).
You then need to select users for whom you want to enable remote desktop for. To do this,
you click Select Users… and click Add. As before, the easiest way to select users is to use the
Advanced option. Within this section, you should search for all users and select all of the
users for whom you want to enable remote access. The easiest way to do this is hold the Ctrl
key down and click on whichever users you want to include. Then click Apply/OK for the
remaining menus as we have already configured them.
Figure 50 - Windows 7 - How to all remote access
Page 37 of 81
Figure 51 - Windows 7 - How to all remote access (continued)
Security is a big issue and leaving known ports open to access can lead to system
vulnerabilities. Port 3389 is the standard port used for Remote Desktop access. If you are
using a default port for that specific function, then hackers know what the port is being used
for and can attack it (unless you are using a known port for another function). On the other
hand, if a hacker sees that you have a port open and it is not a port that is default for a certain
function, then they have to try and find out what you are using it for. Hence, it is wise to
disable this port and use other ports for Remote Desktop access.
A number of steps are required be taken in order to implement it. Firstly, you must edit the
registry to change the default port for Remote Desktop access. To do this, you search for
‘regedit’ in the Start Menu and click on regedit. User Account Control (as explained before)
then appears to make sure you want to allow the Registry to make changes to the computer.
You click Allow the Registry to make changes to the computer, then Yes and the Registry
Editor opens. Within here you must follow the following path:
HKEY_LOCAL_MACHINE\System\CurrentControlSet\Control\TerminalServer\WinStation
s\RDP-Tcp. Within this window, you right-click on PortNumber and click Modify… You
then change it to Decimal and put in the port that you want to use for the Remote Desktop
Protocol. It is very important that after changing the remote desktop port in the registry, you
restart your computer. Otherwise the change won’t take effect.
Figure 52 - Windows 7 - How to change remote desktop port to non-default port
Page 38 of 81
Figure 53 - Windows 7 - How to change remote desktop port to non-default port (continued)
Windows Firewall must then be altered to allow for this port to be enabled. To do this you
search for ‘firewall’ in the Search Menu and click on Windows Firewall with Advanced
Security. Within this section, you go to Inbound Rules as you want to enable access coming
into the computer through a specified port. You then click New Rule… on the right hand side
to create a new inbound rule.
Figure 54 - Windows 7 - How to create a new inbound rule for Windows Firewall
As you want to open a TCP port, you select Port and click Next. You then choose TCP and
specify the port that you want to open for inbound access. As we are using Windows Remote
Desktop, we are going to Allow the connection if it is secure. This can be customised, but we
Page 39 of 81
are going to leave the default security settings. The other options are to block the port or open
the port with basic security. You then have to select the users on whose computers you want
the port open on. Select Only allow access to these users, type ‘Administrators’ and click
Check Names. In the Computers step, leave the default settings as we are only working with
one computer. Make sure in the Profile step that you apply the rule to just private network
locations. If you apply it when you are connected to a public network location, you are more
prone to attack. As we are not part of a Domain there is no need to enable this option. In the
next section, you simply name the rule, give a description of it, and click Finish.
Figure 55 - Windows 7 - How to create a New Inbound Rule for Windows Firewall
Page 40 of 81
Figure 56 - Windows 7 - How to create a New Inbound Rule for Windows Firewall (continued)
Note that when you use Remote Desktop, only one user can see the screen at a time. Hence, if
the user is logged in, they will be logged out and you as the remote user will be given full
access to their machine. They will not be able to see what you are doing.
You should now be able to connect to the machine using Remote Desktop. Search for
‘remote’ in the Start Menu and click on Remote Desktop Connection. Within this window,
enter either the name of the computer to which you want to connect to or its IP address.
Remember that you must specify the port after the computer name or IP address, e.g.
192.168.1.13:65000. The address and port number together are known as a socket. There are
advanced options that you can access by clicking on Show Options but in this case we are just
going to use the default settings. When you click connect, you will be asked to enter some
credentials for the computer/user that you are trying to access. Enter these and click OK. A
warning pop up may then appear. This just warns you that the remote computer cannot be
verified due to problems with its security certificate. If you know what you are accessing then
this should not be a problem so click Yes. This then opens the computer that you want to
remotely access.
Figure 57 - Windows 7 - How to connect to another computer using Remote Desktop
Page 41 of 81
Figure 58 - Windows 7 - How to connect to another computer using Remote Desktop (continued)
For more information on remote connectivity, see Meyers (2012, p. 1129-1131).
Page 42 of 81
Task A.5 - Network
In order to be able to communicate statically with another computer, you must change your
settings so that your IP address is statically (manually) assigned rather than dynamically
(automatically) assigned. To do this in Windows 7, you select the option to View network
status and tasks in the Control Panel. In the next window you select Change adaptor settings
in the tab on the right hand side. This brings you to Network Connections. You must right
click on Local Area Connection and click Properties in order to edit its settings. You then
click on Internet Protocol Version 4 (IPv4) and the Properties. It is the Properties window
that you change from dynamic to static configuration. To do this, you select Use the
following IP address and Use the following DNS server addresses. You then type in the
required settings (as detailed in the screenshot) and click OK.
Figure 59 - Windows 7 - How to assign a static IP address
Page 43 of 81
Figure 60 - Windows 7 - How to assign a static IP address (continued)
To test the static connection of the Windows 7 OS, you can use the Network Tools utility in
Debian to ping to the Windows 7 computer. A successful connection will look something like
this:
Figure 61 - Linux Debian - How to ping
To set up a static IP address in Debian, you must edit the interfaces file in the /etc/network
directory. Within this file, you add the static IP address details at as outlined below:
‘# The primary network interface
allow-hotplug eth0
iface eth0 inet static
address 192.168.1.111
gateway 192.168.1.1
netmask 255.255.255.0
network 192.168.1.0
broadcast 192.168.1.255’
You then must restart the OS so that the new configurations will take affect. To test the static
connection of the Debian OS, you can use the ping command in Windows 7 (as used to test
the hosts file earlier). A successful connection will look something like this:
Page 44 of 81
Figure 62 - Windows 7 - How to ping
For further information on network setups within Debian, see Debian (Network Setup, 2012).
Note that he Subnet mask and Default gateway must be the same on both machines in order
for them to connect statically. The IP address of each machine must be different and not
conflict with any other nodes on the network. For further information on static IP addressing,
see Meyers (2012, p. 1022, 1031).
Dynamic connectivity means that nodes on a network are assigned IP addresses
automatically. Hence, TCP/IP settings don’t have to be configured on each individual node
manually. The biggest benefit of this is that it requires no administration. However, if you
need a computer to be at a specific IP address always, you need to assign a static IP address.
By default, TCP/IP settings are usually configured to receive an IP address automatically
from a DHCP server on the network. The DHCP is assigned a pool of IP addresses and can
distribute them as required. IP addresses are assigned temporarily. If the computer system
cannot contact a DHCP server, it uses Automatic Private IP Addressing (APIPA). This
automatically assigns an IP address to the system from the 169.254.0.1 to 169.254.255.254
range when the client cannot obtain an IP address using DHCP. Both DHCP and APIPA are
used when the Obtain an IP address automatically option is selected in the TCP/IPv4/IPv6
Properties. In order to implement TCP/IP using dynamic connectivity, the router must
support it and it must be enabled in the settings of the router.
Page 45 of 81
Task A.6 - Performance
A paging file is an area on the HDD that Windows uses as if it were RAM. Basically it moves
RAM that is not being used to the HDD and as a result, frees up RAM so that it can be used
for other tasks. If the RAM that was moved to the HDD is needed again, it simply does the
same thing again. There are a number of ways that you can modify swap files to try to
improve the performance of a machine. The difference in performance levels can be
highlighted by means of a benchmarking tool.
The main modification to the paging file is to move it to a HDD that the OS is not on. This
means that the performance should be improved because the HDD is only used for that
purpose. Another reason for modifying the page file settings is that continually changing the
size of the page file can result in disk fragmentation. This is the one of the arguments used
against leaving Windows to modify the page file automatically.
We are going to use PassMark PerformanceTest as our benchmarking tool. Firstly download
this software from their website, http://www.passmark.com/download/pt_download.htm, and
install it (like you did with Microsoft Security Essentials). If you have trouble installing, you
can see the additional screenshots available in the files included with this document. Once
you install it, you can run a benchmark on the default Windows settings.
Figure 63 - Windows 7 - How to run benchmark
Following on from this, you can now modify the swap file settings. To modify the virtual
memory, you first search for ‘advanced system settings’ in the Start menu and click View
advanced system settings. Within this tab, you click Settings in the Performance section.
Then move to the Advanced tab and click on Change in the Virtual memory section. It is
within this window that you modify the paging file setup. The first thing you have to do is
untick the box beside Automatically manage paging file size for all drives. A warning
message will appear that you click OK to. You then modify the settings accordingly, click
Set, and then OK. Restart the computer to make sure the changes are made accordingly.
Page 46 of 81
Figure 64 - Windows 7 - How to customise the paging file setup
For this task, I modified the swap files 6 different ways.
Setup 1 - Windows default settings (completed already)
Setup 2 - Disable paging file
Setup 3 - 6GB paging file on C: partition
Setup 4 - 8GB paging file on C: partition
Setup 5 - Paging files divided between C: (2GB) and D: (4GB) partitions
Setup 6 - Paging file purely on D: partition (6GB)
The results can be seen in the following chart below.
Page 47 of 81
2500
2000
Passmark (Overall)
1500
CPU
2D Graphics
1000
Memory
Disk
500
0
Setup 1
Setup 2
Setup 3
Setup 4
Setup 5
Setup 6
Figure 65 - Windows 7 - Results of modifying paging files
The main difference can be seen in the disk performance. Setup 1, which used the default
settings, was the best performer in this category. However, it did not perform the best overall.
This can be seen in the exact results below.
Performance Marks
Passmark (Overall)
CPU
2D Graphics
Memory
Disk
Setup 1 Setup 2 Setup 3 Setup 4 Setup 5 Setup 6
807
825
813
802
785
804
1224
1261
1253
1236
1218
1264
453.9
493.7
483.2
475.8
464.3
457.3
822
834
824
836
843
827
2189
1899
1787
1681
1498
1670
Figure 66 - Windows 7 - Results of modifying paging files
Setup 2 performed the best according to the Passmark overall result with a mark of 825. This
compares to 807 of setup 2. Overall, because these tests were performed on a VM, and
because the paging files were only modified between partitions, the validity of the results can
be questioned. If these test were performed on an OS that is the host platform and there was
more than one HDD, perhaps these results would be different.
For further information on page files, see Microsoft (Change the size of virtual memory,
2012) and Lifehacker (Understanding the Windows Pagefile, 2012). Also Meyers (2012, p.
263-267) provides a very detailed overview of them.
Page 48 of 81
Task A.7 - Email Accounts
As Outlook Express is no longer used in Windows 7, Windows Live Essentials will be
installed and Windows Live Mail will be used as an alternative to Outlook Express. Microsoft
intend for people to migrate to Windows Live Mail when upgrading OS’s. To start this
process, the first thing you must do is download Windows Live Essentials. Firstly, open
Internet Explorer from the taskbar. Then search for ‘Microsoft Live Essentials’. Select the
link from the Microsoft website with the Download Windows Live Essentials header. The
location of this may vary in the search results as these periodically change and depend on
Google. Within here, select the download option and, if given the option, save it to the
Downloads folder.
Figure 67 - Windows 7 - How to download Windows Live Essentials
Next, open the Downloads folder by opening Documents and then selecting Downloads from
the left hand side. Within here, the file you just downloaded should appear.
Page 49 of 81
Figure 68 - Windows 7 - How to open Downloads
Double click on the downloaded file and select yes from the User Account Control option
that appears. User Account Control is a security feature of Windows 7 that notifies the user
when a program is about to make administrative changes to the computer. If the user doesn’t
trust this program, and doesn’t authorise the program to make these changes, then no changes
can be made.
As we only want to install Windows Live Mail, we are going to select the second option to
Choose the programs you want to install. After this, you just select Mail and then click
install.
Figure 69 - Windows 7 - How to install Windows Live Essentials
Page 50 of 81
Figure 70 - Windows 7 - How to install Windows Live Essentials (continued)
Next, you need to open the program. To do this, you open the Start Menu and search for
‘mail’. Windows Live Mail is the first option so you click on this. You are then asked to
accept an agreement with Microsoft. Make sure you read all of this and be sure that you
understand what it means. If you are happy to proceed, click accept.
You then are given the option to add your email accounts. In this example we will add a
sample email account. Fill in your email address, password and select the name for your sent
messages so that people will know that the message is from you. Then click OK. In the next
interface, you have to configure the server settings. The server is basically where your emails
are stored and processed. There are a number of server types such as web servers and FTP
servers. However, in this case, as we are setting up an email account, we require the mail
server details. There are two types of mail servers, incoming and outgoing. There is only one
outgoing mail server; the Simple Mail Transfer Protocol (SMPT) server which is used in
conjunction with outgoing mail servers. Hence, as this is the only option for incoming mail,
you don’t have to configure any settings. On the other hand, there are two options for
incoming mail servers; POP and IMAP. Post Office Protocols (POP) servers store sent and
received emails on a PC’s local HDD. Most POP servers can also store messages on servers
too. Internet Message Access Protocol (IMAP) servers store copies of emails on servers
which allow you to access your email without downloading them locally to your computer.
As we require an IMAP server, we select this option. This changes the port number to 993
which is the default port used for IMAP. You may have noticed that the port used for the
outgoing mail server is automatically set to port 25. This is because it is the default port used
for SMPT. We then enter our server address. This address will vary depending on your email
provider. There is an option to use Secure Sockets Layer (SSL). This basically encrypts any
incoming messages. Hence, it would be recommended that you select this option. Then you
select the method of authentication you want to use; Secure Password Authentication (SPA)
which means that the logon credentials are encrypted and clear text authentication which
means that the logon credentials are unencrypted. It is recommended that you use SPA; some
Internet Service Providers (ISP) even require you to use SPA. You then enter the outgoing
server address and select whether you want to use SSL and if it requires authentication. It is
recommended that you select both of these for security purposes. Again, for some ISP’s,
using SSL is mandatory.
Page 51 of 81
Figure 71 - Windows 7 - Windows Live Mail setup
When you complete all of these steps with the relevant information, your email is setup.
Obviously in this case it will not work as it’s a fabricated account but the general steps would
all be the same for an authentic account. For more information on e-mail and client setups,
see Meyers (2012, p. 1121-1124).
Page 52 of 81
Task A.8 - System Restore Setup and Testing
In this task, we are going to create a system restore, make some changes, and then restore
back to the restore point we created and see what happens. This will emphasise what system
restore actually does. To get started, we are going to create a restore point on the computer.
To do this, you go into the Properties of Computer and select System Protection. Within
System Protection, you select Create on the bottom right. This gives you the option to name a
restore point and then create it. Simply choose a name and click on Create.
Figure 72 - Windows 7 - How to create a restore point
Note that you can configure restore settings in the System Protection tab also. This allows
you to Turn off system protection, Only restore previous versions of files and Restore system
settings and previous versions of files. It also allows you to limit the amount of storage that
system restores can use.
Page 53 of 81
Figure 73 - Windows 7 - How to configure system restore
Next, we are going to make some changes to the computer. Firstly we are going to change the
name of the computer. This is done in the System settings (as shown earlier). Within this
window, you select Change settings located to the right of Computer name, domain and
workgroup settings. Then you select Change. You then type the new name for the computer
and click OK. Note that you will have to restart the computer in order to complete this.
Figure 74 - Windows 7 - How to change the computer name
We are now going to create a new folder. In Computer open the Local Disk (D:). Within this
drive, select New Folder. Then type the name of the folder you want to create and press enter.
Page 54 of 81
Figure 75 - Windows 7 - How to create a folder
We now have to disable the floppy drive. To do this you go into System settings (as before)
and select Device Manager. Then open the Floppy disk drive tab, right click on Floppy disk
drive and click disable. You are then given a warning message and you click Yes. The Floppy
disk drive will now have an arrow pointing down on it indicating that it is disabled.
Page 55 of 81
Figure 76 - Windows 7 - How to disable a hardware device
We are now going to restore the system to the previous state that we saved. To do this open
the Start Menu and search for ‘restore’ and select System Restore. Within this window, you
are given the option to restore to a recommended restore point or to choose a different restore
point. As we know what restore point we want to use we select the second option. Within
here we select the restore point that we created earlier and click Next. Then you have to
confirm that you want to restore to this point and click Finish. A warning message appears
stating that the restoration process cannot be undone until the entire procedure is completed.
You have to select Yes. The system restarts, restores the computer and then gives a message
stating that the restoration process has been successful or unsuccessful.
Figure 77 - Windows 7 - How to restore to a specified restore point
Page 56 of 81
Figure 78 - Windows 7 - How to restore to a specified restore point (continued)
Now that the restoration process has been completed, we can check what this procedure
actually accomplished. If you are unclear as to how to check, follow the steps from earlier to
check the name of the computer, whether the floppy disk drive is still disabled and whether
the folder named ‘backup’ is still there.
It turns out that the name of the computer was changed back to Company-PC. The Floppy
disk drive was also re-enabled. However, the backup folder that we created is still there. This
is because the System Restore will restore only the Windows environment and the settings
associated with this environment, but will never delete your files. However, if applications
are installed between restore point and current state, they will be removed. Hence, if you have
any files that need these applications to run, they will not run as before. Note that you can
undo a restoration and you have access to System Restore within Safe Mode. For more
information on the System Restore utility, see Meyers (2012, p. 768-771).
Page 57 of 81
Task A.9 - System Registry
As before, in order to create a folder, you right click and select New Folder. You then name
the folder.
Figure 79 - Windows 7 - Create a folder
In order to backup the System Registry, firstly you must open the Registry Editor. In order to
do this, you search for ‘regedit’ through the Search Menu and then click on regedit. This
gives a User Account Control warning (as discussed before) to which you click Yes to. This
opens the Registry Editor. In order to export the system registry, you click File and then
Export. You then select the location where you want to export it. In our case, we want to
export it to the reg-export folder on the desktop that we created. This saves the .reg file to this
folder. Note that there is an option to select which registry folders you want to export; all or a
selected branch.
Figure 80 - Windows 7 - How to make a backup of the System Registry
Page 58 of 81
Figure 81 - Windows 7 - How to make a backup of the System Registry (continued)
As can be seen in the screenshot below, there are five folders within the registry editor. Each
of these contains different configuration settings and options.
Figure 82 - Windows 7 - Registry Editor folders
HKEY_CLASSES_ROOT contains all of the software environment settings. All applications
that are installed are stored here as well as their associations, e.g. Notepad, Paint, etc.
HKEY_CURRENT_USER contains all of the current logged on user details and settings.
HKEY_LOCAL_MACHINE contains the local computer hardware settings and associations.
HKEY_USERS contains the details and settings of all users.
HKEY_CURRENT_CONFIG contains the current state of the local machine.
When Windows shuts down, the HKEY_CURRENT_USER and
HKEY_CURRENT_CONFIG configurations and settings are moved to the other long term
storage paths. Any changes that are made in the control panel and with applications mean that
changes are being made within the registry behind the scenes. Hence, being able to export the
registry is a very handy utility as it means you can backup all of the current settings, and
make any changes you like to the registry without having to worry about making changes that
may harm the environment. For a very detailed description of the Windows Registry, see
Meyers (2012, p. 630-636).
Page 59 of 81
Task A.10 - Driver Compatibility
It is often company policy to only allow signed drivers to be installed on computers. All
signed drivers have been checked and are verified as safe by Microsoft. Unsigned drivers, on
the other hand, are not verified by Microsoft and can sometimes cause problems. Hence, this
practice is implemented in order to maintain the stability of the OS environment in the future
and reduce the possibility of compromising the OS environment.
In order to prevent unsigned drivers from being installed, you search for ‘gpedit.msc’ in the
Start Menu and click on gpedit. This opens the Local Group Policy Editor interface. Within
this window, you must go into the Driver Installation folder (as demonstrated in the
screenshots below). Then you double click on Code signing for device drivers. This gives you
the option to enable this setting and block drivers without a digital signature from being
installed.
Figure 83 - Windows 7 - How to prevent unsigned drivers from being installed
For more information on the signed and unsigned drivers see Meyers (2012, p. 346-351, 746748). Also, Device Driver Finder (Signed Drivers and Unsigned Drivers, 2012) provides a
good overview.
Page 60 of 81
Task B.1 - IIS and Linux Debian Installation
There are many differences between Windows and Linux hosting platforms. Each has its
benefits and each has its drawbacks. First and foremost, please note that the OS you run on a
daily basis should not influence what you use as your hosting platform. Servers are accessible
no matter what OS they run on. End users will not have to deal with it so that doesn’t have to
be taken into consideration when choosing the platform. Since most administrators have very
high computer literacy, they should have no problem using Linux although it can be
alienating at the start and there is a larger learning curve in comparison to using Windows.
Hence, there is no need to consider this as an obstacle if you are considering using Linux as a
hosting platform.
I am going to discuss the use of Windows as a hosting platform first. Windows web-server is
known as Internet Information Services (IIS). IIS is more expensive to run as a hosting
platform because it has to run on a Windows server. In comparison Linux is open-source and
therefore there are no software licensing costs. Some Microsoft technologies are aimed at
Windows and cannot be used in Unix-based platforms such as Linux. Such technologies
include VB Script and Microsoft Access. IIS is designed to support Microsoft’s .NET
Framework as well as ASPX scripts (IIS is your only option if you use ASPX scripts). While
there is a GUI available for both platforms, the Windows GUI is more detailed and considered
easier to navigate. One of the main selling points of Windows based web server is that
Microsoft provide support. With Linux based servers, you are depending on the user
community to help with any issues.
There are many Linux based web-servers available. One of the most widely used platforms is
Apache web server. Fewer resources are spent on the Linux GUI. Hence it is not as user
friendly and detailed as the Windows GUI. However, it uses the Command Line Interface
(CLI) which is very powerful. CLI’s can be quite intuitive as well as reliable and efficient to
use as the environment requires fewer resources. As Linux is open-source, the software can
be altered by the administrator if they know how to edit the code. Linux is also considered
more secure as well as it is less targeted due to it being open source. Linux servers require
less rebooting and hence are more stable and have better uptime in general.
If you are 50/50 and unsure what platform to go for, it is easier to change from a Linux based
platform to a Windows based platform. It also costs less. Switching the other way around can
cause significant problems. Hence, if you are in this situation you should try Linux first and
then if needs be change over to Windows. Overall the decision should be based on required
features; use Windows for .NET Framework or VisualBasic, use Linux for PHP, Perl and
CGI. In terms of speed and reliability, Linux shades it.
If you require more information on this subject, please look at the following resources:
G. Seymour - Which Web Server: IIS vs. Apache , M. Brown - IIS vs Apache: Looking
Beyond the Rhetoric , BrainHost - Linux vs Windows Hosting - What's the Difference? And
HostShopper - Windows vs Linux Hosting. Full details of these resources are available in the
bibliography.
Windows web-server is known as Internet Information Services (IIS). In order to use it, you
have to turn the feature on as it is disabled by default. To do this you go to the Control Panel
which can be accessed within the Start Menu. You then go to Programs and select Turn
Page 61 of 81
Windows features on or off. Within here, you scroll to ‘Internet Information Services’ and
tick the box beside it. By default, only the minimum set of features are installed. If you wish
to install the whole package or optional features, you must tick the box beside them as
required. Once you click OK, Windows makes the required changes and enables the programs
selected.
Figure 84 - Windows 7 - How to enable Internet Information Services (IIS)
To then use this feature (IIS), you must go to Administrative Tools within the Control Panel
and double click on Internet Information Services (IIS) Manager (as demonstrated in the
screenshots below).
Page 62 of 81
Figure 85 - Windows 7 - Where to find Internet Information Services once it's installed
Linux Debian 6 is now going to be installed. As with Windows, this is going to be installed as
a VM and demonstrated accordingly. However, if you want to install Debian as the primary
OS on your machine, follow the instructions from Task A.1 which describes how to boot
from a CD. Note that you will also need to burn the ISO to a CD, or buy it.
In this case, you can skip the next section which illustrates how to set up the OS as a VM.
However, this VM is setup using VMware Workstation on a Windows 7 Professional OS as
opposed to VMware Fusion Professional on a Mac OS X machine as used in the previous
tasks. You can download the .iso being used here from http://cdimage.debian.org/debiancd/6.0.6/i386/bt-cd/debian-6.0.6-i386-netinst.iso.torrent or select a different version from
http://cdimage.debian.org/debian-cd/6.0.6/i386/bt-cd/. This is a 32-bit net install version.
The setup is very similar to the last VM setup. However there are minor differences. Firstly,
open VMware Workstation and select File - New Virtual Machine. Select Typical installation
and select the Installer disc image file (.iso). Browse to the location of the .iso file and click
next. You can then choose the name of the VM and the location where you want to install it.
Page 63 of 81
Figure 86 - Setting up a VM in VMware Workstation
Next you select the size of the HDD you want to create and select Split virtual disk into
multiple files. The reason for this was explained when creating the Windows 7 VM. You can
then configure the VM settings as required within the Configure Hardware… section.
Page 64 of 81
Figure 87 - Setting up a VM in VMware Workstation
You then power on the VM and begin the installation of Debian. You configure the language,
location and keyboard settings as required.
Page 65 of 81
Figure 88 - Linux Debian Installation - Language, location and keyboard options
You then configure the network settings as required. After this you must create a root
password. This is the password that will be needed to perform any sort of administrative tasks
such as assigning permissions, installing software, etc. Next you create a user account that
will be used for non-administrative activities. You enter the full name of the person (e.g.
Samantha Grace) and then create a username for them (e.g. sgrace).
Page 66 of 81
Figure 89 - Linux Debian Installation - Configuring networks and users
The next task is to select which way you want to partition the HDD. As we want to use the
whole disk for the OS, we select Guided - Use entire disk. There is an option to set up LVM
(Logical Volume Manager) which provides a higher level view of disk storage but in this
case we have no need for this. As we are required to create account structures similar to
Windows 7, we are going to create a separate /home partition. This is where all of the
department and user folders will be setup. In the next screen, you can view all of the
partitions that will be created. Note that Debian automatically creates a swap file partition
when installing the OS. Hence, there are three partitions viewable here.
Page 67 of 81
Figure 90 - Linux Debian Installation - Configuring partitions
The next section requires you to configure the package manager. You configure appropriately
and then select any software you want to install on top of the OS. Graphical desktop
environment and Standard system utilities are selected by default. As we are also required to
install Apache web server, we select web server as well.
Page 68 of 81
Figure 91 - Linux Debian Installation - Configuring package manager and selecting software to install
If you forgot to include the web server in the initial setup, it is very easy to install afterwards.
Simply type ‘sudo apt-get install apache2’ in terminal and it will install. Note that you must
be logged in as root or as a user who is part of the sudo (‘Super-Users’) group. This will be
easier to understand after completing task B.2. Also remember that passwords are not echoed
to the console as they are typed. Hence you will not see characters being entered as you type
in your sudo password in the terminal. If you are having trouble with permissions, complete
task B.2 and you should have a better understanding of this procedure.
Next you must select if you want to install the GRUB boot loader to the master boot record.
If you do not select yes, you will have to load it to a USB or a CD to boot up Debian. This
Page 69 of 81
may be required if you are setting up a dual-boot system and want to make sure that the other
OS isn’t affected. Installation of Debian is now complete.
Figure 92 - Linux Debian Installation - Finalising installation
For further detailed information on Debian installations, see Debian (Installation Guide,
2010).
Page 70 of 81
Task B.2 - Users and user account structures on Linux Debian
In order to illustrate some of the capabilities of Linux, and the differences between using CLI
and GUI, all of the following tasks will be completed through Command, and then the same
tasks will be completed using the GUI. Before we get started, a very useful tool is the Debian
manual. This can be accessed to find out a description of any functions used within Terminal
and all of its parameters, etc. To use it, simply type ‘man functionname’, e.g. ‘man adduser’.
This will open up a screen with a detailed description of the function and all of its parameters.
To exit out of this screen, simply type ‘q’.
Firstly, you must assign a user to the sudo (super user) group. This allows the user to perform
administrative tasks through Terminal without logging in as the administrator. To do this you
create a user and add the user to the sudo group. This must all be done through the Root
Terminal as the user login is not in the sudo group. Hence, you open Root Terminal and enter
the root password as created during setup. When you login, you can check who you are
performing commands as by typing the command ‘whoami’. This should be root. In order to
create a user, you then type: ‘adduser jsmith’. In Linux it is common practice to avoid using
dots in filenames and to use lowercase only as they can cause problems. To add this user to
the sudo group, you type ‘adduser jsmith sudo’. This can also be done using the command
‘sudo addgroup jsmith finance’. This adds the user ‘jsmith’ to the group ‘sudo’. This means
that this user can perform administrative tasks through the terminal by typing sudo before the
command and typing in the required password.
Figure 93 - Linux Debian - How to add user to the sudo group
Page 71 of 81
This user will now be able to perform administrative tasks within the normal, non-root
Terminal. However, to make a user a full administrator, you must add the user to multiple
groups as below: sudo addgroup jsmith
adm/dialout/fax/cdrom/floppy/tape/sudo/audio/dip/video/plugdev/netdev/lpadmin/fuse/scann
er. Note each of these will have to be done individually.
In order to find out what groups a user is in, you can use the command ‘groups jsmith’. Note
that when a user is created, by default a group is created for that user. As every user creates a
group, the easiest way to create a group in this situation is to create a group as a user. This
means that you can assign the user and group finance to the folder finance and then add other
users to the group finance. Otherwise the owner of the folder would have to be one of the
other users. Then to add users to that group, you type ‘adduser username groupname’.
As we create the /Home partition for department folders, we are going to create these folders
within this directory; one for each department. Firstly, you need to open the Terminal. This is
in the same menu as Root Terminal except slightly lower down. If you are logged in as jsmith
you can check in which directory you are currently located in by typing ‘pwd’ (print working
directory). This should be ‘/home/jsmith’. As we want to create folders for each department
within the home directory, we need to change directory to just /home. To do this you type ‘cd
..’ (change directory). If you need to move up a directory, you type cd ‘cd foldername’.
Figure 94 - Linux Debian - How to open Terminal
When you are in the /home directory, to create a folder, you type ‘sudo mkdir finance’. To
create user folders here, you type ‘cd finance’ to go into that directory and then type ‘sudo
mkdir ssmith’ to create a folder for that user.
Next, we need to grant permissions to these folders. To view a list of the file/folder full
details including owners within a directory, you type ‘ls -l’ within that directory. To change
the owner(s) of a folder including its sub directories, you type ‘sudo chown user:group - R
foldername/filename’. In the case of the finance departments folder, this command will be
‘sudo chown finance:finance -R finance’. In the case of Sam Smith’s folder, it will be ‘sudo
chown ssmith:ssmith -R ssmith’. The ‘-R’ part of the command is what is necessary in order
to include all of the sub directories.
Then, permissions for each folder have to be set. For the finance folder, we only allow people
from the finance department to be able to enter and look at the folders within. Hence you
enter the commands ‘sudo chmod g+rwxXst -R finance’ and ‘sudo chmod o-rwxXst -R
Page 72 of 81
finance’ The first command means that users of the group (g) which owns the file have (+)
read (r), write (w), execute (x), etc. permissions. The second command means that all other
users outside of the group (o) do not have (-) read (r), write (w), execute (x), etc. permissions.
In order to set all of these users/permissions through the GUI environment, there are a
number of steps to take. To set up a user, you open Users and Groups from the System Administration menu. You then click on Add and fill in the users details.
Figure 95 - Linux Debian - How to add a user
To add a user to a group, or add a group, you click on Manage Groups. Then you select Add
if you want to create a group. If you want to edit a specific group, select the group and click
properties. This window gives you the option to edit members of that group.
Page 73 of 81
Figure 96 - Linux Debian - How to add user to group
In order to make someone an administrator, you click on the user and select Change beside
the Account type. You then authenticate yourself by typing the root password. You can then
change the account type as necessary.
Figure 97 - Linux Debian - How to make user an administrator
Page 74 of 81
Figure 98 - Linux Debian - How to make user an administrator (continued)
To create a folder, you right click and select Create folder. This must be done to create a
folder for each department/user.
Figure 99 - Linux Debian - How to create a folder
In order to edit the permissions of a folder/file, you right click and select Properties. Then
you go to the Permissions tab. You can modify the owner, as well as groups associated with
the file/folder and which access different users have.
Figure 100 - Linux Debian - How to edit folder permissions
Page 75 of 81
Task B.3 - Install open source products on Linux Debian
In order to search for a package, you use the command ‘sudo apt-cache search searchterm’.
To get a description of a specific package, you type the command ‘sudo apt-cache search
packagename’. In order to install open source products for the required facilities, you use the
following commands:
‘sudo apt-get install icedove’ (alternative to thunderbird that is available in the Debian
package manager)
‘sudo apt-get install firestarter’ (open source firewall)
‘sudo apt-get install klamav’ (open source anti-virus software)
‘sudo apt-get install mtpaint’ (open source graphics and imaging editing package)
If the program is already installed, the terminal will notify you of this and tell you if it is the
latest version. To view a list of all of the programs installed on the OS, you type the
command ‘sudo dpkg --get-selections’. In order to check for any software updates for all of
the software installed on the machine, you type ‘sudo apt-get update’. Then to download and
apply these updates, you type ‘sudo apt-get upgrade’.
Thunderbird is only available if you download it through a web browser. This can be done by
opening the pre-installed web browser Epiphany Web Browser. You then must enter the URL
http://www.mozilla.org/en-US/thunderbird/ and click to download it. You then need to
extract the folder that just downloaded. Make sure to include all files in the extraction. Open
the folder that you extracted the files to and open the file named thunderbird.
Figure 101 - Linux Debian - How to install Thunderbird
Page 76 of 81
Figure 102 - Linux Debian - How to install Thunderbird
This will open up Thunderbird and you can set your account up as necessary.
Figure 103 - Linux Debian - How to setup account in Thunderbird
To create a shortcut for the application so that it appears with all of the other applications,
you right click on Applications at the top left hand corner of the screen and click Edit Menu.
You then select which menu you want to include it in and click New Item. You locate the file
that opens Thunderbird, name it and click OK. It will now appear in the menu that you
selected.
Figure 104 - Linux Debian - How to add application launcher in Application menu
Page 77 of 81
Figure 105 - Linux Debian - How to add application launcher in Application menu (continued)
To install the other programs using the GUI, you must follow the following steps. Firstly you
have to open the Software Center. Then you search for whatever software you want to install,
e.g. ‘firewall’. You then select the software that you want to install and enter the root
password for authentication.
Figure 106 - Linux Debian - How to install software
Note that you can also look for a more detailed description of the package by clicking on the
More Info button.
Page 78 of 81
Figure 107 - Linux Debian - How to install software
To view all of the software that you have installed on the machine, you simply click Installed
Software in the tab on the left of the screen.
Figure 108 - Linux Debian - How to view installed software (note that GIMP came pre-installed)
There are vast amounts of resources available explaining how to use Linux utilities and
commands. The most complete manual is Aoki (2012) which gives detailed references for the
vast majority Linux Debian features. The Debian Administrator’s Handbook by Hertzog and
Mas (2012) is also a very useful resource, especially for specific administrative tasks.
Page 79 of 81
Bibliography
Aoki, O. (2012) Debian Reference, Debian, Retrieved February 20th, 2013, from
http://www.debian.org/doc/manuals/debian-reference/.
Apache Software Foundation (2012) What is the Apache HTTP Server Project? Apache
Software Foundation, Retrieved February 20th, 2013, from
https://httpd.apache.org/ABOUT_APACHE.html.
BrainHost (n.d.) Linux vs Windows Hosting - What's the Difference? BrainHost. Retrieved
February 20th, 2013, from http://blog.brainhost.com/linux-vs-windows-hosting-whats-thedifference/.
Brett, T. (2012). Various Topics. COMP41140 - Introduction to Hardware and Software.
Lectures conducted from Institute of Public Administration, Dublin.
Brown, M. (2008) IIS vs Apache: Looking Beyond the Rhetoric. ServerWatch. Retrieved
February 20th, 2013, from http://www.serverwatch.com/tutorials/article.php/3074841.
Debian (2012) Chapter 5. Network Setup. Debian. Retrieved February 20th, 2013, from
http://www.debian.org/doc/manuals/debianreference/ch05.en.html#_the_static_ip_connection_with_the_ethernet.
Debian (2010) Debian GNU/Linux Installation Guide. Debian. Retrieved February 20th,
2013, from http://www.debian.org/releases/stable/i386/install.pdf.en.
Hertzog, R. and Mas, R. (2012) The Debian Administrator’s Handbook. Debian
Handbook.Retrieved February 20th, 2013, from http://debian-handbook.info/browse/stable/.
HostShopper (n.d.) Windows vs Linux Hosting. HostShopper. Retrieved February 20th, 2013,
from http://www.host-shopper.com/windows-vs.-linux-hosting.html.
Lifehacker (2012) Understanding the Windows Pagefile, Lifehacker, Retrieved January 20th,
2013, from http://lifehacker.com/5426041/understanding-the-windows-pagefile-and-whyyou-shouldnt-disable-it.
Meyers, M. (2012). CompTIA A+ Certification All-in-One Exam Guide (Exams 220-801 &
220-802) (8th Ed.). San Francisco: McGraw-Hill Osborne.
Microsoft Windows (2012) Change the size of virtual memory, Microsoft Windows,
Retrieved January 20th, 2013, from http://windows.microsoft.com/en-ie/windowsvista/change-the-size-of-virtual-memory.
Microsoft Windows (n.d.) Firewall: frequently asked questions. Microsoft Windows.
Retrieved January 20th, 2013, from http://windows.microsoft.com/en-IE/windowsvista/Firewall-frequently-asked-questions.
Microsoft Windows (n.d.) Support is ending for Windows XP. Microsoft Windows. Retrieved
January 20th, 2013, from http://windows.microsoft.com/en-IE/windows/end-support-help.
Page 80 of 81
Microsoft Windows (n.d.) Updates: frequently asked questions. Windows Support, Retrieved
February 20th, 2013, from http://windows.microsoft.com/en-IE/windows7/Updatesfrequently-asked-questions.
Microsoft Windows (n.d.) User accounts: frequently asked questions. Windows Support,
Retrieved February 20th, 2013, from http://windows.microsoft.com/en-IE/windowsvista/User-accounts-frequently-asked-questions.
Microsoft Windows (n.d.) Windows 7 System Requirements. Microsoft Windows. Retrieved
January 18th, 2013, from http://windows.microsoft.com/systemrequirements.
Seymour, G. (n.d.) Which Web Server: IIS vs. Apache. Hostway Web Solutions. Retrieved
February 20th, 2013, from http://www.hostway.com/web-resources/find-web-hosting/whichweb-server-iis-vs-apache/.
Stanek, W. (2009) Create a New Partition on a Windows 7 Hard Disk. Microsoft TechNet,
Retrieved February 20th, 2013, from http://technet.microsoft.com/enus/magazine/gg309170.aspx.
Toms Hardware (2011) Client/Server Versus Peer Networks. Toms Hardware, Retrieved
February 20th, 2013, from http://www.tomshardware.com/reviews/local-area-network-wi-fiwireless,3020-2.html.
Page 81 of 81