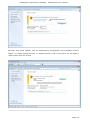
1
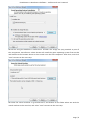
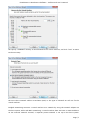
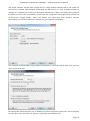
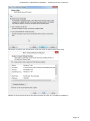
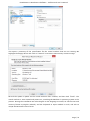
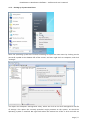
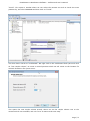
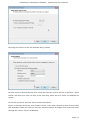
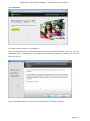
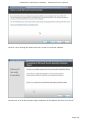
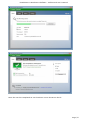
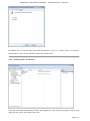
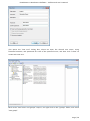
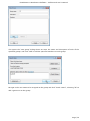
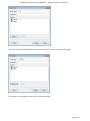
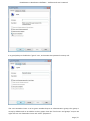
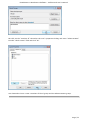
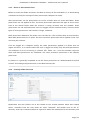
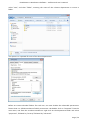
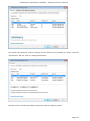
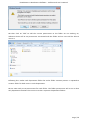
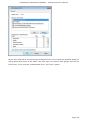
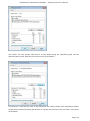
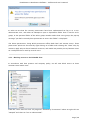
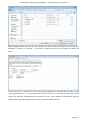
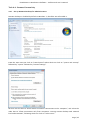
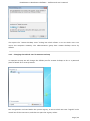
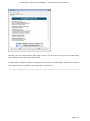
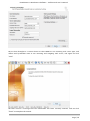
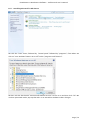
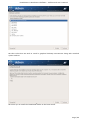
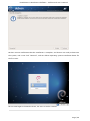
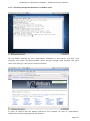
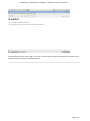
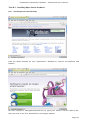
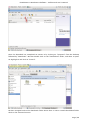
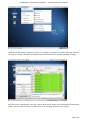
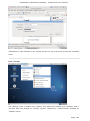
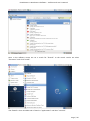
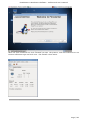
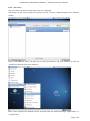
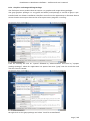
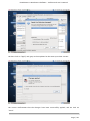
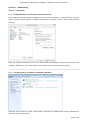
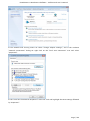
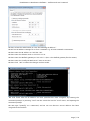
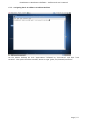
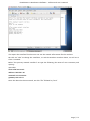
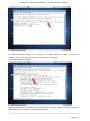
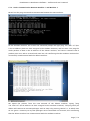
Course: Masters in Computer Science (Conversion) Module: Foundations in Hardware and Software Assignment Title: Foundations in Hardware and Software –Assignment Submitted by: Garrett Coleman, Student No. 96344598 Lecturer: Mr. Tom Brett Submission Date: 20th December 2013 Foundations in Hardware & Software – Professional User‟s Manual Table of Contents Introduction .......................................................................................................................................... 4 Section A - Machine 1 - Windows 7 Professional Operating System ................................................. 5 Task A.1 - Creation of 2 Virtual Machines & Installation of Windows 7 Pro. OS .......................... 5 A.1.1 - Creation of Windows Virtual Machine ................................................................................. 5 A.1.2 - Setting up System Partitions ..............................................................................................11 A.1.3 - Assigning the Machine to a Workgroup ............................................................................15 Task A.2 - Updates and Antivirus ......................................................................................................17 A.2.1 - Updates ...............................................................................................................................17 A.2.2 Antivirus ................................................................................................................................19 A.2.3 - Activate Windows Firewall ..................................................................................................22 Task A.3 - Users, Groups & Security .................................................................................................23 A.3.1 - Implementing Security Policies ..........................................................................................23 A.3.2 - Creating Users and Groups ................................................................................................27 A.3.3 - Share vs NTFS Permissions ................................................................................................33 A.3.4 - Creating Folder Structure ...................................................................................................33 A.3.5 - Blocking Access to Social Media Sites ...............................................................................40 Task A.4 - Remote Connectivity ........................................................................................................43 A.4.1 - Set up Remote Desktop for Administrators ......................................................................43 A.4.2 - Changing the Default Port for Remote Desktop ..............................................................44 Task A.5 - Performance ......................................................................................................................49 A.5.1 - Use Swap File to Increase Performance of the Machine...................................................49 Task A.6 - Email Accounts .................................................................................................................54 A.6.1 - Setting up an Email Account for a User ............................................................................54 Task A.7 - System Restore Setup and Testing ..................................................................................57 A.7.1 - Creating a System Restore Point .......................................................................................57 A.7.2 - System Configuration Changes and Creation of New Folders ........................................58 A.7.3 - Restoring the PC to the Created Restore Point.................................................................63 Task A.8 - System Registry ................................................................................................................68 A.8.1 - Creating a Backup of The Registry ....................................................................................68 Task A.9 - Driver Compatibility .........................................................................................................71 A.9.1 - Preventing Unsigned Drivers from Being Installed ..........................................................71 Page | 2 Foundations in Hardware & Software – Professional User‟s Manual Section B - Machine 2 - Linux Debian Operating System.................................................................72 Task B.1 - Web-Servers .......................................................................................................................72 B.1.0 - Comparison of Windows and Linux as Hosting Platforms ...............................................72 B.1.1 - Installing Microsoft's Web-Server .......................................................................................74 B.1.2 - Installing Debian Linux .......................................................................................................75 B.1.3 - Installing the Apache Web-Server on Debian Linux ..........................................................91 Task B.2 - Create User and User Account Structures .......................................................................93 B.2.1 - Creating Users and User Account Structures ....................................................................93 Task B.3 - Installing Open Source Products......................................................................................97 B.3.1 - Installing Email (Thunderbird)............................................................................................97 B.3.2 - Firewall .............................................................................................................................. 100 B.3.3 - Anti Virus .......................................................................................................................... 103 B.3.4 - Graphics and Image Editing Package ............................................................................. 106 Section C - Networking ................................................................................................................... 108 Task C.1 - Network .......................................................................................................................... 108 C.1.1 - Bridged Network Connection to Virtual Machines ........................................................ 108 C.1.2 - Assigning Static IP Address to Windows Machine ......................................................... 108 C.1.3 - Assigning Static IP Address to Debian Machine ............................................................ 111 C.1.4 - Static Communication Between Machine 1 and Machine 2 .......................................... 114 Appendix A - Assignment Details .................................................................................................. 115 Page | 3 Foundations in Hardware & Software – Professional User‟s Manual Introduction This document is a professional user manual detailing the installation and use of hardware and software on two different operating systems: Microsoft Windows 7 and Debian 6.0. The user manual follows a series of practical tasks set by the Institute of Public Administration (see Appendix A). Windows 7 is an operating system produced by Microsoft for use on personal computers which was released in 2009. While Microsoft have since released Windows 8, Windows 7 remains the most in-use version of Windows at present. Debian is an operating system composed of free software developed by an internet collaboration of volunteers aligned with The Debian Project (an association of individuals who have made it a common cause to create a free operating system). The Debian system uses the Linux kernel (a Unix-like operating system). This user manual describes the steps taken to carry out a variety of hardware and software tasks in order to deepen the user‟s practical knowledge and skills. Tasks are carried out relating to operating system installation, system updates, security, creating users, remote connectivity, performance, email accounts, system restore & registry, drivers and networking. The manual has been written for a novice computer technician, with little to no prior knowledge of the procedures described. The step-by-step procedure is described for each task from beginning to end, with the aid of screen shots. Page | 4 Foundations in Hardware & Software – Professional User‟s Manual Section A - Machine 1 - Windows 7 Professional Operating System Task A.1 - Creation of 2 Virtual Machines & Installation of Windows 7 Pro. OS A.1.1 - Creation of Windows Virtual Machine Note: The description of the second virtual machine is described in Task B.1. hereunder. For the purposes of the tasks described in this manual, VMWare Workstation 9 has been used. The installation of this program is outside the scope of this manual. The first step is to launch the VMWare program and select "create a new virtual machine", which opens the new virtual machine wizard. We select custom (advanced) configuration and click "next" to move to the next step. Page | 5 Foundations in Hardware & Software – Professional User‟s Manual We will be using the Windows 7 Professional installer disc image file (iso) provided as part of this assignment, therefore we select that we will install the guest operating system from an ISO and browse to the location where we have saved it on the host computer's hard drive, and click "next" to move to the next step. We name the virtual machine as g-coleman-win7, and browse to the folder where we wish the virtual machine to be saved to, and select "next" to move to the next step. Page | 6 Foundations in Hardware & Software – Professional User‟s Manual We specify 1500MB of memory to be allocated to the virtual machine, and click "next" to move to the next step. We next select network address translation (NAT) as the type of network we will use for the virtual machine. Bridged networking connects a virtual machine to a network by using the network adapter on the host system, while with NAT networking, a virtual machine does not have its own IP address on the external network. Instead, a separate private network is set up on the host system. Page | 7 Foundations in Hardware & Software – Professional User‟s Manual The virtual machine and the host system share a single network identity that is not visible on the external network. With bridged networking the VM requires it's own IP address from the network it is supposed to belong to, while NAT networking is often used when the amount of IP addresses in the external network is limited. As this assignment was largely being carried out at University College Dublin, where the author has experience poor wireless internet accessibility, the virtual machine was initially set up using NAT networking. The standard recommended LSI logic SAS SCSI controller is selected, and we then click "next" to move to the next step. We specify the maximum disk size as 60GB as per the assignment instructions, tick to allocate all disk space now, and select to split the virtual disk into multiple files. Page | 8 Foundations in Hardware & Software – Professional User‟s Manual We select "create a new virtual disk" and click next to move to the next step. Before we click finish to finish the wizard setup we click on "customise hardware". Page | 9 Foundations in Hardware & Software – Professional User‟s Manual This opens a summary of the specification for the virtual machine that we are creating. We highlight the floppy device and click on "remove" to minimise unnecessary resource usage. We tick the option to power on the virtual machine after creation, and then click "finish". The virtual machine is now created and powers on, installing the Windows 7 operating system in the process. During the installation we select English as the language to install, we set the time and currency format as English (Ireland), and the keyboard or input method as Irish, and tick to accept the Microsoft license terms. Page | 10 Foundations in Hardware & Software – Professional User‟s Manual A.1.2 - Setting up System Partitions Once the operating system has finished installing we open the start menu by clicking on the microsoft symbol on the bottom left of the screen, and then right click on computer, and click "manage". This opens the computer management utility, where we click on the disk management sub-file of storage. This opens the currently provided single partition on the system, on which the operating system is installed. We right-click within the hatched are of the C drive and click on Page | 11 Foundations in Hardware & Software – Professional User‟s Manual "shrink". This opens a window where we can select the amount we wish to shrink the main partition by, we select 30000 MB and then click on "shrink". This then leaves 30 GB as "unallocated". We right click on the unallocated disk space and click on "new simple volume", to create a second partition which we will create as the location for secured directories for system users. This opens the new simple volume wizard, where we set the simple volume size as the maximum disk size available, and cick "next" to move to the next step. Page | 12 Foundations in Hardware & Software – Professional User‟s Manual We assign the letter E to the new partition being created. We then select to format the new drive using the NTFS file system and tick to perform a quick format, and then click "next" to move to the next step, where we click "finish" to complete the wizard. For the file system we have the choice of NTFS and FAT32. FAT32 is the older of the two drive formats. FAT32 is the most common version of the old FAT (File Allocation Table) file and has been the standard format for floppy disks and hard drives through the various versions of Windows. Page | 13 Foundations in Hardware & Software – Professional User‟s Manual NTFS (New Technology Files System) is the newer drive format. Windows 7 and 8 default to NTFS format on new PCs. The table below shows the comparison between the two file systems, and the associated benefits and drawbacks of each (source: www.guidingtech.com, 2013) Back at the disk management utility, we can now see that the system has two partitions each of 30 GB in size. Page | 14 Foundations in Hardware & Software – Professional User‟s Manual A.1.3 - Assigning the Machine to a Workgroup We will now assign the machine we have just created to workgroup g-colemean. We once again access the start menu and right click on computer, this time clicking on "properties". This opens the system window where, under computer name, domain, and workgroup settings, we click on "change settings". Page | 15 Foundations in Hardware & Software – Professional User‟s Manual This opens the system properties window where we click "change" to rename the computer or change its domain name or workgroup. This opens the computer name/domain changes window, where we assign the computer the name of JanitorComputer (for security purposes, such a name would be less likely to be targeted by hackers), and click on workgroup for the computer to be a member of a workgroup, which we name g-coleman. Page | 16 Foundations in Hardware & Software – Professional User‟s Manual Task A.2 - Updates and Antivirus A.2.1 - Updates From the start menu we click on "control panel" and select "system and security", where we click on "windows updates". From the windows updates dialog we select "turn on automatic updates". We then are presented with the install new windows updates software window where we click "install now", to check for updates. Page | 17 Foundations in Hardware & Software – Professional User‟s Manual We then click install updates, and the downloading, configuration and installation process begins. It is worth noting that this is a lengthy process, and is best left to run overnight in order to best make use of time. Page | 18 Foundations in Hardware & Software – Professional User‟s Manual A.2.2 Antivirus Using the internet browser we navigate to: http://windows.microsoft.com/en-IE/windows/security-essentials-download, where we click on "download now" to download the microsoft security essentials antivirus software, "for the low low price of free". Once it has downloaded we select "run" which starts the installation wizard. Page | 19 Foundations in Hardware & Software – Professional User‟s Manual We click "next" through the wizard and click "install" to install the software. We then tick to scan the computer upon completion of installation and then click "finish", Page | 20 Foundations in Hardware & Software – Professional User‟s Manual Once the scan has completed we see that there are no threats on the PC. Page | 21 Foundations in Hardware & Software – Professional User‟s Manual We then open the "settings" tab to set the frequency of scans, where we select to run a scheduled scan every Sunday at 2am, and save changes. A.2.3 - Activate Windows Firewall WIndows firewall is activated by default with windows 7 installations, however if we wished to switch it off it is accessed by clicking the "start" menu, followed by "control panel" followed by "system and security". Within system security we click on "windows firewall" and "customise settings" which open a dialog box where the firewall could be turned off. Page | 22 Foundations in Hardware & Software – Professional User‟s Manual Task A.3 - Users, Groups & Security A.3.1 - Implementing Security Policies Microsoft Management Console The microsoft management console is a very useful tool for the IT technician. It is accessed by typing "mmc" into the search bar on the start menu which locates the mmc.exe application. When opened, the console can have frequently used utilities, such as device manager, disk management and local users and groups added as "snap-ins" to the console, which can be saved for future use. Page | 23 Foundations in Hardware & Software – Professional User‟s Manual Security policies in relation to passwords and logons are implemented from the local security policy interface, which can be accessed by typing "local security" into the search bar on the start menu, and opening the search result. When we open the interface, we can then expand the account policies folder, followed by the password policy folder, which then allows us to right click on the various elements of the password and account lockout policies, and set them in accordance with best practice. We set the password history to remember the last 24 passwords used to ensure that passwords are not reused. Page | 24 Foundations in Hardware & Software – Professional User‟s Manual We set the maximum password age as 30 days. We set the minimum age of passwords as 2 days. Page | 25 Foundations in Hardware & Software – Professional User‟s Manual We set the minimum password length as 8 characters. We enable complexity requirements of passwords, i.e. mixture of letters, numbers and characters. Page | 26 Foundations in Hardware & Software – Professional User‟s Manual Passwords are not stored using reversible encryption as this is a security risk in a business environment, and is better suited for home and personal use. A.3.2 - Creating Users and Groups Using the microsoft management console, we expand the "local users and groups" snap-in, and right click on "users" and select "new user". Page | 27 Foundations in Hardware & Software – Professional User‟s Manual This opens the "new user" dialog box, where we enter the desired user name, using firstinitial.surname, and password for each of the specified users, and then click "create" to create each new user. Back at the "local users and groups" snap-in, we right click on the "groups" folder, and select "new group". Page | 28 Foundations in Hardware & Software – Professional User‟s Manual This opens the "new group" dialog where we enter the name and description of each of the specified groups, and click "add" to add the specified members to each group. We type in the user name to be assigned to the group and click "check names", selecting "ok" to add a given user to the group. Page | 29 Foundations in Hardware & Software – Professional User‟s Manual Once the user has been added to the group we click on "create" to create that group. This process is repeated for each of the specified groups. Page | 30 Foundations in Hardware & Software – Professional User‟s Manual It is good policy to disable the "guest" user, to eliminate this potential security risk. The user Samantha Grace is to be given membership to an administrators group, this group is set up by default and so we add her to this group. From the "local users and groups" snap-in we right click on user Samantha Grace and select "properties". Page | 31 Foundations in Hardware & Software – Professional User‟s Manual We click on the "member of" tab within the user's properties dialog and enter "administrators" into the "check names" field and click "ok" User Samantha Grace is now a member of the IS group and the Administrators group. Page | 32 Foundations in Hardware & Software – Professional User‟s Manual A.3.3 - Share vs NTFS Permissions Before we create our folder structures and look at security of files and folders, it is worth taking a moment to clarify the concept of share permissions compared to NTFS. Share permissions are the permissions we set for a folder when we share that folder. Share permissions are not applied to files. The share permissions determine the type of access users have to the shared folder when the resource is being accessed over the network. Share permissions are not evaluated when users are logged into the machine locally. There are three types of share permissions: Full Control, Change, and Read. NTFS permissions determine the action users can take for a file or folder when accessed locally. When both permissions are in place, the most restrictive permission will be applied to the user accessing the resource. If we are logged on a computer locally, the share permissions applied to a folder have no impact on the us. In a scenario where the user is logged on locally, only the NTFS permissions are evaluated. If we are accessing a resource (file, folder, etc...) over the network, then the share and NTFS permissions are combined. The most restrictive permission is the effective permission. In practice it is generally acceptable to set the share permissions to "Authenticated Users/Full Control" and manage the permissions via the NTFS Security tab. A.3.4 - Creating Folder Structure Department and User folders are to be created on the second partition which was created earlier. Therefore from the start menu we select "computer" and double click on the "E" directory. From the resultant window we right click within the whitespace for the directory and Page | 33 Foundations in Hardware & Software – Professional User‟s Manual select "new", and then "folder", entering the name of the relevant department to receive a folder. This process is repeated for each of the three departments. Before we create individual folders for each user, we must disable the inheritable permissions feature that is a default attribute of NTFS permissions. We double click on "computer" from the start menu, and from the resultant window we right click on the department folder and select "properties", followed by "security" followed by "advanced". Page | 34 Foundations in Hardware & Software – Professional User‟s Manual This opens the advanced security settings for the folder we are working on, where, from the "permissions" tab, we click on "change permissions". We then untick "include inheritable permissions from this object's parent" Page | 35 Foundations in Hardware & Software – Professional User‟s Manual We then click on "add" to add the current permissions to the folder we are working on, otherwise there will be no permissions associated with the folder and no users will be able to access it Following this, within each department folder the earlier folder creation process is repeated to create a folder for both users in each department. We are now ready to set permissions for each folder. The folder permissions will be set so that only department members have access to their respective department folders. Page | 36 Foundations in Hardware & Software – Professional User‟s Manual We right click on the folder and select "properties", followed by "security" and we then under "permissions for authenticated users" we tick the box for "full control", followed by clicking "add". We then enter the name of the group who will have access to the folder in the "enter the object names to select field" and click "ok". Page | 37 Foundations in Hardware & Software – Professional User‟s Manual We are then returned to the permissions dialog where we can see that the specified group are now granted permissions to the folder. The next step is to remove other groups who will not have access, in this case the "authenticated users" and "users" groups. Page | 38 Foundations in Hardware & Software – Professional User‟s Manual This leaves the only groups with access to the folder being the specified group and the administrators group, who have full access to all of the folders. This process is repeated for each of the individual user folders within each department folder, except that instead of granting permission to a group we grant it to the user who is the owner of the folder. Page | 39 Foundations in Hardware & Software – Professional User‟s Manual In order to test that the security permissions have been implemented we log in as a nonadministrator user, and when we attempt to open a department folder that is not the user's group, or the personal folder of the other group member within that users group, the pop-up message "you don't currently have permission to access this folder" is displayed. The above permissions, being NTFS permissions affect both local and remote access. Share permissions (which are accessed by right clicking on a folder and selecting the "share" tab), by contrast, apply only to shared network resources, and would not provide privacy between users on a computer that is used by several users. A.3.5 - Blocking Access to Social Media Sites In accordance with best practice and company policy, we will now block access to three common social media sites. From the "start" menu we click "all programs" followed by "accessories" where we right click on "notepad" and chose to "run as administrator". Page | 40 Foundations in Hardware & Software – Professional User‟s Manual When notepad opens we click on "file" followed by "open" and we navigate to local disk (C)/ Windows / System 32 / Drivers / etc, which is where the host file is located, and which we open. As the host file is a system file we must be running notepad as administrator in order to save any changes made to it. At the bottom of the host file we can now add the addresses of the sites to be blocked, following the convention 127.0.0.1 (the computer's loopback IP address) followed by www.websitename.com. We then save the edited host file. Page | 41 Foundations in Hardware & Software – Professional User‟s Manual When we attempt to access one of the blocked websites we can see that it is no longer accessible. Page | 42 Foundations in Hardware & Software – Professional User‟s Manual Task A.4 - Remote Connectivity A.4.1 - Set up Remote Desktop for Administrators Remote desktop is disabled by default in Windows 7, therefore we will enable it. From the start menu we click on "control panel" within which we click on "system and security" followed by "system" followed by "remote settings". We then tick the box to "allow remote assistance connections to this computer", and select the radio box to "allow connections only from computers running remote desktop with network level authentication", following which we click on "select users". Page | 43 Foundations in Hardware & Software – Professional User‟s Manual This opens the "remote desktop users" dialog box which allows us to set which users can access the computer remotely. The administrators group have remote desktop access by default. A.4.2 - Changing the Default Port for Remote Desktop To improve security we will change the default port for remote desktop as this is a potential point of attack for a security breach. Port assignations are listed within the system registry, to access which we enter "regedit" in the search bar of the start menu, and then we open the registry editor. Page | 44 Foundations in Hardware & Software – Professional User‟s Manual Within the registry editor we expand the "HKEY_LOCAL-MACHINE" key, followed by the "SYSTEM" folder, followed by the "current control set" folder, followed by the "control" folder. From the "control" folder we expand the "Terminal Server" folder, followed by the "WinStations" folder, from where we open the "RDP-Tcp" folder. Within this folder we open the "PortNumber" file. Page | 45 Foundations in Hardware & Software – Professional User‟s Manual This opens the port number dialog, from where we can change the port number from the default number of 3389 to a non-default value. We will select 7502. We must select a number greater than 1024 as the first 1024 ports are either used or reserved. It is now necessary for the operating system to know which port to use for remote desktop connections, therefore from the microsoft management console we open "windows firewall with advanced security" followed by "inbound rules". From here we click on "new rule". Page | 46 Foundations in Hardware & Software – Professional User‟s Manual This opens the "new inbound rule" wizard where we select "port" to create a rule that controls connections for a TCP or UDP port. We then select "TCP" and enter the new port number for remote desktop connections into the "specific local ports" field, and click "next". Page | 47 Foundations in Hardware & Software – Professional User‟s Manual We then give the new rule a name, in this case we will call it RDP Custom Port Number and a description, after which we click "finish" to complete the wizard. The process is repeated as a new "Outbound Rule", after which the newly assigned port is now configured to connect with a remote desktop connection. Page | 48 Foundations in Hardware & Software – Professional User‟s Manual Task A.5 - Performance A.5.1 - Use Swap File to Increase Performance of the Machine We will now use the configuration of the swap file to improve the performance of the machine, and use a benchmarking tool to document the results. Therefore it is necessary to install a benchmarking tool in order to have a benchmark to compare the performance with following changes to the configuration. We will use Novabench, a free application to do this. Using the web browser we navigate to www.novabench.com, and click on "download now", and select the windows download. Once the utility has installed we click on "start benchmark test", once all open programs have been closed. Page | 49 Foundations in Hardware & Software – Professional User‟s Manual The benchmarking tool carries out a series of tests on the system, and produces a score, in our case, of 480. This will be our benchmark to compare the system performance once we have made changes to the swap file. To access the swap file settings from the "start" menu we click on "control panel" followed by "system and security" followed by "system" followed by "advanced system settings" followed by the "settings" button within the "performance" section. Page | 50 Foundations in Hardware & Software – Professional User‟s Manual Within the "advanced" tab of the resultant dialog box, under the "virtual memory" section we click on the "change" button. We firstly untick the "automatically manage paging file sizes for all drives". Page | 51 Foundations in Hardware & Software – Professional User‟s Manual We can then add a paging file to our second partition by highlighting this partition, and then and set the size of this paging file by clicking on "custom size" (the recommended size is 1.5 times the size of the system RAM) so we change the maximum size to 2250MB). Upon installation, windows locates the paging (swap) file on the boot partition. However as we now have a paging file on our secondary partition, we can create a performance boost by removing the paging file from the boot partition, by clicking on the primary partition and then selecting "no paging file". Page | 52 Foundations in Hardware & Software – Professional User‟s Manual We then run our benchmarking tool again, and we see that there has been an performance gain, with the score rising from 480 to 483. An alternative method to secure a significant improvement in performance would be to install a solid state drive in a computer, and locate the swap file on it. Page | 53 Foundations in Hardware & Software – Professional User‟s Manual Task A.6 - Email Accounts A.6.1 - Setting up an Email Account for a User From the "start" menu we select "all programs" followed by "outlook express" and select "yes" on the resultant dialog asking if we wish to configure an email account. We then enter the name Samantha Grace and the email address [email protected] as specified, and enter a password for the user's email account, and having clicked to manually configure server settings, we click "next" to continue the wizard. Page | 54 Foundations in Hardware & Software – Professional User‟s Manual We then select "internet email" and click "next". Page | 55 Foundations in Hardware & Software – Professional User‟s Manual We are then brought to a screen where we select IMAP as our incoming mail server type, and define mail1.pretendacc.com as our incoming and outgoing mail server, and again we click "next" We then receive a message that the information has been correctly entered, and we click "finish" to complete the wizard. Page | 56 Foundations in Hardware & Software – Professional User‟s Manual Task A.7 - System Restore Setup and Testing A.7.1 - Creating a System Restore Point From the "start" menu we right click on "computer" and select "properties", and in the "system" dialog box we click on "system protection" in the left column. Under the "system protection" tab we click "create" to create a restore point. Page | 57 Foundations in Hardware & Software – Professional User‟s Manual We are then prompted to type a description for the restore point, following which we click "create". We then receive confirmation that the restore point has been created, and we click "close". A.7.2 - System Configuration Changes and Creation of New Folders From the "start" menu we right click on "computer" and select "properties", and in the "system" dialog box we click on "change settings" in the "computer name" section. Page | 58 Foundations in Hardware & Software – Professional User‟s Manual We click on "change" to rename the computer. We enter the new name "mc1" as specified and click "ok". Page | 59 Foundations in Hardware & Software – Professional User‟s Manual We are then prompted to restart the computer to effect the computer name change, following which, navigating to the system window again, we see that the computer name has changed to mc1. To create new folders, we right click on the desktop and select "new" followed by "folder". Page | 60 Foundations in Hardware & Software – Professional User‟s Manual Having created two new folders, we right click on each of them and select "rename", naming them folder1 and folder2. We then double click on folder1 to open it and once it open we right click within the window and click "new" followed by "text file" which we then rename as "notes". Page | 61 Foundations in Hardware & Software – Professional User‟s Manual We then open the "notes" text file and enter our name within it. We then enter the computer management utility by right clicking on "computer" from the "start" menu and selecting "manage". Within the utility we open the device manager, and right click on "floppy disk drives" and select "disable", and "yes" to confirm. Page | 62 Foundations in Hardware & Software – Professional User‟s Manual We can then see that the floppy drive has been disabled. A.7.3 - Restoring the PC to the Created Restore Point Our next step is to restore the PC to the restore point that we created earlier, so that we can discern which changes we made in the steps above are affected by the system restore utility. From the "start" menu we select "all programs" followed by "accessories", and within "system tools" we click on "system restore". Page | 63 Foundations in Hardware & Software – Professional User‟s Manual In the system restore dialog box we select "chose a different restore point" and then click "next". We are then presented with a window that lists all of the previously created restore points. Restore points can be created manually, but are also created automatically whenever updates are installed or new drivers are installed, as well as just before each time the system is rolled back to a restore point. We select our previously created restore point and then click "next". Page | 64 Foundations in Hardware & Software – Professional User‟s Manual We are then asked to confirm the restore point we have selected and we click "finish", after which A confirmation dialog advises that the system restore completed successfully. Page | 65 Foundations in Hardware & Software – Professional User‟s Manual We see that the system restore utility does not affect any data, with both created folders remaining, and with the notes text file still present in folder1. We can see in system properties that the computer name has reverted back to JanitorComputer, the name it had before we changed it to mc1. Page | 66 Foundations in Hardware & Software – Professional User‟s Manual When we open the computer management utility, under device manager, we can see that the floppy drive has been re-enabled. Page | 67 Foundations in Hardware & Software – Professional User‟s Manual Task A.8 - System Registry A.8.1 - Creating a Backup of The Registry From the ever reliable "start" menu we type "regedit" into the search field and open the registry editor. We then click "file" and "export". Page | 68 Foundations in Hardware & Software – Professional User‟s Manual We then click "computer", select the "directories (E)" partition that we created earlier, and right click within the window to access the "new" and "folder" options, where we create a new folder called "backup". We then click once on this new folder to assign this as the export location for the backup of the registry, and having given the backup a name, we click on "open" to confirm it. Page | 69 Foundations in Hardware & Software – Professional User‟s Manual The registry now has a backup located in the backup folder. Page | 70 Foundations in Hardware & Software – Professional User‟s Manual Task A.9 - Driver Compatibility A.9.1 - Preventing Unsigned Drivers from Being Installed Driver signing associates a digital signature with a driver package. Windows device installation uses digital signatures to verify the integrity of driver packages and to verify the identity of the vendor (software publisher) who provides the driver packages. We access the command prompt from the "start" menu, within the "accessories" folder within the "programs" folder. We right click on the command prompt icon and select "run as administrator", and select "yes" to continue after the user account control warning. Within the command prompt we then enter "Bcedit.exe /set nointegritychecks ON". This is in fact turning driver signing off, as it is enabled by default in Windows 7, to re-enable it we simply repeat the above command, replacing "ON" with "OFF". Page | 71 Foundations in Hardware & Software – Professional User‟s Manual Section B - Machine 2 - Linux Debian Operating System Task B.1 - Web-Servers B.1.0 - Comparison of Windows and Linux as Hosting Platforms In relation to our hypothetical customer who is seeking advice on the benefits and drawbacks to using both windows and Linux as a hosting platform, a brief discursive comparison of the two is of benefit, following which, having seen a variety of practical tasks associated with a windows installation, we will detail some common taks associated with a linux debian installation. While web hosting systems are very varied, there are really only two kinds with variations of each in existence. The two choices are Windows and Linux. The decision to choose one web hosting system over another generally comes down to which type of scripting languages the customer needs. Linux hosting Linux was once the leader of the web hosting world. While the Linux web hosting platform is still the most popular, it has decreased in popularity in recent times because of the emergence of Windows. Linux offers several benefits over Windows including: Cost For web hosts, Linux is free, which is a significant advantage over Windows. Diverse scripting language support: Whether a customer needs PHP, Ruby on Rails, Perl, or Python, a Linux web hosting platform will usually support them all by default. Linux disadvantages include: ASP and .NET support: It is rare to find a Linux web hosting platform that supports ASP or .NET. Windows hosting It is a common misconception for customers to think that they need to get Windows hosting because their desktop computer is using Windows. This is not the case. A Windows server is very different to a Windows desktop and most interaction with a web server is through FTP or a web interface. One of the biggest advantages of Windows hosting over Linux hosting is: The ability to run classic ASP or .NET scripts: These languages are very powerful and are becoming increasingly popular. Page | 72 Foundations in Hardware & Software – Professional User‟s Manual The disadvantages of a Windows hosting platform include: Availability: Windows is currently much less popular than Linux so it can be difficult to find a Windows web hosting system with the exact features that the customer may need. Cost: Windows web hosting usually costs more than Linux web hosting, sometimes by a substantial amount. Similarities between Windows and Linux hosting: In reality, there are several aspects that are virtually the same whether a customer chooses Windows hosting or Linux hosting: Performance: On both platforms the speed and efficiency will be comparable when an competent administrator manages it. Stability: While Windows web hosting systems had a deserved reputation for being unstable in the past, the difference in stability between a Windows server and a Linux server today is minimal. Ease of use: Most interaction with a web hosting system will be through FTP or a server's control panel. So even though Windows provides a user-friendly GUI interface, it isn't hugely necessary. Security: Today, both web hosting platforms are comparably secure. Page | 73 Foundations in Hardware & Software – Professional User‟s Manual B.1.1 - Installing Microsoft's Web-Server We click the "start" menu, followed by "control panel" followed by "programs", from where we click on "turn windows features on or off" under "programs and features". We then tick the box beside "Internet Information Services" to turn it on and then click "ok". We are then presented with a pop-up that asks us to wait while windows makes changes. Page | 74 Foundations in Hardware & Software – Professional User‟s Manual To test if the installation was successful we open the "internet explorer" web browser from the "start" menu, and we enter http://localhost into the address bar. We then see the above screen which confirms that Internet Information Systems (IIS) has installed. B.1.2 - Installing Debian Linux We follow the same method as previously within VMWare Workstation, this time using the Debian 6.0.6 installer disc image file supplied as part of this assignment, with the same specifications in terms of memory allocation etc. Page | 75 Foundations in Hardware & Software – Professional User‟s Manual We are then brought to the debian installer boot menu, where we type "G" to use the graphical install and then hit return on our keyboard. Page | 76 Foundations in Hardware & Software – Professional User‟s Manual On the language page we select English and then click "continue" to move to the next step. Having chosen Ireland as our location we then select British English as the keymap for our keyboard configuration and click "continue". Page | 77 Foundations in Hardware & Software – Professional User‟s Manual We then leave the host name as the default and hit "continue". We then enter a password for the system administrative account. For the purposes of this assignment we have used the same password as was used for the windows machine, i.e. Pa$$w0rd, but in reality a more complex password in compliance with best practice would be employed. Page | 78 Foundations in Hardware & Software – Professional User‟s Manual We then setup a user account for Samantha Grace, firstly by entering her name. We are then prompted to enter her user name, which we do, and then click on "continue". Page | 79 Foundations in Hardware & Software – Professional User‟s Manual We then type and verify the password for Samantha Grace's account. The next window is related to the partitioning of the disk. We select manual, as we wish to partition the hard drive into two disks. Page | 80 Foundations in Hardware & Software – Professional User‟s Manual Select "yes" and "continue". We then select "create a new partition" and click "continue". Page | 81 Foundations in Hardware & Software – Professional User‟s Manual We then enter the size of this first partition as 30GB and hit "continue". We set this first partition as the primary partition and hit "continue". Page | 82 Foundations in Hardware & Software – Professional User‟s Manual We select for the partition to be created at the beginning of the available disk space and hit "continue". In the "Use as:" setting option, we select "Ext3 journaling File System". Page | 83 Foundations in Hardware & Software – Professional User‟s Manual For the mount point we select "/ - the root file system" , and "continue". We then click once on "done setting up the partition" to highlight it, and then click "continue". We are then presented with a partition disks overview, where if we double click on the free space we can assign the remaining space to our directories partition. Page | 84 Foundations in Hardware & Software – Professional User‟s Manual The same process as above is repeated, however this time we select the mount point as "/home - user home directories". We also set the disk type as a logical disk rather than the primary disk. Page | 85 Foundations in Hardware & Software – Professional User‟s Manual The partition disk overview now shows the 2 partitions we have created, and we click once on "finish partitioning and write changes to disk", and then click "continue". We then select "yes" to confirm the changes and click "continue". Page | 86 Foundations in Hardware & Software – Professional User‟s Manual We are then brought to the package manager configuration, where we select "no" for do we want to scan additional CDs for the package manager. We select "yes" in order to use a network mirror to supplement the software that is included on the ISO from which we are installing the debian operating system. Page | 87 Foundations in Hardware & Software – Professional User‟s Manual We select Ireland as our country. We are presented with a number of mirror options, and we select the ftp.<your country code>.debian.org as recommended by the installer wizard. Page | 88 Foundations in Hardware & Software – Professional User‟s Manual We then select that we wish to install a graphical desktop environment along with standard system utilities. We select yes to install the GRUB boot loader to the boot record. Page | 89 Foundations in Hardware & Software – Professional User‟s Manual We then receive notification that the installation is complete, and that we are ready to boot into the system, and so we click "continue", and our debian operating system installation boots for the first time. We can now logon as Samantha Grace, the user we earlier created. Page | 90 Foundations in Hardware & Software – Professional User‟s Manual B.1.3 - Installing the Apache Web-Server on Debian Linux On the debian desktop we click "applications" followed by "accessories" and then "root terminal". This opens the above window, where we type "apt-get install apache2" and press enter, then typing "y" when we are asked to confirm. In order to confirm that the Apache web-server has installed, we click on "applications", followed by "internet and epiphany web browser". Page | 91 Foundations in Hardware & Software – Professional User‟s Manual In the address bar we enter http://127.0.0.1 and we see the above window which confirms that the web server has been installed correctly. Page | 92 Foundations in Hardware & Software – Professional User‟s Manual Task B.2 - Create User and User Account Structures B.2.1 - Creating Users and User Account Structures On the debian desktop we click on "system" followed by "administration" followed by "users and groups". On the users settings page we click "add". Page | 93 Foundations in Hardware & Software – Professional User‟s Manual On the create new user page we then enter the name and user name, and on the following page the password, for each of the specified users. On the user settings screen we then click "manage groups" to create the specified groups. Page | 94 Foundations in Hardware & Software – Professional User‟s Manual On the groups settings page we click "add". We can then enter the name of each of the specified groups, and click on the users who are assigned to each group. Page | 95 Foundations in Hardware & Software – Professional User‟s Manual Samantha Grace has already been included in the administrator group as part of our installation of the debian operating system. Page | 96 Foundations in Hardware & Software – Professional User‟s Manual Task B.3 - Installing Open Source Products B.3.1 - Installing Email (Thunderbird) From the debian desktop we click "applications", followed by "internet and epiphany web browser". We then navigate to www.getthunderbird.com by typing this address into the address bar, where we click on the "free download for Linux English (British). Page | 97 Foundations in Hardware & Software – Professional User‟s Manual Once the download has completed we extract it by clicking on "computer" from the desktop followed by "downloads". We then double click on the "thunderbird" folder, and when it opens we highlight it and click on "extract". We then navigate back to the downloads folder where there is now a second thunderbird folder which is the extracted version. Page | 98 Foundations in Hardware & Software – Professional User‟s Manual Software on the debian operating system is installed in packages, therefore from the desktop we click on "system" followed by "administrator" followed by the "synaptic package manager". We then enter "thunderbird" into the search field which locates the downloaded thunderbird folder, and we select all of the "icedove" files to be installed, and then click "apply". Page | 99 Foundations in Hardware & Software – Professional User‟s Manual Thunderbird is now available on our system and we can set up an email account for Samantha Grace. B.3.2 - Firewall The software centre in debian linux contains free software for debian linux machines, and is accessed from the desktop by clicking "system", followed by "administration" followed by "software centre". Page | 100 Foundations in Hardware & Software – Professional User‟s Manual Once in the software centre we run a search for "firewall". In the search results we select "firestarter" and click "install". The firewall is then installed and is found in "applications" and then "internet". Page | 101 Foundations in Hardware & Software – Professional User‟s Manual When we open Firestarter we click "forward" to start the process, and select Ethernet as our internet connection type and click save. The firewall is then active. Page | 102 Foundations in Hardware & Software – Professional User‟s Manual B.3.3 - Anti Virus The next step is to find an open source anti virus package. The process is the same as with the firewall, we click "system", "administration" and "software centre". Once in the software centre, we then run a search for KlamAV, and once located, we click on "install" to install the anti virus software. Once it has installed, the software can be accessed from the desktop through "applications", in "system tools". Page | 103 Foundations in Hardware & Software – Professional User‟s Manual When we first open KlamAV we enter the first-run wizard and we click on "next" to set it up. Klam AV now wants to know where we want quarantined files to be kept, either choose a location or leave the default and click finish to complete the Klam AV setup process. Page | 104 Foundations in Hardware & Software – Professional User‟s Manual We click on "scan" to run an initial scan. The scan results window advises that no viruses or problems have been found. Page | 105 Foundations in Hardware & Software – Professional User‟s Manual B.3.4 - Graphics and Image Editing Package The final open source product that we require is a graphics and image editing package. The gimp graphics package is a very good and widely used package. A version of gimp is preinstalled with our debian installation, therefore we will use this opportunity to illustrate how to ensure that the most up to date version of an open source program is running. From the desktop we click on "system" followed by "administration" and then by "synaptic package manager". When this application has opened we enter "gimp" into the search bar and click the "search" button. We right click on the gimp package and select "mark for reinstallation" Page | 106 Foundations in Hardware & Software – Professional User‟s Manual We then click on "apply" and gimp is then updated to the most up to date version. We receive confirmation that the changes have been successfully applied, and we click on "close". Page | 107 Foundations in Hardware & Software – Professional User‟s Manual Section C - Networking Task C.1 - Network C.1.1 - Bridged Network Connection to Virtual Machines We will statically assign unique IP addresses to each of our machines. In order to do so we must power off each virtual machine in VMWare Workstation, and then click on "edit virtual machine settings". From the resultant window we click the radio button for "Bridged: Connected directly to the network", followed by "ok". After which we can power on the virtual machines again. C.1.2 - Assigning Static IP Address to Windows Machine From the "start" menu we select "control panel" followed by "network and internet" followed by "network and sharing centre". Page | 108 Foundations in Hardware & Software – Professional User‟s Manual In the network and sharing centre we select "change adapter settings", and in the resultant "network connections" dialog we right click on the "local area connection" icon and select "properties". In the “Local Are Connection Properties” menu we click and highlight the IPv4 settings followed by “Properties”. Page | 109 Foundations in Hardware & Software – Professional User‟s Manual We then select the radio button to “Use the following IP address:” We will use IP Address settings for a Class C Network e.g. A home network environment. We then enter the IP address as 192.168.1.85. We then enter the Subnet mask as 255.255.255.0. We then enter the Default gateway as 192.168.1.1 (this is the default gateway for the router). We then enter the “Preferred DNS server” enter as 8.8.8.8 We then click “OK” to effect the changes we have made. We next check that the IP address we have specified has been assigned, by entering the command prompt, by entering "cmd" into the search bar on the "start" menu, and opening the command prompt. We now type "ipconfig" as a command, and we can see that our new IP address has been assigned to the machine. Page | 110 Foundations in Hardware & Software – Professional User‟s Manual C.1.3 - Assigning Static IP Address to Debian Machine On the debian desktop we click "applications" followed by "accessories" and then "root terminal". This opens the above window, where we type "gedit /etc/network/interfaces". Page | 111 Foundations in Hardware & Software – Professional User‟s Manual This opens the interface file where we can see the network information for the machine. We click on "edit" to change the interfaces, as with the windows machine above, we will use a Class C network. Below "The primary network interface" we type the following (be aware of case sensitivity and spacing: auto eth0 iface eth0 inet static address 192.168.1.91 netmask 255.255.255.0 gateway 192.168.1.1 Once the above has been entered, we click "file" followed by "save" Page | 112 Foundations in Hardware & Software – Professional User‟s Manual To effect the above changes it is necessary on a debian operating system to restart the network. This is done by returning to the root terminal and typing: "/etc/int.d/networking restart". Once the network has restarted, from the root terminal we type "ifconfig", and we see that the new IP address has now been assigned to the machine. Page | 113 Foundations in Hardware & Software – Professional User‟s Manual C.1.4 - Static Communication Between Machine 1 and Machine 2 We will use the ping command to communicate between the two machines. On the windows machine, we re-enter the command prompt and type "ping 192.168.1.91" (this is the IP address which we have assigned to the debian machine), and hit enter. The ping the sends packets of data to the IP address of the debian machine, and returns statistics that 4 packets were sent, with 4 received and none lost, ths confirming that the windows machine has successfully communicated with the debian machine. We repeat the process from the root terminal of the debian machine, typing "ping 192.168.1.85" (the IP address we have assigned to the windows machine). The ping utility on debian will continue to transmit packages until we stop it by pressing control + c, at which time we are given a summary to say that packages were transmitted and received, thus confirming that the debian machine has communicated with the windows machine. Page | 114 Foundations in Hardware & Software – Professional User‟s Manual Appendix A - Assignment Details INSTITUTE OF PUBLIC ADMINISTRATION MSc in Computer Science Foundations in Hardware and Software Module Assignment Introduction The purpose of this assignment is to give you a thorough understanding of hardware and software by deepening your practical knowledge and skills in relation to both. In this assignment, you will be asked to carry out a series of practical tasks. Important: an essential part of this assignment will be to document the procedures by which you completed each task from beginning to end. Each task should be described in a series of steps. In addition, for each task, you should provide two or three legible screen shots as evidence that you have actually worked through the task. (Screen shots are normally placed at the most important stages/steps in any task). The documentation should be laid out to resemble a professional user‟s manual, aimed at the novice technician (someone who knows little of such procedures). The documentation / manual should adopt the standards we associate with such documentation. At the end of the assignment you will be required to produce the following deliverables: A user‟s manual documenting the steps you used to complete each task In this assignment you will be asked to create two virtual machines. The specifications for both machines are given below in Sections A and B, respectively. On each of these machines you will be asked to carry out a number of practical tasks. You are required to answer both Sections of the Assignment. Page | 115 Foundations in Hardware & Software – Professional User‟s Manual Section A Machine 1 Task A. 1 Using either Virtual Box or Virtual PC create two virtual machines. The specification for machine 1 is given directly below Machine name: X –win7 (where X is your initial-surname) RAM: at least 1024MB Hard Disk 60GB Hard On this virtual machine environment install Microsoft Windows 7 Entreprise as follows: The system is to be set-up with two partitions, 50GB and 10GB in size One partition is to be used for the installation of the operating system and files, and is to use a file system acessable by other operating systems for access to files and diagnostic purposes. The second partition will be used for creation of secured directories for system users Assign the machine to workgroup X (where X is your initial-surname) Task A.2 Updates & Antivirus The system should be updated with all service packs and security fixes. An antivirus is to be installed with scheduled scans to be ran at least once a week. Windows firewall is to be active Task A.3 Users, Groups & Security In accordance with best practice implement the security polices in relation to passwords, logons and set up the machine to enforce these requirements. The following users are staff members who will require logon access to this machine. For each of the users, create accounts and groups, in accordance with best practice Name: Samantha Grace Department: IS Name: Rachael Mathews Department: IS Name: Sam Smith Department: Finance Name: Paul Daniels Department: Finance Page | 116 Foundations in Hardware & Software – Professional User‟s Manual Name: Stephanie Brown Department: HR Name: Francis Brennan Department: HR [Note: The username follows the structure: firstinitial.surname Samantha Grace is also to be given membership to an administrators group.] Using the second partition, create a folder structure to meet the following requirements: Each department should have its own folder with each user within the department having a private folder accordingly. Share out each department folder and restrict same to only allow members of each department access to the folders – this access is to be restricted both from remote and local access. Grant the administrators group full access to all of the folders. In accordance with best practice and company policy block access to three common social media sites. Task A.4 Remote connectivity Set up remote desktop on the machine to enable administrators to carry out administrative tasks. To increase security, the default port is to be changed, modify any system settings accordingly. Task A.5 Performance Use swap file to improve the performance of the machine. Verify the improved performance by means of a benchmarking tool and clearly document the results. Task A.6 Email accounts An Email account is to be setup using an Email client for the user account Samantha Grace using the following details. Mail server type IMAP Email address [email protected] Page | 117 Foundations in Hardware & Software – Professional User‟s Manual Incoming and outgoing mail server: mail1.pretendacc.com Task A.7 System Restore setup and testing A system restore point is to be created. After creating the system restore point, perform the following: Change the name of the machine to „mc1‟. Create two new folders on the desktop called folder1 and folder2, add a text file into folder1 called notes, enter your name within this file. Disable the floppy diskette within the machine Restore the pc to the restore point created earlier. Outline what changes the system restore process has performed. Task A.8 System registry Create a backup of the registry and save it to a folder called backup on the second partition. Task A.9 Driver compatibility In order to maintain the stability of the operating system environment in the future it is required that you prevent any unsigned drivers from being installed. Section B Machine 2 This section deals with machine 2. Task B.1 A customer is looking at implementing a webserver inhouse to share company documents on the network. They are looking for advice on the benefits and drawbacks to using both Windows and Linux as a hosting platform. Using the existing windows installation, as per Section A, install Microsoft‟s web-server. Create a second virtual machine and on this new virtual machine install Apache web-server on Debian Linux. Page | 118 Foundations in Hardware & Software – Professional User‟s Manual Task B.2 Create users and user account structures with the same details as those in Section A Task B.3 On machine 2 install open source products for Email (Thunderbird) A firewall Anti Virus Graphics and Image editing package Section C Task C.1 Network Implement the procedures required so that machine 1 and machine 2 (outlined in section B) can communicate statically with one another. Outline the TCP/IP settings to be used on each of the machines and set this machine up accordingly IMPORTANT: At the end of the assignment do not forget to submit: A user‟s manual documenting the steps you used to complete each task. The user‟s manual should be emailed to [email protected] on or by the deadline given. Most Important: This assignment is to be completed individually. You are NOT permitted to consult with other members of your group. This regulation is being implemented on a code of honour basis. We ask you to respect it. Failure to abide by it may result in disqualification. The very best of good wishes and good luck to you. Page | 119