1
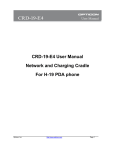
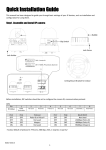
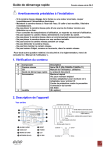
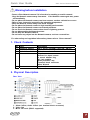
Quick User Guide
ZN-C Series Network Camera
4. Assign IP address
The default setting of the camera is set to “DHCP” and “UPnP” function is
set to ON. If you have a DHCP server on your network and UPnP function is
enabled on your PC you can find the network camera in “My network”.
If a DHCP server is not available on your network, please assign IP address
by the following process.
1)
2)
3)
4)
5)
Execute ZR-DS Admintool.exe and click “Search” button.
After the camera is listed in camera list, select the camera.
Type in the all network information.
Click “Apply” button, the setting will be showed in the list.
Click “Setting” Button to set network information to the camera.
Then double click the camera in the list, Internet explorer will open
automatically.
5. Web browser connection
Note : The Network camera supports Internet Explorer 7 or above.
Please check version of your browser and update it if necessary.
When you first access the camera you need to download and install an
Active X control from the camera to display a Live image.
Default User and Password are set to “ADMIN” and “1234”.
the user ID and password to connect the network camera.
Please type in
3