1
SERIAL
UNIT RATING
PLATE
A
AIR DISCHARGE
PROD
MODEL
PISTON
ID
OD
FACTORY CHARGED R-22
Kg
LBS
AIR IN
POWER SUPPLY
VOLTS
HZ
PH
PERMISSIBLE VOLTAGE AT UNIT
AIR
DISCHARGE
MIN
MAX
SUITABLE FOR OUTDOOR USE
COMPRESSOR
VOLTS AC
PH
HZ
RLA
LRA
FIELD POWER SUPPLY CONN
7/8″ DIA HOLE WITH
1 1/8″ DIA KNOCKOUT
AND 1 3/8″ DIA KNOCKOUT
FAN MOTOR
VOLTS AC
PH
AIR IN
FLA
DESIGN/TEST PRESSURE GAGE
HI
AIR IN
PSI
kPa
LO PSI
kPa
MINIMUM CIRCUIT AMPS
FIELD CONTROL POWER
SUPPLY CONN
7/8″ DIA HOLE
MAX OVERCURRENT PROTECTIVE DEVICE
USA
TYPE
AIR
DISCHARGE
CANADA
MAX FUSE
D
TIEDOWN KNOCKOUTS
(2) PLACES
E DIA SERVICE LINE CONN
HZ
N/A
MAX HACR CKT-BKR
MAX CKT-BKR
N/A
®
3/8″ DIA LIQUID TUBE CONN
AIR IN
Payne Heating & Cooling P.O. Box 70
Indianapolis, IN 46206
C
B
A92490
UNIT SIZE
024
030, 036
042–060
A
In.
30
30
30
B
In.
23-1/2
23-1/2
23-1/2
C
In.
6-1/2
6-1/2
6-1/2
D
In.
10
10
10
E
In.
5/8
3/4
7/8
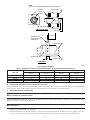
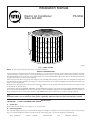
Fig. 2—Unit Reference Drawing
PROCEDURE 2—INSTALL ON A SOLID, LEVEL MOUNTING PAD
If conditions or local codes require unit be attached to pad, tie-down bolts should be used and fastened through knockouts provided in unit base
pan. Refer to unit mounting pattern in Fig. 2 to determine base pan size and knockout hole locations.
When installing, allow sufficient space for airflow clearance, wiring, refrigerant piping, and service. Allow 30-in. clearance to service end of unit
and 48 in. above unit. For proper airflow, a 6-in. clearance on 1 side of unit and 12 in. on all remaining sides must be maintained. Maintain a
distance of 24 in. between units. Position so water, snow, or ice from roof or eaves cannot fall directly on unit.
On rooftop applications, locate unit at least 6 in. above roof surface. Place unit above a load-bearing wall and isolate unit and tubing set from
structure.
Arrange supporting members to adequately support unit and minimize transmission of vibration to building. Consult local codes governing rooftop
applications.
PROCEDURE 3—REPLACE INDOOR CHECK-FLO-RATER® PISTON, IF REQUIRED
Check indoor coil piston to see if it matches required piston shown on unit rating plate. If it does not match, replace indoor coil piston with piston
shipped with outdoor unit. The piston shipped with outdoor unit is correct for any approved indoor coil combination.
PROCEDURE 4—MAKE PIPING CONNECTIONS
Outdoor units may be connected to indoor sections using accessory tubing package or field-supplied refrigerant grade tubing of correct size and
condition. For tubing requirements beyond 50 ft, consult Long-Line Application Guideline which is available at your local distributor.
NOTE: In some cases noise in living area has been traced to gas pulsations from improper installation of equipment.
A. Installation Recommendations
1. Locate unit away from windows.
2. Ensure that vapor and liquid line diameters are appropriate to capacity of unit. (See Table 1.)
3. Run refrigerant tubes as directly as possible by avoiding unnecessary turns and bends.
4. Leave some slack between structure and unit to absorb vibration.
5. When passing refrigerant tubes through wall, seal opening with RTV or other pliable silicon-based caulk. (See Fig. 3.)
6. Avoid direct lineset contact with water pipes, ductwork, floor joists, wall studs, floors, and walls.
7. Do not suspend refrigerant tubing from joists and studs with a rigid wire or strap which comes in direct contact with tubing. (See Fig. 3.)
8. Ensure that tubing insulation is pliable and completely surrounds vapor line.
9. When necessary, use hanger straps which are 1-in. wide and conform to shape of tubing insulation. (See Fig. 3.)
10. Isolate hanger straps from insulation by using metal sleeves bent to conform to shape of insulation.
If refrigerant tubes or indoor coil is exposed to atmospheric conditions for longer than 5 minutes, it must be evacuated to 500 microns to eliminate
contamination and moisture in system.
CAUTION: DO NOT BURY MORE THAN 36 IN. OF REFRIGERANT TUBING IN GROUND. If any section of tubing is
buried, there must be a 6-in. vertical rise to valve connections on outdoor unit. If more than recommended length is buried,
refrigerant may migrate to cooler buried section during extended periods of unit shutdown, causing refrigerant slugging and
possible compressor damage at start-up.
—2—