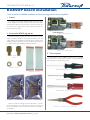
1
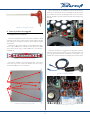
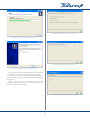
 Once the flat cables are inserted, position the new RJ45 board
using the same black screw and brass spacer support standoff that
were keeping the original RJ45 board in place, just set the two
spacers between the RJ45 board and the front panel (FIGURE 31).
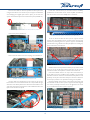
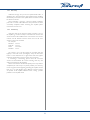
Locate the control board (or the DSP board if installed),
positioned in the front left corner of the amplifier (FIGURE 35)
and remove the screws with a Phillips PH0 screwdriver.
FIGURE 31: RJ45 board with screw and spacers in position
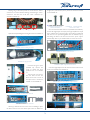
23 RJ45 board with screw and spacers in position Then fix the panel (FIGURE 32).
FIGURE 35: Screws of the control board (or DSP board)
Screw on the same holes the brass spacers support standoff
coming with the KAESOP kit. Be careful in both removing the
screws and positioning the brass spacers support standoff: help
yourself with a long needle nose solid joint pliers for avoiding any
piece to fall under control board.
FIGURE 32: RJ45 board positioned
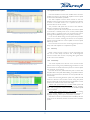
24 RJ45 board in position Now fix the flat cables to the two red plugs as in FIGURE 33.
FIGURE 36: Brass spacers in place
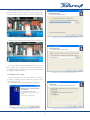
KAESOP board can be positioned directly on top of the control
board or on top of the DSP board if fitted but do not remove
control board from the amplifier...it will not work without it!
Once the KAESOP board is on top of the control board (or
of the DSP board if it’s installed in the amplifier), pay particular
attention to the four connectors of both boards, they have to mate
perfectly, do not press the board until you’re sure that connectors
are exactly in position or it’s possible to damage the amplifier!
Plug the KAESOP board on the control board (or K-DSP) and
secure it back on the two brass spacers support standoff, using the
two screws previously removed. Do not to tight them too much
or you could brake the brass spacers supports.
FIGURE 25 33:flat Flatcables cables
fitted
RJ45
circuit
fitted on on
RJ45 circuit
The flat cables are equally long but since one has to travel a
lower distance it must be bend in order to avoid possible damage
when the cover will be placed back. Please look at FIGURE 34 and
verify that the abundance of the lower cable is folded between the
RJ45 circuit and the front panel.
FIGURE 37: KAESOP board correctly positioned
FIGURE 34: Lower cable bent
4
26 Lower flat cable bended between RJ45 circuit and front panel 29 KAESOP board correctly positioned