1
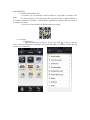
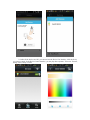
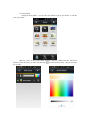
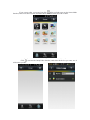
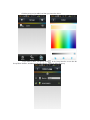
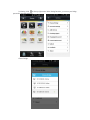
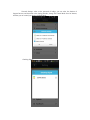
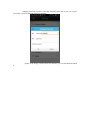
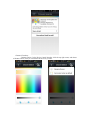
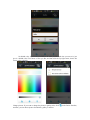
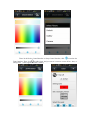
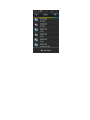
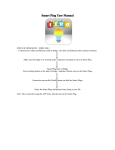
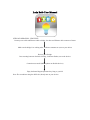
Ledo Bulb User Manual
STEPS OF OPERATION(FIRST-USE)
Connect power cable and Ethernet cable to bridge , the other end Ethernet cable connects to Router
Make sure the bridge is in working order , Indicators constants on ,turn on your devices
Devices pair of bridge
Press resetting button on the back of bridge , indicators flashes ,turn on the devices
Connection successful (Mobile phone can find the devices)
Enjoy the Smart Plugs and pleasure they bring to your life
Note :The second time using the APP Ledo ,directly turn on your devices.
BRIDGE OPERATION
1、Turn on Pair Mode
Button Pair Mode : Correctly connect power cable and Ethernet cable, when indicators
constant on , press resetting button , after the two indicators flashing ,turn on the Smart Plug.
Mobile Phone Pair Mode : Run the Ledo App, in the Setting interface , click the Add
Device ,and then bridge will turn into the Pair Mode.
2、Bridge resetting to factory default : long press button on the back for 8s.
LEDO BULB USING
1、First fix the bulb well,
2、And then open the devices.
APP OPERATION
1、Download and install the APP
For iPhones, you can download Ledo from APP store ,and install it according to the
guides.
For Android phones, you can download Ledo from Google Play, or Android Market, or
360 Mobile Applications Assistant, or Baidu Mobile Applications Assistant, and then install it
according to the guides.
Of course you can download it by Dimensional code scanning.
2、Ledo Using
2.1 Add Device
When the bridge have no devices, first you can click
on the top right the
corner ,and choose Add Devices, then bridge will turn into Pair Mode , the interface will also show all
your devices automatically.
2.2 After all the devices are OK, you can turn into the Device List Interface, click the device
you want to control. In the Device Control Interface, you can play those operators: Turn on or Turn off,
change colors, Delay or Timer.
2.3 Scenes Mode
Setting the Scene Mode: you can select the default scenes by just click it, or edit the
scene by yourself.
Add new scene: In the Scenes Mode Interface, click the [ADD] turn into Add Scene
Interface, Select the device you want, and then click
it as you like.
to set the device's status, and you can name
If you want to editor your scene, Just click
on the top light corner on the Scenes Mode
Interface, after scenes have turn into the Editor Mode, click the Scene you want to editor.
2.5 Group: If you have more than one bulbs, you can control them by Group control.
Click
turn into the Group Editor Interface, And select the devices you want, save it
with a name you like.
Click the group you just added, and then you can set the device.
If you want to editor your group, click
in the Group Interface to turn into the
Group Editor Interface, and then you can select devices, rename or delete the group.
2.6 Setting: click
on the top right corner. In the Setting Interface, you can set your bridge ,
password or network and so on.
Choose Bridge:
Network Settings: After set the password of bridge, you can select the function of
Support Internet, and then back to the Setting Interface, change the Control Mode Local to Internet,
and then you can control your devices in WAN Mode.
Checking Signal:
Changing Password: To protect your bridge that other people can not use, you can give
your bridge a password (Default password is 000000)
Update: If the bridge or devices have new firmware, you can download and install
it.
Character Functions:
Rename Device: In the Device Control Interface, click the top right corner, and choose
to Rename Device, then you can rename the device as you like.
Set default color: If you want your bulb be the color you like each time you turn on it, just
give it a default color. First choose a color you like, and then click the top right corner, choose Set
current color as default.
Change pictures: If you want to change the picture to getting color, click
and then, you can choose picture from default , gallery or camera.
on the Device Interface,
Timer: In the Device Control Interface or Group Control Interface, click
to turn into the
Timer Interface. Then click
to add a timer, and you can set it turn on or turn off in a time, or
setting color. (Now supports less than 7 timers ).