1
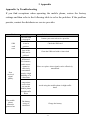
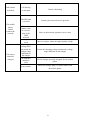
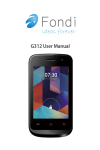
Content Introduction .................................................................................................... 1 Acknowledgement ......................................................................................... 1 Announcements ............................................................................................. 1 1 Getting Started .......................................................................................... 3 1.1 Functions of Keys .................................................................................. 3 1.2 Functions of icons ................................................................................. 3 1.3 Charging the Battery ............................................................................. 4 1.4 Linking to the Networks and devices .................................................... 5 1.5 Using the touch screen .......................................................................... 6 1.6 Using the onscreen keypad .................................................................... 7 1.7 Dialing Calls .......................................................................................... 8 2 Using the Menus........................................................................................ 9 2.1 Phone ..................................................................................................... 9 2.2 People .................................................................................................... 9 2.3 Browser.................................................................................................. 9 2.4 Messaging .............................................................................................. 9 2.5 Gallery ................................................................................................. 10 2.6 Sound Recorder ................................................................................... 10 2.7 FM Radio ............................................................................................. 10 2.8 Communication collection .................................................................. 10 2.9 Clock.................................................................................................... 11 -I- 2.10 Calendar ............................................................................................... 11 2.11 Game collection ................................................................................... 12 2.12 Baidu Music ........................................................................................ 12 2.13 Video player......................................................................................... 12 2.14 Network Collection ............................................................................. 12 2.15 Flash light ............................................................................................ 13 2.16 Camera ................................................................................................. 13 2.17 Theme Collection ................................................................................ 13 2.18 ES File Explorer .................................................................................. 13 2.19 Settings ................................................................................................ 13 2.20 Email .................................................................................................... 15 2.21 Calculator ............................................................................................ 16 2.22 Downloads ........................................................................................... 16 2.23 Label .................................................................................................... 16 2.24 To Do ................................................................................................... 16 2.25 SIM Toolkit.......................................................................................... 16 3 Appendix .................................................................................................. 17 -II- Introduction Acknowledgement Thanks for your purchase of our product. Flash One is based on Android 4.2 operation system, and easy to expand the third application procedure. The product is designed with various functions, including WCDMA, WIFI, BT, GPS, FM, voice call and so on. It is easy to achieve wireless communication and Internet, you have access to surf the internet anytime and anywhere; it is also built with high accuracy GPS module, so that it can be used for navigating through installing map software. There are many sensors which offer you brand-new operation and entertainment. The manual systemically introduces the functions, use techniques and announcements, please read this manual carefully before your operation. Announcements General Notices For Use —This product is a highly advanced electronics device, disassembly, customization or repairs without the appropriate knowledge and pre-cautions can lead to dangerous situations with chance on damaging the product and serious injuries. —Avoid use in extreme conditions such as high and low temperatures, high humidity or moist environments and around magnetic fields. Also avoid long-time exposure to sunlight. —Only used by the manufacturer permitted accessories to avoid damages to the product with possibly warranty loss. —Please follow the relevant local environmental regulations to deal with obsolete machines and accessories. -1- —Use a protective folder to avoid extreme physical shocks to the device (i.e. of dropping). Disclaimer —The screenshots are for Android reference only. They may be made on a device with a different resolution or hardware configuration than yours and therefore can be slightly different from the final product. —The manufacturer takes no responsibility for loss of information or data caused by hardware or software failure. The user is responsible for performing timely backups of important data. —All information and images used in this user manual are provided ‘as is’ and are subject to change without notice. —The manufacturer accepts no liability for the information offered in this document. -2- 1 Getting Started Front Camera Micro USB 3.5mm Jack Rear Camera Flashlight Power on/off Volume 1.1 Functions of Keys The mobile phone provides the following keys: Power key Power key situates at the right side of the phone. While using the phone, you can press this key to lock screen; if you press and hold this key, a phone-options dialog would pop out. Here, you can select to adjust the profile mode,power off or turn on/off airplane mode. Volume key Volume key situates at the left side of the phone. You can press it to adjust ringer volume. 1.2 Functions of icons Menu icon Touch this icon to access options of a selected function; Home icon Touch it to open home screen. If you’re viewing the left or right extended Home screen, touch it can enter the home screen. Back icon -3- Touch this icon to return to the previous screen; 1.3 Charging the Battery Your mobile phone can monitor and display the battery state. Normally the remaining energy of the battery is indicated by the battery level icon at the upper right corner of the display screen. When the battery energy is insufficient, the mobile phone prompts "Battery low". Using a travel adapter: Install the battery into the mobile phone before charging the battery. Connect the adapter of the travel charger with the charging slot in the mobile phone. Ensure that the adapter is fully inserted. Insert the plug of the travel charger to an appropriate power outlet. During the charging, the battery level grids in the battery icon keep flickering till the battery is fully charged. The battery icon does no longer flicker when the charging process ends. Note: Ensure that the plug of the charger, the plug of the earphone, and the plug of the USB cable are inserted in the right direction. Inserting them in a wrong direction may cause charging failure or other problems. Before the charging, ensure that the standard voltage and frequency of the local mains supply match the rated voltage and power of the travel charger. Optimizing battery life You can extend your battery’s life between charges by turning off features that you don’t need. You can also monitor how applications and system resources -4- consume battery power. To guarantee the optimal performance of your battery, please stick to the following rules: Turn off radios that you aren’t using. If you aren’t using Wi-Fi, Bluetooth, or GPRS, use the Setting application to turn them off. Turn down screen brightness and set a shorter screen timeout. If you don’t need them, turn off automatic syncing for Gmail, Calendar, Contacts, and other applications. Note: On the Home screen, press Menu icon and touch Settings > About phone > Battery use. The Battery Use screen lists the applications that have been using the battery, from greatest to least battery use. The top of the screen displays the time since you were last connected to a charger or, if you’re currently connected to one, how long you were running on battery power before you connected to a charger. Then each application or service that used battery power during that time is displayed, in order of the amount of power they used. Touch an application in the Battery Use screen to learn details about its power consumption. Different applications offer different kinds of information. 1.4 Linking to the Networks and devices Your phone can connect to a variety of networks and devices, including mobile networks for voice and data transmission, Wi-Fi data networks, and Bluetooth devices, such as headsets. You can also connect your phone to a computer, to transfer files from your phone’s SD card and share your phone’s mobile data connection via USB. Connecting to mobile networks When you assemble your phone with a SIM card, your phone is configured to use your provider’s mobile networks for voice calls and for transmitting data. Connecting to Wi-Fi networks Wi-Fi is a wireless networking technology that can provide Internet access at distances of up to 100 meters, depending on the Wi-Fi router and your surroundings. Touch Settings > Wi-Fi. Check Wi-Fi to turn it on. The phone scans for -5- available Wi-Fi networks and displays the names of those it finds. Secured networks are indicated with a Lock icon. Note: If the phone finds a network that you connected to previously, it connects to it. Touch a network to connect to it. If the network is open, you are prompted to confirm that you want to connect to that network by touching Connect. If the network is secured, you’re prompted to enter a password or other credentials. Connecting to Bluetooth devices Bluetooth is a short-range wireless communications technology that devices can use to exchange information over a distance of about 8 meters. The most common Bluetooth devices are headphones for making calls or listening to music, hands-free kits for cars, and other portable devices, including laptops and cell phones. Touch Settings > Bluetooth. Check Bluetooth to turn it on. You must pair your phone with a device before you can connect to it. Once you pair your phone with a device, they stay paired unless you unpair them. Your phone scans for and displays the IDs of all available Bluetooth devices in range. If the device you want to pair with isn’t in the list, make it discoverable. Connecting to a computer via USB You can connect your phone to a computer with a USB cable, to transfer music, pictures, and other files between your phone’s SD card and the computer. 1.5 Using the touch screen Touch-screen tips Touch To act on items on the screen, such as application and settings icons, to type letters and symbols using the onscreen keyboard, or to press onscreen buttons, you simply touch them with your finger. Touch & hold Touch & hold an item on the screen by touching it and not lifting your finger until an action occurs. For example, to open a menu for customizing the Home screen, you touch an empty area on the Home screen until the menu opens. Drag Touch & hold an item for a moment and then, without lifting your finger, move your finger on the screen until you reach the target position. -6- Swipe or slide To swipe or slide, you quickly move your finger across the surface of the screen, without pausing when you first touch it (so you don’t drag an item instead). For example, you slide the screen up or down to scroll a list. Lock screen When Screen lock in Security setting is enabled, press Power key to lock the handset. This helps to prevent accidental touching of keys and as well as power saving. When Sleep function in Display setting is enabled, after the handset device has been idle for preset period, the screen will be locked automatically to save power. Unlock screen Press Power key to switch on the handset device. The lock screen appears. Touch and slide left, right, up or down to unlock screen, and the screen being locked last time will show. 1.6 Using the onscreen keypad You enter text using the onscreen keyboard. Some applications open the keyboard automatically. In others, you touch a text field where you want to enter text to open the keyboard. You can also enter text by speaking instead of by typing. To enter text Touch a text field, and the onscreen keyboard opens. Some applications open the keyboard automatically. In others, you touch a text field where you want to enter text to open the keyboard. Touch the keys on the keyboard to type. The characters you’ve entered appear in the text field, with suggestions for -7- the word you are typing below. Use the Delete icon to erase characters to the left of the cursor. After finishing typing, touch Back icon to close the keyboard. 1.7 Dialing Calls Dialing a call to a number in the contacts Touch the Phone icon or the phone application icon on the Home screen, then select the Contacts tab. Swipe or slide upward/downward to pick out the target contact. Then you can touch the dial icon to originate a call. Dialing a call to a number in call log Touch the Phone icon or the phone application icon on the Home screen, then select the call log tab. Swipe or slide upward/downward to pick out and touch the target contact. Then you can originate a call. Answering incoming calls Drag the Answer icon towards right to answer an incoming call. Touch the End icon to end the current conversation. To reject an incoming call, drag the End icon towards left. Managing multiple calls If you accept a new call when you’re already on a call, you can drag the Answer icon towards right to answer the current calls. -8- 2 Using the Menus 2.1 Phone Touch the Phone icon on the Home screen. Three tabs are listed at the top of the screen. Select the phone tab and you can find a dial-pad screen where you can input phone number to originate a call. Note: During a conversation, you can’t originate a new call by open the dial-pad, enter number and press dial key. If you press dial key, the current conversation would hold. 2.2 People In the contacts screen, touch menu icon and you can perform the following operations: Delete contact: Select this function, then you can mark the target contacts. To delete all contacts, you just need to touch all at the top of contacts screen. Last, touch OK and confirm to delete contacts. Contacts to display: you can select the contacts on different group to display. Import/export: you can import/export the contacts form SIM card or storage; you can also share the visible contacts. Accounts: you can sync with your account. Settings: you can set the display options in this interface. Share visible contacts: you can share your visible contacts via various ways. 2.3 Browser You can use Google Browser to view web pages and search for information on the web. 2.4 Messaging You can use Messaging to exchange text messages (SMS) and multimedia messages (MMS) with your friends on their mobile phones. Sending a message 1. Touch message icon on the home screen and touch New message icon to edit a new message. -9- 2. Enter a contact’s name or call number in the To field. As the information is entered, all matching contacts appear. Touch a suggested contact or multiple contacts as message recipient(s). 3. Touch Enter message to compose your message. Touch to select a message template. 4. After completing the message, touch Send icon which beside template icon to send your message. Message template Message templates can save your time in editing message with similar format. To create a message template: 1. Touch message icon on the home screen and touch menu icon to enter message settings. 2. Touch Message template to create or edit a message template. 2.5 Gallery Both pictures and videos taken by camera or stored in SD card can be scanned through this function. 2.6 Sound Recorder Use this function to record audio files. Press the red icon to start recording. 2.7 FM Radio Please plug in the compatible earphone to the device and then turn on the radio. The earphone cable can be used as FM Antenna. Please adjust appropriate volume when listening to the radio. Continue to use higher volume is harmful for your ear. 2.8 Communication collection You can log on WeChat, Weibo or QQ etc, in this interface. -10- 2.9 Clock Touch the Clock icon on the Home screen. Clock opens with the date and time displayed on your Home screen wallpaper. You can set an alarm by modifying an existing alarm or by adding a new one. Note: Alarms that are set are underlined in green. 2.10 Calendar You can open Calendar to view events you’ve created. Touch the Calendar icon in the main menu interface. Events from each account you’ve added to your phone and configured to synchronize calendars are displayed in Calendar. Creating an event You can use Calendar on your phone to create events. In any calendar view, touch menu icon and then touch more> new event to open a event details screen for a new event. Enter a name, time, and optional additional details about the event. You can touch plus icon to add more reminders. In the Guests field, you can enter the email addresses of everyone you want to invite to the event. Separate multiple addresses with commas. If the people to whom you send invitations use Google Calendar, they’ll receive an invitation in Calendar and by email. You can touch menu icon and touch Show extra options to add details about the event. Scroll to the bottom of the Event details screen and touch Done. The event is added to your calendar. Synchronizing and displaying calendars When you add a Google Account or Microsoft Exchange ActiveSync account to your phone that includes a calendar service, and you configure that account to synchronize calendar events to the phone, the events from that calendar are added and kept up to date in Calendar on the phone. In calendar screen, touch menu icon and touch Calendars to display > -11- Calendars, here, you can set whether calendars are stored on the phone or visible. The Calendars screen displays all the calendars you’ve added or subscribed to for each account that is configured to synchronize events to your phone, organized by account. Touch the name of an account to show or hide its calendars on your phone. An icon to the right of each calendar indicates whether its events are synchronized in the phone and whether they are visible in Calendar. Change Calendar settings You can change the following settings for how Calendar displays event and how it notifies you of upcoming events. Open a Calendar view, touch menu icon and touch settings. 2.11 Game collection You can play games in this interface. 2.12 Baidu Music You can listen to music through this function. 2.13 Video player With Videos, you can play video clips in your device (for example, the video you captured by the camera) or video files stored in compatible SD card (if inserted). <Tips> If there are available video files in the device, for example, you captured some video files by camera, the amount of these video files will be displayed in bracket at right of Movie. 2.14 Network Collection You can log on Sohu News, Tencent news and Baidu etc, through this interface; you can also Backup& Restore data through this function. -12- 2.15 Flash light You can turn on/off flash light through this funciotn. 2.16 Camera Touch the Camera icon on the home screen, camera opens in Landscape mode, ready to take a picture. In this mode, you can touch the bottom icon to take a photo, touch the icon beside start icon to switch between camera and video mode. Note: you can also touch menu icon to pop out an option box. There, you can switch to camcorder mode. 2.17 Theme Collection You can change the theme of phone through this function. 2.18 ES File Explorer The phone supports the SD card. You can use the File Explorer to conveniently manage various directories and files on the SD card. 2.19 Settings The Settings application contains most of the tools for customizing and configuring your phone. 【WIRELESS & NETWORK】 You can use Wireless & Network settings to configure and manage connections to networks and devices by using Wi-Fi. You also can set Bluetooth, data usage, airplane mode, VPN, tethering & portable hotspot and mobile networks in this interface. 【DEVICE】 Sound You can set volumes, phone ringtone, system sound, etc in this interface. -13- Display You can set Brightness, Scenes, Wallpaper, Theme, Auto-rotate screen, Sleep and Font size in this interface. Apps You can use the Applications settings to view details about the applications installed on your phone, to manage their data and force them to stop, to view and control currently running services, and to view the storage used by applications, etc. 【PERSONAL】 SIM management You can manage your SIM card through this function. Add account You can add account to phone through this function. Language & input Use the Language & Keyboard settings to select the language for the text on your phone and for configuring the input method. More Settings You can set Backup & reset, Scheduled power on & off, Date & time, Developer options, Security as well as view storage and Battery through this function. 【SYSTEM】 Accessibility You use the Accessibility settings to configure any accessibility plug-ins you have installed on your phone. About phone -14- This function enables you to view some phone related information. 2.20 Email You use the Email application to read and send email. Touch email icon to access it. If the Email account has not been set up, you can set up an Email account in a few steps. Account setup Enter an Email address and the account’s password. Account settings Set inbox checking frequency. Set Send email from this account by default. Set Notify me when email arrives. Set Synchronize contacts, calendar or Email from this account. Set Automatically download attachments when connected to Wi-Fi. Compose and sending Email To compose and send an Email: 1. Touch the create icon to compose a new Email. 2. Enter Email address(es) for intended recipient(s). 3. Touch Menu → Attach file to attach a file. 4. Touch Menu → Add Cc/Bcc to add copy or blind copy this Email to other contacts. 5. After completing the Email, Touch send icon to send the Email. Touch folder icon to check the account status. For each Email account there are five default folders, i.e., Inbox, Drafts, Outbox, Send and Trash folders. To view sent Emails, open Sent folder and tap refresh icon. -15- 2.21 Calculator You can use this Calculator to solve simple arithmetic problems or use its advanced operators to solve more complex equations. Enter numbers and arithmetic operators on the basic screen; Drag the basic screen to the left to open the advanced screen; Touch Clear to delete the last number or operator you entered. Touch & hold Clear to delete everything in the display. In the calculator screen, you can touch menu icon to clear history or access advanced panel. 2.22 Downloads Through this function, you can view a list of files and applications which you downloaded from the webpage. 2.23 Label You can create memos in text mode through this function. 2.24 To Do You can create the task you need to do to remind you, it will also display the item which has done. 2.25 SIM Toolkit STK service is the tool kit of SIM card. This phone supports the service function .The specific items are depended by SIM card and network. Service menu will be auto added to the phone menu when supported by network and SIM card. -16- 3 Appendix Appendix 1:Troubleshooting If you find exceptions when operating the mobile phone, restore the factory settings and then refer to the following table to solve the problem. If the problem persists, contact the distributor or service provider. Fault SIM card error Poor received signal quality The mobile phone cannot be powered on Cause The SIM card is damaged. The SIM card is not in position. The metal face of the SIM card is polluted. Signals are obstructed. For instance, radio waves cannot be effectively transmitted nearby a high building or in a basement. Line congestions occur when you use the mobile phone in high-traffic hours The battery energy is exhausted. Solution Contact your network service provider Check the SIM card Clean the SIM card with a clean cloth Move to a place where signals can be effectively transmitted Avoid using the mobile phone in high-traffic hours Charge the battery -17- Calls cannot be dialed The mobile phone cannot connect the network The battery cannot be charged Call barring is activated Cancel call barring The SIM card is invalid Contact your network service provider The mobile phone is not in a service area of the GSM network The signal is weak The charging voltage does not match the voltage range indicated on the charger An improper charger is used Poor contact Move to the network operator's service area Move to a place where the signal quality is high Ensure the charging voltage matches the voltage range indicated on the charger Use the charger specially designed for the mobile phone Ensure the charger plug is in good contact with the mobile phone -18-