1
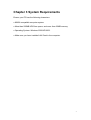
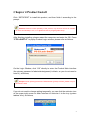
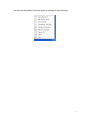
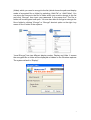
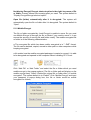
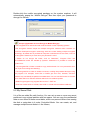
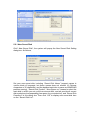
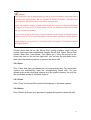
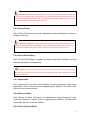
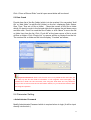
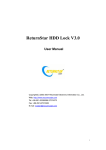
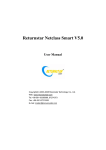
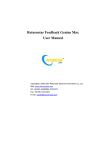
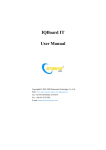
PC E-Lock Smart Finance V9.0 User Manual Copyright(C) 2003-2007 Returnstar Electronic Information Co., Ltd. Web: http://www.recoverystar.com Tel: +86-591-83385086, 87274373 Fax: +86-591-87274383 E-mail: [email protected] Important Statements: 1. Use this product strictly according to detailed operation instruction in this User Manual so as to ensure proper use. Please read the instruction thoroughly to save the installation time. 2. If this product is defective, please return it to the appointed agent or our company, together with your original sales receipt or invoice for replacement. 3. Returnstar Electronic Information Co., Ltd. is not liable for any consequential, incidental or indirect damages (including damages for indirect personal injury, loss of business profits, business interruption, loss of business information and the like) arising out of the use or inability to use this product. 4. The product includes enclosed software, later issue and update as well as correlative electronic documents and printing material. By installing, copying, downloading, visiting or using this product in any way, you agree to the terms and conditions of all the clauses in this user manual. The agreement on these clauses has the same effect as one signed through formal negotiation. You may not use this product unless you have agreed to all the clauses in this user manual 5. Returnstar Electronic Information Co., Ltd. will not accept returns of opened packages. 6. Special Notice: ● Please do not deliberately attack or use other tool software to destroy the product’s normal running, or run FDIS/MBR, repartitioning, or low formatting after boot from FD or CD. Otherwise this company assumes no liability for all losses arising herefrom, express or implied. ● Please do not apply in the important occasions such the important network service as the satellite launch, the missile guide, the military control, the national secret, etc, without authorization of Returnstar Electronic Information Co., Ltd. Otherwise this company assumes no liability for all losses arising herefrom, express or implied. ● Regular backup of important data is still necessary when using this product. Returnstar Electronic Information Co., Ltd. does not undertake compensation responsibility for any losses of HD arising from insufficient backup. any Copyright Your purchasing of this product does not mean that Returnstar Electronic Information Co., Ltd. has transferred the Intellectual Property Right. The product (includes but not limited to any trademarks, images, photos, flash, video, recording music, writing and additional procedure, and other relative product), enclosed printed material, and any copies made in authorization of Returnstar Electronic Information Co., Ltd. are products of Returnstar Electronic Information Co., Ltd and their Intellectual Property are owned by Returnstar Electronic Information Co., Ltd. The name of the product and all its copies are consistent in CD and the manual. The framework, organization and source code of this product are Returnstar’s valuable commercial secret and may not be transferred. This product is protected by PRC Copyright Law, related international treaties, the laws in the product using country. No part of the product may be copied, modified, rented, leased, transferred in any ways without the writing permission or authorization of Returnstar Electronic Information Co., Ltd., You are allowed to use one product on one computer only. Any reverses engineering, decompiling, and decoding of this product, and retrieving the source code of the product by other ways is also prohibited. Returnstar, Returnstar Jindun, Recoverystar, and PC E-Lock are registered trademarks of Returnstar Electronic Information Co., Ltd. Any modification of Copyright marks, product names and brand names of this product and its copies is strictly prohibited. Returnstar Electronic Information Co., Ltd. reserves all rights to charge the fee at anytime for product replacement, revision and update. The information in this document is subject to change at anytime without notice. Chapter 1 Product Introduction Returnstar PC E-Lock software is one suite of behavior control and security management product, which is researched and developed by Returnstar Electronic Information Co., Ltd for many years of endeavor. It has the following 5 versions: 1. Family Flagship Version: This version is suitable for parent who is not good at computer to control their children’s computer behavior at home. 2. Family Perfect Version: This version is suitable for administrator (parent) to control their children’s computer behavior at home. 3. Finance Version: This version is suitable for financial personnel or common computer users. It is an effective toll in computer behavior control and security management. 4. Commercial Version: This version is suitable for businessmen and other users who have requirements in computer behavior control and security management. 5. Full Capability Version: It integrates all functions of Family Perfect Version and Commercial Version. It is suitable for other consumer group to use in different environment and management habit, and guarantees the effective management of the same computer in different environments. Returnstar Electronic Information Co., Ltd has become a global leader in the computer behavior control and security management. It is the only one solution provider of the comprehensive and perfect computer behavior control and security management for family, commerce, enterprise, office, internet cafes, school computer lab, factory, network center. These solutions (including PC E-Lock, HDD Lock, Personal Key, Net work Alarm System and Network Monitoring System) greatly enhance the efficiency of computer behavior control and security management for computer user and administrator, and solve the key problems on computer management which has disturbed PC users all over the world. This is an installing and operating manual for Returnstar Smart Finance Version. 1 Chapter 2 Product Characters Returnstar PC E-lock Smart Finance version has the following strong features: 2.1 Easy to install and use. Anyone who knows a little about the computer can acquire the operation in 10 minutes. 2.2 Support Windows 2000/XP/2003, it is compatible with all hardware and software when installing and using 2.3 Resist deleting, tracking by special program, uninstalling and modifying the catalogue, file, and the program of the product after it is installed. So you do not need to worry about that someone will rename, modify, delete, uninstall or dismiss the product. 2.4 Resist deleting the program and terminating its running through registry or task manager while running the product. So you do not need to worry about termination of the running by other people. 2.5 Function validly under Windows OS safe mode. 2 Chapter 3 System Requirements Ensure your PC has the following characters: ● 80X86 compatible computer system ● More than 500MB HDD free space, and more than 32MB memory. ● Operating System: Windows 2000/XP/2003. ● Make sure you have installed LAN Card in the computer. 3 Chapter 4 Product Install Click “SETUP.EXE” to install this product, and then finish it according to the prompt. Caution: Because of the speciality of the product, any shortcut will not be created on menu and desktop in OS, or on [add and remove program] after setup. After finishing installing, please restart the computer and enter the OS. Press “CTRL+SHIFT+F” to popup Product Login window, please refer as follows: On the Login Window, click “OK” directly to enter the Product Main interface (the primary password of administrator(parent) is blank, so you do not need to enter it), as follows, Prompt: As the primary password of administrator (parent) is blank, please set your password in time. If you do not need to change setting temporally, you can click the minimize icon at the upper right corner on Main Interface to minimize it to the tray (system taskbar icon), as follows, 4 You can set the product functions again by clicking or right-clicking it. 5 Chapter 5 Product Usage 5.1 Data Encrypt Provide two different encrypt methods: “Local Encrypt” and “Mobile Encrypt”. As follows, 5.1.1 Local Encrypt: It is of the highest security. ●Encrypted file or folder will be unable to open or decrypt, when it is renamed or copied to other places. ●Encrypted file or folder can still be found and opened or decrypted from encrypted file (folder) list on the “Data Encrypt” Main Menu (see the below figure), after it is deleted. ● If the encrypted file or folder has been cut, you are unable to open or decrypt them in the new path, but can still find and open or decrypt it from encrypted file (folder) list on the “Data Encrypt” Main Menu (see the below figure). It can effectively prevent others from using, deleting or modifying the storage path or copying your data in the computer. Caution: If you want to inquire file (folder) in the list again after you close an encrypted file or folder, you have to refresh it by the “Refresh” button. Provide an item list for encrypted file (folder). You can add the item of file 6 (folder) which you need to encrypt to the list (which shows the path and display mode of encrypted file or folder) by selecting “Add File” or “Add Folder”, You can move the mouse to the file or folder which you need to decrypt in the list and click “Decrypt” then input your password in the popup box. The file or folder will be decrypted and open. You are also able to encrypt or decrypt the file or folder by clicking “Encrypt” or “Decrypt” shortcut option on the right- key menu of file or folder in the explorer. “Local Encrypt” has two different display modes: Display and Hide. It means the encrypted file or folder will be displayed or hidden on the Windows explorer. The system default is “Display”. 7 Caution: ● If you adopt “Hide” to display the file or folder by “Local Encrypt”, you must decode it on the “Data Encrypted” Main Menu (see the above figure) since it can not be found on the explorer. ● After reinstalling OS, all encrypted files or folders will keep the password you set and stay in encrypted state. You are able to decrypt them when you re-install the product. ● The encrypted folder can not be in the partition where you will re-install OS, otherwise it will be deleted when re-install. ● After uninstalling PC E-lock, the previously encrypted folder is unable to be decrypted; moreover it keeps encrypted state all the same. You are able to decrypt them when re-install the product. Design some parameters for users’ convenience as follows, Encrypted File Icon: Provide three different icons. ● Windows Standard File Icon ●Special Encrypted File Icon ● Customized File Icon (The format must be .ICO) The system default is “Special Encrypted File Icon”. Encrypted Folder Icon: Provide three different icons. ● Windows Standard Folder Icon ●Special Encrypted Folder Icon ● Customized Folder Icon (The format must be .ICO) The system default is “Special Encrypted Folder Icon”. 8 Not display Encrypt/ Decrypt shortcut option in the right- key menu of file or folder: Prevent others from knowing what you used. The system default is “Display Encrypt/Decrypt shortcut option”. Open file (folder) automatically after it is decrypted: The system will automatically open the file or folder after it is decrypted. The system default is “Open”. 5.1.2 Mobile Encrypt The file or folder encrypted by Local Encrypt is unable to move. So you must use Mobile Encrypt to encrypt the file or folder if you need to move it. It can ensure the security of moving file and folder mostly. The mobile-encrypted file or folder is of the following characteristics: ● The encrypted file which has been mobile encrypted is in“* .EXE” format. The file can be deleted, copied, moved to other path or other computers while keeping encrypted. ● No matter how the mobile encrypted packages is copied or moved, it is able to be decrypted and opened in the computer without installing PC E-Lock. Click “Add File” or “Add Folder” and select the file or folder which you need mobile encrypt in the popup explorer (The file or folder path will display on the mobile encrypt item). Select “Delete the original file or folder after it is mobile encrypted”. The system default is to “Delete”. Click “Mobile Encrypt” and input your password in popup dialog box, the file or folder would be mobile encrypted. As follows, 9 Double-click the mobile encrypted package on the system explorer, it will automatically popup the “Mobile Decrypt” Box then input your password to decrypt. As follows, Prompt: (Applicable in Local Encrypt or Mobile Encrypt) ●The encrypted file is valid under safe mode and DOS or other operating systems. ●The encryption function adopts the multiple encryption methods which combine our exclusive developed encryption technology with the current leading multiple encrypted technology. No matter who is proficient at computer or whichever tools are used, it can not be decrypted. Therefore you must bear your password in mind. ● Please do not encrypt the folder, such as "Windows", "Program Files” and “SYSTEM32"etc which are needed by systems. Otherwise it is possible to cause the system error. ● The encrypted file or folder is unable to copy, read and write. So it can prevent the virus and Trojan from ruining and attacking. ● The encrypted file or folder is unable to execute, avoiding the potential destroyer using the program. Fox example, some files or folders get new virus, however, anti-virus software only can identify its path but not delete them. You can use the function to lock the file or folder with virus and then kill them after anti-virus software update. ● Data Encrypt support any program files such as”* .EXE” etc. ● If the user locked A file or A folder, then A file or A folder shortcut will be ineffective 5.2 My Secret Disk It is of the so-called file safe function. You can set up one or more new secret partitions in any original partition with free space. You can copy the confidential data or save them to these secret disks, which can prevent others from seeing the disk or using data in it under Controlled Mode. You can create, set, and manage multiple secret disks in it. As follows, 10 5.2.1 New Secret Disk Click” New Secret Disk”, the system will popup the New Secret Disk Setting dialog box. As follows, Set your new secret disk, including “Secret Disk Name” (support names in various kinds of language, but these names does not exceed 16 Chinese characters or 32 characters, and the detailed restriction is same as WINDOWS partition naming), “Secret Disk Symbol”, “New Space on” (means to select the main disk in which you set up the new secret disk, and we provide all current disk symbol and corresponding free space for your selection), and “Secret Disk Password” in this dialog box. Then click “OK” to display new secret disk item on the “Secret Disk List". 11 Prompt: ●The secret disk is one or more partitions you set up in previous partition, which means that it is based on the original partition. We can consider it as “partition in partition”. The space of the original partition will reduce when you add files in the secret disk. ● After OS reinstall or software uninstall, all the secret disk and data in it will not be destroyed so long as you do not re-part or change partition format. You will find the secret disk and data after you re-install this software. ● You can set up several secret disks. These secret disks can not use the same name and disk symbol, but can be set up on the same partition. All secret disks’ passwords could be different. ● After setting up your secret disk, do not need to format .The partition is in the same format as the original partition. Provide secret disk list on “My Secret Disk” setting Interface, which lists all current secret disk items established (display Secret Disk Name, Secret Disk Symbol, Main Disk, Used Space, Free Space etc.). Move the mouse to the secret disk item on the list and right-click; you can see the pull-down menu then select the following options to operate the secret disk. 5.2.2 Open Click “Open” and input your password in the popup dialog box. The secret disk explorer will automatically open the corresponding secret disk. You can operate them in the secret disk explorer as in the system explorer. You will find the secret disk symbol in Windows explorer. 5.2.3 Close Click “Close” the Secret Disk symbol will disappear in Windows explorer. 5.2.4 Delete Click “Delete” and input your password in popup dialog box to delete the disk. 12 Important Statement: After deleting the secret disk, the data will be crushed and not exist on the Recycle Bin. Such design is to guarantee your private data security. The secret disk is deleted like “Data Crush”. (Refer to the next section “Data Crush”) and then the used space will be released to the main disk. 5.2.5 Clear all Data Click “Clear all Data” and input your password in popup dialog box to clear up all data in the disk. Important Statement: After emptying the secret disk, the data in these disks will not be on the Recycle Bin. Such design is to guarantee your private data security. The secret disk is emptied, like “Data Crush”. (Refer to the next section “Data Crush”) 5.2.6 Secret Disk Setting Click “Secret Disk Setting” to display the Secret Disk Setup Interface; you can reset the parameter and password. Prompt: Please confirm that the free space of the new main disk must be larger than the used space of the secret disk before you change the main disk, otherwise the data transfer will be fail! 5.2.7 Import Data Click “Import Data” and input your password in popup dialog box, then select the folder or file you want to move on appearing the explorer. The folder or file will be cut into the secret disk. 5.2.8 Export all Data Click “Export all Data” and input your password in popup dialog box, then select the catalog you want to move on appearing the explorer. All data in this secret disk will be cut into the catalog. 5.2.9 Close all Secret Disks 13 Click “Close all Secret Disks” and all open secret disks will be closed. 5.3 Data Crush Provide item list of the file (folder) which is to be crushed. You can select “Add file” or “Add folder” to add the file (folder) on the list(displaying Path, Status, Size, Type, Time etc of file or folder). Move the mouse to the file or folder which you want to crush in the list and right-click to appear the pull down menu, and then click “Crush” to crush the file or folder, or click “Move” to move the file or folder item from the list. Click “Crush All” at the lower corner of list to crush all files or folders. Click “Empty List” to remove all files or folders from the list. The crushed file or folder on the list will display “Crushed” as follows, Important Statement: Data Crush function can not only delete the file and folder, but also clear up the file and folder’s information on the magnetic track thoroughly. The crushed file or folder can’t be recovered, even using the “Final Data” tool. Any behaviors trying to find out and recover the lost information will fail, so you should be cautious when executing the operation. 5.4 Parameter Setting ● Administrator Password Modify Administrator Password which is required when to login (It will be input directly into the lock.). 14 ●Clear Recent Documents automatically when exiting the OS Clear the recent documents automatically when exiting the OS. The system default is “Enabled”. 15 Chapter 6 Advanced Applications Finance Smart Database Encrypt: ● Backup database files ● Set up the private secret disk such as Z disk ● Reinstall finance software and set up the install or database default catalog in the private secrete disk (Z disk) ●When you do not login the PC E-Lock, the finance software will prompt error, and the database is unable to open. You can use the software normally and open the database when you login the PC E-Lock. Finance Data Multi-encrypt: ● Mobile encrypt data if you need to move it ● Save finance data to my secret disk ● Encrypt the finance data file ● Encrypt the catalog where finance data file is again ● After that your data has multiple protections. No one can guess your password easily and say nothing of decoding. Certainly you can also use the compress software such as WINRAR etc to compress and encrypt again. 16 Chapter 7 Uninstall Under the login state, click “SETUP.EXE” to uninstall and then finish it according to the prompt on Uninstall Interface. Please be sure to restart computer after uninstall. 17 Chapter 8 Upgrade We provide two ways to upgrade the product: ●Click “Upgrade” option on the main interface or on the right key menu of small icon in taskbar, system will automatically prompt that upgrade package is found and now it is upgrading (subject to upgrade package version NO. and date). There is no need to uninstall the old version’s software when upgrade. Prompt: The function is only provided for registered version. ● You have to uninstall the old version, and download the new version to install from our website: www.recoverystar.com, if this product has been significantly improved and upgraded. 18 Chapter 9 Notice 9.1 The product can not be used under Windows 95, Windows NT 3.51, and Windows NT 4.0. 9.2 All functions of this product can be used separately and multiple set, but please note the function of “Lock Computer” has priority to work. 9.3 It is not allowed to install another product of the same type on the same system. 9.4 You have to install PC E-Lock for each operation system if your PC has multiple operating systems 9.5 Please reinstall the product under newly installed operation system at once, in order to guarantee normal using. 9.6 We designed two passwords for the product: Program Administrator (parent) Password, Super Password. The Super Password is the product SN. So please be sure to save it cautiously and secretly. 19 Chapter 10 FAQ 10.1 Is there any product with similar function in the market at present? A: There is no similar product with such high security and efficiency in the market at present. Maybe there are some products (pure software / software+ hardware) achieve some functions but with following shortcomings: ● Easy to be decrypted. ● Easy to be uninstalled and deleted by administrator. ● Easy to terminate or delete its program in the registry and task manager. ● Invalid under the safe mode. Please be cautious to purchase. 20 Appendix: Purchase and Register Trial: You can download our Returnstar PC E-Lock software package to install from our website (http://www.recoverystar.com), and you can get a trial version for 30 times. The trial time is subject to your booting PC E-Lock. After 30 times, if you want to go on, you must register. Purchase: Contact Returnstar Electronic Information Co., Ltd headquarter or our business agents to purchase genuine software. A full set of software includes Install CD, Product Serial Number and User Manual. Or you can get Product Serial Number through online purchase on domestic large share software website. Register: No need to un-install a trial version after purchasing the software. Enter the Product Register Interface and click “Obtain Product Registration No.”; then input your product SN and Hardware ID Code in the popup box to acquire Product Registration No. Write down your Product Registration No. and input it in the Product Register Interface, and click “Register” button to finish registration. If your 30-time trial ends, it will prompt you to input Product Register Number after you start PC every time. You can input Product Register Number in the prompt box and press “Enter” to finish. Besides you can use your E-mail or telephone to acquire Product Register Number manually. Our detailed information is as below: Email: [email protected] Telephone: +86-591-83385086 21 Caution: Please be sure to register after you install the product. The unregistered user only can use 30 times, by contraries the registered user can use without any limitation and get free upgrade. If your PC E-Lock Smart is not registered, and your trial is up, moreover you don’t want to use this product, then you have to uninstall this product. You can uninstall directly without login the product. Please note this product is unable to use and will prompt “Your trial time have ended!” if you want to reinstall PC E-Lock. 22