1
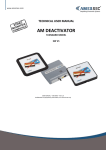
The TornadoTM User Guide www.TheTornado.com This is a software and hardware product. Return Policy – Exchange only after pull-tab has been broken. Once the tab has been removed from the case, the product can only be returned in exchange for a replacement unit. For support go to http://www.thetornado.com/site/support.shtml Table of Contents Copyright 2007 Data Drive Thru, Inc. All rights reserved. Data Drive Thru and The Tornado logos are trademarks of Data Drive Thru, Inc. The TornadoTM Overview . . . . . . . . . . . . . . . . . . . . . . .3 Package Contents. . . . . . . . . . . . . . . . . . . . . . . . . . . . 3 The TornadoTM Specifications . . . . . . . . . . . . . . . . . . . . 4 Computer System Requirements . . . . . . . . . . . . . . . . . .4 Using The TornadoTM File Transfer Tool. . . . . . . . . . . . . .5 Using The TornadoTM Read Only Settings . . . . . . . . . . . .7 Removing The TornadoTM File Transfer Tool . . . . . . . . . .8 Windows® 98 SE Drivers . . . . . . . . . . . . . . . . . . . . . . . 9 Windows® 2000 and XP. . . . . . . . . . . . . . . . . . . . . . . 11 Windows® VISTA . . . . . . . . . . . . . . . . . . . . . . . . . . . 12 The TornadoTM FAQs . . . . . . . . . . . . . . . . . . . . . . . . . 13 Troubleshooting . . . . . . . . . . . . . . . . . . . . . . . . . . . . 14 Regulatory Compliance Statement . . . . . . . . . . . . . . . .17 Warranty. . . . . . . . . . . . . . . . . . . . . . . . . . . . . . . . . .18 Contact Information. . . . . . . . . . . . . . . . . . . . . . . . . . 18 2 The TornadoTM Overview . The TornadoTM File Transfer Tool networks two computers with Windows® 98SE, ME, 2000, XP and VISTA operating systems. Included within The TornadoTM is an easy to use application window for the transfer of files from one computer to another. The simple drag and drop file interface does not require any additional networking equipment or network configurations. The TornadoTM network is automatically created typically within seconds of plugging the tool into each computer. Two green LED indicators on the top of The TornadoTM light up and slowly pulse on then off when the tool is connected correctly to USB ports and flash rapidly when a data transfer is in progress. The TornadoTM File Transfer Tool includes Data Drive Thru’s 1-year limited warranty and free technical support. Package Contents: • One The TornadoTM File Transfer Tool • One The TornadoTM User Guide 3 The TornadoTM Specifications . Specifications: Interface: Connectors: Power Supply: Max. Cable span: Product Housing: Product Color: LED Indicators: Dimensions (L x W x H): Weight: Operating Temperature: Storage Temperature: USB 2.0 compliant and 1.1 compatible x2 Standard USB A-type USB BUS powered Approximately 4.5 feet, including device High-Impact Plastic Metallic Silver x2 Green LED’s 4.47 inches x 3.21 inches x 0.85 inches (113.61mm) x (81.61mm) x (21.70mm) 3.90 ounces (110.50 grams) 32°F to 113°F (0°C to 45°C) 20°F to 176°F (-7°C to 80°C) Computer System Requirements: Data Drive Thru’s The TornadoTM File Transfer Tool is intended for use with computers meeting the following system requirements: Operating Systems: Windows® 98SE, ME, 2000, XP, VISTA Processor: 75Mhz Pentium® CPU or above PC memory: 128MB or higher PC available HD space: 3MB minimum Interface: USB 2.0 or 1.1 port(s) Specifications are subject to change without prior notice. 4 Using The TornadoTM File Transfer Tool . 1. Both computers must be physically located no more than four feet apart 2. 3. 4. 5. 6. 7. 8. 9. 10. from each other for the USB cables to reach. Turn on both Computers. Remove The TornadoTM from packaging. Peel the PULL TAB from the case breaking the tab in two. Slowly extend the retractable USB cables by firmly gripping the USB cable PULL TAB or the USB plug. Only one cable needs to be pulled. Stop pulling the cable when the RED line on the cable is exposed. Connect The TornadoTM to the USB ports of each computer. The green LED indicators will light and slowly pulse on then off indicating that The TornadoTM is properly connected to the computers. Depending on your computer’s operating system and any user configurations, The TornadoTM will AUTOLOAD and AUTORUN to each computer. Some computers take longer than others. (See page 9 of this user guide for Windows® 98SE driver and operating system instructions) You do not need to reboot or restart your computer after The TornadoTM has loaded even if prompted to do so by your operating system. Once The TornadoTM application is open, a split-screen window will appear showing THIS COMPUTER and OTHER COMPUTER (see Figure 1). Files can now be viewed on either computer using The TornadoTM File Transfer Tool application. Use your mouse to drag and drop files or folders from THIS COMPUTER to OTHER COMPUTER (and vice versa) or use the Copy and Paste functions. The green LED lights on The TornadoTM File Transfer Tool will flash rapidly while data transfer is in progress (Figure 1) 5 Using The TornadoTM File Transfer Tool . Refresh – Use the Refresh button to refresh (update) The TornadoTM application split screens after copying or dragging and dropping files or folders from THIS COMPUTER and OTHER COMPUTER. Not usually required. Cut - Use the Cut button to move a folder or file from The TornadoTM split screen view. The Cut function may also be accessed from Edit or by right clicking with the mouse. When using Cut you should immediately follow with a Paste function (see Paste below). Copy - Use the Copy button to duplicate a folder or file from The TornadoTM split screen view. The Copy function may also be accessed from Edit or by selecting and dragging a file or folder in the split screen. Paste - Use the Paste button to point to where the file should go and then apply the action from the previous Cut or Copy function. The Paste function may also be accessed from Edit or by dropping a selected file or folder in the split screen. Delete – Use the Delete button to delete a folder or file from The TornadoTM split screen view. The Delete function may also be accessed from Edit or by selecting a file or folder in the split screen, right clicking the selected item then use Delete in the file folder options window. 6 Using The TornadoTM Read Only Settings . A user may also limit file transfer access to a computer by enabling the "Read Only" mode. The "Read Only" mode can be enabled on either computer by clicking the “System”. Then click on the "Set Up" tab, mark the "Share as Read Only" option. (See Figure 2) (Figure 2) When the "Share as Read Only" option is checked, a user of the OTHER COMPUTER will not be able to copy or delete any files on THIS COMPUTER. File access by the OTHER COMPUTER is restricted to read only. The default position for the "Share as Read Only" option after initial installation is unchecked. Once The TornadoTM USB cables are unplugged from both computers, place The TornadoTM File Transfer Tool on a flat surface, press the USB cable Retract Button to retract both cables back inside The TornadoTM housing. . 7 Removing The TornadoTM File Transfer Tool To remove The TornadoTM from the computers, exit the application on both computers and click the SAFELY REMOVE icon from the Windows® taskbar. Select the USB mass storage Tool for removal and unplug The TornadoTM File Transfer Tool from the computer. (See Figure 3) (Figure 3) NOTE: The SAFELY REMOVE USB device icon is not available in the Windows® 98SE taskbar. For Windows® 98SE users, close The TornadoTM application before disconnecting the USB cables. Unplugging The TornadoTM from computers without using the SAFELY REMOVE function of the operating system will not harm the The TornadoTM tool. However, when unplugging The TornadoTM from your computer without using the SAFELY REMOVE feature, the computer may not properly handle the next USB device plugged into the computer. 8 Windows® 98SE Drivers Important: Microsoft® does not support the auto loading of drivers to Windows® 98SE. Install Data Drive Thru’s Windows® 98SE drivers BEFORE connecting The TornadoTM to a Windows® 98SE Computer, otherwise conflicts may occur. 1. 2. 3. Go to http://www.thetornado.com/site/downloads.shtml Click on the "Windows® 98SE Drivers" button. Select RUN in the file download window, the WinZip will automatically download to the computer. (See Figure 4) (Figure 4) When the SELF-EXTRACTOR window appears, click on setup. WinZip will install The TornadoTM "Windows® 98SE Drivers" on the computer. (See Figure 5) (Figure 5) 9 Windows® 98SE Drivers continued . Once the Windows® 98SE drivers have completed installing, open The TornadoTM File Transfer application from MY COMPUTER or WINDOWS EXPLORER by double clicking on The TornadoTM icon. (See Figure 7) (Figure 7) The TornadoTM ICON may have a different drive letter assigned (X:) on your computer depending on how many drive accessories are configured and or attached to the computer. 10 Windows® 2000 and XP Windows® 2000 and XP 1. The TornadoTM file transfer application will be displayed on each computer when connected to USB ports on both computers. 2. In Windows® 2000 and XP, the AUTORUN feature must be enabled for The TornadoTM to AUTORUN. 3. In Windows® XP systems, a dialog box may appear asking what you want to do. If you see this dialog box, select AUTORUN. 4. In Windows® XP systems, a dialog box may appear with instructions to reboot or restart your computer. This instruction may be ignored, no reboot or restart is required, cancel out of this dialog box. 5. In Windows® 2000 systems, if the split-screen application does not automatically appear, access The TornadoTM file transfer application from MY COMPUTER. Open the application by double clicking on The TornadoTM icon. (See Figure 8) . (Figure 8) 11 Windows® VISTA Windows® VISTA 1. In Windows® VISTA, the USER ACCOUNT CONTROL dialog box may appear asking what you want to do. If you see this dialog box, select “Accept, I trust this program. I know where it’s from or I’ve used it before.” (See Figure 9) 2. In Windows® VISTA, the split-screen application may not automatically appear. Access The TornadoTM file transfer application from COMPUTER. Open the application by double clicking on The TornadoTM icon. 3. In Windows® VISTA, a dialog box may appear with instructions to reboot or restart your computer. This instruction may be ignored, no reboot or restart is required, cancel out of this dialog box. (Figure 9) 12 The TornadoTM – FAQ’s Q. Does The TornadoTM work with Windows® VISTA. A. Yes, The TornadoTM works with the Windows® VISTA operating system. (See page 12 of this user guide for instruction regarding the Windows® VISTA operating system.) Q. Does The TornadoTM move files from one computer to the other or does it copy them? A. The TornadoTM copies files from one computer to another when you drag and drop files from one computer to the other. The files and folders remain on the computer that you’re moving them from. Using the Cut or Delete function will remove the files from the computer that you’re cutting or deleting the files from. To securely remove files and folders from your old computer, use Data Drive Thru’s PC Eraser TM program to wipe the files completely from the hard drive using USDoD (U.S. Government Department of Defense) standards. When deleting files using the Delete function of Windows® operating systems, a computer expert may be able to recover files using special software. Data Drive Thru’s PC Eraser TM removes files in a manner that makes it extremely difficult, if not impossible to recover deleted files. Go to http://www.thetornado.com/site/pc_eraser.shtml to learn more about the PC Eraser TM product. Q. Can I extend the length of The TornadoTM File Transfer Tool by using an extension cable? A. Yes, the length of The TornadoTM File Transfer Tool may be extended by using only USB 2.0 compliant extension cables. When using extensions on each cable of The TornadoTM Tool. Do not connect more than one extension cable per one TornadoTM cable. Q. Can I use The TornadoTM File Transfer Tool with my Computer 1.1 USB Port? A. Yes, The TornadoTM File Transfer Tool is backward compatible. You can use The TornadoTM File Transfer Tool with both USB 1.1 and USB 2.0 Ports. For more answers to your questions, go to http://www.thetornado.com/site/support.shtml 13 Troubleshooting Quick First Steps: Windows® does not detect The TornadoTM File Transfer Tool: 1. Windows® Versions - Make sure the operating system is Windows® 98SE or higher. When using Windows® 98SE, make sure the proper drivers are installed. (See the section on "Windows® 98SE" starting on page 9 of this user guide) If you do not know what Windows® operating system version you are using, go to your Control Panel, click on System and view the info on the General tab. 2. AUTORUN Disabled - Go to MY COMPUTER to see if The Tornado TM icon is present. When AUTORUN is disabled on the computer, the tool may be connected but not detected by the computer. If you do not see The TornadoTM icon in MY COMPUTER, go to our web site http://www.thetornado.com/site/support.shtml and follow the steps shown in the how to check if the AUTORUN function is ON. 3. USB Cabling - Make sure the USB cable fits properly. The cable should be firmly in place, but not so tight force must be used to plug in. If the cable’s connector or the computer’s port is damaged, the cable may be loose. A loose cable will cause erratic behavior in any USB device. 4. USB Hubs a. Hub Overloading - If using a USB hub, and other devices are connected to that hub, there may not be enough power to power all the devices. While the computer’s USB port supplies plenty of power for The TornadoTM by itself, sometimes even powered hubs can be overwhelmed by power hungry devices such as USB hard drives, external CD drives, tape drives, etc. Before doing anything else, remove all other devices from the hub. Then unplug and re-connect The TornadoTM Tool. b. Test Hub – If you are using a USB hub, check the hub itself, it may be the cause of the problem. Unplug the hub from the computer, then plug The TornadoTM directly to the computer. Try using a different computer USB port. 5. USB Port Quality – Some USB ports on the front side of machines may not support The TornadoTM. This is due to poor wiring/shielding from the motherboard to the front USB ports. This is particularly true of older machines. Try inserting The TornadoTM in a rear USB port. . 14 Troubleshooting 6. System Busy – Sometimes a computer is busy doing something in the background. The computer may fail to notice a change in USB devices. To test this, wait until the computer is no longer busy, unplug The TornadoTM Tool, count to ten, plug The TornadoTM Tool back in. Computer Configuration – Any use of the computer’s DEVICE MANAGER is at the users own risk. It is not recommended to attempt any changes to the devices found in the DEVICE MANAGER of your Windows® operating system unless the user is completely familiar with this Windows® screen and understands the risks involved. Consult an experienced computer technician if you’re experiencing a DEVICE MANAGER problem. 1. Navigate to the DEVICE MANAGER. a. Windows® XP or 2000 – click START; click RUN; type in "devmgmt.msc" and hit enter. b. Windows® 98SE – right click on MY COMPUTER; click on the DEVICE MANAGER tab. 2. Locate USB – Scroll down to UNIVERSAL SERIAL BUS CONTROLLERS, click on the little plus sign inside the square to expand. 3. Inspect USB Icons – Look at the icon next to each item listed under the UNIVERSAL SERIAL BUS CONTROLLERS. a. Red X – When a red X on the icon is present, either the USB hardware is missing or has been disabled. b. Exclamation Point – When an exclamation point is present in the USB hardware, a conflict has occured on the computer. c. Question Mark – When a question mark is present in the USB hardware, the entry is unknown and Windows does not know how to deal with it. If any of the above three situations occur in the USB configuration then you have a problem with your computer. Consult a computer professional. If you see The TornadoTM driver is installed and "working properly", then contact Data Drive Thru’s support department at http://www.thetornado.com/site/support.shtml 4. Other Possibilities – DEVICE MANAGER in Windows® does not . recognize The TornadoTM File Transfer Tool. a. Make sure the drive letters are available in MY COMPUTER and assigned to The TornadoTM File Transfer Tool. b. Disconnect all other USB hardware from the computer. c. When multiple network drives are connected, disconnect the network drives and connect only The TornadoTM File Transfer Tool. 15 Troubleshooting Reconnect the network drives after the computer has detected The TornadoTM File Transfer Tool. d. If your computer still does not recognize The TornadoTM then unplug The TornadoTM and reboot the problem computer. Then plug The TornadoTM back into the USB port of the problem computer AFTER it has completed loading all start-up applications. Then wait a couple of minutes and see if your computer finds the tool. 5. Exclamation or Question Mark is present in the DEVICE MANAGER and or the USB HOST CONTROLLER. a. Make sure the Windows® Installation Disk for the problem computer is available. b. From the DEVICE MANGER remove the USB root hub followed by removal of all USB hubs and controllers. c. Reboot the computer and the USB drivers will be automatically reinstalled. d. Install all critical updates from Microsoft.com web site. Miscellaneous: 6. Slower Than Expected Speed - I am not experiencing USB 2.0 High Speed performance. Low performance may be related to: a. The tool is connected to USB 1.1 port, cable or hub. b. Transferring folders with multiple files may take longer time than transferring a single file. c. The computing environment is not fully optimized to meet The TornadoTM File Transfer Tool speed. d. Antivirus software may slow down the transfer of files (however such software is still recommended.) 7. Copy Denied - I cannot copy a file from THIS COMPUTER to the OTHER COMPUTER. Make sure the setup is not set to "Read Only". To change the set-up, click on "System", then "Set Up" and uncheck the box set to "Read Only". Note about Data Drive Thru’s free technical support: Data Drive Thru provides support for The TornadoTM File Transfer Tool and other Data Drive Thru products only. Computer troubleshooting and Microsoft® operating system configuration problems are not covered by our free technical support service. Our support team is happy to help you determine if the tool is working properly or not but does not provide general computer troubleshooting and repair services. 16 Regulatory Compliance Statement United States - This device complies with Part 15 of the FCC rules. Operation is subject to the following two conditions: (1) This device may not cause interference, and, (2) This device must accept any interference, including interference that may cause undesired operation. This equipment has been tested and found to comply with the limits for a Class B digital device, pursuant to Part 15 of the FCC Rules. These limits are designed to provide reasonable protection against harmful interference in a residential installation. This equipment generates, uses and can radiate radio frequency energy and, if not installed and used in accordance with the instructions, may cause harmful interference to radio communications. However, there is no guarantee that interference will not occur in a particular installation. If equipment does cause harmful interference to radio or television reception, which can be determined by turning the equipment off and on, the user is encouraged to try to correct the interference by one or more of the following measures: Reorient or relocate the receiving antenna. Increase the separation between the equipment and receiver. Connect the equipment to an outlet on a circuit different from that to which the receiver is connected. Consult the dealer or an experienced technician for help. Modifications not authorized by the manufacturer void user’s authority to operate this device. Canada - This product carries the CE mark to indicate compliance. This Class B digital apparatus meets all the requirements of the Canadian Interference Causing Equipment Regulations. Ce produit porte la marque de C E pour indiquer la conformité. Cet appareillage de la classe B se conforme à toutes les exigences pour Interférence Canadienne Causant Equipement. Europe - This product carries the CE mark to indicate compliance with the European Directive on Electromagnetic Compatibility (89/336/EEC), as amended (92/31/EEC and 93/68/EEC). This device has been tested to EN EMI/EMC standards CISPR 22 and CISPR 24. Warning: This is a Class B Product. In a domestic environment this product may cause radio interference in which case the user may be required to take adequate correction measures. 17 Limited Warranty Limited Warranty Data Drive Thru, Inc.’s The TornadoTM File Transfer Tool has a one year limited warranty. Data Drive Thru, Inc. warrants this product against defects in material or workmanship for one year from purchase shown on your receipt. If Data Drive Thru finds the product containing any such defects, we will either replace or repair the product during the warranty period. Limitation of Liability, warranty and return information is available at http://www.thetornado.com/site/return.shtml or at 1-866-668-3141 The Tornado TM For product support, go to: http://www.thetornado.com/site/support.shtml The TornadoTM is protected by patents in multiple countries around the world. The TornadoTM brand LOGO and The TornadoTM brand name are trademarks of Data Drive Thru, Inc. all rights reserved 2007. Windows® is a registered trademark of Microsoft Corporation. 18