1
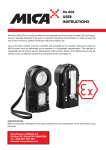
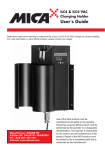
IL-640
IL-640 EM
IL-6400
User Manual
Please read this manual carefully in order
to experience the full benefits of your lamp.
Please store the manual for later use.
USING THE LAMP
The charge of the lamp’s battery will be reduced when the lamp is stored. The lamp must be carefully
charged prior to use by using a MICA ILC4 charging stand. The battery will be charged from empty
to full in 6 to 12 hours, depending on the temperature and condition of the battery. A new battery will
reach its full capacity when it has been fully charged and discharged about ten times. The first
charging of a new lamp must take at least 12 uninterrupted hours!
OPERATING MODES
A pushbutton controls the functions of different lamp models as follows:
IL-640: LOW-POWER -> FULL-POWER -> OFF
IL-640 EM: LOW-POWER -> FULL-POWER -> OFF. If the lamp is in the charging stand and a power
failure occurs, the lamp is automatically lit at LOW-POWER.
IL-6400: LOW-POWER -> FULL-POWER -> OFF. Boost is available when the lamp is switched on.
IL-6400 is equipped with a “Boost” function which is activated by holding the button down. IL-6400 will
provide over 50% more light in Boost mode compared to FULL-POWER, but it is intended to be used
only briefly to prevent overheating. The function stays on for as long the button is held down.
IL-640 EM SAFETY LIGHT
The light will be automatically turned on when the lamp is in the charging stand and the charging
power is cut off (power failure, etc.). IL-640 EM is always automatically in safety light mode when
placed in the charging stand.
Manufacturer: ATEXOR OY
P.O.Box 89, FIN-60101 SEINÄJOKI
Tel: +358-207 343 250
Internet: www.atexor.com
MICA IL-640, IL-640 EM, IL-6400 User Manual
OPERATING TIMES
The operating time with a fully charged battery depends on the lamp model and the operating mode
used (see table).
LOW POWER
FULL-POWER
IL-640 NiMH
IL-640 NiCd
IL-6400 NiMH
24 h
8h
16 h
5h
24 h
5h
The series of red LEDs under the handle show the battery charge. If only one LED is on and/or
the lamp begins to flash approximately every 15 seconds, the lamp battery is almost empty (10–20
minutes remaining). The control electronics will automatically turn off the lamp prior to deep discharge
of the battery. In an emergency, the lamp can still be used for a short period of time, but the battery’s
service life will be reduced.
The operating time will become shorter as the battery ages. If the overall operating time remains clearly
below the values stated in the table even with a fully charged battery, the battery should be replaced.
TO BE TAKEN INTO ACCOUNT WHEN USING LAMP
In case of NiCd batteries, in order to guarantee the longest service life possible, the battery should be
discharged completely from time to time by leaving the lamp on until it automatically shuts off. Lamps
equipped with NiCd batteries should be discharged fully approximately once a month. This helps to
avoid the battery memory phenomenon that reduces operating time. Please note that you may not
install an NiMH battery in an NiCd lamp!
CHARGING AND STORAGE
Do not charge IL-640 & IL-6400 lamps in charging stands other than the new MICA ILC4. Older MICA
charging stands will not charge the lamp correctly, but can be upgraded to be suitable (contact your
dealer for more information). IL lamps should be stored in their stands while not in use. Please read
the charger manual as well!
CHARGING TIMES
IL-640 NiMH 11 h
IL-640 NiCd 7 h
IL-6400 NiMH 11 h
MAINTENANCE
During the warranty period, components may be replaced by an authorized ATEXOR service agent
only. Only original ATEXOR spare parts may be used. Other procedures will invalidate the warranty.
IL-640 lamp disassembly and assembly
1. Unscrew the charging contacts on the bottom of the lamp (Pozidriv 2).
2. Unscrew the locking ring, remove the lens and seal.
3. Open the hex socket screw (3 mm hex key) and lift the reflector out.
4. Carefully disconnect the connector from the LED circuit board. Pay special attention to not touch
any of the 4 LEDs on the circuit board.
5. Open the Torx (T20 key) screws and remove the LED module.
6. Slide the carriage unit halfway out of the enclosure (if the carriage is stuck, tap the lamp gently
against the edge of a table) and disconnect the pushbutton connector. Pull the carriage completely
out of the enclosure.
7. Replace components as necessary and assemble in reverse order.
a. Avoid pinching any wires.
b. Be careful that the reflector does not come into contact with LEDs during assembly.
c. Carefully insert the o-ring seal back in the groove and then place the lens over the o-ring.
d. The locking ring should be tightened while in the charging stand in order to ensure sufficient tightness.
MICA IL-640
4
14
5
8
3
12
1
11
13
6
7
9
2
MICA IL-6400
4
14
5
8
3
12
1
10
11
6
7
2
13
IL-6400 lamp disassembly and assembly
1. Remove the charging contacts on the bottom of the lamp (open Phillips screws).
2. Open the six hex socket screws (2.5 mm hex key) and remove the lens frame, lens and seal.
3. Open the hex socket screw (3 mm hex key) and lift the reflector out.
4. Open the six hex socket screws (2 mm hex key) and open the aluminum frame slightly and
carefully disconnect the black/red wire connector from the LED circuit board. Pay special attention
to not touch any of the 4 LEDs on the circuit board.
5. Slide the carriage unit halfway out of the enclosure (if the carriage is stuck, tap the lamp gently
against the edge of a table) and disconnect the pushbutton connector. Pull the carriage completely
out of the cover.
6. Replace components as necessary and assemble in reverse order.
a. Avoid pinching any wires.
b. Be careful that the reflector does not come into contact with the LEDs during assembly.
SPARE PARTS
1
22002
22006
2
M00940
3
16034
16035
16036
4
MH0101_2
5
6
Battery pack 9.0 Ah NiMH
Battery pack 5.5 Ah NiCd
Charging contact assembly
IL-640 lamp body NiMH
IL-640 lamp body NiCd
IL-6400 lamp body NiMH
Switch cover assembly, black
NiMH lamps)
MH0101_1 Switch cover assembly, grey
(NiCd lamps)
M03356
Pushbutton assembly
M00895
IL-640 locking ring, black
(NiMH lamps)
M01264
IL-640 locking ring, grey
(NiCd lamps)
M02862
IL-6400 lens frame
ACCESSORIES
M11350
M11351
M11352
M11357
M11265
M11266
7
8
9
10
11
12
13
14
M01297_X
21017
21018
21019
21020
M02867
MH0106_3
21013
21014
21015
16023
M01193
M02673
35032
35033
70705
Glass lens
IL-640 LED module Cool
IL-640 LED module CRI
IL-6400 LED module Cool
IL-6400 LED module CRI
IL-640 O-ring seal (1 pc)
IL-6400 O-ring seals (2 pcs)
IL-640 main circuit board
IL-640 EM main circuit board
IL-6400 main circuit board
Reflector
Internal cassette assembly
Gore-Tex valve
IL-640 screw set
IL-6400 screw set
IL shoulder strap
Red filter, plastic (IL-640)
Green filter, plastic (IL-640)
Orange filter, plastic (IL-640)
Diffuser filter, plastic (IL-640)
Flashlight stand (IL-640/6400)
Filter pouch (IL-640)
TECHNICAL SPECIFICATIONS
Light source:
4 x Cree LED
Battery:
NiMH 6V or NiCd 6V
Operating temperature range: -20 °C ... +40 °C
Ingress Protection class:
IP67
Dimensions:
215mm (L) x 120mm (W) x 125mm (H)
Weight:
MICA IL-640 with NiMH battery 1.4 kg, with NiCd battery 1.3 kg
MICA IL-6400 with NiMH battery 1.6 kg
TERMS AND CONDITIONS OF GUARANTEE
A two-year guarantee from the purchase date is granted for the MICA lamp, covering any
manufacturing and material defects according to generally applicable terms and conditions of
guarantee. Please note that the guarantee period for the battery is six months. The guarantee
becomes void if the adjustment values of the electronics components have been changed or if any
components have been damaged in any other way. Under the warranty period, the lamp may be
serviced by an authorized Atexor service agent only. For maintenance repair, please send the lamp
and the charger stand as well as the purchase receipt with the product. Note! A new MICA lamp/
battery must be used or recharged within three (3) months of manufacture.
© 5-2014 ATEXOR OY.
We reserve the right to make changes to
these user instructions without advance notice.
Manual_IL-640_IL-640 EM_IL-6400_ENGL_5-2014_lowress
Pushbutton replacement
Note! The lamp must be disassembled before the pushbutton can be replaced.
1. Unscrew the four screws holding the switch cover plate in place.
2. Remove the cover plate and the rubber cover, and remove the switch from the inside of the cover.
3. Before reassembling, check that the rubber cover is intact, since its condition is crucial to
the ingress protection of the lamp.