1
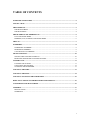
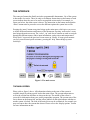
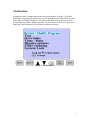
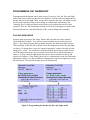
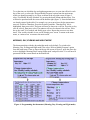
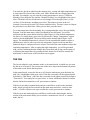
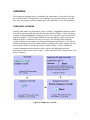
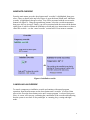
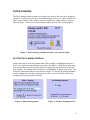
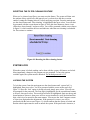
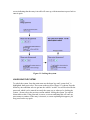
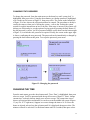
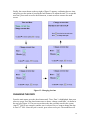
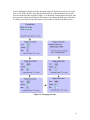
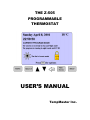
THE Z-505
PROGRAMMABLE
THERMOSTAT
USER’S MANUAL
TempMaster Inc.
TABLE OF CONTENTS
OVERVIEW OF FEATURES ..................................................................................................................... 2
INSTALLATION.......................................................................................................................................... 2
THE INTERFACE ....................................................................................................................................... 3
THE MAIN SCREEN................................................................................................................................. 3
THE MAIN MENU .................................................................................................................................... 4
PROGRAMMING THE THERMOSTAT ................................................................................................. 5
DAY AND NIGHT MODE ........................................................................................................................ 5
MORNING, DAY, EVENING AND NIGHT MODE ............................................................................... 6
THE FAN....................................................................................................................................................... 7
OVERRIDES................................................................................................................................................. 8
TEMPORARY OVERRIDE....................................................................................................................... 8
INDEFINITE OVERRIDE ......................................................................................................................... 9
CANCELLING AN OVERRIDE ............................................................................................................... 9
FILTER CLEANING ................................................................................................................................. 10
SETTING THE CLEANING INTERVAL............................................................................................... 10
RESETTING THE FILTER CLEANING FEATURE ............................................................................. 11
SYSTEM LOCK ......................................................................................................................................... 11
LOCKING THE SYSTEM ....................................................................................................................... 11
UNLOCKING THE SYSTEM ................................................................................................................. 12
CHANGING THE PASSWORD.............................................................................................................. 13
CHANGING THE TIME ........................................................................................................................... 13
CHANGING THE DATE........................................................................................................................... 14
CHANGING TO CELSIUS OR FAHREINHEIT ................................................................................... 16
DISPLAYING TIME IN STANDARD OR MILITARY FORMAT...................................................... 16
CUSTOMIZING THE MAIN SCREEN................................................................................................... 16
APPENDIX.................................................................................................................................................. 17
INSTALLATION ..................................................................................................................................... 17
WARRANTY ........................................................................................................................................... 17
1
OVERVIEW OF FEATURES
Thank you for purchasing the Z-505 programmable thermostat! No more walking up to
the old thermostat all the time to adjust the temperature! You will be able to program a
weekly temperature schedule as well as benefit from a bunch of additional features. But
the best part is that you won’t have to stare at the unit, scratching your head, trying to
figure out how it works. Our interface has been designed with you, the end-user, in mind.
A lot of emphasis was placed on this aspect, and in fact much user testing was done to
help us make the system as easy to use as possible. You will not be disappointed!
Programming the thermostat can be done in one of two ways. First, the ‘Day and Night’
mode allows you to split your days into two segments. You first select a temperature for
the day and one for the night. Then, you decide at what time the ‘day’ and ‘night’ periods
are to start for each day of the week by filling in a simple table. So if you’re like most
people and get up a little later on the weekends, the day temperature could be set to come
into effect later on Saturdays and Sundays. Alternatively, the ‘Morning, Day, Evening
and Night’ mode allows you to split the day into four time segments. There are four
temperature settings to be selected, and again you decide when these periods start for
each individual day of the week by filling in the timetable.
Other features include manual and automatic modes for the fan. The ‘system lock’ feature
allows you to lock the thermostat: in this state, modifications to the various system
settings are not permitted. The ‘filter cleaning reminder system’ reminds you when the
furnace filters are due to be changed or cleaned: in order to use this feature, the interval at
which this is to be done must be set. The ‘override’ feature allows the weekly program to
be overridden to any temperature. The override can be indefinite, or temporary, in which
case the duration (in hours) is requested.
The main screen contains information relating to the current state of the system. If you
find some of this information unhelpful or annoying, the look of this screen can be
customized by accessing the ‘display options’. Finally, temperature can be displayed in
Celsius or Fahrenheit, and time shown in standard format (AM/PM) or in military style
(20:00).
INSTALLATION
It is highly recommended that the unit be installed by a professional electrician.
Instructions and specifications are supplied in the appendix. However, if you choose to
install it yourself, please be very careful, electricity isn’t something you wand to mess
around with.
2
THE INTERFACE
The concept of menus has finally arrived to programmable thermostats. Use of the system
is thus made a lot easier. There are only seven buttons. Instructions on the bottom of each
screen indicate how they are to be used to accomplish various tasks. For example, in
figure one below, the main screen is shown. The instruction on the bottom states that the
‘menu’ button must be pressed to access the different options the system has to offer.
Pressing the ‘menu’ button at any time brings up the main menu, which gives you access
to all the different functions and features of the thermostat. Pressing ‘main screen’ at any
time brings the main screen up. The ‘select’, ‘up’ and ‘down’ buttons are used to navigate
through the different menus, and to input information, such as times and temperatures.
When ‘back’ is pressed, the previous screen comes up. Finally, if at any given moment
you feel you need some quick assistance, pressing the ‘help’ button brings up some
useful tips.
Figure 1: The main screen
THE MAIN SCREEN
Please refer to figure 1 above. All information relating to the state of the system is
available simply by taking a quick look at the main screen. The current temperature as
well as the current time and date are shown at the top. The middle of the screen is
reserved for information about your weekly temperature program. The current state of the
fan is shown on the bottom left, and the yellow padlock on the right indicates whether or
not the system is locked. The look of the main screen can be customized, for example you
may not want to have the current date shown. Please refer to the ‘display options’ section
for more information on this.
3
THE MAIN MENU
Pressing the ‘menu’ button brings up the screen shown below in figure 2. All of the
thermostat’s functions and features are accessed through this menu. By default, the first
option (Review/Modify Program) is selected. As the instruction on the bottom of the
screen dictates, to choose another option the ‘up’ and ‘down’ keys are to be used, and
finally the ‘select’ button is to be pressed to confirm your choice.
Figure 2: The main menu
4
PROGRAMMING THE THERMOSTAT
Programming the thermostat can be done in one of two ways. First, the ‘Day and Night’
mode allows you to split your days into two segments. You first select a temperature for
the day and one for the night. Then, you decide at what time the ‘day’ and ‘night’ periods
are to start for each day of the week by filling in a simple table. Alternatively, the
‘Morning, Day, Evening and Night’ mode allows you to split the day into four time
segments. There are four temperature settings to be selected, and again you decide when
these periods start for each individual day of the week by filling in the timetable.
DAY AND NIGHT MODE
From the main screen press the ‘menu’ button, and select the first option, entitled
‘Review/Modify Program’. You will be presented with the screen on the top left of
figure 3. The current program mode is shown at the top: the thermostat ships with the
‘Day and Night’ mode selected by default. Next, the temperatures for the day and night
are shown. To change these, since the ‘change temperatures’ option is already selected,
simply press ‘select’. You will then be presented with the screen shown on the bottom
left. The temperature for the day is currently selected, use the up and down buttons to
adjust it. To move on to the night temperature, press select and again use the up and
down keys to adjust it. Then, finally, press select. A confirmation screen will confirm the
adjustments, and give you the possibility of changing the temperatures again by pressing
the back button. To accept the changes, press the menu button.
Figure 3: Programming the thermostat (Day and Night mode)
5
To set the times at which the day and night temperatures are to come into effect for each
day of the week, re-select the ‘Review/Modify Program’ option from the main menu,
which you should currently be in. Then, as shown in the top right screen of figure 3,
select ‘See/Modify Weekly Schedule’ by pressing the down button and then select. You
will then be presented with the screen on the bottom right (figure 3). Some default times
are already entered in the table. For example, say you want to have the day temperature
start at 8:30AM on Thursdays. Press the down key until the ‘Thursday/Day’ box is
highlighted, then press select. The hours will now be shown in a red box. Press the up key
once to select 8, then press select. The minutes will now be shown in the red box. Press
the up key until 30 is reached, and finally press select. Repeat the process to set other
times. Your weekly schedule is now saved! Simply press ‘menu’ to return to the main
menu, or ‘main screen’ to return to the main screen.
MORNING, DAY, EVENING AND NIGHT MODE
The thermostat ships with the day and night mode set by default. To switch to the
Morning, Day, Evening and Night mode, first select ‘Review/Modify Program’ option
from the main menu. Then, as shown in the top left screen of figure 4, press the down key
twice to highlight ‘Morning/Day/Evening/Night mode’ and press select. You will now be
presented with the screen shown on the bottom left.
Figure 4: Programming the thermostat (Morning, Day, Evening and Night mode)
6
You must now decide at what times the morning, day, evening and night temperatures are
to come into effect for each day of the week. Some default times are already entered in
the table. For example, say you want the evening temperature to start at 7:30PM on
Mondays. Press the down key until the ‘Monday/Evening’ box is highlighted, then press
select. The hours will now be shown in a red rectangle. Press the up key once, so now
you have 19 for the hours, and then press select. The minutes are now in the red
rectangle. Press the up key until 30 is shown, and then select. The time is now set. Repeat
the procedure to set other times. When you are done, press the menu.
To set the temperatures for the morning, day, evening and night, select ‘Review/Modify
Program’ from the main menu, which you should be in at this point. You will be
presented with the screen shown in the top right of figure 4. Some default temperatures
are shown. To modify them, press select to get into the ‘Change Temperatures’ option,
which is already highlighted. The screen shown on the bottom right of figure 4 will
appear. The morning temperature is selected. Use the up and down buttons to adjust it,
and then press select to move on to the day temperature. Again use the up and down
buttons to adjust it, and press select to accept it. Proceed in the same manner to adjust the
remaining temperatures. After accepting the night temperature, you will be presented
with a screen confirming that the changes have been made and giving you the option of
re-adjusting the temperatures by pressing the back button. Press menu to return to the
main menu, or main screen to have the main screen appear.
THE FAN
The fan can either be set in automatic mode, or in manual mode, in which case you turn
the fan on or off yourself. The current state of the fan is shown in the bottom left portion
of the main screen, beside the fan picture.
In the manual mode, to turn the fan on or off, from the main menu, press the down key
until ‘fan’ is highlighted, then press select. If the fan is currently off, the option selected
by default is ‘Turn fan on’, and if the fan is currently on, the option selected by default is
‘Turn fan off’. You simply have to press select. A screen will then be shown to confirm
that the fan has been turned on or off, press menu to continue.
If the fan is currently in manual mode and you would like to switch to the automatic
mode, simply go into the fan section from the main menu and select ‘switch to auto
mode’. A screen will then come up to confirm the switch, press menu to continue.
If the fan is in auto mode and you would like to switch to the manual mode, the fan
section of the main menu allows you to switch to ‘manual mode, fan off’ or ‘manual
mode, fan on’.
7
OVERRIDES
The temperature program can be overridden to the temperature of your choice by using
the override feature. The temporary override prompts for a duration in hours: after that
time is up, the program will start running again. The indefinite override last indefinitely.
TEMPORARY OVERRIDE
From the main menu, use the down key until ‘overrides’ is highlighted, then press select.
You will be presented with the screen shown in the top left of figure 5. Since ‘temporary
override’ is already highlighted, simply press select. You will now see the screen on the
bottom left (figure 5). The override temperature must be entered: use the up and down
buttons to adjust it, and then press select to accept it. The duration of the temporary
override in hours is now requested, as shown on the bottom right (figure 5). Use the up
and down buttons to choose the number of hours, and then press select. Finally, you will
be presented with the screen shown on the top right of figure 5, which confirms the
override temperature and the duration of the override, and additionally provides
instructions on how to cancel the override – see the ‘cancel override’ section below. Press
menu to continue.
Figure 5: Temporary override
8
INDEFINITE OVERRIDE
From the main menu, press the down button until ‘overrides’ is highlighted, then press
select. Then, as shown in the top left of figure 6, press the down button until ‘indefinite
override’ is highlighted, then press select. You will be presented with the screen on the
bottom left (figure 6). Using the up and down buttons, select the override temperature,
then press select to accept it. Finally, you will be presented with the screen on the bottom
right (figure 6) which confirms the indefinite override and gives instructions as to how to
cancel the override – see the ‘cancel override’ section below. Press menu to continue.
Figure 6: Indefinite override
CANCELLING AN OVERRIDE
To cancel a temporary or indefinite override and continue with normal program
operation, from the main menu use the down button until ‘overrides’ is selected, then
press select. Press the down button twice until ‘resume program’ is selected, then press
select. A screen will come up, confirming the cancellation of the override and indicating
that the system is now back to ‘day and night’ or ‘morning, day, evening and night’
mode.
9
FILTER CLEANING
The filter cleaning feature reminds you of when your furnace filters are to be changed or
cleaned. You set an interval in days, and when that time arrives, you will be notified by a
little picture of filters on the main screen with ‘wash filters’ written under it, as shown
below in figure 7. When you’ve cleaned them, simply reset the filter cleaning option.
Figure 7: Filter cleaning, reminder on main screen (bottom right)
SETTING THE CLEANING INTERVAL
In the main menu, use the down button until ‘filter cleaning’ is highlighted, then press
select. You will be presented with the screen shown in figure 8, which shows how many
days ago the filters were last cleaned, and in how many days the filters are due for their
next cleaning. ‘Set cleaning interval (in days)’ is highlighted, so simply press select. You
will then be presented with the screen shown in figure 9. Using the up and down buttons,
set the cleaning interval in days, and then press select. A screen will then confirm the
cleaning interval, press menu to continue.
Figure 8: Filter cleaning menu
Figure 9: Set filter cleaning interval
10
RESETTING THE FILTER CLEANING FEATURE
When you’ve cleaned your filters, you must reset the feature. The system will then wait
the amount of days specified by the interval you’ve selected (see the above section
entitled ‘setting the cleaning interval’) before notifying you again. From the main menu,
use the down button until ‘filter cleaning’ is highlighted, then press select. You will then
be presented with the screen shown in figure 8. Press the down button to choose ‘reset
(filters have been cleaned)’ and press select. You will be presented with the screen shown
in figure 10, which confirms the reset and indicates when the next cleaning is scheduled
for. Press menu to continue.
Figure 10: Resetting the filter cleaning feature
SYSTEM LOCK
When the system is locked, nothing can be done with the system, all features are locked.
Most importantly, changes to the program are not permitted. To have the options
available again, the system must be unlocked. The default password is 111.
LOCKING THE SYSTEM
To lock the system, from the main menu use the down button until ‘system lock’ is
highlighted, then press select. You’ll be presented with the screen on the top left of
figure 11. Since the ‘lock’ option is already selected, simply press select. You will now
be prompted for the password. The first digit is highlighted, use the up and down buttons
to select it, then press select. The next digit will now be highlighted, again use the up and
down buttons to choose it, then press select to accept it and move on to the third and last
digit, which is to be entered in the same manner. You can use the ‘back’ button to return
to a previous digit and make adjustments. If the password is correct, you will be
presented with the last screen of figure 11, which confirms that the system is locked and
that the unlock option must be used to unlock the system. If the password is incorrect, a
11
screen indicating that the entry is invalid will come up, with instructions to press back to
enter it again.
Figure 11: Locking the system
UNLOCKING THE SYSTEM
To unlock the system, from the main menu use the down key until ‘system lock’ is
highlighted, then press select. The screen on the top left of figure 11 is shown. Press the
down key once and then select to get into the ‘unlock’ section. You will be asked for the
password, which is to be entered in exactly the same way as when you’re locking the
system – please refer to the previous section entitled ‘locking the system’ for explicit
instructions on this. If the password is correct, a screen confirming this will come up,
press menu to continue. If the entry is incorrect, a screen explaining this appears, you
may press back to try again.
12
CHANGING THE PASSWORD
To change the password, from the main menu use the down key until ‘system lock’ is
highlighted, then press select. Using the down button, get ‘change password’ highlighted,
as it is in the top left screen of figure 12, then press select. The screen on the bottom left
of figure 12 is now shown: the old password must be entered. The procedure to do this is
exactly the same as when you’re locking the system – refer to the ‘locking the system’
section for explicit instructions on how to do this. If the entry is incorrect, the system will
inform you of this and give you the option of trying again by pressing the back button. If
the old password is correct, you’ll be presented with the screen shown on the bottom right
of figure 12, in which the new password is required. Finally, the screen on the upper right
is shown, confirming the new password. The password can be immediately re-changed by
pressing the back button at this point. To accept the password, press menu.
Figure 12: Changing the password
CHANGING THE TIME
From the main menu, press the down button until ‘Time / Date’ is highlighted, then press
select to accept. You’ll be presented with the top-left screen of figure 13. Since ‘change
current time’ is already chosen, simply press select to accept. The current time is now
shown, split up into hours and minutes, as can be seen in the middle-left screen of figure
13 (say it is 11:57 right now). Suppose we want to change the time to 16:30. Since the
hours are already selected, use the up button until 16 is displayed, then press select. The
minutes will now be selected. Use the down button until 30 is reached, then press select.
13
Finally, the screen shown on the top right of figure 13 appears, confirming the new time,
and giving you the option of pressing the back button to re-adjust the time. To accept this
new time, press menu to access the main menu, or main screen to return to the main
screen.
Figure 13: Changing the time
CHANGING THE DATE
From the main menu, press the down button until ‘Time / Date’ is highlighted, then press
select to accept. Press the down button once to choose ‘change current date’, as shown in
the top left of figure 14. The next screen shows the date currently stored in the system
(April 9th 2001 in our example), and the year is selected. Say we want to change the date
to June 24th 2001. Since the year is correct, press select to accept it. The month box will
14
now be highlighted, simply press the up button until 6 is shown, press select to accept it.
You’re now in the day box, press the up button until 24 is shown and then press select.
The screen shown in the top right of figure 14 is displayed, confirming the new date, and
giving you the option of pressing the back button to go change the date again. If the date
is correct, press menu for the main menu or main screen to return to the main screen.
Figure 14: Changing the date
15
CHANGING TO CELSIUS OR FAHREINHEIT
The thermostat ships with temperature units set to Celsius by default. To switch to
Fahrenheit, from the main menu use the down button until ‘display options’ is selected,
then press select. You will be presented with a list of six options, the 5th of which is
‘display temperature in Fahrenheit’. Using the down button, get this line highlighted and
press select. The next screen will confirm the switch of temperature units. Press menu to
go to the main menu, main screen to return to the main screen, or back to adjust more
display options.
To switch back to Celsius, follow the same steps as above, the only difference being that
the 5th option in ‘display options’ will now be ‘display temperature in Celsius’.
DISPLAYING TIME IN STANDARD OR MILITARY FORMAT
The thermostat ships with the time displayed in military format (19:00, 01:00). To switch
to the standard notation (AM/PM), from the main menu use the down button until
‘display options’ is selected, then press select. You will be presented with a list of six
options, the 6th of which is ‘display time in standard format’. Using the down button, get
this line highlighted and press select. The next screen confirms that time will now be
displayed in standard format. Press menu to go to the main menu, main screen to return to
the main screen, or back to adjust more display options.
To switch back to military format, follow the same steps as above, the only difference
being that the 6th option in ‘display options’ will now be ‘display time in military format’.
CUSTOMIZING THE MAIN SCREEN
The look of the main screen can be tailored to your personal preferences. The current
time and date as well as current program information can be hidden, and finally the big
yellow padlock, indicating whether or not the system is locked, can be removed if
desired. To access these options, from the main menu use the down button until ‘display
options’ is highlighted, then press select. You will be presented with a list of six options,
the first four of which are for adding or removing information from the main screen. So
for example, suppose you want to remove the current date from the main screen. In the
‘display options’ screen, press the down button once to get ‘hide current date on main
screen’ selected, then press select. A screen will then confirm that the current date will no
longer be shown on the main screen. Press menu to go to the main menu, main screen to
get to the main screen, or the back button to make more display adjustments. If ever you
would like to have the current date shown again, simply repeat the same steps, except this
time in ‘display options’ instead of having a line reading ‘hide current date on main
screen’, you will see a ‘show current date on main screen’ line.
16
APPENDIX
INSTALLATION
<Detailed installation instructions, electrical specifications of the unit>
WARRANTY
TempMaster’s Z-505 programmable thermostat is guaranteed for 5 years from the date of
purchase – please conserve your original proof of purchase. Contact us at 1-800-7779990.
17