1
Advantage CA-XCOM Data
Transport for OpenVMS Alpha
Installation and User Guide
3.0 SP02
B00304-1E
This documentation and related computer software program (hereinafter referred to as the “Documentation”) is for
the end user’s informational purposes only and is subject to change or withdrawal by Computer Associates
International, Inc. (“CA”) at any time.
THIS DOCUMENTATION MAY NOT BE COPIED, TRANSFERRED, REPRODUCED, DISCLOSED OR
DUPLICATED, IN WHOLE OR IN PART, WITHOUT THE PRIOR WRITTEN CONSENT OF CA. THIS
DOCUMENTATION IS PROPRIETARY INFORMATION OF CA AND PROTECTED BY THE COPYRIGHT LAWS
OF THE UNITED STATES AND INTERNATIONAL TREATIES.
TO THE EXTENT PERMITTED BY APPLICABLE LAW, CA PROVIDES THIS DOCUMENTATION “AS IS”
WITHOUT WARRANTY OF ANY KIND, INCLUDING WITHOUT LIMITATION, ANY IMPLIED WARRANTIES
OF MERCHANTABILITY, FITNESS FOR A PARTICULAR PURPOSE OR NONINFRINGEMENT. IN NO EVENT
WILL CA BE LIABLE TO THE END USER OR ANY THIRD PARTY FOR ANY LOSS OR DAMAGE, DIRECT OR
INDIRECT, FROM THE USE OF THIS DOCUMENTATION, INCLUDING WITHOUT LIMITATION, LOST
PROFITS, BUSINESS INTERRUPTION, GOODWILL OR LOST DATA, EVEN IF CA IS EXPRESSLY ADVISED OF
SUCH LOSS OR DAMAGE.
THE USE OF ANY PRODUCT REFERENCED IN THIS DOCUMENTATION AND THIS DOCUMENTATION IS
GOVERNED BY THE END USER’S APPLICABLE LICENSE AGREEMENT.
The manufacturer of this documentation is Computer Associates International, Inc.
Provided with “Restricted Rights” as set forth in 48 C.F.R. Section 12.212, 48 C.F.R. Sections 52.227-19(c)(1) and (2) or
DFARS Section 252.227.7013(c)(1)(ii) or applicable successor provisions.
Ó 2001 Computer Associates International, Inc., One Computer Associates Plaza, Islandia, New York 11749. All
rights reserved.
All trademarks, trade names, service marks, or logos referenced herein belong to their respective companies.
Contents
Chapter 1: Introduction
CA-XCOM Flexibility ......................................................................... 1–1
Multiple User Interfaces ................................................................... 1–2
Unified Solution .......................................................................... 1–2
CA-XCOM Applications ....................................................................... 1–2
File Transfer .............................................................................. 1–2
Type 2.1 Support .......................................................................... 1–3
TCP/IP Support .......................................................................... 1–3
Report Distribution ........................................................................ 1–3
RJE/NJE Replacement ..................................................................... 1–3
CA-XCOM Features ........................................................................... 1–4
Modular Support of Most Systems .......................................................... 1–4
Data Link Types........................................................................... 1–5
Standard Features ......................................................................... 1–5
Standard Functions ........................................................................ 1–5
High Capacity and Performance ............................................................ 1–6
Security .................................................................................. 1–6
Management .............................................................................. 1–6
Types of Transfers ............................................................................ 1–7
Answering Remote Requests ............................................................... 1–7
Invoking CA-XCOM .......................................................................... 1–8
Menu Interface ............................................................................ 1–8
Batch/Command Line Interface ............................................................ 1–8
Programming Interface .................................................................... 1–8
CA-XCOM Connectivity ....................................................................... 1–9
Network Levels in the SNA Model............................................................. 1–10
The End User Level....................................................................... 1–10
The Logical Level ........................................................................ 1–10
The Physical Level ....................................................................... 1–11
Network Level Diagram .................................................................. 1–11
Benefits of LU 6.2 (APPC) ................................................................. 1–11
Contents
iii
Improved Throughput ...............................................................
Support for Advanced Networking ....................................................
CA-XCOM in the TCP/IP Network ...........................................................
TCP/IP Protocol Stack ...................................................................
Network Layer ......................................................................
Internetwork Layer...................................................................
Transport Layer......................................................................
Application Layer ....................................................................
CA-XCOM Nodes in the TCP/IP Network .................................................
TCP/IP Address .....................................................................
TCP/IP Port .........................................................................
Successful Send File Transfer Scenario .........................................................
Send File Flowchart ......................................................................
Conventions ................................................................................
Technical Support ...........................................................................
1–12
1–12
1–13
1–13
1–14
1–14
1–14
1–15
1–15
1–15
1–15
1–16
1–17
1–18
1–18
Chapter 2: Installing CA-XCOM for OpenVMS Alpha
Requirements for Using CA-XCOM ............................................................ 2–1
How Operating System Upgrades Affect CA-XCOM ............................................. 2–2
Before You Begin ............................................................................. 2–2
If You Are Installing CA-XCOM for OpenVMS Alpha for the First Time ....................... 2–2
If You Are Installing a CA-XCOM for OpenVMS Alpha Upgrade .............................. 2–3
The CA-XCOM for OpenVMS Alpha Installation Checklist ................................... 2–3
Installing the CA-XCOM for OpenVMS Alpha Software .......................................... 2–4
Accessing the System ..................................................................... 2–4
Installing CA-XCOM for OpenVMS Alpha Using VMSINSTAL ............................... 2–4
Installing CA-XCOM for OpenVMS Alpha From a CD ....................................... 2–6
Sample Installation Log ................................................................... 2–6
Post-Installation Cleanup .................................................................. 2–8
Adding CA-XCOM for Open VMS Alpha to SystemStartup ................................... 2–8
Configuring SNA Network Resources Using Auto-Install ........................................ 2–9
About the Auto-Install Feature ............................................................ 2–10
Using Auto-Install ....................................................................... 2–10
Installing CA-XCOM for OpenVMS Alpha Manually ........................................ 2–13
Defining the System-wide ................................................................ 2–14
Inserting ................................................................................ 2–14
The CA-XCOM for OpenVMS Alpha Files.................................................. 2–14
iv
CA-XCOM for OpenVMS Alpha Installation and User Guide
Chapter 3: Configuring the Network
Defining DECnet SNA Connections ............................................................. 3–1
Configuring DECnet SNA for CA-XCOM for OpenVMS Alpha Transfers ........................... 3–2
CA-XCOM ACCESS NAME Definitions ..................................................... 3–3
ACCESS NAME ....................................................................... 3–3
LU LIST .............................................................................. 3–3
PU SNA .............................................................................. 3–4
APPLICATION ....................................................................... 3–4
LOGON .............................................................................. 3–4
The SNA Configuration File ................................................................ 3–4
Configuring DIGITAL TCP/IP Services for CA-XCOM for OpenVMS Alpha Transfers .............. 3–7
Configuring UCX ......................................................................... 3–7
Providing a Trace ......................................................................... 3–8
Chapter 4: Configuring CA-XCOM for OpenVMS Alpha
Configuring the Local Request Handler (XCOMV30.CFG) ........................................ 4–1
The CA-XCOM Configuration File XCOMV30.CFG ........................................... 4–1
The CA-XCOM for OpenVMS Alpha Configuration Utility XCOMCFG.EXE .................... 4–2
Running XCOMCFG.EXE .................................................................. 4–2
Invoking XCOMCFG.EXE From the Command Line ...................................... 4–2
The XCOMCFG.EXE Commands and Qualifiers .............................................. 4–3
The ADD Command ................................................................... 4–3
The DELETE Command ................................................................ 4–5
The LIST Command ................................................................... 4–5
The HELP Command .................................................................. 4–5
The EXIT Command ................................................................... 4–5
Direct and Indirect Connections to Remote Systems .......................................... 4–6
Configuring the CA-XCOM for OpenVMS Alpha Remote Request Handlers ........................ 4–7
Configuring EXCOMACP.COM ............................................................ 4–7
The EXCOMACP.COM Qualifiers .......................................................... 4–9
DEC TCP/IP Services ................................................................. 4–10
The XCOMIP.COM Qualifiers ............................................................. 4–11
Completing the Configuration ............................................................. 4–12
Chapter 5: Customization and Command Qualifiers
DCL XCOM Command Customization .......................................................... 5–1
Modifying the CA-XCOM for Open VMS Alpha Command Definition File ..................... 5–2
CA-XCOM for OpenVMS Alpha Command Qualifiers ........................................ 5–3
Contents
v
/APPEND ........................................................................... 5–3
/ASA /NOASA ...................................................................... 5–3
/BINARY ............................................................................ 5–3
/CHECKPOINT[=[dddd-] hh:mm:ss.cc] /NOCHECKPOINT ............................. 5–4
/CLASS=class-id ..................................................................... 5–4
/COMPRESS=compression method /NOCOMPRESS .................................... 5–5
/COPIES=nnn ........................................................................ 5–5
/CREATE ............................................................................ 5–5
/DELETE /NODELETE ............................................................... 5–6
/FCB=xxxx ........................................................................... 5–6
/FORM=string ....................................................................... 5–6
/GETFILE ............................................................................ 5–7
/HOLD /NOHOLD................................................................... 5–7
/LNOTIFY=username ................................................................. 5–7
/LOG=filename /NOLOG ............................................................. 5–8
/MENU .............................................................................. 5–8
/BLOCKL=nnnnn .................................................................... 5–8
/FORMAT=rcd-format ................................................................ 5–9
/RECL=nnnnn ....................................................................... 5–9
/PACK /NOPACK .................................................................. 5–10
/PASSWORD=string ................................................................. 5–10
/PORT=n ........................................................................... 5–10
/PRINT ............................................................................. 5–10
/QUEUE=queue-name /NOQUEUE .................................................. 5–11
/REPLACE .......................................................................... 5–11
/RESUME ........................................................................... 5–11
/RMTFILE=remote-file-spec .......................................................... 5–12
/RMTSYS=remote-system-name ...................................................... 5–12
/RNFLAG=keyword code ............................................................ 5–12
/RNOTIFY=remote-user-name ........................................................ 5–13
/SENDFILE ......................................................................... 5–13
/SNA ............................................................................... 5–13
/SUBMIT ........................................................................... 5–13
/TCPIP ............................................................................. 5–14
/TEXT .............................................................................. 5–14
/TITLE=string ....................................................................... 5–14
/TRACE ............................................................................ 5–14
/TRUNCATE /NOTRUNCATE ....................................................... 5–15
/UNIT=unit-name ................................................................... 5–15
/USERID=username ................................................................. 5–15
/VOLUME=volume-name ............................................................ 5–16
vi
CA-XCOM for OpenVMS Alpha Installation and User Guide
/WAIT[=[dddd-] hh:mm:ss.cc] /NOWAIT.............................................. 5–16
DCL EXCOMACP Command Customization ............................................... 5–17
DCL EXCOMACP Command Qualifiers .................................................... 5–17
/ACCESS=accname .................................................................. 5–17
/ASTLM=nn ......................................................................... 5–17
/BATCH_QUEUE=string ............................................................. 5–17
/BIOLM=nn ......................................................................... 5–17
/BYTLM=nnnnn ..................................................................... 5–18
/DEFACCNT=username .............................................................. 5–18
/DEFAULT_OWNER ................................................................. 5–18
/DEFPSWRD=password .............................................................. 5–18
OUTDENT = /DIOLM=nn ............................................................ 5–18
/FILLM=nn .......................................................................... 5–19
/NODE=nodeid ...................................................................... 5–19
/PGFLQUOTA=nnnnn ............................................................... 5–19
/POLL=delta-time .................................................................... 5–19
/PRINT_QUEUE=queue-name ........................................................ 5–19
/PRIORITY=nn ...................................................................... 5–19
/PRIVILEGE=nn ..................................................................... 5–20
/SESADDR=nn ...................................................................... 5–20
/WSDEFAULT=nnn .................................................................. 5–20
/WSEXTENT=nnnn .................................................................. 5–20
/WSQUOTA=nnn .................................................................... 5–20
DCL XCOMIP Command Customization ................................................... 5–21
DCL XCOMIP Command Qualifiers ....................................................... 5–21
/ASTLM=nn ......................................................................... 5–21
/BATCH_QUEUE=string ............................................................. 5–21
/BIOLM=nn ......................................................................... 5–21
/BYTLM=nnnnn ..................................................................... 5–21
/DEFACCNT=username .............................................................. 5–22
/DEFAULT_OWNER ................................................................. 5–22
/DEFPSWRD=password .............................................................. 5–22
OUTDENT = /DIOLM=nn ............................................................ 5–22
/FILLM=nn .......................................................................... 5–22
/PGFLQUOTA=nnnnn ............................................................... 5–23
/PORT=n ............................................................................ 5–23
/PRINT_QUEUE=queue-name ........................................................ 5–23
/PRIORITY=nn ...................................................................... 5–23
/PRIVILEGE=nn ..................................................................... 5–23
/SESADDR=nn ...................................................................... 5–23
/WSDEFAULT=nnn .................................................................. 5–24
Contents
vii
/WSEXTENT=nnnn .................................................................. 5–24
/WSQUOTA=nnn ................................................................... 5–24
Chapter 6: The Menu Interface
Using the Menu Interface...................................................................... 6–1
XCOM/MENU Valid Qualifier............................................................. 6–2
Transmission Report ...................................................................... 6–2
The Function Keys ............................................................................ 6–3
CA-XCOM Main Menu ....................................................................... 6–4
Send Functions Menu ......................................................................... 6–5
Send a File Screen ............................................................................ 6–6
Screen Fields ............................................................................. 6–6
Checkpoint Restart Menu ................................................................. 6–10
Screen Fields ............................................................................ 6–10
Creating Mainframe Files ................................................................. 6–11
Screen Fields ............................................................................ 6–11
Initiating the Transfer ........................................................................ 6–13
Print a File Screen ........................................................................... 6–13
Screen Fields ............................................................................ 6–14
Checkpoint Screen ....................................................................... 6–18
Screen Fields ............................................................................ 6–18
Submit a Job Screen .......................................................................... 6–19
Screen Fields ............................................................................ 6–19
Receive a File Screen ......................................................................... 6–22
Screen Fields ............................................................................ 6–22
Chapter 7: The Command Line Interface (DCL)
HELP Facility ................................................................................ 7–1
The XCOM/SENDFILE Command ............................................................. 7–2
Specifying Remote System Filenames ................................................... 7–2
/SENDFILE Example ..................................................................... 7–3
XCOM/SENDFILE Qualifiers .............................................................. 7–3
The XCOM/GETFILE Command ............................................................. 7–15
Specifying Remote System Filenames .................................................. 7–15
GETFILE Example ....................................................................... 7–16
XCOM/GETFILE Qualifiers .............................................................. 7–16
The XCOM/PRINT Command................................................................ 7–25
/PRINT Examples ....................................................................... 7–25
viii
CA-XCOM for OpenVMS Alpha Installation and User Guide
XCOM/PRINT Qualifiers ................................................................. 7–26
The XCOM/SUBMIT Command .............................................................. 7–35
XCOM/SUBMIT Examples................................................................ 7–36
XCOM/SUBMIT Qualifiers ............................................................... 7–36
Submitting a CA-XCOM Transfer as a Batch Job ................................................ 7–42
Chapter 8: The Application Programming Interface (API)
Returning Status Information .................................................................. 8–2
Function Return Values .................................................................... 8–2
The Output Message Vector ................................................................ 8–2
XCOM$API - Perform a CA-XCOM Transfer Function ............................................ 8–3
XCOM$API Function Item Codes ........................................................... 8–4
XCOM$_SENDFILE ................................................................... 8–4
XCOM$_GETFILE ..................................................................... 8–5
XCOM$_SUBMIT ..................................................................... 8–6
XCOM$_PRINT ....................................................................... 8–7
Item Descriptor Fields ................................................................. 8–9
XCOM$API Function Qualifier Item Codes ............................................. 8–10
Using the CA-XCOM API Facility ............................................................. 8–24
A Program Which Uses the CA-XCOM API Facility ......................................... 8–24
Linking a Program Which Uses the CA-XCOM API Facility .................................. 8–25
Chapter 9: Remote Spooling (XQUE)
Startup ....................................................................................... 9–1
Qualifiers Supported ...................................................................... 9–2
Qualifiers Not Supported .................................................................. 9–5
Stopping the Print Queue ...................................................................... 9–5
Examining the Print Queue .................................................................... 9–5
Printing Files ................................................................................. 9–5
XQUE Command Line Syntax .............................................................. 9–6
Ignored Print Qualifiers .................................................................... 9–6
Printing Errors and Recovery .................................................................. 9–6
Chapter 10: Remotely Initiated Requests and User Security
CA-XCOM Ancillary Control Processes ........................................................ 10–1
XCOMACP Processing ................................................................... 10–2
XCOMACP States ........................................................................ 10–2
Contents
ix
XCOMIP Processing and States ........................................................... 10–2
XCOMACP Process Creation ............................................................. 10–4
XCOMIP Process Creation ................................................................ 10–5
XCOMACP/XCOMIP Running Privileges ................................................. 10–5
Message Logging ............................................................................ 10–6
Line Disconnects ............................................................................ 10–6
User Security and Accounting Considerations .................................................. 10–6
Using DECnet-OpenVMS Proxy Identifiers ................................................. 10–7
Password Encryption .................................................................... 10–8
Resource Accounting ........................................................................ 10–9
Default File Specifications .................................................................... 10–9
Receiving From a Remote System ............................................................ 10–10
Receiving Files From a Remote System .................................................... 10–10
Receiving Jobs From a Remote System .................................................... 10–10
Receiving Print Requests From a Remote System........................................... 10–11
Chapter 11: Operation and Control
General CA-XCOM Operation and Management ............................................... 11–1
Creating Custom Character Sets for File Conversion ............................................ 11–2
When to Use ............................................................................ 11–2
About Custom Character Sets ............................................................. 11–2
Procedure ............................................................................... 11–3
Example 1 ........................................................................... 11–3
Example 2 ........................................................................... 11–3
Procedure ............................................................................... 11–4
CA-XCOM Checkpoint/Restart Transfer Processing ............................................ 11–4
Startup ................................................................................. 11–4
Processing .............................................................................. 11–5
Checkpoint Filename Format ............................................................. 11–6
Checkpoint Filename Examples ....................................................... 11–6
XCOM$RECOVER Queue Management ....................................................... 11–7
Show Queue ............................................................................ 11–7
Change an Entry's Default Age Limit ...................................................... 11–8
Manually Resuming a Checkpointed Transfer ............................................. 11–10
Deleting An Entry ...................................................................... 11–11
Deleting and Restarting the XCOM$RECOVER Queue ..................................... 11–12
The CA-XCOM Exits ........................................................................ 11–13
Defining the Logical Name XCOM$EXIT01................................................ 11–13
Installing XCOMEXIT01.EXE ............................................................ 11–13
Customizing Your Exit Routine .......................................................... 11–14
x
CA-XCOM for OpenVMS Alpha Installation and User Guide
Linking an Executable Image to a Shareable Image ......................................... 11–14
The Exit Routine Input (XCOM_HISTORY) ................................................ 11–14
The XCOM_HISTORY.H File Parameters .................................................. 11–15
Chapter 12: Communicating With Other Systems
IBM MVS ................................................................................... 12–2
Naming Conventions ..................................................................... 12–2
Types of Files Supported .................................................................. 12–2
DCB Information ......................................................................... 12–3
Additional Features ...................................................................... 12–3
CICS Interface ........................................................................ 12–3
Store-and-forward .................................................................... 12–3
IBM VM..................................................................................... 12–4
Naming Conventions ..................................................................... 12–4
Types of Files Supported .................................................................. 12–4
DCB Information ......................................................................... 12–4
IBM VSE .................................................................................... 12–5
Naming Conventions ..................................................................... 12–5
SAM Naming Conventions ................................................................ 12–5
TAPE Naming Conventions ............................................................... 12–7
VSAM Managed SAM Naming Conventions ................................................ 12–9
DTF Information ........................................................................ 12–10
Types of Files Supported ................................................................. 12–10
Restrictions ............................................................................. 12–10
OpenVMS .................................................................................. 12–11
File Support ............................................................................ 12–11
Restrictions ............................................................................. 12–12
IBM AS/400 ................................................................................ 12–13
Naming Conventions .................................................................... 12–13
Types of Files Supported ................................................................. 12–14
Additional Features ..................................................................... 12–14
Xque ............................................................................... 12–14
Configuration Issues..................................................................... 12–14
Case Sensitivity ......................................................................... 12–14
PC-DOS .................................................................................... 12–15
Naming Conventions .................................................................... 12–15
Restrictions ............................................................................. 12–16
Configuration Issues..................................................................... 12–16
OS/2 ...................................................................................... 12–17
Naming Conventions .................................................................... 12–17
Contents
xi
Restrictions ............................................................................
Novell NetWare ............................................................................
Naming Conventions ...................................................................
Types of Files Supported ................................................................
Destination Printer Information ..........................................................
Restriction .............................................................................
Stratus/System 88 ..........................................................................
Naming Conventions ...................................................................
Types of Files Supported ................................................................
Additional Features .....................................................................
Restrictions ............................................................................
Tandem ...................................................................................
Naming Conventions ...................................................................
Types of Files Supported ................................................................
File Type Specification ..................................................................
Remotely-Initiated Send Requests ........................................................
UNIX......................................................................................
Naming Conventions ...................................................................
Types of Files Supported ................................................................
Restriction .............................................................................
Windows ..................................................................................
Naming Conventions ...................................................................
Restriction .............................................................................
Windows NT...............................................................................
Naming Conventions ...................................................................
Types of Files Supported ................................................................
Additional Features .....................................................................
Destination Printer Information ..........................................................
Restrictions ............................................................................
12–18
12–19
12–19
12–19
12–19
12–19
12–20
12–20
12–21
12–21
12–21
12–22
12–22
12–22
12–23
12–24
12–24
12–24
12–24
12–25
12–25
12–25
12–26
12–26
12–26
12–28
12–28
12–28
12–29
Chapter 13: Messages
Log File.....................................................................................
CA-XCOM Messages ........................................................................
SNA Messages ..............................................................................
Messages Without Idents .....................................................................
Transmission Report .........................................................................
XCOMACP Transmission Report .............................................................
Message Formats Received From Remote CA-XCOM Nodes .....................................
Messages From Failed Transfers to Remote Systems .........................................
List of Messages .............................................................................
xii
CA-XCOM for OpenVMS Alpha Installation and User Guide
13–1
13–2
13–2
13–3
13–3
13–5
13–6
13–7
13–8
TXPI Messages.............................................................................. 13–51
Glossary
Index
Contents
xiii
Chapter
1
Introduction
This guide explains how to use the CA-XCOM for OpenVMS connectivity
software with Digital Equipment Corporation (DEC) VMS systems. Its scope
ranges from an overview of the software to descriptions of the parameters
required to execute CA-XCOM functions. This guide is for users installing,
configuring, and running CA-XCOM.
Although there are extensive similarities between all of the CA-XCOM
components, you should always refer to the corresponding user guide when you
require specific information about a component.
CA-XCOM supports high-speed transfers of files between all supported systems.
Users can send files from the local system to remote systems across an SNA or
TCP/IP network and actively retrieve files from those systems. The remote
system can initiate the same range of transfer capabilities as the local system.
This chapter is a general introduction to the features and functions of CA-XCOM
across all of its platforms.
CA-XCOM Flexibility
CA-XCOM allows data centers in various locations worldwide to interact with
each other for the following purposes:
■
Sharing data
■
Automating data and report distribution
■
Providing unattended back-up to dissimilar computers
■
Controlling and auditing network activities
■
Maintaining network security
■
Communicating with Point-of-Sale (POS) terminals
The applications listed above are only a few examples. Under most conditions,
CA-XCOM will allow file sharing between any two computers or workstations.
Introduction
1–1
CA-XCOM Applications
Multiple User Interfaces
Any computer using CA-XCOM can communicate with any other machine using
CA-XCOM. Transfers can be invoked through the following methods:
■
Menu interface
■
Batch/command line interface
■
Application Programming Interface (API)
Unified Solution
CA-XCOM is a unified solution. It supports communications over more
hardware environments than any other software product on the market today.
CA-XCOM also has a solid technology base. By using LU 6.2 or TCP/IP
communications protocols, CA-XCOM uses state-of-the-art technology,
protecting your company’s investment for years to come.
CA-XCOM Applications
The key to CA-XCOM’s considerable flexibility is its ability to transfer the
following:
■
Files
■
Jobs
■
Reports
When these functions are combined, a wide variety of applications are possible.
File Transfer
CA-XCOM supports high-speed file transfers between all supported processors.
In some environments, you can start thousands of transfers with a single
operation. Parallel sessions are possible in varying degrees throughout the
product line.
You can totally automate CA-XCOM transfers. On a PC, you can be actively
engaged in the use of other applications (for example, word processing) while
receiving or transmitting files in the background. Comprehensive management
tools allow for effective central-site control of CA-XCOM activity, including
advanced problem determination features.
1–2
CA-XCOM for OpenVMS Alpha Installation and User Guide
CA-XCOM Applications
CA-XCOM will support transfers between any two processors in an SNA
network or a TCP/IP network with one of the following methods:
■
■
■
By using the MVS, VM, or VSE mainframes for store-and-forward
Through Independent Logical Unit (ILU) support over the SNA (Systems
Network Architecture) backbone
Through use of the TCP/IP network
Type 2.1 Support
CA-XCOM supports node Type 2.1 connections to allow the direct interchange of
files between DOS PCs, AS/400s, OS/2 workstations, and others. Support for
Independent Logical Units (ILUs) allows CA-XCOM to deliver data in Advanced
Peer to Peer Networking (APPN) and Low Entry Networking (LEN) networks.
This means that PCs and minicomputers attached to the same SNA or APPN
network can exchange data even if they are not directly connected.
TCP/IP Support
CA-XCOM provides support for performing transfers using TCP/IP between
CA-XCOM Version 3.0 platforms that support TCP/IP. TCP/IP support is
provided between MVS, AS/400, Windows, Windows 95, Windows NT, OS/2,
Tandem, OpenVMS and common UNIX platforms.
Report Distribution
CA-XCOM allows MVS, VM, VSE, AS/400 and VMS users to take print output
from any supported system and automatically transfer it to another system for
printing. The application programs producing the reports do not require any
modification to support CA-XCOM report distribution, and no operator
intervention is required at either end.
RJE/NJE Replacement
Current Remote Job Entry (RJE) systems contain inherent limitations. Remote
computers can submit work to the host for processing and receive print data, but
the host cannot distribute processing tasks to idle processors residing on the
network. A further concern for data processing managers is the requirement that
users have a knowledge of Job Entry Subsystem (JES) commands to operate the
system.
Introduction
1–3
CA-XCOM Features
CA-XCOM avoids these limitations by taking advantage of the LU 6.2 and
TCP/IP protocols, providing a peer-to-peer relationship between all supported
systems. Any CA-XCOM system is able to send and receive batch jobs and print
data from any other CA-XCOM system without formatting constraints.
For example, an AS/400 user can do the following:
■
Automatically retrieve files from a number of attached PCs.
■
Process the data.
■
Generate a report.
■
Send one copy of the report back to the source PC for printing.
■
Send another to the MVS mainframe for printing on a high-speed printer.
You can easily implement CA-XCOM without any changes to your existing
applications programs. Data is transferred with greater integrity and higher
efficiency.
CA-XCOM Features
CA-XCOM provides peer-to-peer communications using LU 6.2 or TCP/IP over
a wider range of systems than any other product. All of CA-XCOM’s major
features are supported across the product line.
Modular Support of Most Systems
By supporting the LU 6.2 and TCP/IP protocols, CA-XCOM can transfer data
between a diversity of platforms. CA-XCOM is now available on the following
systems:
1–4
IBM MVS
SCO OpenServer
IBM VM
Sun Solaris
IBM VSE
NCR 3000 (AT&T)
IBM AS/400
PC or MS-DOS
Stratus
NetWare
OpenVMS Alpha
OS/2
OpenVMS VAX
Windows
Tandem
Windows 95
IBM RS/6000
Windows NT
CA-XCOM for OpenVMS Alpha Installation and User Guide
CA-XCOM Features
HP 9000
Sequent
Data Link Types
CA-XCOM supports the following data link types:
■
SDLC
■
COAX
■
X.25
■
Async, Autosync
■
Local Area Network (Token Ring, Ethernet, etc.)
■
All SNA data links, including channel-based links
■
TCP/IP
Standard Features
The following features are standard to CA-XCOM:
■
■
■
■
Simple installation - You can install CA-XCOM without hardware changes
to your system.
Initiation by either computer (any-to-any) - Either computer can send and
retrieve data files.
Low maintenance - There are no hooks or patches into the operating system.
Choice of interfaces - You can choose from batch/command line,
programming (on supported platforms), and menu interfaces.
Standard Functions
The following functions are offered over most of the CA-XCOM platforms:
■
■
■
■
Compression - CA-XCOM provides a wide variety of compression
algorithms to reduce the size of the data prior to transmission. In certain
cases, throughput is significantly higher than the actual line speed.
ASCII/EBCDIC translation - CA-XCOM can translate data between ASCII
and EBCDIC formats as needed. Translations occur on the ASCII-based
platform.
Checkpoint/Restart -All components of CA-XCOM running Version 2 or
higher support checkpoint/restart. Transfers that are stopped or fail prior to
completion automatically resume, continuing from the last checkpoint.
Store-and-forward - Users communicating through a common MVS, VM, or
VSE hub can perform data transfers even if the remote (target) machine is
Introduction
1–5
CA-XCOM Features
not communicating or turned on at the time of the initial transfer. CA-XCOM
ensures that the data is sent as soon as the device is available.
■
Remote spooling - CA-XCOM allows VM, MVS, VSE, AS/400 and VMS
users the following reporting options:
- CA-XCOM on all platforms can receive reports.
- CA-XCOM on all platforms can send a file to a remote CA-XCOM
partner, requesting that it be treated as a report.
- Some CA-XCOM platforms can also take reports off the system spool
and forward them to another CA-XCOM platform without operator
action. This automatic report transfer facility is called Process SYSOUT
on MVS and VSE, and it is called XQUE on AS/400 and VMS. VM does
not allow automatic processing of spooled files. However, spooled files
on VM can be manually received and redirected.
High Capacity and Performance
CA-XCOM is optimized for high-speed bulk data transfer. For instance, the
CA-XCOM MVS product can allow up to 1,000 simultaneous, active file transfers
from a single machine, depending upon your hardware and software
configuration.
Security
CA-XCOM interfaces with the native security facility on all supported systems.
When security is invoked, you are required to provide a valid user ID and
password for the remote system. For example, in the MVS environment, an
interface is also provided to RACF, CA-ACF2, and CA-TOP SECRET. On PC and
OS/2 versions of CA-XCOM (where no native security exists), you are given the
option to create an ID/password table to prevent unauthorized use of
CA-XCOM.
CA-XCOM also has special security capabilities which can help data centers
handle their individual needs. For example, CA-XCOM’s security features allow
installer specification of what can or cannot run under the privileges of someone
other than the person requesting the transmission. These security features can
also force user IDs from both remote computers to be the same or different. For
otherwise unsatisfied security needs, CA-XCOM supplies a variety of user exits
which enable user-written security packages to be fully integrated.
Management
An important feature for any enterprise-wide information product is the ability
to effectively control and manage the distribution of files and work throughout
1–6
CA-XCOM for OpenVMS Alpha Installation and User Guide
Types of Transfers
the network. CA-XCOM systems maintain a comprehensive log of all transfer
activity. Utilities are provided to allow the system administrator to view the log
on-line and modify the status of pending or currently-active transfers.
Details of any transfer errors are also maintained in the log, allowing rapid
problem determination and resolution. In addition, messages signaling the
completion of any CA-XCOM event can be directed to a user in the network.
Types of Transfers
CA-XCOM will perform the following transfers:
■
■
■
■
Sending files - With CA-XCOM, a computer can send a data file to be stored
on the remote system in a specified “remote” file.
Sending reports - CA-XCOM can send a report to be printed on a remote
system.
Sending batch jobs for execution - CA-XCOM can send a job to be executed
on a remote system.
Retrieving files - When a computer starts the transmission request, it can also
retrieve a file from a remote computer and store it in a specified local
“remote” file.
Send Data File
SOURCE
COMPUTER
Send Report for Printing
Send Job to be Run
TARGET
COMPUTER
Retrieve Data File
Answering Remote Requests
CA-XCOM monitors the network for incoming requests. Upon detecting one,
CA-XCOM determines whether it is a request to send a file inbound (from the
remote system to this machine) or outbound (from this machine to another
system).
■
Files - The remote system can send or retrieve files. When a remote system
requests CA-XCOM to send it a file, CA-XCOM tries to allocate and open the
file. CA-XCOM then reads the data records and transfers them to the remote
system.
Introduction
1–7
Invoking CA-XCOM
■
■
Jobs - The remote system can use CA-XCOM to submit jobs to the local
system.
Reports - The remote system can send the local system a report. CA-XCOM
writes the report to an output spool file. Each supported system has unique
spooling capabilities and CA-XCOM has been designed to provide a high
degree of print redirection and manipulation.
Invoking CA-XCOM
CA-XCOM is both easy to use and diverse enough for the most complex
applications. Data transfer can be completed through any one of three interfaces,
and reports can be printed on a remote printer using the Remote Spooling
feature. These are described fully in later chapters.
Menu Interface
The menu interface provides a simple, fill-in-the-blanks approach to file transfer.
You are prompted for required information and can use the extensive on-line
help facilities provided with each product. CA-XCOM menus always have the
“look and feel” appropriate to the system on which they are running. For
example, the micro-computer platforms use a graphical user interface with
menus, tool bars, pop-up windows, etc., while MVS is written for the popular
ISPF Dialog Manager.
Batch/Command Line Interface
CA-XCOM can also be initiated with a batch file on your computer. For example,
a transfer can be invoked through a JCL batch job on MVS and a CMS EXEC on
VM. On mini and microcomputers, a transfer can be initiated via a command
entered at the operating system prompt/command line or placed in a batch file
to be executed with other commands.
Programming Interface
Any programming language supporting callable subroutines can call CA-XCOM.
Examples of calling programs from common programming languages are given
in each user manual, for supported platforms. For instance, the OS/2 and
PC/DOS versions of CA-XCOM allow direct API calls to specific CA-XCOM
functions in addition to allowing you to run CA-XCOM as a subprogram.
CA-XCOM also provides exits on many systems which allow you to control or be
informed about certain CA-XCOM events involving security and completed
transfers.
1–8
CA-XCOM for OpenVMS Alpha Installation and User Guide
CA-XCOM Connectivity
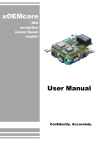
CA-XCOM Connectivity
The diagram below shows how CA-XCOM can provide connectivity across very
diverse environments. Any client node using CA-XCOM can send and receive
files from any of the remote systems shown in this example or any other
CA-XCOM component (see Modular Support of Most Systems in this chapter).
AS/400
UNIX
MVS, VSE, VM
Host
Windows
VAX
APPC
SNA
TCP/IP
Network
DOS
Tandem
OS/2
Stratus
NetWare
Windows
Client
OS/2
Client
Windows NT
Server
NT
Client
NT
Client
Note: TCP/IP support is provided for CA-XCOM Version 3.0 platforms as
noted on page 1-4.
Introduction
1–9
Network Levels in the SNA Model
Network Levels in the SNA Model
An SNA network is divided into levels of physical and logical components. The
logical components are interconnected by a path control network that runs over
the physical components.
As data is passed up and down the SNA functional layers, each layer performs a
set of control functions and adds control information to the data in the form of a
header. The headers do not change the information in the data, but communicate
with the next layer of SNA to ensure that the data is understood.
As the data is passed through the layers, headers that are added at one end of the
network are stripped off and read by the receiving end. Thus, when the data
reaches its final destination, it is back to its original form.
The End User Level
The end user level consists of transaction programs (like CA-XCOM) that
communicate with other transaction programs using LUs. In a CA-XCOM
transfer request, the local end user specifies the following:
■
Type of transfer (send report, file, or job, or receive file)
■
Name of the local file
■
Name of the remote file to create, append, or replace
The request is then processed by the CA-XCOM transaction program on the local
system which sends an allocate verb and header record to the remote system to
establish an LU 6.2 session. When a session is established and all of the
parameters are confirmed by the remote system, CA-XCOM on the local system
will send the file, broken into data records, across the physical connection.
The remote CA-XCOM transaction program is then invoked by the allocate verb
sent by the local system (some systems cannot be automatically invoked and
must already be active to receive the allocate verb). The remote transaction
program then creates or opens the requested file, receives the data records, and
places them in the file. When all the records have been received, CA-XCOM on
the remote system will send a trailer record to the local system stating the
number of records transmitted.
The Logical Level
The logical level consists of logical units (LUs) which link the physical units
(PUs) and transaction programs (TPs). Each CA-XCOM user should be assigned
a unique LU name for gateway or workstation identification. Each data record
1–10
CA-XCOM for OpenVMS Alpha Installation and User Guide
Network Levels in the SNA Model
traveling across the line will contain LU 6.2 protocol information containing
instructions for the remote system.
The Physical Level
The physical level consists of physical unit (PU) nodes linked by a physical
connection. CA-XCOM supports transfers between physically-connected systems
whether they are directly or indirectly connected. PU Type 2.1 nodes can make a
direct logical link even without a direct physical connection. Transfers involving
PU Type 2.0 nodes (like VMS) can be made using the store-and-forward feature
of CA-XCOM.
Network Level Diagram
The diagram below shows the various network levels used to communicate with
CA-XCOM:
END
USER
LEVEL
Local
User
Remote
User
CA-XCOM
CA-XCOM
LU 6.2
LU 6.2
Physical
Unit Node
Physical
Unit Node
LOGICAL
LEVEL
PHYSICAL
LEVEL
Physical Connection
Benefits of LU 6.2 (APPC)
Introduction
1–11
Network Levels in the SNA Model
CA-XCOM is built upon the LU 6.2 protocol. LU 6.2 is also known as Advanced
Program-to-Program Communications (APPC) and is IBM’s most powerful
enhancement to the Systems Network Architecture (SNA) suite of
communications protocols.
Improved Throughput
When CA-XCOM uses the LU 6.2 protocol, it does not place hardware
restrictions on the size of the data that it sends. RJE-based data transfer packages
(LU Type 1) limit the size of a data frame (RU) to 80 characters, while 3270-based
transfer packages (LU Type 2) often limit the size to 1,920 characters, the size of
one screen. LU 6.2 allows RU sizes of up to 65,536 characters.
Each transmitted string of data is wrapped in a protocol envelope. Larger RU
sizes, such as those allowed with CA-XCOM, mean less protocol overhead and a
higher percentage of actual data traveling across your communication links.
P = Protocol
Overhead
Other LUs (RJE, etc.)
P
Data
P
Data
P
Data
LU 6.2 (CA-XCOM)
P
Data
Support for Advanced Networking
For SNA, LU 6.2 fully exploits the PU Type 2.1 “peer” protocol. This means that
LU 6.2 is the only protocol that can use advanced functions such as “Low Entry
Networking” (LEN), “Advanced Peer-to-Peer Networking” (APPN), and
“Independent Logical Units” (ILUs) that are changing the face of computer
networking today. If you are not familiar with these topics, you will find
additional information in both the Glossary and “Appendix A. About Logical
Units.”
APPC allows two programs running on distinctly different computers to
converse with each other in real time without regard to hardware. All other
protocols assume that one of the two devices communicating is a dumb terminal
and impose all the limitations of a particular terminal on the partner computer.
APPC and CA-XCOM recognize that distributed processing employs intelligent
1–12
CA-XCOM for OpenVMS Alpha Installation and User Guide
CA-XCOM in the TCP/IP Network
processors so they can exploit the intelligence of the computers on which they
are running.
CA-XCOM in the TCP/IP Network
This section provides a discussion of the architectural and conceptual framework
of the TCP/IP communications protocol as it relates to the implementation of
CA-XCOM as a TCP/IP application.
TCP/IP Protocol Stack
TCP/IP is a collection of specialized communications protocols and functions
organized into a stack of four layers. The layers that make up the TCP/IP
protocol stack are the following:
· Network layer (the lowest protocol layer)
· Internetwork layer
· Transport layer
· Application layer (the highest protocol layer)
Each layer in the TCP/IP protocol stack provides services to the layer above it
and uses the services below it.
The table below lists the protocols and functions that form the content of each
layer of the TCP/IP protocol stack. (The table shows only partial contents for the
top and bottom layer.)
TCP/IP Protocol
Layer
Protocols and Functions
Network layer
Token Ring
Ethernet
X.25
etc.
Internetwork
layer
Internet Protocol (IP)
Control Message Protocol (ICMP)
Address Resolution Protocol (ARP)
Transport layer
Transmission Control Protocol (TCP)
User Datagram Protocol (UDP)
Introduction
1–13
CA-XCOM in the TCP/IP Network
Application layer
Telnet
File Transfer Protocol (FTP)
Simple Mail Transfer Protocol (SMTP)
Domain Name System (DNS)
Sockets
And so on…
The next few sections provide (1) a summary of the services that each layer of the
protocol stack performs in the TCP/IP network and (2) a description of the
protocols that are particularly important for the functioning of CA-XCOM as a
TCP/IP network node.
Network Layer
The Network layer provides a set of protocols, Token Ring, Ethernet, etc., that
define how data are transported over different physical networks.
Internetwork Layer
The protocols of the Internetwork layer provide connection services for TCP/IP.
The protocols in this layer connect physical networks and transport protocols.
The Internet Protocol (IP) of this layer integrates different physical networks into
a unified logical network known as the internet and provides for the universal
addressing of computers (hosts) in a TCP/IP (internet) network. IP uses a 32-bit
number (IP address) which identifies both a physical network and a specific
computer within that network. The IP address is the basic transport mechanism
for routing data from a source computer to a destination computer.
However, IP does not ensure a reliable communication, because it does not
require that the computers participating in a data exchange acknowledge the
reception of the transmitted data. The reliability of communication is
implemented at the next higher protocol layer.
Transport Layer
The protocols of the Transport layer allow communication between application
programs.
The Transmission Control Protocol (TCP) of this layer establishes a connection
between the sender and receiver and provides a continuous communication
service with reliability of transmissions. TCP divides the data to be transmitted
into smaller units (packets, datagrams) , sends them individually using IP, and
reassembles them at the destination node, comparing the received data with the
data that were sent. TCP is capable of determining if the two are the same. If they
1–14
CA-XCOM for OpenVMS Alpha Installation and User Guide
CA-XCOM in the TCP/IP Network
are not (i.e., data were lost or damaged during transmission), TCP resends the
missing data.
Application Layer
The Application layer, which is built on the services of the Transport layer,
provides a number of applications that allow users to use network services
(terminal-to-terminal communication, data transfer, electronic mail, etc.).
The Application layer provides an application programming interface known as
Sockets for communications applications. CA-XCOM uses this component of the
Application layer to transfer files to machines in a TCP/IP network.
CA-XCOM Nodes in the TCP/IP Network
Each computer in a TCP/IP network is assigned at least one unique address,
which is used by the IP and other higher-level protocols.
TCP/IP Address
TCP/IP employs an addressing scheme consisting of a 32-bit long field divided
into two parts. The first part of the address field contains a network address; the
second field contains the address of a specific computer.
A TCP/IP address is written in dotted-decimal notation, which is obtained by
first dividing the 32-bit long address into four 8-bit long fields and then
converting each of the four fields into a decimal number and separating the fields
with periods.
Instead of using a numeric address, a symbolic name may be used to identify a
computer in a TCP/IP network. Each computer in a TCP/IP network is assigned
at last one name, which is resolved to a numeric address using either a
translation file or an application known as the name server (which is part of the
Domain Name System function of the Application layer).
TCP/IP Port
The notions of port and port number are extensions of the TCP/IP address. Once
the TCP/IP address has been used to deliver data to the desired computer in the
network, the port number is used to identify the process for which the data are
intended. By using ports and port numbers one computer can provide more than
one service. CA-XCOM uses a predefined port number but it can be changed if it
interferes with existing application services.
Introduction
1–15
Successful Send File Transfer Scenario
Successful Send File Transfer Scenario
This section contains a flow chart to illustrate a typical successful send file
scenario. Compare the steps below with the Send File Flowchart to follow a
typical successful send file transfer.
1.
The local user invokes CA-XCOM and requests a transfer.
2.
CA-XCOM verifies the information contained in the request.
Example: CA-XCOM checks to see if the local file exists on the local system.
1–16
3.
CA-XCOM establishes a connection with the remote system and sends along
the header record to the remote system. The header record contains transfer
information regarding the request, for example, filenames and compression.
The local system then waits for confirmation of the header record
information.
4.
Once the contents of the header record are verified, CA-XCOM begins
sending data records to the remote system. CA-XCOM sends each data
record, checking to see if any sending errors occur. If no errors are found, the
local system checks for an end-of-file marker denoting the last record of the
file. If no end-of-file marker is found, another data record is sent.
5.
If an end-of-file marker is found, the local system sends a trailer record,
which indicates the number of data records sent. The local system then
awaits verification from the remote system that the number of records
received is equal to the number of records sent. If the number of records
matches, a successful send file message is sent to the user on the local system
and the conversation ends. If notification was specified, CA-XCOM on the
remote system notifies the user of a successful transfer.
CA-XCOM for OpenVMS Alpha Installation and User Guide
Successful Send File Transfer Scenario
Send File Flowchart
The following flowchart illustrates a normal CA-XCOM send file request:
Start
1.
User Requests
Transfer
2.
CA-XCOM
Verifies Information
(e.g., Local Filename)
No
Verify
3.
Display Error
Message
End
Display Error
Message
End
Display Error
Message
End
Display Error
Message
End
Yes
Establish Connection
with
Remote System
Send Header
No
Verify
Yes
4.
Send Data Records
Yes
Error
No
End of
File
Yes
5.
End
Send Trailer
Successful
Transfer
Message
No
Yes
Verify
Introduction
1–17
Conventions
Conventions
The following is a list of standard conventions used in this manual.
Variable Input
Variable input is generally shown in lowercase letters and angle brackets, in the
exact format that you're supposed to use. (example: <luname>). Variable input
should not contain spaces. When a repeated letter such as nnnnnn is used, the
number of letters represents the number of characters to be entered.
Ellipses
An ellipsis (...) is used to show that there are additional items not shown.
Programs, Filenames, and Parameters
Programs, filenames, and parameters are displayed in uppercase letters to
distinguish them from the surrounding text (for example, the EXCOMACP.COM
file). This does not mean that they must be in uppercase when you use them in
commands.
Commands and System Prompts
Command statements are displayed in uppercase letters in a different typeface to
distinguish them from the surrounding text. For example:
SET <parameter_name>=<parameter_value>
Longer command statements are displayed in a table for easy reference.
Note: You must be aware of the case-sensitivity of the remote system when
entering commands, programs, and parameters.
Technical Support
For further technical assistance with this product, please contact Computer
Associates Technical Support at http://esupport.ca.com. Technical support is
available 24 hours a day, seven days a week.
1–18
CA-XCOM for OpenVMS Alpha Installation and User Guide
Chapter
2
Installing CA-XCOM for OpenVMS
Alpha
The installation and configuration procedure for CA-XCOM consists of three
parts:
n
Installing the CA-XCOM software
n
Configuring the SNA resources for DECnet SNA
n
Configuring CA-XCOM to handle your particular transfer requirements
n
Configuring TCP/IP
This chapter discusses the first step, installing the CA-XCOM software. Before
starting the installation, you should review the information in this chapter and in
the release notes, and work with your system administrator to complete the
Installation Checklist.
Requirements for Using CA-XCOM
To use CA-XCOM, you need a physical attachment to a network and a VMS
system configured for the hardware at your site. Other system requirements are
described below.
Hardware and
Software (for
DECnet SNA)
Make sure your system has the following:
n
n
n
Hardware and
Software for TCP/IP
Disk Space
Requirements
All OpenVMS installations must have the DECnet SNA VMS APPC/LU 6.2
Programming Interface Version 2.2 or higher.
Networked VMSes (including Micro VMSes using an ST, CT SNA Gateway,
or Peer Server) must use the DECnet SNA software in addition to APPC.
Standalone VMS systems must use a synchronous communications board
with OpenVMS SNA software.
n
n
DEC TCP/IP Services for OpenVMS (UCX).
A network adapter capable of handling TCP/IP
communications.
The CA-XCOM program modules use a minimum of 2500 blocks of disk space.
Installing CA-XCOM for OpenVMS Alpha
2–1
How Operating System Upgrades Affect CA-XCOM
Distribution Media
CA-XCOM is distributed on a 4-mm DAT tape.
How Operating System Upgrades Affect CA-XCOM
If you upgrade the OpenVMS operating system, the following files may be
modified or updated:
n
n
SYS$SHARE:DCLTABLES.EXE
SYS$HELP:HELPLIB.HLB
If you installed the CA-XCOM command as a system-wide command in
DCLTABLES.EXE, and the CA-XCOM help topic into the system-wide help
library HELPLIB.HLB, then replacing these files during a VMS upgrade deletes
the respective CA-XCOM entries. The next time you enter the CA-XCOM
command, a message indicates that the command does not exist. If you enter
CA-XCOM as a help topic, a message indicates that there is no documentation on
"CA-XCOM."
To restore information deleted during an operating system upgrade, do the
following:
To reinstall...
Use this Command
XCOM.CLD in DCLTABLES.EXE
SET COMMAND
The help information in
HELPLIB.HLB
LIBRARY/HELP/REPLACE
For more information on installing CA-XCOM information in system libraries,
see the topic The CA-XCOM Files, later in this chapter.
Before You Begin
Before installing the CA-XCOM for OpenVMS Alpha software, make sure you
read the information on this page and complete the installation checklist.
If You Are Installing CA-XCOM for OpenVMS Alpha for the First Time
If you are installing CA-XCOM for the first time, the installation procedure
consists of three steps:
2–2
CA-XCOM for OpenVMS Alpha Installation and User Guide
Before You Begin
1.
Load the software. Instructions for using the VMSINSTAL procedure begin
on the next page.
2.
Configure the network's basic SNA services. If you are using DECnet SNA,
you can use the auto-install feature XCOM_INSTALL_PART_2 to configure
the network's basic SNA services. If you don't want to use auto-install, you
can enter the SNA configuration manually as described as described in the
section Installing CA-XCOM Manually.
3.
Configuring DEC TCP/IP Services.
If You Are Installing a CA-XCOM for OpenVMS Alpha Upgrade
If CA-XCOM is already installed and you are upgrading to a newer version,
follow the VMSINSTAL procedure that begins on the next page.
Note: Do not use the auto-install procedure for upgrades. To change the SNA
configuration, enter the information manually as described in the section
Installing CA-XCOM Manually.
The CA-XCOM for OpenVMS Alpha Installation Checklist
Before starting the installation procedure, read and complete the checklist below.
Pre-installation Checklist (All Users)
Comment/Sample Response
n
Ensure availability of disk space.
Requires 2500 blocks of disk space
n
Pick directory name for CA-XCOM
(use default if possible).
The default directory is
SYS$SYSDEVICE:[XCOMV3]
n
Decide whether to install
help.modules in system-wide HELP
library
YES is the recommended value
Decide whether XCOM is to be a
system-wide command.
YES is the recommended value
n
Installing CA-XCOM for OpenVMS Alpha
2–3
Installing the CA-XCOM for OpenVMS Alpha Software
Installing the CA-XCOM for OpenVMS Alpha Software
To load the CA-XCOM software on an OpenVMS AXP system, use the
VMSINSTAL procedure. In addition to loading the software, VMSINSTAL
installs CA-XCOM as a system-wide command and inserts CA-XCOM help text
in the system help files.
It is possible to use VMSINSTAL to install CA-XCOM while DECnet SNA and
other processes are active. However, if an active process is using a previously
installed version of CA-XCOM, that process might interfere with the CA-XCOM
installation and should be discontinued.
For more information on VMSINSTAL, see your VMS documentation.
Tip: To abort the installation procedure, press CTRL + Y. This deletes
all files created during the installation procedure and displays the DCL
prompt. To retry the installation, run VMSINSTAL again.
Accessing the System
Before starting the VMSINSTAL procedure, log on to a fully privileged system
manager's account on the OpenVMS computer where CA-XCOM is to be
installed. Confirm the following:
n
The distribution volume is mounted on the device.
n
The device is software enabled or set online.
Then, follow the installation procedure appropriate to your system to install the
software.
Installing CA-XCOM for OpenVMS Alpha Using VMSINSTAL
The instructions in this section describe how to use VMSINSTAL to install
CA-XCOM software from a 4-mm DAT tape. Your installation sequence may
differ slightly from the steps below.
1.
At the $ prompt, type the following command and press Enter:
@SYS$UPDATE:VMSINSTAL XCOM MUA0:
Result: The system asks whether you are satisfied with your system disk
backup.
2–4
CA-XCOM for OpenVMS Alpha Installation and User Guide
Installing the CA-XCOM for OpenVMS Alpha Software
2.
If you are satisfied with the backup, press Enter.
Result: The system prompts you to mount the CA-XCOM OpenVMS tape.
3.
Mount the tape and press Enter.
Result: The system asks whether you are ready to continue the installation.
4.
To continue, type Y and press Enter.
Result: The system displays the name of the tape drive where the disk is
mounted, begins the installation, and displays the default directory where
the files will be installed.
5.
To install CA-XCOM in the default directory, press Enter, or type the disk
and directory name where you want to install CA-XCOM and press Enter.
Result: A message confirms that the directory was created and asks whether
you want to purge the files that were replaced during the upgrade.
6.
To delete the old CA-XCOM files, press Enter. Or, to save these files, type N
and press Enter.
Note: If you are installing CA-XCOM for the first time, press Enter.
Result: A prompt asks whether you want to install the online help text.
7.
To install the online help in the system-wide help library
SYS$HELP:HELPLIB.HLB, press Enter.
If you don't want to install online help, type N and press Enter.
Result: A prompt asks whether you want a system-wide CA-XCOM DCL
command.
8.
To add the CA-XCOM DCL command to SYS$LIBRARY:DCLTABLES.EXE,
press Enter.
If you don't want to add this command, type N and press Enter.
Result: The installation continues until the following prompt is displayed:
Installation of CA-XCOM V3.0 completed at 23:53
VMSINSTAL procedure done at 23:53
Note: If you selected YES for online help text and the system-wide CA-XCOM
command, the SYS$HELP:HELPLIB.HLB and SYS$LIBRARY:DCLTABLES.EXE
files have been updated to include this information. After you have configured
your network to work with CA-XCOM as described in the next section, you must
reboot your system to allow the new settings to take effect.
Installing CA-XCOM for OpenVMS Alpha
2–5
Installing the CA-XCOM for OpenVMS Alpha Software
Installing CA-XCOM for OpenVMS Alpha From a CD
CA-XCOM is supplied on an ISO 9660 format CD. To install from a CD, copy file
XCOM030.A to a temporary directory. Alter the header with the following
command:
$ SET FILE/ATTRIB=(ORG:SEQ,RFM:FIX,LRL:32256,MRS:32256)
XCOM030.A
Run the install specifying the location of file XCOM030.A. When the installation
is complete, delete the xcom030.a file.
Example
$
$
$
$
$
MOUNT DKA400 /MEDIA=CDROM /OVERRIDE=ID
COPY DKA400:[000000]XCOM030.A []
DISMOUNT DKA400
SET FILE/ATTRIB=(LRL:32256) XCOM030.A
SYS$UPDATE:VMSINSTAL XCOM SYS$SYSDEVICE:[USERA]
Sample Installation Log
Welcome to OpenVMS AXP (TM) Operating System, Version V6.1
Username: SYSTEM
Password:
Welcome to OpenVMS AXP (TM) Operating System, Version V6.1 on node YEW
Last interactive login on Monday, 13-FEB-1998 16:01:03.37
Last non-interactive login on Friday, 10-FEB-1998 14:08:14.45
OpenVMS AXP Software Product Installation Procedure V6.1
It is 13-FEB-1995 at 16:36.
Enter a question mark (?) at any time for help.
%VMSINSTAL-W-ACTIVE, The following processes are still active:
DECW$TE_0182
_FTA38:
DECW$SERVER_0
_FTA42:
* Do you want to continue anyway [NO]? yes
* Are you satisfied with the backup of your system disk [YES]?
Please mount the first volume of the set on
MKA0:.
* Are you ready? yes
%MOUNT-I-MOUNTED, XCOM02 mounted on _YEW$MKA0:
The following products will be processed:
XCOM V3.0
Beginning installation of XCOM T3.0 at 16:36
%VMSINSTAL-I-RESTORE, Restoring product save set A ...
%VMSINSTAL-I-RELMOVED, Product's release notes have been moved to SYS$HELP.
2–6
CA-XCOM for OpenVMS Alpha Installation and User Guide
Installing the CA-XCOM for OpenVMS Alpha Software
VMS CA-XCOM V3.3-0 Installation proceeding...
This procedure will create a directory for all XCOM files.|. The default directory
used will be YEW$DKA200:[XCOMV3]. You may Enter an alternative. If the directory
does not exist it will be created.
* XCOM directory [YEW$DKA200:[XCOMV3]]: YEW$DKA200:[BETA]
%VMSINSTAL-I-SYSDIR, This product creates system disk directory
YEW$DKA200:[BETA].
%CREATE-I-EXISTS, YEW$DKA200:[BETA] already exists
* Do you want to purge files replaced by this installation [YES]?
The 'XCOM' online help text can be added to the system wide help
library
'SYS$HELP:HELPLIB.HLB'. After this installation it can be viewed by just typing
"help xcom". If the 'XCOM' help text is not added to the system-wide help library
then the DCL command:
"$ HELP/LIBRARY=XCOM$IMAGE:XCOMHELP"
must be executed to view the online help text
* Provide system-wide XCOM help? [Y]?
The 'XCOM' command is usually inserted into the DCL command tables
'SYS$LIBRARY:DCLTABLES.EXE". After the system is rebooted 'XCOM' will become
another DCL command. If the 'XCOM'|command is not inserted into the tables then the
DCL command:
"$ SET COMMAND XCOM$IMAGE:XCOM"
must be executed prior to using the 'XCOM' command.
* Provide system-wide XCOM DCL command? [Y]?
%XCOM-I-DONEASK, No further questions will be asked.
%XCOM-I-HLPLIBMOD, XCOM help topic added to SYS$HELP:HELPLIB.HLB%XCOM-I-DCLTBLMOD,
XCOM command added to DCLTABLES.EXE
%XCOM-I-REBOOT, Please reboot your system after the installation procedure is
finished!
%XCOM-I-XCOMSTRTUP, Building XCOM$STARTUP.COM.
1. This installation of CA-XCOM V3.0-0 is about to complete.
Please be sure to read the release notes in:
SYS$HELP:XCOMV30.RELEASE_NOTES
2. To start using this new release execute the XCOM startup file, located in the
XCOM installation directory:
XCOM$STARTUP.COM
You may want to add a call to this command procedure in your
SYS$MANAGER:SYSTARTUP_VMS.COM so that XCOM is automatically setup for usage
whenever your system is rebooted.
3. The present XCOM V3.0 configurator is NOT compatible with the V1.5 configuration
file. An empty V3.0 configuration file is provided by this installation procedure.
You can use the configurator to add XCOM node definitions to this file.
%VMSINSTAL-I-MOVEFILES, Files will now be moved to their target directories...
Installation of XCOM T3.0 completed at 16:37
Adding history entry in VMI$ROOT:[SYSUPD]VMSINSTAL.HISTORY
Creating installation data file: VMI$ROOT:[SYSUPD]XCOM024.VMI_DATA
VMSINSTAL procedure done at 16:38
Installing CA-XCOM for OpenVMS Alpha
2–7
Installing the CA-XCOM for OpenVMS Alpha Software
$ lo
SYSTEM
logged out at 13-FEB-1995 16:38:17.52
Post-Installation Cleanup
If you are using the VMSINSTAL procedure to upgrade an existing version of
CA-XCOM, the following files are created during the update to supersede the
ones from the previous version:
n
n
n
n
n
SYS$COMMON:[SYSLIB]XCOMAPI.EXE
SYS$COMMON:[SYSLIB]XCOMTRATBL.EXE
SYS$COMMON:[SYSMSG]XCOMMSG.EXE
SYS$COMMON:[SYSEXE]XCOMPRTSMB.EXE
SYS$COMMON:[SYSEXE]XCOMCKPSVR.EXE
To ensure that old files are no longer in the system, check the root directory for
the following files and delete any that you find:
n
n
n
n
n
SYS$SYSROOT:[SYSLIB]XCOMAPI.EXE
SYS$SYSROOT:[SYSLIB]XCOMTRATBL.EXE
SYS$SYSROOT:[SYSMSG]XCOMMSG.EXE
SYS$SYSROOT:[SYSEXE]XCOMPRTSMB.EXE
SYS$SYSROOT:[SYSEXE]XCOMCKPSVR.EXE
Adding CA-XCOM for Open VMS Alpha to SystemStartup
When you install the CA-XCOM software, a file called XCOM$STARTUP is
created in the CA-XCOM directory. This file defines the logical names
XCOM$IMAGE and XCOM_CONFIG_FILE.
n
n
The XCOM$IMAGE file specifies which directory contains the CA-XCOM
executable images.
The XCOM_CONFIG_FILE file defines CA-XCOM 's default configuration
file XCOMV30.CFG.
Both of these logical names must be defined to issue local CA-XCOM requests.
The XCOM$STARTUP file also creates the XCOM$RECOVER queue and starts
the print queues used by CA-XCOM. EXCOMACP.COM is executed by
XCOM$STARTUP to start the process(es) for remotely initiated transfers.
2–8
CA-XCOM for OpenVMS Alpha Installation and User Guide
Configuring SNA Network Resources Using Auto-Install
Configuring SNA Network Resources Using Auto-Install
Note: The Auto-Install feature is valid for SNA configurations only.
If you are installing CA-XCOM for the first time, you can use the auto-install
procedure described in this section to configure your SNA resources to run
CA-XCOM. If you don't want to use the auto-install feature, or if you are
upgrading an existing CA-XCOM configuration, you can configure the network
manually as described later in this chapter.
The checklist below identifies the information you will need to configure your
SNA resources:
Site-Dependent Checklist (First Time User)
Sample Response
❏
DECnet name of SNA Gateway (if used)
0 (No Gateway)
❏
Circuit name connecting to IBM mainframe
(found in SNA configuration file)
SNA-0
❏
Session number(s) used by IBM mainframe to
initiate requests as defined in VTAM (local addr)
5,7
❏
Session number(s) used by VMS to initiate
requests as defined in VTAM (local addr)
6,8
❏
XCOM LOGMODE name as specified in VTAM
Logon Mode Table for the remote system
XCOMMODE
❏
APPLID defined for the remote system as
specified in VTAM
XCOMAPPL
❏
Symbolic name used in reference to the remote
IBM system
BIGBLU
❏
Default local username to be used by remote
users of CA-XCOM (can be provided via DECnet
proxy accounts and/or by the chosen default
account name and password)
Installing CA-XCOM for OpenVMS Alpha
2–9
Configuring SNA Network Resources Using Auto-Install
About the Auto-Install Feature
The automatic installation procedure for configuring your network is called
XCOM_INSTALL_PART_2.COM. This procedure is intended for new
CA-XCOM installations. It is not necessary for upgrades.
XCOM_INSTALL_PART_2.COM does the following:
n
n
n
Creates a file SYS$MANAGER:XCOMDEFINE.TXT that will contain the
ACCESS NAMES that have been defined for locally and remotely initiated
requests. You must edit the text in this file and then add it to the SNA
configuration file located on either the load node or the OpenVMS itself.
Runs XCOM$IMAGE:XCOMCFG to add the SYSTEM NAMES and their
configuration settings for the remote systems with which you will
communicate for locally initiated transfers.
Edits the XCOM$IMAGE:EXCOMACP.COM file to add entries for the
ACCESS NAMES you will use for receiving remotely initiated requests.
Note: Before you begin the auto-install procedure, make sure that the
XCOM$IMAGE logical name defines the CA-XCOM installation directory.
Using Auto-Install
To run auto-install in your SNA configuration, follow the steps below. Because of
hardware and software variations at your site, your installation sequence may
differ slightly. This installation sequence is for loading a gateway from the local
node.
1.
At the DCL $ prompt, type the following :
@xcom$image:xcom_install_part_2
Result: The system displays a description of the auto-install procedure.
2.
Press Enter to continue.
Result: The system displays the questions you will need to answer to
complete the installation. Make sure you have this information available on
your configuration worksheet before continuing the installation.
3.
After reading the questions, press Enter to continue.
Result: The system asks for the gateway name.
4.
2–10
To accept the default name, press Enter, or type the gateway node name
specified on your worksheet and press Enter.
CA-XCOM for OpenVMS Alpha Installation and User Guide
Configuring SNA Network Resources Using Auto-Install
Result: The system asks you to verify the name.
5.
To verify the gateway name, press Enter.
Result: The system asks which circuit connects your gateway to IBM.
6.
To accept the default circuit, press Enter, or type another circuit and press
Enter.
Result: The system asks you to verify the circuit.
7.
To verify the circuit value, press Enter.
Result: The system asks which session number IBM will use to initiate
requests to the OpenVMS.
8.
Type the session number (from your configuration worksheet) and press
Enter.
Result: The system asks you to verify the session number.
9.
To verify the session number, press Enter.
Result: The system asks which session number the OpenVMS will use to
initiate a CA-XCOM request.
10. Type a session number and press Enter. Repeat this step to enter as many
session numbers as you want to use.
After entering all the numbers, press Enter to continue to the next step.
Result: The system asks you to verify the session number(s).
11. To verify the session number(s), press Enter.
Result: The system asks for the logon mode name for the sessions you just
defined.
12. Press Enter to accept the default mode name, or type another mode name
and press Enter.
Result: The system asks you to verify the mode name.
13. To verify the mode name, press Enter.
Result: The system asks for the application name for the sessions you
defined.
Installing CA-XCOM for OpenVMS Alpha
2–11
Configuring SNA Network Resources Using Auto-Install
14. Press Enter to accept the default application name, or type another name and
press Enter.
Result: The system asks you to verify the application name.
15. To verify the application name, press Enter.
Result: The system asks which name you want to use for the IBM
mainframe.
16. Press Enter to accept the default system name, or type another name (up to 8
alphanumeric characters) and press Enter.
Result: The system asks you to verify the system name.
17. To verify the system name, press Enter.
Result: The system asks if you want to continue.
18. To continue with the installation procedure, press Enter.
Result: The system completes the installation and displays the network
configuration that you entered, which may look something like this:
CA-XCOM is configured as follows:
Remote system BIGBLU gateway: VMS/SNA
Gateway access name: XCOMLOC
Line speed: 0 bits per second
Connection type: directly connected
System Type: IBM MAINFRAME, E.G. MVS MAINFRAME
Character set: EBCDIC
Description: ADJACENT NODE.
Finished!
19. Press Enter to continue.
Result: The system displays a series of configuration reminders, including
instructions to reboot the system before using CA-XCOM.
20. Instead of rebooting the system, issue the following command:
@<install-dir>:xcom$startup
When the $ prompt appears, you are ready to continue to the next step, defining
the system-wide DCL command.
2–12
CA-XCOM for OpenVMS Alpha Installation and User Guide
Configuring SNA Network Resources Using Auto-Install
Installing CA-XCOM for OpenVMS Alpha Manually
Note: For DECnet SNA, you must use the manual installation procedure.
You must add ACCESS NAMES for the LUs you want to use for CA-XCOM.
Different LUs must be used for locally and remotely initiated requests. For the
ACCESS NAMES that you add, the SESSION or LU LIST must be the LOCADDR
defined in VTAM, the APPLID must be the name of the mainframe XCOM
APPLID, and LOGON must be the name of the mode defined in VTAM.
If you are already familiar with the CA-XCOM installation procedure, you can
configure the SNA services manually as described below:
1.
Run XCOM$IMAGE:XCOMCFG to add the REMOTE SYSTEM NAME
associated with the SNA ACCESS NAME or TCP/IP information for the LUs
that you have designated for locally initiated transfers.
For more information on running XCOM$IMAGE:XCOMCFG, see the chapter
"Configuring CA-XCOM".
2.
For SNA configurations, edit the XCOM$IMAGE:EXCOMACP.COM file to
add the ACCESS NAMES you will use for receiving remote requests. For
more information, see the chapter "Configuring CA-XCOM".
To configure DEC TCP/IP Services, execute command procedure
SETUP_XCOM_TCPIP.COM.
3.
Configure the DECnet SNA by editing your SNA configuration file. For a
sample SNA configuration, see the chapter "Configuring CA-XCOM". The
filename and command syntax will vary, depending on the version and type
of DEC SNA you are running.
4.
To start CA-XCOM automatically when you boot the system, include the
DCL command
@<install-dir>:XCOM$STARTUP
in the system startup command procedure
SYS$MANAGER:SYSTARTUP_VMS.COM
5.
Create and start the checkpoint queue as described in the "Options and
Controls" chapter.
6.
Create and start CA-XCOM print queues as described in the "Remote
Spooling (XQUE)" chapter.
Installing CA-XCOM for OpenVMS Alpha
2–13
Configuring SNA Network Resources Using Auto-Install
Defining the System-wide "CA-XCOM" DCL Command
If desired, you can insert the CA-XCOM command in the DCL command tables
to define it as a system-wide command.
At the DCL prompt, type the following:
$ SET COMMAND/TABLE=SYS$LIBRARY:DCLTABLES.EXE/OUTPUT= SYS$LIBRARY:- _$
DCLTABLES.EXE XCOM$IMAGE:XCOM.CLD
where the initial "$" and "_$" are DCL prompts.
This command definition permanently defines the CA-XCOM command in the
DCL tables. To ensure that the new command takes effect immediately for all
users on the system, you should reboot the VMS system. If the system is not
rebooted, users cannot access the command until they log out and log back into
the system.
Inserting "CA-XCOM"Help Text in the System-wide Help Library
If desired, you can update the system-wide help library to include the
CA-XCOM help text.
At the DCL prompt, type the following:
$ LIBRARY/HELP/REPLACE SYS$HELP:HELPLIB.HLB XCOM$IMAGE: XCOMHELP.HLP
where the initial "$" is the DCL prompt.
The CA-XCOM for OpenVMS Alpha Files
EXCOMACP.CLD
Command Language Definition file for the program EXCOMACP.EXE (see
below).
EXCOMACP.EXE
Program used to create the XCOMACP.
EXCOMACP.COM
Command procedure used to start the EXCOMACP image.
SETUP_XCOM_TCPIP.COM
Command procedure used to configure DEC TCP/IP Services.
STOP_XCOMACP.COM
Command procedure to stop the XCOMACP.
XCOM.CLD
Command Language Definition file for all user CA-XCOM commands.
XCOMV30.FDL
File Definition Language file for the CA-XCOM Version 3.0.0 Configuration
File.
XCOMnn.RELEASE_NOTES
Contains release notes for this version of CA-XCOM. “nn” is the release number.
2–14
CA-XCOM for OpenVMS Alpha Installation and User Guide
Configuring SNA Network Resources Using Auto-Install
XCOM62F.EXE
Handles user commands for locally initiated CA-XCOM transfers from the DCL
/SENDFILE command procedure.
XCOM62G.EXE
Handles user commands for locally initiated CA-XCOM transfers from the DCL
/GETFILE command procedure.
XCOM62J.EXE
Handles user commands for locally initiated CA-XCOM transfers from the DCL
/SUBMIT command procedure.
XCOM62M.EXE
Handles user commands for locally initiated CA-XCOM transfers from the Menu
Interface.
XCOM62R.EXE
Handles user commands for locally initiated CA-XCOM transfers from the DCL
/PRINT command procedure.
XCOMACP.EXE
Contains the image which handles all remotely initiated requests.
XCOMCFG.EXE
Contains a utility program used to maintain the CA-XCOM Configuration File.
XCOMIP.CLD
Command Language Definition file for the program XCOMIP.EXE.
XCOMIP.COM
Command procedure used to start the XCOMIP image.
XCOMIP.EXE
Program that handles TCP/IP transfers initiated by another system (CA-XCOM
partner).
XCOMPRTSMB.EXE
Contains the CA-XCOM print symbiont (XQUE).
XCOM_HELP*.*
Contains the CA-XCOM help libraries and modules.
Installing CA-XCOM for OpenVMS Alpha
2–15
Chapter
3
Configuring the Network
This chapter covers the second part of the installation and configuration process,
configuring the network's resources to run CA-XCOM.
CA-XCOM uses DIGITAL TCP/IP Services for TCP/IP transfers.
CA-XCOM uses DEC's APPC software to provide LU 6.2 services. This chapter
contains step-by-step instructions for configuring the appropriate APPC to run
CA-XCOM.
Before configuring the SNA resources, consult a systems programmer or
network administrator to obtain the configuration information for your network.
Defining DECnet SNA Connections
The DECnet SNA configuration file defines the SNA connections.
The worksheet shown next lists the information you will need to configure the
SNA connection. Use it as a guide in the configuration process.
Configuring the Network
3–1
Configuring DECnet SNA for CA-XCOM for OpenVMS Alpha Transfers
Required Information
Sample Response
Circuit name used by the SNA
product
SNA-0 or LC-0
Session number used by the IBM
mainframe to initiate requests to VMS
(the LOCADDR value in the IBM
NCP generation)
1
Range of session numbers used by
OpenVMS to initiate requests to the
IBM mainframe
2,4
Mode name (the LOGMODE value in
the IBM NCP generation)
XCOMMODE
VTAM Application name
XCOMAPPL
User Response
DECnet name of SNA/GATEWAY (if
used)
Access name(s) (also required by the
CA-XCOM Configurator, in reference
to the session number(s) previously
chosen)
XCOMLOC
Configuring DECnet SNA for CA-XCOM for OpenVMS Alpha
Transfers
As part of the CA-XCOM configuration procedure, you must add access names
(LUs) for both local and remotely initiated transfers and insert these names into
the SNA Configuration file.
If you installed CA-XCOM using the auto-install procedure described in
Chapter 2, the LUs have been generated for you already. All you have to do is
insert them into the SNA configuration file.
If you did not use auto-install and are configuring the SNA manually, use the
DECnet SNA or VMS/SNA SNANCP utility and the SET ACCESS command to
define LUs for locally and remotely initiated transfers.
3–2
CA-XCOM for OpenVMS Alpha Installation and User Guide
Configuring DECnet SNA for CA-XCOM for OpenVMS Alpha Transfers
$++++++++ XCOM ACCESS NAME DEFINITIONS +++++++++++++++++++++++++++++++++++
SET ACCESS NAME XCOMRMTLU LIST 1 APPLICATION XCOMGA LOGON XCOMMODE PU SNA-0
!
SET ACCESS NAME XCOMLOC LU LIST 2 APPLICATION XCOMGA LOGON XCOMMODE PU SNA-0
Figure 3-1: CA-XCOM Set Access Definitions
Figure 3-1 shows the CA-XCOM LU definitions that the automatic installation
procedure generates.
CA-XCOM ACCESS NAME Definitions
ACCESS NAME
Enter a name (up to eight alphanumeric characters) you want to assign to an LU
or a range of LUs.
For an LU assigned to local transfers, the name must match the access name in
the CA-XCOM Configuration file XCOMV30.CFG. For an LU assigned to
remotely initiated transfers, the access name must match the access name entered
in the EXCOMACP.COM command file. This file starts an XCOMACP process
for each LU that handles remotely initiated transfers.
The default access name for the LU assigned to local transfers is XCOMLOC. The
default access name for the LU assigned to remote transfers is XCOMRMT.
LU LIST
Enter the session number(s) the IBM mainframe uses to initiate requests to the
OpenVMS (the LOCADDR value in the IBM NCP generation).
If the access name indicates that an LU is assigned to remotely initiated transfers
(XCOMRMT in the above example), then you have to specify only a single LU. If
the access name indicates that an LU is assigned to local transfers (XCOMLOC in
the above example), enter the session number(s) that the OpenVMS uses to
initiate requests to the IBM mainframe.
Configuring the Network
3–3
Configuring DECnet SNA for CA-XCOM for OpenVMS Alpha Transfers
PU SNA
Enter the PU that corresponds to either the Gateway node name or to the
VMS/SNA PU identification that will match the appropriate entry in the
XCOMCFG file.
APPLICATION
Enter the name (up to 8 characters) of the CA-XCOM mainframe application that
you want to access.
Example
XCOMAPPLID
LOGON
Enter XCOM's logon mode table entry (this corresponds to the LOGMOD value
in the IBM NCP generation). The default is XCOMMODE.
The SNA Configuration File
Below is an SNA configuration file, with the access names defined for
CA-XCOM transfers inserted at the end of the file.
VMS/SNA Version 2.X uses the following startup configuration file:
SYS$COMMON:[SNAVMS$]SNAVMS$CFG_node-name.COM.
DECnet SNA Version 2.X uses the following startup configuration file:
SYS$COMMON:[SNA$CSV]SNAGATEWAY_gateway-node-name_SNA.COM.
3–4
CA-XCOM for OpenVMS Alpha Installation and User Guide
Configuring DECnet SNA for CA-XCOM for OpenVMS Alpha Transfers
$! VMS/SNA configuration file. If the first character on a line is an
$! Exclamation point, the line is regarded as a comment. If the last
$! character on a command line is a hyphen, the command continues on
$! The next line.
$!
$RUN SYS$SYSTEM:SNANCP
!
!Set the state of the lines and circuits off.
!
SET KNOWN CIRCUITS STATE OFF
SET KNOWN LINES STATE OFF
!
Clear all lines, circuits, and PUs.
!
CLEAR KNOWN PUs ALL
CLEAR KNOWN CIRCUITS ALL
CLEAR KNOWN LINES ALL
Set the communications line parameters:
! SET LINE line-id
{DPV|DSV|DMB|DST|DSB|DSH}
!
BUFFER [SIZE] number
{frame size, in decimal between 265-1482}
!
DUPLEX keyword
{HALF|FULL}
!
LOGGING [ENABLED]keyword
{ALL|INFORMATIONAL|WARNING|ERROR|FATAL}
!
NOTE [“]string[“]
{0 to 30 characters}
!
PROTOCOL keyword
{SDLC TRIBUTARY|SDLC POINT}
!
RECEIVE [BUFFERS] number
{in decimal between 16-512}
!
SIGNALLING keyword
{NORMAL|NRZI}
STATE keyword
{ON|OFF}
SET LINE DPV-0BUFFER SIZW 521DUPLEX HALFLOGGING ENABLED ALLNOTE UHAO:PROTOCOL SDLC POINTRECEIVE BUFFERS 32SIGNALLING NORMALSTATE OFF
!
! Set the SDLC circuit parameters
! SET CIRCUIT CIRCUIT-ID
{SDLC-N}
Configuring the Network
3–5
Configuring DECnet SNA for CA-XCOM for OpenVMS Alpha Transfers
!
COUNTER [TIMER] value
(0 TO 65535 seconds)
!
DUPLEX keyword
{HALF|FULL}
!
IDLE [TIMER] value
(15 to 1800 seconds)
!
LINE line-id
{from SET LINE command}
!
LOGGING [ENABLED} keyword {ALL|INFORMATIONAL|WARNING|ERROR}
!
NOTE [“]string[“]
(0 to 30 characters)
!
STATE keyword
{ON|OFF}
!
STATION ADDRESS address (2 digit hex number)
!
STATION ID value
(8 digit hex XID value)
!
SET CIRCUIT SDLC-0 COUNTER TIMER 0 DUPLEX HALF IDLE TIMER 30 LINE DPV-0 LOGGING ENABLED ALL STATION ADDRESS C1 STATION ID 05000FFF STATE OFF
!
! Set the Physical Unit (PU) parameters.
!
! SET PU pu-id
{SNA-n}
!
CIRCUIT circuit-id
{SDLC-n|QLLC-n}
!
LOGGING [ENABLED] keyword {ALL|INFORMATIONAL|WARNING|ERROR}
!
LU [LIST] values
(numbers of ranges, separated by commas)
!
SEGMENT [SIZE] value
(segment size, in decimal)
!
SET PU SNA-0 CIRCUIT SDLC-0 LOGGINH ENABLED ALL LU LIST 1-64 SEGMENT SIZE 521
!
SET KNOWN LINES STATE ON
SET KNOWN CIRCUITS STATE ON
!
! Set access names and their parameters:
!
! SET ACCESS [NAME] name
(1 to 16 alphanumeric characters)
!
PU physical_unit
{SNA-n}
!
LU [LIST] address(es)
(numbers or ranges, separated by commas)
$! VMS/SNA configuration file. If the first character on a line is an
$! exclamation point, the line is regarded as a comment. If the last
$! character on a command line is a hyphen, the command continues on
$! the next line.
$!
$RUN SYS$SYSTEM:SNANCP
!
!Set the state of the lines and circuits off.
!
SET KNOWN CIRCUITS STATE OFF
SET KNOWN LINES STATE OFF
!
Clear all lines, circuits, and PUs.
!
CLEAR KNOWN PUs ALL
CLEAR KNOWN CIRCUITS ALL
CLEAR KNOWN LINES ALL
Set the communications line parameters:
! SET LINE line-id
{DPV|DSV|DMB|DST|DSB|DSH}
Figure 3-2: Sample SNA Configuration File
3–6
CA-XCOM for OpenVMS Alpha Installation and User Guide
Configuring DIGITAL TCP/IP Services for CA-XCOM for OpenVMS Alpha Transfers
Configuring DIGITAL TCP/IP Services for CA-XCOM for
OpenVMS Alpha Transfers
TCP/IP must be configured to receive incoming transfers. TCP/IP is called
"UCX" on some VMS systems.
Configuring UCX
To configure UCX :
1. Ensure logical XCOM$IMAGE is defined.
2. Run command file "setup_xcom_tcpip.com"
The port is set to 8044. If a different port is required, edit the
setup_xcom_tcpip.com file and change port parameter.
To verify the UCX setup, type the command:
UCX SHOW SERVICE/FULL XCOM
Output should be similar to that shown below.
Service: XCOM
Port:
Inactivity:
UXS
Limit:
8044
5
2
State:
Enabled
Protocol: TCP
User_name: SYSTEM
Address:
Process:
Active:
Peak:
File:
Flags:
XCOM$IMAGE:XCOMIP.COM
Listen Multi
Socket Opts:
Receive:
Rcheck Scheck
0
Send:
Log Opts:
File:
None
not defined
0
0.0.0.0
XCOMIP_UCX_AUXS
1
0
Security
Reject msg: not defined
Accept host: 0.0.0.0
Accept netw: 0.0.0.0
The UCX service waits for incoming activity on the relevant port. When there is
an incoming transfer on the port the command procedure XCOMIP.COM is
started. XCOMIP.EXE then runs and processes the transfer.
Configuring the Network
3–7
Configuring DIGITAL TCP/IP Services for CA-XCOM for OpenVMS Alpha Transfers
Providing a Trace
CA-XCOM technical support may request a trace. Tracing is turned on by
editing file XCOMIP.COM and changing command "$ xcomip" to
"$xcomip/trace".
3–8
CA-XCOM for OpenVMS Alpha Installation and User Guide
Chapter
4
Configuring CA-XCOM for
OpenVMS Alpha
After installing the CA-XCOM software and configuring the SNA resources, you
can customize CA-XCOM's communications configuration to handle your
particular transfer requirements.
This chapter explains how to configure the following CA-XCOM files:
Filename
Transfer type
Node
XCOMCFG.EXE
Locally initiated
DECnet SNA
EXCOMACP.COM
Remotely initiated
DECnet SNA
Configuring the Local Request Handler (XCOMV30.CFG)
This section describes the CA-XCOM Configuration File and the XCOMCFG.EXE
utility that lets you modify the file.
The CA-XCOM Configuration File XCOMV30.CFG
XCOMV30.CFG maintains a list of entries, each of which defines the connection
to a specific remote system. Each entry includes the following information:
n
n
n
n
n
n
Remote system name
Local LU name
Remote LU name
Mode name
Code type
Operating system type
XCOMV30.CFG is located in the XCOM$IMAGE directory. You must define the
logical name XCOM_CONFIG_FILE to point to XCOMV30.CFG.
To change the configuration file settings, use the XCOMCFG.EXE utility in the
XCOM$IMAGE directory. For more information about XCOMCFG.EXE, see the
next section.
Configuring CA-XCOM for OpenVMS Alpha
4–1
Configuring the Local Request Handler (XCOMV30.CFG)
Once XCOMV30.CFG has been configured, you can request a specific transfer by
entering a remote system name on the command line or in the menu interface.
CA-XCOM then obtains the configuration information for the specified remote
system from the configuration file.
The CA-XCOM for OpenVMS Alpha Configuration Utility XCOMCFG.EXE
XCOMCFG.EXE is the CA-XCOM configuration utility that lets you modify
XCOMV30.CFG to define access to remote systems. After a CA-XCOM remote
node is defined, local users on your system can send and receive data to and
from this node.
Note: The configuration file is referred to by the logical name
XCOM_CONFIG_FILE. The actual filename is XCOM$IMAGE:XCOMV30.CFG.
XCOMCFG.EXE uses the following commands:
n
n
n
n
n
ADD
DELETE
LIST
HELP
EXIT
More information about these commands and their associated parameters
appears later in the chapter.
Running XCOMCFG.EXE
There are two ways to invoke XCOMCFG.EXE:
n
n
From the command line.
From within a DCL command procedure.
Invoking XCOMCFG.EXE From the Command Line
1.
Use the DCL command to display the XCOMCFG> prompt.
2.
Invoke the ADD command.
Result: The system prompts you for the necessary information as shown in
the examples below. The transfer protocol you select determines which
prompts are displayed and which defaults are used.
4–2
CA-XCOM for OpenVMS Alpha Installation and User Guide
Configuring the Local Request Handler (XCOMV30.CFG)
$ run xcom$image:xcomcfg.exe
XCOMCFG> add
_HOSTNAME: tso44
Operating system? [UNKNOWN] :mvs
Protocol? [SNA] :
Gateway node name? ('0' for VMS/SNA) [0] :gcgw02
Access name? [] :xcom57
Is the system directly connected? [Y] :y
Character set, EBCDIC or ASCII? [EBCDIC] :
Description? [] :IBM Mainframe
Record added!
To make an entry for
a system using SNA:
XCOMCFG> add
_HOSTNAME: tso44
Operating system? [UNKNOWN] :mvs
Protocol? [SNA] :
Gateway node name? ('0' for VMS/SNA) [0] :gcgw02
Access name? [] :xcom60
Is the system directly connected? [Y] :n
Link logical unit (LU) name? [] :LU102
Character set, EBCDIC or ASCII? [EBCDIC] :
Description? [] :Texas mainframe
Record added!
XCOMCFG> add
_HOSTNAME: usausu00
Operating system? [UNKNOWN] :unix
Protocol? [SNA] : tcpip
TCP/IP Port number? [8044] :
Is the system directly connected? [Y] :y
Character set, EBCDIC or ASCII? [ASCII] :
Description? [] :FreeBSD 2.2.5
Record added!
To make an entry for a
system using TCP/IP:
3.
When you are finished, press CTRL + Z or use the exit command to exit
XCOMCFG.EXE.
The XCOMCFG.EXE Commands and Qualifiers
This section describes the five XCOMCFG.EXE commands and their qualifiers.
The ADD Command
The ADD command defines and adds the remote system to the CA-XCOM
network of accessible computers. CA-XCOM associates this symbolic name of the
remote system with the attributes defined by the ADD command.
CA-XCOM users should specify this symbolic name when referring to this
system.
There are two formats available for defining the remote systems (TCP/IP and
SNA, as previously described).
Configuring CA-XCOM for OpenVMS Alpha
4–3
Configuring the Local Request Handler (XCOMV30.CFG)
"Hostname" is a symbolic name (up to 254 characters) used by CA-XCOM file
transfer commands to identify the remote partner.
Note: When you configure these parameters, make sure the settings match those
on the remote system.
ADD Command Fields and Descriptions
The ADD command will prompt for various fields. The fields and their
descriptions are described next.
Access name
An up to 16 character access name defined in the VMS/SNA or SNA Gateway
installation procedure. For directly connected systems, this is simply the access
name for 'hostname'. For indirectly connected systems, this is the access name
defined for the system that 'hostname' is connected to. Access names are defined
further by the VMS/SNA or SNA Gateway installation procedures. See the
appropriate DEC documentation.
Character set,
EBCDIC or ASCII
Specifies 'hostname' is an ASCII or EBCDIC system.
Description
A character string used to describe remote system 'hostname'.
Gateway node
name
For SNA transfers, specify the gateway to be used.
HOSTNAME
An up to 14 character name that will be used in all XCOM software to refer to the
defined system.
Is the system directly
connected
Specify ‘Y’ for direct transfers, ‘N’ for indirect transfers.
Link logical unit (LU)
name
SNA:
For systems that are connected INDIRECTLY to the VAX, an up to 8 character
logical unit name used on the routing directlyconnected system to route
messages to 'hostname'. Since the IBM MVS mainframe is currently the only
system that can be connected directly to the VAX (an VMS/SNA and SNA
Gateway restriction), luname will be a logical unit name on the MVS mainframe
that the IBM system programmer defined to access 'hostname'.
TCPIP:
Enter the hostname of the system that will act as the intermediate node of an
indirect transfer.
4–4
CA-XCOM for OpenVMS Alpha Installation and User Guide
Configuring the Local Request Handler (XCOMV30.CFG)
Operating System
The Operating System of the remote system. The Options are :
MVS
VM
VMS
IBMPC
UNIX
AS400
SUN
UNKNOWN
Protocol
Specify TCP/IP or SNA transfer protocol.
TCP/IP Port number
For TCP/IP transfers, the port number to be used.
The DELETE Command
Deletes the remote system from the CA-XCOM network of accessible computers.
Format:
DELETE [hostname]
Hostname (up to 254 characters) is a symbolic name that refers to the defined
system. If you don't enter a name, all of the defined nodes are displayed.
The LIST Command
Displays one or all of the CA-XCOM computer systems and their defined
attributes.
Format:
LIST [hostname]
The HELP Command
Provides online help for all five XCOMCFG commands.
Configuring CA-XCOM for OpenVMS Alpha
4–5
Configuring the Local Request Handler (XCOMV30.CFG)
The EXIT Command
Terminates the execution of the XCOMCFG utility. You can also exit the
XCOMCFG utility by pressing CTRL + Z.
Direct and Indirect Connections to Remote Systems
A direct connection refers to an adjacently attached remote system. An indirect
connection refers to a remote system, or node, which can be reached via the IBM
mainframe to which it is attached.
A direct file transfer exchanges data with an adjacently attached remote system
or node. An indirect file transfer exchanges data with a remote system via an
adjacently attached IBM mainframe system which stores and then forwards the
data to the target node.
The Link logical unit (LU) qualifier of the ADD command is used to distinguish
between a directly and indirectly attached remote system. Figure 4-1 shows an
example of direct and indirect remote systems configuration.
4–6
CA-XCOM for OpenVMS Alpha Installation and User Guide
Configuring the Local Request Handler (XCOMV30.CFG)
$ run xcom$image:xcomcfg.exe
XCPMCFG> list
Remote system USAUSU00
Xcom Version 2
Transfer Protocol: TCP/IP
TCP/IP Port: 8044
Connection type: directly connected
System Type: Generic UNIX system
Character set: ASCII
Description: FREEBSD 2.2.5 IN AUSTIN
Remote system USAUSU01
Xcom Version 2
Transfer Protocol: TCP/IP
TCP/IP Port: 8044
Connection type: directly connected
System Type: Generic UNIX system
Character set: ASCII
Description: SOLARIS X86 IN AUSTIN
Remote system XCPS
Xcom Version 2
Transfer Protocol: SNA
Gateway name: GCGW02
Gateway access name: XCOM57
Connection type: directly connected
System Type: IBM MVS MAINFRAME
Character set: EBCDIC
Description: MVS
Remote system XCPS2
Xcom Version 2
Transfer Protocol: SNA
Gateway name: GCGW02
Gateway access name: XCOM58
Connection type: indirect via LU name: LU101
System Type: IBM MVS MAINFRAME
Character set: EBCDIC
Description: MVS in main office
XCOMCFG>
Figure 4-1: XCOMCFG List
Note that the output differs depending on the transfer protocol. For TCP/IP, the
port number is shown, but the gateway is not because it is not relevant. For
SNA, the gateway information is shown, but the port number is not because it is
not relevant.
Configuring CA-XCOM for OpenVMS Alpha
4–7
Configuring the CA-XCOM for OpenVMS Alpha Remote Request Handlers
Configuring the CA-XCOM for OpenVMS Alpha Remote
Request Handlers
For remote requests, you must configure one of the following files:
n
EXCOMACP.COM (for DECnet/SNA)
n
XCOMIP.COM (for TCP/IP)
Configuring EXCOMACP.COM
An ancillary control process exists for CA-XCOM which handles all remotely
initiated transfer requests. This is known as the XCOMACP process. Just as
your local VMS system can originate CA-XCOM file transfer requests with
remote CA-XCOM systems, any one of these remote systems can initiate a file
transfer with your local VMS system.
The XCOMACP process creation is initiated via a command procedure file
generated by the CA-XCOM installation procedures. This file is known as the
XCOM$IMAGE:EXCOMACP.COM file. Within this command procedure file is
the EXCOMACP command (containing many qualifiers) which initiates the
creation of the XCOMACP process. The major qualifiers are /DEFACCNT,
/DEFPSWRD, /NODE, /ACCESS, and /POLL.
In the EXCOMACP.COM file, create a separate entry for each remote LU with
which you want to establish a connection. These LUs are dedicated to remotely
initiated requests only. A process running XCOMACP.EXE will be created for
each entry.
Each process assumes the name of the access parameter name in the
EXCOMACP.COM entry. This naming convention facilitates associating each
XCOMACP process with the LU session it is conducting. A logfile is also created
for each process, in the following format:
XCOMACP_FOR_<access_name>_ON_<node>.log is
4–8
CA-XCOM for OpenVMS Alpha Installation and User Guide
Configuring the CA-XCOM for OpenVMS Alpha Remote Request Handlers
The following provides an example of the XCOM$IMAGE:EXCOMACP.COM
file:
$! PROCEDURE TO CREATE XCOM ACP(s). Created 14-JUN-1996 13:35:13.68
$!
$! Define EXCOMACP command
$ set command xcom$image:excomacp
$!
$! create XCOM ACP(s)
$!
$! rename old log files
$ set noon
$ log = f$search("xcom$image:xcomacp*.log")
$ if log .nes. "" then rename xcom$image:xcomacp*.log;* *.old;0
$ set on
$
$! execute acp startup routine
$ assign/user sys$command sys$input
$ excomacp /defaccnt=DECNET! use decnet account as the default
/defpswrd=DECNET! default password
/node=GCGW02
! gateway node name or VMS/SNA unit #
/access=XCOM58
! access name (defined in config file)
/poll="0 00:05:00.00"
! delta time between session polls
$!
$! remove this verb
$ set command/delete=excomacp
Figure 4-2: EXCOMACP.COM File
Configuring CA-XCOM for OpenVMS Alpha
4–9
Configuring the CA-XCOM for OpenVMS Alpha Remote Request Handlers
The EXCOMACP.COM Qualifiers
Qualifier
Default
Description
/ACCESS=accname
none
The access name (up to 8 characters) as defined
in the DECnet/SNA or VMS/SNA configuration
file (the default is XCOMRMT).
/ASTLM=nn
24
The AST process astlm quota. It should be 24 or
greater.
/BATCH_QUEUE
SYS$BATCH
Default queue where jobs are sent.
/BIOLM=nn
18
The process biolm quota. It should be 18 or
greater.
/BYTLM=nnnnn
20480
The process bytlm quota. It should be 20480
bytes or greater.
/DEFACCNT=username
DECnet
The default username used when no username is
specified. Report and job requests received
without a username will be submitted under this
account.
If set, then the file is owned by the UIC for the
user specified in the userid field in the request.
/DEFAULT_OWNER
If not set, or set to /NO_DEFAULT_OWNER, the
file is owned by one of the following:
The owner UIC of an existing version of the file,
if the creating process has ownership rights to
the previous version.
The owner UIC of the parent directory, if the
creating process has ownership privileges to the
parent directory.
The UIC of the creating process.
/DEFPSWRD=password
DECnet
Password for the default username above.
/DIOLM
18
Direct I/O limit.
/FILLM=nn
40
The process fillm quota. It should be 40 or
greater.
/NODE=node-id
0
Gateway node name or VMS/SNA unit number
associated with the /ACCESS qualifier. (For
VMS/SNA this number is usually 0 because it
doesn't use a gateway.)
4–10
CA-XCOM for OpenVMS Alpha Installation and User Guide
Configuring the CA-XCOM for OpenVMS Alpha Remote Request Handlers
Qualifier
Default
Description
/PGFLQUOTA=nnnnn
100000
The process page limit. It should be a value of
40000 pages or greater.
/POLL=delta-time
0 00:05:00.0
Delta time value between session polls, when the
OpenVMS might be unavailable to receive BINDs
from the IBM host. The ACP uses this value to
determine how often it should check for lost
sessions when LU and PU have already been
activated.
/PRINT_QUEUE
SYS$PRINT
Where jobs are sent to await printing.
/PRIORITY=nn
4
The priority at which the ACP runs.
/PRIVILEGE
1340229331
Privileges for the XCOMACP process.
/SESSADDR
0
The LU that will be used for XCOMACP.
/WSDEFAULT=nnn
250
The default size of the process working set. It
should be a value of 250 or greater.
/WSEXTENT=nnnn
2048
The size of the process working set. It should be
a value of 1024 or greater.
/WSQUOTA=nnn
500
The quota for the process working set. It should
be a value of 250 or greater.
DEC TCP/IP Services
DEC TCP/IP Services for OpenVMS (or UCX) takes care of starting CA-XCOM
when a transfer is initiated by another system running CA-XCOM. The UCX
Auxiliary Server listens for a request for the CA-XCOM service, normally on port
8044. When a request comes in, the UCX Auxiliary Server starts XCOMIP.COM,
a command procedure file. XCOMIP.COM runs XCOMIP.EXE, the CA-XCOM
program that handles incoming TCP/IP transfers.
You may customize XCOMIP.COM as you like. Here is the file distributed with
CA-XCOM for OpenVMS AXP.
$ set noon
$! uncomment the next line to make a log.
$! everything after this will appear in the log file
$! define sys$output xcom$image:xcomip_startup.log
$ define sys$error sys$output
$ set command xcom$image:xcomip.cld
$ xcomip /default_owner
$ set command/delete=xcomip
Configuring CA-XCOM for OpenVMS Alpha
4–11
Configuring the CA-XCOM for OpenVMS Alpha Remote Request Handlers
The XCOMIP.COM Qualifiers
Qualifier
Default
Description
/ASTLM=nn
24
The AST process astlm quota. It should be 24 or
greater.
/BATCH_QUEUE
SYS$BATCH
Default queue where jobs are sent.
/BIOLM=nn
18
The process biolm quota. It should be 18 or
greater.
/BYTLM=nnnnn
20480
The process bytlm quota. It should be 20480
bytes or greater.
/DEFACCNT=username
DECnet
The default username used when no username is
specified. Report and job requests received
without a username will be submitted under this
account.
If set, then the file is owned by the UIC for the
user specified in the userid field in the request.
/DEFAULT_OWNER
If not set, or set to /NO_DEFAULT_OWNER, the
file is owned by one of the following:
The owner UIC of an existing version of the file,
if the creating process has ownership rights to
the previous version.
The owner UIC of the parent directory, if the
creating process has ownership privileges to the
parent directory.
The UIC of the creating process.
/DEFPSWRD=password
DECnet
Password for the default username above.
/DIOLM
18
Direct I/O limit.
/FILLM=nn
40
The process fillm quota. It should be 40 or
greater.
/PGFLQUOTA=nnnnn
100000
The process page limit. It should be a value of
40000 pages or greater.
/PORT
8044
Specifies the port number in TCP/IP transfers.
/PRINT_QUEUE
SYS$PRINT
Where jobs are sent to await printing.
/PRIORITY=nn
4
The priority at which the ACP runs.
/PRIVILEGE
1340229331
Privileges for the XCOMACP process.
/SESSADDR
0
The LU that will be used for XCOMACP.
4–12
CA-XCOM for OpenVMS Alpha Installation and User Guide
Configuring the CA-XCOM for OpenVMS Alpha Remote Request Handlers
Qualifier
Default
Description
/WSDEFAULT=nnn
250
The default size of the process working set. It
should be a value of 250 or greater.
/WSEXTENT=nnnn
2048
The size of the process working set. It should be
a value of 1024 or greater.
/WSQUOTA=nnn
500
The quota for the process working set. It should
be a value of 250 or greater.
Note: After installing CA-XCOM, run DCL command file
setup_xcom_tcpip.com to configure DEC TCP/IP Services.
Completing the Configuration
Modify the system startup procedure SYS$MANAGER:SYSTARTUP_VMS.COM
to invoke the CA-XCOM startup procedure
XCOM$IMAGE:XCOM$STARTUP.COM. To invoke this command procedure
from the system startup procedure, use the actual installation disk and directory.
This is typically SYS$SYSDEVICE:[XCOM]. When this is completed, CA-XCOM
will be started each time the system is rebooted.
Note: The XCOM$STARTUP.COM procedure defines the system-wide logical
name XCOM$IMAGE.
The CA-XCOM startup procedure does the following:
1.
Defines the logical name XCOM$IMAGE, which is the location of the
CA-XCOM installation directory.
2.
Defines the logical name XCOM_CONFIG_FILE, which is the location of the
CA-XCOM configuration file.
3.
Executes the command procedure XCOM$IMAGE:EXCOMACP.COM,
which starts the XCOMACP process.
When all these items have been completed, and you have just finished installing
CA-XCOM, then reboot the system. If you are using a DECnet SNA Gateway,
reload the configuration file with either of the following DCL commands:
$MCR NCP TRIGGER NODE gtway
or
$MCR NCP LOAD NODE gtway
where “gtway” is the name of the gateway. Consult the NCP utility manual for
more information.
Configuring CA-XCOM for OpenVMS Alpha
4–13
Chapter
5
Customization and Command
Qualifiers
This chapter explains the following topics:
n
DCL XCOM command customization
n
DCL XCOM command qualifiers
n
DCL EXCOMACP command customization
n
DCL EXCOMACP command qualifiers
DCL XCOM Command Customization
The command definition file XCOM$IMAGE:XCOM.CLD defines the XCOM
command verb and all its qualifiers to the Digital Command Language (DCL).
This file is used by the CA-XCOM installation procedure to define the XCOM
command during installation . This command definition file also defines the
defaults described in the next section.
Note: Before you modify the XCOM$IMAGE:XCOM.CLD file, make sure you
understand how to use VMS Command Definition Utility. For more information
about this utility, see the DEC publication "The VMS Command Definition
Utility Manual".
Customization and Command Qualifiers
5–1
DCL XCOM Command Customization
Modifying the CA-XCOM for Open VMS Alpha Command Definition File
The file XCOM$IMAGE:XCOM.CLD defines the XCOM command verb to the
OpenVMS command language interpreter. It also defines default values for the
command qualifiers.
Use a text editor to modify the XCOM$IMAGE:XCOM.CLD file as described
below:
1.
Change or add the default values desired for a qualifier.
Note: Before you do this, make sure you understand how to use the VMS
Command Definition Utility.
2.
Redefine the XCOM command verb to ensure that your changes take effect.
Do the following:
a.
Log on to the system as a privileged user with access to the
SYS$LIBRARY:DCLTABLES.EXE file.
b. At the DCL prompts $ and _$, type the following:
$ SET COMMAND/TABLE=SYS$LIBRARY:DCLTABLES.EXE$ /OUTPUT=SYS$LIBRARY:DCLTABLES.EXE XCOM$IMAGE:XCOM.CLD
This command will redefine the XCOM command in the DCL tables. Reboot the
OpenVMS system to ensure that this change takes effect immediately for all
users on the system. If the system is not rebooted then for users to have access to
the modified XCOM command they must log out and then log back into the
system.
5–2
CA-XCOM for OpenVMS Alpha Installation and User Guide
DCL XCOM Command Customization
CA-XCOM for OpenVMS Alpha Command Qualifiers
The DCL XCOM command qualifiers and defaults are listed below:
/APPEND
Valid for the /SENDFILE and /GETFILE qualifiers.
Specifies that the transferred data be appended to the destination file.
If /APPEND, /CREATE, or /REPLACE are not specified then /CREATE is the
default value used.
Default:
/CREATE
/ASA
/NOASA
Valid only for the /PRINT function code.
/ASA indicates that CA-XCOM is to convert the file to ASA print format, also
called FORTRAN carriage control. /ASA is a format supported by most IBM
and DEC printers.
/NOASA indicates there is to be no ASA conversion of the file.
Default:
/NOASA
/BINARY
Valid for the /SENDFILE and /GETFILE qualifiers.
Specifies that the transferred file is a binary file. No translation will be
performed.
If neither /BINARY nor /TEXT is supplied, then /TEXT is the default.
Default:
/TEXT
Customization and Command Qualifiers
5–3
DCL XCOM Command Customization
/CHECKPOINT[=[dddd-] hh:mm:ss.cc]
/NOCHECKPOINT
Valid for the /SENDFILE, /GETFILE, and /PRINT qualifiers.
/CHECKPOINT indicates how long CA-XCOM will wait before restarting an
interrupted transfer. After the specified wait time has elapsed, CA-XCOM
automatically resumes the transfer from the point where the transfer stopped.
To enter the wait time, use standard OpenVMS delta time format. If you don't
enter a checkpoint time, the default setting is used.
CA-XCOM retries an interrupted transfer until the transfer either completes
successfully or reaches an aging time limit and is then aborted. The as-delivered
default setting is 1 hour (001:00:00). /NOCHECKPOINT indicates that an
interrupted transfer is not to resume.
A delta time has the following format: [dddd-] [hh:mm:ss:cc]
dddd
hh
mm
ss
cc
The number of days.
The number of hours.
The number of minutes.
The number of seconds.
The number of hundredths of seconds.
The fields located on the righthand side of the delta time format can be truncated
where time is to be specified. Any of the fields can also be omitted in the middle
of the format as long as the punctuation marks which separate the fields are
specified.
Default:
/NOCHECKPOINT
/CLASS=class-id
Valid for the /PRINT function code.
Specifies the print class, (a one character string) through which the print request
is to be placed on the remote system. If the remote system is an IBM mainframe,
then this field indicates the JES2 SYSOUT class.
Default:
5–4
None
CA-XCOM for OpenVMS Alpha Installation and User Guide
DCL XCOM Command Customization
/COMPRESS=compression method
/NOCOMPRESS
Valid for the /SENDFILE, /GETFILE, /SUBMIT, and /PRINT qualifiers.
/COMPRESS indicates the transmitted data be compressed. Valid values for the
compression method are:
n
NO
n
YES
n
RLE
n
LCOMPACT
n
LZSMALL
n
LZMEDIUM
n
LZLARGE
n
COMPACT
/NOCOMPRESS indicates the transmitted data should NOT be compressed.
Default:
/COMPRESS=NO or /NOCOMPRESS
/COPIES=nnn
Valid for the /PRINT function code. This qualifier must contain a maximum of
three (3) ASCII, decimal, or numeric characters.
Specifies the number of copies to be printed on the remote system. Specify a
range between 1 and 999 copies.
Default:
1
/CREATE
Valid for the /SENDFILE and /GETFILE qualifiers.
Specifies that the destination file is to be created.
If /APPEND, /CREATE, or /REPLACE are not specified then /CREATE is the
default value used.
Default:
/CREATE
Customization and Command Qualifiers
5–5
DCL XCOM Command Customization
/DELETE
/NODELETE
Valid for the /PRINT function code.
/DELETE indicates that the file be deleted after printing on the remote system.
/NODELETE indicates that the file be kept or retained on the remote system
after it is printed.
Default:
/NODELETE.
Note: With respect to remotely initiated transfers, (i.e., a user on a remote
system initiates a report print on an OpenVMS system) the default is to delete the
file after it has printed on the OpenVMS.
/DESTINATION=string
Valid for the /PRINT function code.
Specifies the print destination for the output on the remote system. Enter a
maximum of 21 characters; the actual number of valid characters is dependent on
the remote system.
Default:
The system's default printer
/FCB=xxxx
Valid for the /PRINT function code.
Used only when printing a file on a remote IBM mainframe. It specifies the
Forms Control Buffer (FCB) and is used to supply a 1 to 4 character FCB that JES
will use to define the forms control parameter used when printing on the remote
system.
Default:
None
/FORM=string
Valid for the /PRINT function code.
Used to inform the remote operator of the type of form the print request is to be
printed on. Specify a maximum of ten (10) characters; the actual number of valid
characters is dependent on the remote system.
Default:
5–6
None.
CA-XCOM for OpenVMS Alpha Installation and User Guide
DCL XCOM Command Customization
/GETFILE
Used to retrieve a data file from a remote IBM mainframe, and place it into a
specified file on your system. If the local file exists, then the transferred data can
append to this file or overwrite it. If the local file does not exist, CA-XCOM will
create a file to hold this data. See the chapter "The Command Line Interface
(DCL)" for more information.
If you enter the XCOM command on a command line by itself, then /MENU is
the default.
Default:
/MENU
/HOLD
/NOHOLD
Valid for the /PRINT function code.
/HOLD specifies that the print request be placed on HOLD status on the remote
system.
/NOHOLD specifies that the print request be sent for immediate printing on the
remote system.
Default:
/NOHOLD
/LNOTIFY=username
Valid for the /SENDFILE, /GETFILE, /SUBMIT, and /PRINT qualifiers.
Identifies which local OpenVMS username (up to 12 characters) to notify when
the data transfer is complete. You must have WORLD privilege to use this field
to notify a user on the system other than yourself.
Default:
None
Customization and Command Qualifiers
5–7
DCL XCOM Command Customization
/LOG=filename
/NOLOG
Valid for the /SENDFILE, /GETFILE, /SUBMIT, and /PRINT qualifiers.
/LOG specifies that the filename is to receive time-stamped CA-XCOM status, or
log messages. Enter a maximum of 64 characters for the filename. If a filename
is not entered then CA-XCOM writes the log to XCOM.LOG.
/NOLOG specifies that there is to be no message logging.
Default:
/LOG
/MENU
Specifies that you want the screen interface of CA-XCOM.
If the XCOM command is entered on a command line by itself then /MENU is
the default.
Default:
/MENU
/BLOCKL=nnnnn
Valid for the /SENDFILE and /GETFILE qualifiers.
Specifies the number of records contained inside a block. This qualifier must
contain a maximum of five (5) ASCII, decimal, or numeric characters and is used
only when creating a file on a remote IBM mainframe. Note that "creating"
signifies that the "/CREATE" qualifier is specified either explicitly or by default.
For Fixed record or Fixed Blocked files, /BLOCKL must be a multiple of the
/RECL field value. For Variable record files it must be at least four bytes larger
than the /RECL field value. For Undefined record file format, /BLOCKL must
be at least as large as the largest record length.
If the /BLOCKL qualifier is not specified and the transfer is to an IBM
mainframe, CA-XCOM will generate an acceptable value.
Default:
5–8
Dependent on file type
CA-XCOM for OpenVMS Alpha Installation and User Guide
DCL XCOM Command Customization
/FORMAT=rcd-format
Valid for the /SENDFILE and /GETFILE qualifiers.
Required when creating files on an IBM mainframe. Equivalent to the DCB
RECFM parameter in the JCL. The keyword choices are:
n
n
n
n
Default:
FIXED
FIXED_BLOCKED
VARIABLE_BLOCKED
UNDEFINED
FIXED
Specifies that the records all have the same length,
(i.e., they are fixed) with multiple records contained
in one block.
FIXED_BLOCKED
Specifies the fixed record length of one record per
block.
VARIABLE_BLOCKED
Specifies the variable record length with multiple
records per block, each of which can have a different
length.
UNDEFINED
Specifies the undefined record format of one variable
length record per block, where the maximum record
length is the blocksize.
FIXED
/RECL=nnnnn
Valid for the /SENDFILE and /GETFILE qualifiers. Used only when creating a
file on a remote IBM mainframe.
Specifies how many bytes are in a record. It is ignored for undefined records.
For Variable records, /RECL equals the maximum record size + 4.
For Fixed and Fixed Blocked records, /RECL specifies the actual record length
(up to 5 ASCII, decimal, or numeric characters).
If you don't specify the /RECL for a transfer to an IBM mainframe, CA-XCOM
generates an acceptable value.
Default:
Dependent on file type
Customization and Command Qualifiers
5–9
DCL XCOM Command Customization
/PACK
/NOPACK
Valid for the /SENDFILE, /GETFILE, /SUBMIT, and /PRINT qualifiers.
/PACK is a Boolean item code that specifies record packing. It is valid only for
text files (not binary files). When packing is on, CA-XCOM reads as many
records as will fit into a 31744-byte buffer before compressing and transmitting
them.
/NOPACK is a Boolean item code that specifies that packing will not be used.
/PACK is ignored when /BINARY is specified.
Default:
/NOPACK
/PASSWORD=string
Valid for the /SENDFILE, /GETFILE, /SUBMIT, and /PRINT qualifiers.
Specifies the password (up to 31 characters) associated with the user ID under
whose set of resource access privileges CA-XCOM is to execute on the remote
system. It should be the password known to the remote security system (e.g.,
RACF, CA-ACF2, and CA-Top Secret on an IBM mainframe.)
Note: To preserve lower case, place the password value in double quotes.
Default:
None
/PORT=n
Specifies a port number other than the default of 8044 for TCP/IP transfers.
/PORT is relevant only when /TCPIP is specified.
Default:
8044
/PRINT
Sends a file from your system to a remote system for printing.
If you enter the XCOM command on a command line by itself, then /MENU is
the default.
Default:
5–10
/MENU
CA-XCOM for OpenVMS Alpha Installation and User Guide
DCL XCOM Command Customization
/QUEUE=queue-name
/NOQUEUE
Valid for the /SENDFILE, /GETFILE, /SUBMIT, and /PRINT qualifiers.
/QUEUE specifies the name (up to 31 characters) of a standard OpenVMS
execution queue where this CA-XCOM transfer request will be placed. /QUEUE
indicates that the transfer request be executed off-line as a batch job. The value
for this qualifier specifies the queue name. If no value is specified then
SYS$BATCH, the default VMS batch queue, will be used.
/NOQUEUE specifies that the transfer request not be queued for execution
off-line as a batch job.)
Default:
/NOQUEUE
/REPLACE
Valid for the /SENDFILE and /GETFILE qualifiers.
Indicates the destination file be replaced.
If /APPEND, /CREATE, or /REPLACE are not specified then /CREATE is the
default value used.
Default:
/CREATE
/RESUME
Valid for the /SENDFILE and /GETFILE qualifiers.
Resumes a transfer that has been checkpointed, interrupted and is awaiting
restart. Specifies that the indicated transfer be restarted immediately.
Default:
None
Customization and Command Qualifiers
5–11
DCL XCOM Command Customization
/RMTFILE=remote-file-spec
Valid for the /SENDFILE and /GETFILE qualifiers.
Specifies which file on the remote system you want to access. The filename (up
to 255 characters) must be fully qualified as to its location.
If the remote system is an IBM mainframe, then specify the qualified dataset
name. No TSO prefix will be appended to the entry. If the remote system is an
IBM PC, then specify the DOS or OS/2 filename and include path information.
To specify the remote filename, use the following format:
["]filename.typ[[.typ]...]["]
Default:
None
/RMTSYS=remote-system-name
Valid for the /SENDFILE, /GETFILE, /SUBMIT, and /PRINT qualifiers.
The name of the remote system (up to 254 characters).
This name is defined in the CA-XCOM configuration file. For more information
about defining remote system names, see the chapter, "Configuring CA-XCOM."
Note: If you specified the remote system name as part of the remote file
specification, you don't need to supply this qualifier.
Default:
None
/RNFLAG=keyword code
Valid for the /SENDFILE, /GETFILE, /SUBMIT, and /PRINT qualifiers.
Specifies the user ID type of the remote user to be notified when the data transfer
is complete. The keyword choices available are:
NONE
TSO
LOG
CICS
LU
ROSCOE
VMSUSER
Default:
5–12
No Notification
Notify TSO user
Write to log
Notify CICS User
Notify Logical Unit
Notify Roscoe User
Notify VMS User
NONE
CA-XCOM for OpenVMS Alpha Installation and User Guide
DCL XCOM Command Customization
/RNOTIFY=remote-user-name
Valid for the /SENDFILE, /GETFILE, /SUBMIT, and /PRINT qualifiers. This
qualifier contains the remote user ID string.
Indicates which remote user ID to notify when the data transfer is complete. The
remote notify name can be a maximum of 12 characters.
Default:
None
/SENDFILE
Sends a copy of a specified file from your system to a specified file on a remote
computer. If the file exists on the remote computer, the transferred data can be
added to the remote file or used to replace the current data. If the remote file
does not exist, CA-XCOM can create a file to hold this data.
If the XCOM command is entered on a command line by itself then /MENU is
the default.
Default:
/MENU
/SNA
Specifies use of the SNA LU6.2 protocol for the file transfer.
/SNA and /TCPIP are mutually exclusive. If neither is specified, SNA is
assumed.
Default:
/SNA
/SUBMIT
Sends a job for execution on a remote system.
If the XCOM command is entered on a command line by itself then /MENU is
the default.
Default:
/MENU
Customization and Command Qualifiers
5–13
DCL XCOM Command Customization
/TCPIP
Specifies use of the TCP/IP protocol for the file transfer.
/SNA and /TCPIP are mutually exclusive. If neither is specified, SNA is
assumed.
/TEXT
Valid for the /SENDFILE and /GETFILE qualifiers.
Specifies that the file be treated as an ASCII text file. When sending information
to, or receiving information from a remote system that uses a different character
representation (e.g., EBCDIC), the file will automatically be translated.
If neither /BINARY nor /TEXT is supplied then /TEXT is the default value used.
Default:
/TEXT
/TITLE=string
Valid for the /PRINT function code.
Specifies the report title (up to 21 characters) for a print request on a remote
system. Although the title is generally used as a comment and will not be
printed as part of the request, some operating systems (such as OpenVMS) allow
a print title to be spooled with the print data.
Default:
None
/TRACE
This qualifier is used at the request of CA-XCOM Technical Support to collect
information which will help diagnose a problem.
Default:
5–14
/TRACE
CA-XCOM for OpenVMS Alpha Installation and User Guide
DCL XCOM Command Customization
/TRUNCATE
/NOTRUNCATE
Valid for the /SENDFILE and /GETFILE qualifiers.
/TRUNCATE indicates a record can be truncated if it is too long.
/NOTRUNCATE indicates that the conversation abend or abort if a record is
encountered that exceeds the maximum allowable record size.
Default:
/NOTRUNCATE
/UNIT=unit-name
Valid for the /SENDFILE and /GETFILE qualifiers.
Used only when creating a file on a remote IBM mainframe. ("Creating" signifies
that the "/CREATE" qualifier is specified, explicitly or by default.) The /UNIT
qualifier specifies the generic unit name under which the file will be placed.
If /UNIT is not entered, the CA-XCOM default unit name will be used as defined
in the CA- XCOM MVS Default Options Table. The string can be a maximum of
10 characters.
Default:
None
/USERID=username
Valid for the /SENDFILE, /GETFILE, /SUBMIT, and /PRINT qualifiers.
Specifies the remote user ID under whose set of resource access privileges CAXCOM is to execute on the remote system. It should be the user ID known to the
remote security system (e.g., RACF, CA-ACF2, and CA-Top Secret on an IBM
mainframe.) For other systems, this is the user's login username. The string can
be a maximum of 12 characters.
Note: To preserve lower case, place the userid value in double quotes.
Default:
None
Customization and Command Qualifiers
5–15
DCL XCOM Command Customization
/VOLUME=volume-name
Valid for the /SENDFILE and /GETFILE qualifiers.
Used only when creating a file on a remote IBM mainframe. Note that "creating"
signifies that the "/CREATE" qualifier is specified, explicitly or by default.
/VOLUME specifies the volume name (up to 10 characters) under which the file
is to be placed.
If /VOLUME is not supplied, the CA-XCOM default volume name will be used
as defined in the XCOM-MVS Default Options Table.
Default:
None
/WAIT[=[dddd-] hh:mm:ss.cc]
/NOWAIT
Valid for the /SENDFILE, /GETFILE, /SUBMIT and /PRINT qualifiers.
/WAIT specifies that the transfer request should wait if the remote system is
unavailable. This qualifier contains the wait time in standard VMS delta time
format. The default time used is 3 minutes, (i.e., 0 00:03:00) if no value is
supplied with the qualifier.
A delta time has the following format: [dddd-] [hh:mm:ss:cc]
dddd
hh
mm
ss
cc
The number of days.
The number of hours.
The number of minutes.
The number of seconds.
The number of hundredths of seconds.
The fields on the right side of the delta time format can be truncated where time
is to be specified. Any of the fields can also be omitted in the middle of the
format as long as the punctuation marks which separate the fields are specified.
/NOWAIT aborts the transfer request if the remote system is unavailable.
Default:
5–16
/NOWAIT
CA-XCOM for OpenVMS Alpha Installation and User Guide
DCL XCOM Command Customization
DCL EXCOMACP Command Customization
The EXCOMACP command is defined, executed, and subsequently removed by
the XCOM$IMAGE:EXCOMACP.COM command procedure. A user should
have no reason to execute the EXCOMACP command directly. The easiest
method for modifying default values is to place the desired values directly into
the XCOM$IMAGE:EXCOMACP.COM command procedure.
DCL EXCOMACP Command Qualifiers
The DCL EXCOMACP command generates the XCOMACP process which
handles remotely initiated transfer requests. The values of the qualifiers
associated with this command are either used for XCOMACP process quotas, or
passed to the XCOMACP process to set up SNA sessions.
The EXCOMACP command qualifiers and their defaults are listed below:
/ACCESS=accname
Access name as defined in the DECnet SNA or VMS/SNA transport software
configuration file.
Default:
None
/ASTLM=nn
The AST process astlm quota. It should be 24 or greater.
Default:
24
/BATCH_QUEUE=string
The remote request handler for the ACP which handles job requests. It specifies
the name of the execution batch queue. The value of "string" can be a maximum
of 31 characters. If you do not specify a value the default value is used.
Default:
SYS$BATCH
/BIOLM=nn
The process biolm quota. It should be 18 or greater.
Default:
18
Customization and Command Qualifiers
5–17
DCL XCOM Command Customization
/BYTLM=nnnnn
The process bytlm quota. It should be 20480 or greater.
Default:
20480
/DEFACCNT=username
The default username used when no username is specified. Report and job
requests received without a username will be submitted under this account.
Default:
DECNET
/DEFAULT_OWNER
If specified, then the file uses the following VMS defaults:
1.
The owner UIC of an existing version of the file if the creating process has
ownership rights to the previous version.
2.
The owner UIC of the parent directory, if the creating process has ownership
privileges to the parent directory.
3.
The UIC of the creating process.
If not set, or set to /NO_DEFAULT_OWNER, then the file will be owned by the
UIC for the user specified in the userid field in the request.
/DEFPSWRD=password
Password to the default username above.
Default:
DECNET
OUTDENT = /DIOLM=nn
The number of concurrent direct I/O that can be in progress.
Default:
5–18
18
CA-XCOM for OpenVMS Alpha Installation and User Guide
DCL XCOM Command Customization
/FILLM=nn
The process fillm quota. It should be 40 or greater.
Default:
40
/NODE=nodeid
Gateway node name or VMS/SNA unit number associated with the /ACCESS
qualifier. (For VMS/SNA this number is usually 0.)
Default:
0
/PGFLQUOTA=nnnnn
The process page limit. It should be 40000 or greater.
Default:
100000
/POLL=delta-time
Delta time value between session polls.
This is the duration of time the OpenVMS might be unavailable to receive BINDs
from the IBM host. The ACP uses this value to determine how often it is to check
for lost sessions if PU and LU are active.
Default:
0 00:01:00.0
/PRINT_QUEUE=queue-name
The remote request handler for the ACP which handles the printing of report
requests. It specifies the name of the print queue. The print queue name can be a
maximum of 31 characters. If you do not specify a value the default value is
used.
Default:
SYS$PRINT
/PRIORITY=nn
The priority at which the ACP runs.
Default:
4
Customization and Command Qualifiers
5–19
DCL XCOM Command Customization
/PRIVILEGE=nn
The type of access granted to a user. This is a quad word field (2 longwords = 64
bits) in which each bit represents a particular privilege. This indicates that there
are 64 different privileges available. If a bit is set on (i.e., the bit is 1) then that
privilege is enabled. If the bit is 0 then that privilege is disabled. This number is
the signed decimal integer representation of this quad word field. For further
information as to the bit representation of this quad word field see "SYS$SETPRV
System Service" in the VMS Systems Services Reference Manual.
Default:
-1340229331
/SESADDR=nn
The gateway secondary logical unit (SLU) address.
Default:
0
/WSDEFAULT=nnn
The default size for the process working set. It should be 250 or greater.
Default:
250
/WSEXTENT=nnnn
The size of the process working set. It should be 1024 or greater.
Default:
2048
/WSQUOTA=nnn
The quota for the process work set. It should be 250 or greater.
Default:
5–20
500
CA-XCOM for OpenVMS Alpha Installation and User Guide
DCL XCOM Command Customization
DCL XCOMIP Command Customization
The XCOMIP command is defined, executed, and subsequently removed by the
XCOM$IMAGE:XCOMIP.COM command procedure. A user should have no
reason to execute the XCOMIP command directly. The easiest method for
modifying default values is to place the desired values directly into the
XCOM$IMAGE:XCOMIP.COM command procedure.
DCL XCOMIP Command Qualifiers
The DCL XCOMIP command generates the XCOMIP process which handles
remotely initiated transfer requests. The values of the qualifiers associated with
this command are either used for XCOMIP process quotas, or passed to the
XCOMIP process to set up TCP/IP sessions.
The XCOMIP command qualifiers and their defaults are listed below:
/ASTLM=nn
The AST process astlm quota. It should be 24 or greater.
Default:
24
/BATCH_QUEUE=string
The remote request handler for the ACP which handles job requests. It specifies
the name of the execution batch queue. The value of "string" can be a maximum
of 31 characters. If you do not specify a value the default value is used.
Default:
SYS$BATCH
/BIOLM=nn
The process biolm quota. It should be 18 or greater.
Default:
18
/BYTLM=nnnnn
The process bytlm quota. It should be 20480 or greater.
Default:
20480
Customization and Command Qualifiers
5–21
DCL XCOM Command Customization
/DEFACCNT=username
The default username used when no username is specified. Report and job
requests received without a username will be submitted under this account.
Default:
DECNET.
/DEFAULT_OWNER
If specified, then the file uses the following VMS defaults:
1.
The owner UIC of an existing version of the file if the creating process has
ownership rights to the previous version.
2.
The owner UIC of the parent directory, if the creating process has ownership
privileges to the parent directory.
3.
The UIC of the creating process.
If not set, or set to /NO_DEFAULT_OWNER, then the file will be owned by the
UIC for the user specified in the userid field in the request.
/DEFPSWRD=password
Password to the default username above.
Default:
DECNET
OUTDENT = /DIOLM=nn
The number of concurrent direct I/O that can be in progress.
Default:
18
/FILLM=nn
The process fillm quota. It should be 40 or greater.
Default:
5–22
40
CA-XCOM for OpenVMS Alpha Installation and User Guide
DCL XCOM Command Customization
/PGFLQUOTA=nnnnn
The process page limit. It should be 40000 or greater.
Default:
100000
/PORT=n
Specifies a port number other than the default of 8044 for transfers over TCP/IP.
Default:
8044
/PRINT_QUEUE=queue-name
The remote request handler for the ACP which handles the printing of report
requests. It specifies the name of the print queue. The print queue name can be a
maximum of 31 characters. If you do not specify a value the default value is
used.
Default:
SYS$PRINT
/PRIORITY=nn
The priority at which the ACP runs.
Default:
4
/PRIVILEGE=nn
The type of access granted to a user. This is a quad word field (2 longwords = 64
bits) in which each bit represents a particular privilege. This indicates that there
are 64 different privileges available. If a bit is set on (i.e., the bit is 1) then that
privilege is enabled. If the bit is 0 then that privilege is disabled. This number is
the signed decimal integer representation of this quad word field. For further
information as to the bit representation of this quad word field see "SYS$SETPRV
System Service" in the VMS Systems Services Reference Manual.
Default:
-1340229331
/SESADDR=nn
The gateway secondary logical unit (SLU) address.
Default:
0
Customization and Command Qualifiers
5–23
DCL XCOM Command Customization
/WSDEFAULT=nnn
The default size for the process working set. It should be 250 or greater.
Default:
250
/WSEXTENT=nnnn
The size of the process working set. It should be 1024 or greater.
Default:
2048
/WSQUOTA=nnn
The quota for the process work set. It should be 250 or greater.
Default:
500
When You Are Done...
You have now successfully installed and customized CA-XCOM.
5–24
CA-XCOM for OpenVMS Alpha Installation and User Guide
Chapter
6
The Menu Interface
The CA-XCOM Menu Interface lets you perform all file transfer functions by
selecting menu options and entering parameter values in screen fields. Because
the menu interface identifies the information required to execute each CA-XCOM
transfer, it is especially helpful for inexperienced CA-XCOM users.
The diagram below illustrates the CA-XCOM screen hierarchy.
Figure 6-1: Menu Relationships
Using the Menu Interface
To invoke the CA-XCOM menu interface from the DCL, enter the CA-XCOM
command and the /MENU qualifier at the $ prompt. This displays the
CA-XCOM Main Menu. If you enter the CA-XCOM command without the
/MENU qualifier or any other command qualifiers, then the menu interface is
invoked by default.
For more information on the CA-XCOM Main Menu, see Figure 6-2.
The Menu Interface
6–1
Using the Menu Interface
XCOM/MENU Valid Qualifier
Qualifier
Default
Description
/LOG=<filename>
/LOG
The log file where CA-XCOM messages
are written for file transfers initiated
from the menu interface. If this qualifier
is not used, the message log is written by
default to the file XCOM.LOG in the
user's default directory. To suppress the
report, specify XCOM/NOLOG.
/TRACE
This qualifier is used at the request of
CA-XCOM Technical Support to collect
information which will help diagnose a
problem.
/NOLOG
/TRACE
Transmission Report
CA-XCOM automatically produces a log of all its processing activities called the
Transmission Report. Each file transfer transaction and all messages generated
during the conversation are time-stamped. This log can serve as an audit trail of
all CA-XCOM status and activities. Messages will also appear on the user's
terminal.
The transmission report is a cumulative file of unlimited size. Users can find
messages recording the most recent CA-XCOM activity at the end of this file. For
a more detailed description of the Transmission Report and an example, see the
chapter, "Messages."
The default is XCOM.LOG.
6–2
CA-XCOM for OpenVMS Alpha Installation and User Guide
The Function Keys
The Function Keys
From the CA-XCOM menu interface, the function keys can be used to prompt
CA-XCOM for assistance, execute DCL commands in the foreground, abort a
request, or terminate processing. The line at the bottom of each menu screen
displays the PF keys and their functions.
Key
Description
PF1
Exits the menu interface and returns to the DEC command line.
Although you can press this key from any screen field on any
CA-XCOM menu screen, note that any values entered in the screen
fields will be lost if you do.
PF2
Accesses the online HELP. Pressing PF2 once displays a single line
of help text that describes the screen field being accessed. Pressing
PF2 again displays a full page tutorial. To exit online HELP and
return to the menu, press any key.
PF3
Returns the user to the previous screen. All input to the current
screen is saved in case the user wishes to return to it at a later time.
For more detail on the CA-XCOM screen hierarchy, see Figure 6-1.
PF4
Suspends the CA-XCOM process and starts a new process,
displaying an XCOM_$ prompt to indicate that your CA-XCOM
image is suspended. To return to CA-XCOM exactly where you
were before you suspended the process, use the LOGOUT (LO)
command.
CTRL+G
Terminates an in-progress transfer request. CA-XCOM will
attempt to clean up any control areas and free resources allocated
to this task. After aborting the transfer, you are taken to the
message screen.
CTRL+E
Displays a message screen that lists all messages generated during
the current CA-XCOM session.
The Menu Interface
6–3
CA-XCOM Main Menu
CA-XCOM Main Menu
The main menu, shown below, is the entry point into the CA-XCOM menu
interface.
Thu Mar 19 18:39
sys$sysdevice: [al]
CA-XCOM Rel
Main Menu
3.x.yymm
SYSTEM
sys$sysdevice: [al]
Select Function:
(1). Send files, Reports or Jobs
(2). Receive Files
PF1=EXIT
PF2=HELP
PF3=PREV SCREEN
(C) COPYRIGHT 1998 Computer Associates
PF4=DCL CTRL-G=ABORT
CTRL-E=MSG SCREEN
Figure 6-2: Main Menu Screen
Select Function 1 to send a file, report, or job to a remote computer. Select
Function 2 to receive a file from a remote computer.
6–4
CA-XCOM for OpenVMS Alpha Installation and User Guide
Send Functions Menu
Send Functions Menu
The Send Functions Menu below displays the three types of outbound
transmissions that CA-XCOM can generate. Data can be sent to a remote system
in the form of a standard data file, a report, or a job.
Thu Mar 19 18:41
sys$sysdevice: [al]
CA-XCOM Rel
Sending Functions
3.x.yymm
SYSTEM
sys$sysdevice: [al]
Select Function:
(1). Send VMS Files to a Remote Computer
(2). Print VMS Files at Remote Computer
(3). Submit Job to Remote Computer
PF1=EXIT PF2=HELP
PF3=PREV SCREEN
(C) COPYRIGHT 1998 Computer Associates
PF4=DCL
CTRL-G=ABORT CTRL-E=MSG SCREEN
Figure 6-3: Sending Functions Screen
Select Function 1 to send a file from your computer for storage in a file on a
remote computer. Select Function 2 to send a file to be printed on a remote
computer. Select Function 3 to send a file for execution, as a batch job, on a
remote system.
Note: The file should contain the control statements necessary to execute the job
on the remote computer (such as JCL for an IBM mainframe, or DCL for a VMS
system).
The Menu Interface
6–5
Send a File Screen
Send a File Screen
The Send a File screen is where you enter the information for transferring a data
file from your computer to a file on a remote computer. Figure 6-4 shows the
Send a File screen with its default values.
Thu Mar 19 18:41
sys$sysdevice: [al]
CA-XCOM Rel
3.x.yymm
Send a File
SYSTEM
sys$sysdevice: [al]
VMS File Name:A.A
SNA or TCP/IP (S/T): T
Remote System Name:
TCP/IP PORT : 8044
Remote File Name:
Remote User ID:
Remote Password:
Notify Local User:
Remote Notify Flag: T
Queue the Request (Y/N): N
Compress Data : N
Chkpnt/Resume/None (C/R/N): N
PF1=EXIT PF2=HELP
Notify Remote User:
Packing: N
Wait for Remote System (Y/N): N
File Type; Binary or Text (B/T): T
Create/Append/Replace Remote File (C/A/R):C
PF3=PREV SCREEN
(C) COPYRIGHT 1998 Computer Associates
PF4=DCL
CTRL-G=ABORT CTRL-E=MSG SCREEN
Figure 6-4: Send a File Screen
Screen Fields
VMS File Name
SNA or TCP/IP
TCP/IP Port
6–6
Enter the OpenVMS filename to be transferred. All
VMS file naming conventions apply.
The default is none.
Enter the transfer type.
The default is S.
Valid options are:
S
SNA Transfer
T
TCP/IP Transfer
Enter the TCP/IP port. This screen field is displayed
only for TCP/IP transfers.
CA-XCOM for OpenVMS Alpha Installation and User Guide
The default is 8044.
Send a File Screen
Remote System Name
Remote File Name
Remote User ID
Remote Password
Notify Local User
Notify Remote User
Enter the symbolic name of the remote computer
where the file is being sent. Valid symbolic names are
defined in the CA-XCOM configuration file
XCOMV30.CFG. See the chapter, "Configuring
CA-XCOM", for more detail on predefined symbolic
names.
The default is none.
Enter the name of the file on the remote system to
which you are transferring data. If you are creating
the file, ensure the designated filename is consistent
with the file naming conventions of the remote
system.
The default is none.
Enter the user ID under whose system resource
privileges this file transfer is to be processed on the
remote system. This parameter is necessary if the
remote computer has a security system, since the ID
authorizes the use of the necessary system resources
to perform the transfer.
Enter the password (up to 31 characters) associated
with the Remote User. For security reasons, the
password will display on the screen as XXXs.
The default is none.
Enter the user on your system CA-XCOM will notify
once it has completed this procedure. If users have
VMS WORLD privileges, any local user can be
designated.
The default is none.
Enter the user on the remote system CA-XCOM will
notify once it has completed this procedure. Note that
the CA-XCOM message log on the remote system is
always written to when this procedure completes.
The default is none.
The Menu Interface
6–7
Send a File Screen
Remote Notify Flag
Enter the user-ID type of the remote user to be
notified when the data transfer is complete. The flag
codes are listed below:
N
T
W
C
L
R
A
Packing
The default is N.
No Notification
Notify TSO User
Write to log
Notify CICS user
Notify Logical Unit
Notify CA-ROSCOE user
Notify OpenVMS user
To turn record packing on, enter Y. It is valid only for
text files and is ignored for binary files. When packing
is on, CA-XCOM reads as many records as will fit into
a 31744-byte buffer before compressing and
transmitting them.
The default is N.
To turn record packing off, enter N
Queue the Request
To place this procedure in the system queue and
execute it as an off-line batch job, enter Y.
The default is N.
To execute this procedure immediately, enter N.
Wait for Remote System
If you want the system to wait until a session is
established with a remote system before attempting
the transfer, enter Y.
The default is N.
If the remote system is currently unavailable and you
want to abort the procedure, enter N.
Compress Data
Indicates that the transmitted data be compressed.
Valid values for the compression method are:
N = No
M = LZMEDIUM
Y = Yes
L = LZLARGE
R = RLE
C = COMPACT
S = LZSMALL
T = LCOMPACT
N indicates the transmitted data should NOT be
compressed.
6–8
CA-XCOM for OpenVMS Alpha Installation and User Guide
The default is N.
Send a File Screen
File Type;Binary or Text
Specifies what kind of data is being transferred, and
whether the transferred data is to be translated from
ASCII to EBCDIC.
The default is T.
If the file being sent is a DATA file or a source code
file, select T. CA-XCOM will check whether the
Remote System Name designated is an ASCII or an
EBCDIC system. These identifications were
designated during the installation procedure. If it is
an EBCDIC system, CA-XCOM will perform the
translation according to standard translation tables.
For more information on the installation procedure,
see the chapter, Installing CA-XCOM.
If an executable file such as a file with an .EXE
extension is being transferred, select B. (XCOM
assumes that because this is a binary file, it should not
be converted to EBCDIC.)
Chkpnt/Resume/None
The Chkpnt option lets you continue an interrupted
transfer from the point where the transfer was
stopped. In other words, the interrupted transfer will
automatically resume at a specified delta time (t) from
the point at which it was interrupted, without having
to return to the beginning of the file. The wait time is
in standard VMS delta time format. For more
information, see Checkpoint Restart Menu in this
chapter.
The default is none.
The Resume option specifies that the indicated
transfer be restarted immediately. Resume works
only for previously checkpointed transfers.
Create/Add/Replace
Remote File
Determines how CA-XCOM handles the file that
receives the transferred data on the remote system.
This is the file named in the Remote File Name field.
The default is C.
Valid options are:
C
Create a new file on the remote system. (For an
explanation of the additional parameters that
appear on the popup menu, see Creating
Mainframe Files.)
A
Append this data to an existing file on the remote
system.
R
Replace an existing file on the remote system.
The Menu Interface
6–9
Send a File Screen
Checkpoint Restart Menu
The sample screen below displays the menu that appears if you select
Chkpnt/Resume/None (C/R/N): C. The additional fields on this menu are
described below.
Thu Mar 19 18:43
sys$sysdevice: [al]
CA-XCOM Rel
Send a File
3.x.yymm
SYSTEM
sys$sysdevice: [al]
VMS File Name:A.A
SNA or TCP/IP (S/T): S
Remote System Name:XCPS
Remote File Name:a
Remote User ID:
Remote Password:
Notify Local User:
Remote Notify Flag: T
Queue the Request (Y/N): N
Compress Data : N
Chkpnt/Resume/None (C/R/N): C
Notify Remote User:
Packing: N
Wait for Remote System (Y/N): N
File Type; Binary or Text (B/T): T
Create/Append/Replace Remote File (C/A/R):C
Checkpoint Size: 1000
Checkpointed Transfer Retry Delta-time: 0000 01:00:00.00
(C) COPYRIGHT 1998 Computer Associates
PF1=EXIT PF2=HELP PF3=PREV SCREEN PF4=DCL
CTRL-G=ABORT
CTRL-E=MSG SCREEN
Figure 6-5: Checkpoint Restart
Screen Fields
Checkpoint Size
The number of records (1 - 9999) to be transferred between
checkpoints.
Checkpointed Transfer
Retry Delta Time
The amount of time (delta time) CA-XCOM will wait on an
interrupted, restartable transfer before it retries the
operation. Delta time has the following format:
[dddd-] [hh:mm:ss.cc]
dddd
hh
mm
ss
cc
The number of days.
The number of hours.
The number of minutes.
The number of seconds.
The number of hundredths of seconds.
You can truncate delta time on the right. Any of the fields
can also be omitted in the middle of the format as long as
the punctuation marks separating the fields are specified.
6–10
CA-XCOM for OpenVMS Alpha Installation and User Guide
The default is
0 01:00:00:.0.
Send a File Screen
Creating Mainframe Files
The sample screen below displays the menu that appears if you select
Create/Append/Replace Remote File (C/A/R):C. The additional fields on this
menu are described below.
Thu Mar 19 18:43
sys$sysdevice: [al]
CA-XCOM Rel
Send a File
3.x.yymm
SYSTEM
sys$sysdevice: [al]
VMS File Name:A.A
SNA or TCP/IP (S/T): S
Remote System Name:XCPS
Remote File Name:a
Remote User ID:
Remote Password:
Notify Local User:
Remote Notify Flag: T
Queue the Request (Y/N): N
Compress Data : N
Chkpnt/Resume/None (C/R/N): N
Prim Alloc: 0
Sec Alloc: 0
Unit Name:
Format:
FB Physical Block Size:
PF1=EXIT
PF2=HELP
Notify Remote User:
Packing: N
Wait for Remote System (Y/N): N
File Type; Binary or Text (B/T): T
Create/Append/Replace Remote File C/A/R):C
Alloc Type: C
Trun: N
Volume Name:
28
Record Length:
28
PF3=PREV SCREEN
(C) COPYRIGHT 1998 Computer Associates
PF4=DCL
CTRL-G=ABORT
CTRL-E=MSG SCREEN
Figure 6-6: Creating Mainframe Files Screen
Screen Fields
Prim Alloc
Sec Alloc
Alloc Type
Trun
Unit Name
Volume Name
Specifies the MVS Primary Allocation.
The default is 0.
Specifies the MVS Secondary Allocation.
The default is 0.
Specifies the MVS Allocation Type. Valid options
are:
The default is C.
C
Cylinders
T
Tracks
B
Blocks
Specifies whether to truncate the date or not.
The default is N.
The unit name for the intended tape drives.
The default is none.
The volume name where the data set is or will be
residing.
The default is none.
The Menu Interface
6–11
Send a File Screen
Format
The record format of the data set. This format
correspond to the JCL RECFM sub-parameter. The
following are valid options:
Fixed
The default is F.
Specifies that the records all have the
same length, (i.e., they are fixed)
with multiple records contained in
one block.
Fixed Blocked Specifies the fixed record length of
one record per block.
Variable Blocked Specifies the variable record
length
with multiple records per block,
each of which can have a different
length.
Undefined
Physical Block Size
Record Length
6–12
Specifies the undefined record
format of one variable length
record per block, where the
maximum record length is the
blocksize.
Specifies the block size of the data set. When using a
fixed or fixed block record format, this value must be
a multiple of the record length. A variable record
format must be 4 bytes larger than the record length.
Undefined record formats must be larger than the
largest record length. Enter a value from 5 to 32760.
If this field is omitted CA-XCOM will attempt to
generate an acceptable value.
The default depends
on the file format.
Specifies the actual or maximum length of a logical
record in bytes. The variable blocked record format
value should equal the maximum record length + 4.
Fixed or fixed block record format values should
equal the constant record length. Skip this field for
undefined record formats. Enter a value from 5 to
32760. If this field is omitted CA-XCOM will
attempt to generate an acceptable value.
The default depends
on the file format.
CA-XCOM for OpenVMS Alpha Installation and User Guide
Initiating the Transfer
Initiating the Transfer
After you fill in the screen fields, the following prompt is displayed:
Is this information correct? [Y/N] :
Enter Y if you are satisfied with this information.
Enter N to change any of the parameters. The cursor returns to the top of the
screen, where you can resume editing the parameter settings.
If the file transfer initiates now, the screen displays a WORKING... prompt in the
lower left corner. As the file is being sent, CA-XCOM displays the percentage
completed above the prompt. Once the transfer completes,
CA-XCOM displays the transfer statistics and any error messages.
Print a File Screen
Use the Print a File screen shown below to enter the information for transferring
a report file from your computer to a remote computer for printing.
Thu Mar 19 18:45
sys$sysdevice: [al]
CA-XCOM Rel
Print a File
3.x.yymm
SYSTEM
sys$sysdevice: [al]
VMS File Name:A.A
SNA or TCP/IP (S/T): S
Remote System Name:XCPS
Remote User ID:
Remote Password:
Print Title:
Print Writer:
Notify Local User:
Remote Notify Flag: T
Queue the Request (Y/N):N
Compress Data :N
Chkpnt/Resume/None (C/R/N):N
Form Type:
Delete file after printing:Y
Form Control Buffer:
PF1=EXIT PF2=HELP
PF3=PREV SCREEN
Print Destination:
Notify Remote User:
Packing: N
Wait for Remote System (Y/N):N
Hold Printing (Y/N):N
Copies:1
Print Class:
ASA Conversion (Y/N):N
(C) COPYRIGHT 1998 Computer Associates
PF4=DCL
CTRL-G=ABORT
CTRL-E=MSG SCREEN
Figure 6-7: Remote Printing Screen
The Menu Interface
6–13
Print a File Screen
Screen Fields
VMS File Name
SNA or TCP/IP
Enter the OpenVMS filename to be transferred. All
the VMS file naming rules apply.
Enter the transfer type.
The default is none.
The default is S.
Valid options are:
S SNA Transfer
T TCP/IP Transfer
TCP/IP Port
Remote System Name
Print Title
Print Writer
Print Destination
Notify Local User
6–14
Enter the TCP/IP port. This screen field is
displayed only for TCP/IP transfers.
The default is
8044.
Enter the symbolic name of the remote computer
where the file is being sent. Valid symbolic names
are predefined in the CA-XCOM Configuration
File. See the chapter "Configuring CA-XCOM" for
predefined symbolic names.
The default is none.
Enter a title (up to 21 characters) describing the
contents of the print file. This field is normally used
only as a comment, and is not printed as part of the
report. However, on some systems, such as VMS,
this title will be spooled with the printout.
The default is
none.
Enter the MVS system WRITER name that will
receive a report. A maximum of 8 characters may
be entered.
The default is none.
Enter the printer or other device on the remote
system that users wish the report to be sent to. If
not specified, the remote system will send it to the
system's default printer. A maximum of 16
characters may be entered.
The default is none.
Enter the user on your system CA-XCOM will
notify once it has completed this procedure. If users
have VMS WORLD privileges, any local user can
be designated.
The default is none.
CA-XCOM for OpenVMS Alpha Installation and User Guide
Print a File Screen
Notify Remote User
Remote Notify Flag
Enter the user on the remote system CA-XCOM
will notify once it has completed this procedure.
Note that the CA-XCOM message log on the
remote system is always written to when this
procedure completes.
The default is N.
Enter the user-ID type of the remote user to be
notified when the data transfer is complete. The
choices available are:
N
T
W
C
L
R
A
Packing
The default is none.
No Notification
Notify TSO User
Write to log
Notify CICS user
Notify Logical Unit
Notify CA-Roscoe user
Notify OpenVMS user
To turn record packing on, enter Y. It is valid only
for text files and is ignored for binary files. When
packing is on, CA-XCOM reads as many records as
will fit into a 31744-byte buffer before compressing
and transmitting them.
The default is N.
To turn record packing off, enter N
Queue the Request
Specify Y to place this procedure on the system
queue and execute it as an off-line batch job.
The default is N.
Specify N to execute this procedure immediately.
Wait for Remote System
Specify Y if the system is to wait until a session is
established with the remote system before
attempting the transfer.
The default is N.
Specify N if the remote system is currently
unavailable and the procedure is to be aborted.
The Menu Interface
6–15
Print a File Screen
Compress Data
Indicates that the transmitted data be compressed.
Valid values for the compression method are:
N = No
M = LZMEDIUM
Y = Yes
L = LZLARGE
R = RLE
C = COMPACT
S = LZSMALL
T = LCOMPACT
The default is N.
N indicates the transmitted data should NOT be
compressed.
Indicates whether the transferred report file is to be
placed on “HOLD” status on the remote system or
be printed immediately. Type Y to request that it be
held.
The default is N.
Chkpnt allows CA-XCOM users to continue an
interrupted transfer from the point at which the
transfer was stopped. In other words, the
interrupted transfer will automatically resume at a
specified delta time (t) from the point at which it
was interrupted, without having to return to the
beginning of the file. The wait time is in standard
VMS delta time format. See the topic, Checkpoint
Screen, for more information about this screen.
Resume specifies that the indicated transfer be
restarted immediately. It is effective only when the
transfer has been previously checkpointed.
The default is none.
Copies
Specifies the number of copies of the report to be
printed. Enter a value from 1 to 999.
The default is 1.
Form Type
Indicates to the remote operator or user what kind
of form to print the report on. Enter a maximum of
10 characters.
The default is null.
Indicates the print class assigned to this report on
the remote system. If the remote system is an IBM
mainframe then this field indicates the JES2
SYSOUT class. This is a 1 character field.
The default is null.
Hold Printing
Chkpnt/Resume/None
Print Class
6–16
CA-XCOM for OpenVMS Alpha Installation and User Guide
Print a File Screen
Delete file after printing
Indicates whether the file is to be deleted once it
has printed on the remote system. The file is
deleted after printing by default.
The default is Y.
To keep the file, enter N.
ASA conversion
Form Control Buffer
Indicates whether to convert the file to ASA print
format. The file is NOT converted to ASA print
format (also called FORTRAN carriage control) by
default. Enter Y to convert the file.
The default is N.
Indicates the 1 to 4 character FCB that JES is to use
to define the forms control parameters when
printing on the remote system. This screen field is
only displayed when the remote system is an IBM
mainframe.
N/A.
When You Are Done...
You have the option of revising any of the values defined or initiate the
procedure. See Initiating the Transfer in this chapter for information on initiating
a transfer.
The Menu Interface
6–17
Print a File Screen
Checkpoint Screen
Use the Print a File screen shown below to set the checkpoint delta-time interval.
Thu Mar 19 18:46
sys$sysdevice: [al]
CA-XCOM Rel
Print a File
3.x.yymm
SYSTEM
sys$sysdevice: [al]
VMS File Name:A.A
SNA or TCP/IP (S/T): S
Remote System Name:XCPS
Remote User ID:
Print Title:
Print Writer:
Notify Local User:
Remote Notify Flag: T
Queue the Request (Y/N):N
Compress Data :N
Chkpnt/Resume/None (C/R/N):C
Form Type:
Delete file after printing:Y
Remote Password:
Print Destination:
Notify Remote User:
Packing: N
Wait for Remote System (Y/N):N
Hold Printing (Y/N):N
Copies:1
Print Class:
ASA Conversion (Y/N):N
Checkpoint Size: 1000
Checkpointed Transfer Retry Delta-time:
0 01:00:00.00
(C) COPYRIGHT 1998 Computer Associates
PF1=EXIT PF2=HELP PF3=PREV SCREEN PF4=DCL
CTRL-G=ABORT
CTRL-E=MSG SCREEN
Figure 6-8: Checkpoint Screen
Screen Fields
Checkpoint Size
Checkpointed Transfer
Retry Delta Time
Specifies the number of records (1 - 9999) to be transferred
between checkpoints.
The default is
1000.
The amount of time (delta time) CA-XCOM will wait on an
interrupted, restartable transfer before it retries the operation.
The default is
0 01:00:00.0
Delta time has the following format:
[dddd-] [hh:mm:ss.cc]
dddd
hh
mm
ss
cc
The number of days.
The number of hours.
The number of minutes.
The number of seconds.
The number of hundredths of seconds.
You can truncate delta time on the right. Any of the fields can
also be omitted in the middle of the format as long as the
punctuation marks separating the fields are specified.
6–18
CA-XCOM for OpenVMS Alpha Installation and User Guide
Submit a Job Screen
Submit a Job Screen
Use the Submit a Job screen shown below to enter the information for submitting
a job from your computer to be run on a remote computer.
Thu Mar 19 18:47
sys$sysdevice: [al]
CA-XCOM Rel
3.x.yymm
Submit a JOB
SYSTEM
sys$sysdevice: [al]
VMS File Name:A.A
SNA or TCP/IP (S/T): S
Remote System Name:XCPS
Remote User ID:
Remote Password:
Notify Local User:
Remote Notify Flag: T
Notify Remote User:
Packing: N
Queue the Request (Y/N): N
Compress Data : N
Wait for Remote System (Y/N): N
PF1=EXIT PF2=HELP
PF3=PREV SCREEN
(C) COPYRIGHT 1998 Computer Associates
PF4=DCL
CTRL-G=ABORT CTRL-E=MSG SCREEN
Figure 6-9: Submit a Job Screen
Screen Fields
VMS File Name
SNA or TCP/IP
Enter the OpenVMS filename to be transferred. All
VMS file naming conventions apply.
The default is
none.
Enter the transfer type.
The default is S.
Valid options are:
S
T
TCP/IP Port
Remote System Name
SNA Transfer
TCP/IP Transfer
Enter the TCP/IP port. This screen field is displayed
only for TCP/IP transfers.
The default is
8044.
Enter the symbolic name of the remote computer where
the file is to be sent. Valid symbolic names are
predefined in the CA-XCOM Configuration File. For
more information on predefined symbolic names, see
the chapter, "Configuring CA-XCOM.
The default is
none.
The Menu Interface
6–19
Submit a Job Screen
Remote User ID
Remote Password
Notify Local User
Notify Remote User
Remote Notify Flag
Enter the user ID (up to 12 characters) under whose
system resource privileges this file transfer is to be
processed on the remote system. This optional
parameter is important if the remote computer has a
security system since this is the user ID which accesses
the necessary system resources (for example, where the
remote file will be permitted or denied).
The default is
none.
Enter the password (up to 31 characters) associated
with the above user ID. For security reasons, the
password will display as xxxxxxx.
The default is
none.
Specify which user on your system CA-XCOM will
notify once it has completed this procedure. If users
have VMS WORLD privileges, any local user can be
designated.
The default is
none.
Specify which user on the remote system CA-XCOM
will notify once it has completed this procedure. Note
that the CA-XCOM message log on the remote system
is always written to when this procedure completes.
The default is
none.
Enter the user-ID type of the remote user to be notified
when the data transfer is complete.
The default is N.
N
T
W
C
L
R
A
Packing
No Notification
Notify TSO User
Write to log
Notify CICS User
Notify Logical Unit
Notify CA-Roscoe User
Notify OpenVMS User
To turn record packing on, enter Y. It is valid only for
text files and is ignored for binary files. When packing
is on, CA-XCOM reads as many records as will fit into
a 31744-byte buffer before compressing and
transmitting them.
To turn record packing off, enter N
6–20
CA-XCOM for OpenVMS Alpha Installation and User Guide
The default is N.
Submit a Job Screen
Queue the Request
To place this procedure in the system queue and
execute it as an off-line batch job, enter Y.
The default is N.
To execute this procedure immediately, enter N.
Wait for Remote System
If you want CA-XCOM to wait until a session is
established with the remote system before attempting
the transfer, enter Y.
The default is N.
If the remote system is currently unavailable and you
want to abort the procedure, enter Y.
Compress Data
Indicates that the transmitted data be compressed.
Valid values for the compression method are:
N = No
M = LZMEDIUM
Y = Yes
L = LZLARGE
R = RLE
C = COMPACT
S = LZSMALL
T = LCOMPACT
The default is N.
N indicates the transmitted data should NOT be
compressed.
When You Are Done...
You can either revise any of the values you just defined, or initiate the procedure.
For more information on initiating a file transfer, see Initiating the Transfer in
this chapter.
The Menu Interface
6–21
Receive a File Screen
Receive a File Screen
Use the Receive a File screen shown below to enter the information for
transferring a file from a remote computer to your computer.
Thu Mar 19 18:47
sys$sysdevice: [al]
CA-XCOM Rel
Receive a File
3.x.yymm
SYSTEM
sys$sysdevice: [al]
Remote File Name:
SNA or TCP/IP (S/T): S
Remote System Name:XCPS
TCP/IP PORT:
VMS File Name:
Remote User ID:
Remote Password:
Notify Local User:
Remote Notify Flag: T
Unit Name:
Queue the Request (Y/N): N
Compress Data : N
Chkpnt/Resume/None (C/R/N): N
PF1=EXIT
PF2=HELP
Notify Remote User:
Packing: N
Volume Name:
Wait for Remote System (Y/N): N
File Type; Binary or Text (B/T): T
Create/Append/Replace Local File(C/A/R): C
PF3=PREV SCREEN
(C) COPYRIGHT 1998 Computer Associates
PF4=DCL
CTRL-G=ABORT
CTRL-E=MSG SCREEN
Figure 6-10: Receive a File Screen
Screen Fields
Remote File Name
SNA or TCP/IP
Enter the name of the file on the remote system (up to
256 characters) that you are transferring to the local
system.
The default is
none.
Enter the transfer type.
The default is S.
Valid options are:
S
SNA Transfer
T
TCP/IP Port
6–22
TCP/IP Transfer
Enter the TCP/IP port. This screen field is displayed
only for TCP/IP transfers.
CA-XCOM for OpenVMS Alpha Installation and User Guide
The default is
8044.
Receive a File Screen
Remote System Name
VMS File Name
Remote User ID
Remote Password
Notify Local User
Notify Remote User
Enter the symbolic name of the remote computer where
the file is located. Valid symbolic names are predefined
in the CA-XCOM Configuration File. For more
information about predefined symbolic names, see the
chapter, "Configuring CA-XCOM."
The default is
none.
Enter the OpenVMS filename that will hold the
transferred file. All VMS file naming conventions
apply.
The default is
none.
Enter the user ID (up to 12 characters) under whose
system resource privileges this file transfer is to be
processed on the remote system. This optional
parameter is important if the remote computer has a
security system, since this is the user ID which accesses
the necessary system resources (for example, where the
remote file will be permitted or denied).
The default is
none.
Enter the password (up to 31 characters) associated
with the above user ID. For security reasons, the
password will not display on the screen.
The default is
none.
Enter the user on your system CA-XCOM will notify
once it has completed this procedure. If users have
VMS WORLD privileges, any local user can be
designated.
The default is
none.
Enter the user on the remote system CA-XCOM will
notify once it has completed this procedure. Note that
the CA-XCOM message log on the remote system is
always written to when this procedure completes.
The default is
none.
The Menu Interface
6–23
Receive a File Screen
Remote Notify Flag
Enter the user-ID type of the remote user to be notified
when the data transfer is complete. The choices
available are:
N
T
W
C
L
R
A
Packing
The default is N.
No notification
Notify TSO User
Write to log
Notify CICS user
Notify Logical Unit
Notify CA-Roscoe user
Notify OpenVMS user
To turn record packing on, enter Y. It is valid only for
text files and is ignored for binary files. When packing
is on, CA-XCOM reads as many records as will fit into
a 31744-byte buffer before compressing and
transmitting them.
The default is N.
To turn record packing off, enter N.
Unit Name
Volume Name
Queue the Request
The unit name under which the file is residing.
Note: This field is ignored if the partner is not an MVS
platform.
The volume name where the file is residing.
Note: This field is ignored if the partner is not an MVS
platform.
Specify Y to place this procedure in the system queue
and execute it as an off-line batch job.
The default is
none.
The default is
none.
The default is N.
Specify N to execute this procedure immediately.
Wait for Remote System
If you want CA-XCOM to wait until a session is
established with a remote system before attempting the
transfer, enter Y.
If the remote system is currently unavailable and you
want to abort the procedure, enter N.
6–24
CA-XCOM for OpenVMS Alpha Installation and User Guide
The default is N.
Receive a File Screen
Compress Data
Indicates the transmitted data be compressed. Valid
values for the compression method are:
N = No
M = LZMEDIUM
Y = Yes
L = LZLARGE
R = RLE
C = COMPACT
S = LZSMALL
T = LCOMPACT
The default is N.
N indicates the transmitted data should NOT be
compressed.
File Type; Binary or Text
Identifies the type of data that is being transferred. Its
secondary function is to indicate whether the
transferred data is to be translated from ASCII to
EBCDIC.
The default is T.
If the file being sent is a DATA file or a source code file,
select T.
CA-XCOM checks whether the Remote System Name
designated during the installation procedure is an
ASCII or an EBCDIC system. For more information on
the installation procedure, see the chapter "Installing
CA-XCOM." If it is an EBCDIC system, CA-XCOM
performs the translation according to standard
translation tables.
If the file being transferred is an executable, such as a
file with an .EXE extension, select B. CA-XCOM
assumes that because this is a binary file, it should not
be converted to EBCDIC.
Chkpnt/Resume/None
Chkpnt allows CA-XCOM users to continue an
interrupted transfer from the point at which the
transfer was stopped. In other words, the interrupted
transfer will automatically resume at a specified delta
time (t) from the point at which it was interrupted,
without having to return to the beginning of the file.
The wait time is in standard VMS delta time format.
For more information about this field, see the section
Checkpoint Screen.
The default is
none.
Resume specifies that the indicated transfer be restarted
immediately. It is effective only when the transfer has
been previously checkpointed.
The Menu Interface
6–25
Receive a File Screen
Create/Append/Replace
Local File
Determines how CA-XCOM handles the file that will
be receiving the transferred data on the local system.
C
Create a new file on the local system.
A
Append this data to an existing file on the local
system.
R
Replace an existing file on the local system.
The default is C.
When You Are Done...
You can either revise any of the values you just defined, or initiate the procedure.
For more information on initiating a file transfer, see Initiating the Transfer in
this chapter.
6–26
CA-XCOM for OpenVMS Alpha Installation and User Guide
Chapter
7
The Command Line Interface
(DCL)
CA-XCOM includes a set of Digital Command Language (DCL) commands and
qualifiers that you can use to implement the CA-XCOM functions. These
commands and qualifiers follow DCL syntax.
To facilitate the use of the CA-XCOM DCL Command Interface, certain VMS
features, such as the ability to define command procedures, symbols, and logical
names are available.
There are five CA-XCOM DCL Commands:
n
n
n
n
n
XCOM/SENDFILE
XCOM/GETFILE
XCOM/PRINT
XCOM/SUBMIT
XCOM/MENU
This chapter discusses the first four file transfer commands, along with their
required parameters, valid qualifiers, and defaults. (For information about the
XCOM/MENU command, which invokes the Menu Interface, see the chapter
"The Menu Interface.")
Most qualifiers are optional, and their use depends on which features you want
to use or the particular remote system type involved in a procedure. In addition,
many qualifiers have default values that CA-XCOM uses if the qualifier is
omitted. These default values will be noted.
HELP Facility
If the CA-XCOM help text was installed in the system-wide help library, users
can use the DCL HELP command to obtain information about CA-XCOM user
commands and qualifiers. To obtain help information, at the DCL "$" prompt,
type: HELP XCOM
For more information, see the chapter, "Installing CA-XCOM."
The Command Line Interface (DCL)
7–1
The XCOM/SENDFILE Command
The XCOM/SENDFILE Command
Use the XCOM command and the /SENDFILE qualifier to send a copy of a file
from the local system to a remote computer. The local file can either replace an
existing file on the remote system, be appended to an existing file, or be created
as a new file on the remote system. A shorter form of this command is
XCOM/SEND.
Enter the command and qualifier in the following format:
$ XCOM/SENDFILE <local-file> <remote-file>
<local-file>
An existing VMS file on the local system.
<remote-file>
An existing remote system filename that the transferred file
will either replace or be appended to.
OR
A remote system filename that will be created on the remote
system to hold the transferred file.
Specifying Remote System Filenames
Remote system filenames must be specified according to the file naming
conventions of the remote system. If the <remote-file> is not in a format that
VMS can recognize then it must be put in quotation marks:
$ XCOM/SENDFILE <local-file> "<remote-file>"
The <remote-file> can also be specified using the following DECnet filename
convention:
rmtsys "userid password"::filename.typ
7–2
rmtsys
The symbolic name of the remote system defined in the
XCOM configuration file.
Userid
The remote system user whose resource access allows the
file transfer.
Password
The password associated with this user ID.
Filename.typ
The remote system filename.
CA-XCOM for OpenVMS Alpha Installation and User Guide
The XCOM/SENDFILE Command
/SENDFILE Example
In this example, we are sending a copy of a local file STORIES.TXT to a file
named VMS.STORIES, which will be created on an IBM mainframe with the
symbolic name HARPO. There is a security system running on this mainframe.
When the file transfer completes the user RWEISS, whose access privileges we
are using on the remote system, will be notified. The request is queued on the
VMS batch queue SYS$BATCH. Because this transfer creates a new file on the
mainframe, you must supply the file format and record length.
$ XCOM/SEND/RMTSYS=HARPO/QUEUE/USERID=RWEISS/PASSWORD=ENIGMA/
RNOTIFY=RWEISS/FORMAT=FIXED_BLOCKED/BLOCKL=800/RECL=80 STORIES.TXT VMS.STORIES
Using the full DECnet filename convention for specifying the remote system
name, the following command string will also work for this transfer :
$ XCOM/SEND/QUEUE/RNOTIFY=RWEISS/FORMAT= FIXED_BLOCKED/BLOCKL=800/RECL=80
STORIES.TXT HARPO"WEISS ENIGMA"::VMS.STORIES
For an example of how to submit a CA-XCOM transfer as a batch job, see
Submitting a CA-XCOM Transfer as a Batch Job in this chapter.
XCOM/SENDFILE Qualifiers
The table below describes the qualifiers that may be used with this command.
Qualifier
Explanation
/ALLOCTYPE=n
Valid only for the /SENDFILE qualifier.
Used only when creating a file on a remote IBM mainframe. Specifies
the MVS Allocation Type.
Range: C, T, or B
C = Cylinders
T = Tracks
B = Blocks
Default: C
/APPEND
Valid only for the /SENDFILE and /GETFILE qualifiers.
Indicates that the data transferred be appended to the destination file.
Default: If /APPEND, /CREATE, or /REPLACE are not specified then
/CREATE is the default value used.
The Command Line Interface (DCL)
7–3
The XCOM/SENDFILE Command
Qualifier
Explanation
/BINARY
Valid only for the /SENDFILE and /GETFILE qualifiers.
Indicates that the file be treated as data; no translation will be
performed.
Default: If /BINARY or /TEXT is not supplied then /TEXT is the
default value used.
/BLOCKL=nnnnn
Valid only for the /SENDFILE qualifier.
Used only when creating a file on a remote IBM mainframe. It specifies
how many records are contained inside a block. Note that "creating"
means that the "/CREATE" qualifier is specified either explicitly or by
default.
Fixed or Fixed Blocked files - /BLOCKL must be a multiple of the
value for the /RECL field.
Variable record files - /BLOCKL must be at least four bytes larger than
the /RECL field.
Undefined record files - /BLOCKL must be at least as large as the
largest record length.
Range: 5 - 32760
Default: If the /BLOCKL qualifier is not specified and the transfer is
to an IBM mainframe, CA-XCOM will generate an acceptable value.
7–4
CA-XCOM for OpenVMS Alpha Installation and User Guide
The XCOM/SENDFILE Command
Qualifier
Explanation
/CHECKPOINT [=[dddd-] hh:mm:ss.cc]
/NOCHECKPOINT
Valid for the /SENDFILE, /GETFILE, and /PRINT qualifiers.
/CHECKPOINT indicates if the transfer is interrupted, it will
automatically restart, or resume at some delta time (t) in the future from
the point where it left off, without having to return to the beginning of
the file. The delta time is the wait time in standard VMS delta time
format.
/NOCHECKPOINT indicates the transfer is not restartable (i.e., if the
transfer is interrupted, there is no automatic retry).
A delta time has the following format: [dddd-] [hh:mm:ss:cc]
dddd
hh
mm
ss
cc
number of days.
number of hours.
number of minutes.
number of seconds.
number of hundredths of seconds.
The fields located on the righthand side of the delta time format can be
truncated where time is to be specified. Any of the fields can also be
omitted in the middle of the format as long as the punctuation marks
which separate the fields are specified. A restart of the transfer will be
attempted until either the transfer is successful or an aging time limit is
reached, at which point it is aborted.
Default: /NOCHECKPOINT
The default time used is 1 hour, (i.e., 0 01:00:00) if delta time is not specified.
/CKPT
Valid only for the /SENDFILE, /GETFILE, AND /PRINT qualifiers.
Specifies the number of records to be transferred between checkpoints.
Range: 1-9999
Default: 1000
The Command Line Interface (DCL)
7–5
The XCOM/SENDFILE Command
Qualifier
Explanation
/COMPRESS=compression method
/NOCOMPRESS
Valid only for the /SENDFILE, /GETFILE, /SUBMIT, and /PRINT qualifiers.
/COMPRESS indicates the transmitted data be compressed. Valid
values for the compression method are:
n
NO
n
LZMEDIUM
n
YES
n
LZLARGE
n
RLE
n
COMPACT
n
LZSMALL
n
LCOMPACT
/NOCOMPRESS indicates the transmitted data should NOT be
compressed.
Range: /COMPRESS or /NOCOMPRESS
Default: /COMPRESS=NO or /NOCOMPRESS
/CREATE
Valid only for the /SENDFILE and /GETFILE qualifiers.
Indicates the destination file is to be created.
Default: If /APPEND, /CREATE, or /REPLACE are not specified then
/CREATE is the default value used.
/FORMAT=rcd-format
Valid only for the /SENDFILE qualifier.
Equivalent to the DCB RECFM parameter in JCL. The keyword choices
are:
Fixed - The records all have the same length, i.e., they are fixed, with
multiple records contained in one block.
Fixed_Blocked - Fixed record length of one record per block.
Variable_Blocked - Variable record length with multiple records per
block, each of which can have a different length.
Undefined - Undefined record format of one variable length record per
block, where the maximum record length is the blocksize.
Range: Fixed, Fixed_Blocked, Variable_Blocked, Undefined
Default: If the /FORMAT qualifier is not specified, the default value is
Fixed_Blocked.
7–6
CA-XCOM for OpenVMS Alpha Installation and User Guide
The XCOM/SENDFILE Command
Qualifier
Explanation
/ID
Valid only for /SENDFILE, /GETFILE, /SUBMIT, and /PRINT qualifiers.
Associates a descriptive name with this file transfer. This ID can be any
combination of alphanumeric or national characters.
The ID parameter complements the unique request number assigned to
every locally initiated file transfer. Refer to your documentation to find
out where ID parameter can be found. This mnemonic on MVS will
appear before the message on the CA-XCOM Message Log and after the
message when it is displayed on the MVS console.
The ID is passed to remote systems running CA-XCOM Version 2 or
higher. If the remote computer is running Version 1, then an ID of
"REMOTE" will always be assigned to this transfer on the remote
system.
Range: 1-10 characters
Default: none
/LOG[=filename]
/NOLOG
Valid only for the /SENDFILE, /GETFILE, /SUBMIT, and /PRINT qualifiers
/LOG specifies the filename to receive time-stamped CA-XCOM status
or log messages. If no filename is specified it will default to xom.log in
the current directory. /NOLOG specifies that there is to be no message
logging.
Range: 1-64 characters
Default: /LOG
/LNOTIFY=username
Valid only for the /SENDFILE, /GETFILE, /SUBMIT, and /PRINT qualifiers.
Identifies the local OpenVMS user to be notified when the data transfer
is complete.
You must have WORLD privilege to use this field to notify any user on the
system other than yourself.
Range: 1-12 characters
Default: none
/PACK
/NOPACK
Valid only for /SENDFILE, /GETFILE, /SUBMIT, and /PRINT qualifiers.
/PACK is a Boolean item code that specifies record packing. It is
valid only for text files (not binary files). When packing is on,
CA-XCOM reads as many records as will fit into a 31744-byte
The Command Line Interface (DCL)
7–7
The XCOM/SENDFILE Command
Qualifier
Explanation
buffer before compressing and transmitting them.
/NOPACK is a Boolean item code that specifies that packing will
not be used.
/PACK is ignored when /BINARY is specified.
Default: /NOPACK.
/PASSWORD=string
Valid only for the /SENDFILE, /GETFILE, /SUBMIT, and /PRINT qualifiers.
Specifies the password for the user ID under whose resource access
authorization CA-XCOM will execute on the remote system. It should
be the password known to the remote security system. For example:
Mainframe - RACF, CA-ACF2 and CA-Top Secret.
Other Systems - The user's login password.
Range: 1-31 characters
Note: If the remote system has passwords defined in lower case, it is
necessary to place the password value in double quotes, that is,
"mypassword", to retain lower case.
/PORT=n
Valid only for the /SENDFILE, /GETFILE, /SUBMIT, and /PRINT qualifiers.
Specifies a port number other than the default of 8044 for TCP/IP
transfers.
Note: /PORT is valid only when /TCPIP is specified.
Range: 1 - 99999
Default: 8044
/PRIMARY=nnnn
Valid only for the /SENDFILE qualifier
Used only when creating a file on a remote IBM mainframe. Specifies
the MVS Primary Allocation.
Range: 0 - 99999
Default: 0
Note: if the value of 0 is specified, CA-XCOM for MVS will generate an
acceptable value.
7–8
CA-XCOM for OpenVMS Alpha Installation and User Guide
The XCOM/SENDFILE Command
Qualifier
Explanation
/QUEUE=queue-name
/NOQUEUE
Valid only for the /SENDFILE, /GETFILE, /SUBMIT, and /PRINT qualifiers.
/QUEUE specifies the name of a standard VMS execution queue on
which to place this CA-XCOM transfer request. Specifying the qualifier
indicates that the CA-XCOM transfer request should be executed
off-line as a batch job. /NOQUEUE specifies that the transfer request be
executed in the current context. (i.e., it should not be executed off-line as
a batch job.)
Range: 1-31 characters
Default: /NOQUEUE
If no value is specified for /QUEUE, then SYS$BATCH, the default VMS batch
queue, will be used.
/RECL=nnnnn
Valid only for the /SENDFILE qualifier.
Used only when creating a file on a remote IBM mainframe to specify
how many bytes are in a record.
Range: 1-5 ASCII, decimal or numeric characters
Default: If /RECL qualifier is not specified and the transfer is to an IBM
mainframe, CA-XCOM will generate an acceptable value.
/REPLACE
Valid only for the /SENDFILE and /GETFILE qualifiers.
Indicates the destination file is to be replaced.
Default: If /APPEND, /CREATE, or /REPLACE are not specified then
/CREATE is the default value used.
/RESUME
Valid only for the /SENDFILE and /GETFILE qualifiers.
Meaningful only if the transfer had previously been checkpointed,
interrupted, and is awaiting restart. It specifies that the indicated
transfer be restarted immediately.
The Command Line Interface (DCL)
7–9
The XCOM/SENDFILE Command
Qualifier
Explanation
/RMTSYS=remote-system-name
Valid only for the /SENDFILE, /GETFILE, /SUBMIT, and /PRINT qualifiers.
Indicates the name associated with the remote computer. The remote
system name is defined in the CA-XCOM configuration file. For
information on defining remote system names, see the chapter,
"Configuring CA-XCOM".
Range: 1-254 characters
Default: none
Note: If the remote system name is specified as part of the remote file
specification then this item does not have to be supplied.
/RNFLAG=keywordcode
Valid only for the /SENDFILE, /GETFILE, /SUBMIT, and /PRINT qualifiers.
Specifies the user ID type of the remote user to be notified when the
data transfer is complete. The keyword choices available are:
NONE
TSO
LOG
CICS
LU
ROSCOE
VMSUSER
No notification
Notify TSO user
Write to log
Notify CICS User
Notify Logical Unit
Notify CA-Roscoe User
Notify VMS User.
Range: NONE, TSO, LOG, CICS, LU, ROSCOE, VMSUSER
Default: NONE
/RNOTIFY=remote-user-name
Valid only for the /SENDFILE, /GETFILE, /SUBMIT, and /PRINT qualifiers.
Indicates the ID of the remote user to be notified when the data transfer
is complete.
Range: 1-12 characters
Default: none
7–10
CA-XCOM for OpenVMS Alpha Installation and User Guide
The XCOM/SENDFILE Command
Qualifier
Explanation
/SECONDARY=nnnn
Valid only for the /SENDFILE qualifier.
Used only when creating a file on a remote IBM mainframe. Specifies
the MVS Secondary Allocation.
Range: 0 - 99999
Default: 0
Note: If the value of 0 is specified, CA-XCOM for MVS will generate an
acceptable value.
/SNA
Valid only for the /SENDFILE, /GETFILE, /SUBMIT, and /PRINT qualifiers.
Specifies use of the SNA LU6.2 protocol for the transfer.
Note: /SNA and /TCPIP are mutually exclusive. If neither is specified,
SNA is assumed.
/TCPIP
Valid only for the /SENDFILE, /GETFILE, /SUBMIT, and /PRINT qualifiers.
Specifies use of the TCP/IP protocol for the transfer.
Note: /SNA and /TCPIP are mutually exclusive. If neither is specified,
SNA is assumed.
/TDUDATA
Valid only for the /SENDFILE, /GETFILE, /SUBMIT, and /PRINT qualifiers.
Transfer-dependent user data (up to 10 characters). This data is passed
by CA-XCOM VMS to a user application. Its use is determined by the
user application.
Range: 1 - 10 characters
Default: NONE
/TEXT
Valid only for the /SENDFILE and /GETFILE qualifiers.
Specifies that the file be treated as an ASCII text file. When sending
information to, or receiving information from a remote system that uses
a different character representation (e.g., EBCDIC), the file will
automatically be translated.
Default: If /BINARY or /TEXT is not supplied then /TEXT is the
default value used.
The Command Line Interface (DCL)
7–11
The XCOM/SENDFILE Command
Qualifier
Explanation
/TRACE
Valid only for the /SENDFILE, /GETFILE, /SUBMIT, and /PRINT qualifiers.
Used primarily at the request of CA-Technical Support to collect
information which will help diagnose a problem.
/TRUNCATE
/NOTRUNCATE
Valid only for the /SENDFILE qualifier.
/TRUNCATE indicates a record can be truncated from the remote
system if it is too long.
/NOTRUNCATE indicates that the LU 6.2 conversation abend or abort
if a record is encountered which is greater than the maximum allowable
record size.
Range: /TRUNCATE or /NOTRUNCATE
Default: /NOTRUNCATE
/UNIT=string
Valid only for the /SENDFILE and /GETFILE qualifiers.
Used when creating or retrieving a file on a remote IBM mainframe.
Note that "creating" means the "/CREATE" qualifier is specified,
explicitly or by default. The /UNIT qualifier specifies the generic unit
name under which the file will be placed or where it resides.
Range: 1-10 characters
Default: If /UNIT is not entered, the CA-XCOM uses the default unit
name defined in the CA-XCOM MVS Default Options Table.
/UDATA
Valid only for the /SENDFILE, /GETFILE, /SUBMIT, and /PRINT qualifiers.
Indicates that system-wide user data included in the logging
information for file transfers initiated by this system. This data can be
used for correlating CA-XCOM activities in multi-CA-XCOM
environments.
Range: 1-10 characters
Default: none
7–12
CA-XCOM for OpenVMS Alpha Installation and User Guide
The XCOM/SENDFILE Command
Qualifier
Explanation
/USERID=username
Valid only for the /SENDFILE, /GETFILE, /SUBMIT, and /PRINT qualifiers.
Specifies the remote user ID under whose set of resource access
authorization CA-XCOM is to execute on the remote system. It should
be the user ID known to the remote security system. For example:
Mainframe systems - RACF, ACF2, and TOPSECRET.
Other Systems - The user's login username.
Range: 1-12 characters
Default: none
Notes:
If the user ID is specified as part of the remote file specification then this
qualifier does not have to be supplied.
If the remote system has user IDs defined in lower case, it is necessary to
place the username value in double quotes, that is, "username", to retain
lower case.
/VOLUME=volume-name
Valid only for the /SENDFILE and /GETFILE qualifiers.
Used when creating or retrieving a file on a remote IBM mainframe.
Note that "creating" means that the "/CREATE" qualifier is specified,
explicitly or by default. /VOLUME specifies the volume name under
which the file is to be placed or where it resides.
Range: 1-10 characters
Default: If /VOLUME is not supplied, the CA-XCOM default volume
name will be used as defined in the CA-XCOM MVS Default Options
Table.
The Command Line Interface (DCL)
7–13
The XCOM/SENDFILE Command
Qualifier
Explanation
/WAIT[=[dddd-] hh:mm:ss.cc]
/NOWAIT
Valid only for the /SENDFILE, /GETFILE, /SUBMIT and /PRINT qualifiers.
/WAIT specifies that the transfer request should wait in the event that
the remote system is unavailable. The buffer contains the wait time in
standard VMS delta time format. /NOWAIT indicates that the transfer
request abort if the remote system is unavailable.
A delta time has the following format:
[dddd-] [hh:mm:ss:cc]
dddd
hh
mm
ss
cc
The number of days.
The number of hours.
The number of minutes.
The number of seconds.
The number of hundredths of seconds.
The fields located on the righthand side of the delta time format can be
truncated where time is to be specified. Any of the fields can also be
omitted in the middle of the format as long as the punctuation marks
which separate the fields are specified.
Default: /NOWAIT
The default time used is 3 minutes, (i.e., 0 00:03:00) if no value is supplied with
the /WAIT qualifier.
/XTRACE
Valid for the /SENDFILE, /GETFILE, /SUBMIT and /PRINT qualifiers.
/XTRACE specifies if tracing is to be taken of an XCOM transfer. Any
trace will be stored in the XCOM$IMAGE:XTRACE.TXT.
Possible values are:
0 = No tracing
1- 9 = Provide tracing with different levels of detail
Range: 0 - 9
Default: 0
7–14
CA-XCOM for OpenVMS Alpha Installation and User Guide
The XCOM/GETFILE Command
The XCOM/GETFILE Command
Use the CA-XCOM command and the /GETFILE qualifier to retrieve a copy of a
file from a remote IBM mainframe to either replace an existing file on the local
system, append it to an existing file or create a new file on the local system. A
shorter form of this command is XCOM/GET.
Format:
$ XCOM/GETFILE <remote-file> <local-file>
<remote-file>
An existing remote system filename
<local-file>
An existing OpenVMS file on the local system that the
transferred file either replaces or is appended to, or a remote
system filename that the system creates to hold the
transferred file.
Specifying Remote System Filenames
Remote system filenames must be specified according to the file naming
conventions of the remote system. If the <remote-file> is not in a format that
OpenVMS can recognize then it must be put in quotation marks:
$ XCOM/GETFILE "<remote-file>" <local-file>
The <remote-file> can also be specified using the following DECnet filename
convention:
rmtsys "userid password"::filename.typ
rmtsys
The symbolic name of the remote system defined in the
CA-XCOM configuration file.
userid
The remote system user whose resource access allows the file
transfer.
password
The password associated with the user ID.
filename.typ
The remote system filename.
The Command Line Interface (DCL)
7–15
The XCOM/GETFILE Command
GETFILE Example
In this example we are retrieving a copy of the file DWNLD.DAT from an IBM
mainframe with the symbolic name MIDWAY and appending this data to an
existing file named LEAVES.MVS. We want our system to wait until a session is
established with MIDWAY before attempting the transfer. For other qualifiers,
the default values will be used.
$ XCOM/GET/RMTSYS=MIDWAY/WAIT/APPEND LEAVES.MVS DWNLD.DAT
or request the same procedure with the following command string:
$ XCOM/GET/WAIT/APPEND LEAVES.MVS MIDWAY:: DWNLD.DAT
For an example of how to submit a CA-XCOM transfer as a batch job, see
Submitting a CA-XCOM Transfer as a Batch Job in this chapter.
XCOM/GETFILE Qualifiers
The table below describes the qualifiers that may be used with this command.
Qualifier
Explanation
/APPEND
Valid only for the /SENDFILE and /GETFILE qualifiers.
Indicates that the data transferred be appended to the destination file.
Default: If /APPEND, /CREATE, or /REPLACE are not specified then
/CREATE is the default value used.
/BINARY
Valid only for the /SENDFILE and /GETFILE qualifiers.
Indicates that the file be treated as data; no translation will be
performed.
Default: If /BINARY or /TEXT is not supplied then /TEXT is the
default value used.
7–16
CA-XCOM for OpenVMS Alpha Installation and User Guide
The XCOM/GETFILE Command
Qualifier
Explanation
/CHECKPOINT[=[dddd-] hh:mm:ss.cc]
/NOCHECKPOINT
Valid only for the /SENDFILE, /GETFILE, and /PRINT qualifiers.
/CHECKPOINT indicates that an interrupted transfer will
automatically restart, or resume at some delta time (t) in the future, at
the point where it left off, without having to return to the beginning of
the file. The delta time is the wait time in standard VMS delta time
format.
/NOCHECKPOINT indicates the transfer is not restartable (i.e., if the
transfer is interrupted, there is no automatic retry).
A delta time has the following format:
[dddd-] [hh:mm:ss:cc]
dddd
hh
mm
ss
cc
number of days.
number of hours.
number of minutes.
number of seconds.
number of hundredths of seconds.
The fields located on the righthand side of the delta time format can be
truncated where time is to be specified. Any of the fields can also be
omitted in the middle of the format as long as the punctuation marks
which separate the fields are specified. A restart of the transfer will be
attempted until either the transfer is successful or an aging time limit is
reached, at which point it is aborted.
Range: /CHECKPOINT or /NOCHECKPOINT
Default: /NOCHECKPOINT
The default time used is 1 hour (i.e., 0 01:00:00) if delta time is not specified.
/CKPT
Valid only for the /SENDFILE, /GETFILE, and /PRINT qualifiers.
Specifies the number of records to be transferred between checkpoints.
Range: 1-9999
Default: 1000
The Command Line Interface (DCL)
7–17
The XCOM/GETFILE Command
Qualifier
Explanation
/COMPRESS=compression method
/NOCOMPRESS
Valid only for the /SENDFILE, /GETFILE, /SUBMIT, and /PRINT qualifiers.
/COMPRESS indicates the transmitted data be compressed. Valid
values for the compression method are:
n
NO
n
LZMEDIUM
n
YES
n
LZLARGE
n
RLE
n
COMPACT
n
LZSMALL
n
LCOMPACT
/NOCOMPRESS indicates the transmitted data should NOT be
compressed.
Range: /COMPRESS or /NOCOMPRESS
Default: /COMPRESS=NO or /NOCOMPRESS
/CREATE
Valid only for the /SENDFILE and /GETFILE qualifiers.
Indicates the destination file is to be created.
Default: If /APPEND, /CREATE, or /REPLACE are not specified then
/CREATE is the default value used.
/ID
Valid only for the /SENDFILE, /GETFILE, /SUBMIT, and /PRINT qualifiers
Associates a descriptive name with this file transfer. This ID can be any
combination of alphanumeric or national characters.
The ID parameter complements the unique request number assigned to
every locally initiated file transfer. Refer to your documentation to find
out where ID parameter can be found. This mnemonic on MVS will
appear before the message on the CA-XCOM Message Log and after the
message when it is displayed on the MVS console.
The ID is passed to remote systems running CA-XCOM Version 2 or
higher. If the remote computer is running Version 1, then an ID of
"REMOTE" will always be assigned to this transfer on the remote
system.
Range: 1-10 characters
Default: none
7–18
CA-XCOM for OpenVMS Alpha Installation and User Guide
The XCOM/GETFILE Command
Qualifier
Explanation
/LNOTIFY=username
Valid only for the /SENDFILE, /GETFILE, /SUBMIT, and /PRINT qualifiers.
Identifies the local OpenVMS user to be notified when the data transfer
is complete.
You must have WORLD privilege to use this field to notify any user on the
system other than yourself.
Range: 1-12 characters
Default: none
/LOG[=filename]
/NOLOG
Valid only for the /SENDFILE, /GETFILE, /SUBMIT, and /PRINT qualifiers.
/LOG specifies the filename to receive time-stamped CA-XCOM status,
or log messages. If no filename is specified, it will default to xcom.log in
the current directory. /NOLOG specifies that there is to be no message
logging.
Range: 1-64 characters
Default: /LOG
/PASSWORD=string
Valid only for the /SENDFILE, /GETFILE, /SUBMIT, and /PRINT qualifiers.
Specifies the password for the user ID under whose resource access
authorization CA-XCOM will execute on the remote system. It should
be the password known to the remote security system. For example:
Mainframe systems - RACF, ACF2 and TOPSECRET.
Other Systems - The user's login password.
Range: 1-31 characters
Default: none
Note: If the remote system has passwords defined in lower case, it is
necessary to place the password value in double quotes, that is,
"mypassword", to retain lower case.
The Command Line Interface (DCL)
7–19
The XCOM/GETFILE Command
Qualifier
Explanation
/PACK
/NOPACK
Valid only for the /SENDFILE, /GETFILE, /SUBMIT, and /PRINT qualifiers.
/PACK is a Boolean item code that specifies record packing. It is valid
only for text files (not binary files). When packing is on, CA-XCOM
reads as many records as will fit into a 31744-byte buffer before
compressing and transmitting them.
/NOPACK is a Boolean item code that specifies that packing will not be
used.
/PACK is ignored when /BINARY is specified.
Default: /NOPACK.
/PORT
Valid only for the /SENDFILE, /GETFILE, /SUBMIT, and /PRINT qualifiers.
Specifies a port number besides the default (8044) for TCP/IP transfers.
Note: /PORT is relevant only when /TCPIP is specified.
Range: 1-99999
Default: 8044
/QUEUE=queue_name
/NOQUEUE
Valid only for the /SENDFILE, /GETFILE, /SUBMIT, and /PRINT qualifiers.
/QUEUE specifies the name of a standard VMS execution queue on
which to place this CA-XCOM transfer request. Specifying the qualifier
indicates that the CA-XCOM transfer request should be executed
off-line as a batch job. /NOQUEUE specifies that the transfer request
should not be executed off-line as a batch job).
Range: 1-31 characters
Default: /NOQUEUE
If no value is specified for /QUEUE then SYS$BATCH, the default VMS batch
queue, will be used.
/REPLACE
Valid only for the /SENDFILE, and /GETFILE qualifiers.
Indicates the destination file is to be replaced.
Default: If /APPEND, /CREATE, or /REPLACE are not specified then
/CREATE is the default value used.
/RESUME
Valid only for the /SENDFILE and /GETFILE qualifiers.
Meaningful only if the transfer had previously been checkpointed,
interrupted, and is awaiting restart. It specifies that the indicated
7–20
CA-XCOM for OpenVMS Alpha Installation and User Guide
The XCOM/GETFILE Command
Qualifier
Explanation
transfer be restarted immediately.
/RMTSYS =remote-system-name
Valid only for the /SENDFILE, /GETFILE, /SUBMIT, and /PRINT qualifiers.
Indicates the name associated with the remote computer. The remote
system name is defined in the CA-XCOM configuration file. For
information about defining remote system names, see the chapter,
"Configuring CA-XCOM for OpenVMS Alpha".
Range: 1-254 characters
Default: none
Note: If the remote system name is specified as part of the remote file
specification then this item does not have to be supplied.
/RNFLAG=keywordcode
Valid only for the /SENDFILE, /GETFILE, /SUBMIT, and /PRINT qualifiers.
Specifies the user ID type of the remote user to be notified when the
data transfer is complete. The keyword choices available are:
NONE
TSO
LOG
CICS
LU
ROSCOE
VMSUSER
No notification
Notify TSO user
Write to log
Notify CICS User
Notify Logical Unit
Notify CA-Roscoe User
Notify VMS User.
Range: NONE, TSO, LOG, CICS, LU, ROSCOE, VMSUSER
Default: NONE
/RNOTIFY=remote-user-name
Valid for the /SENDFILE, /GETFILE, /SUBMIT, and /PRINT qualifiers only.
Indicates the ID of the remote user to be notified when the data transfer
is complete.
Range: 1-12 characters
Default: none
/SNA
Valid for the /SENDFILE, /GETFILE, /SUBMIT, and /PRINT qualifiers only.
Specifies use of the SNA LU6.2 protocol for the file transfer.
Note: /SNA and /TCPIP are mutually exclusive. If neither is specified,
SNA is assumed.
The Command Line Interface (DCL)
7–21
The XCOM/GETFILE Command
Qualifier
Explanation
/TCPIP
Valid for the /SENDFILE, /GETFILE, /SUBMIT, and /PRINT qualifiers only.
Specifies use of the TCP/IP protocol for the file transfer.
Note: /SNA and /TCPIP are mutually exclusive. If neither is specified,
SNA is assumed.
/TDUDATA
Valid for the /SENDFILE, /GETFILE, /SUBMIT, and /PRINT qualifiers only.
Transfer-dependent user data (up to 10 characters) that CA-XCOM VMS
passes to a user application. Its use is determined by the user
application.
Range: 1-10 characters
Default: none
Valid only for the /SENDFILE and /GETFILE qualifiers.
/TEXT
Specifies that the file be treated as an ASCII text file. When sending
information to, or receiving information from a remote system that uses
a different character representation (e.g., EBCDIC) the file will
automatically be translated.
Default: If /BINARY or /TEXT is not supplied then /TEXT is the
default value used.
/TRACE
Valid only for the /SENDFILE, /GETFILE, /SUBMIT, and /PRINT qualifiers.
Used primarily at the request of CA-Technical Support to collect
information which will help diagnose a problem.
/UDATA
Valid for the /SENDFILE, /GETFILE, /SUBMIT, and /PRINT qualifiers only.
Indicates that system-wide user data included in the logging
information for file transfers initiated by this system. This data can be
used to correlate CA-XCOM activities in multi-CA-XCOM
environments.
Range: 1-10 characters
Default: none
7–22
CA-XCOM for OpenVMS Alpha Installation and User Guide
The XCOM/GETFILE Command
Qualifier
Explanation
/UNIT=string
Valid only for the /SENDFILE and /GETFILE qualifiers.
Used when creating or retrieving a file on a remote IBM mainframe.
Note that "creating" means that "/CREATE" qualifier is specified,
explicitly or by default. The /UNIT qualifier specifies the generic unit
name under which the file will be placed or where it resides.
Range: 1-10 characters
Default: If /UNIT is not entered, the CA-XCOM default unit name will
be used as defined in the CA-XCOM MVS Default Options Table.
/USERID=username
Valid only for the /SENDFILE, /GETFILE, /SUBMIT, and /PRINT qualifiers.
Specifies the remote user ID under whose set of resource access
authorization CA-XCOM is to execute on the remote system. It should
be the user ID known to the remote security system. For example:
Mainframe systems - RACF, CA-ACF2, and CA-Top Secret
Other systems - The user's login username.
Range: 1-12 characters
Default: none
Note: If the user ID is specified as part of the remote file specification
then this qualifier does not have to be supplied.
Also, if the remote system has user IDs defined in lower case, it is
necessary to place the username value in double quotes, that is,
"username", to retain lower case.
/VOLUME=volume-name
Valid only for the /SENDFILE and /GETFILE qualifiers.
Used when creating or retrieving a file on a remote IBM mainframe.
Note that "creating" means that the "/CREATE" qualifier is specified,
explicitly or by default. /VOLUME specifies the volume name under
which the file is to be placed or where it resides.
Range: 1-10 characters
Default: If /VOLUME is not supplied, CA-XCOM uses the default
volume name defined in the CA-XCOM MVS Default Options Table.
The Command Line Interface (DCL)
7–23
The XCOM/GETFILE Command
Qualifier
Explanation
/WAIT[=[dddd-] hh:mm:ss.cc]
Valid only for the /SENDFILE, /GETFILE, /SUBMIT and /PRINT qualifiers.
/WAIT specifies that the transfer request should wait if the remote
system is unavailable. The buffer contains the wait time in standard
VMS delta time format. /NOWAIT indicates that the transfer request
abort if the remote system is unavailable.
A delta time has the following format:
[dddd-] [hh:mm:ss:cc]
dddd
hh
mm
ss
cc
The number of days.
The number of hours.
The number of minutes.
The number of seconds.
The number of hundredths of seconds.
The fields located on the righthand side of the delta time format can be
truncated where time is to be specified. Any of the fields can also be
omitted in the middle of the format as long as the punctuation marks
which separate the fields are specified.
Default: /NOWAIT
The default time used is 3 minutes, (i.e., 0 00:03:00) if no value is supplied with
the /WAIT qualifier.
/XTRACE
Valid for the /SENDFILE, /GETFILE, /SUBMIT and /PRINT qualifiers.
/XTRACE specifies if tracing is to be taken of an XCOM transfer. Any
trace will be stored in the XCOM$IMAGE:XTRACE.TXT.
Possible values are:
0 = No tracing
1- 9 = Provide tracing with different levels of detail
Range: 0 - 9
Default: 0
7–24
CA-XCOM for OpenVMS Alpha Installation and User Guide
The XCOM/PRINT Command
The XCOM/PRINT Command
Use the CA-XCOM command and the /PRINT qualifier to send a copy of a file to
a remote IBM mainframe for printing.
To enter the command and qualifier, use the following format:
$ XCOM/PRINT <local-file> <remote-system>::
<local-file>
An existing local filename
<remote-system>
The remote node name
You must enter the double colons at the end of the command.
Remote System
Name Specification
The remote system name can be specified using the DECnet filename convention
with the following format:
rmtsys"userid password"::
where "rmtsys" is the optional name of the remote computer to which you are
sending.
If "rmtsys" is not specified, then the remote system name must be specified via
the /RMTSYS qualifier. Similarly, "userid password" replaces the /USERID
qualifier and the /PASSWORD qualifier. The password field cannot appear
without the user ID field. The quotes are only necessary when specifying the
user ID and the password.
/PRINT Examples
In this example we are sending a report file called AUGUST.RPT on our local
system to another computer with the symbolic name ALTER. The report's title is
"Personnel Changes" and we want the printer queue designated DIABLO2 to
print six copies. For other qualifiers the default values will be used.
$ XCOM/PRINT/RMTSYS=ALTER/RNOTIFY=BOSS/TITLE="Personnel Changes"/COPIES=6/DESTINATION=DIABLO2 AUGUST.RPT
Or, request the same procedure with the following command string:
$ XCOM/PRINT/RNOTIFY=BOSS/TITLE="Personnel Changes"/COPIES=6 /DESTINATION=DIABLO2
AUGUST.RPT ALTER::
In the former case, the second parameter was used to specify the remote system.
For an example of how to submit a CA-XCOM transfer as a batch job, see the
topic Submitting a CA-XCOM Transfer as a Batch Job later in this chapter.
The Command Line Interface (DCL)
7–25
The XCOM/PRINT Command
XCOM/PRINT Qualifiers
The table below describes the qualifiers that may be used with this command.
Qualifier
Explanation
/ASA
Valid only for the /PRINT function code.
/ASA indicates that CA-XCOM is to convert the file to ASA print
format, also called FORTRAN carriage control. /ASA is a format
supported by most IBM and DEC printers./NOASA indicates that there
is to be no ASA conversion of the file.
Range: /ASA or /NOASA
Default: /NOASA
/CHECKPOINT[=[dddd-] hh:mm:ss.cc]
/NO CHECKPOINT
Valid only for the /SENDFILE, /GETFILE, and /PRINT qualifiers.
/CHECKPOINT indicates that an interrupted transfer will
automatically restart, or resume at some delta time (t) in the future, at
the point where it left off, without having to return to the beginning of
the file. The delta time is the wait time in standard VMS delta time
format. /NOCHECKPOINT indicates the transfer is not restartable (i.e.,
if the transfer is interrupted, there is no automatic retry).
A delta time has the following format:
[dddd-] [hh:mm:ss:cc]
dddd
hh
mm
ss
cc
number of days
number of hours
number of minutes
number of seconds
number of hundredths of seconds.
The fields located on the righthand side of the delta time format can be
truncated where time is to be specified. Any of the fields can also be
omitted in the middle of the format as long as the punctuation marks
which separate the fields are specified. A restart of the transfer will be
attempted until either the transfer is successful or an aging time limit is
reached, at which point it is aborted.
Range: /CHECKPOINT or /NOCHECKPOINT
Default: /NOCHECKPOINT
The default time used is 1 hour, (i.e., 0 01:00:00) if delta time is not specified.
7–26
CA-XCOM for OpenVMS Alpha Installation and User Guide
The XCOM/PRINT Command
Qualifier
Explanation
/CKPT
Valid only for the /SENDFILE, /GETFILE, and /PRINT qualifiers.
Specifies the number of records to be transferred between checkpoints.
Range: 1-9999
Default: 1000
/CLASS=class-id
Valid only for the /PRINT function code.
Specifies the print class through which the print request is to be placed
on the remote system. If the remote system is an IBM mainframe, then
this field indicates the JES2 SYSOUT class.
Range: 1 character string
/COMPRESS=compression method
/NOCOMPRESS
Valid only for the /SENDFILE, /GETFILE, /SUBMIT, and /PRINT qualifiers.
/COMPRESS indicates the transmitted data be compressed. Valid
values for the compression method are:
n
NO
n
LZMEDIUM
n
YES
n
LZLARGE
n
RLE
n
COMPACT
n
LZSMALL
n
LC
O
M
P
A
C
T
/NOCOMPRESS indicates the transmitted data should NOT be
compressed.
Range: /COMPRESS or /NOCOMPRESS
Default: /COMPRESS=NO or /NOCOMPRESS
/COPIES=nnn
Valid only for the /PRINT function code.
Specifies the number of copies to be printed on the remote system.
Range: 1-999
Default: 1
The Command Line Interface (DCL)
7–27
The XCOM/PRINT Command
Qualifier
Explanation
/DELETE
/NODELETE
Valid only for the /PRINT function code.
/DELETE indicates that the file be deleted after printing on the remote
system./NODELETE indicates that the file be kept or retained on the
remote system after it is printed.
Range: /DELETE or /NODELETE
Default: /NODELETE
With respect to remotely initiated transfers, i.e., a user on a remote system
initiates a report print on a VMS system, the default is to delete the file after it
has printed on the OpenVMS.
/DESTINATION=string
Valid only for the /PRINT function code.
Specifies the print destination for the output on the remote system.
Range: 1-21 characters
Default: If this qualifier is not supplied, the remote system will send it
to the system's default printer. The actual number of valid characters
are dependent on the remote system.
/FCB=xxxx
Valid only for the /PRINT function code.
Used only when printing a file on a remote IBM mainframe. It specifies
the Forms Control Buffer (FCB) that JES will use to define the forms
control parameter used when printing on the remote system.
Range: 1-4 characters
Default: If this qualifier is not supplied, there is no default value.
/FORM=string
Valid only for the /PRINT function code.
Used to inform the remote operator of the type of form on which to
print the request.
Range: 1-10 characters
Default: The actual number of valid characters is dependent on the
remote system.
7–28
CA-XCOM for OpenVMS Alpha Installation and User Guide
The XCOM/PRINT Command
Qualifier
Explanation
/HOLD
/NOHOLD
Valid only for the /PRINT function code.
/HOLD specifies that the print request is to be placed on "HOLD" status
on the remote system. /NOHOLD specifies that the print request is to
be sent for immediate printing on the remote system.
Range: /HOLD or /NOHOLD
Default: /NOHOLD
/ID
Valid only for the /SENDFILE, /GETFILE, /SUBMIT, and /PRINT qualifiers.
The ID parameter complements the unique request number assigned to
every locally initiated file transfer. Refer to your documentation to find
out where ID parameter can be found. This mnemonic on MVS will
appear before the message on the CA-XCOM Message Log and after the
message when it is displayed on the MVS console.
The ID is passed to remote systems running CA-XCOM Version 2 or
higher. If the remote computer is running Version 1, then an ID of
"REMOTE" will always be assigned to this transfer on the remote
system.
Range: 1-10 characters
Default: none
/LNOTIFY=username
Valid only for the /SENDFILE, /GETFILE, /SUBMIT, and /PRINT qualifiers.
Identifies the local OpenVMS user to be notified when the data transfer
is complete. You must have WORLD privilege to use this field to notify any
user on the system other than yourself.
Range: 1-12 characters
Default: none
/LOG[=filename]
/NOLOG
Valid only for the /SENDFILE, /GETFILE, /SUBMIT, and /PRINT qualifiers.
/LOG specifies the filename to receive time-stamped CA-XCOM status,
or log messages. If no filename is specified, it will default to xcom.log in
the current directory. /NOLOG specifies that there is to be no message
logging.
Range: 1-64 characters
Default: /LOG
The Command Line Interface (DCL)
7–29
The XCOM/PRINT Command
Qualifier
Explanation
/PACK
/NOPACK
Valid only for the /SENDFILE, /GETFILE, /SUBMIT, and /PRINT qualifiers.
/PACK is a Boolean item code that specifies record packing. It is valid
only for text files (not binary files). When packing is on, CA-XCOM
reads as many records as will fit into a 31744-byte buffer before
compressing and transmitting them.
/NOPACK is a Boolean item code that specifies that packing will not be
used.
Default: /NOPACK.
/PASSWORD=string
Valid only for the /SENDFILE, /GETFILE, /SUBMIT, and /PRINT qualifiers.
Specifies the password for the user ID under whose resource access
authorization CA-XCOM will execute on the remote system. It should
be the password known to the remote security system. For example:
Mainframe systems - RACF, ACF2 and TOPSECRET.
Other systems - The user's login password.
Range: 1-31 characters
Default: none
Note: If the remote system has passwords defined in lower case, it is
necessary to place the password value in double quotes, that is,
"mypassword", to retain lower case.
/PORT=n
Valid only for the /SENDFILE, /GETFILE, /SUBMIT, and /PRINT qualifiers.
Specifies a port number other than the default of 8044 for transfers over
TCP/IP.
Note: /PORT is valid only when /TCPIP is specified
Range: 1-99999
Default: 8044
7–30
CA-XCOM for OpenVMS Alpha Installation and User Guide
The XCOM/PRINT Command
Qualifier
Explanation
/QUEUE=queue-name
/NOQUEUE
Valid only for the /SENDFILE, /GETFILE, /SUBMIT, and /PRINT qualifiers.
/QUEUE specifies the name of a standard VMS execution queue on
which to place this CA-XCOM transfer request. Specifying the qualifier
indicates that the CA-XCOM transfer request should be executed
off-line as a batch job. /NOQUEUE specifies that the transfer request be
executed in the current context (i.e., it should not be executed off-line as
a batch job.)
Range: 1-31 characters
Default: /NOQUEUE
If no value is specified for /QUEUE then SYS$BATCH, the default
VMS batch queue, will be used.
/RMTSYS =remote-system-name
Valid only for the /SENDFILE, /GETFILE, /SUBMIT, and /PRINT qualifiers.
Indicates the name associated with the remote computer. The remote
system name is defined in the CA-XCOM configuration file. See the
chapter "Configuring CA-XCOM" for information on defining remote
system names.
Range: 1-254 characters
Default: none
Note: If the remote system name is specified as part of the remote file
specification then this item does not have to be supplied.
/RNFLAG=keywordcode
Valid only for the /SENDFILE, /GETFILE, /SUBMIT, and /PRINT qualifiers.
Specifies the user ID type of the remote user to be notified when the
data transfer is complete. The keyword choices available are:
NONE
TSO
LOG
CICS
LU
ROSCOE
VMSUSER
No notification
Notify TSO user
Write to log
Notify CICS User
Notify Logical Unit
Notify CA-Roscoe User
Notify VMS User
Range: NONE, TSO, LOG, CICS, LU, ROSCOE, VMSUSER
Default: NONE
The Command Line Interface (DCL)
7–31
The XCOM/PRINT Command
Qualifier
Explanation
/RNOTIFY=remote-user-name
Valid only for the /SENDFILE, /GETFILE, /SUBMIT, and /PRINT qualifiers.
Indicates the ID of the remote user to be notified when the data transfer
is complete.
Range: 1-12 characters
Default: none
Valid only for the /SENDFILE, /GETFILE, /SUBMIT, and /PRINT qualifiers.
/SNA
Specifies use of the SNA LU6.2 protocol for the transfer.
Note: /SNA and /TCPIP are mutually exclusive. If neither is specified,
SNA is assumed.
/TCPIP
Valid only for the /SENDFILE, /GETFILE, /SUBMIT, and /PRINT qualifiers.
Specifies use of the TCP/IP protocol for the transfer.
Note: /SNA and /TCPIP are mutually exclusive. If neither is specified,
SNA is assumed.
/TDUDATA
Valid only for the /SENDFILE, /GETFILE, /SUBMIT, and /PRINT qualifiers.
Transfer-dependent user data (up to 10 characters). This data is passed
by CA-XCOM VMS to a user application. Its use is determined by the
user application.
Range: 1 - 10 characters
Default: NONE
/TITLE=string
Valid only for the /PRINT function code.
Specifies the report title used to describe the contents of a print request
on a remote system. Although the title is generally used as a comment
and will not be printed as part of the request, some operating systems
(such as OpenVMS) allow a print title to be spooled with the print data.
Range: 1-21 characters
Default: none
7–32
CA-XCOM for OpenVMS Alpha Installation and User Guide
The XCOM/PRINT Command
Qualifier
Explanation
/TRACE
Valid only for the /SENDFILE, /GETFILE, /SUBMIT, and /PRINT qualifiers.
Used primarily at the request of CA-Technical Support to collect
information which will help diagnose a problem.
/UDATA
Valid only for the /SENDFILE, /GETFILE, /SUBMIT, and /PRINT qualifiers.
Indicates that system-wide user data included in the logging
information for file transfers initiated by this system. This data can be
used for the correlation of CA-XCOM activities in multi-XCOM
environments.
Range: 1-10 characters
Default: none
/USERID=username
Valid only for the /SENDFILE, /GETFILE, /SUBMIT, and /PRINT qualifiers.
Specifies the remote user ID under whose set of resource access
authorization CA-XCOM is to execute on the remote system. It should
be the user ID known to the remote security system. For example:
Mainframe systems - RACF, CA-ACF2, and CA-Top Secret.
Other systems - The user's login username.
Range: 1-12 characters
Default: none
Note: If the user ID is specified as part of the remote file specification,
then this qualifier does not have to be supplied.
If the remote system has user IDs defined in lower case, it is necessary to
place the username value in double quotes, that is, "username", to retain
lower case.
The Command Line Interface (DCL)
7–33
The XCOM/PRINT Command
Qualifier
Explanation
/WAIT[=[dddd-] hh:mm:ss.cc]
Valid only for the /SENDFILE, /GETFILE, /SUBMIT and /PRINT qualifiers.
/WAIT specifies that the transfer request should wait in the event that
the remote system is unavailable. The buffer contains the wait time in
standard VMS delta time format. /NOWAIT indicates that the transfer
request abort if the remote system is unavailable.
A delta time has the following format:
[dddd-] [hh:mm:ss:cc]
dddd
hh
mm
ss
cc
number of days
number of hours
number of minutes
number of seconds
number of hundredths of seconds.
The fields located on the righthand side of the delta time format can be
truncated where time is to be specified. Any of the fields can also be
omitted in the middle of the format as long as the punctuation marks
which separate the fields are specified.
Default: /NOWAIT
The default time used is 3 minutes, (i.e., 0 00:03:00) if no value is supplied with
the /WAIT qualifier.
/ WRITER
Valid only for /PRINT qualifiers.
Specifies the WRITER name on the MVS system to receive a report.
Range: 1-8 characters
Default: none
7–34
CA-XCOM for OpenVMS Alpha Installation and User Guide
The XCOM/SUBMIT Command
Qualifier
Explanation
/XTRACE
Valid for the /SENDFILE, /GETFILE, /SUBMIT and /PRINT qualifiers.
/XTRACE specifies if tracing is to be taken of an XCOM transfer. Any
trace will be stored in the XCOM$IMAGE:XTRACE.TXT.
Possible values are:
0 = No tracing
1- 9 = Provide tracing with different levels of detail
Range: 0 - 9
Default: 0
The XCOM/SUBMIT Command
Use the XCOM command and the /SUBMIT qualifier to send a job for execution
on a remote system.
Enter the command and qualifier using the following format:
$ XCOM/SUBMIT <local-file> <remote-system>::
<local-file>
An existing local filename.
<remote-system>
The remote node name.
You must enter the double colons at the end of the command.
Remote System
Name Specification
The remote system name can be specified using the DECnet filename
convention with the following format:
rmtsys"userid password"::
where "rmtsys" is the optional name of the remote computer to which you are
sending.
If "rmtsys" is not specified, then the remote system name must be specified via
the /RMTSYS qualifier. Similarly, "userid password" replaces the /USERID
qualifier and the /PASSWORD qualifier. The password field cannot appear
without the user ID field. The quotes are only necessary when specifying the
user ID and the password.
The Command Line Interface (DCL)
7–35
The XCOM/SUBMIT Command
XCOM/SUBMIT Examples
In this example, we are sending a file called PAYROLL.JCL containing JCL and
data to execute as a job on an IBM mainframe with the symbolic name is CHICO.
There is a security system running on this mainframe, and we will be running
this job under the access privileges assigned to the remote user GOULD whose
password is DARWIN. For other qualifiers the default values will be used.
$ XCOM/SUBMIT/RMTSYS=CHICO/USERID=GOULD/PASSWORD=DARWIN PAYROLL.JCL
or request the same procedure with the following command string:
$ XCOM/SUBMIT PAYROLL.JCL CHICO"GOULD DARWIN"::
For an example of how to submit a CA-XCOM transfer as a batch job, see the
topic Submitting a CA-XCOM Transfer as a Batch Job.
XCOM/SUBMIT Qualifiers
The table below describes the qualifiers that may be used with this command.
Qualifier
Explanation
/COMPRESS=
compression method
/NOCOMPRESS
Valid only for the /SENDFILE, /GETFILE, /SUBMIT, and /PRINT qualifiers.
/COMPRESS indicates the transmitted data be compressed. Valid values
for the compression method are:
n
NO
n
LZMEDIUM
n
YES
n
LZLARGE
n
RLE
n
COMPACT
n
LZSMALL
n
LCOM
PACT
/NOCOMPRESS indicates the transmitted data should NOT be compressed.
Range: /COMPRESS or /NOCOMPRESS
Default: /COMPRESS=NO or /NOCOMPRESS
7–36
CA-XCOM for OpenVMS Alpha Installation and User Guide
The XCOM/SUBMIT Command
Qualifier
Explanation
/ID
Valid only for the /SENDFILE, /GETFILE, /SUBMIT, and /PRINT qualifiers.
The ID parameter complements the unique request number assigned to every
locally initiated file transfer. Refer to your documentation to find out where ID
parameter can be found. This mnemonic on MVS will appear before the
message on the CA-XCOM Message Log and after the message when it is
displayed on the MVS console.
The ID is passed to remote systems running CA-XCOM Version 2 or higher. If
the remote computer is running Version 1, then an ID of "REMOTE" will
always be assigned to this transfer on the remote system.
Range: 1-10 characters
Default: none
/LNOTIFY=username
Valid only for the /SENDFILE, /GETFILE, /SUBMIT, and /PRINT qualifiers.
Identifies the local OpenVMS user to be notified when the data transfer is
complete.
You must have WORLD privilege to use this field to notify any user on the system
other than yourself.
Range: 1-12 characters
Default: none
/LOG[=filename]
/NOLOG
Valid only for the /SENDFILE, /GETFILE, /SUBMIT, and /PRINT qualifiers.
/LOG specifies the filename to receive time-stamped CA-XCOM status, or log
messages. If no filename is specified, it will default to xcom.log in the current
directory. /NOLOG specifies that there is to be no message logging.
Range: 1-64 characters
Default: /LOG
/PACK
/NOPACK
Valid only for the /SENDFILE, /GETFILE, /SUBMIT, and /PRINT qualifiers.
/PACK is a Boolean item code that specifies record packing. It is valid only
for text files (not binary files). When packing is on, CA-XCOM reads as many
records as will fit into a 31744-byte buffer before compressing and
transmitting them.
/NOPACK is a Boolean item code that specifies that packing will not be used.
Default: /NOPACK.
The Command Line Interface (DCL)
7–37
The XCOM/SUBMIT Command
Qualifier
Explanation
/PORT=n
Valid only for the /SENDFILE, /GETFILE, /SUBMIT, and /PRINT qualifiers.
Specifies a port number for transfers over TCP/IP.
Note: /PORT is relevant only when /TCPIP is specified.
Range: 1-99999
Default: 8044
/PASSWORD=string
Valid only for the /SENDFILE, /GETFILE, /SUBMIT, and /PRINT qualifiers.
Specifies the password associated with the user ID under whose set of
resource access authorization CA-XCOM is to execute on the remote system.
It should be the password known to the remote security system. For example:
Mainframe systems - RACF, CA-ACF2 and CA-Top Secret.
Other systems - The user's login password.
Range: 1-31 characters
Default: none
Note: If the remote system has passwords defined in lower case, it is necessary
to place the password value in double quotes, that is, "mypassword", to retain
lower case.
/QUEUE=queue-name
/NOQUEUE
Valid only for the /SENDFILE, /GETFILE, /SUBMIT, and /PRINT qualifiers.
/QUEUE specifies the name of a standard VMS execution queue on which to
place this CA-XCOM transfer request. Specifying the qualifier indicates that
the CA-XCOM transfer request should be executed off-line as a batch job.
/NOQUEUE specifies that the transfer request be executed in the current
context (i.e., it should not be executed offline as a batch job).
Range: 1-31 characters
Default: /NOQUEUE
If no value is specified with /QUEUE then SYS$BATCH, the default VMS batch
queue, will be used.
7–38
CA-XCOM for OpenVMS Alpha Installation and User Guide
The XCOM/SUBMIT Command
Qualifier
Explanation
/RMTSYS=remote-system-name
Valid only for the /SENDFILE, /GETFILE, /SUBMIT, and /PRINT qualifiers.
Indicates the name associated with the remote computer. The remote system
name is defined in the CA-XCOM configuration file. For more information on
defining remote system names, see the chapter "Configuring CA-XCOM for
OpenVMS Alpha".
Range: 1-254 characters
Default: none
Note: If the remote system name is specified as part of the remote file
specification then this item does not have to be supplied.
/RNFLAG=keywordcode
Valid only for the /SENDFILE, /GETFILE, /SUBMIT, and /PRINT qualifiers.
Specifies the user ID type of the remote user to be notified when the data
transfer is complete.
The keyword choices available are:
NONE
TSO
LOG
CICS
LU
ROSCOE
VMSUSER
No notification
Notify TSO user
Write to log
Notify CICS User
Notify Logical Unit
Notify CA-Roscoe User
Notify OpenVMS User.
Range: NONE, TSO, LOG, CICS, LU, ROSCOE, VMSUSER
Default: NONE
/RNOTIFY=remote-user-name
Valid only for the /SENDFILE, /GETFILE, /SUBMIT, and /PRINT qualifiers.
Indicates the ID of the remote user to be notified when the data transfer is
complete.
Range: 1-12 characters
Default: none
/SNA
Valid only for the /SENDFILE, /GETFILE, /SUBMIT, and /PRINT qualifiers.
Specifies use of the SNA LU6.2 protocol for the transfer.
Note: /SNA and /TCPIP are mutually exclusive. If neither is specified, SNA
is assumed.
The Command Line Interface (DCL)
7–39
The XCOM/SUBMIT Command
Qualifier
Explanation
/TCPIP
Valid only for the /SENDFILE, /GETFILE, /SUBMIT, and /PRINT qualifiers.
Specifies use of the TCP/IP protocol for the transfer.
Note: /SNA and /TCPIP are mutually exclusive. If neither is specified, SNA
is assumed.
/TDUDATA
Valid only for the /SENDFILE, /GETFILE, /SUBMIT, and /PRINT qualifiers.
Transfer-dependent user data (up to 10 characters). This data is passed by
CA-XCOM VMS to a user application. Its use is determined by the user
application.
Range: 1 - 10 characters
Default: none
/TRACE
Valid only for the /SENDFILE, /GETFILE, /SUBMIT, and /PRINT qualifiers.
Used primarily at the request of CA-Technical Support to collect information
which will help diagnose a problem.
/UDATA
Valid only for the /SENDFILE, /GETFILE, /SUBMIT, and /PRINT qualifiers.
Indicates that system-wide user data is included in the logging information for
file transfers initiated by this system. This data can be used to correlate
CA-XCOM activities in multi-CA-XCOM environments.
Range: 1-10 characters
Default: none
7–40
CA-XCOM for OpenVMS Alpha Installation and User Guide
The XCOM/SUBMIT Command
Qualifier
Explanation
/USERID=username
Valid only for the /SENDFILE, /GETFILE, /SUBMIT, and /PRINT qualifiers.
Specifies the remote user ID under whose set of resource access authorization
CA-XCOM is to execute on the remote system. It should be the user ID
known to the remote security system. For example:
Mainframe systems - RACF, CA-ACF2 and CA-Top Secret.
Other systems - The user's login username.
Range: 1-12 characters
Default: none
Note: If the user ID is specified as part of the remote file specification, then
this qualifier does not have to be supplied.
If the remote system has user IDs defined in lower case, it is necessary to place
the username value in double quotes, that is, "username", to retain lower case.
/WAIT[=[dddd-] hh:mm:ss.cc]
Valid only for the /SENDFILE, /GETFILE, /SUBMIT and /PRINT qualifiers.
/WAIT specifies that the transfer request should wait in the event that the
remote system is unavailable. The buffer contains the wait time in standard
VMS delta time format. /NOWAIT indicates that the transfer request abort if
the remote system is unavailable. A delta time has the following format:
[dddd-] [hh:mm:ss:cc]
dddd - number of days
hh - number of hours
mm - number of minutes
ss - number of seconds
cc - number of hundredths of seconds
The fields located on the righthand side of the delta time format can be
truncated where time is to be specified. Any field can be omitted in the
middle of the format as long as the punctuation marks which separate the
fields are specified.
Default: /NOWAIT
The default time is 3 minutes (i.e., 0 00:03:00) if no value is supplied with the /WAIT
qualifier.
The Command Line Interface (DCL)
7–41
Submitting a CA-XCOM Transfer as a Batch Job
Qualifier
Explanation
/XTRACE
Valid for the /SENDFILE, /GETFILE, /SUBMIT and /PRINT qualifiers.
/XTRACE specifies if tracing is to be taken of an XCOM transfer. Any trace
will be stored in the XCOM$IMAGE:XTRACE.TXT.
Possible values are:
0 = No tracing
1- 9 = Provide tracing with different levels of detail
Range: 0 - 9
Default: 0
Submitting a CA-XCOM Transfer as a Batch Job
The XCOM/SENDFILE, XCOM/GETFILE, XCOM/PRINT and XCOM/SUBMIT
commands can all be used to submit a CA-XCOM file transfer as a batch job.
There are two ways in which to cause a CA-XCOM transfer request to be
executed as a batch job, i.e., to be submitted as a batch job.
1.
Add the "/QUEUE" qualifier to a CA-XCOM command line. The example
below uses the XCOM/SENDFILE command:
$ XCOM/SEND/RMTSYS=HARPO/QUEUE/USERID=RWEISS/PASSWORD=ENIGMA/
RNOTIFY=RWEISS/MVSFORMAT=FIXED_BLOCKED/MVSBLOCKL=800/MVSRECL=80 -STORIES.TXT
VMS.STORIES
The "/QUEUE" qualifier causes CA-XCOM to generate a temporary
command procedure file named XCOM_REQUEST.COM in the user's
default directory and then submits the file to the specified batch queue. The
batch queue is specified as a parameter to the "/QUEUE" qualifier, (e.g.,
"/QUEUE=SPVMS$BATCH") if none is supplied to the qualifier. The
temporary command procedure file is deleted after the transfer command is
completed.
2.
7–42
Create a command procedure file and then place a CA-XCOM transfer
command line in the file. You can then subsequently submit this command
file to the batch queue of your choice.
CA-XCOM for OpenVMS Alpha Installation and User Guide
Chapter
8
The Application Programming
Interface (API)
This section describes how to invoke CA-XCOM from an application program.
The Application Programming Interface (API) is intended to assist
Alpha/OpenVMS application programmers in the development of customized
applications that use CA-XCOM. Users can invoke the Application
Programming Interface, known as XCOM$API, from any high-level or assembly
language which operates under Alpha/OpenVMS.
The same four transfer functions available through the Menu and DCL interfaces
are also available with the XCOM$API interface facility.
XCOM$API provides the following transfer functions:
■
XCOM$_SENDFILE
Transmits an Alpha/OpenVMS file to a remote
system.
■
XCOM$_GETFILE
Retrieves a file from a remote system into the
Alpha/OpenVMS.
■
XCOM$_SUBMIT
Transmits an Alpha/OpenVMS file for execution as
a job on a remote system.
■
XCOM$_PRINT
Transmits an Alpha/OpenVMS file to print on a
remote system's printer.
The parameters required by the various functions are similar to those used by the
DCL command interface.
The Application Programming Interface (API)
8–1
Returning Status Information
Returning Status Information
The CA-XCOM API uses the following two mechanisms to return completion
status codes to the requesting program:
■
Function return values.
■
An output message vector.
A description of all the status codes returned by Alpha/OpenVMS CA-XCOM
API is detailed in the chapter, "Messages".
Function Return Values
All CA-XCOM API function requests return by immediate value a condition
value in R0. After each call to XCOM$API you must check this status value.
High-level languages provide some mechanism for testing the return status
value in R0. Consult your specific high-level language documentation for the
exact mechanism.
The Output Message Vector
The CA-XCOM API also returns completion status to the calling program by
means of a message vector that provides the program complete information
about error conditions. The message vector contains a top-level completion code
that is the same as the function value and, in certain cases, supplies additional
qualifying codes.
The format of the message vector is identical to that of the VMS system service
SYS$PUTMSG (see Figures 8-1, 8-2, and 8-3). The calling program can display
the return status by means of a call to this VMS system service. SYS$PUTMSG
translates the message codes within the message vector into text and sends it to a
terminal or file.
8–2
CA-XCOM for OpenVMS Alpha Installation and User Guide
XCOM$API - Perform a CA-XCOM Transfer Function
XCOM$API - Perform a CA-XCOM Transfer Function
For more information about formats similar to the XCOM$API routine argument
descriptions, see the VMS Introduction to System Services Reference Manual.
The items bolded in the routine argument descriptions are for emphasis only.
Format:
status = XCOM$API(func, itmlst, msgvec)
Returns:
status
VMS usage:
type:
access:
mechanism:
cond_value
longword(unsigned)
write only
by value
Return is a longword condition value. It is by immediate value.
"func" Argument
For more information about the func argument, see the VMS Introduction to
System Services Reference Manual.
func
VMS usage:
type:
access:
mechanism:
Function_code
function_code
word(unsigned)
read only
by value
Specifies the operation that XCOM$API is to perform. The func argument is a
word containing this function code.
The XCOM62API.xx included file defines the name of each function code. "xx"
refers to the appropriate file type for the particular language in use; e.g., for C
Language, xx=h.
You may specify only one function code in a single call to XCOM$API. All
function codes require additional information to be passed in the call. Pass this
information with the itmlst argument, which specifies a list of one or more item
descriptors. Each item descriptor in turn specifies an item code which modifies,
restricts, or otherwise affects the action designated by the function code.
The following lists and describes each function code. Listed are the item code(s)
which you must and may specify for each function code. Descriptions of the
item codes appear in the description of the itmlst argument.
The Application Programming Interface (API)
8–3
XCOM$API - Perform a CA-XCOM Transfer Function
XCOM$API Function Item Codes
The following sections describe the valid item codes for the various XCOM$API
function codes.
XCOM$_SENDFILE
This function is used to send a copy of a specified file from your system to a
specified file on a remote computer. If the file exists on the remote computer, the
transferred data can be added to the remote file or used to replace the current
data. If the remote file does not exist, CA-XCOM can create a file to hold this
data.
The following input item codes must be specified:
XCOM$_PASSWORD
XCOM$_RMTFILE
XCOM$_RMTSYS
XCOM$_USERID
XCOM$_VAXFILE
The following input or Boolean item codes may also be specified:
XCOM$_ALLOCTYPE_B
XCOM$_ALLOCTYPE_C
XCOM$_ALLOCTYPE_D
XCOM$_ALLOCTYPE_T
XCOM$_PRIMARY
XCOM$_SECONDARY
XCOM$_NO_CHECKPOINT
XCOM$_CHECKPOINT
XCOM$_CKPT
XCOM$_NO_COMPRESS
XCOM$_COMPRESS
XCOM$_DATAOPT_APPEND
XCOM$_DATAOPT_CREATE
XCOM$_DATA OPT_REPLACE
XCOM$_FILETYPE_BINARY
XCOM$_FILETYPE_TEXT
XCOM$_LNOTIFY
8–4
CA-XCOM for OpenVMS Alpha Installation and User Guide
XCOM$API - Perform a CA-XCOM Transfer Function
XCOM$_LOG
XCOM$_NO_LOG
XCOM$_MVSBLOCKL
XCOM$_MVSFORMAT_F
XCOM$_MVSFORMAT_FB
XCOM$_MVSFORMAT_VB
XCOM$_MVSFORMAT_U
XCOM$_PACK
XCOM$_NOPACK
XCOM$_PORT
XCOM$_MVSRECL
XCOM$_TCPIP
XCOM$_QUEUE
XCOM$_NO_QUEUE
XCOM$_RESUME
XCOM$_RNOTIFY
XCOM$_TRUNCATE
XCOM$_NO_TRUNCATE
XCOM$_UNIT
XCOM$_VOLUME
XCOM$_WAIT
XCOM$_NO_WAIT
XCOM$_GETFILE
This function is used to retrieve a data file from a remote system and copy it into
a specified file on your system. If the local file exists, then the transferred data
can append to this file or overwrite it. If the local file does not exist, CA-XCOM
will create a file to hold this data.
The following input item codes must be specified:
XCOM$_PASSWORD
XCOM$_RMTFILE
XCOM$_RMTSYS
XCOM$_USERID
XCOM$_VAXFILE
The Application Programming Interface (API)
8–5
XCOM$API - Perform a CA-XCOM Transfer Function
The following input or Boolean item codes may also be specified:
XCOM$_CHECKPOINT
XCOM$_NO_CHECKPOINT
XCOM$_CKPT
XCOM$_COMPRESS
XCOM$_NO_COMPRESS
XCOM$_DATAOPT_APPEND
XCOM$_DATAOPT_CREATE
XCOM$_DATA OPT_REPLACE
XCOM$_FILETYPE_BINARY
XCOM$_FILETYPE_TEXT
XCOM$_LNOTIFY
XCOM$_LOG
XCOM$_NO_LOG
XCOM$_PACK
XCOM$_NOPACK
XCOM$_PORT
XCOM$_QUEUE
XCOM$_NO_QUEUE
XCOM$_RESUME
XCOM$_RNOTIFY
XCOM$_TCPIP
XCOM$_TRUNCATE
XCOM$_NO_TRUNCATE
XCOM$_UNIT
XCOM$_VOLUME
XCOM$_WAIT
XCOM$_NO_WAIT
XCOM$_SUBMIT
This function is used to send a file as a job for execution on a remote system.
The following input item codes must be specified:
XCOM$_PASSWORD
XCOM$_RMTSYS
XCOM$_USERID
8–6
CA-XCOM for OpenVMS Alpha Installation and User Guide
XCOM$API - Perform a CA-XCOM Transfer Function
XCOM$_VAXFILE
The following input or Boolean item codes may also be specified:
XCOM$_COMPRESS
XCOM$_NO_COMPRESS
XCOM$_LNOTIFY
XCOM$_LOG
XCOM$_NO_LOG
XCOM$_PACK
XCOM$_NOPACK
XCOM$_PORT
XCOM$_QUEUE
XCOM$_NO_QUEUE
XCOM$_RNOTIFY
XCOM$_TCPIP
XCOM$_WAIT
XCOM$_NO_WAIT
XCOM$_PRINT
This function is used to send a file from your system to be printed on a remote
system.
The following input item codes must be specified:
XCOM$_PASSWORD
XCOM$_RMTSYS
XCOM$_USERID
XCOM$_VAXFILE
The following input or Boolean item codes may also be specified:
XCOM$_ASA
XCOM$_NO_ASA
XCOM$_CHECKPOINT
XCOM$_NO_CHECKPOINT
XCOM$_CKPT
XCOM$_CLASS
XCOM$_COMPRESS
The Application Programming Interface (API)
8–7
XCOM$API - Perform a CA-XCOM Transfer Function
XCOM$_NO_COMPRESS
XCOM$_COPIES
XCOM$_DELETE
XCOM$_NO_DELETE
XCOM$_DESTINATION
XCOM$_FCB
XCOM$_FORMTYPE
XCOM$_HOLD
XCOM$_NO_HOLD
XCOM$_LNOTIFY
XCOM$_LOG
XCOM$_NO_LOG
XCOM$_PACK
XCOM$_NOPACK
XCOM$_PORT
XCOM$_QUEUE
XCOM$_NO_QUEUE
XCOM$_TCPIP
XCOM$_RNOTIFY
XCOM$_TITLE
XCOM$_WAIT
XCOM$_NO_WAIT
"itmlst" Argument
Itmlst
VMS usage:
type:
access:
mechanism:T
item_list_3
Item_list_3
longword(unsigned)
read only
by reference
Supplies the information used to perform the function specified by the
func argument.
The itmlst argument is the address of the item list. It consists of one or more
item descriptors, each of which specifies an item code. An item code, or a
longword, of 0 terminates the item list.
8–8
CA-XCOM for OpenVMS Alpha Installation and User Guide
XCOM$API - Perform a CA-XCOM Transfer Function
The structure of a single item descriptor is shown below:
31
15
Item Code
0
Buffer Length
Buffer Address
Return Length Address
Figure 8-1: Structure of Single Item Descriptor
Item Descriptor Fields
Buffer length
item code
A word specifying the length of the buffer, supplying either information to be
used by XCOM$API or information to be received from XCOM$API. The
required length of the buffer varies depending on the item code specified and
is given in the description of each item code.
A word containing an item code which identifies the nature of the
information supplied for use by XCOM$API or received from XCOM$API.
Each item code has a symbolic name. The CA-XCOM installation procedure
supplies include files, e.g., xcomapidef.h, which defines these symbolic names
with the following format:
XCOM$_code
There are three types of item code:
■
Boolean item code.
Specifies a true or false value. The form XCOM$_code specifies a true value;
XCOM$_NO_code specifies a false value. For Boolean item codes, the buffer
length, buffer address, and return length fields of the item descriptor must
be zero.
■
Input value item code.
Specifies an input value to be used by XCOM$API. For input value item
codes, the buffer length and buffer address fields of the item descriptor
must be nonzero; the return length field must be zero. Specific buffer length
requirements are given in the description of each item code.
■
Output value item code.
Specifies an output value for information returned by XCOM$API. For
output value item codes, the buffer length and buffer address fields of the
item descriptor must be nonzero; the return length field may be zero or
nonzero. Specific buffer length requirements are given in the description of
each item code.
The Application Programming Interface (API)
8–9
XCOM$API - Perform a CA-XCOM Transfer Function
Buffer address
Address of the buffer that specifies or receives the information.
Return length address
Address of a word to receive the length in bytes of information returned by
XCOM$API. If you specify this address as 0, no length is returned.
XCOM$API Function Qualifier Item Codes
The following describes each of the XCOM$API Function Qualifier Item Codes.
Item Codes
Default
Explanation
Valid only for the XCOM$_SENDFILE function
code.
XCOM$_ALLOCTYPE_B
XCOM$_ALLOCTYPE_C
XCOM$_ALLOCTYPE_D
XCOM$_ALLOCTYPE_T
XCOM$_ALLOCTYPE_B – Specifies MVS
Allocation Type Blocks.
XCOM$_ALLOCTYPE_C – Specifies MVS
Allocation Type Cylinders.
XCOM$_ALLOCTYPE_D – Specifies MVS
Allocation Type Default.
XCOM$_ALLOCTYPE_T – Specifies MVS
Allocation Type Tracks.
XCOM$_ASA
XCOM$_NO_ASA
XCOM$_NO_ASA
Valid only for the XCOM$_PRINT function code.
XCOM$_ASA - A Boolean item code specifying that
CA-XCOM is to convert the file to ASA print format
(FORTRAN carriage control) supported by most IBM
and DEC printers.
XCOM$_NO_ASA - A Boolean item code indicating
that no ASA conversion of the file is to be performed.
8–10
CA-XCOM for OpenVMS Alpha Installation and User Guide
XCOM$API - Perform a CA-XCOM Transfer Function
Item Codes
Default
Explanation
XCOM$_CHECKPOINT
XCOM$_NO_CHECKPOINT
XCOM$_NO_CHECKPOINT
Valid only for the XCOM$_SENDFILE,
XCOM$_GETFILE, and XCOM$_PRINT function
codes.
XCOM$_CHECKPOINT - An input value item code
indicating that once a transfer is interrupted it will
automatically restart or resume at some delta time (t)
in the future from the point where it left off without
having to return to the beginning of the file. The
buffer contains the wait time in standard VMS delta
time format. If the buffer length is less than or equal to
zero, the default time used is 1 hour (i.e., 0 01:00:00).
XCOM$_NO_CHECKPOINT - A Boolean item code
indicating the transfer is not to restart (i.e., if the
transfer is interrupted, there is no automatic retry).
A delta time has the following format:
[dddd-] [hh:mm:ss:cc]
dddd
hh
mm
ss
cc
The number of days.
The number of hours.
The number of minutes.
The number of seconds.
The number of hundredths of seconds.
The fields located on the right hand side of the delta
time format can be truncated where time is to be
specified. Any of the fields can also be omitted in
the middle of the format as long as the punctuation
marks which separate the fields are specified. A
restart of the transfer will be attempted until either
the transfer is successful or an aging time limit is
reached, at which point it is aborted.
For further information on the delta time format
refer to the VMS Using DCL Reference Manual or at
the DCL $ prompt enter: Help Specify Date_Time
XCOM$_CKPT
1000
Valid only for the XCOM$_SENDFILE,
XCOM$_GETFILE, XCOM$_SUBMIT, and
XCOM$_PRINT function codes.
Specifies the number of records to be transferred
between checkpoints.
The buffer must contain a maximum of four (4)
ASCII, decimal, numeric characters within the range
of 1-9999
The Application Programming Interface (API)
8–11
XCOM$API - Perform a CA-XCOM Transfer Function
Item Codes
Default
Explanation
Valid only for the XCOM$_PRINT function code.
XCOM$_CLASS
An input value item code used to specify the print
class (a one character string) placed on the remote
system by the print request. If the remote system is
an IBM mainframe, then this field indicates the JES2
SYSOUT class. The buffer must contain the one
character string.
XCOM$_COMPRESS
XCOM$_NO_COMPRESS
XCOM$_COMPRESS
Valid only for the XCOM$_SENDFILE,
XCOM$_GETFILE, XCOM$_SUBMIT and
XCOM$_PRINT function codes.
XCOM$_COMPRESS - An input value item code
used to specify the type of compression wanted.
Possible values are: NO, YES, COMPACT,
LCOMPACT, LZSMALL, LZMEDIUM, LZLARGE,
and RLE.
XCOM$_NO_COMPRESS - A Boolean item code
indicating the data transmitted should not be
compressed.
XCOM$_COPIES
1
Valid only for the XCOM$_PRINT function code.
An input value item code used to specify the number
of copies to be printed on the remote system. The
buffer must contain a maximum of three (3) ASCII,
decimal, numeric characters within the range of 1-999.
XCOM$_DATAOPT_APPEND
XCOM$_DATAOPT_CREATE
XCOM$_DATAOPT_REPLACE
XCOM$_DATAOPT_CREATE
Valid only for the XCOM$_SENDFILE and
XCOM$_GETFILE function codes.
XCOM$_DATAOPT_APPEND - A Boolean item
code indicating the data transferred is to be
appended to a destination file.
XCOM$_DATAOPT_CREATE -A Boolean item
code indicating the creation of a destination file.
XCOM$_DATAOPT_REPLACE - A Boolean item
code indicating the replacement of a destination file.
8–12
CA-XCOM for OpenVMS Alpha Installation and User Guide
XCOM$API - Perform a CA-XCOM Transfer Function
Item Codes
Default
Explanation
XCOM$_DELETE
XCOM$_NO_DELETE
XCOM$_NO_DELETE
Valid only for the XCOM$_PRINT function code.
XCOM$_DELETE - A Boolean item code indicating
that the file be deleted after printing on the remote
system.
XCOM$_NO_DELETE - A Boolean item code
indicating the file be kept or retained on the remote
system after it is printed.
NOTE: With respect to remotely initiated transfers,
the default is to delete the file after it has printed on
the VMS system.
XCOM$_DESTINATION
***
Valid only for the XCOM$_PRINT function code.
A 1 - 21 character input value item code indicating
the print destination for output on the remote
system. The actual number of valid characters are
dependent on the remote system. The buffer must contain
this string.
* * * If this item code is not supplied, the remote system
will send it to the system's default printer.
XCOM$_FCB
***
Valid only for the XCOM$_PRINT function code.
An input value item code used only when printing a
file on a remote IBM mainframe. It specifies the 1-4
character Forms Control Buffer (FCB) that JES is to
use to define the forms control parameter to be used
when printing on the remote system. The buffer must
contain this string.
* * * If this item code is not supplied, there is no default
value.
XCOM$_FILETYPE_BINARY
XCOM$_FILETYPE_TEXT
XCOM$_FILETYPE_TEXT
Valid only for the XCOM$_SENDFILE and
XCOM$_GETFILE function codes.
XCOM$_FILETYPE_BINARY - A Boolean item code
indicating the file be treated as data; no translation
will be attempted.
XCOM$_FILETYPE_TEXT - A Boolean item code
indicating the file be treated as ASCII text. When
sending to a remote system that uses a different
character representation (e.g., EBCDIC) the file is
then automatically translated.
The Application Programming Interface (API)
8–13
XCOM$API - Perform a CA-XCOM Transfer Function
Item Codes
Default
Explanation
Valid only for the XCOM$_PRINT function code.
XCOM$_FORMTYPE
A 1-10 character input value item code used to
inform the remote operator of the type of form the
print request is to be printed on. The actual number of
valid characters is dependent on the remote system. The
buffer must contain this string.
XCOM$_HOLD
XCOM$_NO_HOLD
XCOM$_NO_HOLD
Valid only for the XCOM$_PRINT function code.
XCOM$_HOLD - A Boolean item code indicating
the print request is to be placed on "HOLD" status on
the remote system.
XCOM$_NO_HOLD - A Boolean item code
indicating the print request is to be sent for
immediate printing on the remote system.
Valid only for the XCOM$_SENDFILE,
XCOM$_GETFILE, XCOM$_SUBMIT and
XCOM$_PRINT function codes.
XCOM$_LNOTIFY
A 1-12 character input value item code indicating the
ID of the local Alpha/OpenVMS user to be notified
when the data transfer is completed. You must have
WORLD privilege to notify users other than yourself.
The buffer must contain the local VMS user ID string.
XCOM$_LOG
XCOM$_NO_LOG
XCOM$_LOG
Valid only for the XCOM$_SENDFILE,
XCOM$_GETFILE, XCOM$_SUBMIT and
XCOM$_PRINT function codes.
XCOM$_LOG - An 1-64 character input value item
code indicating the file specification is to receive
time-stamped CA-XCOM status or log messages.
XCOM$_NO_LOG - A Boolean item code indicating
that there is to be no message logging.
8–14
CA-XCOM for OpenVMS Alpha Installation and User Guide
XCOM$API - Perform a CA-XCOM Transfer Function
Item Codes
Default
Explanation
XCOM$_MVSBLOCKL
***
Valid only for the XCOM$_SENDFILE function code.
An input value item code used only when creating a
file on a remote IBM mainframe. It specifies how
many records are contained inside a block. Note that
"creating" means that the
"XCOM$_DATAOPT_CREATE" item code is
specified either explicitly or by default.
Fixed or fixed Blocked record files XCOM$_MVSBLOCKL must be a multiple of the
value of the XCOM$_MVSRECL field.
Variable record files - XCOM$_MVSBLOCKL must
be at least four bytes larger than the value of the
XCOM$_MVSRECL field.
Undefined format - XCOM$_MVSBLOCKL must be
at least as large as the largest record length.
* * * The buffer must contain a maximum of five (5)
ASCII, decimal, numeric characters. If the
XCOM$_MVSBLOCKL item code is not specified and the
transfer is to an IBM mainframe, CA-XCOM will
generate an acceptable value.
XCOM$_MVSFORMAT_FB
XCOM$_MVSFORMAT_VB
XCOM$_MVSFORMAT_F
XCOM$_MVSFORMAT_U
XCOM$_MVSFORMAT_FB
Valid only for the XCOM$_SENDFILE function code.
The FORMAT codes are Boolean item codes equivalent to
the DCB RECFM parameter in JCL and required only
when creating files on an IBM mainframe.
XCOM$_MVSFORMAT_FB - Specifies Fixed record
length of one record per block.
XCOM$_MVSFORMAT_VB - Specifies Variable
record length, with multiple records per block, each
of which can have a different length.
XCOM$_MVSFORMAT_F -Specifies that the
records all have the same length with multiple
records contained in the one block.
XCOM$_MVSFORMAT_U - Specifies undefined
record format of one variable length record per
block, where the maximum record length is the block
size.
The Application Programming Interface (API)
8–15
XCOM$API - Perform a CA-XCOM Transfer Function
Item Codes
Default
Explanation
Valid only for the XCOM$_SENDFILE,
XCOM$_GETFILE, XCOM$_SUBMIT and
XCOM$_PRINT function codes.
XCOM$_PACK
XCOM$_NOPACK
XCOM$_PACK - A Boolean item code used to
specify record packing. It is valid only for text files
(not binary files). When packing is on, CA-XCOM
reads as many records as will fit into a 31744-byte
buffer before compressing and transmitting them.
XCOM$_NOPACK - A Boolean item code used to
specify that packing will not be used.
XCOM$_PORT
8044
Valid only for the XCOM$_SENDFILE,
XCOM$_GETFILE, XCOM$_SUBMIT and
XCOM$_PRINT function codes.
The TCP/IP port number used when transferring
files via TCP/IP. It has no effect unless
XCOM$_TCPIP is specified.
XCOM$_PRIMARY
0
XCOM$_MVSRECL
***
Valid only for the XCOM$_SENDFILE function code.
Specifies the MVS Primary Allocation.
Valid only for the XCOM$_SENDFILE function code.
An input value item code used only when creating a
file on a remote IBM mainframe. It specifies how
many bytes are in a record.
Undefined records - Ignored.
Variable records - XCOM$_MVSRECL must be
equal to the maximum record size plus four (4).
Fixed and fixed blocked records XCOM$_MVSRECL specifies the record length.
* * * The buffer must contain a maximum of 5 ASCII,
decimal, numeric characters. If the XCOM$_MVSRECL
item code is not specified and the transfer is to an IBM
mainframe, CA-XCOM will generate an acceptable value.
8–16
CA-XCOM for OpenVMS Alpha Installation and User Guide
XCOM$API - Perform a CA-XCOM Transfer Function
Item Codes
Default
Explanation
XCOM$_RNOTIFY_FLAG
XCOM$S_RNOTIFY_WRITELOG
Valid only for the XCOM$_SENDFILE,
XCOM$_GETFILE, XCOM$_SUBMIT and
XCOM$_PRINT function codes.
An input value item code indicating the user ID
Type of the remote user to be notified when the data
transfer is complete. The available choices are:
XCOM$S_RNOTIFY_NONE=No notification
XCOM$S_RNOTIFY_WRITELOG=Write to log
XCOM$S_RNOTIFY_CICS=Notify CICS User
XCOM$S_RNOTIFY_LU=Notify Logical Unit
XCOM$S_RNOTIFY_ROSCOE=Notify Roscoe User
XCOM$S_RNOTIFY_VMSUSER=Notify
Alpha/OpenVMS User
The buffer must contain this one character constant.
XCOM$_TCPIP
Valid only for the XCOM$_SENDFILE,
XCOM$_GETFILE, XCOM$_SUBMIT and
XCOM$_PRINT function codes.
Specifies that TCP/IP will be used as the transfer
protocol, instead of SNA.
See also XCOM$_PORT.
XCOM$_PASSWORD
Valid only for the XCOM$_SENDFILE,
XCOM$_GETFILE, XCOM$_SUBMIT and
XCOM$_PRINT function codes.
A 1-31 character input value item code indicating the
password associated with the userid under whose
set of resource access privileges CA-XCOM is to
execute on the remote system. It should be the
password known to the remote security system. For
example,
Mainframe systems - RACF, CA-ACF2 and
CA-Top Secret
Other systems - The user’s login password.
The buffer must contain the local password string.
The Application Programming Interface (API)
8–17
XCOM$API - Perform a CA-XCOM Transfer Function
Item Codes
Default
Explanation
XCOM$_QUEUE
XCOM$_NO_QUEUE
XCOM$_NO_QUEUE
Valid only for the XCOM$_SENDFILE,
XCOM$_GETFILE, XCOM$_SUBMIT and
XCOM$_PRINT function codes.
XCOM$_QUEUE - A 1-31 character input value item
code specifying the name of a standard OpenVMS
execution queue (the default VMS execution queue
processor). Specification of this item code indicates
that the CA-XCOM transfer request should be
executed off-line as a batch job. The buffer must
hold the queue name.
XCOM$_NO_QUEUE - A Boolean item code
specifying the transfer request should not be
executed off-line as a batch job.
XCOM$_RESUME
Valid only for the XCOM$_SENDFILE, and
XCOM$_GETFILE function codes.
A Boolean item code meaningful only if the transfer
had previously been checkpointed, interrupted, and
is awaiting restart. It specifies that the indicated
transfer be restarted.
8–18
CA-XCOM for OpenVMS Alpha Installation and User Guide
XCOM$API - Perform a CA-XCOM Transfer Function
Item Codes
Default
Explanation
XCOM$_RMTFILE
***
Valid only for the XCOM$_SENDFILE and
XCOM$_GETFILE function codes.
A 1-255 character input value item code indicating
the file specification of the remote file. It is the name
of the file on the remote system to be accessed. The
filename must be fully qualified as to its location.
The buffer must contain the file specification string.
If the remote system is:
Mainframe systems - Specify the qualified data set
name. No TSO prefix will be appended to the entry.
IBM PC - Specify the DOS or OS/2 filename and
include path information.
System 38 -Specify the qualified filename.
VMS - Specify the OpenVMS filename.
The remote filename specification format is:
node"userid
password"::["]filename.typ[[.typ]...]["
]
Note: The above syntax is shown across
multiple lines due to page margins. It should be
entered as one line.
* * * If the password is specified as part of the remote
file specification then this item code does not have to
be supplied.
XCOM$_RMTSYS
***
Valid only for the XCOM$_SENDFILE,
XCOM$_GETFILE, XCOM$_SUBMIT and
XCOM$_PRINT function codes.
A 1-254 character input value item code used to
specify the name associated with the remote
computer. The remote system name is defined in the
CA-XCOM configuration file. For information on
defining these names see the chapter, "Configuring
CA-XCOM for OpenVMS Alpha"..
* * * The buffer must contain the remote system
namestring. If the remote system name is specified as part
of the remote file specification then this item code does not
have to be supplied.
The Application Programming Interface (API)
8–19
XCOM$API - Perform a CA-XCOM Transfer Function
Item Codes
Default
Explanation
Valid only for the XCOM$_SENDFILE,
XCOM$_GETFILE, XCOM$_SUBMIT and
XCOM$_PRINT function codes.
XCOM$_RNOTIFY
A 1-12 character input value item code specifying the
ID of the remote user to be notified when the data
transfer is complete. The buffer must contain the remote
user ID string.
XCOM$_SECONDARY
0
Valid only for the XCOM$_SENDFILE function code.
Specifies the MVS Secondary Allocation.
Valid only for the XCOM$_PRINT function code.
XCOM$_TITLE
A 1-21 character input value item code specifying
the Report Title used to describe the contents of a
print request on a remote system. While the title is
generally used as a comment and will not be printed
as part of the request, some operating systems (such
as VMS) allow a print title to be spooled with the
print data. The buffer must contain the title string.
XCOM$_TRUNCATE
XCOM$_NO_TRUNCATE
XCOM$_NO_TRUNCATE
Valid only for the XCOM$_SENDFILE function code.
XCOM$_TRUNCATE - A Boolean item code
indicating if a record is too long it can be truncated.
XCOM$_NO_TRUNCATE - A Boolean item code
indicating that the LU 6.2 conversation abend or
abort if a record is encountered which is greater than
the maximum allowable record size.
XCOM$_UNIT
***
Valid only for the XCOM$_SENDFILE and
XCOM$_GETFILE function code.
A 1-10 character input value item code used when
creating or retrieving a file on a remote IBM
mainframe. Note that "creating" means that
"XCOM$_DATAOPT_CREATE" item code is
specified either by default or explicitly. The
XCOM$_UNIT item code specifies the generic unit
name under which the file will be placed or where it
resides.
* * * The item code buffer must specify this string. If this
parameter is not entered, the CA-XCOM default unit
name will be used as defined in the CA-XCOM MVS
Default Options Table.
8–20
CA-XCOM for OpenVMS Alpha Installation and User Guide
XCOM$API - Perform a CA-XCOM Transfer Function
Item Codes
Default
Explanation
XCOM$_USERID
***
Valid only for the XCOM$_SENDFILE,
XCOM$_GETFILE, XCOM$_SUBMIT and
XCOM$_PRINT function codes.
A 1-12 character input value item code indicating the
remote userid under whose set of resource access
privileges CA-XCOM is to execute on the remote
system. It should be the userid known to the remote
security system. For example:
Mainframe systems - RACF, ACF2, and
TOPSECRET.
Other systems - The user's login username.
* * * The item code buffer must specify this string. If the
user ID is specified as part of the remote file specification,
then this item code does not have to be supplied.
Valid only for the XCOM$_SENDFILE,
XCOM$_GETFILE, XCOM$_SUBMIT and
XCOM$_PRINT function codes.
XCOM$_VAXFILE
A 1-255 character input value item code indicating
the local VMS filename to receive the data being
transmitted from, or holding the data to be
transmitted to, a remote system. The buffer must
contain the file specification string.
XCOM$_VOLUME
***
Valid only for the XCOM$_SENDFILE and
XCOM$_GETFILE function code.
A 1-10 character input value item code used when
creating or retrieving a file on a remote IBM
mainframe. Note that "creating" means that the
"XCOM$_DATAOPT_CREATE" item code is
specified either by default or explicitly. The
XCOM$_VOLUME item code specifies the volume
name under which the file will be placed or where it
resides.
* * * If this parameter is not supplied, the CA-XCOM
default volume name will be used as defined in the
CA-XCOM MVS Default Options Table.
The Application Programming Interface (API)
8–21
XCOM$API - Perform a CA-XCOM Transfer Function
Item Codes
Default
Explanation
XCOM$_WAIT
XCOM$_NO_WAIT
XCOM$_NO_WAIT
Valid only for the XCOM$_SENDFILE,
XCOM$_GETFILE, XCOM$_SUBMIT and
XCOM$_PRINT function codes.
XCOM$_WAIT - An input value item code which
specifies that the transfer request should wait in the
event that the remote system is unavailable. The
buffer contains the wait time in standard VMS delta
time format. If the buffer length is less than or equal
to zero, the default time used is 3 minutes (i.e., 0
00:03:00).
XCOM$_NO_WAIT - A Boolean item code used to
specify that the transfer request abort in the event
that the remote system is unavailable. A delta time
has the following format:
[dddd-] [hh:mm:ss:cc]
dddd
hh
mm
ss
cc
The number of days.
The number of hours.
The number of minutes.
The number of seconds.
The number of hundredths of seconds.
The fields located on the right hand side of the delta
time format can be truncated where time is to be
specified. Any of the fields can also be omitted in
the middle of the format as long as the punctuation
marks that separate the fields are specified.
For further information on the delta time format
refer to the OpenVMS Using DCL Reference Manual or
at the DCL $ prompt enter:
Help Specify Date_Time
8–22
CA-XCOM for OpenVMS Alpha Installation and User Guide
XCOM$API - Perform a CA-XCOM Transfer Function
"msgvec" Argument
msgvec
OpenVMS usage:
type:
access:
mechanism:
msgvec
ctrlblk
longword vector
write only
by descriptor
Message argument vector into which the message code(s) and options that can be
used by the VMS SYS$PUTMSG system service to write readable message text(s)
is written.
The msgvec argument is the address of a descriptor pointing to a buffer memory
area whose size must be at least XCOM$K_MIN_APIMSG_VECTOR bytes. This
constant is defined by the C include files supplied in the installation procedure.
The format of the output message vector consists of one longword followed by
one or more message descriptors, containing one descriptor per message. Figure
8-2 depicts the contents of the first longword (ctrlblk).
31
Default message options
15
0
Argument Count
Figure 8-2: Contents of First Longword
argument count
Word-length field specifying the total number of longwords in the message
vector, not including the first longword.
default message
options
Word-length field specifying which message component(s) is to be written. The
default message options field is a word-length bit vector wherein a bit, when
set, specifies that the corresponding message component is to be written. For
further information, see "$PUTMSG Put Message" in the Alpha/OpenVMS
System Services Reference Manual. Following the first longword of the message
vector are one or more message descriptors. Figure 8-3 illustrates the message
descriptor format used by the CA-XCOM API.
The Application Programming Interface (API)
8–23
Using the CA-XCOM API Facility
31
15
0
Message Code
New Message Options
FAQ Parameter Count
First FAQ Parameter
Second FAQ Parameter
:
Figure 8-3: Message Descriptor Format
message code
Longword value that uniquely identifies the message.
Messages can be identified by symbolic names defined for return codes (e.g.,
CA-XCOM status codes, VMS system return codes, etc.).
FAO parameter count
Word-length value specifying the number of longword Formatted ASCII
Output (FAO) parameters, if any, that follow in the message descriptor.
For further details, see $FAO in the Alpha/OpenVMS System Services Reference
Manual.
new message options
Word-length bit vector specifying the new message options for the current
message.
The contents and format of this field are identical to that of the default message
options field.
FAO parameter
Longword value used by an FAO directive appearing in the message text.
Using the CA-XCOM API Facility
The best way to show how to use the CA-XCOM API facility is to perform the
following:
1.
Write an Alpha/OpenVMS-C program which uses the interface.
2.
Link the program written in step 1 to the CA-XCOM API shareable image.
A Program Which Uses the CA-XCOM API Facility
To compile the following program (see Figure 8-4, OpenVMS-C Program), at the
DCL prompt, type:
$ CC/LIST/OBJECT CALLXCOM
8–24
CA-XCOM for OpenVMS Alpha Installation and User Guide
Using the CA-XCOM API Facility
Linking a Program Which Uses the CA-XCOM API Facility
To link the code to the CA-XCOM API facility, type the following in response to
the DCL prompt:
LINK CALLXCOM,CALLXCOM/OPT/NO TRACE
#ifdef
file:
DOCUMENTATION
callxcom.c
function:
Use the XCOM 6.2 API to:
a) SEND a file to a remote system.
b) GET a file from a remote system.
=================================================================
#endif
#include <stdio>
#include <rms>
#include <xcomapidef.h>
int callxcom()
{
/*
* own storage:
*/
struct FAB myfab;
struct RAB myrab;
int
struct
int
char
status,func;
itemlist itmlst[12];
msgvec[XCOM$K_MIN_APIMSG_VECTOR];
vax_sfile[]="sys$login:login.com",
vax_rfile[]="sys$login:junk.api",
vax_xfile[]="sys$login:login.com",
rmtfile[]="dc6.xcomtest(+1)",
rmtsys[]="A",
/* remote sys must be in caps */
userid[]="DC6",
pword[]="HELPME",
ckpt[]="0",
recl[]="80",
blockl[]="6160",
logfile[]="apix.log";
/*
* code:
*/
/* zero context */
lib$movc5(&0,&0,&0,&sizeof msgvec,msgvec);
/* setup item code(s) */
itmlst[0].bfrlen = sizeof vax_xfile;
itmlst[0].itmcde = XCOM$_VAXFILE;
The Application Programming Interface (API)
8–25
Using the CA-XCOM API Facility
itmlst[0].bfradr = vax_xfile;
itmlst[5].bfrlen = sizeof rmtfile;
itmlst[5].itmcde = XCOM$_RMTFILE;
itmlst[5].bfradr = rmtfile;
itmlst[2].bfrlen = sizeof rmtsys;
itmlst[2].itmcde = XCOM$_RMTSYS;
itmlst[2].bfradr = rmtsys;
itmlst[3].bfrlen = sizeof userid;
itmlst[3].itmcde = XCOM$_USERID;
itmlst[3].bfradr = userid;
itmlst[4].bfrlen = sizeof pword;
itmlst[4].itmcde = XCOM$_PASSWORD;
itmlst[4].bfradr = pword;
itmlst[1].bfrlen = sizeof logfile;
itmlst[1].itmcde = XCOM$_LOG;
itmlst[1].bfradr = logfile;
itmlst[6].bfrlen = sizeof ckpt;
itmlst[6].itmcde = XCOM$_CKPT;
itmlst[6].bfradr = ckpt;
itmlst[7].bfrlen = 0;
itmlst[7].itmcde = XCOM$_MVSFORMAT_FB;
itmlst[7].bfradr = 0;
itmlst[8].bfrlen = sizeof blockl;
itmlst[8].itmcde = XCOM$_MVSBLOCKL;
itmlst[8].bfradr = blockl;
itmlst[9].bfrlen = sizeof recl;
itmlst[9].itmcde = XCOM$_MVSRECL;
itmlst[9].bfradr = recl;
itmlst[10].bfrlen = 0;
itmlst[10].itmcde = 0;
/*
* SEND a file:
*
* The following API send operation is equivalent
* to the DCL command line:
*
* $ XCOM/SEND X$TOP:XFILE.TST VM"DRWHO GALIFRE"::APIFILE.TXT
*/
func = XCOM$_SENDFILE;
status = xcom$api(func, itmlst, msgvec);
sys$putmsg(msgvec,0,0,0);
return status;
}/* end callxcom() */
Figure 8-4: OpenVMS-C Program
8–26
CA-XCOM for OpenVMS Alpha Installation and User Guide
Chapter
9
Remote Spooling (XQUE)
The CA-XCOM XQUE facility allows transparent routing of OpenVMS spool
files to remote CA-XCOM nodes. The remote node does not have to be running
CA-XCOM, but can be running any CA-XCOM component. Users do not have to
use the XCOM command syntax to transfer print files. Use standard OpenVMS
print commands as though you are using the usual OpenVMS printer even
when, for example, this output is being sent to a high speed printer attached to
an IBM mainframe.
XQUE is installed during the CA-XCOM installation procedure.
Features and facilities of XQUE include;
■
■
XQUE works with standard digital communications products, such as
DECnet SNA/Gateway, VMS/SNA, and DECnet APPC.
Generic printer queues can be designated so that the file is sent to the printer
that currently has the shortest queue.
Startup
The CA-XCOM remote spooler (XQUE) is generated as a standard OpenVMS
remote print queue. The queue’s symbiont process image file is
“XCOMPRTSMB.EXE” and is installed in SYS$COMMON:[SYSEXE] directory by
the CA-XCOM installation process. The queue is started by issuing the DCL
INITIALIZE/QUEUE and/or START/QUEUE command. A typical command
that initializes but does not start a CA-XCOM remote spool queue is:
$INIT/QUEUE/PROCESS=XCOMPRTSMB/ON=BIGBLU IBM$QUEUE
Note: “BIGBLU” is an example of a symbolic name for a remote node that must
be predefined during CA-XCOM configuration (see the chapter "Configuring the
Network"). “IBM$QUEUE” is the queue-name parameter that is initialized.
To actually start this queue, type:
$ START/QUEUE IBM$QUEUE
Note: Both INIT/QUEUE and START/QUEUE require OPER privileges.
Remote Spooling (XQUE)
9–1
Startup
A command procedure is included in the CA-XCOM installation procedure to
automate the setup and startup of the CA-XCOM remote print symbiont
(XQUE). The command procedure deletes the named queue, if one exists, and
proceeds to initialize and start the queue. The following is a description of this
process.
File:
xcom$image:initxg.com
Function:
startup the CA-XCOM remote spooler
Input:
p1=local OpenVMS queue name
p2=remote IBM host node identifier or name
Note: This node must be defined in the CA-XCOM configuration file.
Optional input:
p3=[$ASA|$NOASA]
$ASA=Convert files to ASA format; $NOASA= No conversion to ASA format.
The default is $NOASA.
The following are examples of the initxq command procedure use:
$ @XCOM$IMAGE:INITXQ MVS$QUEUE BIGBLU $ASA
$ @XCOM$IMAGE:INITXQ VM$PRINTQ VMSYS $NOASA
The first example defines a print queue called mvs$queue to the CA-XCOM
remote node bigblu where ASA conversion is performed on the transmitted files.
The second example defines a print queue called vm$queue to the
CA-XCOM remote node vmsys where no ASA conversion is performed.
Qualifiers Supported
Most INITIALIZE/QUEUE and STARTUP/QUEUE qualifiers are supported by
XQUE. The summary descriptions of these qualifiers in the following table focus
on functions that are pertinent to XQUE. For additional information, such as
valid keywords and default values, refer to the OpenVMS DCL Dictionary.
Qualifiers that are either not supported or meaningful to XQUE are identified
later in this chapter.
9–2
CA-XCOM for OpenVMS Alpha Installation and User Guide
Startup
Qualifier
/BLOCK_LIMIT=([lowlim,]uplim)
/NOBLOCK_LIMIT
/CHARACTERISTICS=(characteristic[,...])
/NOCHARACTERISTICS
Description
Defines the lower and upper sizes
(in blocks) of print requests to this
queue. If no values are defined,
XQUE uses the default value.
Defines characteristics for this
queue.
A job must match these
characteristics before printing,
otherwise it is held “pending”. If
no characteristics are defined,
XQUE uses the default value.
/DEFAULT=(option[,...])
/NODEFAULT
Defines default options for the
print command.
Specify FLAG or FLAG=ALL to
place flag pages before each
printed file in the job.
FLAG=ONE places a flag page
before the first printed file in the
job. If no options are set, XQUE
uses the default options.
/ENABLE_GENERIC
/NOENABLE_GENERIC
/FORM=type
Enables generic print requests.
If no generic print request is
desired, XQUE uses the default
value.
Specifies the default form name for
this queue.
/TRAILER
/NOTRAILER
Specify TRAILER or
TRAILER=ALL to place trailer
pages after each printed file in the
job. TRAILER=ONE places a
trailer page after the last printed
file in the job.
/GENERIC=(queue_name[,...])
/NOGENERIC
Specifies the queue as generic.
/LIBRARY=($ASA | $NOASA)
/NOLIBRARY
Indicates whether to override the
print queue’s ASA conversion
mode. $ASA converts files to ASA
format; specify $NOASA for no
ASA conversion.
Use the default value if the queue
is not generic.
Remote Spooling (XQUE)
9–3
Startup
Qualifier
Description
/NEXT
Restarts the queue with the next
job.
/ON=nodename
Required. Specifies the
CA-XCOM node name through
which files are printed. This
qualifier must be entered for XQUE
to function properly.
/OWNER_ULC=ulc
Specifies the ULC for the queue.
/PROCESSOR=XCOMPRTSMB
Required. Designates the
CA-XCOM symbiont. This
qualifier must be entered for XQUE
to function properly.
/PROTECTION=(codes)
Assigns default protection to the
queue.
/RETAIN [=keyword]
/NORETAIN
Indicates the job’s retention in the
queue after completion of the task.
XQUE uses the default value if the
job does not have retention.
/SCHEDULE=SIZE
/SCHEDULE=NOSIZE
Specifies whether the job size
influences scheduling the queue.
Use the default value if the job size
influences scheduling the queue.
/SEPARATE=(keyword[,…])
/NOSEPARATE
Specifies the job’s separation
defaults. Use the default values if
the job does not have any
separation defaults.
Note: The /SEPARATE qualifier
cannot be used with the
/GENERIC qualifier.
/SETUP=($ASA | $NOASA)
Indicates whether to override the
print queue’s ASA conversion
mode.
$ASA converts files to ASA format;
$NOASA does not perform ASA
conversion.
9–4
/TOP_OF_FILE
Resumes printing at the current
file.
/WSQUOTA=n
The working set quota for the
symbiont process.
CA-XCOM for OpenVMS Alpha Installation and User Guide
Stopping the Print Queue
Qualifiers Not Supported
XQUE does not support or use the following qualifiers or keyword values:
/ALIGN
/BACKWARD
/DEFAULT=BURST
/FORWARD
/SEARCH
/SEPARATE=BURST and SEPARATE=RESET
/TERMINAL
Stopping the Print Queue
To stop the CA-XCOM print queue, use the STOP/QUEUE command. For more
information on this command, refer to the OpenVMS DCL manual.
Examining the Print Queue
To examine the status of a CA-XCOM print queue or a job in the queue, use the
DCL SHOW QUEUE command. For more information on this command, refer to
the OpenVMS DCL manual.
If there is a communications problem, for example, the system is temporarily not
available, an XQUE queue displays its current status. For example:
STALLED, DEVICE UNAVAILABLE
Problem details are always logged. For more information about reading the log,
refer to the section Printing Errors and Recovery at the end of this chapter.
Printing Files
Files are sent to XQUE controlled queues for printing as a standard OpenVMS
queue. There is no difference between application programs that send files to an
OpenVMS queue and files sent through XQUE controlled queues except that
application programs specify PRINT dispositions when closing files that are to
be printed. Consult your particular programming language’s reference manual
for more information.
Remote Spooling (XQUE)
9–5
Printing Errors and Recovery
XQUE Command Line Syntax
To print using the OpenVMS print command to run XQUE, use the following
command:
PRINT/QUEUE=/PARAMETERS=(p1,p2,p3)
The /PARAMETERS=(p1,p2,p3) qualifier specifies parameter values that
override those set in the INITQX command procedure where:
p1=
p2=
p3=
remote system name
writer name
destination name
For example, specifying /PARAMETER=(,PRT39) sends the print request to
printer PRT39 on the default remote CA-XCOM node (as specified when the
queue was initialized). Specifying /PARAMETER=(SUN2,LA129) sends the
print request to printer “LA129” on CA-XCOM node ‘SUN2”.
Ignored Print Qualifiers
When using the DCL PRINT command to send a file to an XQUE controlled
queue, most “PRINT” qualifiers are supported. However, the following
qualifiers are ignored:
/BURST
/NOTE
/PAGES
/PASSALL
Printing Errors and Recovery
All XQUE events are logged to the following file:
XCOM$IMAGE:SYMBIONT_LOG_FOR_queue-name
LOG is the name of the XQUE queue.
Events include communications failures, successful or unsuccessful completions,
and requests aborted by users.
When an error occurs while a print request is being processed, the request is
requeued, placed on hold, and the event is logged. This assures the
accountability of print requests, as well as preventing unnecessary retries.
9–6
CA-XCOM for OpenVMS Alpha Installation and User Guide
Chapter
10
Remotely Initiated Requests and
User Security
Just as your local OpenVMS computer can originate CA-XCOM file transfer
requests between itself and remote CA-XCOM systems, so can one of these
remote systems initiate a file transfer with your local OpenVMS. A CA-XCOM
host can initiate the full set of file transfers to CA-XCOM by:
n
Sending a File
n
Sending a Job or Report
n
Retrieving a File
For any kind of remote initiate, the host always generates the request for the
conversation with CA-XCOM. This will be the case whether a CA-XCOM user
has actually originated the file transfer request (for example, through the
CA-XCOM TSO/ISPF menus), or it is acting as the intermediary system on
behalf of another system (indirect file transfer).
For example, assume a CA-XCOM-PC user initiates a request to send a file to
your OpenVMS. Although the PC and the OpenVMS are not directly connected
to each other, both are connected to the mainframe. CA-XCOM-PC sends the file
to the mainframe which temporarily stores it, while CA-XCOM on the
mainframe sets up a conversation with the user's OpenVMS and forwards the file
to the user's system. The entire store-and-forward process is performed
automatically and remains transparent to the CA-XCOM-PC user.
CA-XCOM Ancillary Control Processes
A detached process handles all transfers initiated by a remote CA-XCOM partner
to CA-XCOM for OpenVMS. For transfers using SNA, the detached process is
called XCOMACP. For transfers using TCP/IP, it is called XCOMIP.
Remotely Initiated Requests and User Security
10–1
CA-XCOM Ancillary Control Processes
XCOMACP Processing
An XCOMACP process is run for each entry in the EXCOMACP.COM file. The
XCOMACP process establishes and maintains a session with the remote system.
Sessions are established by the DEC system issuing an INIT_SELF. The remote
system then issues the BIND that is accepted by the DEC system.
Note: The TYPE=EXECUTE request will not work because it requires the remote
system to accept an unsolicited BIND.
In the EXCOMACP.COM file, there is a separate entry for each LU that receives
remote requests. The access name defined in your SNA configuration specifies
the LU. A separate process running the image XCOMACP.EXE is created for
each entry in the EXCOMACP.COM. Each process is named for the access name
to which it is connected.
The command procedure file called XCOM$IMAGE:EXCOMACP.COM starts
the XCOMACP process. This file defines a DCL command verb known as
EXCOMACP, and then subsequently invokes it. The command line qualifiers for
this DCL command convey all the required initial and default values for the
XCOMACP process(es). The command which creates the XCOMACP process is
the EXCOMACP command.
XCOMACP States
When the XCOMACP process is created, it obtains initialization parameter
values from the processing of the EXCOMACP command, a phase known as the
INIT state. Next, an attempt is made to obtain an SNA session.
When the initialization is successful, the process enters into the IDLE state and
waits for a remote CA-XCOM partner to initiate a transfer. If the attempt to
obtain an SNA session fails, the process enters the DISC state, which indicates
that the physical SNA line and the logical circuit are inactive. As long as the
system is in the DISC state, XCOMACP will make periodic attempts to obtain an
SNA session based on the POLLing interval.
XCOMIP Processing and States
XCOMIP is started by the UCX Auxiliary Server. UCX is also known as DEC
TCP/IP Services for OpenVMS. UCX listens for incoming CA-XCOM transfers
as defined at installation time, and runs the command procedure XCOMIP.COM
whenever a message is received on the CA-XCOM TCP/IP port – usually port
8044. XCOMIP, in turn, starts a process by running XCOMIP.EXE.
10–2
CA-XCOM for OpenVMS Alpha Installation and User Guide
CA-XCOM Ancillary Control Processes
XCOMIP accepts the TCP/IP socket from the UCX Auxiliary Server and then
receives the message that describes the incoming transfer. Because XCOMIP
does not run all the time, it does not have an IDLE or DISC state.
The table below lists the XCOMACP and XCOMIP process states:
XCOMACP/XCOMIP
Process States
Explanation
INIT
The XCOMACP process has just been created and is initializing itself.
DISC
No SNA session is activated. There may not be an SNA circuit e.g., no
SDLC link activated.
Not applicable to XCOMIP.
IDLE
Half of an SNA session is established, i.e., the session is activated but
there is no transfer in progress.
Not applicable to XCOMIP.
REQR
A transfer request has been received from a remote CA-XCOM user.
REQV
A received transfer request from a CA-XCOM remote user is being
verified e.g., to determine if a remote user is permitted access to
resources on this node.
RFIL
A remote request is verified and XCOMACP is receiving a TEXT or
BINARY file from the remote node.
SFIL
A remote request is verified and XCOMACP is sending a TEXT or
BINARY file to the remote node.
RRPT
A remote request is verified and XCOMACP is receiving a REPORT
file from the remote node. Subsequently, this file will be submitted to
an OpenVMS print queue.
RJOB
A remote request is verified and XCOMACP is receiving a JOB file
from the remote node. This file will then be submitted to an
OpenVMS batch queue.
The XCOMACP process name conveys the process states to the user in the
following format:
<state>:<access name>
An activated but idle XCOMACP process name, with only one active process,
would be shown like this:
IDLE:<access name>
The XCOMIP process name conveys the process states in the following format:
<state>:<ip address>
Remotely Initiated Requests and User Security
10–3
CA-XCOM Ancillary Control Processes
XCOMACP Process Creation
The creation of the XCOMACP process or processes is a multi-step procedure
performed by the command procedure “XCOM$IMAGE:EXCOMACP.COM.”
The first step is the definition of a DCL command verb, namely EXCOMACP.
The second is the execution of this command one or more times. The command
is executed “n” times if “n” XCOMACP processes are to be created; n is greater
than or equal to one. The result of the EXCOMACP command execution is the
creation of an XCOMACP process.
Each XCOMACP process assumes the name of the access name specified in the
EXCOMACP entry. The qualifiers supplied to the EXCOMACP command
provide both the process quotas that the XCOMACP process is to execute with,
and the parameters that the process will use to control some of its activities. For
example, the default username and password if none is supplied by a remote
CA-XCOM user, or the polling interval between session polls.
The last action performed is the removal or undefining of the EXCOMACP DCL
command verb. Following is an example of an EXCOMACP.COM command
procedure file to create two XCOMACPs.
Note: Each XCOMACP process is dedicated only to one SNA session, and each
has a unique /ACCESS name value.
$! Define EXCOMACP command
$ set command xcom$image:excomacp
$!
$! create XCOM ACP(s)
$!
$! rename old log files
$ set noon
$ log = f$search("xcom$image:xcomacp*.log")
$ if log .nes. "" then rename xcom$image:xcomacp*.log;* *.old;0
$ set on
$
$! execute acp startup routine
$ assign/user sys$command sys$input
$ excomacp /defaccnt=DECNET! use decnet account as the default
/defpswrd=DECNET! default password
/node=GCGW02
! gateway node name or VMS/SNA unit #
/access=XCOM58
! access name (defined in config file)
/poll="0 00:05:00.00"
! delta time between session polls
$!
$ excomacp /defaccnt=DECNET! use decnet account as the default
/defpswrd=DECNET! default password
/node=GCGW02
! gateway node name or VMS/SNA unit #
/access=XCOM60
! access name (defined in config file)
/poll="0 00:05:00.00"
! delta time between session polls
$!
$! remove this verb
$ set command/delete=excomacp
10–4
CA-XCOM for OpenVMS Alpha Installation and User Guide
CA-XCOM Ancillary Control Processes
Figure 10-1: EXCOMACP.COM Command Procedure
XCOMIP Process Creation
As noted earlier, XCOMIP is started by the UCX Auxiliary Server. UCX is also
known as DEC TCP/IP Services for OpenVMS. After CA-XCOM is installed,
you must customize and then execute SETUP_XCOM_TCPIP.COM to tell UCX
to listen for incoming CA-XCOM messages and activate XCOMIP as needed.
You need to execute SETUP_XCOM_TCPIP.COM only once.
The command procedure in Figure 10-2 instructs UCX to listen on TCP/IP port
8044 for incoming CA-XCOM messages, and to execute the command procedure
XCOMIP.COM whenever such messages are received.
<SETUP_XCOM_TCPIP.COM>
$ set noon
$ ucx disable service xcom
$ ucx set service xcom /protocol=tcp/port=8044/user_name=SYSTEM/process_name=XCOMIP_UCX_AUXS/file=XCOM$IMAGE:xcomip.com/flags=multithread
$! /log_options=(file=some_log_file_name.log,all)$ ucx set config enable service xcom
$ ucx enable service xcom
Figure 10-2. UCX Command Procedure
The command procedure in Figure 10-3 defines the XCOMIP command to
OpenVMS and then starts XCOMIP to handle incoming transfer requests.
<XCOMIP.COM>
$SET noon
$!uncomment the next line to make a log.
$!eerything after this will appear in the log file
$!define sys$output XCOM$IMAGE:xcomip_startup.log
$ define sys$error sys$output
$ set command XCOM$IMAGE:xcomip.cld
$ xcomip /default_owner
$ set command/delete-xcomip
Figure 10-3. XCOMIP.COM Command Procedure
XCOMACP/XCOMIP Running Privileges
To start the XCOMACP or XCOMIP, you must have the following privileges:
n
EXQUOTA
n
GRPNAM
n
DETACH
n
NETMBX
Remotely Initiated Requests and User Security
10–5
Message Logging
n
PRMMBX
n
CMKRNL
n
WORLD
n
TMPMBX
n
SYSNAM
n
OPER
Message Logging
The XCOM ACP logs all messages to the following file:
XCOM$IMAGE:XCOMACP_FOR_<access_name>_ON_<node>. log
<access_name>
<node>
The access name defined in the EXCOMACP.COM file.
The gateway node defined in the EXCOMACP.COM file.
The ACP logs and time-stamps all CA-XCOM events that include received
requests and their associated status messages. All XCOMACP process activities
resulting from a remotely initiated CA-XCOM procedure are logged on both the
user's system and the partner system.
XCOMIP logs all messages to XCOM$IMAGE:XCOMIP.LOG.
Line Disconnects
If the line or link connecting a VMS system to the host during a remotely
initiated file transfer goes down, either temporarily or for some time, the
XCOMACP logs this and performs an automatic recovery process as soon as the
line comes up again.
Although the ACP is immediately aware that the line is down, the POLL
qualifier value specified in the XCOM$IMAGE:EXCOMACP.COM command
procedure determines how long it takes the ACP to act upon a line transition
from off to on. Therefore, examine the as-delivered default value to determine if
it is appropriate for your site.
User Security and Accounting Considerations
The security environment at both the local and remote system must be taken into
account for any CA-XCOM file transfer. Each must satisfy the access
requirements of the security in place on their system when processing is
performed.
10–6
CA-XCOM for OpenVMS Alpha Installation and User Guide
User Security and Accounting Considerations
For remotely initiated file transfers, any requests for resources on your local
OpenVMS must also satisfy your local security requirements. Therefore,
CA-XCOM will only be able to access those files and devices which are accessible
to the username associated with the current file transfer. This username, along
with its proper password should be specified by the remote user through the
CA-XCOM “User ID” and “Password” parameters. The “Password” will be sent
encrypted.
If a “User ID” is not specified, then the default username under whose privileges
this file transfer will be processed and specified through the DEFACCNT and
DEFPSWRD qualifiers (located in the XCOM$IMAGE:EXCOMACP.COM or
XCOM$IMAGE:XCOMIP.COM command procedure) will be used. The default
username provided will be DECNET and the default password provided will be
DECNET. A security error will result if an invalid username/password pair is
specified, or if an access request is made during processing of the file transfer
which is not permitted for the associated username.
The username/password procedures under CA-XCOM are identical to those
followed by DECnet, which is DEC's networking product. CA-XCOM is
completely compatible and consistent with native OpenVMS security features.
Using DECnet-OpenVMS Proxy Identifiers
If you do not want to specify a password parameter in the user ID information
passed from the IBM system to the XCOMACP/XCOMIP process, then a proxy
ID can be used. A proxy ID enables a user logged in at a remote node to be
automatically logged in to a specific account at the local node, without having to
supply any access control information.
In order to establish proxy login to an account on the local OpenVMS node,
without specifying any access control information, the remote user must have a
default proxy account on the local node which maps to a local user account. The
remote user assumes the same file access rights as the local account and receives
the default privileges of the local account.
The proxy login capability increases security since it minimizes the need to
specify explicit access control strings in node specifications passed over the
network or stored in command procedures. More comprehensive information
regarding DECnet-OpenVMS can be obtained in The OpenVMS Networking
Manual.
The XCOMACP/XCOMIP process accesses local files on behalf of the supplied
remote username. XCOMACP/XCOMIP uses DECnet-OpenVMS security
capabilities to verify that the supplied user ID has access privileges to the local
node and files. Therefore, to properly use proxy identifiers, see the following
assumed process.
Remotely Initiated Requests and User Security
10–7
User Security and Accounting Considerations
Let us assume that the XCOMACP/XCOMIP process is running with the
“SYSTEM” local OpenVMS identifier and privileges. The following is an
example of the User Authorization File (UAF) command to define a proxy
account:
ADD/PROXY <local-node-name>::SYSTEM IBMUSER
<local-node-name>
The local node name.
IBMUSER
IBMUSER is a locally defined username on the OpenVMS,
which the remote IBM user will supply as the user ID to
XCOMACP. (The password is not supplied.) You can also
define a password for this username.
Once the XCOMACP/XCOMIP successfully completes security checking, all
XCOMACP/XCOMIP accesses made on the local OpenVMS system will be with
the access rights and privileges of the user IBMUSER.
Password Encryption
The PFILE program ensures that when you invoke transfers from the OpenVMS,
the password will not be displayed in the command line, command file, or in the
transfer itself. PFILE creates a file which stores an encrypted password and a
VMS group code, and names the file after the userid associated with this
password. The filename does not have an extension.
To create a password file, do the following:
1.
At the DCL prompt $, type PFILE and press Enter.
Result: The program prompts you for your userid.
2.
Type your userid and press Enter.
Result: The program prompts you for your password.
3.
Type your password and press Enter
Result: The program creates a password file using the same name as your
userid. The file name does not have an extension.
To initiate a command line transfer, specify PASSWORD=X. CA-XCOM reads
your password and VMS group code from the password file (which PFILE
created) that has the same name as your userid. The VMS group code ensures
that only authorized users can access the password.
Note: If a checkpointed transfer originally specified PASSWORD=X, then the
XCOM_CHECKPOINT.COM file created to restart the transfer also specifies
PASSWORD=X.
10–8
CA-XCOM for OpenVMS Alpha Installation and User Guide
Resource Accounting
Resource Accounting
The username under whose access privileges the file transfer processing runs is
also held accountable for all used resources. If this happens to be a default
username, then the default account will be charged.
Note: For locally initiated procedures, resources used at the local end are
charged to the account of the local username who made the file transfer request.
Default File Specifications
A complete OpenVMS file specification uses the following format:
device:[directory]filename.extension;version
Where
Indicates
device
The disk drive name.
directory
The directory name. A file is listed in a directory. A directory
is a special kind of file containing the names and locations of a
file(s).
filename
The name of the file extension.
version
The version number of the file.
When a local file is not completely specified by the remote user, the
XCOMACP/XCOMIP uses the same defaults that the DECnet uses.
If the device or directory is not specified, the system uses the default value
specified in the SYSUAF, which corresponds with the local username associated
with this file transfer. (This is the CA-XCOM “User ID” parameter specified by
the remote user under whose privileges and account this procedure will run on
the local OpenVMS.)
If either the filename or extension is not specified, then null filenames or
extensions are used.
If no version number is specified, then the next higher version number will be
used for this file.
Remotely Initiated Requests and User Security
10–9
Receiving From a Remote System
For example, a file specification of FRED.DAT in a file transfer associated with
the username of MILLER will access file FRED.DAT in the default directory of
MILLER. If a username was not specified by the remote user, the default
username is used. This is usually DECNET.
In this case the file FRED.DAT, with no username specified, will access a file in
the default directory associated with DECNET, which is typically
SYS$SPECIFIC:[DECNET].
Receiving From a Remote System
As discussed earlier, local CA-XCOM users can send files, reports, and jobs to a
remote system. Conversely, these remote systems may also send files, reports,
and jobs to your local CA-XCOM site. Files are created according to the
OpenVMS rules. VMS RMS attempts to determine file protection in the
following order:
1.
Using the protection assigned to an existing file of the same name.
2.
Using the default file protection of the directory. This is set by setting an
ACL on the directory.
3.
Using the process-default protection.
Note: For CHECKPOINT/RESTART operations, XCOMACP/XCOMIP must
have READ and WRITE access to the file.
Receiving Files From a Remote System
When a remote user initiates a Send File, the XCOMACP/XCOMIP receives the
transferred file.
Note: When CA-XCOM is instructed to create a file, it creates variable length
files for text data and fixed length files for binary data. When appropriate, text
files are converted to ASCII.
Receiving Jobs From a Remote System
When a remote user initiates a Send Job, the XCOMACP/XCOMIP receives the
transferred job (i.e., command file to be executed).
REMEMBER:
n
10–10
Jobs are always submitted to SYS$BATCH. If the remote user specifies a
destination parameter value then the job is submitted to this destination.
CA-XCOM for OpenVMS Alpha Installation and User Guide
Receiving From a Remote System
n
Jobs will be put on HOLD if the remote user has specified this option.
n
If a local user is logged in under the same username that was specified in the
remote request, this user will be notified when the request is queued and
upon the job's completion.
n
The job's log is kept in the file XCMJOB_RQST.LOG in the username's
default directory, but is not printed.
n
The job (the command file) is kept in the username's default directory in the
file XCMJOB_RQST.COM.
n
The job name is always XCMJOB_RQST.
n
Files are converted to ASCII when appropriate, i.e., when the remote
computer is an EBCDIC system.
Receiving Print Requests From a Remote System
When a remote user initiates a Send Report, the XCOMACP/XCOMIP will
receive the transferred print file.
REMEMBER:
n
Files are submitted to SYS$PRINT unless otherwise specified. If the remote
user specifies a destination parameter value then the job is submitted to this
destination.
n
The print file is put on HOLD if the remote user has specified this option.
n
If a local user is logged in under the same username that was specified in the
remote request, this user will be notified when the request is queued and
when the print job completes.
n
The remote user should specify only print characteristics (corresponding to
the CA-XCOM “Class” parameter) and form names (corresponding to the
CA-XCOM “Form Type” parameter) that have been defined on the local
VMS system. To predefine valid values, use the DCL
DEFINE/CHARACTERISTIC and DEFINE/FORM commands respectively.
Note: To ensure compatibility with IBM mainframe conventions, the system
interprets a “CLASS=A” specification as the local default print characteristic, and
a blank Form Type as the local default form name.
n
To request multiple copies, use the CA-XCOM ”Copies” parameter.
n
If the remote user does not specify a job name through the CA-XCOM
“Report Title” parameter, the job name defaults to XCMPRT_RQST.
n
CA-XCOM stores print requests in the username's default directory as
XCMPRT_RQST.LIS. When the procedure completes, the system deletes the
print requests unless otherwise instructed.
Remotely Initiated Requests and User Security
10–11
Chapter
11
Operation and Control
CA-XCOM consists of a set of components, for example, XCOMACP, remote
spooler, and so on. Most of these components have already been described in
preceding chapters. This chapter discusses the following additional topics:
■
General CA-XCOM product operation and management
■
Creating Custom Character Sets for file conversion
■
Restartable transfer processing and management
■
User exits
General CA-XCOM Operation and Management
CA-XCOM consists of the following components:
XCOMCFG
CA-XCOM Command
Language Interface
The CA-XCOM configurator.
Consists of:
n
Menu Interface
n
Command Line Interface
XCOMACP
The CA-XCOM remote request handler.
XCOMAPI
The application programming interface that
allows you to call CA-XCOM from an application
program to initiate a transfer.
CA-XCOM Remote
Spooler
Establishes print queues for printing on remote
printers attached to CA-XCOM SNA nodes.
CA-XCOM Checkpoint
Server
Handles checkpoint/restart processing of
restartable transfers.
Operation and Control
11–1
Creating Custom Character Sets for File Conversion
The preceding chapters explained how to use most of these components for
routine transfer activity. The rest of this chapter discusses the checkpoint/restart
feature.
For the remote spooler and checkpoint server, you can use normal OpenVMS
DCL queue commands. For more information about the remote spooler, see the
chapter, "Remote Spooling XQUE".
Note: Because old versions of the EXCOMACP file and the checkpoint server
queue's log file are retained in the XCOM$IMAGE directories, you should
periodically purge these files.
Creating Custom Character Sets for File Conversion
This section contains information on using custom character sets for conversion
processing and procedures for creating and specifying custom character sets. It
describes ASCII-to-EBCDIC and EBCDIC-to-ASCII conversions and building a
custom character conversion set.
There are two files, etoa.tab and atoe.tab , used for EBCIDIC/ASCII translations.
When CA-XCOM needs to do a translation, it looks for the appropriate file. If the
file does not exist, an internal table is used. For example, when transferring to
MVS, CA-XCOM will look for the file, XCOM$IMAGE:ATOE.TAB to do the
ASCII to EBCDIC translation. If that file does not exist, an internal table is used.
When to Use
Use conversion processing when the following situations occur:
■
■
■
When a non-USA character set is being used.
When the transferred file is to be converted to all uppercase or lowercase
characters.
When the CA-XCOM default character conversion sets would not be
appropriate.
About Custom Character Sets
The custom character sets are stored in standard ASCII files as conversion tables.
Each original character and the character to which it is translated are defined by
a single line in the file. The line number of the file itself indicates the decimal
code value of the original character.
11–2
CA-XCOM for OpenVMS Alpha Installation and User Guide
Creating Custom Character Sets for File Conversion
The character conversion table must be the only contents of the conversion file.
Do not insert any comments or additional numbers. Each conversion file must
contain 256 lines. If your text editor provides a line counter, you can use it to
help you keep track of the line numbers.
Procedure
Use the following procedure to create a custom character translation table.
Step
Action
1
Use an editor that can generate ASCII text to create and open a
file.
2
Define each character on a separate line.
Note: The line number represents the decimal code value.
Example 1
In the following example, to translate the standard USA ASCII character for the
question mark (?) to the equivalent EBCDIC code, line 63 of the conversion file
would contain only the information below:
0x6f
The decimal code for the question mark is 63, the line number is 63 and the
hexadecimal code for the EBCDIC character is 6F.
Example 2
In the following example, to translate the EBCDIC character “A” to the
equivalent ASCII code, line 193 of the conversion file would contain only the
information below:
0x41
The decimal code for the EBCDIC character “A” is 193, the line number is 193
and the hexadecimal code for the ASCII character is 41.
Operation and Control
11–3
CA-XCOM Checkpoint/Restart Transfer Processing
Procedure
Use the following procedure to translate all lower case ASCII characters to upper
case EBCDIC characters.
Step
Action
1
Use an editor that generates ASCII text to open the file,
XCOM$IMAGE:ATOE.TAB, and copy the values from lines 65-90
to lines 97-122.
Note: The decimal ASCII code for “a” is 97 and the decimal ASCII
code for “z” is 122.
Result—The values in lines 97-122 are changed to represent
uppercase EBCDIC characters.
2
Save the file as an ASCII text file and exit the editor.
CA-XCOM Checkpoint/Restart Transfer Processing
When large file transfers are interrupted, it is crucial that the transfer resume
where it left off, without having to return to the beginning of the file. This
capability is known as checkpoint/restart.
Most users will use checkpoint/restart for both large and small transfers. For
example, if the line goes down during the ninth hour of transmission of a file that
normally takes ten hours to transmit, you would want the transmission to restart
with only the final hour’s worth of data when the line is back up and not restart
from the beginning.
Startup
As part of the CA-XCOM startup procedure, a server queue is started with a
queue name of XCOM$RECOVER, with a queue processor image file of
SYS$SYSTEM:XCOMCKPSVR.EXE. Specifically, the queue is started with the
following DCL command:
$ INITIALIZE/QUEUE/PROCESSOR=XCOMCKPSVR/RETAIN=ALL/DEFAULT=NOFEED-R_$ /START
XCOM$RECOVER
Note that $ and _$ are DCL prompts.
11–4
CA-XCOM for OpenVMS Alpha Installation and User Guide
CA-XCOM Checkpoint/Restart Transfer Processing
Normally, the XCOM$RECOVER queue is initialized and started by the
command procedure XCOM$IMAGE:STARTCKPSVR.COM. This procedure is
called from the CA-XCOM startup command procedure. All errors or symbiont
image problems are logged to the file:
XCOM$IMAGE:XCOM$CHECKPOINT.LOG
Prior to queue initialization and startup, this procedure renames any existing
XCOM$IMAGE:XCOM$CHECKPOINT.LOG file to
XCOM$IMAGE:XCOM$CHECKPOINT.OLD
Processing
To make a transfer restartable, add the qualifier /CHECKPOINT=delta-time to
the CA-XCOM command line during a CA-XCOM transfer request. Here
delta-time is the time the system is to wait before an attempt is made to
automatically resume an interrupted transfer.
When a CA-XCOM user requests a restartable transfer, the system creates a
checkpoint file in the directory where the OpenVMS file involved in the transfer
is located. The current transfer context is written to it, and an entry is submitted
to the checkpoint server queue XCOM$RECOVER, which describes this transfer.
The context is updated periodically in the checkpoint file while the transfer is in
progress.
For remotely initiated transfers the checkpoint file is always created in the target
directory specified for the transfer. In addition, the AFTER time specified for an
XCOMACP generated entry is in the far future since it is incumbent on the
remote user to restart the transfer.
Note: The aging limit is the same as that for locally (i.e., OpenVMS) initiated
transfers with a default of 30 days.
When the transfer is successful, the checkpoint file is deleted and the
XCOM$RECOVER entry is removed. If the transfer is interrupted, then after a
"delta-time" wait time CA-XCOM will try to resume and complete the transfer.
The server queue symbiont resumes a checkpointed transfer by generating a
command file named XCOM_CHECKPOINT.COM in the user's XCOM$IMAGE
directory and then submits this file to the SYS$BATCH queue. Audit trail
reports are written to SYS$LOGIN:XCOM.LOG, and the server queue log file is
written to SYS$LOGIN:XCOM_CHECKPOINT.LOG.
Operation and Control
11–5
CA-XCOM Checkpoint/Restart Transfer Processing
Checkpoint Filename Format
Use the following format for the checkpoint file:
disk:[dir]transfer-file-name_node.ckp
Where
Indicates
Disk:[dir]
Disk and directory default at the time of the CA-XCOM
checkpointed transfer command initiation, e.g.,
dua0:[xcomuser].
Transfer-file-name
Filename of the file involved in the transfer, e.g.,
testfile.txt;10.
Node
The CA-XCOM remote system name to which the
transfer was directed, e.g., bigblu. For the XCOMACP
process this value is a concatenation of the CA-XCOM
transfer request number and the group name, e.g.,
002086XCOM MVS2XN. Here "002086" is the request
number, and "XCOMMVS2XN" is the group name.
Checkpoint Filename Examples
VMS-initiated Transfer If the filename is dua0:[xcomuser]testfile.txt;10 and the
transfer is directed to a CA-XCOM remote node bigblu, the
respective checkpoint filename is
dua0:[xcomuser]testfile_txt_10_bigblu.ckp.
Remotely initiated Transfer
If the remote user requested a transfer of a file named
dua0:[vicki]peter1.txt;1, with a transfer request number
00314 and a group name XCOMMVS2XN, the respective
checkpoint filename is
dua0:[vicki]peter1_txt_1_00314xcommvs2xn.ckp.
11–6
CA-XCOM for OpenVMS Alpha Installation and User Guide
XCOM$RECOVER Queue Management
XCOM$RECOVER Queue Management
As a rule, the checkpoint queue XCOM$RECOVER manages itself by aging the
entries in the queue and automatically deleting or removing an entry that has
reached its age limit (default = 30 days). In addition, the checkpoint file is
deleted.
Situations could arise, however, when a user would like to perform specific
operations to the queue. The following actions can be done to the queue, or its
elements:
n
n
n
n
Display the queue
Change an entry's default age limit
Manually resume a checkpointed transfer
Delete an entry from the queue
Show Queue
To fully display the XCOM$RECOVER queue entries and their parameters, issue
the following DCL command:
$ SHOW QUEUE/ALL/FULL XCOM$RECOVER
For each displayed entry, the values shown for the /PARAMETER qualifier
mean the following:
n
n
n
The first value is the CA-XCOM remote node name.
The second value is the fully qualified checkpoint filename in the format
described in "Checkpoint Filename Format" on page 11-6.
The third value is the default age limit for the entry, in VMS delta-time
format.
Operation and Control
11–7
XCOM$RECOVER Queue Management
An example of SHOW/FULL/QUEUE XCOM$RECOVER command output appears
next.
$ sh queue/full/all xcom$recover
Server queue XCOM$RECOVER, on YEW::, mounted form DEFAULT
/BASE_PRIORITY=4 /DEFAULT=(FORM=DEFAULT) /OWNER=[SYSTEM]
/PROCESSOR=XCOMCKPSVR /PROTECTION=(S:RSMD,O:RSMD,G:RSMD,W:RSMD) /RETAIN
Entry Jobname
Username
Blocks Status
----- ------------------- -----42 XCOM CHECKPOINT XCOMUSER
0 Holding until 24-MAR-1998 12:32:58
Submitted 19-MAR-1998 12:32:58.43 /FORM=DEFAULT
/PARAM=("000114IP251ECA8D",
"DKA200:[XCOMUSER]XCMJOB_RQST_COM_4_000114IP251ECA8D.CKP;1",
"30 00:00:00") /PRIORITY=100
File: _YEW$DKA200:[XCOMUSER]XCMJOB_RQST.COM;4
43 XCOM CHECKPOINT XCOMUSER
0 Holding until 24-MAR-1998 12:33:34
Submitted 19-MAR-1998 12:33:34.17 /FORM=DEFAULT
/PARAM=("000115IP251ECA8D",
"DKA200:[XCOMUSER]XCMJOB_RQST_COM_6_000115IP251ECA8D.CKP;1",
"30 00:00:00") /PRIORITY=100
File: _YEW$DKA200:[XCOMUSER]XCMJOB_RQST.COM;6
44 XCOM CHECKPOINT XCOMUSER
0 Holding until 24-MAR-1998 12:33:48
Submitted 19-MAR-1998 12:33:48.10 /FORM=DEFAULT
/PARAM=("000115IP251ECA8D",
"DKA200:[XCOMUSER]XCMJOB_RQST_COM_7_000115IP251ECA8D.CKP;1",
"30 00:00:00") /PRIORITY=100
File: _YEW$DKA200:[XCOMUSER]XCMJOB_RQST.COM;7
Figure 11-1: Show Queue Sample Output
Change an Entry's Default Age Limit
To change the age limit of an entry in the XCOM$RECOVER server queue,
follow the steps below.
1.
At the DCL "$" prompt, type the following:
SHOW QUEUE/ALL/FULL XCOM$RECOVER
2.
Determine, from the output of the above command, the desired entry's
display. In particular note the P1, P2, and P3 values for the "/PARAMETER"
qualifier.
3.
To change the age limit, type the following at the DCL "$" prompt:
SET ENTRY <entry- number>/PARAMETER=(P1,P2,P3)
11–8
<entry-number>
The entry number.
<P1>
Exactly the same as the values noted in (2) above.
<P2 >
Exactly the same as the values noted in (2) above.
<P3>
The new age limit.
CA-XCOM for OpenVMS Alpha Installation and User Guide
XCOM$RECOVER Queue Management
For an example of changing the age limit for an entry, see Modify Age Limit
Example Output in Figure 11-2. The modified entries were initially displayed in
Show Queue Sample Output in Figure 11-1.
WARNING: Because an incorrectly specified command could prevent the
proper processing of an affected queue entry, be extremely careful when you
change an entry's default age limit.
$
$SET ENTRY 42 _$/PARAMETER=_$(000114IP251ECA8D,DKA200:[XCOMUSER]XCMJOB_RQST_COM_4_000114IP251ECA8D.CKP;1,"0
00:15:00")
$
$
$ sh queue/full/all xcom$recover
Server queue XCOM$RECOVER, on YEW::, mounted form DEFAULT
/BASE_PRIORITY=4 /DEFAULT=(FORM=DEFAULT) /OWNER=[SYSTEM]
/PROCESSOR=XCOMCKPSVR /PROTECTION=(S:RSMD,O:RSMD,G:RSMD,W:RSMD) /RETAIN
Entry Jobname
Username
Blocks Status
----- ------------------- -----42 XCOM CHECKPOINT XCOMUSER
0 Holding until 24-MAR-1998 12:32:58
Submitted 19-MAR-1998 12:32:58.43 /FORM=DEFAULT
/PARAM=("000114IP251ECA8D",
"DKA200:[XCOMUSER]XCMJOB_RQST_COM_4_000114IP251ECA8D.CKP;1",
"0 00:15:00") /PRIORITY=100
File: _YEW$DKA200:[XCOMUSER]XCMJOB_RQST.COM;4
43 XCOM CHECKPOINT XCOMUSER
0 Holding until 24-MAR-1998 12:33:34
Submitted 19-MAR-1998 12:33:34.17 /FORM=DEFAULT
/PARAM=("000115IP251ECA8D",
"DKA200:[XCOMUSER]XCMJOB_RQST_COM_6_000115IP251ECA8D.CKP;1",
"30 00:00:00") /PRIORITY=100
File: _YEW$DKA200:[XCOMUSER]XCMJOB_RQST.COM;6
44 XCOM CHECKPOINT XCOMUSER
0 Holding until 24-MAR-1998 12:33:48
Submitted 19-MAR-1998 12:33:48.10 /FORM=DEFAULT
/PARAM=("000115IP251ECA8D",
"DKA200:[XCOMUSER]XCMJOB_RQST_COM_7_000115IP251ECA8D.CKP;1",
"30 00:00:00") /PRIORITY=100
File: _YEW$DKA200:[XCOMUSER]XCMJOB_RQST.COM;7
Figure 11-2: Modify Age Limit Example Output
Operation and Control
11–9
XCOM$RECOVER Queue Management
Manually Resuming a Checkpointed Transfer
If the transfer was a locally initiated transfer from the OpenVMS, you can restart
a waiting checkpointed transfer manually in either of two ways:
Method 1
Enter one of the following DCL queue commands at the "$" prompt. Either:
SET ENTRY <entry-number>/release
or
SET ENTRY <entry-number>/noafter
Issuing either command immediately restarts or resumes the waiting
checkpointed transfer identified by <entry- number>.
Method 2
Reissue the original CA-XCOM transfer command and replace the
"/CHECKPOINTED" qualifier with the "/RESUME" qualifier.
For example, let's assume that the following CA-XCOM transfer command was
previously issued at the "$" prompt to initiate a checkpointed transfer, which
then failed in the midst of a transfer because of a line failure:
XCOM62/SENDFILE/CHECKPOINT somefile.txt bigblu::"xcom01.jcllib.don"
To manually resume this transfer after the line is restored, you would issue the
following command at the "$" prompt:
XCOM62/SENDFILE/RESUME somefile.txt bigblu::"xcom01.jcllib.don"
This command would restart the transfer from the last checkpoint prior to the
line failure and complete it, assuming there are no further problems.
11–10
CA-XCOM for OpenVMS Alpha Installation and User Guide
XCOM$RECOVER Queue Management
Deleting An Entry
At the $ prompt, enter the DCL commands shown below to delete an entry in the
XCOM$RECOVER server queue. Then delete the associated checkpoint file.
Step
Enter DCL Command
1.
SHOW QUEUE/ALL/FULL XCOM$RECOVER
2.
Comment
Determine from the output of the above
command which entry belongs or relates to
your interrupted transfer.
The checkpoint file is the second value (P2)
specified for the "/PARAMETER" qualifier.
The checkpoint filename format is:
disk:[dir]transfer-file-name_node.ckp
disk:[dir]=Disk and directory default at the
time of the CA-XCOM checkpointed transfer
command initiation, e.g., dua0:[xcomuser].
transfer-file-name= Filename of the file
involved in the transfer, e.g., testfile.txt;10
node=The CA-XCOM remote system name to
which the transfer was directed, e.g., bigblu.
For the XCOMACP process this value is a
concatenation of the CA-XCOM transfer
request number and the group name, e.g.,
002086XCOMMVS2XN. Here 002086" is the
request number, and "XCOMMVS2XN is the
group name.
file:=The file that was being transferred.
3.
DELETE/ENTRY=(entry-number[,...])
XCOM$RECOVER
This will remove the desired
XCOM$RECOVER queue entry.
(entry-number[,...])=The entry number or list
of entry numbers of jobs to be deleted.
4.
DELETE/LOG
DUA0:[XCOMUSER]TESTFILE_TXT_10_BIGBLU.CKP
This entry deletes the related checkpoint file.
The actual checkpoint file itself can be deleted
at the $ prompt by the DCL DELETE file
command.
Operation and Control
11–11
XCOM$RECOVER Queue Management
Deleting and Restarting the XCOM$RECOVER Queue
Under Normal
Conditions
To delete the XCOM$RECOVER queue under normal circumstances, at the $
prompt execute the following three DCL commands:
STOP/QUEUE/NEXT XCOM$RECOVER
STOP/QUEUE XCOM$RECOVER
DELETE/QUEUE XCOM$RECOVER
To restart the queue, at the $ prompt type the following:
@XCOM$IMAGE:STARTCKPSVR.COM
Under Abnormal
Conditions
Under certain conditions, an entry in the XCOM$RECOVER server queue
may be in the abort state or status. It may be seen after the specification of a
'show/queue xcom$recover' DCL command. If the abort does not clear up
within about 10 minutes , it prevents checkpointed transfers awaiting
automatic restart at a particular time from being executed. This permanently
aborting task literally plugs up the queue.
To unplug the queue, enter the following DCL commands at the $ prompt to
solve the aborting state.
Step
Enter DCL Command
1.
SHOW SYSTEM
2.
Comment
On a piece of paper, note the process ID of
all processes having the following format:
SYMBIONT_nnnn
nnnn = An integer
3.
SHOW PROC/CONTINUOUS/ID=<SYMBIONT_PROCESS-ID>
symbiont_process-id = One of the Ids
obtained from the previous step. When you
observe a symbiont with the image filename
of "XCOMCKPSVR.EXE", stop. Note the
process ID of this particular process.
4.
STOP/ID=<xcomckpsvr-symbiont-process-id>F255D
xcomckpsvr-symbiont-process-id = The
process ID noted in the previous step. This
symbiont process deletion stops the queue
since the aborting task prevents the DCL
command stop/queue xcom$recover from
being effective. The aborting task’s status
changes from "aborting" to "pending."
11–12
CA-XCOM for OpenVMS Alpha Installation and User Guide
The CA-XCOM Exits
Step
5.
Enter DCL Command
DELETE/ENTRY=entry-number XCOM$RECOVER
Comment
This will delete the now “pending” task.
entry-number=The entry number of the job
to be deleted.
6.
@XCOM$IMAGE:STARTCKPSVR.COM
This will restart the XCOM$RECOVER
queue.
The CA-XCOM Exits
CA-XCOM has an EXIT option that you can use to define and call your own user
exit when a transfer completes (either successfully or unsuccessfully). The user
exit allows you to write any post-processing routines that you may require.
Note: Because the EXIT option runs as part of the CA-XCOM file transfer
process, extensive post-processing will delay CA-XCOM in receiving the next file
transfer. Therefore, you must decide the extent of your own file transfer
post-processing.
Defining the Logical Name XCOM$EXIT01
To call the user exit after a file transfer completes (either successfully or
unsuccessfully), you must define the logical name XCOM$EXIT01. A sample
logical name definition appears below:
DEFINE/SYS XCOM$EXIT01 1
Installing XCOMEXIT01.EXE
Whether or not you want to use the EXIT option and any user exit processing,
you must install the shared image file XCOMEXIT01.EXE that is included on the
distribution tape. If you do decide to call a user exit, the exit will then be able to
execute XCOMEXIT01.EXE.
To install this file, use the format below:
INSTALL REPLACE/OPEN/SHARE/WRITE SYS$SHARE:XCOMEXIT01
Operation and Control
11–13
The CA-XCOM Exits
Customizing Your Exit Routine
To create your own exit routine, create a module (in any language) with an entry
point called XCOM$EXIT01. After successfully compiling your module, you
must link it with the following link command:
LINK /SHARE XCOMEXIT01, EXIT/OPT
Linking an Executable Image to a Shareable Image
The EXIT.OPT file contains the GSMATCH control parameter for the shareable
image. This parameter indicates whether an executable image is allowed to link
to a shareable image. The GSMATCH parameter setting for the linked
executable image and the shareable image should match.
The EXIT.OPT file also calls the C library routines. If you are not using C, you
must modify this file.
The Exit Routine Input (XCOM_HISTORY)
The XCOM_HISTORY record is the input to the exit routine. The CA-XCOM
distribution tape includes a sample record XCOM_HISTORY.H, written in C,
that you can use for your exit processing. To write exits in languages other than
C, you can modify the XCOM_HISTORY.H sample file for use with the desired
language.
A listing of XCOM_HISTORY.H parameters appears in the next section.
11–14
CA-XCOM for OpenVMS Alpha Installation and User Guide
The CA-XCOM Exits
The XCOM_HISTORY.H File Parameters
Parameter
Data type
Length
Description
status
integer
N/A
The status of the transfer.
A low order bit set means the transfer was
successful.
initiation_type,
character
1
The origin of the transfer.
L - the transfer was locally initiated
R - the transfer was remotely initiated
request_type
character
1
The type of request initiated.
S - a SEND request (OpenVMS sent a file)
R - a RECEIVE request (OpenVMS received a
file)
P - a request to send or receive a report
J - a request to send or receive a job
notify
character
12
The name of the local notify for the
OpenVMS.
remote_system
character
14
For locally initiated transfers - the name of the
remote system for the transfer.
For remotely initiated transfers - the ACCESS
NAME for the LU on the OpenVMS receiving
the transfer.
vax_file
character
256
The name of the OpenVMS file sent or
received.
request_id
character
6
The request number used for the transfer.
record_count
integer
N/A
The number of records transferred.
byte_count
integer
N/A
The number of bytes transferred.
compress_byte_
count
integer
N/A
The number of bytes in the transferred file
after decompression.
elapsed_time
float
N/A
How long it takes the transfer to complete.
elapsed_time_asc
character
31
How long it takes (in ASCII) for the transfer
to complete.
user_id
character
12
For remote transfers, this is the user ID
specified to receive the transfer.
Operation and Control
11–15
Chapter
12
Communicating With Other
Systems
One of the outstanding features of the CA-XCOM family of communication
products is that any version of CA-XCOM, regardless of the system on which it
runs, may transfer data with any other version of CA-XCOM that runs in the
same or a connected network. These transfers may be done either directly or
through a mainframe hub.
This chapter highlights important facts about some of the operating systems on
which CA-XCOM runs. Specifically, it identifies any special configuration issues
that you will need to be aware of if you are responsible for setting up your
system, as well as the file types and naming conventions used on other machines.
This chapter also contains information about pitfalls, restrictions, and additional
features of each CA-XCOM component.
In this release, you will find information regarding communications with partner
platforms running the following operating systems:
■
■
■
■
■
■
■
■
■
■
■
■
■
■
IBM MVS
IBM VM
IBM VSE
OpenVMS
IBM AS/400
PC-DOS (IBM or Microsoft DOS for PCs)
OS/2 (IBM or Microsoft)
Data General AOS/VS
Novell Netware
Stratus
Tandem
UNIX
Windows
Windows/NT
This material is intended as an overview only. If you require additional
information about any operating system, please see the CA-XCOM manual for
that system or the manufacturer's manuals.
Communicating With Other Systems
12–1
IBM MVS
IBM MVS
Naming Conventions
In MVS jargon, a file is typically referred to as a data set. Like most systems,
these filenames may have multiple levels. Each level can be up to eight
characters long and must start with either an alphabetic character or a national
character, such as a dollar or percent sign. Each level is separated by a period.
There is a limit of eight levels with a total of 44 characters, including the
separating periods.
A file type unique to MVS is the Partitioned Data Set (PDS). The PDS is a library
containing members that are each separate sequential files. The member name
becomes appended to the end of the filename in parenthesis in the form
A.B.C(MEMBER) and is limited to 8 alphanumeric or national characters.
The following are examples of valid MVS data set names:
SYS1.VTAMLST
C54684.UTILITY.CNTL(JOBCARD)
PROD.PAYROLL.SEPT90.TIMECARD.DATA
TESTDATA
A.$DDD.LOAD
In most MVS environments, a data set name is further restricted based upon
security rules created by the company. You will need to contact the appropriate
personnel within your organization for details, but typically, the high-level name
(first-level name) must match your MVS user ID or some other predefined index.
Most sites catalog all files through the system master catalog. In short, this
means that the system will be able to locate the file you specify by name only.
Under the rare occurrence of an uncataloged file, you will also need to specify
the volume and unit information for the device that holds the file.
Types of Files Supported
Sequential files are the most common forms of data transferred. Individual
members of PDS files may also be sent as sequential files. Entire PDS libraries or
multiple selected members may currently be transferred only between two MVS
systems.
All three types of VSAM files (KSDS, ESDS, and RRDS) may be transferred
between MVS systems, but they must be pre-allocated, or they may be sent to
non-MVS systems as sequential files.
12–2
CA-XCOM for OpenVMS Alpha Installation and User Guide
IBM MVS
ISAM, BDAM (direct access), IMS, FDR, and DFDSS data sets are not directly
supported, but may be put into a sequential format prior to transmitting, using
native utilities.
DCB Information
MVS file characteristics must be pre-defined when creating a new file.
Collectively, these characteristics are known as DCB parameters. The parameters
are specified in the form of the block size, logical record length, and data set
organization fields in the version of CA-XCOM that you are running. For more
information regarding any of these fields, please refer to an IBM JCL reference
manual.
Additional Features
CA-XCOM for MVS is rich with additional functions. Below are some of the
more appropriate features that you may wish to use.
CICS Interface
You may turn this on by indicating that you wish to notify CICS in the
appropriate "remote system notify" field in your version of CA-XCOM. To do
this, provide the VTAM APPLID of the CICS system in the related ID field. This
may be provided by your MVS/CICS application development team. Invoking
this interface should start a CICS transaction program following the successful
completion of a transfer, if one has been provided at the host.
Store-and-forward
You can perform transfers between two nodes connected to an intermediate MVS
system by invoking the indirect transfer feature in your version of CA-XCOM.
This will ask you for the final destination LU name and will send a transfer in
two stages. The first stage will go to the MVS JES spool where it will wait for the
final destination to be connected before the second stage occurs.
Communicating With Other Systems
12–3
IBM VM
IBM VM
Naming Conventions
The names of files under CMS consist of three parts: the filename, the filetype,
and the filemode.
The filename and filetype can be a maximum of 8 characters in length. They can
consist of letters, numbers, and/or national characters ($, #, @, +, -, :, _). In
general, lowercase letters are not allowed. In the CA-XCOM VM parameters
FILE and LFILE, the filename and filetype are specified as one string with a
period as a separator.
The third part of the CMS file identifier is the filemode. When one virtual
machine needs access to the minidisk of another virtual machine, CP is the
portion of VM which makes this possible. Therefore, when the CA-XCOM
Service Virtual Machine performs a transfer, it must be able to identify the target
minidisk to CP by the user ID of its virtual machine (LUSER=or USERID) and its
virtual address (LUNIT or UNIT).
Types of Files Supported
The CA-XCOM Service Virtual Machine runs IBM's GCS (Group Control System)
operating system. Due to the limitations of this environment, CA-XCOM-VM
only supports the CMS extended file system format. This covers CMS files on
minidisks formatted with 512, 1024K, 2048K, and 4096K block sizes. It does not
support the CMS Shared File System, minidisks formatted with 800 byte blocks,
or tape I/O.
DCB Information
CMS file characteristics must be predetermined when creating a new file. The
parameters you must specify are as follows:
■
■
■
12–4
The record format (RECFM), which can be either fixed (F) or variable (V)
The logical record length (LRECL), which indicates the number of characters
in the longest line of the file
The Block size (BLKSIZE) - Since files under CMS are essentially unblocked,
this is the same as the LRECL for fixed length files (RECFM=F), and for
variable length files (RECFM=V), it would be equal to the LRECL + 4.
CA-XCOM for OpenVMS Alpha Installation and User Guide
IBM VSE
IBM VSE
Naming Conventions
When accessing a file on a VSE system, the "Remote file name" field indicates the
file-id as would be specified on the DLBL, an indicator of whether the file is
VSAM or SAM, and optionally, additional information needed for locating the
file.
Format for VSAM files
The format for VSAM files is as follows:
file-id,V[,catalog-id]
Where
Indicates
file-id
The name given to the data set when it was defined
using IDCAMS by including this line in the JCL:
DEFINE CLUSTER (NAME
(file-id) ...
V
This is a VSAM file.
catalog-id (optional)
The name of the user catalog that owns the VSAM data
set, as defined using IDCAMS by including the line
DEFINE USERCATALOG (NAME
(catalog-id) ...
in the JCL. Leave this field blank if the data set is
owned by the master catalog.
SAM Naming Conventions
Format for SAM
filenames
Use the following format to name a SAM file:
file-id,S,[unit],[location],[size],[override]
Communicating With Other Systems
12–5
IBM VSE
The following table describes the parts of a SAM filename:
Part
Description
file-id
The name which identifies this dataset in the VTOC of the specific
DASD volume. This is the file-id you specify on the DLBL JCL
statement. Range: 1 to 44 characters.
Note: Do not enclose it in quotes.
S
Indicates that this is a SAM file.
unit
The physical device address as defined by the CUU parameter on
the ASSGN JCL statement. It identifies the disk drive on which this
file resides. This parameter can be omitted if the UNIT or VOL
parameters are specified, or if a DASD manager is in use.
location
Optional for output files.
The starting location of the file on the disk, as defined on the
EXTENT JCL statement. If a DASD manager is in use, specify a
value of 1.
size
Optional for output files.
Indicates how much space this dataset will use, as defined on the
EXTENT JCL statement. For CKD devices, this is the number of
tracks. For FBA devices, this is the number of blocks.
12–6
CA-XCOM for OpenVMS Alpha Installation and User Guide
IBM VSE
Part
Description
override
Optional for output files.
Indicates whether this file should be processed as if the FLLTAB
option for DASDM were coded as indicated by the override
parameter. The override applies only to the processing for the file
whose dataset name is on the statement that the statement where
the override appears. The following are the available override
parameters and their equivalent DFLTAB option:
1.
DMYES to force DASDM=YES for this file.
2.
DMNO to force DASDM=NO for this file
3.
DMEPIC to force DADSM=EPIC for this file.
Note: If you are running with a DASD manager, the DASD
manager’s STRTTRK or Trigger value would be placed in the
location field. DASD manager pools should be indicated by putting
the poolname in the Volume parameter.
For EPIC/VSE users, you may omit
■
The location if you want EPIC to default to its STRTTRK value.
■
The size if you want EPIC to default to its DEFEXT value.
■
The Volume information if you want EPIC to default to its
DEFPOL value.
For CA-Dynam users who want to access Dynam catalog controlled
files (included GDG datasets), no extent information should be
entered. (No cuu, location, size or override information and no
Volume or Unit parameters for the files you are referencing.)
TAPE Naming Conventions
Format for TAPE
filenames
Use the following format to name a TAPE file:
file-id,T,[unit],[unit],[unit],[override]
Communicating With Other Systems
12–7
IBM VSE
The following table describes the parts of a TAPE filename:
Part
Description
file-id
The name which identifies this dataset in the tape manager catalog
or in the HDR1 label on the tape. This is the file-id you specify on
the TLBL JCL statement. Range: 1 to 44 characters.
Note: When the file-id contains imbedded spaces or commas, it
should be enclosed in quotes.
Note: IBM only supports a 17-character file-id in a tape header
label. If you have a tape manager, 44-character tape file-ids may be
supported. CA-XCOM does not validate your file-id, but takes
whatever you put on the statement and passes it along to IBM’s
OPEN routine or to your tape manager as you have entered it.
T
Indicates that this is a TAPE file.
Note: If you enter a transfer request from a platform that has not
yet implemented the extended tape processing parameters or menu
interface fields for controlling tape processing to an
CA-XCOM/VSE server, you must use the T option. You are
restricted to standard label tape processing.
unit
The physical device address as defined by the CUU parameter on
the ASSGN JCL statement. If you are using TAPEM=YES|EPIC,
CA-XCOM ignores any units coded and the tape manager does the
tape AVR and assignment. If you are not using the tape manager,
the primary assignment is made to the first unit CA-XCOM finds.
Other units found are assigned as temporary alternates.
This parameter can be omitted if you prefer to use the UNIT
parameter to specify a unit or two units (primary and alternate).
This parameter can be used in conjunction with the UNIT
parameter to specify a primary unit and up to four alternate units
which will be assigned by CA-XCOM prior to open. Units specified
on the statement containing the file-id will be assigned before units
specified on the UNIT parameter.The unit parameter is ignored
because tape processing is only supported when you have a tape
manager on your VSE system.
12–8
CA-XCOM for OpenVMS Alpha Installation and User Guide
IBM VSE
Part
Description
override
Optional for output files.
Indicates whether this file should be processed as if the DFLTAB
option for TAPEM were coded as indicated by the override
parameter. The following are the available override parameters and
their equivalent DFLTAB option:
■
TMYES to force TAPEM=YES for this file.
■
TMNO to force TAPEM=NO for this file.
■
TMEPIC to force TAPEM=EPIC for this file.
Note: The override applies only to the processing for the file whose
dataset name is on the statement that the override appears on. It is
in effect for this transfer only.
VSAM Managed SAM Naming Conventions
Format for VSAM
managed SAM
filenames
Use the following format to name a VSAM managed SAM file:
file-id,M,prim#recs, sec#recs,catalog-id
The following table describes the parts of a VSAM managed SAM filename:
Part
Description
file-id
The name which identifies this dataset that will be implicitly
defined to VSAM at open time. Range: 1 to 44 characters.
M
Indicates that this is a VSAM managed SAM file.
Note: If you enter a transfer request from a platform that has not
yet implemented the extended tape processing parameters or
menu interface fields for controlling tape processing to a
CA-XCOM/VSE server, you must use the T option. You are
restricted to standard label tape processing.
prim#recs
Used for output files only. This indicates the number of blocks (of
the size defined by the BLKSIZE parameter) for the primary
dataset allocation
sec#recs
Used for output files only. This indicates the number of blocks
for the secondary dataset allocation. If no secondary allocation is
coded, VSAM defaults to 20% of the primary allocation. Zero
may be specified if you do not want any secondary allocation.
Communicating With Other Systems
12–9
IBM VSE
Part
Description
catalog-id
Optional for output files.
Defines the name of the user catalog that will own the dataset.
You may leave this field blank if the master catalog owns the
dataset.
Note: The use of VSAM managed SAM files requires IBM’s
IDCAMS program to be dynamically loaded in the partition. This
requires an additional 130K partition GETVIS storage.
DTF Information
VSE file characteristics must be predetermined when creating the files. If sending
to or receiving from a VSE system you must specify the following:
■
■
■
The record format (RECFM) which can be either fixed (F), fixed blocked (FB),
variable (V) or variable blocked (VB).
The logical record length (LRECL) indicates the number of characters in the
longest record in the file.
The block size (BLKSIZE) which can be either equal to the LRECL for fixed
files, a multiple of the LRECL for fixed blocked files, the LRECL +4 for
variable files or the BLKSIZE +4 for variable blocked files.
Types of Files Supported
IBM VSE supports VSAM (RRDS, KSDS, and ESDS) and SAM files.
Restrictions
The following restrictions apply to CA-XCOM for VSE:
■
■
12–10
No FILEOPT=ADD for receiving VSE - CA-XCOM for VSE does not support
FILEOPT=ADD if the VSE is receiving the file.
No Checkpoint/Restart for SAM - CA-XCOM for VSE does not support
checkpoint/restart for SAM jobs.
CA-XCOM for OpenVMS Alpha Installation and User Guide
OpenVMS
OpenVMS
File Support
The entire file specification can be a maximum of 255 characters. The file type
can be a maximum of 39 characters. A complete OpenVMS Alpha file or an
OpenVMS VAX file specification may be rendered as follows:
node::device:[directory]filename.type;version
Where
Indicates
Node
The VMS system where the file resides within a DECnet
environment. This field is not required because the
system name is identified through other fields in the
CA-XCOM product.
Device
This is a disk drive name (up to 15 characters).
If the device is not specified, then the system uses the
default provided in the VMS SYSUAF (defined on the
DEC system) for that user. The CA-XCOM remote
USERID field determines the SYSUAF USERID. If a
USERID is not provided, a CA-XCOM system-wide
default may be used, which is usually "DECNET," but
may be set by the system administrator that installed
CA-XCOM on the VMS system.
Communicating With Other Systems
12–11
OpenVMS
Where
Directory
Indicates
Directory and subdirectory information should be
placed here. If this information is not provided, then
defaults will be selected as described under "device"
above. Not all keyboards provide square brackets ([ ]).
This is particularly true of older 3270 series terminals in
the MVS and VM environments. To simplify usage for
customers with such keyboards, CA-XCOM will accept
angle brackets (< >) or braces ( { } ) in VMS filenames
which will be converted to square brackets on the VMS
computer.
For example:
PLAYERS1:<BRIDGE>CARD.DAT
or
PLAYERS1:{BRIDGE}CARD.DAT
would be treated as an equivalent to
PLAYERS1:[BRIDGE]CARD.DAT
Filename and Type
Together, these identify the specific file within the
directory. VMS "null" filenames will be used if these are
not provided.
Version
The VMS operating system may keep multiple versions of
a file each time that file is saved. It is normal to omit this
number to indicate that you want the most recent version
of a file, which is the highest version number.
For further information on VMS file specifications, refer to the VMS Using
DCL-DCL Concepts Manual.
Restrictions
Non-queued Host
Transfers
Due to restrictions in the DEC SNA software, the MVS TYPE=EXECUTE
(non-queued) transfer feature will fail with an 8003 sense code. It is not
supported by CA-XCOM to a VMS system.
Connectivity
The DEC VMS/SNA software is based on the Physical Unit 2.0 standard and not
on the more flexible 2.1. This means that the VMS system must be connected to a
VTAM (MVS or VM) system in an SNA network. CA-XCOM may still use the
store-and-forward function (described previously as an additional MVS and VM
feature) to transfer files with other CA-XCOM partners.
12–12
CA-XCOM for OpenVMS Alpha Installation and User Guide
IBM AS/400
Multiple Session
Configuration
VMS does not support parallel sessions with an MVS system, but if three file
transfers are needed concurrently with a VMS system, it does allow you to
define three APPC logical units. For this example, call the three logical units,
LUD1, LUD2, and LUD3, and assign a group name of LAVMS. Code the
GROUP and LU parameters for this #PSOTAB entry as follows:
GROUP=LAVMS, LU=(LUD1,LUD2,LUD3)
Type LAVMS as the Remote System Name to schedule transmissions to this
VMS system through the Menu Interface. When using the Batch Interface, use
the GROUP parameter instead of the LU parameter. Use the code:
GROUP = LAVMS
This can be used with all the CA-XCOM interfaces, including the Process
SYSOUT Interface.
A group name can be 1-8 characters. The first character must be alphabetic,
while the rest can be any combination of alphanumeric or national characters.
Try to use mnemonic names. This feature is useful for assigning nicknames.
Initiating the Session
Bind Request
Although separate VTAM LU names can be used for CA-XCOM sessions, you
should not "LOGAPPL" these LUs to CA-XCOM when configuring on MVS or
VM. This will fail with an 0801 or 8003 sense code, since the DEC software must
initiate the session bind request.
IBM AS/400
Naming Conventions
Use the following guidelines to specify an AS/400 file:
libraryname/filename(membername)
Where
Indicates
Libraryname
The name of the library that holds the file.
Filename
The name of the file that you wish to access. Periods are
allowed within the filename.
Membername
The name of the member in the file. If this component is
omitted, it defaults to the filename.
Communicating With Other Systems
12–13
IBM AS/400
Types of Files Supported
In addition to the standard file type discussed above, the Save File format is also
supported. When you wish to send such a file to a System/38 or AS/400 from
MVS, the file must exist on the target system prior to your transmission.
Additional Features
Xque
Xque is a feature of the System/38 and AS/400 implementations of CA-XCOM
that allows the transfer of reports from output queues on these systems to other
CA-XCOM nodes. The reports are transferred automatically, with NO user
intervention or changes to the applications. Xque is capable of selecting specific
classes of reports from output queues. The selection may be based on the user,
job name, form, etc.
In addition to the selection capability, Xque allows user and/or workstation
groups to be equated to printer destinations on remote CA-XCOM nodes. This
may be used, for example, to get reports back to your host system that are
generated on an AS/400 that you reach through IBM's HCF facility, or between
multiple AS/400s connected within a pass-through environment.
Configuration Issues
If you are configuring the VTAM LU that represents the AS/400 on an MVS or
VM system, you must ensure that the VTAM USS message 10 is not sent to that
LU. IBM's APPC software cannot start a session when this message, commonly
called the "welcome" message, is sent. To prevent this problem, the VTAM or
NCP USSTAB definition must be set to a table that does not have a USSMSG10.
The original table provided by IBM with VTAM is a good alternative, as message
10 is not included.
Case Sensitivity
Because the IBM AS/400 is case-sensitive, you must enter the user ID and
password in uppercase.
12–14
CA-XCOM for OpenVMS Alpha Installation and User Guide
PC-DOS
PC-DOS
Naming Conventions
CA-XCOM for PC-DOS only supports the FAT file system, which has the
following conventions:
d:[directory name]\..\filename.[ext]
Where
Indicates
d:
The drive letter specification (A...Z plus some special
characters). The drive letter usually identifies a
particular device. The C drive is the most common local
hard drive, the A drive is the most common floppy, and
the F drive is the most common network drive. PCs
support a facility in which a section of memory (RAM)
can also be used as a virtual disk drive.
In high-speed link environments, the performance of
CA-XCOM is directly related to the speed of the disk
drive. In most environments, the fastest to the slowest
devices are as follows:
■
RAM disks
■
Directly connected hard disks
■
Network disks
■
Floppy disks
If you do not specify a drive, the default (current) drive
will be used.
[directory name]
One or more optional directories which allow you to
assign organization to the drive. Directory names are
from 1 to 8 characters long with an optional extension
(like a file). If you do not specify a directory, the default
(current) directory will be used. If you specify a
destination filename with a directory that does not exist,
CA-XCOM for PC-DOS will create the directory for you.
See the receiving PC's configuration file
(XCOMCONF.DAT) to determine if this option
(CreateDirectories) has been set.
filename
Required. The name of the data file. It can be from 1 to 8
characters (characters past position 8 will be ignored).
Communicating With Other Systems
12–15
PC-DOS
Where
[ext]
Indicates
The file extension. It is used to further identify the file.
Executable programs must use the extension ".EXE" or
".COM." Executable batch files must use the extension
".BAT." If you do not specify an extension, then
CA-XCOM will not supply a default.
Restrictions
Due to the vast number of vendor APPCs and link types supported by
CA-XCOM, you should consult the APPC vendor's manual for restrictions on the
services provided by that vendor. These restrictions may impact such features as
MVS TYPE=EXECUTE transfers, environments that you can or cannot send to,
etc.
CA-XCOM-PC for DOS Version 2 does not support library transfers to MVS or
VM mainframes.
Configuration Issues
When communicating PC-DOS to PC-DOS using APPC, both systems must be
capable of PU 2.1. Some of the APPCs only support PU 2.0, which can only
communicate with a PU 4 or 5 (which is usually a MVS or VM mainframe). As of
this writing, the APPCs which support PU 2.1 include the following:
■
■
■
Network Software Associates Adapt (all link types except their gateway,
async controllers, and coax connections)
Novell (Token Ring only)
IBM APPC/PC
You can communicate PC to PC, even on systems which only support PU 2.0, by
using the indirect (store-and-forward) feature of CA-XCOM available when both
PCs are attached to an MVS mainframe.
When communicating PC to PC using PU 2.1, you should set the following
options (where available):
■
■
Negotiated link stations
Peer-to-peer connections
It is not necessary to set independent LUs (LU local address of 0), but it is
acceptable, and it is necessary when you use an SNA backbone to connect PC to
PC.
12–16
CA-XCOM for OpenVMS Alpha Installation and User Guide
OS/2
When using the Adapt product, PC to PC directly connected, in the Logical Unit
menu, you will need to set the ACTION parameter of one of the PCs to ACCEPT
and the other to INITIATE.
OS/2
Naming Conventions
OS/2 supports the High Performance Disk System (HPFS). This section will
address that format. See PC-DOS, earlier in this chapter for information on the
FAT file format naming conventions.
d:[directory name]\..\filename
Where
Indicates
d:
The drive letter specification (A...Z plus some special
characters). The drive letter usually identifies a
particular device. The C drive is the most common
local hard drive, the A drive is the most common
floppy, and the F drive is the most common network
drive. PCs support a facility in which a section of
memory (RAM) can also be used as a virtual disk
drive. Note that in high-speed link environments, the
performance of CA-XCOM is directly related to the
speed of the disk drive. In most environments, the
fastest to the slowest devices are as follows:
■
■
■
■
RAM disks
Directly connected hard disks
Network disks
Floppy disks (never support the HPFS system)
If you do not specify a drive, the default (current) drive
will be used.
[directory name]
One or more optional directories which allows you to
assign organization to the drive. Directory names are
from 1 to 254 characters long with an optional extension
(like a file). If you do not specify a directory, the default
(current) directory will be used. If you specify a
destination filename in a directory that does not exist,
CA-XCOM for OS/2 will create the directory for you.
See the target system's configuration to determine if this
option has been set.
Communicating With Other Systems
12–17
OS/2
Where
Indicates
filename
Required. The name of the data file. It can be from 1 to
254 characters. Usually, you separate components of
the name with periods. Executable binary files end with
a ".EXE" and executable batch files end with a ".CMD."
HPFS also supports extended attributes. CA-XCOM
does not transfer extended attributes.
When using the FAT system in OS/2, there may be
problems if you specify a file or path name which
violates the OS/2 naming conventions.
Restrictions
The following restrictions apply to CA-XCOM for OS/2:
■
■
■
■
12–18
APPC limitations - Due to the vast number of vendor APPCs and link types
supported by CA-XCOM, consult the APPC vendor’s manual for restrictions
on the services provided by that vendor. These restrictions may impact such
features as MVS TYPE=EXECUTE transfers, environments that you can or
cannot send to, etc.
No library transfers - CA-XCOM for OS/2 Version 2 does not support library
transfers from MVS mainframes.
No extended attributes - CA-XCOM for OS/2 does not support the transfer of
extended attributes.
Packing options - Versions of CA-XCOM for OS/2 prior to Version 3.0 do not
support some of the various packing options available on other CA-XCOM
systems. For example, they do not support the UNIX packing option
carriage_flag=MPACK.
CA-XCOM for OpenVMS Alpha Installation and User Guide
Novell NetWare
Novell NetWare
Naming Conventions
Use the following format to name a Netware file:
Note: CA-XCOM for LAN Workstation accesses files from any Novell file server
in a NetWare network.
[server\]volume:directory\subdirectory\...\filename
Types of Files Supported
CA-XCOM for NetWare LAN supports standard NetWare file types.
Destination Printer Information
When sending a report to a NetWare system, specify the Destination parameter
value or the Destination Printer field in the following form:
\\server name\printer queue name
CA-XCOM limits the length of this field as indicated below. The actual name on
the destination system may be longer.
Type of transfer
Specify
Direct transfers using Version 2
protocols.
Up to 21 characters.
Indirect transfers or transfers using
Version 1 protocols.
Up to 16 characters.
Restriction
CA-XCOM for NetWare LAN does not support library transfers to Novell
NetWare systems.
Communicating With Other Systems
12–19
Stratus/System 88
Stratus/System 88
Naming Conventions
Use the following format to name Stratus files:
#top_directory>group_directory>home_directory>filename.suffix
All names must be unique to that level.
The following table describes the parts of a Stratus filename:
Part
Description
top_directory
The physical disk(s). Range: 1 to 32 characters.
group_directory
A group of user home directories. Range: 1 to 32 characters.
home_directory
The user’s home directory. This directory resides in a group
directory. Range: 1 to 32 characters.
filename
Required.
The name of the Stratus file. Range: 1 to 32 characters.
suffix
12–20
A file classification. You can have multiple suffixes at the
end of a filename. Each suffix starts with a period. The
following table describes some common Stratus suffixes:
File type
Suffixes
Examples
Source
.pl1, .cobol,
.c
payroll.c, application.cobol
Object
.obj
payroll.obj, application.obj
List
.list
payroll.list, application.list
Error
.error
payroll.error,
application.error
program
module
.pm
payroll.pm, application.pm
command
macro
.cm
start_up.cm,
compile_and_bind.cm
back up
.backup
payroll.c.backup
CA-XCOM for OpenVMS Alpha Installation and User Guide
Stratus/System 88
Types of Files Supported
Stratus supports the following filetypes for remotely initiated transfers:
■
■
Fixed - This type of file contains records of the same size. Each record is
stored in a disk or tape region holding a number of bytes that is the same for
all the records in the file.
Sequential - This type of file contains records of varying sizes in a disk or tape
region holding approximately the same number of bytes as the record (for
example, the record storage regions vary from record to record). Records can
only be accessed on a record-by-record basis.
Additional Features
The following are additional features of CA-XCOM for Stratus of which you
should be aware:
■
■
Security option - CA-XCOM for Stratus can use its own account file to verify
the user ID and password and to map the CA-XCOM user ID to a VOS user
ID to check for file access. If this option is turned on and the remote user
ID/password combination is invalid, CA-XCOM for Stratus rejects the
request.
Restart/Recovery facility - CA-XCOM for Stratus can attempt periodic data
transmissions after the initial file transfer has failed. A certain number of
retries can be specified through the xcom_ser.pm file.
Restrictions
The following restrictions apply to CA-XCOM for Stratus:
■
■
No checkpoint/restart - CA-XCOM for Stratus Version 1 does not support
checkpoint/restart.
No library transfers - CA-XCOM for Stratus does not support the transfer of
libraries from MVS.
Communicating With Other Systems
12–21
Tandem
Tandem
Naming Conventions
Use the following format to name a Tandem file:
\<system>.<volume>.<subvolume>.<filename>
All of these components are restricted to eight characters, except as indicated
below.
The following table describes the parts of a Tandem filename:
Part
Description
system
The system name. Up to seven characters.
volume
The disk name
subvolume Can be thought of as a directory name
filename
Example
The name of your file
The following example uses a volume of $CLX12, a subvolume
of SCI, and a filename of FILE1:
$CLX12.SCI.FILE1
The Tandem file system is not a tree structure. Each volume.subvolume is
independent, that is, it has no subvolumes above or below.
Types of Files Supported
CA-XCOM for Tandem supports the following file types through ENSCRIBE,
Tandem’s disk file architecture:
12–22
■
Edit files
■
Unstructured files
■
Entry-sequenced files
■
Relative files
■
Key-sequenced files (for Replace only)
CA-XCOM for OpenVMS Alpha Installation and User Guide
Tandem
Unstructured files - Unstructured files are large-byte arrays. Data in these files is
accessed by using the relative byte address and the READ-COUNT or WRITECOUNT parameters in the system procedure calls. The application program
determines the way in which they are used. An EDIT file is a type of
unstructured file signified by the file code 101.
For more information on ENSCRIBE and unstructured files, refer to the
ENSCRIBE Programmer’s Guide.
Structured files - CA-XCOM supports entry-sequenced and relative structured
files.
■
■
■
Entry-sequenced files - Entry-sequenced files are sequential files. Records are
stored in the order in which they are entered. These records are variable in
length and cannot be added or deleted. They are accessed by their record
address.
Relative files - Relative files are ordered by relative record number. The space
allocated for each record is specified when the file is created. Records in
these files can be deleted and added again in place.
Key-sequenced files - Key-sequenced files are supported only for the Replace
operation. The file must already exist for CA-XCOM to perform an action on
it.
File Type Specification
Locally Initiated Send
Requests
When you send a file from the Tandem, the remote CA-XCOM determines the
file type when it opens the file.
Receive Requests
For locally or remotely initiated receive requests, the file type must be specified
by the GUARDIAN_FILE_TYPE parameter. Use one of the following values:
■
EDIT
■
UNSTRUCTURED
■
ENTRYSEQ
■
RELATIVE
Communicating With Other Systems
12–23
UNIX
Remotely-Initiated Send Requests
For remotely-initiated transfer requests (that is, send a file, job, or report), use the
following:
Record Format
Guardian Filetype Created
F
Relative
FB
Entry Sequence
VB
Edit
U
Unstructured
Note: Key sequence files are supported only if the file exists. You can do a
replace but not a create.
UNIX
Naming Conventions
Use the following format to name a UNIX file:
/directory/subdirectory/.../filename
Use up to 256 characters for the entire path of the file; there are no restrictions on
size for the individual parts of the path.
The following table describes the parts of a UNIX path:
Part
Description
/ (slash)
The root directory when it is in the first position: otherwise, the slash
separates directories and filenames in the path.
directory
The directory that contains the file. You can specify more than one
directory in a path.
filename
The name of the UNIX file.
Types of Files Supported
CA-XCOM for UNIX supports standard UNIX file types.
12–24
CA-XCOM for OpenVMS Alpha Installation and User Guide
Windows
Restriction
CA-XCOM does not support library transfers to UNIX systems.
Windows
Naming Conventions
CA-XCOM for Windows only supports the FAT file system. Use the following
format to name Windows files:
d:\[directory name]\..\filename.[ext]
The following table describes the parts of a Windows filename:
Part
Description
d
A particular device. The C drive is the most common local hard
drive, the A drive is the most common floppy, and the F drive is
the most common network drive. PCs support a facility in
which a section of memory (RAM) can also be used as a virtual
disk drive.
In high-speed link environments, the performance of
CA-XCOM is directly related to the speed of the disk drive. In
most environments, the fastest to the slowest devices are as
follows:
■
RAM disks (D drive)
■
Directly connected hard disks (C drive)
■
Network disks (F drive)
■
Floppy disks (A or B drive)
Note: If you do not specify a drive, the default (current) drive
is used. This directory in Windows changes, depending on the
last application accessed.
directory name One or more optional directories which allow you to assign
organization to the drive. Range: 1 to eight characters with an
optional 3-character extension (like a file). If you specify a
destination filename with a directory that does not exist,
CA-XCOM for Windows creates the directory for you.
Note: If you do not specify a directory, the default (current)
directory is used.
Communicating With Other Systems
12–25
Windows NT
Part
Description
filename
Required.
The name of the data file. Range: 1 to 8 characters (characters
past position eight generate an error).
ext
The file extension used to further identify the file. Executable
programs must use the extension “.EXE” or “.COM.” Range: 1
to 3 characters.
Note: If you do not specify an extension, CA-XCOM does not
supply a default.
Restriction
The following restriction applies to CA-XCOM for Windows:
APPC restrictions - Due to the vast number of vendor APPCs and link types
supported by CA-XCOM, consult the APPC vendor’s manual for restrictions
on the services provided by that vendor. These restrictions may impact such
features as MVS TYPE=EXECUTE transfers, environments to which you can
send, etc.
■
Windows NT
Naming Conventions
CA-XCOM for Windows NT supports the standard Windows NT file names and
the Universal Naming Convention (UNC). The file naming conventions for
Windows NT are similar to those for Windows, with some significant
differences, some of which are outlined below.
Use the following format to name files when using standard Windows NT file
names:
d:[\][directory name\..\]filename[.ext]
Use the following format to name files when using UNC file names:
\\server name\share name\directory\filename
12–26
CA-XCOM for OpenVMS Alpha Installation and User Guide
Windows NT
The following table describes the parts of Windows NT filenames and UNC
filenames:
Part
Description
d
Required. A particular device, indicated as a drive letter.
directory name Required. One or more optional directories and subdirectories.
Subdirectories can take the form of name[.ext].
Note: The form of the directory name and filename depend on
the operating system running on the server.
filename
Required. The name of the data file.
For FAT file systems, filename is 1 to 8 characters.
NTFS and HPFS file systems support long file names, up to 256
characters, including the extension.
Names may or may not be case sensitive, depending on the file
system on the server.
For FAT, NTFS and HPFS, names are not case sensitive. You can
use uppercase and lowercase when creating a name, and they
will display as typed, but internally Windows NT makes no
distinction for this. For example, Windows NT would consider
MYFILE and MyFiLe as references to the same file.
Windows NT also creates an MS-DOS-style name based on the
long name for compatibility with environments where long file
names are not always supported.
ext
The file extension used to further identify the file.
For FAT file systems, the extension is up to 3 characters.
For NTFS and HPFS, the extension is included in the long file
name limit of 256 characters.
Note: If you do not specify an extension, CA-XCOM does not
supply a default.
server name
The name of the server.
share name
The share name is network provider dependent.
For Microsoft Windows networks this is the name of the share.
For NetWare networks this is the name of the volume.
Communicating With Other Systems
12–27
Windows NT
Types of Files Supported
CA-XCOM supports standard Windows NT file types.
Additional Features
Additional features include the following:
File Systems
The standard Windows NT file systems are:
■
File Allocation Table format (FAT)
■
Windows NT File System format (NTFS)
■
High-performance File System format (HPFS)
File Access
CA-XCOM accesses files locally or from any file server on the Microsoft
Windows Network or the NetWare or Compatible Network, or any other
network provider installed on the Windows NT system.
Security
User IDs and passwords are case sensitive.
Home Directory
A Windows NT user can have a default home directory assigned by the
Windows NT administrator.
Destination Printer Information
When sending a report to a Windows NT system, specify the Destination
parameter value or the Destination Printer field in the following form:
\\server name\printer queue name
CA-XCOM limits the length of this field as indicated below. The actual name on
the destination system may be longer.
12–28
Type of transfer
Specify
Direct transfers using Version 2
protocols.
Up to 21 characters.
Indirect transfers or transfers using
Version 1 protocols.
Up to 16 characters.
CA-XCOM for OpenVMS Alpha Installation and User Guide
Windows NT
Restrictions
Access to directories and files on drives formatted for NTFS can be controlled
with the security features of Windows NT.
Access to all files on a Windows NT system can be controlled by the permissions
set on a directory or file. The access rights of the user ID on the remote system
determine the actions permitted for the transfer. Users cannot use a directory or
file unless they have been granted the appropriate permissions.
CA-XCOM for Windows NT does not support the transfer of files using wildcard
characters.
Communicating With Other Systems
12–29
Chapter
13
Messages
CA-XCOM includes a comprehensive message list to indicate which tasks can or
cannot be performed because you ran into a problem when you initiated a
transfer.
Log File
CA-XCOM messages are written to a log file, which can serve as an audit trail of
CA-XCOM status and activity. Some messages are also displayed on the user's
terminal, the VMS operator console, or sent to the session partner on the remote
computer.
All locally initiated transfers are logged in the XCOM.LOG file.
Remotely initiated transfers are logged in the following file:
XCOM$IMAGE:XCOMACP_FOR_<access_name>_ON_<node>.log
<access_name> is the access name defined in the EXCOMACP.COM file, and
<node> is the gateway node defined in the EXCOMACP.COM file.
Messages
13–1
CA-XCOM Messages
CA-XCOM Messages
Most CA-XCOM messages have the following format:
%FACILITY-L-IDENT, TEXT
[-FACILITY-L-IDENT, TEXT]
Where
(%)
(-)
FACILITY
L
Indicates
The first message entered.
Each subsequent message.
A VMS facility or component name.
A severity level indicator with one of the
following values:
S = Success
I = Information
W = Warning
E = Error
F = Fatal or severe error
IDENT
An abbreviation of the message text.
TEXT
The explanation of the message.
[-FACILITY-L-IDENT,TEXT]
The next message.
An example of this type of message format is shown as follows where
CA-XCOM is the facility name, I is the severity level, TIME is the IDENT, and
XCOM time stamp at 14-MAY-2000 11:48:13.2 is the message text:
%XCOM-I-TIME, XCOM time stamp at 14-MAY-2000 11:48:13.2
SNA Messages
The majority of messages generated will be from CA-XCOM, DECnet/APPC LU
6.2, and/or DECnet/SNA or VMS/SNA.
CA-XCOM messages generally have the facility name XCOM. DECnet/APPC
software messages generally have the facility code SNALU62. DECnet/SNA or
VMS/SNA message have the facility code SNA.
13–2
CA-XCOM for OpenVMS Alpha Installation and User Guide
Messages Without Idents
Messages Without Idents
Some CA-XCOM messages in this version do not use the format described
previously. These message types consist only of text, as shown below:
Failed SENDing 'TESTFILE.LIS' to 'BIGBLU" ROSE password"::TST.LIS'
Transmission Report
CA-XCOM automatically produces a log of all its processing activities called the
Transmission Report. Each file transfer transaction and the messages generated
during the conversation are time-stamped. This log can serve as an audit trail of
all CA-XCOM status and activities. All messages will also appear on the user's
terminal.
The message log is written by default to the file XCOM.LOG in the user's default
directory. To suppress the report, specify XCOM/NOLOG. A sample
Transmission Report is shown in Figure 13-1.
Messages
13–3
Transmission Report
CA-XCOM VMS Rel. 3.0
TRANSMISSION REPORT
%XCOM-I-TIMESTAMP, XCOM time stamp at 20-MAR-2000 15:06:51.92
SENT 'DKA200:[XCOMUSER]REC100.LEN;1' to 'USI226ME"xcomuser
password"::XCOMUSER.qa.aaopnpds(member2)'
Sent 10000 bytes, 101 records, in
-XCOM-E-LASTRCD_CNFMERR, Error confirming last data record #101.
XCOMM0269E MEMBER2 DUPLICATE MEMBER ON ADD FUNCTION
DSN=XCOMUSER.QA.AAOPNPDS
%XCOM-I-TIMESTAMP, XCOM time stamp at 20-MAR-2000 15:07:15.38
SENT 'DKA200:[XCOMUSER]REC100.LEN;1' to 'USAUSU01"xcomuser
password"::/u/xcomuser/from2.vms'
Sent 10000 bytes, 101 records, in 2.47 secs, at 4049.6 bytes/sec
%XCOM-I-TIMESTAMP, XCOM time stamp at 20-MAR-2000 15:07:31.24
RECEIVEd 'DKA200:[XCOMUSER]REC100.AUSTIN;3' from 'USAUSU01"xcomuser
password"::/u/xcomuser/rec100.len'
Received 10000 bytes, 101 records, in 2.44 secs, at 4182.1 bytes/sec
%XCOM-I-TIMESTAMP, XCOM time stamp at 20-MAR-2000 15:10:04.94
RECEIVEd 'DKA200:[XCOMUSER]GETFROM.MVS;9' from 'USI226ME"xcomuser
password"::xcomuser.qa.aaopnpds(member2)'
Received 10100 bytes, 101 records, in 12.24 secs, at 834.6 bytes/sec
%XCOM-I-TIMESTAMP, XCOM time stamp at 20-MAR-2000 15:23:39.04
SENT 'DKA200:[XCOMUSER]REC100.LEN;1' to 'USAUSU01"xcomuser
password"::/u/xcomuser/from2.vms'
Sent 10000 bytes, 101 records, in 3.48 secs, at 2874.6 bytes/sec
%XCOM-I-TIMESTAMP, XCOM time stamp at 20-MAR-2000 15:25:28.34
SENT 'DKA200:[XCOMUSER]REC100.LEN;1' to 'USI226ME"xcomuser
password"::xcomuser.qa.aaopnpds(member1)'
Sent 10000 bytes, 101 records, in 3.49 secs, at 2866.3 bytes/sec
%XCOM-I-TIMESTAMP, XCOM time stamp at 20-MAR-2000 15:26:36.06
SUBMITed 'DKA200:[XCOMUSER]AUSTIN.JOB' to 'USAUSU01"xcomuser password"::'
Sent 15585 bytes, 300 records, in 6.3 secs, at 2684.9 bytes/sec
%XCOM-I-TIMESTAMP, XCOM time stamp at 20-MAR-2000 15:26:54.81
SUBMITed 'DKA200:[XCOMUSER]MVSTCP.JOB' to '141.202.201.26"xcomuser password"::'
Sent 1169 bytes, 48 records, in 6.13 secs, at 204.6 bytes/sec
%XCOM-I-TIMESTAMP, XCOM time stamp at 20-MAR-2000 15:27:19.24
PRINTed 'DKA200:[XCOMUSER]REC100.LEN;1' on '141.202.201.26"xcomuser password"::'
Sent 10000 bytes, 101 records, in 14.45 secs, at 706.9 bytes/sec
Figure 13-1: Transmission Report
13–4
CA-XCOM for OpenVMS Alpha Installation and User Guide
XCOMACP Transmission Report
XCOMACP Transmission Report
A sample ACP Transmission Report is shown below.
Remotely initiated transfers are logged in
XCOM$IMAGE:XCOMACP_FOR_<access_name>_ON_<node> .log
<access_name> is the access name defined in the EXCOMACP.COM file.
<node> is the gateway node defined in the EXCOMACP.COM file.
CA-XCOM VMS Rel. 3.0
XCOM ACP TRANSMISSION REPORT
%XCOM-I-TIMESTAMP, XCOM time stamp at 21-MAR-2000 09:11:20.54
-XCOM-I-ACPSTART, XCOM ACP Started!
%XCOM-I-TIMESTAMP, XCOM time stamp at 21-MAR-2000 09:11:31.02
-XCOM-I-SESSIONATMPT, Attempting to establish SNA session.
%XCOM-I-TIMESTAMP, XCOM time stamp at 21-MAR-2000 09:11:31.67
-XCOM-I-SESSIONUP, SNA session established.
%XCOM-I-TIMESTAMP, XCOM time stamp at 21-MAR-2000 09:12:25.28
RECEIVEd file 'DKA200:[XCOMUSER]TEST.TXT;2' for user '"XCOMUSER password"'
Received 33264 bytes, 216 records, in 10.15 secs, at 3278.2 bytes/sec
File was compressed by 55.28 percent
Figure 13-2: ACP Transmission Report
Messages
13–5
Message Formats Received From Remote CA-XCOM Nodes
Message Formats Received From Remote CA-XCOM Nodes
A CA-XCOM message sent from a remote computer to the VMS computer which
initiated the procedure will be recorded in the "local" computer's message log
file. These messages are indented.
Standard CA-XCOM messages follow this format:
Msg #XCOMcnnnns - The first line of text.
Any additional text.
Where
Indicates
c
The CA-XCOM component that was the source of this
message. For example:
M
C
S
D
V
U
8
E
N
T
R
nnnn
S
MVS
PC DOS and OS/2
AS/400 and System/38
VMS (DEC)
VM
UNIX System
Stratus and System/88
VSE
Windows/NT
Tandem
Netware
The unique message number identifier.
The type of message. It can be:
I = Informational message
E =Error message
The following is an example of an informational message issued by CA-XCOM
for PC DOS:
XCOMC0000I DATA TRANSFER SUCCESSFUL
13–6
CA-XCOM for OpenVMS Alpha Installation and User Guide
Message Formats Received From Remote CA-XCOM Nodes
Messages From Failed Transfers to Remote Systems
If a remote system sends a transfer to the VMS and the transfer does not
complete, the VMS sends one of the following messages to the remote system:
XCOMD302E1E - Unable to open local file.
XCOMD404E1E - Confirm of transmit header failed.
XCOMD702E1E - VMS detected fatal error.
XCOMD405E1E - Receive of max record length failed.
In addition to the error code and header listed above, the message indicates if
this is a VMS or CA-XCOM error and gives a more specific explanation about
why the error occurred.
For more information about VMS and DEC/SNA errors, refer to the user
manuals for these systems. For more information about the CA-XCOM
messages, refer to the CA-XCOM error message listing that begins in the next
section.
Messages
13–7
List of Messages
List of Messages
This section lists the CA-XCOM messages.
Note: The CA-XCOM messages below display message text only. There are no
error numbers associated with these messages.
ABMISMATCH, Restart failed - Beta mismatch.
Reason:
In a restart, or a resume of a checkpointed transfer, the received Alpha and Beta
did not match those recorded in our checkpoint file. The transfer will be restarted
from the beginning of the file.
Action:
None.
ACCESS, Error with ACCESS access name value.
Reason:
The value specified for the ACCESS command qualifier is not acceptable.
"ACCESS" is a command qualifier for the EXCOMACP command which can be
found in the file XCOM$IMAGE:EXCOMACP.COM. This command file is used
to start the CA-XCOM remote request handler component, also known as
XCOMACP.
Action:
Examine the XCOM$IMAGE:EXCOMACP.COM command procedure. Make
any necessary changes, and retry its execution.
ACPFAIL, ACP failure, explanation follows.
Reason:
The CA-XCOM component responsible for handling remotely initiated requests
via SNA has failed for some reason. There should be additional error messages
which describe the exact cause of failure.
Action:
Evaluate the additional error messages. Make any necessary changes, and retry
the remotely initiated transfer operation.
ACPSTART, XCOM ACP Started!.
Reason:
Each time this message is generated, it indicates that the CA-XCOM remote SNA
request handler (also known as XCOMACP) has started.
Action:
None.
13–8
CA-XCOM for OpenVMS Alpha Installation and User Guide
List of Messages
ALLOCATE_FAIL, "ALLOCATE" verb failed. Reason follows.
Reason:
An attempt to initiate a conversation between the local CA-XCOM software and
a remote IBM host CA-XCOM software failed. A conversation requires a SNA
session to support it. There should be subsequent error messages which describe
in more detail the protocol interface errors returned.
Action:
Examine the subsequent error messages. Adjust, or resolve problems with the
communication interface (APPC or TCP/IP) and retry the operation.
If the problem persists, contact CA-XCOM Technical Support. You may be asked
to provide a trace of the APPC or TCP/IP session.
BADHEADER, Header received in illegal format.
Reason:
The CA-XCOM component responsible for handling remotely initiated requests
(also known as XCOMACP) has received a transmit header from which it cannot
determine the type of transfer (e.g., send-file, receive-report, etc.) desired by the
remote user.
This problem can occur when the two communicating CA-XCOM transaction
programs are out of sync with respect to their mutually agreed upon
communications protocol.
Action:
Request, if necessary, that both the XCOMACP and the remote CA-XCOM
software be stopped and restarted. Then, retry the transfer.
If the problem persists, contact CA-XCOM Technical Support. You may be
required to supply a SNA session level trace.
BATCHQ, Illegal batch queue name.
Reason:
The value specified for the BATCHQ command qualifier is not acceptable.
"BATCHQ" is a command qualifier for the EXCOMACP command which can be
found in the file XCOM$IMAGE:EXCOMACP.COM. This command file is used
to start the CA-XCOM remote request handler component, also known as
XCOMACP.
Action:
Examine the XCOM$IMAGE:EXCOMACP.COM command procedure. Make
any necessary changes, and retry its execution.
Messages
13–9
List of Messages
BOFRESTART, File transfer being done from beginning of file.
Reason:
During a restart of a transfer either the checkpoint file was not accessible or the
Beta start point values recorded in the checkpoint file did not match the values
received from the remote node.
Action:
None. This is an informational message to notify the user that a resumed
transfer had to restart from the beginning of the transfer file. There should be
additional messages describing why this was necessary.
CHKP_BFRLENERR, CHECKPOINT item code buffer length error.
Reason:
The CHECKPOINT item code buffer length value supplied when a CA-XCOM
API request was made is wrong. The value is larger than the maximum
delta-time string size specification allowed, which is sixteen (16).
Action:
Verify that the delta-time string size supplied when the CA-XCOM API request
was made is within the string size boundary. Make any necessary changes to the
user program, recompile, relink, and retry the operation.
CHKPBADFILE, Bad checkpoint file, read context error. Deleting.
Reason:
An error was returned by VMS RMS when reading the checkpointed CA-XCOM
transfer context from the checkpoint file. There should be a second message
which describes the specific RMS error returned. The current checkpoint file is
deleted. The problem may have been due to a write operation from a previously
bad checkpoint record.
A checkpoint file is created when a user requests a CA-XCOM transfer operation
to be restartable. It is opened, and records within it used and then updated when
a previously checkpointed transfer is resumed. The checkpoint file type is ".ckp,"
with the disk, directory, and filename being the same as that of the VMS target
file to be transferred. Note that the target file's version number is also made a
part of the filename (concatenated) .
Action:
Verify that the target disk is online and the directory is readable by the user
requesting the CA-XCOM transfer. Evaluate the RMS error returned. Make any
necessary changes, and retry the operation.
If the problem persists try the operation without requesting that it be
checkpointed. If the operation must be checkpointed and the problem persists,
contact CA-XCOM Technical Support.
13–10
CA-XCOM for OpenVMS Alpha Installation and User Guide
List of Messages
CHKPCONFIRM_ERR, Error receiving checkpoint confirm message.
Reason:
At each checkpoint of a restartable CA-XCOM transfer, a SNA LU 6.2 confirm
handshake is performed in order to force a synchronization point. During such a
procedure an error was returned by the protocol interface. There should be a
second message from the protocol interface which describes the specific error
encountered.
Action:
Evaluate the error returned by the protocol interface. Make any necessary
changes, and retry the operation. If the problem persists try the operation
without requesting that it be checkpointed.
If the operation must be checkpointed and the problem persists, contact
CA-XCOM Technical Support. You might be required to supply an SNA session
level trace.
CHKPCTXWRTERR, Unable to write checkpoint file (context).
Reason:
An error was returned by VMS RMS when writing the current CA-XCOM
transfer context to the checkpoint file. There should be a second message which
describes the specific RMS error returned.
A checkpoint file is created when a user requests a CA-XCOM transfer operation
to be restartable. It is opened, and records within it used and then updated when
a previously checkpointed transfer is resumed. The checkpoint file type is ".ckp,"
with the disk, directory, and filename being the same as that of the VMS target
file to be transferred. Note that the target file's version number is also made a
part of the filename (concatenated).
Action:
Verify that the target disk and the directory are online, and writable by the user
requesting the CA-XCOM transfer. Evaluate the RMS error returned. Make any
necessary changes, and retry the operation. If the problem persists, try the
operation without requesting that it be checkpointed. If the operation must be
checkpointed and the problem persists, contact CA-XCOM Technical Support.
Messages
13–11
List of Messages
CHKPDATERR, Unable to read checkpoint date.
Reason:
An error was returned by VMS RMS when reading the CA-XCOM transfer file's
revision date and time (RDT) from the checkpoint file. There should be a second
message which describes the specific RMS error returned. The current
checkpoint file is deleted. The problem could have been due to write operation
from a previously bad checkpoint record.
A checkpoint file is created when a user requests that a CA-XCOM transfer
operation be restartable. It is opened, and records within it used and then
updated when a previously checkpointed transfer is resumed. The checkpoint
file type is ".ckp," with the disk, directory, and filename being the same as that of
the VMS target file to be transferred. Note that the target file's version number is
also made a part of the filename (concatenated).
Action:
Verify that the target disk is online and the directory is readable by the user
requesting the CA-XCOM transfer. Evaluate the RMS error returned. Make any
necessary changes, and retry the operation.
If the problem persists try the operation without requesting that it be
checkpointed. If the operation must be checkpointed and the problem persists,
contact CA-XCOM Technical Support.
CHKPDATEWRTER, Unable to write checkpoint file (date).
Reason:
An error was returned by VMS RMS when writing the current CA-XCOM
transfer file's revision date and time (RDT) field to the checkpoint file. There
should be a second message which describes the specific RMS error returned.
A checkpoint file is created when a user requests a CA-XCOM transfer operation
to be restartable. It is opened, and records within it used and then updated when
a previously checkpointed transfer is resumed. The checkpoint file type is ".ckp,"
with the disk, directory, and filename being the same as that of the VMS target
file to be transferred. Note that the target file's version number is also made a
part of the filename (concatenated).
Action:
Verify that the target disk is online and the directory is writable by the user
requesting the CA-XCOM transfer. Evaluate the RMS error returned. Make any
necessary changes, and retry the operation.
If the problem persists try the operation without requesting that it be
checkpointed. If the operation must be checkpointed and the problem persists,
contact CA-XCOM Technical Support.
13–12
CA-XCOM for OpenVMS Alpha Installation and User Guide
List of Messages
CHKPFILECHGD, Cannot resume. File was modified.
Reason:
On a resume of a previously checkpointed transfer, it was discovered that the
original VMS file involved in the transfer has changed. The checkpoint file is
deleted.
A checkpoint file is created when a user requests a CA-XCOM transfer operation
to be restartable. It is opened, and records within it used and then updated when
a previously checkpointed transfer is resumed. The checkpoint file type is ".ckp,"
with the disk, directory, and filename being the same as that of the VMS target
file to be transferred. Note that the target file's version number is also made a
part of the filename (concatenated).
Action:
Retry the transfer from the beginning.
CHKPINCMPLTE, Incomplete checkpoint information. Aborting.
Reason:
An error was returned by VMS RMS when reading the checkpointed CA-XCOM
Record File Address (RFA) from the checkpoint file. There should be a second
message which describes the specific RMS error returned. The current
checkpoint file is deleted. The problem could have been due to a write operation
from a previously bad checkpoint record.
A checkpoint file is created when a user requests a CA-XCOM transfer operation
to be restartable. It is opened, and records within it used and then updated when
a previously checkpointed transfer is resumed. The checkpoint file type is ".ckp,"
with the disk, directory, and filename being the same as that of the VMS target
file to be transferred. Note that the target file's version number is also made a
part of the filename (concatenated) .
Action:
Verify that the target disk is online and the directory is readable by the user
requesting the CA-XCOM transfer. Evaluate the RMS error returned. Make any
necessary changes, and retry the operation.
If the problem persists try the operation without requesting that it be
checkpointed. If the operation must be checkpointed and the problem persists,
contact CA-XCOM Technical Support.
Messages
13–13
List of Messages
CHKPLASTRCD_ERR, Error confirming last data record #"integer" at a chkpnt.
Reason:
At each checkpoint of a restartable CA-XCOM transfer, a SNA LU 6.2 confirm
handshake is performed in order to force a synchronization point. During such a
procedure an error was returned by the protocol interface. There should be a
second message from the protocol interface which describes the specific error
encountered. The "integer" value is the last record successfully transferred
to/from the remote node.
Action:
Evaluate the error returned by the protocol interface. Make any necessary
changes, and retry the operation.
If the problem persists try the operation without requesting that it be
checkpointed. If the operation must be checkpointed and the problem persists,
contact CA-XCOM Technical Support. Note that you might be required to
supply an SNA session level trace.
CHKPMODIFYERR, Unable to modify checkpoint file.
Reason:
An error was returned by VMS RMS when updating the checkpointed
CA-XCOM transfer context in the checkpoint file. There should be a second
message which describes the specific RMS error returned. The current
checkpoint file is deleted.
A checkpoint file is created when a user requests a CA-XCOM transfer operation
to be restartable. It is opened, and records within it used and then updated when
a previously checkpointed transfer is resumed. The checkpoint file type is ".ckp,"
with the disk, directory, and filename being the same as that of the VMS target
file to be transferred. Note that the target file's version number is also made a
part of the filename (concatenated).
Action:
Verify that the target disk is online and the directory is writable by the user
requesting the CA-XCOM transfer. Evaluate the RMS error returned. Make any
necessary changes, and retry the operation.
If the problem persists try the operation without requesting that it be
checkpointed. If the operation must be checkpointed and the problem persists,
contact CA-XCOM Technical Support.
13–14
CA-XCOM for OpenVMS Alpha Installation and User Guide
List of Messages
CHKPNTAKE_ERR, Error taking checkpoint on record "rcd- number."
Reason:
An error was returned by VMS RMS when writing a checkpoint record to the
transfers checkpoint file. The "rcd- number" is the number of the last record
successfully transferred to/from the remote node. There should be a second
message which describes the specific RMS error returned.
A checkpoint file is created when a user requests a CA-XCOM transfer operation
to be restartable. It is opened, and records within it used and then updated when
a previously checkpointed transfer is resumed. The checkpoint file type is ".ckp,"
with the disk, directory, and filename being the same as that of the VMS target
file to be transferred. Note that the target file's version number is also made a
part of the filename (concatenated) .
Action:
Verify that the target disk is online and the directory is writable by the user
requesting the CA-XCOM transfer. Evaluate the RMS error returned. Make any
necessary changes, and retry the operation.
If the problem persists try the operation without requesting that it be
checkpointed. If the operation must be checkpointed and the problem persists,
contact CA-XCOM Technical Support.
CHKPOPENERR, Unable to open checkpoint file.
Reason:
An error was encountered while performing a VMS RMS create, open, or connect
operation to the checkpoint file. There should be a second message which
describes the specific RMS error encountered. The error could be due to an
invalid user default disk device name and/or directory.
A checkpoint file is created when a user requests a CA-XCOM transfer operation
to be restartable. It is opened, and records within it used and then updated when
a previously checkpointed transfer is resumed. The checkpoint file type is ".ckp,"
with the disk, directory, and filename being the same as that of the VMS target
file to be transferred. Note that the target file's version number is also made a
part of the filename (concatenated .
Action:
Verify the disk and directory specification on the VMS system of the target file to
be transferred; also make sure the disk is online. Evaluate the RMS error
returned. Make any necessary changes, and retry the operation.
If the problem persists try the operation without requesting that it be
checkpointed. If the operation must be checkpointed and the problem persists,
contact CA-XCOM Technical Support.
Messages
13–15
List of Messages
CHKPQJOBSTS, "text."
Reason:
This message is given when a checkpointed transfer has failed and the command
to retry the transfer at a later time has been queued to the CA-XCOM checkpoint
recovery queue. "text" is the message text returned by the VMS queue routine.
Action:
Typically none, but if the text of the message indicates that a problem occurred,
then make any required changes, and retry the operation. In this case the
required changes may mean that you have to use VMS DCL commands to delete
the queue entry, and then to retry the transfer operation, perhaps without
requesting that it be checkpointed.
CHKPQUEUE_ERR, Unable to queue checkpoint to XCOM$RECOVER.
Reason:
Upon an attempt to queue a failed, checkpointed or restartable transfer for a later
retry, an error was returned by the VMS system service SYS$SNDJBCW. There
should be a second message which describes the specific reason why the queue
submission was rejected.
Action:
Evaluate the error returned by the SYS$SNDJBCW system service. Make any
necessary changes, and retry the operation.
If the problem persists try the operation without requesting that it be
checkpointed. If the operation must be checkpointed and the problem persists,
contact CA-XCOM Technical Support.
CHKPRFAWRTERR, Unable to write checkpoint file (Record File Address).
Reason:
An error was returned by VMS RMS when writing the current CA-XCOM
transfer file's Record File Address (RFA) to the checkpoint file. There should be a
second message which describes the specific RMS error returned.
A checkpoint file is created when a user requests a CA-XCOM transfer operation
to be restartable. It is opened, and records within it used and then updated when
a previously checkpointed transfer is resumed. The checkpoint file type is ".ckp,"
with the disk, directory, and filename being the same as that of the VMS target
file to be transferred. Note that the target file's version number is also made a
part of the filename (concatenated) .
Action:
Verify that the target disk is online and the directory is writable by the user
requesting the CA-XCOM transfer. Evaluate the RMS error returned. Make any
necessary changes, and retry the operation.
If the problem persists try the operation without requesting that it be
checkpointed. If the operation must be checkpointed and the problem persists,
contact CA-XCOM Technical Support.
13–16
CA-XCOM for OpenVMS Alpha Installation and User Guide
List of Messages
CHKPWHATRCV_ERR, What Rcv ("hex-value") error when expecting a chkpnt CONFIRM msg.
Reason:
At each checkpoint of a restartable CA-XCOM transfer, a SNA LU 6.2 confirm
handshake is performed in order to force a synchronization point. When such a
point was reached the CA-XCOM software did not receive a value from the
protocol interface that indicates that the remote host transaction program has
issued a verb to force a synchronization point. The "hex-value" is the unexpected
value received instead.
This problem typically occurs when the two communicating CA-XCOM
transaction programs are out of sync with respect to their mutually agreed upon
communications protocol.
Action:
Examine the subsequent error messages. Adjust, or resolve problems with the
communication interface (APPC or TCP/IP) and retry the operation.
If the problem persists, contact CA-XCOM Technical Support. You may be asked
to provide a trace of the APPC or TCP/IP session.
CLASS_BFRLENERR, CLASS item code buffer length error.
Reason:
The CLASS item code buffer length value supplied when a CA-XCOM API
request was made is wrong. The value must be one (1).
Action:
Verify that the CLASS string size supplied when the CA-XCOM API request was
made is within the string size boundary. Make any necessary changes to the user
program, recompile, relink, and retry the operation.
COPIES_BFRSZERR, COPIES item code buffer length error.
Reason:
The COPIES item code buffer length value supplied when a CA-XCOM API
request was made is wrong. The range is between 1 and 3 inclusive.
Action:
Verify that the COPIES string size supplied when the CA-XCOM API request
was made is within the string size boundary. Make any necessary changes to the
user program, recompile, relink, and retry the operation.
COPIES_VALUERR, COPIES item code value error.
Reason:
The integer number of copies requested when a CA-XCOM API print request
was made is wrong. The integer range is between 1 and 999.
Action:
Verify that the COPIES integer value supplied when the CA-XCOM API request
was made is within the integer size boundary. Make any necessary changes to
the user program, recompile, relink, and retry the operation.
Messages
13–17
List of Messages
CPUNSID_GETERR, Error getting CPU type and CPU SID value.
Reason:
An attempt to get the VMS systems' CPU ID and SID resulted in an error return
from the SYS$GETSYI system service. There should be an additional error
message which describes the error returned by this VMS system service.
Action:
Evaluate the additional error returned by the VMS system service SYS$GETSYI.
Make any necessary changes and retry the operation.
DATAOPT_APNDERR, DATAOPT_CREATE
and/or
DATAOPT_REPLACE item codes specified when only XCOM$_DATAOPT_APPEND was expected.
Reason:
Only one of the following item codes can be specified in a CA-XCOM API
SENDFILE function request; more than one of these item codes was specified
concurrently.
DATAOPT_APNDERR
DATAOPT_CREATE
DATAOPT_REPLACE
Action:
Examine the item list supplied when the CA-XCOM API request was made.
Make sure that only XCOM$_DATAOPT_APPEND of the above item codes is
supplied. Make any necessary changes to the user program, recompile, relink,
and retry the operation.
DATAOPT_CRTEERR, DATAOPT_REPLACE
and/or
DATAOPT_APPEND item codes specified when only XCOM$_DATAOPT_CREATE was expected.
Reason:
Only one of the following item codes can be specified in a CA-XCOM API
SENDFILE function request; more than one of these item codes was specified
concurrently.
DATAOPT_APNDERR
DATAOPT_CREATE
DATAOPT_REPLACE
Action:
13–18
Examine the item list supplied when the CA-XCOM API request was made.
Make sure that only XCOM$_DATAOPT_CREATE of the above item codes is
supplied. Make any necessary changes to the user program, recompile, relink,
and retry the operation.
CA-XCOM for OpenVMS Alpha Installation and User Guide
List of Messages
DATAOPT_RPLCERR, DATAOPT_CREATE
and/or
DATAOPT_APPEND item codes specified when only XCOM$_DATAOPT_REPLACE was expected.
Reason:
Only one of the following item codes can be specified in a CA-XCOM API
SENDFILE function request; more than one of these item codes was specified
concurrently.
DATAOPT_APNDERR
DATAOPT_CREATE
DATAOPT_REPLACE
Action:
Examine the item list supplied when the CA-XCOM API request was made.
Make sure that only XCOM$_DATAOPT_REPLACE of the above item codes is
supplied. Make any necessary changes to the user program, recompile, relink,
and retry the operation.
DCMPERR, Error decompressing data record.
Reason:
An error was encountered while decompressing a received data record. It maybe
that the received data record was mangled in transit.
Action:
This error should not occur. Retry the operation. If the problem persists, contact
CA-XCOM Technical Support. You may be required to supply an SNA session
level trace.
DEFACCNT, Illegal default account qualifier value.
Reason:
The value specified for the DEFACCNT command qualifier is not acceptable.
"DEFACCNT" is a command qualifier for the EXCOMACP command which can
be found in the file XCOM$IMAGE:EXCOMACP.COM. This command file is
used to start the CA-XCOM remote request handler component, also known as
XCOMACP.
Action:
Examine the XCOM$IMAGE:EXCOMACP.COM command procedure. Make
any necessary changes, and retry its execution.
DEFINERMT_FAIL, "DEFINE_REMOTE" verb failed. Reason follows.
Reason:
An attempt to initialize local SNA LU 6.2 LU parameters which control the
operation of the local LU in conjunction with the remote LU failed. There should
be subsequent error messages which describe in more detail the LU 6.2 protocol
interface errors returned.
This message may be indicative of a problem with the underlying SNA LU 6.2
software utilized by the CA-XCOM software. It may be that no SNA links or
circuits have been activated between the VMS and the remote host.
Messages
13–19
List of Messages
Action:
Examine the subsequent error messages. Adjust, or resolve problems with the
communication interface (APPC or TCP/IP) and retry the operation.
If the problem persists, contact CA-XCOM Technical Support. You may be asked
to provide a trace of the APPC or TCP/IP session.
DEFPSWRD, Illegal default password qualifier value.
Reason:
The value specified for the DEFPSWRD command qualifier is not acceptable.
"DEFPSWRD" is a command qualifier for the EXCOMACP command which can
be found in the file XCOM$IMAGE:EXCOMACP.COM. This command file is
used to start the CA-XCOM remote request handler component, also known as
XCOMACP.
Action:
Examine the XCOM$IMAGE:EXCOMACP.COM command procedure. Make
any necessary changes, and retry its execution.
DEST_BFRLEN_ERR, DESTINATION item code buffer length error.
Reason:
The DESTINATION item code buffer length value supplied when a CA-XCOM
API request was made is wrong. The range is between 1 and 21 inclusive.
Action:
Verify that the DESTINATION string size supplied when the CA-XCOM API
request was made is within the string size boundary. Make any necessary
changes to the user program, recompile, relink, and retry the operation.
FCB_BFRLEN_ERR, FCB item code buffer length error.
Reason:
The FCB item code buffer length value supplied when a CA-XCOM API request
was made is wrong. The range is between 1 and 4 inclusive.
Action:
Verify that the FCB string size supplied when the CA-XCOM API request was
made is within the string size boundary. Make any necessary changes to the user
program, recompile, relink, and retry the operation.
FCB_FOR_MVSONLY, FCB ONLY used when printing on a mainframe, e.g. MVS system.
Reason:
An FCB value was supplied when requesting a file transfer to a remote system
which is not an IBM mainframe. An FCB can be specified only when
communicating with an IBM mainframe system.
This problem can be caused by the remote system's operating system name being
incorrectly specified in the CA-XCOM configuration file. This characteristic can
be set via the CA-XCOM configurator. With this configurator verify that the
remote system is not an IBM mainframe.
13–20
CA-XCOM for OpenVMS Alpha Installation and User Guide
List of Messages
Action:
If the remote system is indeed not an IBM mainframe system then remove FCB
value specification from the transfer request command and retry the operation. If
the remote system is supposed to be an IBM mainframe, but is not defined as
such, then use the CA-XCOM configurator to rectify the problem and retry the
operation.
FILEDESC_RCVERR, Error Receiving file descriptor record.
Reason:
An attempt to receive a file descriptor record, prior to a data file transfer,
resulted in an error from the protocol interface. There should be subsequent
error messages which describe in more detail the protocol interface errors
returned.
Action:
Examine the subsequent error messages. Adjust or resolve problems with the
communication interface (APPC or TCP/IP) and retry the operation.
If the problem persists, contact CA-XCOM Technical Support. You may be asked
to provide a trace of the APPC or TCP/IP session.
FRMTYP_BFRSZERR, FORMTYPE item code buffer length error.
Reason:
The FORMTYPE item code buffer length value supplied when a CA-XCOM API
request was made is wrong. The range is between 1 and 10 inclusive.
Action:
Verify that the FORMTYPE string size supplied when the CA-XCOM API
request was made is within the string size boundary. Make any necessary
changes to the user program, recompile, relink, and retry the operation.
FUNC_ITMLSTCDE, Function item code when expecting qualifier item code.
Reason:
While parsing the qualifier item codes for a CA-XCOM Application
Programming Interface (API) function, a unexpected function item code was
encountered.
Action:
Examine the user program containing the item list of item codes and remove the
offending function item code from the list. Then recompile, link, and retry the
operation.
GETFAIL, Failed GETting file from remote node.
Reason:
An attempt to retrieve a file from a remote host node failed. There should be
subsequent error messages which detail why the GET operation failed.
Action:
Examine the subsequent error messages. Make any necessary operations, and
retry the operation.
Messages
13–21
List of Messages
ILLITMCDEM1_ERR, Illegal item code(s) (Mask1 = 0x"hex- number") specified for a CA-XCOM
function.
Reason:
In a CA-XCOM API request made from a user program, a function qualifier item
code was supplied which is invalid for the requested CA-XCOM function.
Action:
See the chapter "The Application Programming Interface (API)" for the API
function requested. Verify that each qualifier item code that you supplied is
acceptable until you discover the one which is not allowed. Make any necessary
changes to the user program that made the CA-XCOM API request, recompile,
relink, and retry the operation. If all the qualifier item codes supplied are legal,
then call the CA-XCOM Technical Support team and supply the mask1 value,
and the "hex-number," displayed with the error message.
ILLITMCDEM2_ERR, Illegal item code(s) (Mask2 = 0x"hex- number") specified for a CA-XCOM
function.
Reason:
In a CA-XCOM API request made from a user program, a function qualifier item
code was supplied which is invalid for the requested CA-XCOM function.
Action:
See the chapter "The Application Programming Interface" for the API function
requested. Verify that each qualifier item code that you supplied is acceptable
until you discover the one which is not allowed. Make any necessary changes to
the user program that made the CA-XCOM API request, recompile, relink, and
retry the operation. If all the qualifier item codes supplied are legal, then call the
CA-XCOM support team and supply the mask2 value, and the "hex-number,"
displayed with the error message.
INCMPLT_FMHDATA, Unexpected incomplete FMH data received.
Reason:
An incomplete Function Management Header (FMH) record was received when
expecting a (file) data record. There should be subsequent error messages which
describe in more detail the protocol interface errors returned.
This problem can occur when the two communicating CA-XCOM transaction
programs are out of sync with respect to their mutually agreed upon
communications protocol.
Action:
Examine the subsequent error messages. Adjust, or resolve problems with the
communication interface (APPC or TCP/IP) and retry the operation.
If the problem persists, contact CA-XCOM Technical Support. You may be asked
to provide a trace of the APPC or TCP/IP session.
13–22
CA-XCOM for OpenVMS Alpha Installation and User Guide
List of Messages
INCMPLTDATA, Unexpected incomplete record.
Reason:
Less than a complete logical data record was received when expecting a full
logical data record. There should be subsequent error messages which describe
in more detail the protocol interface errors returned.
Action:
Examine the subsequent error messages. Adjust, or resolve problems with the
communication interface (APPC or TCP/IP) and retry the operation.
If the problem persists, contact CA-XCOM Technical Support. You may be asked
to provide a trace of the APPC or TCP/IP session.
INDHDR_SNDERR, Error sending indirect header.
Reason:
An attempt to send an indirect header for an indirect CA-XCOM transfer
resulted in an error from the SNA LU 6.2 protocol interface. There should be
subsequent error messages which describe in more detail the LU 6.2 protocol
interface errors returned.
Action:
Examine the subsequent error messages. Adjust, or resolve problems with the
communication interface (APPC or TCP/IP) and retry the operation.
If the problem persists, contact CA-XCOM Technical Support. You may be asked
to provide a trace of the APPC or TCP/IP session.
INVCHKP_RTRYTME, Incorrect CHECKPOINTed period specified.
Reason:
The checkpoint retry delta time value supplied when a CA-XCOM API request
was made is wrong. More than likely the delta-time format used is incorrect.
The value was rejected by the VMS system service SYS$BINTIM. There should
be a second message which describes the error returned by the SYS$BINTIM
service. The SYS$BINTIM system service is described in the VMS System Services
Reference Manual.
Action:
Evaluate the error returned by the SYS$BINTIM system service. Make any
necessary changes to the user program that made the CA-XCOM API request,
recompile, relink, and retry the operation.
Messages
13–23
List of Messages
INVFILEDSC_RCVD, Invalid file descriptor record received.
Reason:
The contents of a received file descriptor record is wrong or incorrect.
Specifically, the maximum record length field is incorrect.
This problem typically occurs when the two communicating CA-XCOM
transaction programs are out of sync with respect to their mutually agreed upon
communications protocol.
Action:
Examine the subsequent error messages. Adjust, or resolve problems with the
communication interface (APPC or TCP/IP) and retry the operation.
If the problem persists, contact CA-XCOM Technical Support. You may be asked
to provide a trace of the APPC or TCP/IP session.
INVITEMCODE, Invalid API Item Code specified.
Reason:
An unknown CA-XCOM Application Programming Interface (API) function
qualifier item code value was supplied as a parameter to the API interface when
a user program made an API request.
Action:
Examine the API function qualifier code value supplied by the user program.
Compare it to the CA-XCOM API documentation to see if the correct function
qualifier name was specified, and to program include files (e.g., C ".h" files)
which assign integer values to the function qualifier names.
INVLD_RCDCNTRCV, Invalid record count received.
Reason:
During a comparison of the actual number of (file) data records received with
the record count, for a "GETFILE" transfer operation, the remote partner
indicates that it does not match.
This problem can occur when the two communicating CA-XCOM transaction
programs are out of sync with respect to their mutually agreed upon
communications protocol.
Action:
Examine the subsequent error messages. Adjust, or resolve problems with the
communication interface (APPC or TCP/IP) and retry the operation.
If the problem persists, contact CA-XCOM Technical Support. You may be asked
to provide a trace of the APPC or TCP/IP session.
13–24
CA-XCOM for OpenVMS Alpha Installation and User Guide
List of Messages
INVWAITTIME, Incorrect WAIT period specified. Use DELTA time format.
Reason:
The wait delta-time value supplied when a CA-XCOM API request was made is
wrong. More than likely, the delta-time format used is incorrect.
The value was rejected by the VMS system service SYS$BINTIM. There should be
a second message which describes the error returned by the SYS$BINTIM
service. The SYS$BINTIM system service is described in the VMS System Services
Reference Manual.
Action:
Evaluate the error returned by the SYS$BINTIM system service. Make any
necessary changes to the user program that made the CA-XCOM API request,
recompile, relink, and retry the operation.
IPFAIL, IP failure, explanation follows.
Reason:
The CA-XCOM component responsible for handling remotely initiated requests
via TCP/IP has failed for some reason. There should be additional error
messages which describe the exact cause of failure.
Action:
Evaluate the additional error messages. Make any necessary changes, and retry
the remotely initiated transfer.
IPSTART, XCOM IP Started!
Reason:
This message is issued each time that XCOMIP.EXE is started. XCOMIP.EXE is
the CA-XCOM component responsible for handling remotely initiated requests
via TCP/IP. Each transfer remotely initiated via TCP/IP causes XCOMIP.EXE to
be started. It processes one transfer and then ends.
Action:
None.
LASTRCD_CNFMERR, Error confirming last data record #"rcd-number."
Reason:
An error was returned by the protocol interface when a "CONFIRM" verb was
issued to verify the transfer of the last data record. "rcd-number" is the record
number of the last record transferred. There should be subsequent error
messages which describe in more detail the protocol interface errors returned.
Action:
Examine the subsequent error messages. Adjust, or resolve problems with the
communication interface (APPC or TCP/IP) and retry the operation.
If the problem persists, contact CA-XCOM Technical Support. You may be asked
to provide a trace of the APPC or TCP/IP session.
Messages
13–25
List of Messages
LINETURN, Error turning line around - No Turn.
Reason:
In the course of a CA-XCOM transfer operation, an error was returned from the
protocol interface when an attempt was made to switch the line state from
transmitting to receiving, or vice-versa. There should be subsequent error
messages which describe in more detail the protocol interface errors returned.
Action:
Examine the subsequent error messages. Adjust, or resolve problems with the
communication interface (APPC or TCP/IP) and retry the operation.
If the problem persists, contact CA-XCOM Technical Support. You may be asked
to provide a trace of the APPC or TCP/IP session.
LNOTIFY_BFRSZER, LNOTIFY item code buffer length error.
Reason:
The LNOTIFY item code buffer length value supplied when a CA-XCOM API
request was made is wrong. The range is between 1 and 12 inclusive.
Action:
Verify that the LNOTIFY string size supplied when the CA-XCOM API request
was made is within the string size boundary. Make any necessary changes to the
user program, recompile, relink, and retry the operation.
LNOTIFY_NAMEERR, Error in local notify username.
Reason:
An authorization check of the local notify username string supplied in a
CA-XCOM API request returned an error, possibly a "nosuchuser" error. There
should be an additional error message detailing why the username validation
failed.
Action:
Examine the additional error message to determine why the username was
rejected by the API. Make any necessary changes to the user program,
recompile, relink, and retry the operation.
LOCFILE, Illegal local file name.
Reason:
For a remotely initiated (by a remote host), CA-XCOM request the VMS file
specification was found to be unacceptable. There should be additional error
messages which describes exactly what was wrong with the supplied file
specification.
Action:
Evaluate the additional error messages. Make any necessary changes, and retry
the remotely initiated transfer operation.
13–26
CA-XCOM for OpenVMS Alpha Installation and User Guide
List of Messages
LOG_BFRLEN_ERR, LOG item code buffer length error.
Reason:
The LOG item code buffer length value supplied when a CA-XCOM API request
was made is wrong. The range is between 1 and 64 inclusive.
Action:
Verify that the LOG string size supplied when the CA-XCOM API request was
made is within the string size boundary. Make any necessary changes to the user
program, recompile, relink, and retry the operation.
LOGFLE_ACCESERR, Error accessing CA-XCOMlog/message file "filename."
Reason:
An error was returned by the VMS RMS file system when an attempt was made
to access the log file supplied to the CA-XCOM software. "filename" is the file
name specification of the log file used. There should be a second message which
describes the specific RMS error returned.
Action:
Verify that the target disk is online and the directory is writable by the user
requesting the CA-XCOM transfer. Evaluate the RMS error returned. Make any
necessary changes, and retry the operation.
If it is imperative that the transfer be performed then try the operation with the
"/NOLOG" command qualifier.
If the problem persists, contact CA-XCOM Technical Support.
MISSING_RMTSYS, Rmt sys name not supplied explicitly or as part of remote filename.
Reason:
The remote system name was not supplied when a CA-XCOM transfer operation
was requested.
Action:
Supply the missing remote system name and retry the operation.
MVSBLKL_BFRSZER, MVSBLOCKL item code buffer length error.
Reason:
The MVSBLOCKL item code buffer length value supplied when a CA-XCOM
API request was made is wrong. The range is between 1 and 5 inclusive.
Action:
Verify that the MVSBLOCKL string size supplied when the CA-XCOM API
request was made is within the string size boundary. Make any necessary
changes to the user program, recompile, relink, and retry the operation.
Messages
13–27
List of Messages
MVSBLKL_MVSONLY, MVSBLOCKL ONLY used when creating file on a mainframe, e.g. MVS
system.
Reason:
An MVSBLOCKL value was supplied when requesting a file transfer to a remote
system which is not an IBM mainframe. An MVSBLOCKL can be specified only
when communicating with an IBM mainframe.
This problem can be caused by the remote system's operating system name being
incorrectly specified in the CA-XCOM configuration file. This characteristic can
be set via the CA-XCOM configurator. With this configurator, verify that the
remote system is not an IBM mainframe.
Action:
If the remote system is indeed not an IBM mainframe, then remove the
MVSBLOCKL value specification from the transfer request command and retry
the operation. If the remote system is supposed to be an IBM mainframe, but is
not defined as such, then use the CA-XCOM configurator to rectify the problem
and retry the operation.
MVSF_BLKLERR, MVSBLOCKL must be a multiple of MVSRECL.
Reason:
For a CA-XCOM transfer which creates a format fixed file on an IBM mainframe,
the MVSBLOCKL value supplied must be a multiple of the MVSRECL value
supplied. This error is generated when this is not true.
Action:
Make the necessary changes to the CA-XCOM transfer request command and
retry the operation.
MVSF_BLKRCDERR, mainframe, e.g. MVS block len of "length" invalid with MVSRECL of "size."
Reason:
The supplied value of an IBM mainframe, equivalent to "length," is incompatible
with a supplied IBM mainframe record length value equivalent to "size." There
should be an additional message describing the exact problem with this Fixed
format transfer.
Action:
Evaluate the additional error messages generated. Make the necessary changes,
and retry the operation.
MVSF_INPVALINV, Invalid values specified for a mainframe, e.g. MVS FORMAT FIXED file create.
Reason:
The values specified when a Fixed format file was to be created upon transfer of
a file from the VMS to an IBM host is wrong. There should be additional error
messages which describe this error in more detail.
Action:
Evaluate the additional error messages generated. Make the necessary changes,
and retry the operation.
13–28
CA-XCOM for OpenVMS Alpha Installation and User Guide
List of Messages
MVSF_VAXRCDERR, Max rcdlen is "length." MVSRECL must be GEQ (max rcdlen).
Reason:
For a format fixed IBM mainframe file create request, the MVSRECL value
specified when a CA-XCOM transfer was requested is invalid. It must be greater
than or equivalent to the maximum VMS file's record size which is equivalent to
"length."
Action:
Adjust the MVSRECL value specified so that it is equivalent to the maximum
VMS file's record size displayed, and retry the operation.
MVSFB_BLKLERR, MVSBLOCKL must be a multiple of MVSRECL.
Reason:
For a CA-XCOM transfer which creates a fixed blocked file on an IBM
mainframe, the MVSBLOCKL value supplied must be a multiple of the
MVSRECL value supplied. This error is generated when this is not true.
Action:
Make the necessary changes to the CA-XCOM transfer request command and
retry the operation.
MVSFB_BLKRCDERR, mainframe, e.g. MVS block len of "length" invalid with MVSRECL of "size."
Reason:
The supplied value of an IBM mainframe block, equivalent to "length," is
incompatible with a supplied IBM mainframe record length value, equivalent to
"size." There should be an additional message detailing exactly what is wrong
with this Fixed Block transfer.
Action:
Evaluate the additional error messages generated. Make the necessary changes,
and retry the operation.
MVSFB_INPVALINV, Invalid values specified for a mainframe, e.g. MVS FIXED BLOCKED file create.
Reason:
The values specified when a Fixed Blocked file was to be created upon transfer of
a file from the VMS to an IBM host is wrong. There should be additional error
messages which describe this error in more detail.
Action:
Evaluate the additional error messages generated. Make the necessary changes,
and retry the operation.
Messages
13–29
List of Messages
MVSFB_VAXRCDERR, Max rcdlen is "length." MVSRECL must be GEQ (max rcdlen).
Reason:
For a fixed blocked IBM mainframe file create request, the MVSRECL value
specified when a CA-XCOM transfer was requested is invalid. It must be greater
than or equivalent to the maximum VMS file's record size which is equivalent to
"length."
Action:
Adjust the MVSRECL value specified so that it is equivalent to the maximum
VMS file's record size displayed, and retry the operation.
MVSFMF_MVSONLY, MVSFORMAT_F ONLY used when creating file on a mainframe, e.g. MVS
system.
Reason:
An MVSFORMAT_F value was supplied when requesting a file transfer to a
remote system that is not an IBM mainframe. An MVSFORMAT_F can be
specified only when communicating with an IBM mainframe.
This problem can be caused by the remote system's operating system name being
incorrectly specified in the CA-XCOM configuration file. This characteristic can
be set via the CA-XCOM configurator. With this configurator, verify that the
remote system is not an IBM mainframe.
Action:
If the remote system is indeed not an IBM mainframe, then remove the
MVSFORMAT_F value specification from the transfer request command and
retry the operation. If the remote system is supposed to be an IBM mainframe,
but is not defined as such, then use the CA-XCOM configurator to rectify the
problem and retry the operation.
MVSFMFB_MVSONLY , MVSFORMAT_FB ONLY used when creating file on a mainframe, e.g. MVS
system.
Reason:
An MVSFORMAT_FB value was supplied when requesting a file transfer to a
remote system that is not an IBM mainframe. An MVSFORMAT_FB can be
specified only when communicating with an IBM mainframe.
This problem can be caused by the remote system's operating system name being
incorrectly specified in the CA-XCOM configuration file. This characteristic can
be set via the CA-XCOM configurator. With this configurator, verify that the
remote system is not an IBM mainframe.
Action:
13–30
If the remote system is indeed not an IBM mainframe, then remove the
MVSFORMAT_FB value specification from the transfer request command and
retry the operation. If the remote system is supposed to be an IBM mainframe,
but is not defined as such, then use the CA-XCOM configurator to rectify the
problem and retry the operation.
CA-XCOM for OpenVMS Alpha Installation and User Guide
List of Messages
MVSFMU_MVSONLY, MVSFORMAT_U ONLY used when creating file on a mainframe, e.g. MVS
system.
Reason:
An MVSFORMAT_U value was supplied when requesting a file transfer to a
remote system that is not an IBM mainframe. An MVSFORMAT_U can be
specified only when communicating with an IBM mainframe.
This problem can be caused by the remote system's operating system name being
incorrectly specified in the CA-XCOM configuration file. This characteristic can
be set via the CA-XCOM configurator. With this configurator, verify that the
remote system is not an IBM mainframe.
Action:
If the remote system is indeed not an IBM mainframe, then remove the
MVSFORMAT_U value specification from the transfer request command and
retry the operation. If the remote system is supposed to be an IBM mainframe,
but is not defined as such, then use the CA-XCOM configurator to rectify the
problem and retry the operation.
MVSFMVB_MVSONLY, MVSFORMAT_VB ONLY used when creating file on a mainframe, e.g. MVS
system.
Reason:
An MVSFORMAT_VB value was supplied when requesting a file transfer to a
remote system that is not an IBM mainframe. An MVSFORMAT_VB can be
specified only when communicating with an IBM mainframe.
This problem can be caused by the remote system's operating system name being
incorrectly specified in the CA-XCOM configuration file. This characteristic can
be set via the CA-XCOM configurator. With this configurator, verify that the
remote system is not an IBM mainframe.
Action:
If the remote system is indeed not an IBM mainframe, then remove the
MVSFORMAT_VB value specification from the transfer request command and
retry the operation. If the remote system is supposed to be an IBM mainframe,
but is not defined as such, then use the CA-XCOM configurator to rectify the
problem and retry the operation.
MVSRECL_BFRSZER, MVSRECL item code buffer length error.
Reason:
The MVSRECL item code buffer length value supplied when a CA-XCOM API
request was made is wrong. The range is between 1 and 5 inclusive.
Action:
Verify that the MVSRECL string size supplied when the CA-XCOM API request
was made is within the string size boundary. Make any necessary changes to the
user program, recompile, relink, and retry the operation.
Messages
13–31
List of Messages
MVSRECL_MVSONLY, MVSRECL ONLY used when creating file on a mainframe, e.g. MVS system.
Reason:
An MVSRECL value was supplied when requesting a file transfer to a remote
system that is not an IBM mainframe. An MVSRECL can be specified only when
communicating with a mainframe.
This problem can be caused by the remote system's operating system name being
incorrectly specified in the CA-XCOM configuration file. This characteristic can
be set via the CA-XCOM configurator. With this configurator, verify that the
remote system is not an IBM mainframe.
Action:
If the remote system is indeed not an IBM mainframe, then remove the
MVSRECL value specification from the transfer request command and retry the
operation. If the remote system is supposed to be an IBM mainframe, but is not
defined as such, then use the CA-XCOM configurator to rectify the problem and
retry the operation.
MVSU_BLKLERR, MVSBLOCKL must be GEQ (max rcdlen).
Reason:
For a CA-XCOM transfer which creates an undefined format file on an IBM
mainframe, the MVSBLOCKL value supplied must be greater than or equivalent
to the maximum VMS file's record size.
Action:
Make the necessary changes to the CA-XCOM transfer request command and
retry the operation.
MVSU_BLKRCDERR, mainframe, e.g. MVS block len of "length" invalid with max rcdlen of "size."
Reason:
The supplied value of an IBM mainframe, equivalent to "length," is incompatible
with a supplied IBM mainframe record length value equivalent to "size." There
should be an additional message detailing exactly what is wrong with this
Undefined format transfer.
Action:
Evaluate the additional error messages generated. Make the necessary changes,
and retry the operation.
MVSU_INPVALINV, Invalid values specified for a mainframe, e.g. MVS UNDEFINED format file
create.
Reason:
The values specified when an Undefined format file was to be created upon
transfer of a file from the VMS to an IBM host is wrong. There should be
additional error messages which describe this error in more detail.
Action:
Evaluate the additional error messages generated. Make the necessary changes,
and retry the operation.
13–32
CA-XCOM for OpenVMS Alpha Installation and User Guide
List of Messages
MVSVB_BLKLERR, MVSBLOCKL must be 4 larger than MVSRECL.
Reason:
For a CA-XCOM transfer which creates a variable blocked file on an IBM
mainframe, the MVSBLOCKL value supplied must be at least 4 bytes larger than
the MVSRECL value supplied. This error is generated when this is not true.
Action:
Make the necessary changes to the CA-XCOM transfer request command and
retry the operation.
MVSVB_BLKRCDERR, mainframe, e.g. MVS block len of "length" invalid with MVSRECL of "size."
Reason:
The supplied value of an IBM mainframe equivalent to "length," is incompatible
with a supplied IBM mainframe record length value equivalent to "size." There
should be an additional message detailing exactly what is wrong with this
Variable Block transfer.
Action:
Evaluate the additional error messages generated. Make the necessary changes,
and retry the operation.
MVSVB_INPVALINV, Invalid values specified for a mainframe, e.g. MVS VARIABLE BLOCKED file
create.
Reason:
The values specified when a Variable Blocked file was to be created upon
transfer of a file from the VMS to an IBM host is wrong. There should be
additional error messages which describe this error in more detail.
Action:
Evaluate the additional error messages generated. Make the necessary changes,
and retry the operation.
MVSVB_VAXRCDERR, Max rcdlen is "length." MVSRECL must be GEQ (4 + max rcdlen).
Reason:
For a variable blocked IBM mainframe file create request, the MVSRECL value
specified when a CA-XCOM transfer was requested is invalid. It must be at least
4 bytes larger than the maximum VMS file's record size which is equivalent to
"length."
Action:
Adjust the MVSRECL value specified so that it is at least 4 bytes larger than the
maximum VMS file's record size displayed, and retry the operation.
Messages
13–33
List of Messages
NEGOTCNFMERR, Negotiation record transfer confirm error.
Reason:
When a CA-XCOM transfer request is initiated, prior to transferring the data file,
a handshake occurs between the local VMS CA-XCOM and the remote host
CA-XCOM software. During this protocol handshake, the protocol interface
either did not return a valid negotiation record confirmation indicator or else it
returned an error.
There should be subsequent error messages which describe in more detail the LU
6.2 protocol interface errors returned.
Action:
Examine the subsequent error messages. Adjust, or resolve problems with the
communication interface (APPC or TCP/IP) and retry the operation. If there
were no subsequent error messages then it could be that the two communicating
CA-XCOM transaction programs are out of sync with respect to their mutually
agreed upon communications protocol. In such a case request, if necessary, that
both the local and the remote CA-XCOM software be stopped and re-started, and
then retry the transfer.
If the problem persists, contact CA-XCOM Technical Support. You may be asked
to provide a trace of the APPC or TCP/IP session.
NEGOTMSGSTR, "text."
Reason:
When a CA-XCOM transfer request is initiated, prior to transferring the data file,
a handshake occurs between the local VMS CA-XCOM and the remote IBM host
CA-XCOM software. During this protocol handshake, the received or expected
negotiation message contained message text rather than transfer protocol
parameters. "text" is the text received.
This error usually is indicative of incompatibility encountered by the remote IBM
host CA-XCOM software.
Action:
Examine the subsequent error messages. Adjust, or resolve problems with the
communication interface (APPC or TCP/IP) and retry the operation.
If the problem persists, contact CA-XCOM Technical Support. You may be asked
to provide a trace of the APPC or TCP/IP session.
13–34
CA-XCOM for OpenVMS Alpha Installation and User Guide
List of Messages
NEGOTPREP_ERR, Error Preparing to receive Negotiation record.
Reason:
When a CA-XCOM transfer request is initiated, prior to transferring the data file,
a handshake occurs between the local VMS CA-XCOM and the remote host
CA-XCOM software. During this protocol handshake, an error was returned by
the communication interface. There should be subsequent error messages which
describe in more detail the protocol interface errors returned.
Action:
Examine the subsequent error messages. Adjust, or resolve problems with the
communication interface (APPC or TCP/IP) and retry the operation.
If the problem persists, contact CA-XCOM Technical Support. You may be asked
to provide a trace of the APPC or TCP/IP session.
NEGOTRCVERR, Error receiving Negotiation record.
Reason:
When a CA-XCOM transfer request is initiated, prior to transferring the data file,
a handshake occurs between the local VMS CA-XCOM and the remote host
CA-XCOM software. During this protocol handshake, an error was returned by
the communication interface. There should be subsequent error messages which
describe in more detail the protocol interface errors returned.
Action:
Examine the subsequent error messages. Adjust, or resolve problems with the
communication interface (APPC or TCP/IP) and retry the operation.
If the problem persists, contact CA-XCOM Technical Support. You may be asked
to provide a trace of the APPC or TCP/IP session.
NEGOTSNDERR, Error sending Negotiation record.
Reason:
An attempt to send a CA-XCOM negotiation record for a transfer resulted in an
error from the protocol interface.
There should be subsequent error messages which describe in more detail the
protocol interface errors returned.
Action:
Examine the subsequent error messages. Adjust, or resolve problems with the
communication interface (APPC or TCP/IP) and retry the operation.
If the problem persists, contact CA-XCOM Technical Support. You may be asked
to provide a trace of the APPC or TCP/IP session.
Messages
13–35
List of Messages
NODE, Illegal node qualifier value.
Reason:
The value specified for the NODE command qualifier is not acceptable. "NODE"
is a command qualifier for the EXCOMACP command which can be found in the
file XCOM$IMAGE:EXCOMACP.COM. This command file is used to start the
CA-XCOM remote request handler component, also known as XCOMACP.
Action:
Examine the XCOM$IMAGE:EXCOMACP.COM command procedure. Make
any necessary changes, and retry its execution.
NORESTARTABLE, Restart not supported on remote system. Starting from top.
Reason:
A user requested a checkpointed, or restartable, transfer to a remote IBM host
CA-XCOM software when such a remote IBM host CA-XCOM software did not
support checkpointable transfers. This is an informational message.
Action: None.
NORSTRTJOB, Remote job submit cannot be a restartable file transfer.
Reason:
An attempt was made to checkpoint, or make restartable, a transfer which was a
remote job being submitted. Such transfers are by definition not checkpointable
or restartable.
Action:
Retry the remote job submission transfer operation without requesting that it be
checkpointed.
NOVIRTUALMEM, Unable to get enough virtual memory: "integer" bytes.
Reason:
CA-XCOM was unable to acquire enough dynamic virtual memory to perform
an operation. "integer" was the number of bytes requested.
This error may be the result of a process exceeding its paging file quota
(PGFLQUOTA), the process working set limit (WSQUOTA) is not enough to
accommodate the increased virtual address space, or when the process' virtual
address space is full.
Action:
13–36
Adjust the process quotas, as implied from the explanation above. If this does
not resolve the problem, you may need to adjust the appropriate VMS SYSGEN
parameters, particularly VIRTUALPAGECNT. You may also need to extend the
system page and/or swap files.
CA-XCOM for OpenVMS Alpha Installation and User Guide
List of Messages
PASWORD_BFRSZER, PASSWORD item code buffer length error.
Reason:
The PASSWORD item code buffer length value supplied when a CA-XCOM API
request was made is wrong. The range is between 1 and 31 inclusive.
Action:
Verify that the RNOTIFY_FLAG string size supplied when the CA-XCOM API
request was made is within the string size boundary. Make any necessary
changes to the user program, recompile, relink, and retry the operation.
POLL, POLL time format not a delta time.
Reason:
The wait delta-time value supplied when a CA-XCOM request was made is
wrong. More than likely the delta-time format used is incorrect. The value was
rejected by the VMS system service SYS$BINTIM. There should be a second
message which describes the error returned by the SYS$BINTIM service. The
SYS$BINTIM system service is described in the VMS System Services Reference
manual.
"POLL" is a command qualifier for the EXCOMACP command which can be
found in the file XCOM$IMAGE:EXCOMACP.COM. This command file is used
to start the CA-XCOM remote request handler component, also known as
XCOMACP.
Action:
Evaluate the error returned by the SYS$BINTIM system service. Make any
necessary changes to XCOM$IMAGE:EXCOMACP.COM command procedure,
and retry the operation.
PRINTQ, Illegal print queue name.
Reason:
The value specified for the PRINT_Queue command qualifier is not acceptable.
"PRINT_Queue" is a command qualifier for the EXCOMACP command which
can be found in the file XCOM$IMAGE:EXCOMACP.COM. This command file
is used to start the CA-XCOM remote request handler component, also known as
XCOMACP.
Action:
Examine the XCOM$IMAGE:EXCOMACP.COM command procedure. Make
any necessary changes, and retry its execution.
Messages
13–37
List of Messages
PRIORITY, Illegal priority qualifier value.
Reason:
The value specified for the PRIORITY command qualifier is not acceptable.
"PRIORITY" is a command qualifier for the EXCOMACP command which can be
found in the file XCOM$IMAGE:EXCOMACP.COM. This command file is used
to start the CA-XCOM remote request handler component, also known as
XCOMACP.
Action:
Examine the XCOM$IMAGE:EXCOMACP.COM command procedure. Make
any necessary changes, and retry its execution.
PRIVILEGE, Illegal privilege mask specified.
Reason:
The value specified for the PRIVILEGE command qualifier is not acceptable.
"PRIVILEGE" is a command qualifier for the EXCOMACP command which can
be found in the file XCOM$IMAGE:EXCOMACP.COM. This command file is
used to start the CA-XCOM remote request handler component, also known as
XCOMACP.
Action:
Examine the XCOM$IMAGE:EXCOMACP.COM command procedure. Make
any necessary changes, and retry its execution.
PRTFAIL, Unable to print job. Explanation follows.
Reason:
The CA-XCOM remote request handler’s attempt to receive a print file from a
remote system resulted in failure. There should be additional messages detailing
why the print request failed.
Action:
Evaluate the additional error messages to determine the exact cause of failure.
Make any necessary changes and retry the operation. Note that the changes
required, more than likely, would have to be made on the remote system.
QJOBSTS, "text."
Reason:
This message is given when an item, (e.g., a received report file or job file) has
been queued to a destination VMS execution or print queue. "text" is the
message text returned by the VMS queue routine.
Action:
Typically none, but if the text of the message indicates that a problem occurred,
then make any required changes, and retry the operation.
13–38
CA-XCOM for OpenVMS Alpha Installation and User Guide
List of Messages
QUEUE_BFRSZERR, QUEUE item code buffer length error.
Reason:
The QUEUE item code buffer length value supplied when a CA-XCOM API
request was made is wrong. The range is between 1 and 31 inclusive.
Action:
Verify that the QUEUE string size supplied when the CA-XCOM API request
was made is within string size boundary. Make any necessary changes to the
user program, recompile, relink, and retry the operation.
RCDCNT_RCVERR, Error Receiving record count.
Reason:
Upon an attempt to receive a count of the total number of data file records
transmitted by the remote partner, an error was returned by the protocol
interface. There should be subsequent error messages which describe in more
detail the protocol interface errors returned.
Action:
Examine the subsequent error messages. Adjust, or resolve problems with the
communication interface (APPC or TCP/IP) and retry the operation.
If the problem persists, contact CA-XCOM Technical Support. You may be asked
to provide a trace of the APPC or TCP/IP session.
RCDCNT_SENDERR, Error Sending record count.
Reason:
Upon an attempt to transmit a count of the total number of data file records
transmitted to the remote partner, an error was returned by the protocol
interface. There should be subsequent error messages which describe in more
detail the protocol interface errors returned.
Action:
Examine the subsequent error messages. Adjust, or resolve problems with the
communication interface (APPC or TCP/IP) and retry the operation.
If the problem persists, contact CA-XCOM Technical Support. You may be asked
to provide a trace of the APPC or TCP/IP session.
Messages
13–39
List of Messages
RCVHDRERR, Error receiving header record.
Reason:
When a remotely initiated CA-XCOM transfer request is initiated, prior to
transferring data files, a transmission header is received from the remote host
CA-XCOM software. An attempt to receive this header resulted in an error
return from the protocol interface. There should be subsequent error messages
which describe in more detail the protocol interface errors returned.
Action:
Examine the subsequent error messages. Adjust, or resolve problems with the
communication interface (APPC or TCP/IP) and retry the operation.
If the problem persists, contact CA-XCOM Technical Support. You may be asked
to provide a trace of the APPC or TCP/IP session.
READCFG_ERR, Unable to read CA-XCOMconfig record for remote system!.
Reason:
An attempt to read the specified remote system name record from the CA-XCOM
configuration file failed during a transfer operation. There should be an
additional error message which describes why the read failed.
Action:
Evaluate the additional error message(s). Make sure that the configuration file
exists and that the remote system name used has an entry in it. Make any
necessary changes to the CA-XCOM command, and retry the operation.
RMTFILE_BFRSZER, RMTFILE item code buffer length error.
Reason:
The RMTFILE item code buffer length value supplied when a CA-XCOM API
request was made is wrong. The range is between 1 and 255 inclusive.
Action:
Verify that the RMTFILE string size supplied when the CA-XCOM API request
was made is within the string size boundary. Make any necessary changes to the
user program, recompile, relink, and retry the operation.
RMTFILE_VALUERR, RMTFILE item code buffer value error.
Reason:
A parse of the RMTFILE value, when a CA-XCOM API request was made,
returned an error. There should be an additional message which describes why
it was rejected.
Action:
Examine the additional error message returned, when the CA-XCOM API
request was made. Make any necessary changes to the user program, recompile,
relink, and retry the operation.
13–40
CA-XCOM for OpenVMS Alpha Installation and User Guide
List of Messages
RMTSYS_BFRSZERR, RMTSYS item code buffer length error.
Reason:
The RMTSYS item code buffer length value supplied when a CA-XCOM API
request was made is wrong. The range is between 1 and 14 inclusive.
Action:
Verify that the RMTSYS string size supplied when the CA-XCOM API request
was made is within the string size boundary. Make any necessary changes to the
user program, recompile, relink, and retry the operation.
RNFLAG_BFRSZERR, RNOTIFY_FLAG item code buffer length error.
Reason:
The RNOTIFY_FLAG item code buffer length value supplied when a
CA-XCOM API request was made is wrong. The value must be 1.
Action:
Verify that the RNOTIFY_FLAG string size supplied when the CA-XCOM API
request was made is within the string size boundary. Make any necessary
changes to the user program, recompile, relink, and retry the operation.
RNFLAG_VALU_ERR, RNOTIFY_FLAG item code value error.
Reason:
The RNOTIFY_FLAG value supplied when a CA-XCOM API request was made
is wrong. The value must be one of the following:
XCOM$S_RNOTIFY_TSO,
XCOM$S_RNOTIFY_WRITELOG,
XCOM$S_RNOTIFY_CICS,
XCOM$S_RNOTIFY_LU,
XCOM$S_RNOTIFY_ROSCOE,
XCOM$S_RNOTIFY_VMSUSER.
Action:
Verify that the RNOTIFY_FLAG value supplied when the CA-XCOM API
request was made is within the above boundary. Make any necessary changes to
the user program, recompile, relink, and retry the operation.
RNOTIFY_BFRSZER, RNOTIFY item code buffer length error.
Reason:
The RNOTIFY item code buffer length value supplied when a CA-XCOM API
request was made is wrong. The range is between 1 and 12 inclusive.
Action:
Verify that the RNOTIFY string size supplied when the CA-XCOM API request
was made is within the string size boundary. Make any necessary changes to the
user program, recompile, relink, and retry the operation.
Messages
13–41
List of Messages
RSTARTALPHA, Alpha restart in progress from record "integer." Filename follows.
Reason:
A resumed transfer is proceeding from the primary (alpha) restart point.
"integer" is the record number from which the file transfer will be resumed. The
name of the file being transferred is displayed in a subsequent message.
Action:
None.
RSTARTBETA, Beta restart in progress from record "integer." Filename follows.
Reason:
A resumed transfer is proceeding from the secondary (beta) restart point.
"integer" is the record number from which the file transfer will be resumed. The
name of the file being transferred is displayed in a subsequent message.
Action:
None.
RSTARTFILE, Restarted (Alpha or Beta) filename is: "file-pathname."
Reason:
A resumption of a previously checkpointed transfer is in progress.
"file-pathname" is the filename of the file being transferred.
Action:
None.
SENDDATAERR, Error sending data record #"rcd-number."
Reason:
An attempt to send file record data during a CA-XCOM transfer resulted in an
error from the protocol interface. "rcd-number" is the number of the record on
which the error was returned. There should be subsequent error messages which
describe in more detail the protocol interface errors returned.
Action:
Examine the subsequent error messages. Adjust, or resolve problems with the
communication interface (APPC or TCP/IP) and retry the operation.
If the problem persists, contact CA-XCOM Technical Support. You may be asked
to provide a trace of the APPC or TCP/IP session.
SENDFAIL, Failed SENDing file to remote node.
Reason:
An attempt to send a file to a remote node resulted in an error. There should be
additional error messages which describes the exact cause of failure.
Action:
Examine the additional errors detailing why the transfer failed. Make any
necessary corrections, and retry the operation.
13–42
CA-XCOM for OpenVMS Alpha Installation and User Guide
List of Messages
SENDHDRERR, Error sending header record.
Reason:
When a CA-XCOM transfer request is initiated, prior to transferring the data file,
a transmission header is sent to the remote host CA-XCOM software. An
attempt to send this header resulted in an error return from the protocol
interface. There should be subsequent error messages which describe in more
detail the protocol interface errors returned.
Action:
Examine the subsequent error messages. Adjust, or resolve problems with the
communication interface (APPC or TCP/IP) and retry the operation.
If the problem persists, contact CA-XCOM Technical Support. You may be asked
to provide a trace of the APPC or TCP/IP session.
SESADDR, Illegal session number qualifier value.
Reason:
The value specified for the SESADDR command qualifier is not acceptable.
"SESADDR" is a command qualifier for the EXCOMACP command which can be
found in the file XCOM$IMAGE:EXCOMACP.COM. This command file is used
to start the CA-XCOM remote request handler component, also known as
XCOMACP.
Action:
Examine the XCOM$IMAGE:EXCOMACP.COM command procedure. Make
any necessary changes, and retry its execution.
SESSIONATMPT, Attempting to establish SNA session.
Reason:
The SNA session, required for an LU 6.2 conversation, is down or deactivated.
This message indicates an attempt to activate a session. This message is usually
given by the XCOMACP.
Action:
None.
SESSIONDOWN, SNA session lost, attempting to re-establish.
Reason:
An SNA session terminated. There should be additional messages explaining
why the session terminated. An attempt will be made to re-establish the session.
Action:
Evaluate the additional messages that should accompany this error message,
take corrective actions as appropriate, and retry the operation.
Messages
13–43
List of Messages
SESSIONUP, SNA session established.
Reason:
An SNA session has been successfully established.
Action:
None.
SETFAIL, Unable to initiate local lu's.
Reason:
The CA-XCOM component responsible for handling remotely initiated
requests(also known as XCOMACP) was unable to define, activate, or otherwise
establish a session with the protocol interface. There should be subsequent error
messages which describe in more detail the protocol interface errors returned.
Action:
Examine the subsequent error messages. Adjust, or resolve problems with the
communication interface (APPC or TCP/IP) and retry the operation.
If the problem persists, contact CA-XCOM Technical Support. You may be asked
to provide a trace of the APPC or TCP/IP session.
SNDERRFDESC, Error Sending file descriptor record.
Reason:
An attempt to transmit a file descriptor record, prior to a data file transfer,
resulted in an error from the protocol interface. There should be subsequent
error messages which describe in more detail the protocol interface errors
returned.
Action:
Examine the subsequent error messages. Adjust, or resolve problems with the
communication interface (APPC or TCP/IP) and retry the operation.
If the problem persists, contact CA-XCOM Technical Support. You may be asked
to provide a trace of the APPC or TCP/IP session.
SPURIOUSRQST, Spurious ACP request "rqst-type" received & rejected.
Reason:
The CA-XCOM component responsible for handling remotely initiated requests
has received an unknown request type, equivalent to the integer "rqst-type." The
request was rejected. There might be additional messages, from the protocol
interface, which may give some insight as to why this spurious request was
received and rejected.
Action:
Evaluate the additional error messages. Make any necessary changes, and retry
the remotely initiated transfer operation.
13–44
CA-XCOM for OpenVMS Alpha Installation and User Guide
List of Messages
SUBFAIL, Unable to submit job. Explanation follows.
Reason:
The CA-XCOM remote request handlers' attempt to receive a job file from a
remote system resulted in failure. There should be additional messages detailing
why the job request failed.
Action:
Evaluate the additional error messages to determine the exact cause of failure.
Make any necessary changes and retry the operation. Note that the changes
required, more than likely, would have to be made on the remote system.
SUBJOBFAIL, Error submitting received batch job for user "user ID."
Reason:
For a remotely initiated (by a remote host) job submit request, queuing of the
received job file failed. There should be additional error messages detailing why
the queue submit step failed.
Action:
Evaluate the additional error messages. Make any necessary changes, and retry
the remotely initiated job submit transfer operation.
SUBPRTFAIL, Error submitting received print job for user "user ID."
Reason:
For a remotely initiated (by a remote host) print job request, queuing of the
received job file failed. There should be additional error messages detailing why
the queue submit step failed.
Action:
Evaluate the additional error messages. Make any necessary changes, and retry
the remotely initiated print job transfer operation.
TIMESTAMP, CA-XCOMtime stamp at "time."
Reason:
This is a time-stamp message intended to indicate the time that a CA-XCOM
event(s) occurred. "time" is the time value in standard VMS absolute time
format.
Action:
None.
TITLE_BFRSZERR, TITLE item code buffer length error.
Reason:
The TITLE item code buffer length value supplied when a CA-XCOM API
request was made is wrong. The range is between 1 and 21 inclusive.
Action:
Verify that the TITLE string size supplied when the CA-XCOM API request was
made is within the string size boundary. Make any necessary changes to the user
program, recompile, relink, and retry the operation.
Messages
13–45
List of Messages
UNEXPCTD_DATA, Unexpected data record.
Reason:
A data record was received when CA-XCOM was expecting a confirm request.
There should be subsequent error messages which describe in more detail the
protocol interface errors returned.
Action:
Examine the subsequent error messages. Adjust, or resolve problems with the
communication interface (APPC or TCP/IP) and retry the operation.
If the problem persists, contact CA-XCOM Technical Support. You may be asked
to provide a trace of the APPC or TCP/IP session.
UNIT_BFRLEN_ERR, UNIT item code buffer length error.
Reason:
The UNIT item code buffer length value supplied when a CA-XCOM API
request was made is wrong. The range is between 1 and 10 inclusive.
Action:
Verify that the UNIT string size supplied when the CA-XCOM API request was
made is within string size boundary. Make any necessary changes to the user
program, recompile, relink, and retry the operation.
UNIT_MVS_ONLY, UNIT ONLY used when creating file on a mainframe, e.g. MVS system.
Reason:
A UNIT value was supplied when requesting a file transfer to a remote system
which is not an IBM mainframe. A UNIT can be specified only when
communicating with a mainframe.
This problem can be caused by the remote system's operating system name being
incorrectly specified in the CA-XCOM configuration file. This characteristic can
be set via the CA-XCOM configurator. With this configurator, verify that the
remote system is not an IBM mainframe.
Action:
13–46
If the remote system is indeed not an IBM mainframe, then remove the UNIT
value specification from the transfer request command and retry the operation.
If the remote system is supposed to be an IBM mainframe, but is not defined as
such, then use the CA-XCOM configurator to rectify the problem and retry the
operation.
CA-XCOM for OpenVMS Alpha Installation and User Guide
List of Messages
UNKAPIFUNC, Unknown API Function item code value specified.
Reason:
An unknown CA-XCOM Application Programming Interface (API) function item
code value was supplied as a parameter to the API interface when a user
program made an API request.
Action:
Examine the API function code value supplied by the user program. Compare it
to the chapter "The Application Programming Interface" to see if the correct
function name was specified, and to program include files (e.g., C ".h" files)
which assign integer values to the function names.
UNXPCTD_CNFMSND, Unexpected CONFIRM_SEND transition.
Reason:
A value indicating that the remote host CA-XCOM software has issued a
"PREPARE_TO_RECEIVE" verb with type "SYNC_LEVEL" and the
synchronization level is "CONFIRM" when we were expecting a data file. There
should be subsequent error messages which describe in more detail the protocol
interface errors returned.
This problem can occur when the two communicating CA-XCOM transaction
programs are out of sync with respect to their mutually agreed upon
communications protocol.
Action:
Examine the subsequent error messages. Adjust, or resolve problems with the
communication interface (APPC or TCP/IP) and retry the operation.
If the problem persists, contact CA-XCOM Technical Support. You may be asked
to provide a trace of the APPC or TCP/IP session.
UNXPCTD_FMHDATA, Unexpected FMH data received.
Reason:
A Function Management Header (FMH) record was received when expecting a
(file) data record. There should be subsequent error messages which describe in
more detail the protocol interface errors returned.
This problem can occur when the two communicating CA-XCOM transaction
programs are out of sync with respect to their mutually agreed upon
communications protocol.
Action:
Examine the subsequent error messages. Adjust, or resolve problems with the
communication interface (APPC or TCP/IP) and retry the operation.
If the problem persists, contact CA-XCOM Technical Support. You may be asked
to provide a trace of the APPC or TCP/IP session.
Messages
13–47
List of Messages
UNXPCTD_SNDTRNS, Unexpected SEND transition.
Reason:
An unexpected line state turn, from receive to send, has occurred while receiving
data. There should be subsequent error messages which describe in more detail
the protocol interface errors returned.
This problem can occur when the two communicating CA-XCOM transaction
programs are out of sync with respect to their mutually agreed upon
communications protocol.
Action:
Examine the subsequent error messages. Adjust, or resolve problems with the
communication interface (APPC or TCP/IP) and retry the operation.
If the problem persists, contact CA-XCOM Technical Support. You may be asked
to provide a trace of the APPC or TCP/IP session.
UNXPTD_CFMDALOC, Unexpected CONFIRM_DEALLOCATE transition.
Reason:
A value indicating that the remote host CA-XCOM software has issued a
"DEALLOCATE" verb with type "SYNC_LEVEL" and the synchronization level
is "CONFIRM" when we were expecting a data file. There should be subsequent
error messages which describe in more detail the protocol interface errors
returned.
This problem can occur when the two communicating CA-XCOM transaction
programs are out of sync with respect to their mutually agreed upon
communications protocol.
Action:
Examine the subsequent error messages. Adjust, or resolve problems with the
communication interface (APPC or TCP/IP) and retry the operation.
If the problem persists, contact CA-XCOM Technical Support. You may be asked
to provide a trace of the APPC or TCP/IP session.
USERID_BFRLSZER, USERID item code buffer length error.
Reason:
The USERID item code buffer length value supplied when a CA-XCOM API
request was made is wrong. The range is between 1 and 10 inclusive.
Action:
Verify that the USERID string size supplied when the CA-XCOM API request
was made is within the string size boundary. Make any necessary changes to the
user program, recompile, relink, and retry the operation.
13–48
CA-XCOM for OpenVMS Alpha Installation and User Guide
List of Messages
VAXFILE_ACCESER, RMS error on VAXFILE "filename"Open or Connect.
Reason:
A VMS RMS file system error was returned when the local VMS file involved in
a CA-XCOM transfer operation was accessed. "filename" is the file specification
used. There should be an additional message which describes the specific RMS
error returned.
Action:
Verify that the target disk is online and the directory is accessible by the user
requesting the CA-XCOM transfer. Evaluate the RMS error returned. Make any
necessary changes, and retry the operation. If the problem persists, contact
CA-XCOM Technical Support.
VAXFILE_BFRSZER, VAXFILE item code buffer length error.
Reason:
The VAXFILE item code buffer length value supplied when a CA-XCOM API
request was made is wrong. The range is between 1 and 255 inclusive.
Action:
Verify that the VAXFILE string size supplied when the CA-XCOM API request
was made is within the string size boundary. Make any necessary changes to
the user program, recompile, relink, and retry the operation.
VAXFILE_READERR, Error reading local file record "rcd-number."
Reason:
An error status was returned by the VMS RMS file system while reading a record
from the VMS input file during a CA-XCOM "SEND" file request. "rcd-number"
is the record number on which the error occurred. There should be an additional
message which describes the specific RMS error returned.
Action:
Verify that the target disk is online and the directory is readable by the user
requesting the CA-XCOM transfer. Evaluate the RMS error returned. Make any
necessary changes, and retry the operation.
If the problem persists, contact CA-XCOM Technical Support.
VAXFILE_WRTERR, Error writing local file record.
Reason:
An error status was returned by the VMS RMS file system while writing a record
to the VMS output file during a CA-XCOM "GETFILE" request. There should be
a subsequent message which describes the specific RMS error returned.
Action:
Verify that the target disk is online and the directory is writable by the user
requesting the CA-XCOM transfer. Evaluate the RMS error returned. Make any
necessary changes, and retry the operation.
If the problem persists, contact CA-XCOM Technical Support.
Messages
13–49
List of Messages
VAXOUTFILE_ERR, Error opening output file.
Reason:
An error status was returned by the VMS RMS file system when an attempt was
made to access the local VMS output file during a CA-XCOM "GETFILE" request.
There should be a second message which describes the specific RMS error
returned.
Action:
Verify that the target disk is online and the directory is writable by the user
requesting the CA-XCOM transfer. Evaluate the RMS error returned. Make any
necessary changes, and retry the operation. If the problem persists, contact
CA-XCOM Technical Support.
VOLUME_BFRSZERR, VOLUME item code buffer length error.
Reason:
The VOLUME item code buffer length value supplied when a CA-XCOM API
request was made is wrong. The range is between 1 and 10 inclusive.
Action:
Verify that the VOLUME string size supplied when the CA-XCOM API request
was made is within the string size boundary. Make any necessary changes to the
user program, recompile, relink, and retry the operation.
VOLUME_MVSONLY, VOLUME ONLY used when creating file on a mainframe, e.g. MVS system.
Reason:
A VOLUME value was supplied when requesting a file transfer to a remote
system which is not an IBM mainframe.
A VOLUME can be specified only when communicating with a mainframe. This
problem can be caused by the remote system's operating system name being
incorrectly specified in the CA-XCOM configuration file. This characteristic can
be set via the CA-XCOM configurator. With this configurator, verify that the
remote system is not an IBM mainframe.
Action:
13–50
If the remote system is indeed not an IBM mainframe, then remove the
VOLUME value specification from the transfer request command and retry the
operation. If the remote system is supposed to be an IBM mainframe, but is not
defined as such, then use the CA-XCOM configurator to rectify the problem and
retry the operation.
CA-XCOM for OpenVMS Alpha Installation and User Guide
List of Messages
WAIT_BFRLEN_ERR, WAIT item code buffer length error.
Reason:
The WAIT item code buffer length value supplied when a CA-XCOM API
request was made is wrong. The range is between 1 and 16 inclusive.
Action:
Verify that the WAIT string size supplied when the CA-XCOM API request was
made is within the string size boundary. Make any necessary changes to the user
program, recompile, relink, and retry the operation.
Messages
13–51
TXPI Messages
XMTHDRCNFMERR, Transmit header record received confirm error.
Reason:
Upon an attempt to complete a confirmation procedure after reception of a
CA-XCOM transmission header, for a remotely initiated request, the protocol
interface returned an error. There should be subsequent error messages which
describe in more detail the protocol interface errors returned.
Action:
Examine the subsequent error messages. Adjust, or resolve problems with the
communication interface (APPC or TCP/IP) and retry the operation.
If the problem persists, contact CA-XCOM Technical Support. You may be asked
to provide a trace of the APPC or TCP/IP session.
TXPI Messages
This section lists messages from the TXPI subsystem of CA-XCOM.
Note: These are not CA-XCOM for VMS errors. They are returned from TCP/IP.
101 Txpi is not supported for protocol
102 dwSizeof invalid for TXP_IFEEDBACK
103 dwSizeof invalid for TXPI_CONNECT
104 Internal error: dwSizeof invalid for CONNECTION
105 Parameter TXPI_CONNECT is NULL
106 Cannot allocate storage
107 Socket Type SOCK_DGRAM is not supported
108 Communication protocol unknown type
109 TxpiInitConnect P_TXPI_CONNECT
13–52
CA-XCOM for OpenVMS Alpha Installation and User Guide
TXPI Messages
110 TxpiInitBroadcast is not supported
111 TxpiInitMulticast is not supported
112 Invalid TXPI_OPTIONS
113 Cannot allocate storage for the TXPI_CONNECT block
114 TxpiTerm for a server before TxpiInitConnection called for hClient
115 TxpiSetOptions cannot change the socket type
116 Cannot allocate storage for the TXPI_BUFFER block
117 Internal error: fnReceive returned too little data
118 Internal error: Receive about to discard
119 Freeing a TXPI buffer before receiving data
120 getclientid
121 givesocket error
122 TXPI_SERVER_OPTIONS is NULL in TxpiInitServer
123 dwSizeof invalid
201 WSAStartup error
202 WSACleanup error
203 Gethostbyname error
Messages
13–53
TXPI Messages
204 Inet_addr error
205 Socket error unknown type
206 Socket error
207 Set socket SO_BROADCAST option error
208 Set socket SO_BROADCAST option error
209 Set socket SO_BROADCAST option error
210 Set socket SO_BROADCAST option error
211 Socket connect error
212 Socket bind error
213 Socket accept error
214 Socket listen error
215 Socket send error
216 Socket sendto error
217 Socket receive error
218 Socket receive from error
219 Socket close error
220 Socket send select error
13–54
CA-XCOM for OpenVMS Alpha Installation and User Guide
TXPI Messages
221 takesocket error
222 Socket select error
224 gethostname error
226 Select timed out with no data available
227 Socket received 0 bytes: partner closed socket
228 Select exception condition for socket
229 TxpiSend aborted because unreceived data is available
230 Internal error: invalid connection type
231 TxpiSend aborted because the partner called TxpiTerm
232 Error following select
233 Socket closed during accept/receive/select
234 Error from getpeername
235 Gethostid error
Messages
13–55
Glossary
Note - Terms defined in this glossary are related to CA-XCOM specifically to your
platform, see your platform’s documentation.
ABEND
Certain errors can cause an abnormal ending (ABEND) of the transaction program. When
the LU terminates a program because of an ABEND condition, it deallocates all active
conversations.
Access Code
A code used in access control lists to show access rights.
Access Control
An operating system mechanism which determines a user's access rights to files and
directories.
Access Mode
The method the I/O system uses to access records for reading or writing. The access
modes are sequential, random, and indexed.
ACF
See Advanced Communications Function.
Adjacent Node
A node that is directly connected (either logically or physically) to another node. A pair of
adjacent SNA Type 2.1 nodes can be directly connected in a peer-to-peer manner. This is
referred to as a Low Entry Networking (LEN) connection.
Advanced Communications Function (ACF)
A prefix given to IBM's mainframe communications packages to differentiate between the
old releases of VTAM, NCP, and SSP, which came with the MVS operating system.
Advanced Peer-to-Peer Networking (APPN)
An IBM technology that allows networking of multiple Type 2.1 nodes without requiring
a System/370 host. APPN nodes provide intermediate node network routing and support
dynamic networking facilities, such as network reconfiguration, locating users in the
network. APPN software is implemented on the System/36 and AS/400.
Glossary–1
Advanced Program-To-Program Communications (APPC)
The marketing term for SNA LU 6.2 program-to-program communications. APPC/LU 6.2
provides a generalized communications vehicle that can be used by transaction programs
to exchange information. IBM transaction programs such as DIS, SNA/DS, and DDM use
LU 6.2 for their program-to-program communications.
American National Standards Institute (ANSI)
This is a United States organization that was created by the computer industry to establish
computing standards. Participation in these standards is voluntary. (See also American
Standard Code for Information Interchange.)
American Standard Code for Information Interchange (ASCII)
The standard binary code prepared and recommended by the American National
Standards Institute to represent characters in a computer system. This system is used by
most non-IBM computers, as well as PC/DOS and OS/2 systems. With ASCII, each
character is represented in a byte consisting of seven bits of data and one parity bit. (See
also Extended Binary-Coded Decimal Interchange Code.)
API
See Application Program Interface.
APPC
See Advanced Program-to-Program Communications.
Application
A program or set of programs which uses a data communication network to provide
remote users with computer services or information. In SNA networks, application
programs are considered end-users of the network and are represented by Logical Units
(LUs).
Application Program Interface (API)
A set of "calls" that application programs use which access services provided by
supporting software. For example, LU 6.2 Transaction Programs interface to the
supporting LU via the LU's application program interface.
APPN
See Advanced Peer-to-Peer Networking.
Architecture
A set of rules and definitions describing the structure and operation of a network.
Systems Network Architecture (SNA) is IBM's set of rules and definitions describing how
their systems will interconnect and operate in a network.
ASCII
See American Standard Code for Information Interchange.
AS/400
IBM's strategic, multi-user, midrange applications processing system. The AS/400
supports a wide range of SNA communications, including 3270 emulation and peer-topeer communications using logical unit type 6.2. The AS/400 is the successor to IBM's
System/36 and System/38 product lines.
Glossary–2
CA-XCOM for OpenVMS Alpha Installation and User Guide
Baud
AST
See Asynchronous System Trap.
Asynchronous
A method of data transmission where every character sent is bounded by a start and stop
bit, and where no timing or clocking information is exchanged between parties.
Asynchronous Communications
A communications protocol standard for data transmission that does not allow for the
buffering of data or polling. The flow of data is maintained by start and stop control bits,
not timing sequences. Thus, the timing interval between the transmission of each
character can vary from one character to the next. This protocol is not recognized by
IBM's SNA suite of protocols. See also Binary Synchronous Communications and
Synchronous Data Link Control.
Asynchronous System Trap (AST)
A VMS-specific term. ASTs are a mechanism for signalling asynchronous events to a
process. Specifically, a procedure (or routine) designated by either the process or the
system executes in the context of the process. An example of these services is
documented in the VMS System Services Reference Manual.
Automatic Dialer
A device which generates pulse or touchtone dialing sequences. An automatic dialer is
used by computers and terminals to directly dial a call. Many modems have automatic
dial features.
Basic Conversations
Conversations that require the transaction to build and interpret generalized data stream
(GDS) headers. The transaction is responsible for error recovery and data stream
mapping.
Batch Process
A noninteractive process that executes a command or command macro. When you request
a batch process from the System/88 or Stratus Operating System for instance, the batch
request is put into a specified queue and a batch process starts to execute the command
whenever resources become available. The batch process runs independently of the
process that issued the batch request.
Batch Task
A collection of related functions that run sequentially, usually without interaction with a
user.
Baud
A unit of signal variation rate on a communication line. In modern usage, it is normally
(and incorrectly) used in place of "bits per second." In data communications, each baud
can encode one or more binary bits of computer data. Typically, one, two, or four bits are
encoded.
Glossary–3
Binary Synchronous Communications
A data communications protocol that allows for buffering and polling. Although
supported by some IBM hardware and software, it is not a recognized protocol in the
SNA suite of protocols. See also Asynchronous Communications and Synchronous Data
Link Control.
Bisync
See Binary Synchronous Communication.
Bit
One binary digit of a computer's representation of information. There are normally eight
bits in a computer character (byte).
Block
A set of information sent on a communication line. Normally associated with synchronous
protocols and sometimes called a "frame," a disk block holds 4,096 bytes. It is the smallest
addressable unit in disk secondary storage and is the unit of transfer of data between
main storage and secondary storage. File and directory blocks are read into the buffer
pool before being accessed by the system.
Block I/O
A method of transferring data between main and secondary storage that moves a block
(4,096 bytes) at a time, disregarding the file and record structures of the data.
Buffer
A memory area reserved for use in performing input/output (I/O) operations.
Byte
A collection of eight bits which make up a letter, number, symbol, etc. Normally used as
another term for "character," byte is an IBM term. An unsigned byte variable can contain
integer values in the range of 0 to 255; a signed byte variable can contain integer values in
the range of -128 to 128.
Carrier
Either a company which provides communication circuits to the public or a signal onto
which digital information is placed for transmission. In popular modern usage, "I have
carrier" means that the signal from the remote modem is reaching the local modem
requirement for communication.
CCITT
International Consultative Committee for Telephone and Telegraph, a United Nations
affiliate which proposes worldwide public standards for computer networking protocols.
The International Standards Organization (ISO) usually shows agreement with CCITT
proposals when it announces new protocol standards every four years.
CCS
See Common Communications Support.
Channel
A path over which information can flow between two points, sometimes used
interchangeably with terms such as "circuit," "line," "trunk," or "path."
Glossary–4
CA-XCOM for OpenVMS Alpha Installation and User Guide
Control Point (CP)
CICS
See Customer Information Control System.
Cluster Controller
An SNA term used to describe peripheral nodes which control multiple, clustered devices
such as display stations and printers. This term is commonly used when talking about
3270 control units. A cluster controller node is now referred to as a peripheral node.
Command Macro
A user-written program invoked from the command line. A command macro is
composed of calls to the operating system commands, calls to user programs and
commands, and command macro statements. The command processor reads and
executes lines from the macro file until it either reaches the end of the file or the
terminating macro statement.
Common Communications Support (CCS)
An SAA element that consists of components used for communications between SAA
systems. The CCS element is subdivided into categories of components including objects,
data streams, application services, session services, network, and data link controls. The
intent of this element is to allow interoperability between SAA systems.
Common Programming Interface (CPI)
An SAA element that is subdivided into categories of programming languages and
services components. This element is used to standardize the available programming
environments on SAA systems. SAA applications are developed using CPI components
and interfaces.
Common Programming Interface for Communications (CPIC)
The LU 6.2-based application programming interface defined as part of SAA's CPI
element. The CPIC interface is used by application programs for communicating with
other application programs.
Common User Access (CUA)
An SAA element that contains specifications and guidelines for an application's user
interface. This element is used to standardize the user interface provided by SAA
application programs. CUA includes support for both non-programmable terminals, such
as 3270s, and intelligent workstations, such as PS/2s running OS/2.
Communication Controller Node
An SNA network node which acts as a "pure" communications processor to handle
functions like network routing and control of physical data links. IBM hardware products
like the 3720, 3725, and 3745 act as SNA communications controllers when they are
running the Network Control Program (NCP) software. SNA communications controllers
are also referred to as Type 4 nodes.
Configuration Table
One of the table files the operating system uses to identify the elements of a system.
Control Point (CP)
The intelligence that manages a node and provides network services to attached logical
units.
Glossary–5
Conversation
The name for communication between two programs on different computer systems in an
APPC session.
Cooperative Processing
The ability to access distributed resources in a transparent manner from any system in a
network. Systems within a network cooperate with one another in carrying out the
distributed access.
CP
See Control Point.
CPI
See Common Programming Interface.
CPIC
See Common Programming Interface for Communications.
CRC
See Cyclic Redundancy Check.
CUA
See Common User Access.
Customer Information Control System (CICS)
A popular IBM timesharing package that runs under the MVS operating system and is
optimized for end-user applications.
Cyclic Redundancy Check
A means of determining whether a message has been received properly. The sender
calculates a "check sum" of each character position in the message, and sends the result at
the end of the message. The receiver, performing the same calculation, should get the
same result.
Data
Information coded in computer language and having a defined code structure meaningful
to both the sender and the receiver.
Database
Logically-organized data which may or may not be recalled through a sorted index.
Data Flow Control (DFC)
The Data Flow Control layer supports the SNA protocols needed to coordinate the flow of
data on an SNA session. Protocols are provided to: control the direction of data flow;
control logical grouping of data for error recovery purposes; send responses to data sent
on the session; and provide support for other session control functions.
Data Line Monitor
A device used to view the actual data on a communication line, consisting of a CRT
display and switches to control the monitoring process. This device is normally used for
troubleshooting.
Glossary–6
CA-XCOM for OpenVMS Alpha Installation and User Guide
Distributed Processing
Data Link
See Link.
Data Link Control (DLC)
The data link control layer defines the protocols that SNA uses to transmit data across a
single physical data link and to perform error detection and error recovery functions for
that data. These DLC protocols are defined by the System/370 channel interface and
token ring for local area networking. Synchronous Data Link Control (SDLC) is the DLC
protocol used across wide area networks.
DDM
See Distributed Data Management.
Descriptor
A data structure used in a calling procedure for passing argument types, addresses, and
other information.
DFC
See Data Flow Control.
DIA
See Document Interchange Architecture.
Disk Operating System (DOS)
IBM's standard operating system for the PC family of systems. DOS is a single-tasking
operating system that runs on PC and PS/2 systems.
DISOSS
See Distributed Office Support System.
Display Station
A CRT terminal or intelligent workstation with a monitor and keyboard that allows
information to be entered into the network and has the ability to display information
received from the network. This term is typically associated with 3270 display stations
(e.g., 3179).
Distributed Data Management (DDM)
An architecture describing a form of remote file access in SNA networks. DDM
transaction programs on different systems use LU 6.2 to distribute requests for record and
file access.
Distributed Office Support System (DISOSS)
An IBM System/370 mainframe-based office application that runs under CICS. DISOSS
provides a number of office-oriented services, allowing end users on different systems to
exchange mail and documents, to store and retrieve documents from host libraries, and to
distribute documents in a network.
Distributed Processing
Processing performed by multiple systems in a network.
Glossary–7
Distributed Resource
A resource residing on one system which is being accessed from another system in a
network. The resource being accessed is not locally-resident on the requesting system.
Distributed Transaction Processing
Distributed processing between cooperating transaction programs.
DLC
See Data Link Control.
Document Interchange Architecture (DIA)
An IBM architecture describing a set of services that allows documents to be exchanged
between different systems in an SNA network. DIA services include document library
services which allow users to store and retrieve documents to and from host libraries, and
document distribution services.
DOS
See Disk Operating System.
DOS/VSE
See Virtual System Extended (VSE).
Dumb Terminal
A terminal, such as a 3270 terminal, which has no application processing capability of its
own. It relies solely on host-based application programs for processing and control.
Terminal operators use such terminals to access host applications.
EBCDIC
See Extended Binary Coded Decimal Interchange Code.
Editor
A program used to create and modify text files.
End User
A device, such as a display station, a printer, or an application program, that is the source
or destination of data exchanged in an SNA network. LUs represent end users, serving as
their port into and out of the network.
Error Code
An alphanumeric status code returned by an operating system service subroutine to
indicate that an error has occurred during execution.
Error Message
A character string associated with an error code.
Event Flag
Event flags are status posting bits maintained for general programming use. In the
APPC/LU 6.2 programming interface, an event flag is set to indicate asynchronous
completion of a procedure.
Glossary–8
CA-XCOM for OpenVMS Alpha Installation and User Guide
Functional Layer
Exchange Identification
See Exchange Station ID.
Exchange Station ID (XID)
A code that allows one computer to recognize another computer or device in a dial, token
ring, or APPN network. Each code must be unique within a network. This is also short
for Exchange Station ID, an SDLC supervisory frame in which two nodes first making
contact identify themselves. An XID frame contains a four-byte node ID and can also
contain optional information such as the NETID and CP name. An XID is optional on
leased lines, but is commonly employed over dialup connections and LANs.
Extended Binary Coded Decimal Interchange Code(EBCDIC)
A code system that allows a binary representation of characters and certain control
information. EBCDIC is the standard developed and used by IBM in their mainframe and
mini-computers. It differs from ASCII in that it uses all eight bits of a byte to represent a
character and therefore may represent more characters (see also American Standard Code
for Information Interchange).
File
A set of records or bytes stored on disk or tape as a unit. A disk file has a path name that
identifies it as a unique entity in the system's directory hierarchy. Attributes of a disk file,
such as its size and when it was created, are maintained in the directory containing the
file.
Fixed File
A file with a fixed organization. In a fixed file, the records are the same size. Each record
is stored in a disk or tape region holding a number of bytes that is the same for all the
records in the file. Compare with relative file, sequential file, and stream file.
FMH
See Function Management Header.
Frame
A more modern term for "block" normally applied to protocols which bound their
messages by fixed codes, such as SDLC and HDLC.
Full Duplex
A physical connection on which information can be transmitted in both directions
between the same two points simultaneously.
Functional Layer
One of the major groupings of functions defined by the SNA architecture. Major
functions have been isolated into separate layers so that changes can be made to one layer
without having to change other layers, thereby making it easier to accommodate new
technologies in SNA. SNA consists of seven layers: transaction services, presentation
services, data flow control, transmission control, path control, data link control, and
physical control.
Glossary–9
Function Management Header (FMH)
Control information that allows an LU to transmit a data stream to a specific destination
and control the presentation of the data at that destination. FMHs are the means by which
an LU selects the functions it wants the presentation services components of its session
partner to perform. For more information about FMHs, see IBM's Systems Network
Architecture - Sessions Between Logical Units, Order No. GC20-1868.
Gateway
A system of hardware and software that handles protocol differences between an IBM
SNA network and another network (for example, DECnet, IPX, NETBIOS, etc.)
GDS
See Generalized Data Stream.
Generalized Data Stream (GDS)
A standard data stream that is used in LU 6.2 communication. (See also Basic
Conversations and Mapped Conversations.)
Half Duplex
A physical connection on which information can be transmitted in both directions, but not
simultaneously. While sending, each party has the entire capacity of the channel.
HDLC
See High Level Data Link Control.
Hertz
Cycles per second (CPS).
Hierarchical
A connection characterized by a master-slave relationship. In SNA terminology, a
hierarchical connection involves a peripheral node (slave) connection to a host subarea
node (master). The host node maintains control and is responsible for initiating and
terminating the connection.
High Level Data Link Control (HDLC)
A communication protocol for full duplex communication which is used as the basis for
the packet switching X.25 protocol. HDLC is a level 2 protocol in terms of the ISO model.
Host Node
A Type 5 SNA node which contains a System Services Control Point (SSCP). A host node
is typically a System/370 mainframe computer running VTAM. A host node serves as a
centralized control point of a network. Host nodes support application programs and
provide network management services. A host node is one type of subarea node, the
other type being a communications controller node.
IMS
See Information Management System.
Independent Logical Unit
A logical unit that does not rely on the SSCP to establish its sessions. To be independent,
a logical unit must meet these criteria:
Glossary–10
CA-XCOM for OpenVMS Alpha Installation and User Guide
ISC
- It must be a logical unit type 6.2.
- It must reside on a type 2.1 PU node.
- It must be capable of sending a "Bind" request.
- It must support parallel sessions.
- Its node must be able to send an XID, which includes a control point name vector.
Information Management System (IMS)
An IBM System/370 host-based Database/Data Communications (DB/DC) subsystem
that runs in the MVS environment. IMS supports user-written batch and interactive
applications, providing communications access to remote systems, and access to databases
maintained by IMS for these applications.
Initial Program Load (IPL)
The process of transferring the operating system from disk into the main memory of a
computer so that it can prepare itself to run application programs. See also Reboot.
Intelligent Workstation
A system, such as a personal computer, that has its own processing capability. Local
applications can execute on an intelligent workstation so that connection to a host system
is not required.
Interface
The connection between a computer or terminal and a datapath. There are various
interface standards, including RS232.
Intermediate Node
A node in a network that provides network routing services but is not the source or
destination of the data being routed. An intermediate node receives data from one node
and, based on addressing information, sends the information to another node. Host nodes
and communications controller nodes can function as intermediate nodes in SNA
networks.
International Standards Organization (ISO)
An organization responsible for issuing recommendations on various issues in computers
and communication. The ISO developed the famous seven layer "Basic Reference Model
for Open Systems Interconnection" called the ISO Model.
Intersystem Communication (ISC)
The method CICS uses to enable communication between separate systems by means of
programmable interfaces and SNA. (See also CICS.)
I/O Status Vector
This mechanism is VMS-specific and provides the VMS transaction program with
complete information about error conditions. The status vector provides a top-level
completion code, and in many cases, further qualifying codes.
IPL
See Initial Program Load.
ISC
See Intersystem Communication.
Glossary–11
ISO
See International Standards Organization.
JES
See Job Entry Subsystem.
Job Entry Subsystem (JES)
A series of IBM products (JES, JES2, JES3) that allows remote users to submit jobs for
execution on System/370 mainframes. The JES subsystems run in the MVS operating
system environments.
LAN
See Local Area Network.
LEN
See Low Entry Networking.
Level N
One of the seven levels or layers of the ISO model. N represents the number of the level.
Level 1 is the physical interface, and level 7 is the application or user interface.
Link
A physical connection between two nodes. Different types of links are supported in SNA
networks, including System/370 local channel links, token ring LANs, and SDLC links.
The Data Link Control (DLC) layer defines various protocols to manage data exchange
across the different links.
Link Protocol
The set of rules which govern communications over a single link within a network. The
link or data link protocol is level 2 of the ISO Model.
Local Area Network (LAN)
A communication technology which passes information over relatively short distances
(less than one mile, typically) and at very high speeds. (This term is usually pronounced
as a word, "lan," rather than by pronouncing the letters separately.)
Local Channel
The direct link between one IBM System/370 processor and either another System/370
processor, a communications controller, or a peripheral node. The local channel interface
is one of the data links supported in SNA networks.
Logical Link
A temporary conversation path established between two transaction programs in a
network.
Logical Unit (LU)
The addressable entity in an SNA network with which a user can send and receive
messages. An LU could also be described as a user's portal to the network. An LU can be
implemented in either hardware, software, or firmware. Whatever fulfills the SNA
responsibilities of the LU is said to implement the LU.
Glossary–12
CA-XCOM for OpenVMS Alpha Installation and User Guide
Mainframe
Logical Unit-To-Logical Unit (LU-LU) Session
A logical connection between the LUs representing users of an SNA network. No
communications can occur between LUs until they establish an LU-LU session.
Low Entry Networking (LEN)
A technical direction within SNA that provides for the routing of traffic between any two
nodes, automatic definition of routes, and directory services. The enhancement to SNA
that makes low entry networking possible is called the type 2.1 network node.
LU
See Logical Unit.
LU Type 0
An implementation-defined LU type that is generally used to support program-toprogram communications. It is most often used in IBM's industry-specific systems (e.g.,
retail POS, banking), and is being superseded by LU Type 6.2 in most new applications.
LU Type 1
The LU type that is designed to support communications between a remote terminal and a
host-based application. LU Type 1 is used for sending SNA Character String (SCS) data
streams to 3270 printers. It is also used to support 3770 Remote Job Entry (RJE) terminals.
LU Type 2
The LU type that is designed to support communications with display stations using the
3270 data stream format.
LU Type 3
The LU type that is designed to support communications with printers using the 3270
data stream format.
LU Type 4
An early SNA LU type used for peer-to-peer communications. LU 4 has now been
superseded by LU 6.2 for peer-to-peer communications.
LU Type 6.1
The LU type that is designed to support program-to-program communications between
IBM host-based applications such as CICS and IMS.
LU Type 6.2
The LU type that is designed to support generalized program-to-program
communications. LU Type 6.2 defines an application program interface (API) which
applications use to communicate with each other. Another important feature of LU Type
6.2 is its ability to support peer-to-peer sessions directly between users on SNA
workstations and mid-range processors.
Mainframe
A System/370 host computer. A mainframe is any model of IBM's System/370, 303X,
308X, 309X, and 4300 and 9370 series of processors. Due to VTAM software which runs in
the mainframe, the mainframe functions as a Type 5 Host Node in an SNA network. In
addition to serving as a network control point, mainframes also support network
management facilities and application programs.
Glossary–13
Mapped Conversations
Conversations that take place between user-written transaction programs. Mapped
conversations transform all data being sent to another transaction into the generalized
data stream (GDS) and then restore the data to its original form before the destination
program receives it. In the VMS environment, the VMS transaction program does not
recognize GDS headers.
Midrange System
One of IBM's non-mainframe, non-PC systems. Typically, midrange systems fall between
mainframes and PCs in processing power and capacity. IBM midrange systems include
the AS/400, System/36, System/38, Series/1, and 8100.
Mode
A set of characteristics used to define a conversation.
Mode Entry
An entry in a VTAM table that describes the mode being used. A mode entry defines
characteristics of a session that both sides must agree upon, such as the LU type and the
data frame size.
Mode Table
A VTAM module that contains one or more mode entries.
Modem
Modulator/Demodulator. A device which converts digital information to a series of tones
suitable for transmission across an analog path, such as a conventional telephone circuit.
Multi-Domain SNA Network
An SNA network whose resources (LUs, PUs, and data links) are controlled by more than
one SNA host. The Systems Services Control Point (SSCP) within each of the hosts
controls some portion of the network's resources.
Multidrop
A wide area communication line which connects more than two points. On multidrop
lines, one station is normally designated the "master" to prevent interference if two
stations attempt to send at once.
Multiple Virtual Storage (MVS)
The general name given to the flagship operating system used on large IBM mainframes.
There are three current variants of MVS: MVS/SP, MVS/XA, and MVS/ESA.
Multiplexer
A communication device which combines several user channels into a single trunk line for
more economical transmission.
MVS
See Multiple Virtual Storage.
NAU
See Network Addressable Unit.
Glossary–14
CA-XCOM for OpenVMS Alpha Installation and User Guide
Node
NCP
See Network Control Program.
Network
A communications facility that connects two or more points.
NetView
The IBM software package that provides VTAM network management capabilities.
NetView provides facilities to allow network operators to monitor and control the
network, detect and isolate problems in the network, determine the status of network
components, and activate and deactivate network resources.
NetView Distribution Manager
An IBM System/370-based program product that is used for distributing software and
microcode to remote systems in an SNA network.
NetView/PC
An IBM program product that runs on PC or PS/2 systems. NetView/PC is used to
provide network management support for non-SNA devices. Applications that interface
with NetView/PC are required to support the non-SNA device. These applications can
then use the services of NetView/PC to send alert messages to NetView on a System/370
host.
Network Addressable Unit (NAU)
The origin or the destination of information transmitted through the path control
network. In Systems Network Architecture (SNA), it is a logical unit, physical unit, or
systems services control point.
Network Control Program (NCP)
The operating system for IBM front-end processors. A front-end processor cannot be
"booted" with NCP until it is first customized during NCP generation.
Network Management
The set of functions and processes used to control a network. Network management
functions include activating and deactivating network resources, monitoring the status of
resources, detecting and isolating problems in the network, distributing software to
systems in the network, configuring the network, and other related activities. NetView is
IBM's primary System/370 host-based network management software.
Node
An endpoint of a communications link or a junction common to two or more links in a
Network. Nodes can be processors, controllers, or workstations. It became popular a few
years ago to stop using the term Physical Unit (PU) and use the term "node" instead. In
SNA, a node embodies the set of responsibilities that govern physical attachment to the
network. Whatever fulfills these responsibilities is said to implement the physical unit,
which can be hardware, software, or firmware.
Glossary–15
Node Type
An SNA node that has a particular role in an SNA network. SNA defines four different
types of nodes: host (type 5) nodes, communications controller (type 4) nodes, and type
2.0 and type 2.1 peripheral nodes.
Non-Switched Line
A communications connection that is not initiated by dialing into a public data network.
This is often known as a leased line, referring to the procedure of leasing a dedicated
circuit from a phone company. See also Switched Line.
Nucleus
The portion of MVS code in which very critical, low-level routines reside. Code residing
in the nucleus usually cannot be altered without shutting down a computer.
OfficeVision
An IBM family of SAA office applications that provides office services such as word
processing, electronic mail, calendar management, decision support, file handling,
document distribution, and communications. The OfficeVision family consists of a series
of products for each of the SAA environments including: the OfficeVision/MVS and
OfficeVision/VM series for the System/370 MVS and VM environments, respectively;
OfficeVision/400 for the OS/400 environment on AS/400 systems; Office Vision/2 LAN
series for the OS/2 Extended Edition environment on PC and PS/2 systems.
Operand
A parameter used to define the meaning of a macro instruction. A network control
program, for example, is customized using macros, and it is common that, as new features
are added, new operands must be specified to go with them.
Organization (File)
The way records in a file are stored on a disk. The four types of organization are
sequential, relative, fixed, and stream.
OS/2
A multitasking operating system for IBM's PS/2 family of personal computers. OS/2 will
also run on some models of the PC family, such as PC AT and PC XT 286 systems.
OS/2 EE
See OS/2 Extended Edition.
OS/2 Extended Edition
IBM's version of OS/2 that includes an integrated relational database manager and an
integrated communications manager. OS/2 EE is the SAA environment for intelligent
workstations.
Outbound Primary Logical Unit
A peripheral node that can start a session by sending a "Bind" request. Outbound PLUs
allow two nonhost computers to hold sessions over an SNA backbone network, a
capability that was only recently made possible.
Glossary–16
CA-XCOM for OpenVMS Alpha Installation and User Guide
Peripheral Node (PN)
Pacing
A method of limiting the number of frames sent between two systems to prevent the data
buffer of the receiving machine from becoming overrun.
Packet Assembly/Disassembly (PAD)
A hardware device which converts information between the X.25 packet protocol format
and a nonpacket protocol so that nonpacket devices may use a packet network.
Packet Switching
A form of communication where multiple users place their data on a single trunk line to
minimize the cost per user. Each conversation is identified by a "logical channel number."
The X.25 protocol is a CCITT standard for packet switching.
PAD
See Packet Assembly/Disassembly.
Parallel
A data transmission method in which the bits in a character are sent on eight channels
simultaneously rather than on a single channel. Printers and other local devices are often
interfaced via parallel transmission, but this method is rare in data communication.
Password
A sequence of characters a user can be required to supply for security reasons when
logging onto a system. The characters in a password do not appear on the screen when
they are typed in.
Path Control
Layer 3 of SNA that deals with the routing of data through a network. Path control
provides end-to-end network routing that may span multiple data links. Path control is
responsible for setting up an end-to-end path through the network connecting a pair of
end users.
PC
IBM's original family of personal computer systems. PCs are based on Intel
microprocessors including the 8088, 8086, and 80286 chips. DOS is the primary operating
system running on most PCs. The original PC line was enhanced to include PC XT and
PC AT models. The PC family has been superseded by the PS/2 family.
Peer-To-Peer Communications
Communications between two adjacent type 2.1 nodes. This type of peer connectivity is
called Low Entry Networking (LEN). Such communications do not require a System/370
mainframe to be involved. This is contrasted with hierarchical communications in which
a type 2.0 or type 2.1 peripheral node must be connected to a host system. Only LU 6.2
sessions are supported across peer-to-peer connections between type 2.1 nodes.
Peripheral Node (PN)
A type 2.1 node that contains logical units, one of which is a session partner. Peripheral
nodes support the attachment of end users to the network. End users may be devices,
such as displays and printers, or they may be application programs. While type 2.0 nodes
are restricted to connecting to host nodes or communication controller nodes, type 2.1
nodes can also directly connect to other type 2.1 nodes without host involvement.
Glossary–17
Physical Control Layer
Layer 1 of SNA that deals with the physical connections of systems into the network. IBM
supports a number of industry standard physical interfaces at this layer, including the RS
232 and 802.2 token ring interfaces. This layer addresses the mechanical and electrical
interfaces used to get information into and out of a system.
Physical Unit
A synonym for node. See also Node.
Physical Unit Name (PU name)
The mnemonic name given to a node. This name is defined to VTAM and/or NCP, and
sometimes to the node itself.
Physical Unit Type 2
Now retroactively called physical unit 2.0, this is the specification for a peripheral node;
examples of PU 2.0 implementations include 3174 cluster controllers and most
minicomputers. Two type 2.0 PUs cannot attach to each other, but instead must be
connected to a larger node (PU type 4 or 5). Node type 2 is being phased out.
Physical Unit Type 2.1
IBM's strategic node type. A PU 2.1 node can be directly connected to any other PU 2.1
node. All future IBM products will be Type 2.1 nodes.
Physical Unit Type 4
The node type of a front-end processor; this is being phased out. A type node 4 is
subordinate to a type 5 node.
Physical Unit Type 5
The node type of a host device that contains a system services control point. To
implement a PU type 5 is to emulate a mainframe.
PIP
See Program Initialization Parameter.
PLU
See Primary Logical Unit.
PN
See Peripheral Node.
Poll
A periodic request by a "master" communication station to a "slave" station requesting
that the slave provide data or status information. "Polling" is the act of requesting status
information from multiple stations.
PORT
A transport layer demultiplexing value. Each application has a unique port number
associated with it. See also: Transmission Control Protocol, User Datagram Protocol.
Glossary–18
CA-XCOM for OpenVMS Alpha Installation and User Guide
Protocol Boundary
Presentation Services (PS)
Layer 6 of SNA that deals with the presentation of data to and from end users. For older
style terminal emulation (e.g., 3270), PS deals with the formatting and unformatting of
data to and from a format that is usable by end users such as displays and printers. For
LU 6.2, PS also provides an application program interface (API) used by application
programs to access the services provided by the LU.
Presentation Services Profile
A subset of SNA Presentation Services (PS) protocols supported by a particular type of
LU.
Primary Logical Unit (PLU)
An LU that initiates an SNA session with a partner LU. For each SNA LU-LU session, one
LU assumes the role of the primary LU while the partner LU assumes the role of the
secondary LU. The primary LU can initiate and terminate the session by sending the SNA
BIND and UNBIND commands.
Procedure
A routine entered by a call in the transaction program.
Process
The sequence of states of the hardware and software during the execution of a user's
program.
Profile
A subset of SNA commands and protocols at a particular layer of the SNA architecture.
Program Initialization Parameter (PIP)
The means of passing program initialization parameters to the destination transaction
program.
Program Temporary Fix (PTF)
A patch sent by the vendor to fix a bug, or bugs, in a software package.
Program-to-Program Communications
Communications between a pair of programs. LU 6.2 provides program-to-program
communications protocols. Two Transaction Programs (TPs) can communicate with one
another using LU 6.2 protocols. IBM refers to this as Advanced Program-To-Program
Communications (APPC).
Protocol
A set of agreements by which two or more stations agree on information structures, codes,
etc., required for successful and error-free communication. SDLC, X.25, etc., are protocols.
Data link control protocols, such as SDLC, define the rules of interaction between two
nodes connected by a single data link.
Protocol Boundary
The interface between a Transaction Program (TP) and a Type 6.2 LU. The protocol
boundary consists of a set of "verbs" that describe the functions provided by the LU which
are available to the TP.
Glossary–19
PS
See Presentation Services.
PS/2
IBM's family of personal computer systems that are the next generation beyond the
original PC family. The PS/2 family consists of a number of models differing in
processing power and capacity. Like the PC family, PS/2 models are based on Intel
microprocessors. Lower end PS/2 models are bus-compatible with IBM's PC models,
while higher end PS/2 models have a MicroChannel Architecture (MCA) bus. OS/2 is the
primary operating system for the PS/2, although DOS is widely used as well.
PTF
See Program Temporary Fix.
Queue
A mechanism to record jobs that are waiting to be processed. Jobs can be given priorities
within a queue.
Reboot
The startup of a computer, when the operating system is read in from a disk and
necessary preparations are made for the system to become available and for applications
to be run.
Reference
An argument in an APPC/LU 6.2 programming interface procedure that is passed by an
address and is usually expressed as a reference name or label associated with a particular
area or field.
Relative File
A file with a relative organization. In a relative file, the records can have varying sizes.
Each record is stored in a disk or tape region holding a number of bytes that is the same
for all the records in the file. Compare with fixed file, sequential file, and stream file.
Remote IBM Host Transaction Program
The transaction program residing on the IBM system with which another transaction
program communicates.
Remote Job Entry (RJE)
Originally, the name given to old-fashioned card reader/line printer devices that were
attached to a mainframe via telephone lines. Today, the term RJE is used to describe small
computers that, in order to communicate with a host, emulate those old printer/readers.
RJE communications use an old SNA protocol called Logical Unit Type 1.
Request for Comments (RFC)
The document series, begun in 1969, which describes the Internet suite of protocols and
related experiments. Not all (in fact, very few) RFCs describe Internet standards, but all
Internet standards are written up as RFCs. The RFC series of documents is unusual in
that the proposed protocols are forwarded by the Internet research and development
community, acting on their own behalf, as opposed to the formally reviewed and
standardized protocols that are promoted by organization such as CCITT and ANSI. See
also: BCP, FYI, STD.
Glossary–20
CA-XCOM for OpenVMS Alpha Installation and User Guide
Session
Restore
A command used to copy onto disk data that was written to tape by the save command.
RFC
See Request for Comments
RJE
See Remote Job Entry.
Roscoe
A software package from Computer Associates that is a partial alternative to IBM's TSO;
Roscoe is less powerful than TSO, but it imposes significantly less overhead.
RS-232
A standard for computer/terminal interfacing which defines a 25-pin connector. RS232 is
the most popular interface standard.
SAA
See Systems Application Architecture.
SCS
See SNA Character String.
SDLC
See Synchronous Data Link Control.
Secondary Logical Unit (SLU)
The LU that accepts a session establishment request from a primary LU. For each SNA
session between a pair of LUs, one LU functions as the primary LU while the other LU
functions as the secondary LU. The primary LU is responsible for initiating (via the SNA
BIND command) and terminating (via the SNA UNBIND command) the LU-LU session,
while the secondary LU accepts or denies these requests.
Sequential File
A file with a sequential organization. In a sequential file, the records can have varying
sizes and each record is stored in a disk or tape region holding approximately the same
number of bytes as in the record. Thus, the record storage regions in a sequential file vary
from record to record. Compare with fixed file, relative file, and stream file.
Serial
A data transmission method in which the bits in a character are sent, one after the other,
over a single channel. Most modern data communication is serial.
Session
A logical connection that permits communication between two logical units. Before any
communication is possible between a pair of NAUs, a session must be established that
logically connects the pair. SNA supports SSCP-SSCP, SSCP-PU, SSCP-LU, and LU-LU
sessions. SNA session level protocols are used to manage the exchange of information
across the session between the pair of NAUs.
Glossary–21
Single Domain Network
An SNA network with only one System/370 host, and therefore only a single System
Services Control Point (SSCP) (which is implemented in VTAM in the System/370 host).
All resources in the network are controlled by the single host.
SLU
See Secondary Logical Unit.
SMP/E
See System Modification Program/Extended.
SNA
See Systems Network Architecture.
SNA Character String (SCS)
A data stream consisting of intermixed end-user data, single-byte control codes, and/or
multi-byte control sequences. The control codes and sequences are used to direct the
presentation of the end user data on display stations or printers. SCS is the type of data
stream used with LU Type 1 processing.
SNA/DS
See SNA/Distribution Services.
SNA/Distribution Services (SNA/DS)
An architecture that describes a generalized, asynchronous delivery facility based on
store-and-forward techniques. SNA/DS is used to distribute different types of objects
(e.g., mail, documents, programs) through an SNA network. SNA/DS is used in
conjunction with Document Interchange Architecture (DIA) to provide electronic mail
services. SNA/DS uses LU 6.2 for its program-to-program communications.
SNA/Management Services
IBM's set of network management services that are used for managing systems in an SNA
network. NetView is IBM's major host-based product that supports SNA/Management
Services.
SNA Network
Multiple interconnected systems using SNA protocols between systems to provide
support for end-to-end information exchange. Typically, an SNA network consists of one
or more System/370 mainframes that act as central control points, multiple
communications controllers that act as intermediate routing nodes, and many terminals,
PCs, and multi-user systems that support end users of the network.
SSCP
See System Services Control Point.
SSP
See Systems Support Program.
Start/Stop Bit
The bits which mark the beginning and end of each asynchronously transmitted character.
Glossary–22
CA-XCOM for OpenVMS Alpha Installation and User Guide
System Modification Program/Extended (SMP/E)
State
The condition of a conversation at a particular point in time. For example, when a
conversation is in receive state, the transaction program cannot send data; it can only
receive data. The state of a conversation determines what procedures a transaction
program can call.
Stream File
A file with a sequential organization. In a stream file, the records can have varying sizes
and each record is stored in a disk or tape region holding approximately the same number
of bytes as in the record. Thus, the record storage regions in a stream file vary from
record to record. In these ways, stream files are similar to sequential files. However,
stream files differ from sequential files in the following ways:
While a sequential file must be accessed on a record basis, a stream file can be accessed on
either a record or byte basis.
Sequential files are stored on disk with the record size at the beginning and end of each
record. Stream files do not have any record size information stored with them; each new
line character in the file is interpreted as the end of a record.
It is possible to have a stream file with only one record. When stream files are used to
store text, each record contains one line of text. Compare with fixed file, relative file, and
sequential file.
Subarea
A division of an SNA network that is under the control of, and addressed by, a front-end
processor or a host access method such as VTAM.
Switched Line
A connection between two or more points that requires the user to dial into a public data
network.
Synchronous
A form of transmission where the sender and receiver exchange clocking or timing
information and send a block or frame with no space or markings between characters.
Because no start/stop bits are required, synchronous transmission is about 25% more
efficient than asynchronous transmission.
Synchronous Communications
Transmission of data at a fixed rate, with the transmitter and receiver synchronized by
means of synchronization characters located at the beginning of each message or block of
data.
Synchronous Data Link Control (SDLC)
SDLC is the synchronous protocol used by SNA. It is level 2 or the link level protocol of
IBM's SNA. SDLC is essentially a subset of HDLC. It provides buffering and polling
capabilities. CA-XCOM runs over SDLC.
System Modification Program/Extended (SMP/E)
An IBM-supplied utility program used to facilitate the installation of software packages
and patches. SMP/E helps ensure that programs are installed in the proper sequence and
that all prerequisites and corequisites are met.
Glossary–23
Systems Network Architecture (SNA)
The logical description of all components within IBM networking strategy and how they
interact. It describes sets of protocols used for communications between logical
components. SNA also defines a set of layers that describes different levels of
functionality needed to support communications between end users. CA-XCOM is an
SNA-based software package.
System Services Control Point (SSCP)
The entity that controls and manages the resources of a data communications network
owned by a host.
Systems Support Program (SSP)
The utility programs that load, dump, and debug the Network Control Program. (SSP
here is short for the mainframe ACF/SSP, and is not to be confused with the SSP
operating system of the System/36.)
Systems Support Program (SSP)
The utility programs that load, dump, and debug the Network Control Program. (SSP
here is short for the mainframe ACF/SSP, and is not to be confused with the SSP
operating system of the System/36.)
System/36
An IBM multi-user, midrange applications-processing system. It supports a wide range of
SNA communications, including 3270 emulation and peer-to-peer communications using
logical unit type 6.2. The System/36 is being replaced by IBM's
AS/400 system.
System/38
An IBM minicomputer and the forerunner of the
AS/400; noted for the relational database integrated into its operating system, the
System/38 is hindered by its 1970s hardware design.
System/370
IBM's family of mainframe processors that are based on the System/370 architecture.
Included in this family are 308X, 3090, 4300, and 9370 processors.
Systems Application Architecture (SAA)
IBM's umbrella architecture that consists of components used to bring greater consistency
to IBM mainframe, midrange, and workstation products. SAA covers user interface,
programming languages and services, and communications issues.
Text File
A sequential or stream file containing only ASCII characters.
TC
See Transmission Control.
TCP
See Transmission Control Protocol.
Glossary–24
CA-XCOM for OpenVMS Alpha Installation and User Guide
Transmission Control (TC)
TCP/IP Protocol Suite
Transmission Control Protocol over Internet Protocol. This is a common shorthand which
refers to the suite of tranport and application protocols which runs over IP.
Third-Party Processing
(A Computer Associates International term.) Use of a computer system to arrange for a
second computer system to send a file, job, or report to a third computer system at a
specified future time if not immediately.
Throughput
In data communications, the amount of data transmitted through a communications link
in a fixed period of time.
Time-Sharing Option (TSO)
A very powerful (but high-overhead) IBM interactive application that is used by
programmers and operators both to develop software and to customize and control an
MVS system.
Token-Ring
IBM's strategic local area network (LAN) based on a token-passing scheme that is
compatible with the IEE 802.2 and 802.5 token ring standards. A token ring LAN interface
is one of the data link types supported in SNA networks.
TPN
See Transaction Program Name.
Transaction Program
An IBM-supplied or user-written application program that directly interfaces to a Type 6.2
LU via the LU 6.2 application program interface (API) provided by the LU. A logical
connection, called a conversation, must be set up between the Transaction Programs (TPs)
before any communication can take place. The conversation and exchange of information
between the TPs is carried out over an underlying SNA LU 6.2 session managed by the
pair of LUs supporting the TPs. Examples of IBM-supplied TPs are DIA, SNA/DS, and
DDM.
Transaction Program Name (TPN)
The identifier of the remote IBM host transaction program with which another transaction
program wants to engage in an LU 6.2 conversation.
Transaction Services (TS)
Layer 7 of SNA that deals with application level processing. Programs running at the
transaction services layer are called Transaction Programs (TPs). These may be either
IBM-supplied TPs such as DIA, SNA/DS, and DDM or they may be user-written TPs. TPs
interact directly with a type 6.2 LU via an LU 6.2 application program interface (API).
Transmission Control (TC)
Layer 4 of SNA that deals with initiating and terminating sessions, controlling the rate of
flow of information across the session, checking sequence numbers to ensure that
information is not lost or duplicated, and encrypting and decrypting data as required.
Glossary–25
Transmission Control Protocol (TCP)
An Internet Standard transport layer protocol defined in RFC 793. It is connectionoriented and stream-oriented, as opposed to UDP. Se also: User Datagram Protocol.
Transmission Subsystem Profile
A subset of SNA Transmission Control (TC) commands and protocols supported by a
particular type of LU.
TS
See Transaction Services.
TSO
See Time-Sharing Option.
Type 2.0 Node
An SNA peripheral node that is capable of only hierarchical connections with a host
system. Examples of type 2.0 node products are 3270 cluster controllers and other systems
emulating 3270 operation.
Type 2.1 Node
An SNA peripheral node that supports both hierarchical connections to host nodes as well
as peer-to-peer connections to other type 2.1 nodes with no host involvement. Examples
of type 2.1 nodes are AS/400s, System/36s, System/38s, and PCs. APPC software in
these systems support the type 2.1 node facilities.
Type 4 Node
An SNA communications controller node that serves as an intermediate routing node in
an SNA network. Type 4 Node functions are implemented by Network Control Program
(NCP) software running in a 37XX communications controller. The primary functions of a
type 4 node are network routing and managing physical data links connected to the node.
Type 5 Node
An SNA host node characterized by a System Services Control Point (SSCP). A type 5
host node is typically a System/370 mainframe running VTAM. It supports application
program end users and provides network management services.
User Datagram Protocol (UDP)
An Internet Standard transport layer protocol defined in RFC 768. It is a connectionless
protocol which adds a level of reliability and mulitplexing to IP. See also: Transmission
Control Protocol.
V.35
The most popular interface standard for data connections over 19.2 KBPS, defined by the
CCITT.
Verbs
The LU functions available to Transaction Programs (TPs) that are formally architected as
part of the LU 6.2 protocol boundary.
Glossary–26
CA-XCOM for OpenVMS Alpha Installation and User Guide
VTAM Printer Support (VPS)
Version 1 Transfers
CA-XCOM transfers you conduct with a partner system running a 1.x version of
CA-XCOM. A system which is running CA-XCOM Version 1.x can conduct only version
1 type transfers. A system running CA-XCOM Version 2.x can conduct both version 1 and
version 2 type transfers. Increased functionality is available for version 2 type transfers
(e.g., checkpoint-restart). See the chapter on Remote System Conventions and the chapter
on Processing Options for more information.
Version 2 Transfers
CA-XCOM transfers you conduct with a partner system running a 2.x version of
CA-XCOM. A system running CA-XCOM Version 1.x can conduct only version 1 type
transfers. A system running CA-XCOM Version 2.x can conduct both version 1 and
version 2 type transfers. Increased functionality is available for version 2 type transfers
(e.g., checkpoint-restart). See the chapter on Remote System Conventions and the chapter
on Processing Options for more information.
Virtual Machine (VM)
One of IBM's primary System/370 operating systems. VM presents a virtual machine
interface to users so that, to each user, it appears that the entire machine is dedicated to
their use.
Virtual System Extended (VSE)
A widely-used IBM mainframe, operating system, not covered by IBM's Systems
Application Architecture, as are MVS and VM. It is formally called DOS/VSE, but VSE is
a widely accepted shorter name.
Virtual Telecommunications Access Method (VTAM)
The software package that mainframe applications use to send and receive messages over
an SNA network; implements Layers 2, 3, and 4 of SNA.
VM
See Virtual Machine.
VMS Transaction Program
The VMS application that the user writes using CA-XCOM.
VMS/SNA
VMS/SNA is a single-system connection to an IBM SNA network. It consists of the
communications software necessary to allow a user of a VMS Alpha family of systems to
connect directly to and participate in an SNA network.
VPS
See VTAM Printer Support.
VTAM
See Virtual Telecommunications Access Method.
VTAM Printer Support (VPS)
A software package (including a VTAM application) from Levi, Ray, and Shoup that
sends spooled output to 3270-attached printers.
Glossary–27
CA-XCOM
A software package (including a VTAM application) from Computer Associates
International that provides for bulk data transfer between mainframes, minis, and micros
using LU 6.2.
XID
See Exchange Station ID.
Zap
Short for SuperZap, this is a powerful utility program that allows those authorized to use
it to modify external storage without limit. SuperZap can be dangerous, and its use is
typically reserved to systems programmers.
Index
/CLASS Qualifier, 5-4, 7-27
/COMPRESS Qualifier, 5-5, 6-8, 6-16, 6-21, 6-24, 7-6,
7-18, 7-27, 7-36
/
/COPIES Qualifier, 5-5, 7-27
/CREATE Qualifier, 5-5, 7-6, 7-18
/ACCESS Qualifier, 4-9, 5-17
/DEFACCNT Qualifier, 4-9, 4-11, 5-18, 5-22
/ALLOCTYPE Qualifier, 7-3
/DEFAULT Qualifier, 9-3
/APPEND Qualifier, 5-3, 7-3, 7-16
/DEFAULT_OWNER, 5-18, 5-22
/ASA Qualifier, 5-3, 7-26
/DEFPSWRD Qualifier, 4-9, 4-11, 5-18, 5-22
/ASTLM Qualifier, 4-9, 4-11, 5-17, 5-21
/DELETE Qualifier, 5-6, 7-28
/BATCH_QUEUE Qualifier, 5-17, 5-21
/DESTINATION Qualifier, 5-6, 7-28
/BINARY Qualifier, 5-3, 7-16
/DIOLM Qualifier, 5-18, 5-22
/BIOLM Qualifier, 4-9, 4-11, 5-17, 5-21
/ENABLE_GENERIC Qualifier, 9-3
/BLOCK_LIMIT Qualifier, 9-3
/FCB Qualifier, 5-6, 7-28
/BYTLM Qualifier, 4-9, 4-11, 5-18, 5-21
/FILLM Qualifier, 4-9, 4-11, 5-19, 5-22
/CHARACTERISTICS Qualifier, 9-3
/FORM Qualifier, 5-6, 7-28
/CHECKPOINT Qualifier, 5-4, 7-5, 7-17, 7-26
Delta Time, 5-4
/FORMAT Qualifier, 5-9
FIXED, 5-9
FIXED_BLOCKED, 5-9
UNDEFINED, 5-9
/CKPT Qualifier, 7-17
Glossary–28
CA-XCOM for OpenVMS Alpha Installation and User Guide
VARIABLE_BLOCKED, 5-9
/PASSWORD Qualifier, 5-10, 7-8, 7-19, 7-30, 7-38
/GENERIC Qualifier, 9-3
/PGFLQUOTA Qualifier, 4-10, 4-11, 5-19, 5-23
/GETFILE Qualifier, 5-7
/POLL Qualifier, 4-10, 5-19
/HOLD Qualifier, 5-7, 7-29
/PRINT Qualifier, 5-10
/ID Qualifier, 7-7, 7-18, 7-29, 7-37
/PRINT_QUEUE Qualifier, 5-19, 5-23
/LIBRARY Qualifier, 9-3
/PRIORITY Qualifier, 4-10, 4-11, 5-19, 5-23
/LNOTIFY Qualifier, 5-7, 7-7, 7-19, 7-29, 7-37
/PRIVILEGE Qualifier, 5-20, 5-23
/LOG Qualifier, 5-8, 7-7, 7-19, 7-29, 7-37
/PROCESSOR Qualifier, 9-4
/MENU Qualifier, 5-8
/PROTECTION Qualifier, 9-4
/MVSBLOCKL Qualifier, 7-4
/QUEUE /NOQUEUE Qualifier, 7-9
/MVSFORMAT Qualifier, 7-6
/QUEUE Qualifier, 5-11, 7-20, 7-31, 7-38
/MVSRECL Qualifier, 7-9
/RECL Qualifier, 5-9
/NEXT Qualifier, 9-4
/REPLACE Qualifier, 5-11, 7-9, 7-20
/NOASA Qualifier, 5-3, 7-26
/RESUME Qualifier, 5-11, 7-9, 7-20
/NOBLOCK_LIMIT Qualifier, 9-3
/RETAIN Qualifier, 9-4
/NOCHARACTERISTICS Qualifier, 9-3
/RMTFILE Qualifier, 5-12
/NOCHECKPOINT Qualifier, 7-5, 7-17, 7-26
/RMTSYS Qualifier, 5-12, 7-10, 7-21, 7-31, 7-38
/NOCOMPRESS Qualifier, 5-5, 6-8, 6-16, 6-21, 6-24,
7-6, 7-18, 7-27, 7-36
/RNFLAG Qualifier, 5-12, 7-10, 7-21, 7-31, 7-39
/NODE Qualifier, 4-9, 5-19
/NODEFAULT Qualifier, 9-3
/NODELETE Qualifier, 5-6, 7-28
/NOENABLE_GENERIC Qualifier, 9-3
/NOGENERIC Qualifier, 9-3
/NOHOLD Qualifier, 5-7, 7-29
/NOLIBRARY Qualifier, 9-3
/NOLOG Qualifier, 5-8, 7-7, 7-19, 7-29, 7-37
/NOQUEUE Qualifier, 5-11, 7-9, 7-20, 7-31, 7-38
/NORETAIN Qualifier, 9-4
/NOSEPARATE Qualifier, 9-4
/NOTRUNCATE Qualifier, 5-15, 7-12
/NOWAIT Qualifier, 5-16, 7-14, 7-24, 7-34, 7-41
/ON Qualifier, 9-4
/OWNER_ULC Qualifier, 9-4
/PACK /NOPACK Qualifier, 7-7
Index–2
/RNOTIFY Qualifier, 5-13, 7-10, 7-21, 7-32, 7-39
/SECONDARY Qualifier, 7-11
/SENDFILE Qualifier, 5-13
/SEPARATE Qualifier, 9-4
/SESADDR Qualifier, 5-20, 5-23
/SETUP Qualifier, 9-4
/SNA Qualifier, 7-11, 7-21, 7-39
/SUBMIT Qualifier, 5-13
/TCPIP Qualifier, 7-11, 7-22, 7-39
/TDUDATA Qualifier, 7-11, 7-22, 7-40
/TEXT Qualifier, 5-14, 7-11, 7-22
/TITLE Qualifier, 5-14, 7-32
/TOP_OF_FILE Qualifier, 9-4
/TRACE Qualifier, 7-12, 7-22
/TRUNCATE /NOTRUNCATE Qualifier, 7-12
/TRUNCATE Qualifier, 5-15
/UDATA Qualifier, 7-12, 7-22
CA-XCOM for OpenVMS Alpha Installation and User Guide
/UNIT Qualifier, 5-15, 7-12, 7-23
B
/USERID Qualifier, 5-15, 7-23, 7-33, 7-41
/USERID Qualifiers, 7-13
BATCH_QUEUE qualifier, 4-9, 4-11
/VOLUME Qualifier, 5-16, 7-13, 7-23
BDAM, 12-2
/WAIT /NOWAIT Qualifier, 7-14
Binary, 6-9
/WAIT Qualifier, 5-16, 7-24, 7-34, 7-41
Delta Time, 5-16
BIOLM qualifier, 4-9, 4-11
/WSDEFAULT Qualifier, 4-10, 4-12, 5-20, 5-24
Buffer Address, 8-10
Buffer Length, 8-9
/WSEXTENT Qualifier, 4-10, 4-12, 5-20, 5-24
/WSQUOTA Qualifier, 4-10, 4-12, 5-20, 5-24
/XTRACE Qualifier, 7-14, 7-24, 7-35, 7-42
A
Access Name Definitions
LU List, 3-3
PU SNA, 3-4
ACCESS NAME DEFINITIONS
Access names, 3-3
Access Name(s), 3-2
ACCESS qualifier, 4-9
Accounting Considerations, 10-6
ACP, 4-7
ADD Command, 4-3
fields, 4-4
Add Remote File, 6-9
Ancillary Control Process, 4-7, 10-4
Argument Count, 8-23
AS/400 Configuration, 12-14
AS/400 File Support
Filename, 12-13
Libraryname, 12-13
Membername, 12-13
Naming Conventions, 12-13
Types of Files Supported, 12-14
ASA Conversion, 6-17
ASCII Translation, 6-9, 11-2
ASTLM qualifier, 4-9, 4-11
C
CA-XCOM
applications
report distribution, 1-3
RJE/NJE replacement, 1-3
type 2.1 support, 1-3
benefits of LU 6.2 (APPC), 1-11
connectivity, 1-9
diagram, 1-9
features, 1-4
data link types, 1-5
high capacity and performance, 1-6
management, 1-6
modular support of most systems, 1-4
security, 1-6
standard, 1-5
standard functions, 1-5
file transfer types, 1-2
invoking, 1-8
menu interface, 1-8
programming interface, 1-8
network levels, 1-10
standard features
simple installation, 1-5
TCP/IP overview, 1-13
unified solution, 1-2
user interfaces, 1-2
uses, 1-1, 1-2
Change an Entry's Default Age Limit, 11-8
Checkpoint Filename Format, 11-6
Checkpointed Transfer Retry Delta-Time, 6-10, 6-18
Chkpnt/Resume/None, 6-9, 6-16, 6-25
Circuit name, 3-2
CMKRNL Privilege, 10-5
Index–3
CMS
DCB Parameters, 12-4
File Naming Conventions, 12-4
Shared File System, 12-4
Configuration
File, SNA, 3-4
Copies, 6-16
DEFAULT_OWNER qualifier, 4-9, 4-11
Defining Locally Initiated Requests, 3-2
applid, 3-4
name, 3-3
Defining SNA connections
Defining locally initiated requests, 3-1
DEFPSWRD qualifier, 4-9, 4-11
Create Remote File, 6-9
Creating Mainframe Files, 6-10
Format Parameter, 6-12
Physical Block Size, 6-11
Record Length, 6-12
Unit Name, 6-11
Volume Name, 6-11
DELETE command, 4-5
Delete file after printing, 6-17
Deleting An Entry, 11-11
Deleting XCOM$RECOVER Queue, 11-12
Delta Time, 5-16
DETACH Privilege, 10-5
D
Device, 10-9
DIOLM qualifier, 4-9, 4-11
DCB Parameters
MVS, 12-3
VM/CMS, 12-4
DCL Commands, 7-1
XCOM/GETFILE, 7-1
XCOM/MENU, 7-1
XCOM/PRINT, 7-1
XCOM/SENDFILE, 7-1
XCOM/SUBMIT, 7-1
DCL EXCOMACP Command Customization, 5-1
DCL EXCOMACP Command Qualifiers, 5-1
DCL XCOM62 Command Customization, 5-1
Modifying the Command Definition File, 5-2
VMS Command Definition Utility, 5-1
DCL XCOM62 Command Qualifiers, 5-1
DECnet, 12-11
DECnet SNA
Defining DECnet SNA Connections, 3-1
Editing for XCOM Transfers, 3-2
DEFACCNT qualifier, 4-9, 4-11
Default File Specifications, 10-9
Device, 10-9
Directory, 10-9
Filename, 10-9
Version, 10-9
Default Message Options, 8-23
Index–4
Direct Connections To Remote Systems, 4-6
Directory, 10-9
E
EBCDIC Translation, 6-9, 11-2
Error Messages
TXPI, 13-51
XCOM Log File, 13-1
EXCOMACP
ACCESS qualifier, 4-9
BATCH_QUEUE qualifier, 4-9, 4-11
BIOLM qualifier, 4-9, 4-11
BYTLM qualifier, 4-9, 4-11
DEFAULT_OWNER qualifier, 4-9, 4-11
DEFPSWRD qualifier, 4-9, 4-11
DIOLM qualifier, 4-9, 4-11
FILLM qualifier, 4-9, 4-11
NODE qualifier, 4-9
PGFLQUOTA qualifier, 4-10, 4-11
POLL qualifier, 4-10
PRINT_QUEUE qualifier, 4-10, 4-11
PRIORITY qualifier, 4-10, 4-11
PRIVILEGE qualifier, 4-10, 4-11
SESSADDR qualifier, 4-10, 4-11
WSDEFAULT qualifier, 4-10, 4-12
WSEXTENT qualifier, 4-10, 4-12
WSQUOTA qualifier, 4-10, 4-12
CA-XCOM for OpenVMS Alpha Installation and User Guide
EXCOMACP command procedure, 5-17, 5-21
Fixed Blocked Record Files, 8-15
EXCOMACP Command Qualifiers, 5-17, 5-21
/ACCESS Qualifier, 5-17
/ASTLM Qualifier, 5-17, 5-21
/BATCH_QUEUE, 5-17, 5-21
/BIOLM Qualifier, 5-17, 5-21
/BYTLM Qualifier, 5-18, 5-21
/DEFACCNT Qualifier, 5-18, 5-22
/DEFAULT_OWNER Qualifier, 5-18, 5-22
/DEFPSWRD Qualifier, 5-18, 5-22
/DIOLM Qualifier, 5-18, 5-22
/FILLM Qualifier, 5-19, 5-22
/NODE Qualifier, 5-19
/PGFLQUOTA Qualifier, 5-19, 5-23
/POLL Qualifier, 5-19
/PRINT_QUEUE Qualifier, 5-19, 5-23
/PRIORITY Qualifier, 5-19, 5-23
/PRIVILEGE Qualifier, 5-20, 5-23
/SESADDR Qualifier, 5-20, 5-23
/WSDEFAULT Qualifier, 5-20, 5-24
/WSEXTENT Qualifier, 5-20, 5-24
/WSQUOTA Qualifier, 5-20, 5-24
Fixed Blocked Records, 8-16
Fixed Record Files, 8-15
Fixed Records, 8-16
FIXED_BLOCKED, 5-9, 6-12
Form Type, 6-16
Format Parameter, 6-12
Forms Control Buffer, 5-6, 8-13
FORTRAN Carriage Control, 5-3
func Argument
function_code, 8-3
Function Return Values, 8-2
function_code, 8-3
G
EXCOMACP.CLD, 2-14
EXCOMACP.COM, 2-8, 2-14, 4-1
EXCOMACP.EXE, 2-14
EXIT command, 4-5
Exits, user, 11-13
GCS, 12-4
General Product Management, 11-1
General Product Operation, 11-1
GRPNAM Privilege, 10-5
EXQUOTA Privilege, 10-5
H
F
FACILITY, 13-2
FAO Parameter, 8-24
FAO Parameter Count, 8-24
FAT File System, 12-15, 12-17
Hardware Requirements, 2-1
HELP command, 4-5
HELP Facility, 7-1
High Performance Disk System, 12-17
Hold Printing, 6-16
FCB, 8-13
File purging, 2-5
I
File Type, 6-9, 6-25
Filename, 10-9
FILLM qualifier, 4-9, 4-11
FIXED, 5-9
Fixed Block Record Format, 6-12
IDENT, 13-2
Ignored PRINT Qualifiers
/BURST, 9-6
/NOTE, 9-6
/PAGES, 9-6
Index–5
/PASSALL, 9-6
Indirect Connections To Remote Systems, 4-6
Initiating the Transfer, 6-13
LU 6.2
benefits
improved throughput, 1-12
LU List, 3-3
Installing The Software, 2-4
Installing using
CD, 2-6
VMSINSTAL, 2-4
M
Installing XCOM, 2-1
Main Menu, 6-4
Installing XCOM 6.2
storage space requirements, 2-1
Manually Resuming a Checkpointed Transfer, 11-10
ISAM, 12-2
item code
Boolean, 8-9
Input Value, 8-9
Output Value, 8-9
item_list_3, 8-8
itmlst Argument, 8-8
Item Code, 8-9
item_list_3, 8-8
Menu Interface
Initiating The Transfer, 6-13
Main Menu, 6-4
Print Report Screen, 6-13
Receive File Menu, 6-21
Relationships, 6-1
Send File Screen, 6-6
Send Functions Menu, 6-5
Submit Job Menu, 6-19
The Function Keys, 6-3
Message Code, 8-24
Message Formats Received From Remote Nodes, 13-6
Message Log, 6-2
L
Message Logging, 10-6
L, 13-2
Messages Without Idents, 13-3
Line Disconnects, 10-6
Mode Name, 3-2
LIST command, 4-5
Modifying The Command Definition File, 5-2
List of Error Messages, 13-8
msgvec Argument, 8-23
msgvec, 8-23
Loading The Software
Selecting Directories, 2-5
LOCADDR, 3-2
Local request config file, 4-1
Logging Into Privileged System Account, 2-4
MVS, 12-2
MVS File Support
DCB Parameters, 12-3
Naming Conventions, 12-2
Types of Files Supported, 12-2
Logical Record, 6-12
LOGMODE, 3-2
N
LOGON, 3-4
Logs
Remotely- initiated Transfers, 10-6
Remotely-initiated transfers, 13-1, 13-5
XCOM.LOG, 13-1
XCOMACP Log, 13-5
Index–6
NETMBX Privilege, 10-5
Network levels
diagram, 1-11
end user level, 1-10
general explanation, 1-10
CA-XCOM for OpenVMS Alpha Installation and User Guide
logical level, 1-10
physical level, 1-11
send file flowchart, 1-17
successful send file transfer over SNA network,
1-16
Network Server Assoc. Adapt, 12-16
New Message Options, 8-24
Node Name, 5-19
NODE qualifier, 4-9
Notify Local User, 6-7, 6-14, 6-20, 6-23
Notify Remote User, 6-7, 6-15, 6-20, 6-23
Novell, 12-16
Novell NetWare, 12-19
Print Report Screen
Chkpnt/Resume/None, 6-16
Print Report Screen
ASA conversion, 6-17
Copies, 6-16
Delete file after printing, 6-17
Form Type, 6-16
Hold Printing, 6-16
Notify Local User, 6-14
Notify Remote User, 6-15
Print Class, 6-16
Print Destination, 6-14
Print Title, 6-14
Queue the Request, 6-15
Remote System Name, 6-14
VAX File Name, 6-14
Wait for Remote System, 6-15
Print Title, 6-14
O
Print VAX File at Remote Computer Screen
Checkpoint Screen, 6-18
OPER Privilege, 10-5
PRINT_QUEUE qualifier, 4-10, 4-11
OS/2
Naming Conventions, 12-17
Restrictions, 12-18
Printing Errors and Recovery, 9-6
Output Message Vector, 8-2
Printing Files
Ignored Overriding Remote System Name, 9-6
Ignored Print Qualifiers, 9-6
PRIORITY qualifier, 4-10, 4-11
P
Partitioned Dataset, 12-2
PC-DOS
Configuration Issues, 12-16
Naming Conventions, 12-15
Restrictions, 12-16
PRIVILEGE qualifier, 4-10, 4-11
Privileges, 6-7
PRMMBX Privilege, 10-5
Proxy Identifiers, 10-7
Proxy-id, 10-7
UAF Command, 10-8
XCOMACP, 10-7
Performing An XCOM Transfer Function, 8-3
PGFLQUOTA qualifier, 4-10, 4-11
Q
Physical Block Size, 6-12
POLL qualifier, 4-10
Queue the Request, 6-8, 6-20, 6-24
Print Class, 6-16
Queue The Request, 6-15
Print Destination, 6-14
Print Queue
Examining, 9-5
See XQUE, 9-1
SHOW QUEUE command, 9-5
R
Receive File Menu
Index–7
Append Local File, 6-25
Chkpnt/Resume/None, 6-25
Create Local File, 6-25
File Type, 6-25
Notify Local User, 6-23
Notify Remote User, 6-23
Queue the Request, 6-24
Remote File Name, 6-22
Remote Password, 6-23
Remote System Name, 6-22
Remote User ID, 6-23
Replace Local File, 6-25
Unit Name, 6-24
VAX File Name, 6-22
Volume Name, 6-24
Wait for Remote System, 6-24
Receiving Files From Remote System, 10-10
Receiving Jobs From Remote System, 10-10
Receiving Print Requests From Remote System, 10-11
Record Length, 6-12
Redefining System-Wide, 2-13
Redefining XCOM62 Command Into DCL Table, 5-2
Reinserting, 2-14
Remote File Name, 6-7, 6-22
Remote Password, 6-7, 6-20, 6-23
Remote print Symbiont, 9-2
Remote Spooler, 9-1
Remote System Name, 6-7, 6-14, 6-19, 6-22
Remote systems
Novell NetWare, 12-19
Stratus/System 88, 12-20
Tandem, 12-22
UNIX, 12-24
Windows, 12-25
Windows NT, 12-26
Restarting XCOM$RECOVER Queue, 11-12
Return Length Address, 8-10
Returning Status Information, 8-2
Function Return Values, 8-2
Output Message Vector, 8-2
Running VMSINSTAL, 2-4
S
SCHEDULE Qualifier, 9-4
Selecting Directories, 2-5
Send File Screen, 6-6
Add Remote File, 6-9
File Type, 6-9
Chkpnt/Resume/None, 6-9
Create Remote File, 6-9
Notify Local User, 6-7
Notify Remote User, 6-7
Queue the Request, 6-8
Record Length, 6-12
Remote File Name, 6-7
Remote Password, 6-7
Remote System Name, 6-7
Remote User ID, 6-7
Replace Remote File, 6-9
VAX File Name, 6-6
Wait for Remote System, 6-8, 6-12
Send Functions Menu, 6-5
SESSADDR qualifier, 4-10, 4-11
Session numbers, 3-2
SET ACCESS Command, 3-2
SET ACCESS NAME, 3-3
Show Queue, 11-7
Remote User Id, 6-7
SNA
Configuration file, 3-4
Remote User ID, 6-20, 6-23
SNA Messages, 13-2
Replace Remote File, 6-9
SNA PU, 3-4
Resource Accounting, 10-9
SNANCP Utility, 3-2
Restart qualifier, 11-5
Software installation checklist, 2-2
Restartable Transfer Management, 11-1
Software requirements, XCOM, 2-1
Restartable Transfer Processing, 11-4
Space Requirements, 2-1
Index–8
CA-XCOM for OpenVMS Alpha Installation and User Guide
Standard features
choice of interfaces, 1-5
initiation by either computer (any-to-any), 1-5
low maintenance, 1-5
Text, 6-9
Standard functions
ASCII/EBCDIC translation, 1-5
checkpoint/restart, 1-5
compression, 1-5
remote spooling, 1-6
store-and-forward, 1-5
Transfer Functions, 8-1
XCOM$_GETFILE, 8-1
XCOM$_PRINT, 8-1
XCOM$_SENDFILE, 8-1
XCOM$_SUBMIT, 8-1
Startup
Adding XCOM 6.2 to System Startup, 2-8
STOP XCOMACP.COM, 2-14
Stopping the Print Queue, 9-5
Stratus/System 88, 12-20
Submit Job Menu
Notify Local User, 6-20
Notify Remote User, 6-20
Queue the Request, 6-20
Remote Password, 6-20
Remote System Name, 6-19
Remote User ID, 6-20
VAX File Name, 6-19
Wait for Remote System, 6-21
Submit Menu
Remote File Name, 6-20
TEXT, 13-2
TMPMBX Privilege, 10-5
Transfer types, 1-7
answering remote requests, 1-7
files, 1-7
jobs, 1-7
reports, 1-8
retrieving files, 1-7
sending batch jobs for execution, 1-7
sending files, 1-7
sending reports, 1-7
Transmission Report, 6-2
Locally-initiated Transfers, 13-3
U
UAF Command, 10-8
UNDEFINED, 5-9, 6-12
Submitting an XCOM 6.2 Transfer as a Batch Job, 7-42
Undefined Format, 8-15
Symbolic Names, 6-7
Undefined Record Format, 6-12
SYS$BATCH, 10-10
Undefined Records, 8-16
SYS$PRINT, 10-11
UNIX, 12-24
SYS$PUTMSG, 8-2
User Authorization File Command, 10-8
SYSNAM Privilege, 10-5
System/38
USSMSG10, 12-14
User Security, 10-6
Security Checking, 10-7
User Authorization File Command, 10-8
Using DECnet-VAX Proxy Identifiers, 10-7
System-Wide On-line Help Provision, 2-5
Using DECnet-VAX Proxy Identifiers, 10-7
T
Using The XCOM API Facility, 8-24
Linking A Program, 8-25
Sample Program, 8-24
USSMSG10, 12-14
Tandem, 12-22
USSTAB, 12-14
TCP/IP, 1-3
and CA-XCOM, overview, 1-13
protocol stack, 1-13
Index–9
V
Windows NT, 12-26
WORLD Privilege, 10-5
Variable Blocked Record Format, 6-12
WSDEFAULT qualifier, 4-10, 4-12
Variable Record Files, 8-15
WSQUOTA qualifier, 4-10, 4-12
Variable Records, 8-16
VARIABLE_BLOCKED, 5-9, 6-12
X
VAX File Name, 6-6, 6-14, 6-19, 6-22
VAX/VMS, 12-13
Sense Codes, 0801 or 8003, 12-13
VAX/VMS File Support, 12-11
Device, 12-11
Directory, 12-12
Filename and Type, 12-12
Node, 12-11
Version, 12-12
VAX/VMS Restrictions
8003 sense codes, 12-12
Initiating the Session Bind Request, 12-13
Multiple Session Configuration, 12-13
Need for VTAM Connection, 12-12
Non-queued host transfer, 12-12
Version, 10-9
VM, 12-4
VM File Support
DCB Parameters, 12-4
Types of Files Supported, 12-4
VMS Command Definition Utility, 5-1
VMS Operating System Upgrade
Defining System-Wide, 2-13
Inserting, 2-14
Volume Name Parameter, 6-11
VSAM, 12-2
VSE, 12-5
File Naming Conventions, 12-5
VTAM Application Name, 3-2
W
Wait for Remote System, 6-8, 6-15, 6-21, 6-24
Windows, 12-25
Index–10
XCOM 6.2 Files, 2-14
XCOM 6.2 Remote Request Handler, 4-7
XCOM Ancillary Control Process, 10-1
XCOM Command
Transmission Report, 6-2
XCOM Command Qualifiers, 5-3
/APPEND Qualifier, 5-3
/ASA Qualifier, 5-3
/BINARY Qualifier, 5-3
/BLOCKL Qualifier, 5-8
/CHECKPOINT Qualifier, 5-4
/CLASS Qualifier, 5-4
/COMPRESS Qualifier, 5-5, 6-8, 6-16, 6-21, 6-24
/COPIES Qualifier, 5-5
/CREATE Qualifier, 5-5
/DELETE Qualifier, 5-6
/DESTINATION Qualifier, 5-6
/FCB Qualifier, 5-6
/FORM Qualifier, 5-6
/FORMAT Qualifier, 5-9
/GETFILE Qualifier, 5-7
/HOLD Qualifier, 5-7
/LNOTIFY Qualifier, 5-7
/LOG Qualifier, 5-8
/MENU Qualifier, 5-8
/NOASA Qualifier, 5-3
/NOCHECKPOINT Qualifier, 5-4
/NOCOMPRESS Qualifier, 5-5, 6-8, 6-16, 6-21,
6-24
/NODELETE Qualifier, 5-6
/NOHOLD Qualifier, 5-7
/NOLOG Qualifier, 5-8
/NOPACK Qualifier, 5-10
/NOQUEUE Qualifier, 5-11
/NOTRUNCATE Qualifier, 5-15
/NOWAIT Qualifier, 5-16
/PACK Qualifier, 5-10
/PASSWORD Qualifier, 5-10
/PORT Qualifier, 5-10
/PRINT Qualifier, 5-10
CA-XCOM for OpenVMS Alpha Installation and User Guide
/QUEUE Qualifier, 5-11
/RECL Qualifier, 5-9
/REPLACE Qualifier, 5-11
/RESUME Qualifier, 5-11
/RMTFILE Qualifier, 5-12
/RMTSYS Qualifier, 5-12
/RNFLAG Qualifier, 5-12
/RNOTIFY Qualifier, 5-13
/SENDFILE Qualifier, 5-13
/SNA Qualifier, 5-13
/SUBMIT Qualifier, 5-13
/TCPIP Qualifier, 5-14
/TEXT Qualifier, 5-14
/TITLE Qualifier, 5-14
/TRACE Qualifier, 5-14
/TRUNCATE Qualifier, 5-15
/UNIT Qualifier, 5-15
/USERID Qualifier, 5-15
/VOLUME Qualifier, 5-16
/WAIT Qualifier, 5-16
XCOM$_FORMTYPE, 8-14
XCOM$_GETFILE Function, 8-1
XCOM$_HOLD, 8-14
XCOM$_LNOTIFY, 8-14
XCOM$_LOG, 8-14
XCOM$_MVSBLOCKL, 8-15
Fixed Blocked Record Files, 8-15
Fixed Record Files, 8-15
Undefined Format, 8-15
Variable Record Files, 8-15
XCOM$_MVSFORMAT_F, 8-15
XCOM$_MVSFORMAT_FB, 8-15
XCOM$_MVSFORMAT_U, 8-15
XCOM$_MVSFORMAT_VB, 8-15
XCOM$_ RNO TIFY_NONOTIFY, 8-17
XCOM$_MVSRECL, 8-16
Fixed Blocked Records, 8-16
Fixed Records, 8-16
Undefined Records, 8-16
Variable Records, 8-16
XCOM$_ RNO TIFY_WRITELOG, 8-17
XCOM$_NO_ASA, 8-10
XCOM$_ALLOCTYPE_B, 8-10
XCOM$_NO_CHECKPOINT, 8-11
XCOM$_ALLOCTYPE_C, 8-10
XCOM$_NO_COMPRESS, 8-12
XCOM$_ALLOCTYPE_D, 8-10
XCOM$_NO_DELETE, 8-13
XCOM$_ALLOCTYPE_T, 8-10
XCOM$_NO_HOLD, 8-14
XCOM$_ASA, 8-10
XCOM$_NO_LOG, 8-14
XCOM$_CHECKPOINT, 8-11
XCOM$_NO_QUEUE, 8-18
XCOM$_CLASS, 8-12
XCOM$_NO_TRUNCATE, 8-20
XCOM$_COMPRESS, 8-12
XCOM$_NO_WAIT, 8-22
XCOM$_COPIES, 8-12
XCOM$_PASSWORD, 8-17
XCOM$_DATAOPT_APPEND, 8-12
XCOM$_PRIMARY, 8-16
XCOM$_DATAOPT_CREATE, 8-12
XCOM$_PRINT Function, 8-1
XCOM$_DATAOPT_REPLACE, 8-12
XCOM$_QUEUE, 8-18
XCOM$_DELETE, 8-13
XCOM$_RESUME, 8-18
XCOM$_DESTINATION, 8-13
XCOM$_RMTFILE, 8-19
XCOM$_FCB, 8-13
XCOM$_RMTSYS, 8-19
XCOM$_FILETYPE_BINARY, 8-13
XCOM$_RNOTI FY_VMSUSER, 8-17
XCOM$_FILETYPE_TEXT, 8-13
XCOM$_RNOTIFY, 8-20
XCOM HELP*.*, 2-15
XCOM Messages, 13-2
XCOM$_RNOTIFY _ROSCOE, 8-17
Index–11
XCOM$_RNOTIFY_ CICS, 8-17
XCOM$_RNOTIFY_CICS, 8-17
XCOM$_RNOTIFY_LU, 8-17
XCOM$_SECONDARY, 8-20
XCOM$_SENDFILE Function, 8-1
XCOM$_SUBMIT Function, 8-1
XCOM$_TITLE, 8-20
XCOM$_TRUNCATE, 8-20
XCOM$_UNIT, 8-20
XCOM$_USERID, 8-21
XCOM$_VAXFILE, 8-21
XCOM$_VOLUME, 8-21
XCOM$_WAIT, 8-22
XCOM$API, 8-3
func Argument, 8-3
Function Item Codes, 8-4
itmlst Argument, 8-8
msgvec Argument, 8-23
XCOM$API Function Item Codes
XCOM$_GETFILE, 8-5
XCOM$_PRINT, 8-7
XCOM$_SENDFILE, 8-4
XCOM$_SUBMIT, 8-6
XCOM$API Function Qualifier Item Codes
XCOM$_ALLOCTYPE_B, 8-10
XCOM$_ALLOCTYPE_C, 8-10
XCOM$_ALLOCTYPE_D, 8-10
XCOM$_ALLOCTYPE_T, 8-10
XCOM$_CLASS, 8-12
XCOM$_COMPRESS, 8-12
XCOM$_DATAOPT_CREATE, 8-12
XCOM$_DATAOPT_REPLACE, 8-12
XCOM$_DESTINATION, 8-13
XCOM$_FCB, 8-13
XCOM$_FILETYPE_TEXT, 8-13
XCOM$_FORMTYPE, 8-14
XCOM$_LNOTIFY, 8-14
XCOM$_MVSBLOCKL, 8-15
XCOM$_MVSFORMAT_F, 8-15
XCOM$_MVSFORMAT_U, 8-15
XCOM$_MVSFORMAT_VB, 8-15
XCOM$_MVSRECL, 8-16
XCOM$_NO_ASA, 8-10
XCOM$_NO_CHECKPOINT, 8-11
XCOM$_NO_COMPRESS, 8-12
Index–12
XCOM$_NO_DELETE, 8-13
XCOM$_NO_HOLD, 8-14
XCOM$_NO_LOG, 8-14
XCOM$_NO_QUEUE, 8-18
XCOM$_NO_TRUNCATE, 8-20
XCOM$_NO_WAIT, 8-22
XCOM$_NOPACK, 8-16
XCOM$_PACK, 8-16
XCOM$_PASSWORD, 8-17
XCOM$_PORT, 8-16
XCOM$_PRIMARY, 8-16
XCOM$_RESUME, 8-18
XCOM$_RMTFILE, 8-19
XCOM$_RMTSYS, 8-19
XCOM$_RNOTIFY, 8-20
XCOM$_RNOTIFY_FLAG, 8-17
XCOM$_RNOTIFY_LU, 8-17
XCOM$_RNOTIFY_NONE, 8-17
XCOM$_RNOTIFY_ROSCOE, 8-17
XCOM$_RNOTIFY_VMSUSER, 8-17
XCOM$_RNOTIFY_WRITELOG, 8-17
XCOM$_SECONDARY, 8-20
XCOM$_TCPIP, 8-17
XCOM$_TITLE, 8-20
XCOM$_UNIT, 8-20
XCOM$_USERID, 8-21
XCOM$_VAXFILE, 8-21
XCOM$_VOLUME, 8-21
XCOM$EXIT01, 11-13
XCOM$IMAGE, 2-8
XCOM$IMAGE:XCOM.CLD
Modifying the XCOM 62 Command Definition
File, 5-1
XCOM$RECOVER, 11-7
XCOM$RECOVER Queue Management, 11-7
Change An Entry's Default Age Limit, 11-7
Checkpoint Filename Format, 11-6
Delete Entry On Queue, 11-7
Deleting Queue, 11-12
Manually Resuming a Checkpointed Transfer,
11-7
Restarting Queue, 11-12
Show Queue, 11-7
XCOM$STARTUP, 2-8
XCOM.CLD, 2-14
XCOM.LOG, 13-3
XCOM/GETFILE Command
Examples, 7-16
CA-XCOM for OpenVMS Alpha Installation and User Guide
Format, 7-15, 7-25
XCOM/GETFILE Qualifiers
/NOCHECKPOINT Qualifier, 7-17
/NOCOMPRESS Qualifier, 7-18
/NOWAIT Qualifier, 7-24
/REPLACE Qualifier, 7-20
/XTRACE Qualifier, 7-24
XCOM/MENU Qualifiers, 6-2
/LOG Qualifier, 6-2
/NOLOG Qualifier, 6-2
XCOM/PRINT Command
Format, 7-25
XCOM/PRINT Qualifiers
/ASA Qualifier, 7-26
/NOCHECKPOINT Qualifier, 7-26
/NODELETE Qualifier, 7-28
/NOHOLD Qualifier, 7-29
XCOM/PRINTFILE Qualifiers
/XTRACE Qualifier, 7-35
XCOM/SENDFILE Command
Format, 7-2
XCOM/SENDFILE Qualifiers
/APPEND, 7-3
/BINARY Qualifier, 7-4
/CHECKPOINT Qualifier, 7-5
/NOCHECKPOINT Qualifier, 7-5
/NOCOMPRESS Qualifier, 7-6, 7-27, 7-36
/NOQUEUE Qualifier, 7-9
/NOTRUNCATE Qualifier, 7-12
/NOWAIT Qualifier, 7-14
/RNFLAG Qualifier, 7-10
/RNOTIFY Qualifier, 7-10
/XTRACE Qualifier, 7-14
XCOM/SUBMIT Command
Examples, 7-36
Format, 7-35
XCOM/SUBMITFILE Qualifiers
/XTRACE Qualifier, 7-42
XCOM_HISTORY
exit routine input, 11-14
XCOM62015.RELEASE NOTES, 2-14
XCOM62F.EXE, 2-14
XCOM62G.EXE, 2-14
XCOM62J.EXE, 2-14
XCOM62R.EXE, 2-15
XCOMACP, 4-7, 10-1
Accounting Considerations, 10-6
Line Disconnects, 10-6
Message Logging, 10-6
Process Creation, 10-4
Process Name Format, 10-3
Processing, 10-1
Receiving File From Remote System, 10-10
Receiving Jobs From Remote System, 10-10
Receiving Print Requests From Remote System,
10-11
Resource Accounting, 10-9
Running Privileges, 10-5
Security Checking, 10-8
states, 10-2
Transmission Log, 13-5
User Security, 10-6
XCOMACP Process Creation, 10-4
XCOMACP Running Privileges
CMKRNL Privilege, 10-5
DETACH Privilege, 10-5
EXQUOTA Privilege, 10-5
GRPNAM Privilege, 10-5
NETMBX Privilege, 10-5
OPER Privilege, 10-5
PRMMBX Privilege, 10-5
SYSNAM Privilege, 10-5
TMPMBX Privilege, 10-5
WORLD Privilege, 10-5
XCOMACP.EXE, 2-15
XCOMCFG.EXE, 2-15, 4-1, 4-2
XCOMEXIT01.EXE, installing, 11-13
XCOMIP, 10-1
Process Name Format, 10-3
Processing, 10-2
States, 10-2
XCOMPRTSMB.EXE, 2-15
XCOMV20.FDL, 2-14
XCOMV24.CFG, 4-1
Xque
AS/400, 12-14
XQUE, 9-1, 9-2
Examining the Print Queue, 9-5
Ignored Print Qualifiers, 9-6
Printing Errors, 9-6
Printing Files, 9-5
Recovery, 9-6
Index–13
Remote Print Symbiont, 9-2
Startup, 9-1
Stopping the Print Queue, 9-5
XQUE Qualifiers
/BLOCK_LIMIT Qualifier, 9-3
/CHARACTERISTICS Qualifier, 9-3
/DEFAULT Qualifier, 9-3
/ENABLE_GENERIC Qualifier, 9-3
/FORM Qualifier, 9-3
/GENERIC Qualifier, 9-3
/LIBRARY Qualifier, 9-3
/NEXT Qualifier, 9-4
/NOBLOCK_LIMIT Qualifier, 9-3
/NOCHARACTERISTICS Qualifier, 9-3
/NODEFAULT Qualifier, 9-3
/NOENABLE_GENERIC Qualifier, 9-3
/NOGENERIC Qualifier, 9-3
/NOLIBRARY Qualifier, 9-3
/NORETAIN Qualifier, 9-4
/NOSEPARATE Qualifier, 9-4
Index–14
/ON Qualifier, 9-4
/OWNER Qualifier, 9-4
/PROCESSOR Qualifier, 9-4
/PROTECTION Qualifier, 9-4
/RETAIN Qualifier, 9-4
/SCHEDULE Qualifier, 9-4
/SEPARATE Qualifier, 9-4
/SETUP Qualifier, 9-4
/TOP_OF_FILE Qualifier, 9-4
/WSQUOTA Qualifier, 9-4
Unsupported Qualifiers, 9-5
XQUE Unsupported Qualifiers
/ALIGN Qualifier, 9-5
/BACKWARD Qualifier, 9-5
/DEFAULT Qualifier, 9-5
/FORWARD Qualifier, 9-5
/SEARCH Qualifier, 9-5
/SEPARATE Qualifier, 9-5
/TERMINAL Qualifier, 9-5
DEFAULT, 9-5
CA-XCOM for OpenVMS Alpha Installation and User Guide