1
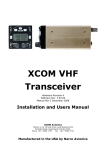
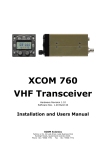
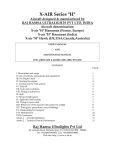
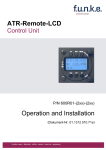
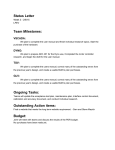
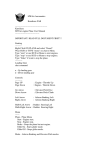
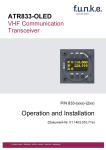
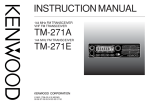
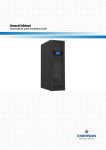
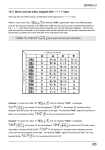
XCOM VHF
Transceiver
Hardware Revision 4
Software Revision 2.80.01
Manual Revision 2.3 June 2011
Installation and Users Manual
XCOM Avionics
Factory 4, No. 24 Leda Drive. Leda Business Park
Burleigh Heads, Queensland Australia 4226.
Phone +61 7 5568 7770
Fax +61 7 5568 7772
Table of Contents
Introduction .................................................................................................. 3
Features Overview ......................................................................................... 4
Manual Release Information ............................................................................ 5
Package Contents .......................................................................................... 6
User Manual.................................................................................................. 6
Warranty Card .............................................................................................. 6
Description ................................................................................................... 6
Front Panel Controls and Switches ................................................................... 7
LCD Display .................................................................................................. 8
XCOM Installation .......................................................................................... 9
Wiring Harness .............................................................................................. 9
Antennas ..................................................................................................... 10
Radio Frequency Hazard Information ......................................................... 10
Radio Ground Strap ................................................................................. 10
Memory Programming ................................................................................... 12
Memory Scanning ......................................................................................... 13
Setup Options .............................................................................................. 14
Introduction ........................................................................................... 14
Operation............................................................................................... 14
Antenna Information ..................................................................................... 16
Wiring Diagram – Typical Installation .............................................................. 18
XCOM VHF Transceiver Specifications July 2010 - Subject to Change .................. 19
Drilling Template .......................................................................................... 24
Master Reset to Factory Defaults .................................................................... 25
Notes .......................................................................................................... 25
Warranty Card ............................................................................................. 26
Introduction
Thank you for purchasing the XCOM VHF Transceiver. This manual describes the
operation and installation of the product. Should you have any questions that are
not answered in this manual, please contact XCOM Avionics in Australia on
+61 7 5568 7770 or +1 213 984 1237 or by email to [email protected]. There
are continual developments and changes being made to our products so XCOM
recommends checking the website for the latest edition of this manual.
The XCOM VHF Transceiver is the second of several innovative avionics products to
be released by XCOM Avionics. Based on the features of the very successful
Microair and Becker radios, the XCOM offers many advanced features previously
only available in the more expensive brands.
Originally designed in Australia, the XCOM offers superior performance under the
demanding and noisy conditions experienced in many amateur built and light sport
aircraft, warbirds and open-cockpit aircraft. With low power consumption, this radio
is also ideally suited to use in gliders, homebuilts and ultralights.
Release 2.3
© XCOM Avionics 2011
www.xcom-usa.com
Page 3
A full 6 watt carrier output ensures that you will be heard above the general chatter
in busy airspace and the voice-activated (VOX) intercom with muting music input
will enhance your enjoyment of the flight. With expanded receive frequency range
up to 163 MHz. the XCOM provides NOAA weather reception, ensuring that you are
always aware of impending weather conditions (NOAA weather only operates in the
USA).
Additional safety enhancements, such as dual watch, allow the pilot to listen to the
standby frequency while still monitoring the primary frequency. The XCOM also has
99 memory channels, large volume and channel selector knobs and well spaced
buttons. This radio is extremely easy to operate, even when wearing flight gloves
and you can even check the condition of your battery with the built in voltage
monitor. Even at voltages as low as 10 volts, the XCOM is capable of delivering 2
watts of carrier with full modulation.
Features Overview
·
Digital volume and squelch controls on front panel
·
Digital volume and vox intercom controls on front panel (same volume
squelch control, but activated by mode button when required).
·
2 place voice activated intercom, with pilot over-ride and passenger (pax)
isolate (pax can listen to CD music while pilot listens to com). Dual mode
input line for CD or second com input. CD music has auto fade, turns off if
com is receiving and reduces in volume if pilot or pax talk.
·
Remote toggle (toggle active or standby or scroll memory channels via a push
button on the stick – only available when copilot PTT is not used)
·
Transmitter (TX) timeout (stuck mic) which turns off transmitter after 30
seconds (user adjustable). TX is re-enabled by releasing and re-pressing PTT.
·
99 memory channels (10 NOAA, 1 priority 121.500 and 88 user defined
memory channels).
·
Memory channels scanning.
·
10 preset NOAA weather channels (suitable for USA only)
·
Dual Watch - allows monitoring of the active frequency while listening on the
standby frequency. The active frequency has priority.
·
User enabled wide receive mode - allows monitoring of the VOR frequencies
between 108 and 118 MHz., the normal airband up to 137 MHz. and then up
to 163 MHz., in 25 kHz. steps. All frequencies, when enabled, can be stored in
memory channels.
Release 2.3
© XCOM Avionics 2011
www.xcom-usa.com
Page 4
·
RS232 interface allowing control of radio functions and programming of
memories. Future revisions may allow upgrade of the internal firmware via
internet download. (This feature to be introduced during 2005/6)
·
Low battery alert with user selectable alert levels for under voltage (default is
11.0 vdc.) and over voltage (default is 14.5 vdc.)
·
Optional MARS / CAP capability (special order to be introduced during 2005/6
subject to FCC approvals)
XCOM Avionics reserves the right to update this manual as product enhancements
are made throughout the life of this product. The actual release number of this
manual is printed on the bottom of each page for easy reference and the latest
version can always be downloaded from the XCOM web site.
Please note that this manual is accurate for the software version denoted on the
front cover page. Features may vary between software versions and some features
may not be available in all XCOM radios.
Manual Release Information
Release
1.0
1.1
1.2
1.3
1.4
1.5
1.6
1.7
1.8
1.9
2.0
2.1
2.2
2.3
Release 2.3
Date
January 04
May 04
July 04
July 04
December 04
January 05
June 2005
July 2005
July 06
March 07
December 08
September 09
July 2010
September 11
Changes
Original draft of document
Release of manual to public
Addition of aerial safety information re: FCC Request
Addition of certification approvals FCC and FAA
Addition of new features in manual, release Version 120 software
Fixed wrong number for Low Volts page 13
Updated to Software version 120 build 0034
Spelling and grammar changes
Changes to Version 2 Software
Change to Backlight Info and Remote Head
Manual review
Manual review
Garmin Protocol release and Manual review
Manual review
© XCOM Avionics 2011
www.xcom-usa.com
Page 5
Package Contents
The XCOM is packed in an anti-static bag, for electrical protection, and enclosed in
foam within a cardboard box for protection during shipping.
The boxed contents are….
· One XCOM VHF transceiver
· User manual
· DB15 solder plug and plastic back shell
· Optional: If you purchased the optional wiring harness it will be included in
this package with installation instructions along with any other accessories.
User Manual
Please read and understand this manual BEFORE attempting to install and operate
this transceiver. The XCOM VHF has many advanced features which, if not properly
understood, could cause improper operation or damage to this product.
Warranty Card
Included in the rear of this manual is the warranty card. Please fill out your details
and return to the manufacturer’s address provided. Please don’t return the card to
your dealer. Alternatively you may fill in the warranty details online through the
website at http://www.xcomavionics.com (select warranty registration).
Description
The XCOM VHF Transceiver has a 2.25” (57mm) face for fitting in a normal aircraft
small instrument hole. The case is 5.1” (129mm) long, 2.4” (61mm) wide and 2.4”
(61mm) high. The unit is secured to the aircraft instrument panel by 4 screws and
is self supporting, requiring no additional supports, trays or brackets.
Release 2.3
© XCOM Avionics 2011
www.xcom-usa.com
Page 6
Front Panel Controls and Switches
Œ
DUAL - Press once to activate dual receive
capability. The DUAL WATCH icon will be
illuminated in the LCD Screen. Press again to deactivate.
• ON - Press for 1 second to turn the
transceiver on. Depress for 2 seconds to turn the
unit off.
Ž MODE - Activates the various different
modes. See mode section below.
• MEM - Accesses the 99 memory locations.
See memory operation sections below.
• Flip Flop (Transfer) Press to transfer the
bottom line to the top and vice-versa. The top
frequency is the active transmit channel and the
bottom line is the standby frequency. (The radio
will not transmit on either the weather or
extended receive channels.) Also used as escape
from other screens.
‘ VOL/SQH - Default is transceiver volume.
between
Rotate the control to adjust the
0 and 63. The default for normal operation is 50.
To activate the squelch, press the knob in once
and the word
will be displayed. Rotate the
control to the left to decrease and open the
squelch. Rotate to the right to increase and close
the squelch. Squelch values range from 0 to 30
with the default for normal operation around 25.
After 3 seconds of no activity the control reverts
back to volume and the screen returns to
default. These controls also adjust the intercom
squelch and volume when using the mode
buttons as described below. The correct Squelch
setting is 2 units above the static threshold.
Note: Older
radios range from
0 to 63
’ F/CH This control adjusts the standby
frequency. In normal use, rotating the control
adjusts the MHz. value. Press the control to
adjust the kHz. value. After 3 seconds of
inactivity the control will revert to MHz.
adjustment.
Emergency Frequency – Press both ‘ and ’
buttons together and you will automatically
activate the emergency frequency 121.5 – press
the flip/flop to exit.
Release 2.3
© XCOM Avionics 2011
www.xcom-usa.com
Page 7
The rear of the radio has
Œ
RS232 Port for external connection
with external systems and additional
external control over the radio
•
DB15 pin plug for connection of the
wiring harness
Ž
BNC fitting for the antenna connection
•
Case grounding screw
LCD Display
TX (Transmit) Icon indicates that the unit
is transmitting. Note that after 30
seconds (default timeout) the unit will
automatically cease transmitting to
guard against a stuck or faulty PTT
switch.
RX (Receive) Icon indicates that a signal
is being received. Note that if the
squelch is fully opened (set at 0) then
the unit will continually receive either a
weak background signal or static/noise.
DUAL WATCH Lights up when the dual
watch button function is activated
LOW BATT indicates that the battery
voltage is low. A flashing icon indicates
that an over voltage situation exists.
MEM Indicates functions of the memory
modes. Please see below for additional
explanation.
Middle Line Displays the active frequency
Bottom line Displays the standby
frequency and other status text.
Release 2.3
© XCOM Avionics 2011
www.xcom-usa.com
Page 8
XCOM Installation
The XCOM VHF Transceiver installation is straight forward and requires no special
skills. However installation of the wiring harness should be undertaken by a suitably
qualified person with the appropriate skills and test equipment. It is our
recommendation that owners purchase the factory manufactured wiring harness or
have a local avionics repair or maintenance facility install the XCOM for you.
When positioning the radio, ensure that the controls are within easy reach of the
pilot and in a suitable viewing angle when the pilot is sitting and secured in the
pilot’s seat. To mount the radio, position the supplied template on your panel and,
when satisfied with the location, drill and cut through the template in the marked
positions. The face hole is a standard 2.25” inches and the 4 securing holes are
drilled 5/32”.
Please check behind your panel for other components which may be damaged
during drilling.
The radio is mounted by insertion into the panel from the rear and is secured in
place by the 4 mounting screws supplied. Replacement screws are #6-32, ½” long.
Do not use longer screws as these may contact internal components and cause
damage to the unit.
Wiring Harness
The wiring harness is the most critical part of the installation and is where most
owners have difficulty. If you are unsure of how to complete this task, please seek
the advice of a qualified person or have the unit installed professionally. To assist
with installation a custom harnesses may be ordered direct from XCOM.
If you decide to manufacture your own harness, please refer to the web site for
advice, techniques and wiring diagrams to assist you.
The following are some basic tips to get you started:
·
·
·
·
·
·
·
·
Only use aircraft quality Tefzel wire. This wire is specially manufactured for
use in aircraft with high quality insulation which will not create harmful
vapors in the event of a fire.
Use 18 gauge (AWG) wire for all power supply connections
Use wide braided wire for the grounding strap connected to the unit case
Other wires should be 22 gauge and shielded if required.
The antenna lead wire should be made from 50 ohm coaxial cable, we
recommend RG400 wire.
Use high quality switches for toggle and PTT
Use aviation quality headset and mike jacks (these are available from most
aviation suppliers or from our XCOM web site)
Most importantly – Follow the directions, use proper tools and supplies and if
not sure…. Ask.
Release 2.3
© XCOM Avionics 2011
www.xcom-usa.com
Page 9
Antennas
Correct operation of the transceiver requires a properly installed antenna suitable
for the frequency range from 118 to 137 MHz. On any new radio (or antenna)
installation, the VSWR of the aerial should be checked. The antenna VSWR should
preferably be no higher than 1.5:1 at the center of the aircraft COM band (127.2
MHz.). While no damage to the transceiver will occur with VSWR’s of 3:1, some
degradation in performance must be expected. There is more information on
antennas in the rear of this manual and on our website, do NOT transmit without an
antenna connected because it will damage the radio.
Radio Frequency Hazard Information
Regulations require a safe working distance between the pilot, copilot, passengers,
or the general public of at least 68 cm (27 inches) from the antenna location. If an
antenna gain of greater than 5.6 dBi is to be used, the antenna manufacturer
should be contacted to determine the minimum safe distance.
Radio Ground Strap
To prevent RF leakage into the radio, ensure that the radio chassis is well
grounded. Use a wide braided wire for the ground strap connected to the unit case
to ensure that a wide band of RF is grounded, which will prevent RF feedback from
entering the radio and causing squeals or other noise when transmitting.
Operating your XCOM Transceiver
On - To switch the unit on simply depress the ON button for one second. To switch
the unit off, hold the button in for 2 seconds. When power is applied, the
transceiver will start up in whatever mode it was in when power was last removed.
That is, if the unit was turned on when the power was removed, by turning off the
aircraft avionics or master switch, then when power is restored, the unit will again
switch on. If the unit was turned off when the power was removed, then the unit
will remain off when power is re-applied.
MODE - This is the main menu button for selecting various user options and for
displaying the voltage. Mode selections are cycled by depressing the MODE button
momentarily. To return to standard operation, press the Flip/Flop (ô)button.
There are 6 Modes:
IntVol
Intercom Volume. Rotating the VOL/SQH control will increase or
decrease the intercom volume.
IntSQH
Intercom Squelch Rotating the VOL/SQH control will increase or
decrease the intercom squelch.
VoR On
Receive VOR (audio only) This setting allows reception in the frequency
range 108 to 117.975 MHz. Push the F/CH knob to toggle the option
between On & Off. Rotating the F/CH knob clockwise accesses the
General Coverage option.
Release 2.3
© XCOM Avionics 2011
www.xcom-usa.com
Page 10
Gen On
General Coverage option is enabled. This extends the receive range
from 137.00 to 163 MHz. The receive sensitivity is reduced above 150
MHz. above 137 MHz. the radio will receive in FM rather than AM. This
enables monitoring of the popular Amateur 2 meter band and marine
frequencies. Push the F/CH knob to toggle the option between on & off.
Rotating the F/CH knob anti-clockwise will return to the VOR option
screen.
VoLTS
Shows the current voltage.
Sidevol
Adjusts the level of sound you hear through the headsets when
transmitting (sidetone). Generally this does not need to be adjusted
from the factory default value.
ScanCH
Adjusts the number of memory channels to scan when memory
scanning is activated. Note that the priority channel 0 (121.500) is
always scanned.
MEM - Press this button once to access the 99 memory channels. The memory
channels are displayed with the channel number on the bottom line and the stored
frequency on the top line.
When accessed for the first time, the memory channel will show the priority or
emergency frequency 121.500 MHz. as this is stored as a factory default in memory
location 0. Subsequent returns to the memory screens will show the last accessed
memory channel.
Memory locations are cycled by rotating the F/CH knob. Only those locations which
have frequencies stored will be displayed. The top 10 memory channel locations,
(channels 90 through 99), contain the NOAA weather frequencies for use within the
United States, there are displayed as channels NOAA 1 to 10. Channels 1 to 5 may
be pre-stored with tuning frequencies used when your radio underwent quality
control and tuning. These may be overwritten at any time.
While in the memory screen, pressing the PTT will transmit on the current memory
frequency. Pressing and holding ô for 2 seconds will enter the current memory
channel into the active frequency of the radio and exit memory mode. Pressing ô
momentarily will simply return you to the default screen with no memory channel
loaded.
For details on how to program the memory channels, please refer to the memory
programming section below.
DUAL - When in the default screen, this button enables the dual watch function,
indicated by the DUAL WATCH icon.
When this function is active, the transceiver will receive on the standby frequency
and intermittently check the active frequency for activity. If a signal is received on
Release 2.3
© XCOM Avionics 2011
www.xcom-usa.com
Page 11
the active frequency, the transceiver automatically switches to that frequency.
When the signal ceases, the unit returns to the standby frequency and continues
scanning the active.
Transmission is only available on the active frequency so care must be taken not to
attempt to reply to a signal received on the standby frequency. To distinguish
between signals received on the standby frequency, the MHz./kHz. separator will
flash. No flashing will occur when receiving on the active frequency.
Note: When receiving on the standby frequency a slight clicking sound may be
heard intermittently. This is the scanning sound as the transceiver momentarily
checks the active frequency and is normal in this mode. This also serves as an
audio indication that any received station is on the standby frequency. In Dual
Watch mode make sure the squelch is set 2 units above the static otherwise it may
not work correctly, if static is heard on setting 21 then correct squelch setting is 23.
Holding the MODE button for 5 seconds while in the default screen will reset the
unit back to factory default settings. Memory channels will be retained but all other
settings will revert to the factory defaults. Upon successful reset, the screen will
show reset and the unit will turn off. Turn the unit back on by pressing the ON
button.
Flip Flop button (ô) – Pressing this in the default screen will swap the active and
standby frequencies. When in MEM mode, pressing and holding it down for 2
seconds will transfer the currently displayed memory channel to the active
frequency in the default screen. In all other instances, this button serves as an exit
button to return to the default screen.
Memory Programming
Introduction - The XCOM has 99 user programmable memory channels, stored in
non-volatile memory. The memory channels can be programmed via the keypad or
via the RS232 data link (using the serial port and Windows based software). This
section deals with the keypad entry method. Refer to the xcomavionics.com website
for software downloads and RS232 interface details.
Operation – To program the currently active frequency into a free memory channel,
simply press and hold the MEM button for 3 seconds while in the default screen.
The memory program screen will appear and the MEM icon will flash.
The display will show the frequency
being entered and the first free memory
channel. If all memory channels are
occupied, then channel 1 will be selected
and the currently stored frequency will
be shown. Press MEM again to
overwrite the current frequency with the
newly entered frequency.
Release 2.3
© XCOM Avionics 2011
www.xcom-usa.com
Page 12
The selected memory channel can be altered by rotating the F/CH knob. If a
channel is already occupied, the currently stored frequency will be shown. To
overwrite an occupied channel, press the MEM button. Channels 0 and 90 through
99 cannot be selected as these are preset with the priority and NOAA weather
frequencies respectively.
Pressing the F/CH knob scrolls between memory channel selection and frequency
adjustment. The selected item flashes to indicate adjustment. Rotate the F/CH
knob to adjust the selected item up or down.
To store the frequency in the currently selected memory channel, press and hold
the MEM button for 2 seconds. The display will show
to indicate
successful entry.
To exit the memory programming screen, press ô.
Clearing Memories – To erase all memory channels, excluding the Priority and NOAA
weather channels, turn off the unit by holding the ON button for 2 seconds and
then, while holding the MEM button, turn the unit on by pressing the ON button.
The display will show Erased and then return to the default screen and all memory
channels will be reset.
To clear individual channels, enter memory programming mode and adjust the
channel MHz. value down below the lowest available MHz. value (108 MHz. if VOR
Receive is activated or 118 MHz. if VOR Receive is deactivated). The word CLEAR
will appear in the display.
Press and hold the MEM button for 2 seconds. The display will show
the channel will be cleared.
and
To exit the memory programming screen, press ô.
Memory Scanning
Introduction - The XCOM has 99 user programmable memory channels, stored in
non-volatile memory. These channels can be scanned sequentially. If a signal is
received in a channel, the scanning is paused. Scanning resumes 3 seconds after
the signal is lost.
Starting Memory Scan – While viewing memories (see MEM section above), press the
F/CH knob to start memory scanning. The number of channels scanned is
determined by the ScanCH setting. This can be altered in the MODE as detailed
above. Note that the Priority channel (CH 0) is always scanned.
Setting a ScanCH value of 10 indicates that the first 10 memory channels will be
scanned, in addition to the Priority channel. The indication of the unit memory
channel scanning is confirmed in the XCOM display as it quickly cycles through the
selected memory channels.
Release 2.3
© XCOM Avionics 2011
www.xcom-usa.com
Page 13
Stopping Memory Scan – Pressing the F/CH knob a second time will cease scanning.
Scanning will also be terminated if a PTT is pressed or if the MODE button is
pressed.
Setup Options
Introduction
These advanced options should be modified only by experienced users.
Modification of these options affects the way in which the XCOM operates, the
features available, and may affect the performance of the unit. These options
should not be modified in flight.
Operation
To access the setup screens, turn the unit off using the ON button and, while
holding the DUAL and MODE buttons, turn the unit back on using the ON button.
The current software version, , will be displayed for a few seconds and then the unit
will enter the setup mode.
The following setup modes are cycled by pressing the F/CH knob:
·
·
·
·
·
·
·
·
·
·
Side
HiVolts
LoVolts
Stuc
Gain
Ptt2
Input
RHEAD
nOAA
Serial
Enables or disables sidetone
Sets the alarm value for hi volts
Sets the alarm value for low volts
Sets the stuck mike (transmit) timeout value
Adjusts the microphone gain
Selects the copilot PTT mode
Selects the line input mode
Activates the RS232 Port to control the Remote Head
Activates or disables the NOAA weather channels
Selects XCOM or Garmin serial mode
Exit setup at any time by pressing the ô button.
Side
Option
On or Off
This selects the sidetone on or off (Default is on).
Disabling the sidetone reduces power consumption by disabling the
headset amplifier during transmission. This is particularly useful
when the unit is used in gliders or other battery powered
installations. When Sidetone is selected off, no voice is heard
during transmission.
Rotate the F/CH control to toggle the setting on or off.
Release 2.3
© XCOM Avionics 2011
www.xcom-usa.com
Page 14
hivolts
This setting determines the point at which the LOW BATT icon
begins to flash. The default value is 14.5 volts.
If the power supply raises above this value, the LOW BATT icon will
illuminate and flash.
Rotate the F/CH control to set the value.
lovolts
This setting determines the point at which the LOW BATT icon
illuminates. The default value is 11.0 volts.
If the power supply reduces below this value, the LOW BATT icon
will illuminate.
Rotate the F/CH control to set the value.
Stuc
Option
10 to 60
Default 30
This setting determines the timeout period for a long transmission.
The default value is 30 seconds.
If the PTT is held for a period longer than this value, the unit will
automatically cease transmission. This feature reduces the effect
of a PTT switch or wiring failure by limiting the time that the unit
can transmit continuously.
Rotate the F/CH control to set the value.
Gain
Option
10 to 63
Default 25
This setting adjusts the microphone gain. The default value will be
set when the unit undergoes tuning prior to shipment and may
vary slightly from unit to unit.
This setting should only be modified by a suitably qualified
technician as transceiver performance will be affected.
Rotate the F/CH control to set the value.
Ptt2
Option
On or Off
This setting determines the mode of operation of the copilot PTT
switch. The default is on.
In a single place aircraft, in helicopters or in aircraft where only
one PTT switch is required, the copilot PTT can be used to toggle
active and standby frequencies, in the default screen, or to cycle
through memory channels, when in the MEM screen. When the
PTT2 setting is on, the copilot PTT is active and when this setting is
off, the copilot PTT acts as a toggle switch.
Rotate the F/CH control to toggle the setting On or OFF.
Input
Option
CD or Rad
This setting determines the mode of operation of the line input
audio. The default is CD.
The line input can be used as a second communication input or as
Release 2.3
© XCOM Avionics 2011
www.xcom-usa.com
Page 15
a music or compact disc input. When CD mode is selected, the
input volume will fade as the pilot or copilot talks and the input will
be muted as a signal is received on the radio. When Radio mode is
selected, this fade and mute feature is disabled. Note: Music input
will only work when intercom is switched ON
Rotate the F/CH control to toggle the setting to CD or RAD.
RHEAD
Option
On or Off
NOAA
Option
On or Off
SERIAL
Option
nOR or GAR
This setting turns the RS 232 port on or off to control either the
remote head or the remote module interface.
This setting turn the NOAA weather frequencies on or off. NOAA
weather frequencies are only available in the USA.
This setting selects either XCOM serial mode or Garmin serial mode
Rotate the F/CH control to toggle the setting to NOR or GAR.
Antenna Information
The XCOM Transceiver is a state-of-the-art product and requires a quality, matched
antenna to provide the best possible performance, clarity and range. Some of the
most important considerations are the location of the antenna, proper installation
and high quality cable and connectors.
The most suitable location for the antenna is generally on top of the aircraft in a
location which can provide the best unobstructed line-of-sight view of the
surrounding areas. The antenna should be positioned so as to provide the
maximum clearance from obstacles and other antennas on the aircraft to limit
reflection and cross talk interference. In particular, position the antenna as far as
reasonably possible from high power transmitter aerials, such as that of the
transponder.
To provide the best performance from your antenna, a suitable ground must be
established. Without an adequate ground, transmission patterns may be difficult to
predict and performance will be significantly reduced. On metal aircraft with
certain antennas it is necessary to remove the paint from the inner surface to
provide a good metal-to-metal contact with the aircraft’s skin. On composite
aircraft it is necessary to install a ground plane unless already installed by the
aircraft manufacturer or unless using a dipole antenna.
Where the antenna requires a ground plane, the ground plane should be at least
20” (500mm) diameter or larger. Best performance will be gained with a large
ground plane. In composite aircraft, it is generally possible to epoxy or RTV
(silicone) a thin piece of aluminum sheet inside the structure to provide an
adequate ground plane.
Release 2.3
© XCOM Avionics 2011
www.xcom-usa.com
Page 16
Ground plane independent antennas are suitable for use with the XCOM. However,
in our experience, a fully grounded antenna with a large ground plane provides
superior performance.
Antenna construction is also a factor in determining the best installation. Most VHF
antennas used on sport aircraft are ¼ wave whip type antennas made from either
metal or fiberglass. The cheaper wire whip antennas are prone to deformation and
bending in flight and this impacts the tuned characteristics, reducing performance
of the radio installation. The enclosed fiberglass antennas generally do not suffer
this shortfall.
As a result, many of the more expensive antennas provide far greater receive and
transmission ranges due to their broad bandwidth characteristics.
Most antennas sold today are pre-tuned to the middle of the aircraft frequency
communications band. Although they provide adequate performance, these
antennas are generally not optimum for every installation as the characteristics
mentioned above vary in every aircraft. We therefore recommended that a SWR
test be performed at 118.000 MHz. and 137.00 MHz. and the antenna tuned to try
and get the SWR reading as low as possible at both of these frequencies. An ideal
VSWR reading should be below 1.5:1 but any value up to 3:1 is still considered
acceptable, do NOT transmit without an antenna connected because it will damage
the radio.
Finally, try to keep the antenna cable as short as possible and keep it clear of other
interference producing wiring such as electrical cables, strobe supplies, other
antenna cables and the like. Never coil excess cable, always cut the antenna cable
to the shortest possible length.
Release 2.3
© XCOM Avionics 2011
www.xcom-usa.com
Page 17
Wiring Diagram – Typical Installation
Release 2.3
© XCOM Avionics 2011
www.xcom-usa.com
Page 18
XCOM VHF Transceiver Specifications July 2010 - Subject to Change
·
·
·
·
·
·
·
·
·
·
·
·
·
·
·
·
·
·
·
·
·
·
·
·
·
·
·
·
Approvals: FCC, FAA, Finland CAA
Tested to TSO C37d and C38d, environmental DO-160D
Receiver Class D
Transmitter Class 4
Note: transceiver was designed to these specifications and meets and
complies with these, but has not yet been submitted for official TSO testing
118.000 to 136.975 MHz, 760 channels transmit and receive (AM) receiver
sensitivity AM (118 – 136.975 MHz.): not less than 12 db SINAD for 1.5 uv
(30% AM at 1 kHz. audio)
160 to 163 MHz. NOAA weather channels receive
137 to 163 MHz. general coverage receive, receiver sensitivity FM (137 – 163
MHz.): Not less than 12 db SINAD for 0.7uv (±3.3 kHz. deviation at 1 kHz.
audio) Typically 12dB SINAD @ 0.5uv
108 to 117.975 VOR receive only audio (no nav) receiver sensitivity AM (108
– 117.975 MHz.): Not less than 12db SINAD for 2.0 uv (30% AM at 1 kHz.
audio)
140 to 144.00 MHz. CAP capable (on request – subject to FCC approval)
Quasi alphanumeric display - 2 line backlight LCD
Backlighting - LCD display and keypads
Memories - 99 user definable memories, non volatile (no battery required)
Transmit power – 5.5 Watts (+ 1dB / - 0.5 dB) into 50 Ohms (5.9 watts
nominal). Approximately 2 watts emergency operation (10 volts input)
Modulation – High level amplitude modulation with a maximum modulation
depth of 80%
Transmit timeout 30 seconds default (user selectable)
Microphones - Electret > 100mv into 200 ohm
Intercom: 2 place voice activated (vox) with CD music input
Auxiliary input for CD/MP3 music system max 1 volt p-p into 600 ohm
Input voltage - 13.8 vdc (8 to 16 vdc receive, 10.0 volts transmit, reduced
output)
Current consumption - < 140ma receive (muted) with no intercom. <2.5
amps transmit
2.2 amps transmit nominal
Voltage alert - low battery indication, user definable (default 11.0 vdc)
Voltage alert - high battery indication, user definable (default 14.5 vdc)
Operating Temperature range - -20 to +55 °C (emergency -40 to + 85 °C
with reduced performance)
Speaker audio output - @ 13.8 Vdc: > 3 Watts rms into 8 Ohms @ 10% thd
RS232 programming port for downloading memory channels and operating
parameters etc. from a PC. Also used for software upgrades
Optional remote control module allows PTT operated frequency selection, dual
watch and memory channel operation.
Release 2.3
© XCOM Avionics 2011
www.xcom-usa.com
Page 19
Certification
800 Independence Ave, SW
Washington, DC 20591
U.S. Department
of Transportation
Federal Aviation
Administration
JUL 0 8 2004
Mr. Andy Leimer
Federal Communications Commission Equipment
Authorization Branch 7435 Oakland Mills Road
Columbia, Maryland 21046
Dear Mr. Leimer:
The Federal Aviation Administration's ATC Spectrum Engineering Services, has reviewed the type
Acceptance Certification request from X-Air Australia for the XCOM 760VHF transceiver ID
number QLDXCOMVHF. The technical data for this equipment is consistent with the spectrum
requirements and we have no objections to certification of this device.
If you have any question, please contact Mr. Donald Nellis, Spectrum Planning and International
Office at (202) 267-9779.
Sincerely,
George K. Sakai
Director, ATC Spectrum Engineering Services
Release 2.3
© XCOM Avionics 2011
www.xcom-usa.com
Page 20
TCB
TCB
GRANT OF EQUIPMENT
AUTHORIZATION
Certification
Issued Under the Authority of the
Federal Communications Commission
By:
Curtis-Straus LLC
527 Great Road
Littleton, MA 01460
United States
Date of Grant: 07/12/2004
Application dated: 07/12/2004
X-Air Australia
4/24 Lead Drive
Leda Business Park, Burleigh Heads
Queensland, 4220
Australia
Attention: Micheal Coates, Company Director
NOT TRANSFERABLE
EQUIPMENT AUTHORIZATION is hereby issued to the named GRANTEE,
and is VALID ONLY for the equipment identified hereon far use under
the Commission's Rules and Regulations listed below,
FCC IDENTIFIER:QLDXCOMVHF
X-Air Australia
Name of Grantee:
Equipment Class: Licensed Non-Broadcast Station
Transmitter
Notes:
VHF Aircraft Transceiver
Grant Notes
FCC Rule Parts
87
Frequency
Range (MHZ)
118.0 –
136.975
Output
Watts
Frequency
Tolerance
Emission
Designator
5.9
30.0 PM
6K00A3E
Power listed is at the antenna terminal
Release 2.3
© XCOM Avionics 2011
www.xcom-usa.com
Page 21
Release 2.3
© XCOM Avionics 2011
www.xcom-usa.com
Page 22
EMC Technologies (NZ) Ltd
Test Report No 40327.1
Report date: 2nd April 2004
6.
COMPLIANCE STATEMENT / ATTESTATION
Testing of the Xcom 760 VHF Aircraft Transceiver complies with the Code of Federal
Regulations (CFR) 47 Part 87 - Aviation Services and (CFR) 47 Part 15 -Radio Frequency
Devices.
This report describes the tests and measurements performed for the purpose of determining
compliance with the specification with the following conditions:
The client selected the test sample.
The report relates only to the sample tested.
This report does not contain corrections or erasures.
Measurement uncertainties with statistical confidence intervals of 95% are shown below test
results. Both Class A and Class B uncertainties have been accounted for, as well as influence
uncertainties where appropriate.
In addition this equipment has been tested in accordance with the requirements contained in the
appropriate Commission regulations.
To the best of my knowledge, these tests were performed using measurement procedures that are
consistent with industry or Commission standards and demonstrate that the equipment complies
with the appropriate standards.
I further certify that the necessary measurements were made by EMC Technologies NZ Ltd,
47 MacKelvie Street, Grey Lynn, Auckland, New Zealand.
Andrew Cutler
General Manager
EMC Technologies NZ Ltd
Release 2.3
© XCOM Avionics 2011
www.xcom-usa.com
Page 23
Drilling Template
NOTE: Please check that this template has not
changed size during printing !
Each radio shipped is supplied with a removable
template sticker which can be used for the
XCOM’s installation.
If you have this diagram in a small booklet
then it is not to scale !
2.
62
5”
D
ia
Standard Cutout for XCOM Radio
D
45
eg
# 27 Drill
9/64” Drill
3.5 mm Drill
2.3125” Dia
Release 2.3
© XCOM Avionics 2011
www.xcom-usa.com
Page 24
Master Reset to Factory Defaults
The XCOM VHF transceiver is quite an advanced product with many owner
adjustable features. It is our experience based on some of the returns for repair
that customers sometimes get lost in all of the adjustable settings and sometimes
make the radio inoperable because of their changes. We have implemented a
Master Reset to factory defaults to return the radio to the same settings that left
our production line with.
Step 1, remove the headset jacks from both the pilot and co-pilot positions, this is
vitally important otherwise when the radio resets it will have the wrong audio levels
present and the intercom will not work.
Step 2, press and hold the mode button in for five seconds until the display shows
the word reset, after this the radio will automatically turn itself off. Using the on
button turn the radio back on and then plug in your headsets again. This will have
returned the radio back to the factory default settings.
Notes
Release 2.3
© XCOM Avionics 2011
www.xcom-usa.com
Page 25
Warranty Card
"- - - - - - - - - - - - - - - - - - - - - - - - - - - - - - - - - - - - - - - - - - - - - - - - - - -
XCOM Avionics
Factory 4, No. 24 Leda Drive. Leda Business Park
Burleigh Heads, Queensland Australia 4226.
Phone +61 7 5568 7770 Fax +61 7 5568 7772
Or fill in the online warranty card at http://www.xcomavionics.com
Owners Name
Address
City
State
Zip
Email Details
Country
Model
Date of
purchase
Supplier
XCOM VHF
Serial No.
To provide you with better customer service and future update options on our products, please return the warranty card to the
address above. Please do not return this warranty registration to your dealer. The warranty details may also be completed
electronically through the web site http://www.xcomavionics.com
We look forward to hearing of your experiences with the XCOM range. Should you have any questions regarding the installation,
operation or performance of this product, please visit our web site or email [email protected] for a prompt reply.
Regards Michael Coates and the XCOM Team
Warranty Information
The XCOM warranty coverage commences from the date of purchase for a period of 12 calendar
months if the faulty radio is returned with proof of purchase and the warranty card has been
completed & returned to XCOM Avionics at time of purchase. If the customer is building an aircraft
the warranty may be extended until the date of first flight plus 12 months with a maximum period of
12 months from date of purchase till the first flight.
Radio returns will only be approved after correspondence with our technicians as most reported
problems are usually with the customers’ installation and not the actual radio itself, email
[email protected] our technical staff will issue you with a RGA (Returned Goods Authorization);
without these details we will not accept your radio. These details will include information on how to
return the faulty radio by the quickest method at the lowest cost.
XCOM Avionics will not accept freight charges, import taxes or customs fees for products returned
other than by our instructions. XCOM Avionics is limited to repairing or replacing the product at our
discretion without charge to the customer. The customer will be liable for any transport costs to
return the faulty product for repair. XCOM Avionics reserves the right to redirect the faulty product
to a local service centre.
This warranty does not cover failures due to abuse, misuse, accident or unauthorized repairs or
alterations carried out by a non approved XCOM service centre; it does not cover water damage.
In no event shall XCOM Avionics be liable for any incidental, special, indirect or consequential
damages, whether resulting from the use, misuse or inability to use this product or from defects in
the product.
Please retain this manual for future reference
Release 2.3
© XCOM Avionics 2011
www.xcom-usa.com
Page 26