1
Atari System V
Developer's Guide
1991
Atari Computer Corporation
Sunnyvale, CA 94089-1302
Copyright Notice
All rights are reserved. You may nor reproduce, transmit, transcribe, store in a
retrieval system, or translate into any language or computer language, in any
form or by any means, electronic, mechanical, magnetic, optical, chemical,
manual, or otherwise, any part of this publication wil/wur the express written
permission of Atari Company.
Trademarks
Atari, the Atari Logo, ST. IT, IT/030 are trademarks of Atari Corporation.
Ethernet is a trademark of Xerox Corporation
GEM is a trademark of Digital Research Inc.
NFS is a trademark of Sun Microsystems, Inc.
OSF/Motifis a trademark of The Open Software Foundation
STREAMS is a tradenwrk of AT&T Corporation
UNIX is a registered tradenwrk of AT&T Corporation
VT100, VT200 are trademarks of Digital Equipment Corporation
WISh2 is a trademark of Non Standard Lagics
XFaceMaker2 is a trademark of the Open Software Foundation
X Window System is a trademark of the Massachusetts Institute of Technology
Disclaimer
Atari Corporation makes no representations or warranties regarding the contents
of this document. We reserve the right to revise this docwnent at any time without
notice and without obligation 10 notify any person of such revision or change.
Contents
Overview
.. i
Atari System V Release Package
ii
How This Guide Is Arranged
ii
iii
Using ll1is Guide .
Adding a New Disk Drive .
iii
Font Conventions And Symbols
iii
Chapter l
Installation
Unpacking
l-1
Required Hardware
1-1
Hardware Installation
1-2
System Installation ..
1-2
References .
1-5
Chapter 2
Interacting with the Atari System V Graphical Interface
Logging-In to the System
2-1
W!Sh2 Windowing Shell
Mouse Duuons
.
2-1
. . . . . . . . . .. .
Getting Help
. . . . . . . . .. . . . . .... . . . . . . .
.. ...... . .. ... . ... .. . .. . . . . . . . .. . . .. .. ... .
2-1
2-2
Changing Your Password
2-2
Language Applications ....
2-3
Changing Console Settings .
2-4
Console Configuration Window
2-4
Screen Saver
Keyboard Adjusunents
Bell
...................
.
.
.
.
.............. .
. . .
.
.
.
.
. . . .
.
.
.
.
•
.
2-5
.
2-5
2 -5
Mouse
2-5
Key Click ...
2-6
Button Panel
2-6
Menu Dar.
2-6
References ...
2-6
Chapter 3
Administrative Tasks
Overview .
3-1
Accounts and Groups
3-1
System Accounts
3-l
System Groups
3-1
Superuser Account
3-2
iii
Contents, continued
User Accounts .
3-3
Seuing Account Passwords ...................... . .......... .
Security
3-5
3-6
System Backups
3-6
3-6
Before Backup .
3-7
3-10
Backup Commands
System Environment .
Setting lhe Date and ·nme ..
System Processes
.
.
.
.
.
.
.
.
.
.
.
.
.
. .
.
.
.
•
.
. . • . . . . • . . .
. . . . • . • . • . .
.
.
.
.
.
.
•
.
.
.
.
.
.
.
.
.
.
. •
.
.
.
.
.
.
.
.
.
. ......... 3-11
3-13
Run Levels .
Localization and Internationalization
Installing a New Application . .
3-13
Installing a New Icon
X Window System Session Management . . .
3-14
3-15
Preference Files
3-15
Command Shells
3-15
3-16
File Systems ......
3-19
3-21
Maintaining File Systems
Peripheral Devices .
Serial Port Configumtion .
3-22
Serial Port Management
3-22
3-22
3-23
Port Monitor ..
TI Port Monitor Configuration . .
Serial Port Printer Configuration .
....
.
.
.
.
. . .
.
3-24
Adding a New Terminal Type ...............
3-24
3-24
3-26
Serial Port Modem Connection and UUCP System Support
Specifying a Connection Method to a Remote Machine
Adding a New Disk Drive ..
3-27
System Rcconfigumtion
3-33
Rcconfigumtion Details .
3-37
3-39
Changing the Boot Preference .
3-40
TOS Boot Preference . .
Atari System V Boot Preference . .........
References
Chapter
iv
3-11
3-11
4
.
3-41
3-41
Application Development
Overview .
4-1
Application Development Libmries
4-1
Contents, continued
'lools
4-2
Programming no!Cs
4-2
4-3
Internationalized Application Development ..
Adding a Language to the System Environment
4-4
.
Application Implementation Guidelines
4-6
Atari Library
4-6
Atari Library Routines
4- 9
Application Packaging
4-10
Device Drivers ..............
Adding a Device Driver
.. . 4-11
.
..........
4-12
.
Porting TOS/GEM Applications ..............
4-13
Porting By Means Of XFaceMaker 2
4-13
Forms and Windows
4-13
Main Loop
.
.. .
.
.
.
.
.
.
..
.
4-14
.
References .
Appendix 1
Changes
4-15
Atari-Specific Manual Pages
. . . .
.
.
. . .
. . .
.
.
.
.
.
.
.
.
•
A-1
.
Additions ......................... .
A-1
Omissions
A-2
Appendix B
Boot Text
Boot Text Output to UJC Console
B-1
.
.
.
.
.
.
.
.
.
.
.
.
.
.
.
.
. .
.
.
.
.
.
.
.
.
.
.
.
B-1
Appendix C
References
C-1
Appendix D
GEM/XIib Equivalents
D-1
Appendix E
Atari Enhancements to Internationalization Standards . . ... . E-1
List of Figures
Figure 2-1
W1Sh2 Shell .
2-2
Figure 2-2
Console Settings Window
2-4
Figure 3-1
Product Installation Window
Figure 3-2
Progress Window . . . . . . . . . . . . .
.
. . . .
. .
.
.
•
3-14
.
3-14
Figure 3-3
File T ree Structure
Figure 3-4
File System Administration Window.
3-19
3-19
.
.
.
.
.
.
.
.
.
Figure 3-5
UFS File System Options
Figure 3-6
NFS File System Options
Figure 3-7
File System Check Window . .
.
. .
.
.
.
.
.
.
.
.
.
•
.
.
.
.
.
.
.
.
.
.
.
.
. .
3-17
3-19
. .
.
.
.
. . . .
Figure 3-8
Kernel Configuration Window .
.
.
Figure 3-9
Modules Window .
.
. . .
. . .
. .
.
.
.
.
. . . .
.
. . . •
.
..
. . . . . . • .
..
.
.
.
. •
.
.
. .
Figure 3-10
Paran1s Window
Figure 3-11
Parameter Change Dialog Box................
.
.
.
.
.
.
•
.
.
•
3-21
.. ..... 3-34
... ....
.
.
.
.
.
.
.
3-35
.
3-36
3-37
List of Tables
vi
Table 2-1
Mouse Buttons and Activities ..
2-2
Table 3-2
System Groups
3-2
Table 3-3
Active System Processes
Table 3-5
Peripheral Devices . . . .
Table 3-6
UCCP Database Files
.
............................ 3-12
. . . .. ..... .... ...... ....... 3-22
. . . .
. . . . .
Table 4-1
Alari System V Libraries .
Table 4-2
Environment File Locales
Table 4-3
Alari System V Device Drivers
.
.
.
. . •
.
. .
.
.
. • .
•
... . . .
3-25
.. 4-2
4-5
...... 4-12
Overview
TI1is is the documentation for the prerelease Atari System V to selected
developers and user sites. It is intended as an installation guide, a system
administrator's guide, a users' guide, and a programmer's manual.
Whether you're a software application developer or a system administratOr-{)r
both-this guide introduces you to Atari System V and helps you set up,
maintain, and use the software system.
As a developer or administrator, you probably have the necessary familiarity
with UNIX, C programming language, and shared libraries. You'll fmd
recommendations for supplemen�11 reading at tlle end of each chapter.
All in formation specific to Atari System V is included in the four chapters of this
guide. The appendixes contain references you may find helpful while getting
acquainted with and using Atari System V.
ATARI SYSTEM V RELEASE PACKAGE
You may have purchased the Atari System V for yourself as a standalone system
or you may be responsible for installing it on a networked system. In any case,
the package you receive includes the following:
Atari System v Operating System
X Window Systcm Version II, Release 4 for Atari System V
OSF/Motif for U1c X Window System
WISh2 (a graphical shell)
Wx2 (a text
editor)
GNU c compiler, C++ compiler, and GNU debugger
XFaceMaker 2 (an interactive graphical interface builder)
Atari Applications Library
HOW THIS GUIDE IS ARRANGED
This guide is designed for experienced users, system administrators, and
developers, whether you simply want to know bow to get started on Atari
Atari System Vis based on Motorola
68000 hardware, bur no UNIX System
V docwnentation specific to this hard·
ware imerface is available. Instead, we
System V as an applications user, or whether you expect to use the advanced
features to develop your own applications. The guide includes the following:
Chapter I
software.
mentation throughout this gllide.
However; some portions of the AT&T
"Installation" gives you unpacking tips, lists hardware
requirements, and leads you through the steps for installing the
have referenced the AT&T 382 docu
Chapter 2
"Interacting with the Atari System V Graphical Interface" explains
to log in,
documentation do not apply, and those
bow
cases have been noted in the margins.
sening up your password, and tells you bow to customize your
introduces the W!Sb2 shell, gives you instructions on
working environment.
Chapter 3
''Administrative Tasks" describes system processes and accounts,
user accounts and applications, Atari tools, peripheral devices, me
systems, and system reconfiguration.
Chapter 4
"Application Development" tells bow to develop an application,
write a device driver, or port a GEM!IDS application to the Atari
System V.
The appendixes contain useful reference material:
Appendix A
"Atari-Specific Manual Pages" is a list of the manual pages
found on-line with Atari System V. The manual pages that were
changed or omitted are also listed in order to indicate the
differences between Atari System V and the AT&T System V,
Release 4, 3B2 version.
Appendix B
"Boot Text" provides some smnple listings of the text that
appears on tl1e system console when you boot the system.
Appendix C
"References" contains a list of U1e materials referenced in the
guide.
ii
Overview
Appendix D
"GEM-Xlib Equivalents" is a table to help you fmd Xlib
functions that arc equivalent to GEM functions when you port
GEM!TOS applications to Atari System V.
Appendix E
"Atari Enhancements
to Internationalization Standards"
contains
a table of Atari System V functions and the corresponding XPG3
function.
Index
USING THIS GUIDE
You needn't read the chapter contents in a particular order.Following is an
illustration that shows a typical structure for describing a process.
Major topic
ADDING A NEW DISK DRIVE
After installing a new external disk drive you should prepare it to store information by
initializing it; that is. organizing its storage space and creating file systems.
Nota pertaini�J1 �� ----+ 0
p
Step·blo-r':.:r�::n�:�:=
1.
Most of the following commands are Atari-specific. Refer to the on-line
manual pages for detailed des ri ptions of commands.
c
Thrn on )'Our S)'Stem ond verify that the new disk is lnstaUcd.
Watch the boot text. If you don't see an additional SCSI device entry, check the
hardware and reboot.
2.
Format the new disk witb the format command
A disk partition is derived using the fo rmula cXdYsZ, where
X
=
controller
=
y
=
drive
=
z
=
slice
=
SCSIID
SCSI LUN (always 0)
partition number (in hex:
0-f)
where f refers to all partitions
eX dO refers to the whole disk and is equivalent to cX.dOsf.
Example of loplc ----+
Example:
tor.mat -� /dev/rdsk/c3d0st
In this example, the SCSI ID of the disk being fonnatted is 3 (refer to the
format(lM) manual page).
FONT CONVENTIONS AND SYMBOLS
Tile following font conventions and symbols are used throughout this guide.
bold
Tile text used for the steps in a process appear in bold.
italics
Names of dircct.ories and Iiles appear in italics.
constant width
System output, such as screen messages, appears in
constant width.
User input, such as commands, options, and arguments
appear in bold type,
<Return>
constant width.
Input that does not appear on the screen when typed, such
as passwords, tabs, or a carriage return, appears between
angle brackets.
iii
<file name>
ll1e words between angle
brackets in examples of
command lines explain what should be included when you
use U1e command; i.e., yourname, a tile name, the date, etc.
comrnand(number)
A C01llld
lla0 name follo w ed by a number in parentheses
refers to the part of a system reference manual in which that
command is documented.
()
The rotated box symbol calls your attention to a
+
The diamond symbol indicates a choice of tasks or
special note.
procedures.
I>
Caution
Read the message following this warning carefully
before proceeding.
iv
CHAPTER 1
Installation
UNPACKING
The following items are shipped witll Atari System Y. Check tlle package you
receive to be sure everytlling is included.
License agreement
Release notes
Mail-in card for requesting GNU source code (tllere is a nominal fee for
tlle distribution media)
Atari System V Developer's Guide (tllis document)
Atari Style Guide
NSL W1Sh2 User's Manual
NSL Wx2 User's Manual
NSL XFaceMaker 2 User's Guide
AT& T Product Overview and Master Index
TOS diskeue for
- Resetting boot preference
- Partitioning a drive
Atari System V diskeue(s) wiU1 software updates
REQUIRED HARDWARE
Atari System V requires tlle following hardware:
Atari IT030 witll tlle following items (refer to tlle Atari IT Computer
Owner's Manual describing tl1e main unit and ports):
Ifyoll need specific hardware part
numbers, refer to the release noles.
- Atari IT hard disk cover
- Brackets to support the hard disk
- Atari IT bottom panel with ventilation louvers
- Motherboard (see release notes for required revision level)
- Atari IT bottom sheet metal piece witll ventilation louvers
200MB disk drive
RAM board combination to equal or exceed 8MB
Atari 19-inch monochrome monitor
Atri
a Urrec-button mouse
An autllorized dealer will verify tllis setup and be able to obtain any parts you
may need.
1-1
Cltnpter 1
HARDWARE INSTALLATION
ll1e dealer will install the Awri System V disk drive in your machine as the
internal drive. This drive uses a SCSI (small computer system interface), which
means that
the internal drive must always be terminated, and
U1c motherboard must always be tenninated unless you have boU1 an
internal hard disk and SCSI devices connected to the external back port.
If you are upgrading an existing TT with bard-disk resident TOS data on an
internal SCSI drive, you must back up the data before replacing the internal disk
with the disk containing UNIX. The section "Adding a New Disk Drive" in
Chapter 3 explains bow you can partition the
hard
disk drive for both TOS and
UNIX partitions.
The Atari System V supports external SCSI devices. Refer to the release notes
included in the system package for a list of tested and supported SCSI devices
U1at can be ordered through your dealer. These devices include an additional
SCSI (not ACSI) bard disk and a tape drive.
The Atari VME Ethernet board may be installed if your computer will be used
on a network.
SYSTEM INSTALLATION
When the computer system is completely
Power on
assembled,
switch on all peripheral
devices and then switch on the computer.
The diskene light goes on-off-on; when it stays on, the TT initialization is
complete. At that same time, the hard disk light turns on. When the internal hard
drive has completed its initialization, the light goes off.
When the TT and the bard disk are both initialized, use the following steps and
information to boot Atari System V into your computer.
Press space bar wher� 1T and
disk drive are ready
1. Press the space bar (or wait 90 seconds).
This message is displayed:
Atari System V.4 <disk date>
The system probes all SCSI devices and lists them. The Equipped Device
Table is displayed and then you see the device specification and the name of
the kernel that Atari System V
will boot:
hd(O,O)unix
Press <Return> to continue boot
process
2.
Press <Return> to continue the boot with this kernel.
If you accidentally press some other key, U1e boo t stops. To continue the boot ,
either
a.
Press the reset button on U1e side of the computer to start the boot from
b.
Type unix
U1e beginning. or
If devices were added, the system recon
figures and rebo01s-go back to Step I
1-2
-
r and then <return>
3. If you added a tape drive, an Ethernet board, or some other supported
device, the system reconfigures and automaticaUy returns to Step l.
lnswllation
More system messages are displayed, including the Ethernet address (if
added). memory capacities, and copyrights.
4. Finally, this message is displayed:
Press <Delete>
Appendix B comains boot text messages,
some wizh and some without peripheral
device changes.
• To continue to come up
to enter System Maintenance Mode.
in multiuser mode, do notbing and go to Step 5.
• To become supcruser in system maintenance mode you have live seconds
to press <Delete>and enter the superuser password at U1e prompt. (As
shipped, no password is set for root, so set one as soon as possible.)
To exit system maintenance mode and to continue bringing up
tbe system, type exit or press <Control d>.
As superuser in system maintenance mode you may perform any of the
following tasks; just select the task and follow tbe instructions.
• Set the root password.
a.
Type paaawd. <Return>
b.
Type the new password, <Return>, and at the prompt
c.
Type the new password a second time
• Set tbe time of day and the time zone.
a.
Type aetenv TZ <zzzXddd>
local time zone
zzz
Set dale and lime of day
X
number of hours from Greenwich mean time
ddd
local daylight savings time zone
For instance:
b.
If the local language is not American
English
Pacilic Coast
=PST8PDT
East Coast
=ESTSEDT
Type date qmnddHHMMYY>
mm
montb
dd
day
HH
hour
MM
minute
yy
year
• Set the default language.
a.
Type setlang
b.
When the prompt appears, select a language from those
available
'Thereafter, all applications on your system (including the rest of this
boot) default to this language. Individual accounts may elect to override
this for tllCir own sessions only. The setlang program can be run by
superuser at any time, but affects only those sessions staned after it has
been run.
Install sofrware the first time you boot
• Install software updates
a.
Type pkgadd -d /dev/floppy
or
pkgadd -d /dev/tape
1-3
Chaprer 1
b.
When prompted, insert the diskettes or tapes
+ Set up the system for network access
Verify Ihal the. Awri VME Erhernei con+
troller is installed
a.
Type setnetwork
b. You are asked for your machine's node name and IP
address. Get these from your network administmtor.
c.
You are asked for the node name and IP address of another machine
on the network. These are used to get the hosts file once the network
is operational.
d. It's up to you to propagate your node name and IP address to all other
nodes of the network. Ask your network administrator about this.
To connect your network to the public internet, contact SRI-NIC (SRI
International, Network Infom>ation Center) to obtain a network number
and domain nan1e. Telephone (USA) 1-800-235-3155, or see AT&T,
UNIX System V. Release 4, Network User's and Administrator's Guide,
Chapter 2.
To reboot, type init 6
In all system maintenance situations, if the program instructs you to reboot
after making changes, type init 6 and return to Step I.
To cominue, type exit
If you are not instructed to reboot, type exit and the system continues to
come up.
5.
Atari System V continues and when initialization is complete, this login
screen is displayed:
6.
Four login accounts are available:
guest
croot
root
kroot
Log in as root (or croot or kroot, if you're familiar with the C-sheU or Kom
Login
shell) and create new user accounts. Do not edit/etdpasswd; Atari System V
maintains a shadow file containing the passwords and directly editing
letc/passwd will confuse the password lookup mechanism. These files should
be updated by system commands. See the "User Accounts" section in
Chapter 3.
It\· importa111 to learn Jww 10 back up Ihe
system.
1-4
l;l
Once your system is installed, your most important consideration is knowing
how to back up that system. To team the necessary backup procedures, see the
section, "System Backups" in Chapter 3.
Installation
REFERENCES
Atari, Atari IT Computer Owner� Manual, 1990, Atari Corporaiion
AT&T, UNIX System
V.
Release 4, Documentation, 1990, Prentice-HaJJ-as
follows:
Network Users and Administrators Guide
System Administrator's Guide
Users Reference Manual
1-5
CHAPTER 2
Interacting with the Atari System
Graphical Interface
V
LOGGING IN TO THE SYSTEM
This is what the screen looks like as soon as tlte system is up and running:
1. Type in your login ID as set up by your system administrator. Press
<Return>
2. Type your password (which wilt not be printed on the screen). Press
<Return>.
For generic access, the login ID guest will let you to use the W!Sb2 capabilities.
WISh2 WINDOWING SHELL
When you log in to Atari System V, you are automatically brought to tlle WISh2
windowing shell running under tlle OSF/Motif Window Manager (MWM).
If this doesn't happen automatically, eitller have your system administrator set up
your account to do so, or set it up yourself. See Ute "X Window System Session
Management" section of Chapter 3.
Refer to the
OSF!Motif User's Guide for infonnation about manipulating
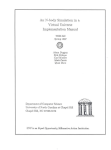
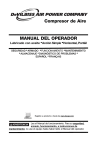
windows, application menus, buttons, and dialogs. Figure 2- I shows tlle WISh2
shell wilh its icons for the guest login.
Mouse Buttons
Use tlle mouse buttons to choose objects on Ute screen, choose text to be edited,
focus Ute keyboard on a particular window, or move objects on the screen.
Table 2-1 describes lhe mouse buttons, tlteir positions. names, actions, and
functions.
2-1
Chapter 2
do. �
Figure 2-1
1·10
Atari Shell: /home/guest
WISh2Shell
File §.dit View
:! ..!.
e
,,...,
Help
Sort Invs
�
I
i
•
.....
'i$1
,;
�
-
curr.I'IIIWOft.JngOirtctory:�t
g A�t �
0 fB
"'
(,...... )
�
� g �
�
-
·-·
Table2-l
Mouse Buttons
and Activities
Position
Left
Name
Select
Action
Click = Move pointer to object,
Funct ion
Selects object.
press and release.
Double·t.:lick = Move pointer to ob-
Executes an object.
ject, press and release twice.
Drug= Move pointer to fll'St object
Selects multiple objects or
or text, press and bold down while
text.
moving mouse over selection, reMiddle
Right
Drag
Custom
or
Menu
lease.
Drag= Move pointer to first object or
Alternate button for moving
text, press
and
and hold down while moving mouse over selection, release.
copying objects.
Click or
Activate pop-up menus
drag to access cbosen menu.
tasks.
Dntg = Move pointer to menu,
and
perform application-specific
Getting Help
Select Help from U1e menu bar; the cursor changes to a small magnifying glass.
Select is used throughout this guide to
tell you to position the nwuse pointer
on the item you want to select and then
click the left mouse button
Move the cursor 10 an item (field, label, text) and Select again. A help window
will open and display infonnation.
The Exit bunon is in the File menu (refer 10 the W!Sh2 documentation for
funller infonnation on menus and icons).
The default MWM menus are shown in Table 2-2. Access these menus by the
press-drag-release action of the appropriate mouse button on !he background
outside !he windows.
CHANGING YOUR PASSWORD
Your password prohibits others from using your account. Keeping your password
a secret, along with using appropriate permissions on your files and directories,
prevents others from altering or dest roying your data. Be sure 10 change your
password from time-to-time-your system administrator may even configure
accounts so tl>at you are required to periodically change your password.
2-2
-----------
Interacting With Atari System V
Table 2-2
Mouse Dutton
MWMMouse
Buttons Menus
Left
Menu
Desktop
WJSh2
New window (use to open a command window)
XFaceMaker 2
Clock
Middle
User defmable
Right
Window manager
Shuffle up
Shuftle down
Refresh
Restart
Exit
To change your password,
1. Select New Window from theMWM menu to open a command window.
A new window is placed on the desktop.
2. Type the command paaswd in this window.
A prompt asks you to type in your old password.
Do this and you are
prompted to type in your new password; when prompted, enter the password
again to catch any typing errors.
Note: To be sure others can't decipher it and thus compromise Ute security of
your data, your password should
Have a least
six characters
Contain at least two alphabetic characters and at least one numeric or
special character
Differ from your login name and any reverse or circular shift of your
login name
Differ from your old password by at least three characters
For additional security, avoid obvious passwords, such as a part of your
nante, name of a family member, Ute make of your car, your license plate
number, etc.
3. Close the window
Continue wiUt your tasks. T h e next time you log in to System V, you must
enter your new password.
LANGUAGE APPLICATIONS
When you first log in, your windows and applications are presented in the
language set up by the system administrator for your particular computer system.
However, if you prefer to work in another language, use the following steps to
change:
1 . Select New Window from theMWM menu to open a command window.
Position the new window on Ute screen desktop.
2-3
Chapter 2
2.
Ir the file .environment does not already exist, create it in your home
directory and add the lines
LANG•<language>_<territory>
export LANG
For example, if you speak German and live in Switzerland, you would enter
LANG=german_switzerland
export LANG
3.
Save the file. ExitMWM and then log in again.
You should be using your new language.
CHANGING CONSOLE SETTINGS
Console Configuration Window
Use U1e Console Configuration Window to change console attributes such as
screen saver characteristics, keyboard and mouse assignments, and bell and key
click volume.
l. Select the Console Configuration icon.
•
The Console Configuration window pops up-ready for you to adjust the
console settings to your own requirements.
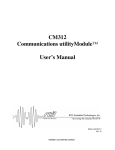
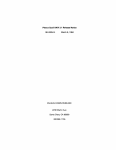
Figure 2·2
Console Settings W indow
t .
fi�
.
0
SCREEN SAVER
BUTTON
r
BELL SELECTIONS
.
it"""""'a Stte'l.'llSawr ----j Potwn
l[+etankSaHD
I j ¢X Logo
I
i
KEYBOARD
SETTINGS
r
-:�
J
BUTTON
PANEL
Wait to Start:
..r,..hc,cl_"
1
NCOnds!
[]2]
� """"'"
1
Keyboard
• AutoR�pe•t
t apu':"''' cFocu=::_• ·-,
--,
+dick 10 Type
...
:�A�..&�·o;]-Bol;l � :-;:����������
Tionsoi�C'�;;'figJ,�ti��
�
� PopO: tbe Pointer
,�
I
. .',_
0 Viiu•l&U
I
Pitch:
V
olu me:
� h&rtz
low !M
c:!J perant
low I
Duration: � mi ll.ise;onds short! M
M
I lUsh
I hiah
ilona
futJ
0
: Mouse --:!.-- I«)USE SPEED
ADJUSTMENTS
: Onub� clkk Tl�' rn!J mim""'..!' •low�
: Spoodrla..hold, o.a.w�nd -�fut
.
Speed Multiplier: E::]}
law r.:=:::J bish
i
--
·�click- ----------------
-Volume:� Jll!�r:t
k-1
M
ihish
j
1
I
0
KEYCLICK
ADJUSTMENTS
t======"""""'""'==.,:d!J
2. Refer to Fi!,'llre 2-2 to identify each portion of your console while reading
the description that matches this portion's attributes.
2-4
Interacting With Atari System
Screen Sm-er
0
V
Screen Saver
I. Select the Screen Saver button to turn it on or ofT.
The screen saver is a utility program tha� after a specified number of seconds
without keyboard activity, bl;mks U1e screen or displays a pauem. ·n1c pallem
is redrawn (cycled) in 01e specified number of seconds. This prevents bum-in
damage to U1e screen.
2.
Choose the display pattern by clicking on the appropriate button with
the Select mouse button.
The screen can go blank or it can display tile X Window System logo.
3.
Select the W ait to Start box and type in the number of seconds to wait
before activating the screen sawr.
4. Select the Refresh Cycle box and type the number of seconds to wait
before the pattern is redrawn.
Keyboard adjustmenrs
e
Keyboard Adjustments
1.
Select the Auto Repeat toggle button to enable or disable automatic
repetition of a depressed key.
In general, it's a good idea to keep auto-repeat enabled.
2.
Select a type of Input Focus.
In Click-to-Type mode, you must Select into a window to enter text.
Follow-Ole-Pointer mode focuses Ole keyboard on whatever window the
mouse cursor is pointing to. This allows you to enter text wiU1out
clicking into Ole window.
Bell
Bell selections
e
FkJsh-invert:Mometltary reversal of
screen color; e.g., black to white.
1.
Select the Visual Bell button to turn the visual bell on or off. The visual
bell will tlash-inven U1e entire screen.
2. Select the Audio Bell button to turn it on or off.
Using the mouse move the slider knob to change the following Audio Bell
attributes:
Pitch-bow deep or bigb the sound is
Volume-bow loud the sound is
Duration-bow long U1e sound lasts
Mouse adjus tmeflls
(i)
Mouse
To change one of its listed attributes, use the mouse to move the slider knob
or Select a box and type a number to change the setting.
Double click speed
Maximum time (milliseconds) allowed between
double clicks.
Speed threshold
Maximum true speed. When mouse is moved at this
speed or slower, the on-screen cursor moves at the
same speed. This is useful for manipulating small
objects. When the mouse is moved faster, the
on-screen cursor moves faster; this is useful for
moving across the screen quick! y.
2-5
Ci!apler 2
1l1e number used to multiply the speed of the on
Speed multiplier
screen cursor, if mouse is moved above tile speed
threshold.
Key click adjustmem «)
Key Click
I. Select the Key Click button to turn the key click sound On or Off.
Key click refers to U1e clicking noise U1at is made when you press a key.
2. Ir you choose to turn on Key Click, use the mouse to move the slider
knob or Select the box and type in a number to set the volume of the key
cl ick.
Button Panel
0
Button Panel
}. Select the Apply button to apply all attribute changes to your current
session.
2. Select the Reset button to reset all attribute adjustments to their last
applied state.
Menu Bar
I. Select the File button and Select Save from the File menu to save all
Menu
Bar(i)
attribute changes.
The new settings are applied to your current session as well as all subsequent
sessions.
2. Select Apply System Defaults from the File menu to change aU settlngs to
the system defaults.
REFERENCES
Use the documents referenced here for more information about s ubjects
d iscussed in this chapter.
AT&T, UNIX Sysum V. Release 4, User� Reference Manual, Prentice HaD, Inc.,
1990.
Manual page passwd(I)
AT&T, UNIX System 11, Release 4, User's Guide,Ompter 3 "Using the File
System," Prentice Hall, Inc., 1990.
Non Standard Logics, W/Sh2 User s Manual. Paris, France, 1991
'
Open Software Foundation, OSF/Moti[User's Guide, Revision 1.0. Prentice Hall
Inc., 1990.
Sections entitled:
"Using the Mouse"
"Exploring Pul!Down Menus"
"Recognizing Common Controls"
"Moving a Window"
"Entering Text I nto an Input Field"
2-6
CHAPTER
3
Administrative Tasks
OVERVIEW
System administration refers to the tasks associated with maintaining Atari
SysiCm V. Typical tasks include managing ftle systems, installing new
applications. managing user accounts, perfonning regular backups, ensuring a
secure environment, and modifying the system itself to accommodate new needs.
Usually these tasks must be petformed using shell commands. In keeping with
Atari's goal of providing a friendly system to both the applications user and the
advanced user, Atari System V includes window-based tools run from the W!Sh2
desktop to perform administrative chores. T his means you don't need to know
the details of how the commands are being used-what's emphasized is the
action to be done. A few of these tools are available with this release; more will
be available later. Those tools provided with this release are fully described.
ACCOUNTS AND GROUPS
Accounts and groups are used to establish ownership of and access to files,
directories, and commands on tllC system.
Accounts are set with a name that
identifies the user and an
identification (!D)
number that is automatically assigned by the system. Login accounts identify the
user who logged in, created files and directories, and executed commands. Each
file or directory is owned by the user who created it; that is, new files and
directories have Ute same account ID as the user. System accounts may be used
to execute administrative commands, or may simply identify system resources
that pertain to a specific purpose. Each account should be protected with a
password.
Files, directories, and commands each have a group ID that affords an additional
level of protection. Only accounts that belong to the same group can access those
resources. The extent of access (read, write, or execute) can be changed to ensure
appropriate security.
System Accounts
Table 3-1 is a list of accounts shipped on Atari System V. The root, croot, kroot,
and guest accounts are login accounts described later in this chapter.
System Groups
1able 3-2 is a list of groups shipped with Atari System V. You can add groups
with the groupadd command. Check the/etc/group file for the next available
reasonable group ID (tl1ere may be gaps in tl1e assigned group ID numbers).
Group numbers 0-99 are reserved for administrative use; users should be
assigned to group numbers over 100.
3-1
Chapter 3
Table 3-1
System Accounts
System
User 10
Description
Account
0
0
0
3
2
4
root
Su per use r account (runs the Bourne shell)
croot
Supcruser account (runs the C shell)
kroot
Superuser account (runs the Kom shell)
bin
Owner of most binary exccutables
sys
Owner of system binaries requiring special permissions
adm
Owner of accounting and associated data files
nobod y
4
20
Nonprivileged user ID for NFS
uuc p
Owner of uucp files
listen
Network listener
n uu cp
Default login for remote uucp
vmsys
Owner of FACE executables
10
oasys
Owner of object architecture files
12
sp
Line printer da em on
6001
guest
Unprivileged login
Superuser Account
Administrative !aSks arc done from the privileged account root, commonly
referred to as the "superuser" account. No one but the designated superuser may
run these processes or update system ftles.
1be root account differs from other accounts in that it bas
user IDO,
group
ID 0, and
permission to access all files and nodes on the system, irrespective of
the pennissions associated with those files.
Table 3-2
System Groups
Group ID
Group
Group Description
0
root
other
Default user
2
bin
Public commands system
I
3
4
5
6
sys
Pri v il eged superuser
Special commands system
adm
Administrative system
uucp
uucp system
mail
Mail system
tty
Terminal files sy stem
lp
nuucp
Printing files system
10
12
daemon
Background processes system
6001
nobody
Incoming uucp system group
Nonprivileged ID for NFS
Following are some important considerations for using root.
Become superuscr only wben you must perform administrative functions.
Never usc the
root account for ordinary word processing or program
compilation.
•
Usc the interactive fonns of lhe commands
rm, mv, and cp (e.g., rm -i) to
warn you before removing flies lhat should be kept.
3-2
Administrative Tasks
• ·
Avoid using wildcard characters (such as
*) in file
name specifications.
When using tbe C-shell or Kom-shell, set variable noclobber to prevent
overwriting existing files witb output redirection.
•
Record all administrative tasks performed as superuser in a log book.
•
Be cautious and consider the implications of any action; many mistakes made
•
Make backups of all important system files before you change them.
as superuser are irreversible.
There are tbree entry points to the superuser account:
root, croot, and kroot. The
difference is the type of shell executed when you log in. The root account uses
tbe Bourne shell,
croot uses U1e C shell, and kroot uses t11e Kom shell.
Sophisticated users may have a preference, but you should use tbe Boume shell
unless you are familiar with the otber shells. Remember to place passwords on
all of tl1ese accounts whetber you use them or not.
User Accounts
Atari System V manages users witb login names, passwords, and groups. To gain
access to the system, a user must enter a valid account name (login !D) and
password. File permissions allow or prevent user access to resources in tbe
system.
Before specifying a new user's account and working environment, have a clear
It's often useful to develop a stan
dard for login names such as:
userS initials, firs/name, first name
and lasz initial, etc.
idea of the user's tasks and system needs-information such as
•
User's full name; you must know the owner of each login account.
•
User's login name: it's best to use only lowerca�e unaccented alphabetic
characters. and it must be unique to the system or network. It must be
printable and may not contain a colon or a new line character.
•
The full pathname of the user's preferred command sbell: /usrlbinlsiz,
/usrlbinlcsiz, or /usrlbinlksh.
Basic copies of the login ru1d environment flies needed for Atari System V shells
and applications are provided in the directory /etclskel.
·me following section describes the files used 10 customize behavior of the
windowing software.
Guest Account
Atari System V is shipped with a guest account that provides generic
nonprivileged access to the system until user accounts are set up. 1l1e guest
account has no password. To protect your system, eit11er assign a password to
tbis account or remove it-after creating other accounts.
Adding a User Account
To add users to a new system. you must become superuser.
1.
Log in as root.
2.
Type
useradd -c <full name> -g <groupname> -m -s
<shell> -k /etc/skel <login name>
\
If there are spaces in t11c full name, it must appear in quotes.
3-3
Chapter 3
Example:
useradd -c "Hans F. Anders" -g staff -m -s
/usr/bin/csb -k /etc / skel banders
\
- User's new login name is banders
- The new login account is locked until a password is assigned.
- A new user entry is added to both theletdpasswd andletclshadow f!les.
- The new user is added to the group of staff
- A home directory is created as 1/wme/handers with read, write, and
execute pennissions of the default group.
- If no login shell is indicated (-s option), it defaults to lsbinlsh.
- Default startup files are copied fromletdskel into the new user's home
directory.
3 . Type
passwd < l ogin name >
Example:
passwd banders
Enter the initial password. When prompted, enter the password again. InfolUl
the user of the new account and initial password. The user can change the
password thereafter. Refer to "Changing Your Password," in Chapter 2.
Disabling s User Account
Occasionally, if a user no longer needs access to the computer, you may want to
disable an account,
I.
The first step in removing a user from a system is to deny that user
access to it. Type
usermod � <date> <login name>
The date may be in any foml but Julian.
Examples:
usermod -e 9 / 10 / 9 1 banders
or,
usermod -e
"18 May 1991" bandera
After the date you entered, no one will able to access this login.
The usermod command disables, but doesn't delete, user accounts. Deleting
the login name from /etclpasswd and letdshadow is not recommended, as it
affects all files owned by that user. The system deletes the owner and uses a
Delering a login
name
number to identify the files. You may forget who the user was and assign that
accoulll is not
reconunended
nmnber to anoU1er user.
System logs, mail files, and news files may have a record of login names, so
it may be useful to maintain expired login entries for historical records.
2.
3-4
Locate all files that belong to that user account, back them up, move
them, or delete them.
Administrative Tasks
a. Locate the flies:
find 1 -user <login>
-print > < f i le>
Example:
find I -user banders -print > ltmplsomef i l e
b . Back u p the flies using cpio.
cat <file>
I cpio -odv > <backup device>
Example:
cat ltmplsomefile
I
cpio -odv > ldevlfloppy
If you have a tape drive, you may want to back up the flles onto the
device called /dev/tape instead of /devlnoppy.
Example:
cat ltmp/somefile
c.
I
cpio -odv > ldevltape
Delete the file s.
Do this only if you 1ruly want 10 permanently purge the system of any
trace of these fllcs. If anyone using the system may need these files, copy
them, changing ownership.
find -user <login name>
-exec rm -i
{} ;
Example:
find I -user banders -print
3.
I
xargs -t rm -i
Delete the login name account from the system.
Do this only if you truly want to pennanently purge the system of any trace
of the user.
userdel -r <login name>
Example:
userdel -r bandera
The home directory and flies will be deleted (-r option). The login name is
removed from the !etdpasswd and /etc/shadow flies.
As mentioned before, deleting a login name account is not recommended.
Setting Account Passwords
Passwords are maintained in tl1e /etc/shadow file, separate from tl1e/etdpasswd
me that contains administrative infom1ation pertaining to each login account.
Direct editing of the passwd ftle will not update the shadow me. Update both
these ftles by commands only-useradd ( lM), usermod(lM) , userdel(lM), and
passwd(l).
The superuser may change any account password, using the command pas.•wd
<login name>. Users may change their own password using the command
passwd. This command prompts for the new password to be typed twice, in
order to catch typing errors. The new password takes effect on login. Remember:
all accounts should have passwords, including guest, root, croot, kroot, and
nuucp.
3-5
Chapter 3
Security
1l1e purpose of any security measure is to protect your system from unauU10rized
access and to main�1in its integrity. Refer to U1e "System Security" chapter of the
AT&T System V Release 4 System Administrator's Guide for security items to
consider, such as p.1sswords, access pennissions, dial-up ports, and the su
command.
ln keeping with the goal of not allowing access without accountability, we
strongly suggest that each remote system that accesses your system by means of
dial-up ports be given a unique login name, rather U1an using nuucp. In this way,
access from various systems will be accounted for.
SYSTEM BACKUPS
As system adminisiiator, it's your responsibility to back up tlle system
periodically. Backup copies can be used to recover files that were removed,
corrupted, or otherwise lost.
Suggested backup procedures arc discussed in U1e AT&T, UNIX System
Release 4 System Administrator's Guide, Chapter 3.
V.
The examples in tllat chapter are implemented using the backup_service
commands, which you may want to use if your backup responsibilities are
extensive. However, the following section describes simple commands for
backing up your Atari System V data. Refer to the manual pages in the AT&T,
UNIX System V U s ers Reference Manual.
It's a good idea to
Streaming tape dril'e: A high·speed
magnetic tape drive.
•
occasionally back up your entire disk, and
•
frequently back up file systems and directories that change.
You can back up the Atari System V to either magnetic tape or diskette. The
siieaming tape drive may be attached to your system or attached to anotller
system across a network.
Before Backup
Before you s�1rt tlle backup, you should know the following:
•
·n1e names of U1e file systems to be backed up.
For example,
- /home has the personal files of all users
- lvar contains the system variable tables
- lnewstuff
•
might include research data
The names of specific directories and files to be backed up.
For example,
- /home/mark might be the mune of tlle directory that contains all the files
in Mark's home directory
- /var!admlspellhist is a log of words flagged by tll c spell character
- /newstuff/lib/srcl*.c might represent some source code files
3-6
Administrative Tasks
•
The device on which the file system is located.
For example,
- /dev/rdsklcOdO represents the internal boot disk
- ldevlrdsklc3d0 is an external storage disk
•
The name of the device to which the file system data is to be copied.
For example,
- /devltape is the name for tl1e streaming tape drive
- /dev/f/oppy is t11e name of the diskette drive
Backup Commands
You can choose one of several commands to back up your system. The same
command is used to restore data from its backup media. Choose the one that best
applies to the task.
Choose the dd command to back 14p a
disk quickly
+ To backup an entire disk to tape (image backup):
- Usc t11e dd conunand to back up an entire disk or file system quickly, if
you don't care about restoring individual files. This command ceopies all
bits from tl1e disk, so tl1e tape must have a capacity equal to or greater
than the disk being backed up. Refer to the dd(IM) manual page.
- To increase the data transfer rate, when backing up from disk to disk, use
a larger block size tlmn tlJat used for backing up onto tape.
- All file systems to be backed up must be unmounted. Enter the command
dd if;<source device> of•<backup device>
ba=<blocksize>
\
Exan1ple:
dd i f ; / dev /rdsk/cOdO of•/dev/tape bs•32k
+ To restore an entire boatable disk dd formatted archive
- Usc the dd command to restore an entire disk from an image backup. Usc
a second disk drive that is nonboatable. Restore data to the second disk
drive and use the cp command to copy files to tile boatable disk.
dd if;<backup device> of=<system device>
bs=<blockaize>
\
Example:
dd if;/dev/tape of• /dev / rdsk/cldO bs=32k
This restores the tape contents to t11e disk with a SCSI ID of I. The
restored files can be copied to the boatable system disk with a SCSI ID of
I>
0.
Caution Attempting to restore your boatable system disk directly from
an image backup will be unpredictable
Q When you restore a disk from a backup of your boot disk, run
fsck on the disk to eliminate ambiguity about tl1e system 's state.
You can also use dd to back up your entire boatable disk by backing up
each file system separately. To restore the entire disk from archive,
3-7
Chapter 3
restore all file systems except root. Boot with U1e fsck file system and
restore the root file system from U1ere.
Example:
dd ifsc0d0s6 of• /dev /tape ba•32K
backs up the 1/wme file system U1at resides in partition 6 of the boatable
disk.
For more information on file systems and partition names see "File
Systems," and "Adding a New Disk" in Chapter 3.
Choose the cpio command to backup an
emirefile system or
specific directories
and files
+ To backup an entire file system to tape, or
• To backup specific directories and files to tape
- Use the cpio command to back up and restore individual files and groups
of files that match a file specification. It's slower Ulan dd, but more
flexible. Become familiar with U1e find command in order to use cpio to
its potential. Refer to the cpio(l) and find(I) manual pages.
- If you backup data with absolute path names, the files are restored to the
same place from which they were saved. If you back up data with relative
paUl names, the files can be restored to any location.
- The file system must be mounted. Enter the command:
<list of files>
<backup device>
I
-c <butteraiza>
cpio -ovc
\ >
- The input to cpio must be a list of files, one per line. Use la or find
or cat to generate the list of files.
Example:
cd /home
find _ -depth -print
/dev/tape
I
cpio -ovc -c 32768 >
\
backs up files and directories in 1/wme so that they have relative path
names. The command to save the same data to have absolute path names
is
find /home -depth -print
> /dev/tape
t> Caution
I
epic
-ovc -c \ 32768
Unless you have U1e expertise to write a shell script with
a complicated find command, do not use epic to backup your
entire boot disk; ilmay hang when it reaches the/procdirectory and
will hang on any open pipes.
Browse the conrents of a cpiofor
malted archive
• To browse the contents of a epic fom1aued archive
- Use the cpio command to list the contents of an archive.
epic -itc
-C<bu ffersize> < <backup device>
Example:
cpio -itc -C32768 < /dev/tape
The -c option assumes Umt the data was saved with a portable header. If
the -c option doesn't work, try
epic -it -32768
3-8
<
/dev/ tape
Administrative Tasks
Restore the filesfrom a cpio
fomwrted archive
• To restore files from a cpio formatted archive
- Use the cpio command to restore infom1ation from cpio-fomJaUed
backups.
Enter the conunand:
cpio -idmuvc <bu f fersize> <target direct ory>
device>
<backup
1;11
The -u option overwrites files with the same name.
Example:
cpio -idmuvc " /home /mark/*" < /dev/tape
This option restores the files /home/mark/* to the exact location from
which they were saved, assuming these files were saved with the absolute
pathname prefiX of /home. If tl1ey were saved with the relative pathname
prefix of
home, the com.mand
cd/
cpio -idmuvc -C32768 "home /mark/*" <
/tape
/dev
\
restores them to 1/wmelma rk.
• To backup files and/or directories to diskette
Choose the
tar comma11d to
backup files and direcrories
tar command to back up regular files-such as text files and
Tar doesn't handle special files, such as device files. Refer to
the tar(I) manual page.
- Use the
binaJ)' files.
- 111e file system where tl1e files reside must be mounted.
- Enter the command:
tar -cvBf <backup device> < f i lenamea>
Example:
cd /home
tar -cvBf /dev / f loppy myfile
/home /myhomedirectory
\
backs up onto the diskette the file myfi.le in the current working directory
as well as all files and directories in lhomelmyhamedirectory.
• To browse ti1e contents of a tar formaued backup
Browse the contelll!i of a UJr
fomumed backup
- Usc the tar command to list the contents of a
tar formatted backup tape
or diskette.
- Enter ti1e com.mand:
tar -tvBf <backup device>
Example:
tar -tvBf
/dev / f loppy
• To restore ftles from a
The tar conunand reswres
fonnarted backups
tar fonnaued archive
- Use U1e tar comm;md to restore information from
tar fonnaued backups.
- Enter the command:
tar -xvBf <backup device> < f i le namea>
3-9
Chapter 3
Example:
tar -xvB f
/dev / f loppy
retrieves all files on the diskette and restores them to Ute directory from
which you issued the command.
Exantple:
cd /tmp
tar -xvBf /dev / f loppy \
/home/myhomedir/acience.doc
retrieves one file lhome/myhomedirlsci ence.doc from the diskette and
restores it to the ltmp directory.
Back up files 1o
"
Iape via the network
• To back up files to a
tape across the network
- The cpio or tar command must be executed on the system to which the
tape drive is attached.
You can pipe the fLies into an rah command that executes on another
system:
Example
1:
tar -cvBf - /home I rah somehoat dd of• \
/dev / t ape obaz32768
Example2:
la I cpio -ovc 1024 I rah aomehoat \
dd• /dev/tape oba•32768
ResioreJiles via Ihe network
• To restore files across NFS from tape on another machine to directories on
your machine:
Example 1:
rsh -n aomehost dd if= /dev / t ape ba•32k
-xvpBf
I
tar \
I
cpio \
Example2:
rah -n aomehost dd if=/dev/tape ba•32k
-idmuvc
SYSTEM ENVIRONMENT
In particular, the system environment consists of the variables maintained by the
shell. These variables may be set from a system file or from
a file in the user's
borne directory, or with a command.
In a more general sense, the system environment consists of all login scripts and
preference ftles that affect behavior of the applications and shells of a login
session. There are generic system files that are used automatically unless a
customized ftle exists in the user's borne directory.
In the most general sense, system environment refers to all system-wide settings
and running processes that both support and affect a login session. Examples are
date and time settings, language settings, WISh2 windowing shell
configurations, login shell preferences, networl< support processes, printer
support processes, and run level settings. This section describes the generic
system environment and bow
it can be customized-both for the system in
general, and individual users in particular.
3-10
Administrative Tasks
Setting the Date and Time
To set tbe date and time of tbe internal system clock, log in as superuser and use
!he date(!) conunand. If you want to set tbe time forward, using tbe -a option
allows it to caleb up slowly and not disturb tbe background process.
To set tbe time back, bring the system down to single-user mode before setting
the dale and time. If you change !he date and time while in multiuser mode, !he
background cron process wiU try to catch up and may run unwanled processes.
System Processes
A process is any computer program running on the system. Many processes run
simultaneously in a multitasking system such as Atari System Y. Processes
execute independentl y yet may communicate wilh olher processes, wilh !he
console and !he keyboard, and with otber system resources. Multiple instances of
a program may be run simultaneously. For example, an independent WISh 2
process is running for each user using WISh 2. Each process is uniquely
identified by a number called tbe process identification (PID).
Most processes running on Atari System V in multiuser mode are associated
witb users at a terminal. Administrative processes and daemon processes are
referred 10 as system processes.
An administrative process may perfornt tasks that affect users; i.e., logging on,
formatting disks, seuing up new accounts, and managing file space.
A daemon process is not associated witb a user, but performs system-wide tasks,
such as scheduling !he printer, communicating wilh Ute network, process
scheduling, and managing internal memory.
The
ps(l) command is used to obtain information about processes tbat are
running at !hat moment. The names and functions of active processes expected in
ps
-e). If your system is not auached to a network, the network suppon processes
a normal running Atari System V system are shown in Table 3-3 (command
will not be running.
Tite kill-2
(TERM) is Ute software
The kill(l) command sends a signal to one or more processes.
command (INT) is an interrupt signal; kill-IS
termination signal, and kill -9 (KILL) sends tlle exit signal. Use kill-2 and kill
-15 at least twice before resorting 10 kill-9.
Example:
kill -9 839
will cause t h e active P ID 839 t o exit.
Run Levels
A run level designates a particular group of processes automatically started by
the system. Atari System V boots 10 the default run level indicated in !he
letclinittab file. It is set to come up to run level4.
3-11
Chapter 3
Table 3-3
Active System
Processes
ID
Process
Command
System
schcd
0
Scheduler
init
Parent of all user processes
pogoout
Page daemon
fsflush
File system daemon
kmdaernon
Kernel memory allocator daemon
inetd
Internet super-daemon. Starts other internet daemons
listen
Network listener
lpNet
Network copy of Jpsched
Network
on demand: rlogiod, Rpd, telnetd, etc.
rpcblnd
RPC (remote procedure call)
nfsd
NFS daemon (usually four copies)
biod
NFS block 110 daemon (usually four copies)
mountd
NFS mount daemon
staid
NFS status daemon
lockd
NFS lock daemon
X Window System
wish
wlsbd
wx
wxd
Windowing sbell
W!Sh2 daemon
Wx2program
Wx2 daemon
xfm
XFacemaker 2
X
X server
Other
soc
Service access controller
lpschod
Line printer scheduler
cron
Clock daemon
ttymon
Terminal (tty) port monitor
Available run levels are
S
single user mode/system maintenance mode
0
shutdown
I
system administration mode
2
multiuser networlcing mode
3
multiuser NFS mode
4
6
multiuser. networking X Window System mode (plus NFS, if available)
shutdown and reboot
Changing the Run Level
Once !.he system is started and running at !.he default run level, !.hat level can be
changed wil.h !.he command init <run-level>. When !.his command is entered,
init scans letclinittab and executes all matching entries. Several messages may
be displayed; !.here will be a final message when !.he change to !.he new run level
is complete.
[> Caution
When you change to a new run leve� !.he activities of other
users currently logged in may be disrupted.
To change 10 a lower run level, use !.he shutdown command.
3-12
Administrative Tasks
Type
shutdown -i
<run level> -g <warning t ime>
Example:
shutdown -il -g3 0 0
warns all users tl1at i n 3 00 seconds ( 5 minutes) the system will b e brought down
to run Ievel l and shut down.
Setting the Default Run Level
When booted, Atari System V slartS the init process (jsbinlinit)). This process
reads the letdinittab file to determine the run level to come up to, and tl>en runs
all the indicated initialization scripts and commands listed. Each line in
/etclinittab is an entry containing four fields separated by colons. The line with
initdefault in the third field is known as the initd efault entry; it specifies the
default initial run level in its second field.
As superuser, you can edit/etdinittab to change the initdefault entry to a
different default run level. The change to inittab takes effect on the next boot.
Localization and Internationalization
All Atari System V application programs will support multilingual operation.
That is, all communications between the program and the user can be in the
language of that user. By default, this is the system-wide language that is set in
the generic login file /etclglobals.
To change languages, set the LANG environment variable in the login script of
the home directory. For example, run a script that sets $LANG from the
.xdmsession script. See the environ(5) manual page for detailed description of
LANG and other shell environment variables. See "Adding a New Language" in
Chapter 4 for a list of supported native languages.
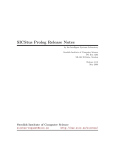
Installing a New Application
Use the Product Install window to install new software application onto t11e hard
disk. The product installation tool needs only to know the device from which to
install t11e product. The product must have been packaged using the Application
Packaging tools. Refer to the "Application Packaging" section of Chapter 4.
1. Select the Install icon from the WISh tool tray panel.
The Product Installation window pops up (Figure 3-1).
2.
Check the display of available disk space to make sure it will hold the
application.
3. Select the installation device icon.
4. Insert the product installation media into the appropriate device. (For
example, insert diskettes in the diskette drive.)
5. Select the Start button to start product installation.
A progress window opens (Figure 3-2) to display product installation status.
If required, it requests input for you to
type into this window.
When
installation is complete, a message indicating success is displayed.
6. When the product installation is complete, press <Return>.
3-13
Chapter 3
Figure 3-1
Product Installation
Window
File
Produd Installation
He p
l
Se!oct installalion device:
To 1nstalla product, pieeul mtkB sure that
you
kbytt a
1 246 l<hy
t ..
):bytu
I
17966
lbo••
57190
��
�!:�fd
·�� i$:!
lvu:
:::��--lnse11 dlskene into floppy di.,k drive.
Figure 3-2
Progress
Window
STATUS UNE
-�
b.. v• IIHlough rpac1 on )'(IUJ ftle fi.Y'tem.
Availah!aspeceon
Oldlftn
Dl6fiLAV FREE
:�:,?;;��
�SPACE
�••
--- �':�n':�l'lETEJ
Of
Install: lnstaftation in Progress
I!=
� Product Jl15tJllation RUilni.og.
(Jieli8020,ac68030,ae68040)
1 Tnt
fti�Ua.u
1.0.
Inue 10
'Diia $f!peln to be an etl..eJIPI;. to imt.all the s•e architect.un and
vernon of a p.dtf.941 which u a.l.uaoty U\)talled.
1il..ia :inst&l..letion
will 1tte"'Pt. to ....,,,.,nta U.i.11 pack�
Should the aanuU
fi l.n ineluded in thia packa;e be in,t.alled
(detwl.t' y) [y.n. 7,qJ X
'
••n should t!le •wwal hbt ba instilled
(default. A:.o•a/rome/xh..?kq/�1) !1.q] Jusr/�hau/aan
/\lu/dlatt/II.WI
lhn.IU
files �tllb.tlOI'I directory h
..
/Un/3hue/a..at1
!lhovld bi11.11cy filu inelud d >n this pdaqe be tnat.aU..d
(daf&U.lt' y)
'
(y,r,.?,ql 1
..
Wben 1hou.l.d the bb\uy hl
(d•hult.·
be inetallecl
lho..e/rom•/;o;b/pk9fd.l) !?,q)
The display of free space is updated.
Installing a New Icon
To inslall a new icon in !he system-wide default W!Sh2 tool tray,
1- Drag the new tool, file, or directory into your (superuser) tool tray with
the Save File Positions option enabled.
This will save a new personal file for tbe superuser.
2- Copy this file (.wish_tools) into system directory /usrllib!Xlllwishltools
Thereafter, when users log in without a personalized configuration, the
system-defmed tool tray will come up.
3-14
Administrative Tasks
In any case, users can drag t11e new tool from a directory into their individual
WISh2 tool trays to make it more accessible.
X Window System Session Management
Atari System V is set up to handle login as follows:
•
xdm brings the system up for tbe X Window System. It then allows you to
log in.
•
xdm looks in your home directory .xdmresources for a Jist of resources that is
read by xrdb. By default this is absent, which means the system default
resources will be used.
•
xdm looks in your home directory for U1e .xdmsession tile and executes its
contents using your login shell; if the file is absent, the system .xdmsession
file is used.
•
Tile default .xdmsesssion runs mwm and brings up the W!Sh2 Shell. When
you exit the WISh shell, you are logged off automatically.
Preference Files
To customize the behavior of tbe Motif window manager
(MWM) or ol WISh2,
the following files, if present, are read from the user's home directory.
. mwmrc-Read instead of the system file when bringing up the MWM. Copy
the system file in /usrllib/Xlllsyscem.mwmrc and make your own changes .
. Xdefau/ts-Read by all X programs when started, except when resources are
set with xrdb (such as those in the .xdmresources file). You can create
.Xdefaults using X documentation for individual X programs.
•
.w ish_opt io ns-A ppl ied instead of system file (/usr/lib/Xll/wishloptions
lwish_options). It C<mnot be created directly. WISh2 creates this file if the
Save File Positions option is enabled. It saves t11e current behavior of file and
window operations as defmed by File/Configuration/File Options... and
File/Configuration/Window Options... menu commands .
. wish...panels-Applied instead of system file (/usrllib/Xlllwishlpanels
I wish.. .panels). It
is not directly creatable. WISh2 creates this file if the Save
File Positions option is enabled. It saves the current window l ayout and will
restart with this configuration whenever WISh 2 is started .
.wisilrc-Applied after U1e system lite (/usrllib/XII/w ishlc/assesl wishrc). It
defines classes of icons and utilities. Your system manager will provide a
standard system-wide definition of classes. Sec U1e Non Standard Logics,
W/Sh2 User·s Manual, "Configuring WISh2," for details .
. xfm. startup-Preference file for XFaceMaker 2. Cannot be created directly,
but by tbe XFaceMaker 2 Save Preference menu command.
Command Shells
A shell is a command interpreter that allows communication wit11 t11e operating
system. TI1e WISh 2 windowing shell provides a graphical interface to those
commands.
In addition to t11e WISh 2 windowing shell, three command-line shells are
available for communicating with Autri System V. Use them in conm1and
3-15
Chapter 3
windows, xtenn windows, and in single-user mode where an operating system
prompt is available.
The shell names and lhe names of the initialization files they look for are listed
below. If the file is not present, lhe shell continues in a default manner defined
by the system-wide initialization files.
Bourne shell(sh)
- executes system-wide profile /etc/profile each time a login shell is
started
- executes the .profile file in U1e user's home directory each time a login
shell is started
•
C shell(csh)
- executes !etc/login each tin1e a login shell is started
- executes the .login file in the user's home directory each time a login
shell is started
- executes the . cshrc ftle in lhe user's borne directory each time a C shell is
started and each time a login shell is started
- executes .logout me in the user's home directory each time a C shell is
exited
•
Kom shell(ksh)
- executes system-wide profile /etc/profile each time a login shell is
started
- executes the .profile file in the user's home directory each time a login
shell is started
- executes the flle specified by the environment variable ENV each time a
Kom shell is started and each time the login shell is started
FILE SYSTEMS
'lbe main file system is called the root ftle system. and is usually depicted as a
slash (/). Other file systems can only be acoessed by users if they are mounted.
That is, if the other file systems are logically connected to the root ftle system or
a file system already mounted on the root file system.
All Atari System V in formation is stored within a directory tree that is a
hierarchical structure of files. Some files are regular files in that they contain
information, such as a letter, a report, an executable program, or a database
data
file. OU1ers are directories that contain listings of files. Still others are special
files used for various kinds of communication; most users rarely need to use
special files.
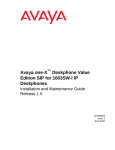
Figure
A directory tree for the X I I directory in /usrllib is depicted in
3-3.
Atari System V files are located logically by type and function in the following
standard directories:
Configuration files are located in !etc
Log files are located in Ivar
Single-user adntinistrative binaries are located in lsbin or /usrlsbin
OU1er binari es are located in lusrlbin and lusrllocallbin.
3-16
Administrative Tasks
4:.
Figure 3-3
File Tree
Structure
CJ
Atarl
CJ
0
CJ app-defautts
0 done
CJ X11
---
�
c::J fonts
c::J xdm
c::J xdm.nat
c::J xdm
c::J
lim
oc
0 Ad-'o - 0
O Fm
CJ bitmaps
g..
m..
0
bllmaps
Cl
100dpl
CJ
7Sdpl
��
CJ
c::J
c::J
0 ·-·
0
All
0
.,
0 Bounce
0 Color
c::J Cr�•
ml��e
c::J
Appll
c::J File Selector
Fm
Help
bttmaps
c::J
Exampln - CJ
bitmaps
Find
c::J Makelt
c::J Menus
c::J TextEdit
C
In some cases !he AT& T System
V. Release 4 documentation misrepresents U1e
location of configuration and binary files that traditionally bave resided in/etc.
In that documentation, configuration Iiles tltat exist in /etc are listed in lsbin,
/usrlsbin, or a comparable directory containing binaries, and binaries that exist
in lsbin and lusrlsbin are listed in /etc.
The Atari System V on-line manual pages do accurately reflect the location
of the binary and configuration ftles.
Some directories directly below root are mountable ftle systems. A file system is
a tree of directories and files stored as a single logically contiguous block of data
on a storage device . For instance, a hard disk may be partitioned into several file
systems .
The
mount command associates a tile system stored o n a disk with a
mount-point directory in the directory tree. A mount point is usually an empty
(or near empty) directory used for providing an access point to a tile system. A
AI'&T, System V.
Release 4, System Administration Guide, Otaptcr 5, "File System
tile system is named for its mount point directory. Refer to
Administmtion." Mountable tile systems contained in Atari System V arc shown
in Table
Table 3-4
Mountable
File Systems
3-4.
File System
Type
Description
ufs
The root file system contains system files, including executables
bfs
Bootable kernels and related files
and some configuration files
/stand
/var
ufs
Variable system-wide information
/home
ufs
Personal files and application software
/fsck
ufs
Special mini-root for file system consistency checks
Several types of file systems arc supported by Atari System V. Each type has its
own intemal protocol, special features, and unique options. For more
information, refer to the "Preface" of Ute AT&T, System V. Release
4, Network
Us er 's and Administrator 's Guide.
3-17
Chapter 3
The file system types are
s5
ufs
bfs
nfs
rfs
Syst.em V file system
Berkeley file system
boot file system V.4
Sun network file system
AT&T remote file system
Use tlle Atari tool ftlesys to
Mount ftle systems
Display U1e status of file systems, including tlle relationship among
ftleservers and directories
Display Ole amount of space available on each file system
Unmount ftle systems
Check file systems for internal consistency
Set ftle system options
Only the person with superuser privileges can use this tool.
1. Select the File System icon
t!!!J
. The File System window shown in
Figure 3-4 pops up.
Figure 3-4
File System Window
rn s MOI.I4TED
[lie Qptlons
___ll: :::�.:.:ra
U = UNMOLifTED
Fil•
SvBI:em Admini.trlltion
Dir��:tol)'
elcxlu
AvailabW'Total
1"11odll
A.vlli.labJe/Toul
/nh/nfth.l
/nh/nevtt
/dev/root.
/defl/d#./cl<WJd;
/d"/dalt/cOdl.u
I
lS�&a !1'99oo
"'""'
/hek
ml6 t4DlSlO
/dn/d»./eOdO•S
'""
/ttaM
<ll':l / 20000
4231 / 12000
lde•/.uk/dld0t3
· D
HelpM,
21•
21\
35\
onl 1 212u
&4.a
JSZ23 / 4l&l6
na
1950 I
100 /
2496
115
l4t
86\
Directol)': llhoaJl
2. Select a ftle system, or type the name of a file system in either the Device
text box or tbe Directory text box, as appropriate.
When only one file system is selected and it is unmounted, you can
Change the mount directory by typing a full pathname in the Directory
text box.
Change the mount options by means of the Options menu (see
Figure 3-5 and Figure 3-6).
The UNIX File System (UFS) options window (Figure 3-5) pops up if Ole
selected file system is on your hard disk.
3-18
Administrative Tasks
"·;;:·,
Figure 3-5
UFS File System
Options
UFS File System Options
• Automatically mount when multiuser.
0 Mount read-only•
• Allow set-user-10 execution.
The Network File System (NFS) options window (Figure 3-6) pops up if the file
system is remote.
Window options for the other file system types will become available as they are
implemented.
Figure 3-6
NFS File System
Options
NFS File System Options
• Automatically mount when mu1tiusm'.
0 Mount read-only.
• Allow set-user·JO execution.
0 Retry mounts in background.
• Wait forever for requests.
• Allow interrupts durins mount.
Number of mount failure retries:
Retransmissions per request:
f.!.o:::J
l1!i:::J
When one or more file systems are selected, you can
moun� using the Mount button,
unmount, using the Unmount button, and
check, using the Check button (must be unmounted).
Maintaining File Systems
Without the File System tool you will need a summary of commands used to
moun� unmount, monitor, and check file systems.
Mounting
To mount an existing tile system to make it available for use, use the
mount(lM) command. Most standard file systems are automatically mounted
during system stanup. See the manual pages for mnttab(4) and vfstab(4).
To specify the type of file system, use the -F option. Type
mount
-F < f i l e_system_type> <device> <mount_point>
3-19
Chapter 3
1:
Example
mount - P ufs
/dev/dsk/c0d0a6 /home
where device /devldsklc0d0s6 is mounted on !home as a ufs file system type.
2:
Example
mount
/home
"!11e file system type and device are listed in letdvfstab and therefore do not need
to be listed here.
Example 3:
mount -P nts
-o retry• 4 , intr newtt : /home
/mnt
mouniS an nfs file system . The -o shows options. The remote system newtt
has its home directory mounted on /mnt
Unmounting
To unmount a file system that is mounted on the system in order to remove it
from use, use the umountO command. (See the manual page for
mount(IM)).
Most slalldard file systems are automatically unmounted during system
shutdown procedures. The
mount command with no argumeniS lists all mounted
file systems.
umount <directory>
or
umount <file
system>
Example 1 :
umount /mnt
where lmnt is UJC mount point directory for a flle system.
Example 2:
umount /dev/dsk/cOdOsl
where /dev/dsklcOdOs 1 is the resident device for a flle system.
Monitoring Disk Usage
To find out how disk space is being used, use the
df command. This command
requires the -F option to specify file system type. if the file system you want
information about is unmounted, and if it is not found in letclvfsrab. See the
manual pages for df(l M) for a list of generic options, along with options specific
to eacb me system type.
Checking
To check, and possi bly repair, unmounted file systems to ensure data integrity,
use the Check button in the File System Administration window to invoke the
filsys window (Figure 3-7).
Type the
fsck conmllld
ll , using the -m flag to determine whether a file system
needs checking. Type
fack -m -P < f ile system type> <file system>
Example:
fsck -m -P u f s /dev/dsk/cOdOsl
3-20
Administrative Tasks
Figure 3-7
File System
Check Window
�1
fi lsys: filesystem check and repair
Done.
Checkin9 /dev/dsk./cOdOe)
12000 tot.al. blocks
7296 free blocks
US total 111odes
96 free inodee
hle systu VlUI not •odihed
!Help . 1
..
·
This command requires UlC -F option to specify tllC file system type, if not found
in letdvfstab. See U1e manual pages for fsck(IM) for a list of generic options,
along with specific options for each file system type.
[> Caution
Because U1c root file system cannot be unmounted, refer Lo it
as ldevlrroot (note the extra r) when checking i� and reboot
inuncdiately afterward. Otherwise, tl1C in-memory copy of the
superblock will later be written to the disk during a periodic update,
undoing some of the changes just made and possibly leaving the file
system in an inconsistent state.
PERIPHERAL DEVICES
Device drivers are present and enabled for the peripheral devices shown in
Table 3-5. In general, all that must be done is to plug the device in. (Refer to the
owner's manual for your computer.)
Table J-S
Supported Devices
External Ports
Peripherru ==
������================��;;;;�;;============o
Devices
Console
19-inch monochrome Atari monitor
Keyboard
Atari TT intelligent keyboard
Three-button mouse
SCSI
Disk drives
Ta
drives
Floppy disk
720KB diskette
Parallel port (Centronics)
Printer
Two serial ports (Zilog SCC)
Two serial ports (MFP)
VME
Printers
Dumb term inals
Modem
Ethernet Network
Additional device drivers may be written and included in U1e system. See
Chapter4, "Application Development"
3-21
Chapter 3
Serial Port Configuration
Atari System V is preconfigured with the following port assigmnents:
External Port
Modem I
Modem 2
Serial I
Serial 2
Device Path
Device
/devltenttlml
ldevlrennlm2
ldev/tennlsl
ldevlrenn/s2
Terminal
Service
login
Modem
uucp
Terminal
login
Terminal
login
Serial Port Management
Access to the computer from remote devices, including tenninals and modems,
is supponed by the Service Access Facility (SAF). The SAF replaces both the
getty and the listen processes on older releases of UNlX systems. The SAF
consists of several layers. The top layer is the Service Access Controller (SAC)
process which oversees the service machine that manages several services,
including tenninal port monitoring and network access for UUCP and other
nonlogin services.
The SAC administrative command is sacadm which
adds or removes port monitors,
starts or stops a port monitor,
enables or disables a port monitor, and
prints requested port monitor information.
The SAC lower level administrative command is pmadm, which facilitates the
servicing of port monitors. 'D1e pmadm command
adds or removes a port service,
enables or a disables a port service, and
prints requested port service infonnation.
Port Monitor
·n1e SAC program, started from inittab, consults a table of enabled services and
starts service-specific daemons to monitor ports in their specific domain.
Typically, SAC starts inetd, the basic Ethernet daemon, and ttymon, the
tem1inal port monitor daemon. These services in tum start specific handler
processes, such as login, when activity is detected on a device under their
m<magement.
The ttymon process is responsible for monitoring serial ports and, when activity
is detected, invoking a service configured for that port, usually login.
The ttyrnon process has three main functions:
It initializes and monitors tty ports.
It sets tenninal modes and line speeds.
It invokes the service associated witll a port whenever it receives a
connection request.
Port services determine the behavior of a connection and, in the case of serial
ports, the service is usually terminal login, which prints a login banner on the
connected tem1inal and controls tl1e login process.
3-22
Administrative Tasks
TT Port Monitor Configuration
The TT is delivered wiU1 !he following port monitor configuration:
•
ttymonl supports modem port 1 and serial port I, providing login service
•
ttymon2 supports modem port 2, providing login service and modem support
•
ttymon2 supports serial port 2, providing login service
TI1e port monitors ttymonl and ttymon2 are started and enabled when the TT
enters multiuser state (initialization states 2, 3, and 4). Services supported by !he
port monitors (login) are now available 10 tllc ports upon an incoming connection
request.
Under most operational conditions, tlle TT port monitor configuration does not
require maintenance, except for disabling of a ttymon port service to
accommodate connection of a serial printer.
For example, tlle command
pmamd -d -p ttymon2
-s s2
disables the serial port 2 login service in order to connect a serial printer.
The service access command
pmadm -e -p ttymon2
-s
s2
enables serial port 2, the ttyrnon2 login service.
Following are examples of adding a port monitor to the ttymon configuration to
support a serial port (serial port 5 in this example).
sacadm -a -p
ttymonS -t ttymon -c
/uar / l ib / a a f / ttymon -v
\
' ttyadm -v•
Use tlle following service access command to add login service for service
support of the serial port 5.
' ttyadm
pmadm -a -p t tymonS -s sS -i root -fu -v \
-v · \
-s /uar/bin / l ogin -m ldterm -p \ " login : \ "" "
Start and enable the new port monitor ttymonS and port monitor service for
service support of serial port 5 as follows:
l. Start port monitor, ttymonS
aacadm -s -p ttymonS
2. Enable port monitor, ttymon5
sacadm -e -p ttymonS
3. Enable port monitor service, ttymon5
pmadm -e -p ttymonS
-s s S
For more complete information on port managemen� refer to the AT&T. UNIX
System V Release 4, System Administrator 's Guide, Section 13, "Service
Access."
3-23
Chapter 3
Serial Port Printer Configuration
One or more of t11e serial ports may be connected to a serial primer. The
simplestmethod of connecting a serial printer is by making a direct connection
to the selected serial port.
To configure the system software to allow operation of a serial printer, disable
the port service associated with the selected serial port and enter the appropriate
Ipadmin commands.
For example, t11e steps necessary to configure serial port 2 for serial printer
operations are
1. Disable serial port 2 port service.
pmadm -d -p ttymon2 -s s2
2. Make the physical printer connection to serial port 2.
3. Add printer name to lp service
lpadmin -p <printer name> -v <pathname>
Example:
lpadmin -p laserjet -v /dev/terms/m2
4. Tell the LP print service to accept the printer.
accept laserjet
5. Tell the LP print service to enable the printer.
enable laserjet
For more information on printer configurations and prim services, refer to the
AT&1; UNIX System V Release 4, System Administrators Guide, Section 9,
"Print Service."
Serial Port Modem Connection and UUCP System Support
The IT is delivered with modem port 2 configured to support UUCP
communications services, modem connection, and direct IT-to-IT connections,
which require that a connection method to a remote system be specified and
supported in its database flies. The information required would include data
specific to your connection method and that of the remote machine you wish to
connect to. The UUCP database ftles are located in the directory letduucp.
Table 3-6 1ists t11ese files and gives a brief description of each one.
Specifying a Connection Method to a Remote Machine
The UUCP ftles and file contents necessary to establish a connection to a remote
machine with a Hayes-compatible modem are as follows:
•
Devices
ACU term/m2 , M-2 4 0 0
hayes
ACU term/m2 , M-12 0 0
hayes
ACU term/m2 , M-3 0 0
hayes
Di r e c t
3-24
term / m 2 , M-3 0 0 d i r e c t
D i r e c t term/m2 , M-2 4 0 0
direct
D i r e c t t e rm/m2 , M-1 2 0 0
direct
Administrative Tasks
Table 3-6
UUCI' file
Files
Config
UCCP Database
Description
Allows you to override some parameters used by the uucp protocols. lbe defauh
always sufficient.
De\'ccmfig
Allows you to override some parameters
s are
used by devices other than modems. 1be
defaults are almost always sufficient.
Devices
Lists the devices present on your system and specifies how to manipulate those devices.
You edit this file when adding new uucp
Dialers
tty lines.
Describes how to dial a phone number on types
of modems connected to the system
You edit this file when adding a new type of modem.
Dialcodes
used within the Syslems file.
common Systems file can be shared by multiple
Gives symbolic names for phone number prefixes to be
Thus numbers can be shortened and a
machines.
Grades
Permits job.s to be panitioned into multiple queues of different priorities. The defaults
provide for three priority grades, which is usually sufficient.
Limirs
Pennissiotrs
Allows you to limit the maximum number of uucico, uusclled, and uuxqt processes
that may run simultaneously.
Describes access rights for other system.s that call
your machine and that �·our machine
calls .
Poll
a system will be polled. This is useful
i
You edit this file when settng up polled sites.
Used by uudemo11.poll to determine what times
for sy.ttems that cannot call your system.
Syslems
Describes the systems known to uucp and how
to connect to each one. You edit this
file when you add a system to be contacted.
Sysfiles
•
The Sysfiles, Devices, and Dialers files can consist of multiple files.
references to these files so that
'The Sysjile contalns
UUCP knows where to look for system information.
Dialers
hayes - , ,
CONNECT \m
""
\dAT\ r \ c OK \ r
\ EATDT \ T \ r \ c
\
Systems
my_sys
Any ACU
1200
\ d og in : - - og i n : --ogin :
Any
1200
\ d og in : - - o g i n : ··-ogin :
nuucp
rdd2
ACU
nuucp
wooky
Any D i r e c t
1200
-
\d og in : --og i n : --og i n :
nuucp
•
Sys[iles
service=cu
sys t ems:Syst ems
devices =Devices
d i a l ers=Dia1ers
service=uuc i o s y s t erns=Systerns . c i co : Sy s t erns
devices=Devic es . c i co : Devi c e s
dia l e r s :O i a l e r s . c ico : D i a l e r s
To summarize,
I.
conununication services
Make connections by consulting sys[iles
to detennine tlle files to usc for
other operations.
3-25
Chapter 3
2. Consult U1e appropriate Systems file to find out what kind of connection to
use for U1e call.
3. Follow tile device name (tllird field of Systems) into tile Devices file, where
tllcy detem1ine what hardware implemems U1at connection metllod.
4.
Follow tile ftftll field of Devices into tile appropriate Dialers file, to
dctcnnine how to talk to that specific device.
5. When tile call is made using tile Devices and Dialers infonnation, cu returns
control to U1e keyboard, or tmcico goes back to the Systems entry and logs in
to tile remote machine.
When U1ese steps are complete, tile connection is made and data communication
begins.
Use tl1e following examples to make a remote connection based on the foregoing
configuration information.
1. Copy myfile from your local machine to the remote machine, rdd2.
uucp /home / j ohn/myfile \
rdd2 ! /var /spool/uucppublic/myfile
2. Make a direct connection from your machine to the remote machine,
wooky.
This connection can be made via dial-up telephone lines, tllrough a
hard-wired data link, or across a local area network.
cu wooky
For more information on UUCP file configurations and remote connections,
refer 10 the AT&T, UNIX System
Section 7. "Network Services."
V Release 4. System Administrator's Guide,
ADDING A NEW TERMINAL TYPE
Before adding a new terminal type, be sure tllat your language choice is properly
displayed so tllat your responses arc interpreted as you intend.
Atari System V supports internationalization on text-based terminals. The
1ERM and LANG environment variables enable the appropriate
character-mapping file.
Set U1e TERM envir01m1ent variable to that of the terminal
Set tile LANG environment variable to tllat of the language.
Atari System V internal code set is ISO 8859- 1 . A terminal that uses a different
code set or tbat uses only pan of this code sel requires a character conversion
between tile terminal and the system.
The GLS software mapping module translates between the terminal STREAMS
device and tile system. This module uses the binary character translation table
indicated by tile TERM and LANG variable settings.
Atari System V provides a binary character translation table for the TT console.
1l1is table is installed the codeset directory (/usrlliblcodeseti$IANG) for each
supported language.
3-26
Administrative Tasks
1l1e codesio conunand creates binary character translation tables from ASCII
code set mapping source tables. Code set source is found in tl1e
/usrlliblcodeset/$TERM_mappings files, where $TERM is one of the following:
TI
VTlOO
VT52
ST52
To install the V TI 00, the VT52, or tl1e ST52, use the codesio command to
compile the ASCII source into object file format. Install the resulting object file
($TERM) in the code set directory (!usrllib!codeset!$LANG) for each language.
Example:
codesio -f vt5 2_mappings -c GERMAN-MAIN
-t vt 5 2
-1
\ german
1l1e -f flag identifies vt52_mappings as U1e input source table file; -c selects
the codeset GERMAN-MAIN within the file vt52_mappings; -1 sets the
language name within the object file to German; and -t names tlle outJ•Ut object
fl.le and sets tl1e terminal name wiU1in U1e object file to be vt52.
If characters are mapped identically, you can link to an existing code set for the
same tem1inal type in anotl1cr language directory.
Exmnple:
1n /usr/ 1 ib/codeset /eng1ish_usa/vt52
/usr/1ib/codeset / eng1ish_UK/vt 5 2
To attach a terminal type tlJat i s not listed above, you must create a codeset
n�apping source table for the terminal type. Copy an existing source table from
the directory lusrllib!codeset and use your favorite editor to customize it for the
new tcnninal type. See the codesio(IM) manual page for required content and
format.
Generate a new object file using codesio as described above. Test it using the
command glscnv, which will output details of how each character will be
converted. When debugged, install the new object file in the codeset directory
for each language as described above.
Thereafter, this object file is loaded when the combination of LANG and TERM
is set.
Q
All X fonts used by Atari System V are ISO 8859-1 fonts.
ADDING A NEW DISK DRIVE
After installing a new extemal disk drive you should prepare it to store
information by initializing it; that is, organizing its storage space and LTeating
file systems.
Q
Most of the following conunands are Atari-specific. Refer to tl1e
on-line manual pages for detailed descriptions of commands.
I. Turn on your system and verify that tbe new disk is installed.
Watch the boot text. If you don't see an additional SCSI device entry, check
the hardware and reboot.
3-27
Chapter 3
2. Format the new disk with the format command
A disk partition is derived using the fonnula
X
conuoller
Y
drive
Z
cXdYsZ, where
SCSI ID
SCSI LUN (always 0)
=
panition number (in
slice
hex: 0-0
where f refers to al l partitions
eXdO refers to the whole disk and is equivalent to cXdtlsf.
Example:
format -t
/dev/rdsk/c3d0af
In this example, the SCSI ID of the disk being formatted is 3 (refer to the
format(lM) manual page).
3. Install an Atari partition table and boot sector.
An Atari partition table may have a maximum of four entries, only one of
which may be an Atari System V entry. A volume table of contents (VTOC)
(see step 5).
is used by Atari System V to keep track of its internal partitions
The Atari System V partition table:
Partition
ID No .
Start
First block o f the pa r t i t i on
0,1,2,3
S i ze
S i z e of
ID
Tag identi fying par t i tion type :
UNX
GEM
Flag
the part i t i o n .
Atari
=
Sy s t em V
Ata ri TOS
=
Flag iden ti fying
S t -boot
in blocks
=
Unix-boot
the pa r t i t i on :
TOS boot part i t i o n
=
Atari System v boot p a r t i t i o n
Block 0 contains the Atari partition table that bas entries describing the
layout of the disk. Each entry describes one disk partition.
The first example and explanation below describes bow to create a disk that
contains only Atari System V; this is followed by an example of a disk that is
divided between Atari System V and TOS.
Example 1-Atari-only partition:
partinit -Ib� -o
/dev/rdak/c 3d 0 a t
-I option clears block zero
- J:
clears block zero, dcsuoying existing Atari partition
-b option idelltifies boatable disk
-b
identifies the disk as bootable; set this option in case you
-1 option installs bootstrap files
-i
tab les
ever want to boot from the disk.
-m
option requests interactive
prompting sequence
3-28
installs boo tstrap flies; set -i in case you e ver want to boot
from U1e disk and to ha ve a backup copy of the bootstrap
flies.
-m
requests the in teracti ve prompting sequence.
Partinit
displays U1e size of the disk in sectors (5 12-bytc units).
Adminisrrarive Tasks
-o
/dev/rdsk/c3dOst
specifies device
-o /dev /rdsk / c 3 d 0 s f specifies the device on which to
inslall the modifications; this must reference the whole
physical disk.
This command asks the questions displayed in the box below; you supply the
answers.
current
Phys i c a l s i z e 4 1 5 4 3 6
Nonbootable disk
0
Which P a r t i t ion?
Flags,
one
I d message
of:
St-Boot,
UNX
( ) ?
Delete,
Unix-boo t ,
Non-Boot?
u
sector ( 0 ) ? 1
S i z e ( 0 1 ? 415435
Which Partition? <Return>
Start
P a r t i t i on
Start
Size
1
0
q
Which P a r t i t ion?
w r i t ing sector
415435
Id
UNX
unix-boot
0
Explanation:
partin.t t promptsfo r a pa11ition
nwnber
Which
Pa r t i t ion?
0-3
0
lets you modify one disk partition entry
prints out the current partition table
<Return>
q
writes changes and quits
<Control D>
abandons any changes and quits
You can create up to three partitions, numbered 0 to 3. In U1is example you
will modify partition 0, the first partition.
partin.t t prompts fo r a flag
Flags ,
one
Non-boot?
u
of :
St-Boo t ,
De l e t e ,
Uni x-boo t ,
De l e t e
removes this entry from the partition !able
Non-Boot
unsets current boolable slatus of the selected
partition
S t - Boot
or
U n i x-boot
sets the partition to be bootable for the
specified operating system
ll1is will be a boolable Alari System 5 partition; U1erefore select u for
Unix- Boot. For any other choice, type the frrst letter using either upper or
lowercase.
partini tpromptsfor an ID
Id message
( ) ? UNX
Type UNX for the panition that contains Alari System V or GEM for partitions
partin.t t promplsfor rhefirst
sector in the partition
parti.nit promptsfor rhe number
of secrors in the partition
that conlain TOS.
Start
sector
(0) ?
1
The part in it infonnation is stored in sector 0. If there will be at least one
TOS partition, sUITt the first one in Sector 2; otherwise, SUITt it in Sector I .
Size
( 0 ) ? 4 15 4 3 5
3-29
Chapter 3
Return
displays the partition table
Since one sector is reserved for part ini t data,
physical size minus l .
size
is the current
Whi ch Par t i t ion? <Return>
Par t i t ion
Start
Size
ID
0
1
4 1 54 3 5
UNX
unix-boot
Pressing <Return> displays a printout of your enUies. Type q to save the data
to disk. lf you made a mistake along the way, type <Control D>.
The responses in this example allotted the entire disk to one bootable Atari
System V partition. The resulting disk layout looks like this:
Atari
System V Partition
.-/'-...
f
l
Boot Sector
Atari Partition Table
Example 2-Atari!fOS-sbared disk:
The command
partinit -iibm -o /dev/rdak/c3d0at
asks the same questions as the previous example:
current
Physical
size
415436
Nonbootable d i s k
Which
Flags,
Pa r t i t i on ? 0
one
Id message
of:
St-Boot,
() ? GKM
Delete,
start sector ( 0 ) ? 2
( 0 ) ? 41674
1
Unix-boo t ,
Non -Boot?
n
Size
Which P a r t i t ion?
Flags,
one o f
ST-Boo t ,
Id message () ? UNX
Start s ec t o r C O l ? l1676
S i z e ( 0 ) 393760
Which partit ion? q
Writing sector 0
Delete,
Unix-Boo t ,
Non-Boot ?
u
Explanation:
In this exan>ple sectors 2 tl>rough 21675 are reserved for TOS, and the rest of
the disk is reserved for Atari System V. The Atari partition is bootable.
If a TOS partition was created, as in Example 2 above, it would be located
immediately after block 0 as follows:
TOS Panition
Atari
BlockO,
I,
I
Atari
3-30
Partition Table
Boot Sector
System V Partition
/'.._
"I
Adminislralive Tasks
Refer to U1e on-line
partition( 1M)
manual page for instructions for
specifying all parameters on U1e command line or in a data file, raU1er than
interactively.
4. Add a pdsecwr (physical disk sector) to the disk.
The pdseclor is a block that describes U1e physical layout of U1e disk.
Example:
format
-w /dev/rdsk / c 3 d 0 s 0
The -w flag does not format the disk; it writes U1e pdsecwr to the disk.Refer
to the
format(lM)
manual page.
The disk layout now looks like this:
V Partition
_....__
Atari System
Block 0
�I
Boot Sector
Atari Panition Table
5. Create the VTOC for the Atari System V partition.
The
VTOC divides Atari
System
V into separate partitions, some of which
will be file systems and others which will be swap space or used for other
types of disk functions.
setvtoc -i /dev/rdsk/c3d0s0 sets an
initial
partition U1e size of the allocaU
i ble disk
VTOC on the disk;
one mountable
with a generic name.
prtvtoc /dev/rdsk/c3d0s0 > vtocdata prints the default VTOC into a flle
named wocdaw which you can then edit.
vi vtocdata edits the file to set up partitions as you want them.
setvtoc -i /dev/rdsklc3d0s0 _.; vtocdata command installs information from
wocdata back into U1e VTOC on the disk.
Refer to the setvtoc(lM) and
prtvtoc(lM) manual pages. The setvtoc
VTOC information that
manual page describes the content and format of the
you edited.
The VTOC partitioning information heads the
shown.
Atari System
v partition as
Atari System V Partition
6. Create one or more file systems using the mkfs command.
Example:
mkfs
-P u f s
/dev/rds k/c3d0s6
<options>
3-31
Chapter 3
Refer to the mkfs(IM) generic manual page and manual pages specific to
each type of file system for options.
Atari System
V Partition
File System(s)
7. Mount the new disk to make it available on your system.
Example:
mount
-P u f a
/dev/dsk/c3d0a6
/newstuff
You must use-F to specify type if you did not specify it in theletclvfstab ftle
for this file system.
/newstuff is the mount point directory to which you decided to attach this
partition. Refer to the mount(IM) and mnttab(4) manual
Atari System V
pages.
8. Edit /etclvfstah so these new file systems wiU be automaticaUy mounted
and unmounted on system start up and shutdown.
FoUowing is a sample letclvfstab with a new entry for /newstuff:
*•J><ciol
fsdc:dev
mountp
lproc
proc
ldevlfd
ldevlfd
/dev/roc;l.
/de:v/rrOOl
fd
ufs
/devldsklcOd0.3 /dev/rdsk/c0d0s3 /stand
no
bfs
yes
ldev/dsklc0d(ls5 /devlrdsklc0d0s5 /var
uh
yes
/dcv/dsk/c0d0s6 /dev/rdsklcOdO:s6 /home
ufs
yes
/dev/dsklcOdOse /devlrdsk/cOdO.e /fsclc
ufs
/dev/dsklc3d0.6 /dev/rdsk/c3d0s6 /newstuff
ufs
Refer to the
9.
fstype fsckpass automnt mntnags
lproc
yes
vfstab(4) manna! page .
Make new file systems available for mounting by remote systems.
Example: Make thelnewsw.fftile system accessible to remote systems via
NFS:
a.
Ensure that the file letddfslfstypes contains the word
nfs as the first word
on one of its lines.
b. Type
share
-P n f s
-orw
/newatu f f
The -F option specifies the file system type by which this file system can
be accessed. The ufs and s5 llle system s can be accessed by
nrs.
Tite -{) rw option specifies that this file system is read-write via NFS.
This exantple makes the entire /newstu..(ffile system available via NFS.
Specifying lnewslll..(flsrc would make a portion of the file system
available to remote systems.
3·32
Administrative Tasks
c.
Add an entry
toletcldfsldfstab so this file system will be automatically
available to remote systems whenever nfs is started. Titat is. you will not
have to type in Ute share command each time your system is boo ted, or
nfs is staned. Each line in letcldfsldfstab
is a share command like the one
issued in Step 9b.
10. To access the lnewstufffile system via NFS, each remote system must
now:
a.
Create a mount point directory to which thelnewstu.fffile system will be
mounted. Choose a name that is meaningful on Ute remote system. For
example:
b.
c.
mkdir /nfs/somehost
Mount Ute /newstuffTLle system. For example,
mount
somehost:/newstufT /nfs/somehost. In this example somebost is the
name of Ute system on which the lnewstu.fffile system resides. TI1e
contents of lnewswf
f are now available to the remote system by referring
to ftles and directories in the lnfslsomehost directory.
Add an entry
IIJ !etclvfstab so that the /newsll#ftle system is
automatically available when this remote system starts up.
Refer to Ute
share(1M), dfstab(4), sharetab(4),
and
mount(IM) manual
pages .
SYSTEM RECONFIGURATION
Atari System
•
•
V
shou ld
be reconfigured whenever one of the following occurs:
The system parameters in the kernel, such as those for tuning, are changed.
A software module is added to the system, with no change in the system
hardware configuration.
•
A software module is added to the system because of a change in the system
hardware configuration.
For all of Utese circumstances, use the Atari IIJOI Kernel Configuration from the
System Administration Tools icon on the WISh desktop.
As superuser,
$
Select the
Kernel Configuration icon from the W!Sh2 tool tray
Tite Kernel Configuration window pops up (Figure
Use this five-step sequence to reconfigure Atari System
I.
Select Ute base kernel to
2.
Change the modules included in the kernel.
Change U1e kernel parameters.
Build the kernel.
5.
lnslall the kernel.
V:
be changed.
3.
4.
3-8).
Following is a detailed description of each of these steps.
I. Select Ibe base kernel to be changed.
Available kernels are displayed on the main Kernel Configuration window.
The chosen kernel is displayed in the selection box.
Select one of the actions
3-33
Chapter 3
Figure 3-8
Kernel
Configuration
Window
MENU BAR
II=
File
� ..
.. .
..
1 · 10 .
Kamel Configuration
.§_dit
Qptlons
!!elp
b!ndo
Select Base Reference for Kernel Conf'l8uration
AVAJLABlf
"""'na
base kernel
I
SELECTED KEittEl -
T
i
create date
�""
l�t.alled IC.,.l
Previ-Jy Inat..lled
Aut 12 15:25 1991
Jul 31 20:46 1!91
1
......
""
....
uniM_ll
......_..
Aut 13 ll:Jl 1991
� 12 17:JJ 1!91
1:140600
1336412
1- ....,..
ACTIOH BUTTONS -
s.lection
IModules..I.
i
I
I Pan.ms...l
�
�
at lhe bottom of lhe window to use Ibis kernel as the base reference kernel or
to view its configuration.
lbere will be entries for all kernels for wbicb build archive directories exist
in lhe lusr/locaVliblkernels.
At a minimum, lhe following specific kernel entries should be present
currently running
/stand/unix
previously installed
/stand/OLDunix
TI1e selected kernel may be Installed immediately. Build is disabled for a
Doubk click: Use left (Sekct) mouse
bulton to point to object and execute
two dicks in quick succession.
kernel !hat is already built. Use lhe Select button to double-click on a kernel
entry to bring up bolh 01e Modules and Pararns windows for !hat kerneL
2.
Change the modules included in the kernel
+ Select lhe Modules.•. button from lhe Kernel Configuration window. "!be
Modules window pops up (Figure 3-9).
Every module included in lhe selected base kernel is represented by an
icon on the right side of lhe window. A scroll bar appears if !here are too
many icons to display.
Olher available modules are represented on lhe left side of lhe window. A
scroll bar appears if !here are too many icons to display.
•
Double click, using U1e Select (left) mouse button, on a module's icon
to move it to the olher side.
If a module to be included has dependencies on modules not included,
you will be warned before lhe module is moved to lhc included list. "!be
dependencies are not moved automatically. Module dependencies are
specified in lhe /etdmaster.d file on lhe first line of the
DEPENDENCIES/VARIABLES column.
"!be Kernel Configuration tool knows only about lhe lstandlsystem file: it
does not read the lstandledt_data fl.le, which bas a list of all possible files.
3-34
Administrative Tasks
Figure 3-9
Modules Window
Kernel Confi uration : Modules
Base Kernel ;
I
untx.....13
� I' wr
I
AVAILABLE MODULES --
X
.,..
X
ARP
X
SHW
LL�P
X
SOCKMOO
SElECTED MODULE
IHfOI!MATION
I �j
�
---------- f :���m
ln•toll Modul..
Do Not l"'toll
UOP
X
RAWIP
X
X
TCP
X
""'
X
KLM
Int.ernat. f'rat.acal
flebt.M: Iatf' _,.
�i••: Non.
a...t. r-ed ror: TCP u
IP b thll f�al c�&..,.._ delilflltf"V prot.oool
r.. tN IP r-uy ot prnt.ncoh.
TtP ...,u_. tO>
IWoW be Uovertod � lAf' Df JP ls pr-ich J'f'OII"'ace
.... ar it. � be accessed direct..lw Wllnc t.he
'
II
I
OK
' '
...
I
BASE KERNEL
MOOUlES
IO<P
Cancel
...,
I
I
�
DE!fJ
'
'
Basically, /stand/system along witll !he /etclmaster.d flies, describes tlle
software portion of tllc system configuration-we portion !he Kemel
Configuration tool deals wilh. The lstandledt_data file is a list of
supported hardware devices; !he system's built-in autoconfiguration
support deals witll checking for these devices and including support for
them,
•
if present.
Select a module icon to view
information about that module such as
Expanded name of module
Module description
Dependencies on other modules or parameters
Q Change an icon by placing a biunap ftle with the same name
(in
uppercase letters) as !he module, plus the .bm extension in tl1e directory
/modules. d; otherwise a default icon is displayed.
+
Select OK to confirm and save changes
•
Select Cancel to retum without saving changes.
If changes arc made, a new entry
(unix_[n+l))
is added to the list of
kemels in !he main Kemel Configuration window and is automatically
selected. Until it is successfully built, the name of this kemel appears in
the list as New Unix and the Install button is disabled whenever this
kemel is selected.
3. Change the kernel parameters
Select !he Params... buuon
from !he Kernel Configuration window. The
Pararns window pops up, as shown in Figure
3-10.
Values are displayed for the selected base ken�el; tl•esc are reference values.
If you change a system configuration parameter,
Select !he Recompute
3-35
Chapter 3
Figure 3-10
Params
Window
SELECTED KERHEL
SELECTED PAIWIIETER
IHfOIIMTKlN
Defaults bullOn to update the default column of kernel parameters. (Only the
megabytes of the CPU memory entry have any effect on the default values in
this release.)
The system configuration parameters are
average number of users
maximum number of users
average number of windows per user
megabytes of CPU memory
Double-click an entry in the list of kernel parameters to change its value. A
pop-up d�'llog box appears showing the name of the selected parameter
(Figure 3-11). The current value will be used to initialize the value entry
field, or you may type in a new value. Select OK to keep the value or save a
change. Select Cancel to close the pop-up dialog box without making any
change.
Figure 3-11
Parameter Change
Dialog Box
Kernel Config : Param Change
Parameter :
Value ,
The
the
3-36
[default I
[de fau 1 t I
NSRMOUNJ'
l::
L
''l,
,_
_J
_
_
_
_
value is for reference only. If you are satisfied with all of
values, click the Set Values = Defaults button to update
Administrative Tasks
tlle value column. Select an entry in the list to get a helpful des�-ription of
tl1at parameter.
When all parameters have been set as you want them (all system
configuration parameters and lhe value column of kemel panWJeters),
Select OK to save the changes and exit the Params window.
Select Cancel to discard all changes and exit the Params window.
l f changes were made, a New Unix ( un i x_ [ n+ l l ) entry is added to tl1e
list of kemels in the main Kernel Configuration window and automatically
selected. The Install button is disabled until !his kernel is successfully builL
4. Build the kernel
a. Select lhe Build button from the main Kemel Configuration window
(refer to Figure 3-8).
Module and Params windows must be closed before a build is allowed.
Build creates a new version of the kemel, using the specified modules
and parameter values. Messages are sent to an xterm exec ute window.
b. To tum verbose mode off or on, Select Qptions from the menu bar and
Select tbe Enable Verbose Mode check button, as preferred.
After a successful build, tl1e entry for tbe new kemel (unix_ [ n+ l J J
changed to unix_ [ n + l l and is selected.
is
c. To remove t11e last kernel t11at was built in Ibis session and is not yet
installed, select l!ndo from menu bar, tben select Remove Last Built.
5. Install the kernel
a. Select the Install from t11e main Kernel Configuration window to install
the selected kernel as t11e bootable file.
b. To swap the currently running kernel witb t11e previously installed
OWtmix, Select !!ndo from menu bar, tben Select Reinstall Previous. If
there is no lstand/OWrmix, this request will be rejected.
c. To exit from Kemel Configuration, Select .[ile from menu bar, t11en select
Exit.
If Module or Params changes were made, but no kernel was built, the
changes are discarded.
Reconfiguralion Details
This section is a description of what occurs when tbe system automatically
reconfigures itself.
AT&T 382 Computu documentalion
does not apply lo infomzation in the
"Reconfiguration Details " section of
the Atari V System Developer's Guide.
Tbe boot code loads files from t11e /stand partition only. Tbe boot command
scans the VTOC (syslvto c.lt) for the stand partition tben loads and executes tbe
desired bootable kemel. Leave a working copy of a kemel in /stand, perhaps
named /stand/unix. old, because errors in a driver may make lhe new kemel
unbootable.
Tbe boot program recognizes two types of boot an auto boot and a demand bool.
In an auto boot. the Equipped Device Table (EDT) probe programs are run and
the date of tl1e /stand/system file is checked. If there is a mismatch between
devices supported by the kernel and those found by probing, or if the system file
3-37
Chapter 3
has been changed, 01e file lstandlmUNIX is loaded and the system will run cunix
to rebuild /stand/unix when it comes up. In a demand hoot. no such checking is
perfonned.
I f 01e initial kemel name in
otherwise, a demand
bootname is unix,
hoot is perfonned.
an auto hoot is perfonned;
If U1e system maintenance mode is
entered, a demand hoot is assumed, unless oU1erwise requested.
The utility
cunix builds kemels from a set of boot modules.
For each device driver or contigurable pan of the kernel there is a binary ftle
called a hoot module and a corresponding
the module named
master(4) tile. The core kernel is in
kernel. Eacb module has the same name as its master file, but
in uppercase leuers.
Boot modules are themselves produced by the utility
mkboot(IM), which
combines a master ftle with either a driver object file or an existing hoot module.
The cunix utility combines the boot modules together accord ing to the
specilications in a system(4) tile.
conf.s containing the device switch tables, interrupt vectors, etc., is
conf.o. Finally,
cunix invokes ld(l) to link the driver and software modules with conf.o to create
A tile
generated automatically by cunlx, and assembled to produce
a single, absolute unix.
Boot time probing is used to determine hardware configuration, using a set of
probe programs installed in
cunix and used to
/stand, one per device. The infonnation is passed
to
detern>ine the hardware modules to be included. Configuration
details for each possible hardware device are listed in the EDT data file
edt_data(4).
Each conligurable board or controller has an associated software probe routine
(EDTP_device).
The EDTP detennines whether the device is present and
functioning and, if it is, records information about the device in the EDT. The
boot code loads all
EDTP_d�ice fLies from /stand and executes them
one-by-one.
When reconfiguration is necessary, the autoboot sequence looks like this:
I. EDT probe routines, executed by U1e boot code, generate an in-core
EDT. The required devices
in-core EDT.
2.
r
flag in lstandledt_data is added to the
The boot code compares the in-core EDT with the EDT in /stand/unix.
If U1ey are different (i.e., hardware driver added) go to step
4.
3. The code compares the modification date of /stand/unix with that of
/stand/system. If /stand/unix is older (if a software module was added or
system parameters were modified), go to step 4; otherwise go to step
5.
4. Reconflguration is necessary. The hoot places /stand/system in U1e
bootname field of the in-core bootargs structure and boots
lstandlmUNIX. lstandlmUNIX is a mini-kernel that contains the
minimal set of modules necessary to reconfigure the kernel.
Keep a copy of mUNIX i n /stand at all times. When the boot code invokes
mUNIX, it passes along a pointer to the in-core bootargs structure. mUNIX
creates a copy of this structure, making bootname available to other
3-38
Administrative Tasks
programs, using U1e sysm68k() system call.
A non-null bootname indicates
reconligural.ion is needed.
5. /ere/in iT begins processing /erc/initrab entries
6. letclcktmmi.x, executed as specified in letclinittab, gets boot name using
sysm68k0. If bootname is non-null and lsTandlnoautoconfig is not
present, then rebuild the system; go to step 9.
7.
(!sTandlnoautoconfig was present or bootname was nuU) letclinit brings
the system to its default initialization state.
8. Boot continues. No reconfiguration is done.
9.
Rebuild tile system.
/etc/ckmkuni.x copies bootname to letclsysfile and
executes /etclbuildsys -s-
10. /etc/build;ys runs lusr/binlcuni.x using the system ftle name from
letclsysfile. The new kernel is placed in /unix.
1 1 . /etclbuildsys reboots the system (uadmin 2 1) i f cunix returns
successful ly.
CHANGING THE BOOT PREFERENCE
V mainUlins an operating system boot preference in nonvolatile
(NVRAM). The preference can be set to one of three values:
Atari System
memory
Boot Atari System
V
Boot TOS
No Preference
If No Preference is the choice, the first bootable operating system is selected.
The search sequence is partitions (}.-3 in order from:
I.
SCSI devices (}.-7, in ascending numerical order
2.
ACSI devices
3.
The diskette
(}.-7, in
ascending numerical order
The diskette does not have a partition table. At this time, a bootable Atari System
V partition can only be found on a SCSI
device; TOS can be found on any of the
three.
If the preference is set to boot a specific operating system, then the first bootable
partition which bas a nag value matching U1e preference is booted. If that
operating system doesn't exist on your hard disk, the boot program will hang,
because it continues the search for a boot partition with U�at partic ular operating
system.
If this should happen, insert the TOS
setboot disk and press any key. The TOS
SETBOOT.PRG and set the boot
system will come up and you can execute
preference to an operating system that exists on your bard disk. Setting it to No
Preference always boots the system.
The system is shipped with No Preference. To change the boot preference from
TOS to Atari System
V, use the TOS program SETBOOT.PRG provided on a
special diskette. To change the boot preference from Atari System
tile
V
to TOS, use
setboot command in System V.
3-39
Chapter 3
TOS Boot Preference
Under TOS, U1e SETBOOT.PRG command brings up U1e
displaying a menu bar with the fol lowing titles:
setboot main screen,
•
Desk, with tbe entry About Setboot... and U1c desk accessories
•
File, conaining
t
tbe menu entry Quit
•
Boot, wiU1 U1e entries
- Set Boot Preference
- Display Boot Preference
- Initialize NVRAM
Help
•
Select About Setboot...
OK to close tbe box.
To quit the program,
from U1e Desk menu to pop up the copyright box.
Select
Select Quit from the File ruenu. You will be prompted to
confirm this action.
To set tbe current value of the boot preference in the
NVRAM, Select Set Boot
Preference from tbe Boot menu. A dialog box with the title Select Preferred
Operating System pops up showing the following radio buuons:
•
TOS
•
Atari System V
•
No Preference
Tile highlighted radio button represents tbe current boot preference in the
NVRAM. No Preference selects the first bootable operating system. To change
the
boot preference, Select tbe radio button of tbe operating
and
Select OK.
system to be booted
A dialog box pops up asking you to reboot tbe system . lllis is
necessary to boot tbe newly selected operating system.
To cancel the dialog box, Select the Cancel button.
Selecting Display Boot Preference from tbe Boot menu opens a dialog box
showing the current boot preference in the NVRAM. Clicking on
OK closes the
dialog box.
If it should ever be necessary to initialize NVRAM because invalid
have affected the checksum,
Select Initialize NVRAM
data values
from the Boot menu. A
dialog box pops up to confirm this action. Initialization clears NVRAM and sets
the checksum.
Tile Help menu offers help boxes for the menu entries in the Boot menu as well
as a general description of the purpose of tbe program .
Following is an example o f how to set the boot preference t o Atari System V
using
SETBOOT.PRG:
I. Execute the SETBOOT.PRG command from the GEM desktop.
2. Select Set Boot Pr.Cerences from the Boot menu; the dialog box with
radio buttons pops up.
3. Change the boot preference to UNIX by selecting the Atari System V
radio button and click on the OK button.
3-40
Administrative 1asks
/
You will
be asked to reboot the system; when done, Atari System V is booted.
Atari System V Boot Preference
The Atari System V version of tl1e boot preference utility is similar to the TOS
version. 1l1e program is called
setboot. Upon invocation from the WISh tool
tray it opens a main window with the following components:
•
A menu bar with tl1e titles File and Options
•
Three radio buttons:
- TOS
- Atari System V
- No Preference
•
An Apply button
1l1e highlighted radio button displays the value of the boot preference in the
NVRAM. To change U1c boot preference, select a different radio button and
Select U1e
Apply
button. ·n,is changes the value in the NVRAM.
To re-read U1e NVRAM,
Select Read NVRAM from
the Options menu. This
causes the program to read the NVRAM and set the radio buttons according to
tl1e boot preference value in the NVRAM.
If an error message appears while setting the boot preference, you should
initialize the NVRAM by selecting Initialize NVRAM in the Options menu. This
action must be confmned.
To exit the program, Select Exit from the File menu.
When you set the boot preference to TOS, you must shut down the system to
boot TOS. At the next reboot the system will then boot TOS.
REFERENCES
AT&T
UNIX System V Release 4 Documentation, Prentice-Hall, 1990:
System Administrator's Reference Manual,
passwd(4)
shadow(4)
group(4)
inittab(4)
useradd(IM)
usermod(IM)
userdei(IM)
init(lM)
User's Reference Manual,
passwd(l)
System Services and Application Packaging Tools, Chapter 8, "Packaging
Application Soflware"
System Administrators Guide,
Chapter 5, "Administering a File System"
Chapter 12, "Security"
Chapter 13, "Service Access"
Chapter 17, ''User and Group Management"
Product Overview and Master Index
Bach, M.J.,
The Design of the UNIX Operating System, Prentice-Hall, 1986
Non Standard Logics,
WISh2 User's Manual, Paris, France, 1991
3-41
CHAPTER 4
Application Development
OVERVIEW
Use this chapter for designing and creating programs in the Atari System V
environment. Some of the information you'll fmd here includes
•
Brief descriptions of software development tools and libraries.
•
Guidelines for creating window-based applications, and internationalized
applications in particular.
•
A summary of bow to package an application.
•
An overview of how to write a device driver program and U1c steps used to
include it in the system.
•
A section on rewriting existing 1DS-GEM programs for the Atari System V
windowing environment.
APPLICATION DEVELOPMENT LIBRARIES
User applications are developed on the Atari System V by writing programs inC
programming language that use the functions and routines that are provided in
several software libraries. Each library can be thought of as a layer.
NEW APPLICATIONS
I
AtarlLlb
I
XFaceMaker 2
I
OSF/Motif
I
Xtoolkit
I
X lib
Each layer is built upon the layers below it; that is, AtariLib makes direct calls to
OSF/Motif routines, Xtoolkit routines, and X lib routines, as well as
XFaceMaker 2 routines.
Each layer, from U1e bottom up, contributes to the construction of a new
application in the following ways:
•
Xlib is library of basic windowing routines, such as mouse event, move
window, size window.
•
Xtoolkit is a library of windowing-associated widgets, including a scroll bar,
a pop-up menu, and a toggle button.
4-1
Chapte r 4
•
OSF/Motif is a library of windowing and widget routines that define Ole
•
XFacemaker 2 is an interactive application that creates the graphical interface
OSF/Motif style.
of a new windowing application. It is also a library of interface routines.
•
AtariLib is a library of graphical user interface routines, such as
internationalization, alert boxes, and context-sensitive help.
Libraries in the Atari System V distribution include those shown in Table 4-1.
Table 4-l
Atari System V
Libraries
Name
Source
Description
Atari
Atari library
Atari
Fm
XFaceMaker2
NSL
Xm
Motif
OSF
XI
X Toolkit
MIT
Xlt
X Library
socket
Soekel library
MIT
V.4
V.4
nsl
Socket hostname library
ma11oc
Network services library
V.4
gen
General purpose routieos
V.4
m
Math library
V.4
To link these libraries iniO your own program, enter the following lines near the
lOp of your malcejile.
LIBS=-lAtari -lFm -lXm -lXt -lXll
-lsockhost -lnsl -lmalloc -lgen
-lsocket
\
-Lm
TOOLS
Included in the Atari System V set of software tools for applications
development are the following
gee
GNU tools from the Free Software Foundation:
g++
C compiler
C++ compiler
gdb
bison
compiler-generator
RCS
Revision Control System
C debugger
PROGRAMMING NOTES
When programming, note the following:
•
The object file format used in Atari System V is the Executable and Linking
format
(ELF), not the Common Object File Format (COFF) used in earlier
releases of System V.
•
When compiling X code, use imake 10 generate makefiles. The !make
program auiOmatically inserts Ole compiler flag -DSYSV 10 accommodate
XII header files in a System V environment
•
The debugger support format is called DWARF; it is supported by gdb.
•
The gee default compiler may issue calls to gnulib. Therefore, when porting
an application 10 a platform that does not have it, include gnulib in the
application package.
4-2
Application Development
IN TERNATIONALIZED APPLICATION DEVELOPMEN T
Internationalization involves generalizing prognuns or systems so !hey can
handle a variety of languages, character sets, and national customs.
All text visible to tile user must be internationalized. ll1at is, it must be displayed
in !he language of the environment variable LANG. This includes
titles,
label
strings, icon names, product names, and formal strings used to compose other
strings. Even a formal string as simple as %s:%s must be internationalized, since
punctuation differs from language to language.
File names and log file output should not be internationalized. If you are
developing an OSF/Motif-based application, routines in the Atari library
simplify the internationalization process.
Within tl1e source code, do the following:
1.
Initialize the program environment to be the language or the user's
locale.
See t11e
environ(S) manual page for a description of t11e environment
variables t11at define a locale.
The
setlocale routine initializes the program environment for a parttcular
language for one or more of the following variables:
LC_ TYPE affects the behavior of character handling and
multibyte character functions
LC_COLLATE affects string collation and tnmsfonnation
LC_MESSAGES affects message catalog functions
LC_MONETARY affects monetary formats
LC_NUMERIC affects numeric fommtting functions
LC_TIME affects dale and tin1e string conversions
In addition, LC_ALL affects all of the above.
Example:
setlocale(LC_ALL,"")
A value of"" for locale specifies that the locale should be taken from
environment variables. Refer to the
setlocale(3C) nmnual page for details.
2. Use the following Atari System V Dlllcros and routines that
automatically handle internationalization requirements.
See Appendix E to read how U1csc routines correspond to the standard
specified in t11e X/Open Portability Guide, Issue
3.
Character routines that handle characters and strings according to the locale
setting are
ctype(3C )
conv(3C)
mhchar(3C)
mbstring(3C)
strcoii(3C)
string(3C)
strxfrm(3C)
character handling
character tnmslation
multibyte character handling
multibyte string functions
string collation
string op::rations
string transfonnation
4-3
Chapter4
1l1e following local convention routines bruJdle language-dependent
representation of numbers, dates, and times. These functions are affected by
the current locale setting.
nl_langinfo(3C) retrieve local convemion information from
environmenlLablc
localeconv(3C) get numeric fonnauing information
ctime(3C)
convert date and time to string
perror(3C)
print system error messages
printf(3C)
print forrnaued output
regexp(S)
regular expression matching routines
strftime(3C)
convert date and time to string
strtod(3C)
convert string to number
scanf(3C)
convert fonnatted input
vprintf(3C)
print formatted output
3. Create and install a message catalog specific to the application.
gencat(l)
produce a message catalog from a text file
The output of the gencat command is placed in the directory
lt�sr/libllocalei$LANGILC_ MESSAGES
replacing $LANG with the appropriate language. For example, if the
language is French from France, then LANG�JrenchJrance and the catalog
would be placed in
lt�srllibllocalelfrench_jrance!LC_MESSAGES
In addition, the gene at file upon which all other translations are based should
be placed in
/usr/liMocalJCILC_MESSAGES
Tnmslators may then ungencat the message file, translate i� gencat the
translation, and move the file to the appropriate place for that language.
4.
Use
the message catalog indicated by the locale setting.
catopen(3C)
catgets(3C)
catclose(3C)
open message catalog specified by NLSPATH
retrieve messages from message catalog
close the message catalog
If possible, use the Atari Library routine FmCatGetS raU1er lhan lhese standard
C library message catalog routines.
ADDING A LANGUAGE TO THE SYSTEM ENVIRONMENT
Table 4-2 shows locales supported by Atari System V environment ftles.
Use lhe following steps to add anoU1er locale:
I. Decide on a language name.
lang_territory.codeset
Since it is almost always ISO 8859-1, you can drop .codese t. Territory may
also be optional. For instance, if the new language were Romansch, it need
not be romansch_swiss.8859-l, but simply romanscb.
2.
4-4
Create and install botb a character translation table and a numeric
representation table.
Application Development
Table 4-2
Environment
File Locales
Locale
Description
english_ usa*
American English
frencb_canada
Canadian French
danish
Danish
dutch
Dutch
english_uk
English
frnnisb
Finnish
french_france*
French
french_switzerland
Swiss French
german_germany*
German
italian_italy•
Italian
italian_switzerland
Swiss Italian
norwegian
Norwegian
portuguese
Portuguese
spanish
Spanish
swedish
Swedish
icelandic
Icelandic
c
Locale used when LANG not specified.
Also used for translating to other locales.
generally english.
"'Default locale for this language
a.
Con s truct an input file using the me supplied in
lusr/libllocale!C ichrtbi_C as the staning point. (See manual page
chrtbi(IM).)
b. Generate tables using the cbrtbl command.
c.
Install tl1e two output tables in their respective directories, /usrllib/localel
$LAN GILC_NUMERIC and /usrllibnocale/$LANGILC_TYPE.
3. Create and install a character collation table.
a.
Construct an input file that describes the collating sequence for the new
language. You may uselusrllibllocale/Cicolltbi_C as a s�'lfling point, but
it may be more useful to usc /usr/lib/localelenglish_usalcolltbl_C. (See
manual page colltbl(lM) for format and content of tl1is file.)
b. Use the coUtbl command to generate a collation table.
c.
4.
Install the collation table in /usr/lib/loca/e/$LANG/LC_COLLATE.
Create and install a table of monetary representations.
a. Construct an input file to describe formatting conventions for monetary
quantities for the new language (see the montbl(lM) manual page for
specifications). You can use the file/usr!lib/locale/Cimontbl_C as a
starting point, but it may be more useful to use
/usr!lib/localelenglish_usa/colltbi_C.
b. Create a monetary database table using the montbl command.
c.
Install the monetary database table in the directory
lusr/lib/locale!$LAN GILG_MONETARY.
4-5
Chapter4
5.
Create and install a file of time representation.
a.
See tllC fonnat specified in U1e strftime(4) manual page. Use U1c file
Jusrllib!locale!Citime_C as a starting point.
b. lns�1ll in directory lusrllib/locale/$LANGILC_TIME
6.
Create and install message catalogs for applications tbat will be used in
the new language.
a.
Usc l.be cp command to copy the original language version of l.be
message file fromlusrllibllocai!CILC_MESSAGES; using a text editor,
change U1e text portions to l.be new language.
b. Generate a formatted message catalog from l.be text source file.
c. Install the formatted message catalog in the directory
Jusrllib!locale/$LANGJLCMESSAGES
APPLICATION IMPLEMENTATION GUIDELINES
This section outlines recommendations for implementing XFM applications. It
deals specifically wil.b the interaction between l.be application and lhe
Jusrllib!Xll!Arari library. All applications must conform to lhe Atari Style, as
described in lhe Atari Style Guide.
Atari Library
The Atari library routines make it easier to confonn to Atari Style. These
routines are listed at !.be end of this section. On-line manual pages are listed in
Appendix A.
Atari library routines facilitate U1e use of XFaceMaker 2 functions lhat
•
integrate intemationalization into an XFaceMaker application,
•
implement boll1 context-sensitive and general help, and
•
implement pop-up alert boxes.
The Atari library provides functions Ulat implement input callback for most
application needs. For example, X library routines call back with an arbiuary
amount of input data; use an Atari library function lhat will pack this data up in
lhc amounts you want before calling your application back.
Window Construction
If U1ere is only one primary window, it must be an XmApplicationSbell. You
must usc XmTopLevelSheU for lhe second and any subsequent primary
windows. All primary windows must be fully decorated, must have
XmMainWindow as their inm•ediate child, and must have a menu bar.
You must use XmTransientShell for secondary windows. which may not have
menu bars. They must have a row of buttons at the bottom and a separator above
U1em. Secondary windows that are modal should always appear near the widget
U1at caused them to appear. 1l1is is done automatically for Help and Nert boxes.
OU1crs may usc PositionNearO. Modeless secondary windows may appear
wherever lhe application designer thinks appropriate, but should defer to the
window manager, if possible.
Secondary windows. even modal ones, must have a title bar so that they can be
moved by the user, and tl1ey must not restrict the cursor to l.be window interior,
which would prevent the user from consulting other applications.
4-6
Application Development
All windows should be unmapped in their jill file. After all .fill files are loaded,
all active values attached, and all library initialization routines called, the
application should use FmShowWidget to make the first primary window
appear. The pointer to the shell widget may be obtained through an active value.
Internationalization
W1tl1in the source code, use tl1e routine FmCatGetS to obtain an
internationalized message. Mnemonics for the set number and message number
should be declared with #define directives, instead of using plain integers. 1l1c
message file (suffix .msg) should contain the mnemonic before 01e set or
message declaration to aid in decoding.
For example, if you define
#define ERRORMSGS_SET
123
#define CANNOT_OPEN 32
tl1e .msg file should contain sometl1ing like
$ ERRORMSGS_SET
The dollar sign($) is a comment sign
for messages
se t l 23
$ CANNOT_OPEN
32 Cannot
Q
open tllat file.
FmCatGetS usescatgets(3n to obtain messages. 1l1ese messages are read into
a static space, so the string retumed by FmCatGetS should be copied if it is to
be used after tl1e next call to FmCatGetS (or catgets).
Alert Popup Dialogs
Alert dialogs are used for all application errors. 1l1e only exception is when the
AlertlnitO function fails. In this case, tl1e application writes a message to the log
file and exits witll a nonzero status. The alert displayed to the user will be of a
nontechnical nature, with all technical and system call error information directed
to the log file.
Fatal alert messages should be presented with the
Interna!Error() function,
which exits after displaying the message.
Nonfatal alert messages must be presented whenever a system call or library
routine fails in a way that adversely affects the application, especially if the user
provided the information, such as a ftle name, for the routine that failed. Some
typical routines that may incur such errors are fopen() and
unlink().
Help Popup Dialogs
All applications must provide Help On Context and Help On Version. If an
application uses a mnemonic not found in tl1e OSF/Motif Style Guide, it must
also provide Help On Keys. If it binds any custom mouse actions, it must also
provide Help On Mouse. Help On Keys and Help On Mouse may be provided
even though not required by tl1e above conditions. Help On Help, Help On
Window, Index help, :mel Tutorial help may be available, but arc not required.
Running Subprocesses
The system() library routine should not be used to run processes, since it waits
for the child to exit before retuming and causes problems for tl1e XII Window
4-7
Chapter4
System's asynchronous event processing. Another drawback of the
systemO
library routine is U1at it uses a shell process to execute the command, which
should not he necessary. For this reason, the
avoided. The
popenO routine should also he
RunProcessO function provides a way to run subprocesses with
input/output redirection, including pipes.
Note U1at t11e asynchronous nature of X II also requires tllat the application not
block U1e waiting period for a subprocess to terminate. Thus, the SIGCLD signal
must he caught by t11e application, and the wait for t11e tenninated process must
he done in the signal handler. To minimize U1e intrusion to X processing, the
signal handler should limit its activity to oblaining U1e termination status of the
process by means of the
wait(2) system call and then registering a work process
to do the actual signal handling. See the documentation on the X Toolkit routine,
XAppAddWorkProc, for details on adding a work process.
Input/Output Handling
Any read or write operations t11at can potentially block may also interfere with
the operation of the XII Window System. Wilen an application is programmed
with all code in-line, effectively blocking whatever is waiting for ftle input or
keyboard input-the window cannot he resized, iconified, moved, or otherwise
manipulated during this wait time. In contras� the window of an application
programmed with input callbacks can he resized, iconified, moved, etc.,
regardless of where t11e dala is.
For this reason, the X Toolkit routine
XtAppAddlnput allows input/output
routines to he called only when the request may he done without blocking.
Although the routine is called XtAppAddlnput, it may in fact he used for
detecting
read, write, and exception conditions. Pipes, pseudo-TTY s, and
network files are all especially susceptible to being blocked, on both reading and
writing. Even ordinary fLies DlllY be network files because of NFS and other
transparent file systems, so it's a good idea to always use
XtAppAddlnput to
handle input/output processing.
This input-<:allback programming technique is described in
•
Nye, A., and O'Reilly, T.,X Toolkit lntrinsics
Programming Manual, Volume
Four, Section 8, "Input Techniques" Subsection 8.3, "File,Pipe, and Socket
Input"
•
•
Nyc, A. and O'Reilly, T., X Toolkit lntrinsics Reference Manual,
Volume
Five, "Xt Functions and Macros Subsection Event Handling, XtAddlnput"
Young, D. A., The X Window System-Programming and Applications with
Xt; OSF/Motif Edition, Section 5.8.1, "Using Input Callbacks"
Log Files
Applications should log U1eir progress using the logging routines provided in the
Atari library. Every major state change, such as opening or closing a window,
should be writle n to the log. More detailed infonnation should use the
LogDebug Olllcro so it will not he compiled into the code for production.
Any abnonnal condition, especially one resulting in a fatal alert message. should
he noted in the log file.
'!be application must call LogCiose upon nonnal lermination in order to remove
U1e log file.
4-8
Application Deve/opmefll
Atari Library Routines
Help Subsystem:
Helplnit
Initialize help subsystcm
PopupHelpAndWait Present help box and wait for response
HelpOnContext
Provides help on context for application
Alert Subsystem:
Alertlnit
InternaiError
AlertSetB uttons
AlertHelp
PopupAlertAndWait
Initialize alert box subsystem
Present an internal error alert box, tl1en exit
Set buttons in an alert box
Present help box for an alert box
Present alert box and wait for a response
Convenience routines present a standard dialog box and wait for a response:
PopupError And Wait
PopuplnformationAndWait
PopupMessageAndWait
PopupQuestionAndWait
Popup WarrtingAndWait
Popup WorkingAndWait
Interactive Command Execution Subsystem:
ExecuteList
ExecuteListV
ExecuteString
Execute a command and a list of arguments
Execute a command and a vector of arguments
Use the sheU to execute a command in a string
Noninteractive C ommand Execution Subsystem:
RunProcess
Run a process with 1/0 redirection
RunProcessV
Run a process with command arguments as a vector
AddCbildHandler
Add a child handler to a running process
GetCornrnandStatus Run a process and call a function with exit status
GetCornrnandStatusVSarne, wi01 command arguments as a vector
High·level Asynchronous Input/Output Routines:
ReadFileData
ReadFlleLines
ReadFileStrings
ReadPipeData
ReadPipeDataV
ReadPipeLines
ReadPipeLinesV
ReadPipeStrings
ReadPipeStringsV
Read raw data from a
file
Read lines from a ftle
Read lines from a file and store in array of strings
Read raw data from a pipe
Like ReadPipeData, with command argwnent vector
Read lines from a pipe
Like ReadP ipeLincs, wi01 command argument vector
Read lines from pipe and store in an array of strings
Like ReadPipcStrings, wi01 command argwnent vector
Low-level Asynchronous Input/Output Routines:
AddloProc
RemO\'eloProc
OpenReadPipe
OpenReadPipeV
Register an asynchronous 1/0 procedure.
Remove an asynchronous 110 procedure
Open a pipe for reading
Open a read pipe, witll command argwnents as a vector
4-9
Chapter 4
OpenWritePipe
OpenWritePipeV
OpenFilter
OpenFilterV
GetPipePid
ClosePipe
Open a pipe for writing
Open a write pipe, with command arguments as vector
Run a filter process with pipes both in and out
Run a filter, with command arguments as a vector
Get process ID of a pipe from its file descriptor
Close pipe file descriptor
Application Logging Routines:
LogO pen
Log Write
LogDehug
LogAssert
LogSysternError
LogCiose
LogReopen
Open a log ftle
Write to a log file
Put debug message in log file
Check an assertion and report failure in log flle
Report a system error to the log file
Close and remove a log file
Change a log flle
Miscellaneous routines:
AddPath
Add an element to a path-like environment variable
AddPathV
Add a vector of elements to a path variable
AdjustWmPadding Adjust padding values depending on resource values
FindWmPadding Find out size of window manager decorations
FmCatGetSAIIoc
Call FmCatGetS and copy result in a dynamic buffer
FmCatGetSRealloc Call FmCatGetS and re-use given buffer
GetSimpleCharSet Get default character set for OSF/Motif strings
PositionBeneath
Position a widget beneath another widget
PositionCenter
Position a widget centered over another widget
PositionNear
Position a widget near another widget
PositionOver
Position a widget over another widget
PositionRootCenter Position a widget in the center of the root window
APPLICATION PACKAGING
You should bundle your application into an installable product so that it can be
installed automatically using the system adminislration tool Product Installation,
or tl1e command pkgadd. There are no choices with regard to the directory in
which the product will be installed, or to the parts of the package to install,
unless incorporated into the installation portions of the package.
ll>is section is an overview of how an application should be bundled into an
installahle product. For more detailed infonnation, refer to the instructions,
sample ftles, and scripts in the AT&T, Unix System V Release 4 Programmer's
Guide: System Services and Application Packaging Tools. Chapter 8 "Packaging
Application Software," Appendix B "Manual Pages," and Appendix C "Package
Installation Case Studies."
I.
Create a file called pkginfo.
ll>is ASCII file describes the application package name, release, and version
numbers.
2. Create a file called prototype.
This ASCII file has one entry per flle that is a part of the application
package, including tl1e pkginjo and request files.
4-10
Application Development
3. Create an (optional) installation script.
1l1is file may be a Bourne shell (sh) script, or may be an executable progrmn.
It cm1 be a request, a class action, or a procedure script. Customize this script
for t11e application package. Typical things m1 installation script can do are
Set up for selective inst<�lation (ask which parts of the package
should be ins��lled <Uld where they should be placed).
Ins���� a device driver (ask bow many device nodes to create,
run a postinstall script, <md reboot U1e system upon
installation).
Define extra disk space requirements required for U1is package
(create a file called space).
Display a copyright message (create a file called
copyriglu)
Define <my software dependencies associated with this package
(�-reate a file called
depend).
Modify a system file during installation.
At the end of U1e request script, relevant parameters are made available to the
installation environment for
pkgadd.
4. Run the pkgmk command, which will gather all components or a
package, copy then onto the installation medium, and place them into a
structure that pkgadd will recognize.
DEVICE DRIVERS
Atari System V treats devices as special files that data is eiU1er read from or
written to. 1l1ese ftles are called device drivers. Files that provide interfaces
to
oU1er system resources are called modules or "software drivers" (i.e., there is no
physically removeable hardware device per se). Some examples of U1ese device
drivers m1d software modules are
•
The block device driver that controls U1e hardware disk unit.
•
The streams driver or module that controls the hardware terminal or the
•
The line discipline module.
software terminal line-discipline module.
Certain drivers <tre required to run U1e system-U1e keyboard driver. for example.
1l1ose shown in Table 4-3 and a few additional drivers are present in Atari
System V.
Additonal drivers can be added to your system; write them as needed, or find
someone who already has one that suits your needs.
A device driver must concern itself with three specific interfaces:
U1e hardware device,
U1e kernel, and
the boot
1l1e interface wiU1 U1e kernel is by means of data structures. See the AT& T
Device Driverlnterface/Driver-Kernellnterface(DDIIDKI) Reference Manual
4-11
Chapter4
Table4-3
Atari System V
Driver
Device Drivers
Function
Intelligent keyboard
IKDB
SCSI
Generic SCSI manager
HD
SCSI hard disk driver(interfaces with SCSI driver)
TP
SCSI tape (interfaces with SCSI driver) archive viper tape streamer
FFD
720KB floppy di>k
port
CE
Centronics parallel
SCCIO
Two serial poets on Zilog
USART
Two serial ports on MFP chips
6530 SCC chip
board driver
LA
VME Ethernet
VIDEO
Video subsystem
PSG
Programmable sound generator
CLOCK
Real-time clock
MFP
Multifunction peripheral/interrupt controller
be some name
68000 environment, but the
for the System V.4 protocol approved by AT&T. There may
changes for writing device drivers in a Motorola
functionality should be the san1e.
If you are writing a device driver for a SCSI device, refer to U1e on-line "Guide
10 Writing Device Drivers for the Generic SCSI" located in tbe file
ltlsrllocaVsrclsampleslscsidriver/scsigen.doc.
The source for a sample SCSI printer driver is available on-line in the file
/usr/locaVsrclsampleslscsidriver/pr.c. Compile it as follows:
gee -Xt
-
D_KERNEL -0 -e pr.e
Adding a Device Driver
1. Create an object file (in
ELF format} with gee, which will be added to
the kernel. If a device uses several a.out files, link them together.
2. Create a master(4) file in /etclmaster.d directory.
3.
4.
lf it is a software-only driver, add an entry to the /stand/system file.
If the driver is for a hardware device, add entry to /standledt_data f'lle.
�
You cannot use edittbl(lM}, because
the
bas been changed in U1e Ala!i System
V release.
format of
edt_data
5. Install the driver with drvinstall(IM). This creates a boot module from
the master file and the driver object file and places it in /boot.
6. If the driver is for a hardware device, install a boot probe program in
/stand. When the system boots, it looks for these.
In
lusrlsrclutslbootlprobe U1ere is a probe program called naiveprobe.c U1at
checks for a bus error when perfom1ing a byte read at the device base
address. For straightforward cases this may be compiled unmodified for each
device, with tbc define
DEVNAME variable setiO tbe appropriate device
name by means of a -DDEVNAME flag in the makefile probe.rnk. For
more complex cases, dedicated probe programs may be written for each
device. The xed/library contains the necessary structures.
4-12
Application Development
driver is a hardware device, make specia l files with mknod(IM).
7.
If the
8.
Reconfigure the kernel. Refer to Chapter 3, "System Reconfiguration."
9.
Reboot and use the device.
PORTING TOS/GEM APPLICATIONS
There is no simple rule for converting GEM programs to OSF/Motif. Bo�1 are
graphical user interfaces with a windowing system and have several features in
common.
Porting By Means of XFaceMaker 2
Alari System V uses the OSF/Motif widget set and lhe XFaceMaker 2 interface
builder, which allow the programmer to concentrate on lhe functionality of lhe
application. XFaceMaker also hides the complexity of lhe X Window System.
However, the XFaceMaker 2 library is more advanced, including such features
as a built-inC-like language, callbacks, active values, and the availabiltity of
powerful widgets.
As a GEM programmer, you are familiar with writing graphical user interface
software. The software you want to pon usually consists of two parts: U1e
application and tile user interface.
Applicstlon
If the application was written inC, it is easy to transfer it to Alari System V and
recompile it. Calls to the TOS operating system must be convened to the
equivalant Alari System V operating system calls. The most compatible way is
to use the C standard library functions-Copen,
fwrite, etc. (Refer to
the section
"Input/Output Handling" in this chapter.
User Interface
The user interface must be redesigned. OSF/Motif has a different look and feel
!han GEM and has new graphical objects you may want to use. Also, the
application now bas to run in a multi-tasking environment
To star� redesign lhe user interface using XFaceMaker 2.Create a main window
that contains the menu bar. The contents of lhe window should be �1e contents of
your main window (fonn) in the GEM application.
Forms and Windows
Under the X Window system, windows are used, ra�1er Ulan fonns; U1ese
windows may overlap. The windows controlled by the window manager have a
title bar and are similar to GEM windows.
Thus, a fonn dialog box in GEM must be implemented as a window under Atari
System V. XFaceMaker 2 helps the developer create windows Uwt behave in the
same way as dialog fonns.
XFaceMaker 2 allows you to create a window and place interactive widgets and
text edit fields inside it. You can specify callback functions U1at are the names of
functions in tlle program you are writing. ll1esc functions will be called by the
XFaceMaker 2 library when U1is object is selected.
4-13
Chapter4
After creating U1e window, save it and write the program. Usually U1e
Xl'aceMaker 2library opens tl1c window automatically and handles all events. If
an object such as a button is selected, the XFaccMaker 2 library calls the
callback fucntion specified for U1c object and acts on tlle user's input. When
using the XFaceMaker 2 library, UlC application developer has less to do Ulan
when using GEM.
To open a window without using XFaceMaker 2, use the Xt Toolkit. To draw
circles, rectangles, etc., inside a window usc U1e Xlib. It's similar lO drawing
with the VDI inside a GEM window. If you usc Xlib drawings, redrawing the
window is more complicated. It's possible to draw with Xlib functions inside a
window created by XFaceMaker 2. Sec Appendix D for a table of GEM/Xlib
equivalents.
Main Loop
The main loop in a GEM program is usually U1e event_multiO loop which waits
for events to occur. The application then determines
occurred and calls the appropriate function.
the type of event that
With XFaceMaker 2, this is not necessary. Once the main event loop
(FmLoop)
has been called, your functions that react on events are called automatically.
During UJC design of tl1e user interface of U1e application using XFaceMaker 2,
you specify callback functions for interactive objects. The XFaceMaker 2libary
will call your function when an action takes place on that object.
For instance, you might create a window with one butt.On. When the butt.On is
pressed, the window closes and the application exits. Design the window with
XFaccMaker
2
and place U1c button inside it. Specify the name of the callback
function for the button via tllC XFaceMaker 2 resource window using the activate
callback resource. For exan1ple, use
button_pressedO .
After saving U1e user interface you write your program. The core program in
general has to contain only two functions:
•
The mainO function, calling FrninitializeO,
FmAttacbFunctionO to
connect the C-function witl1 U1e user interface and the FmLoopO.
•
Your callback function for the button in this example,
button_pressedO.
This function calls exit(O), which causes the window to close and the
application to exit.
TI1e FmLoopO is like calling U1e event_multiO function in GEM and parsing
the occured events, except U1at U1e parsing is done aut.Omatically by X and U1e
XFaceMaker 2 library. Because the library knows the names and addresses of
your functions, it is able to call tllem.
Porting Example
There is a small GEM address application available which was ported to
OSF/Motif. There you arc able to see how the GEM look and feel was converted
to Motif/X Windows following the Atari Style Guide. This GEM application is
on-line in
/usrllocallsrclsampleslgem2motif. The GEM example is in subdirgem
s11bdirmotif
and the Motif example in
4-14
.-
Application Development
REFERENCES
Alari Computer Corp., Atari Syle
t
Guide, Alari,
1 991
AT&T, UNIX System V Release 4 Documentation, Prentice Hall,
1990:
Device Driver Interface/Driver Kernel lnt erface(DDI/DKI) Reference
Manual
Programmer's Guide: STREAMS
Programmer :< Guide: Nerworking Interfaces
Programmer's Guide: BSDIXENIX Compatibility Guide
Programmer's Reference Manual
System Administrator's Guide
System Administrator's Reference Manual
environ(S)
langinro(S)
nl_types(S)
chrtbi(IM)
colltbi(IM)
montbi(IM)
System Services and Application Packaging 1bols,
Chapter 8, "Packaging Application Software"
Appendix B.
Appendix C,
Non Standard Logics, XFaceMaker
2 Programmer's Guide, Paris , France, 1991
N o n Standard Logics, XFaceMaker
2 User 's Guide, Pmis, France, 1991
Nye, A. and O'Reilly,
T., O'Reilly & Associates, 1990:
Volume One: Xlib Programming Manual
Volume Two: Xlib Reference Manual
Volmne Four: X Toolkit lmrinsics Programming Manual
Volume Five: X Toolkit Intrinsic.< Reference Manual
Open Software Foundation, OSF/M otifProgrammer's Guide, Prentice-Hall,
1990
Open Software Foundation, OSF/MotifStyle Guide. Revision 1 . 1 , Prentice-Hall
Inc.,
1991
Open Software Foundation, OSF/MotifProgrammer's Reference, Prentice-Hall,
1991
Young, Douglas, 1/ze X Window System-Programming and Applications with
Xt-OSF/Morij Edition, Prentice-Hall Inc.,
1990
X/Open Company, Ltd., X!Open Portability Guide. XSI Supplementary
Definitions, Prentice Hall, Inc.,
1989
4-15
.·
APPENDIX A
Atari-Specific Manual Pages
Following is a list or changes. additions, and omissions that characterize the
difference between the
Atari System Von-line manual pages and the AT&T 3B2
manual page documentation. Some differences have to do with the nature of U1e
Atari port, oU1ers are Atari enhancements.
Manual pages for commands and flies that have been changed or added are
available on-line by using the man( I) command. For example, for infom1ation
about gee, type man gee_
Usc UJC pennuted index in the AT& T Product Overview and Master Index to
locate specific manual pages in U1e manuals
Changes
These manual pages were changed to accommodate U1e Atari System V port.
cunix(lM)
edt_data(4)
fonnat(IM)
master(4)
prtvtoc(lM)
newboot(IM)
Additions
The following manual pages contain Atari System Venhancements.
bison(!)
patch(!)
ci(l)
psc(l)
co(l)
rcs(l)
codesio(l)
rcsdiff(l)
findsrc(l)
rcsintro(I)
gcc(l)
rcsmerge(l)
g++(l)
rlog(l)
gdb(l)
sc(l)
glscnv(l)
shar(l)
glssuy(l)
unshar(l)
gnudiff(l)
hex (I)
bootaddhdr(l M)
ident(l)
bpatch(IM)
indent(!)
consmode(IM)
kennit(l)
e(IM)
less(!)
nvram(IM)imagpartini
lesskey(l)
t(IM)
makekit(l)
sctlang(lM)
merge( I)
setnetwork(IM)
mush(!)
setvtoc(lM)
A-1
Appendix A
sysm68k(2)
position(3A)
readfilcd.���(3A)
readfllelines(3A)
readlilestrings(3A)
readpipedata(3A)
readpipelines(3A)
readpipestrings(3A)
runprocess(3A)
writefilcdata(3A)
writefilelines(3A)
writepipedata(3A)
writepipelines(3A)
addchildhandler(3A)
addioproc(3A)
addpall1(3A)
alertinit(3A)
atarilib(3A)
closepipe(3A)
executelist(3A)
findwmpadding(3A)
fmcatgets(3)
fmcatopen(3A)
getcommandstatus(3A)
getpipepid(3A)
getsimplecharset(3A)
helpinit(3A)
logopen(3A)
Iogwrite(3A)
openfilter(3A)
openreadpipe(3A)
openwritepipe(3A)
getedt(3C)
getxedt(3C)
rcsfile(5)
gls(7)
boot(8)
edtp(8)
Omissions
Not a part of Atari System Y.
crash
disks
editsa
edittbl
empress
ntboot
fmtflop
fmthard
ismpx
A-2
ledre
login
pwnp
sadp
wtinil
XIS
xu
zdump
XWIN Xll/NeWS server
jtenn
Xll/NeWS, tNt and Shapes
jwin
layers
ldsysdump
EMD
API toolkits
3B2 Floppy Disk Driver ...
AT&T Windowing Utilities
APPENDIX B
Boot Text
BOOT TEXT OUTPUT TO THE CONSOLE
TI1e screen starts blank. After a 90-second time out (or when any key is
depressed), U1e following message appears:
Atari System V-4 Fri Jun 7
14: 02:04 EDT 1991
This message appears only on the console, not on a tenninal output of the
USART port. The date and message may change, depending on the specific
generation of llle System V boot.
TilC next section of infonnation appears on both console and the USAJ1T port
This infonnation differs, depending
on the specific conjig14ra1ions of
SCSI devices connected to the ma
chine. Every SCSI device should
appear on Ihis lisI.
Now there is a rime-om of aboul 20
secondr. As administrator you may
press <.Return> to skip the pause.
SCSI:
TARGET LUN
0
MAX TOR
LXT-213S
4-20 Direct access
UNIX System V Release 4. 0 Boot Loader
Boot: hd(O,O)unix
Building Equipped Device 'I'able
CEN:
controller 0 at OxFFFF8800
CLOCK:
controller 0 at OxPPPP8960
PPD:
controller 0 at OxPPPP8606
HD:
controller 0 at OxO
The no devicBs found message
means that those specific devices
are not physically connected to Ihe
IKBD:
controller 0 at OxPPFFFCOO
LA:
no devices found
MFP:
controller 0 at OxFFFFFA01
system.
ND:
no devices found
PR:
no devices found
PSG:
controller 0 at OxFFPP8800
SCCIO:
controller 0 at OxFFFF8C80
SCSI:
controller 0 at OxFFFF8780
'I'P:
no devices
VIDEO:
controller 0 at OxO
USART:
controller 0 at OxPPPPFA01
Loading unix:
820 +
found
0[193192]
+
722896 +
93432 +
864
These numbers vary, depe,Iding on
I he amount of memory installed on
1/ze system and the configuration of
the kernel.
UniSoft UNIX
(R)
System V
Release
4-0
Version UElO for the mc68030
Total real m�ory
8388608
Available memory
6664192
B-1
Appendix B
**********•*********************************************
Copyright
(c)
1984,
1986,
1987,
1988,
1989
AT&T-All
Right•
Reserved
The screen clears and is repl.aced by the
gray background of root X Window; then
the login screen is displayed.
THIS IS UNPUBLISHED PROPRIETARY SOURCB CODB
The copyright notice
above doe•
not
OP
evidence
ATitT INC.
any
actual
intended publication of such •ource code.
Portion• provided by
unisott
Corp.
under
a development
agree
ment with AT&T and Motorola.
*Node:
This line varies, depending
011
the node
name of the system.
noname
MOTOROLA M68K SYSTEM CONFIGURATION
Memory size:
8 Megabytes
System Peripherals:
Device Name
CEN
CLOCK
l'l'D
HD
Memory and device configuration will
MAXTOR
vary.
LXT-213S
4.20
0
203 Mbytea
IKBD
KP'P
PSG
SCCIO
SCSI
USART
VIDEO
SYSTEM V S'l"RBAMS TCP Relea•e 1. 0
1983,1984,1985,1986,1987,1988,1989 AT�T.
(c)
1986,1987,1988,1989 Sun Mic:ro.yat.m..
(c:)
1987,1988,1989 Lachman A•eoc:iates, Inc:. {LAI).
{c:)
All
The
B-2
Right• R•••rved.
system is ready.
APPENDIX C
References
Atari Computer Corporation, ATARI T1 Computer Owners Manual, Atari
Corporation, 1990
Atari Computer Corporation, Atari Style, Atari Corporation, 1991
AT&T, UNIX System V Release 4, Prentice-Hall, Inc., 199G:-lbe following:
Device Driver Interface /Driver Kernel Interface
N etwork User's and Administrator's Guide
Product Overview and Masters Index
Programmer's Guide: BSD/XENIX Compatibility Guide
Programmer's Guide: N etworking Interfaces
Programmer's Guide: ST REAMS
Programmer's Guide: System Services and Application Packaging Tools
Programmer's Reference Manual
System Administrator's Guide
System Administrator's Reference Manual
System Services and Application Packaging Tools
User's Guide
User's Reference Manual
Bach, M.J., The Design of the UNIX Operating System, Prentice-Hall, 1986
Bourne, S., The Unix System V Environment,
McGilton, and Morgan, Introducing Unix System
V, McGraw Hill,
1983
Non Standard Logics, WISI!2 User'sManual, Paris, France, 1991
Non Standard Logics, WX2 User'sGuide, Paris, Frdllce, 1991
Non Standard Logics, XFaceMaker 2 User's Guide for Use With Version 1.0
Nye, A. and O'Reilly, T., published by O'Reilly & Associates, 199G:-the
following:
Volume One, Xlib Programming Manual for Version II
Volume Two, Xlib Reference Manual for Version II
Volume Four, :X Toolkitlntrinsics Programming Manual
Volume Five, X Toolkitlntrinsics Reference Manual for X Version 11
Open Software Foundation, Prentice Hall Inc., 199G:-lbe following:
OSF/MotifProgrammer's Guide, 1/evision 1.0
OSF/Motif Programmer's Reference, Revision 1.1
OSF/MotifStyle Guide, Revision 1 .. 1
OSF/Moti[User'sGuide, Revision 1.0
Sobell, M., A Practical Guide to Unix System V-Second Edition, Release 4,
Benjamin Cwnming Publishing Company, 1991
C-1
Appendi.x C
Young, D. A., The X Window System-Programming and Applications with Xt;
OSF/MotifEdition, Prentice-Hall, Inc., 1990
X/Opcn Company, Ltd, X/Open Ponabiliry Guide, XSI Supplementary
Definitions, Prentice-Hall, Inc.
C-2
APPENDIX D
GEM IXlib Equivalents
Tile following table of
GEM/Xlib cquivaleniS will help you find tbe Xlib
GEM function. The parameter display is always llle
function equivalent to a
returned display pointer from XOpenDisplay.
X provides several routines for drawing. TI1e graphic context
(GC) resource
specifies variables such as color, line widtb, and fill pattern. A
GC is specified as
an argument to tbe drawing routine and modilies iiS appearance. For more details
about tbe
GC and how to write
progran1s using Xlib, see tbe Xlib Programming
Manual.
The table contains lhe most frequently used
GEM functions, tbeir Xlib
cquivaleniS, and U1e page number for tbe function description in tbe Xiib
Reference Manual. Instead of attribute functions for each graphic primitive such
as
GEM has, Xlib uses only one function to set an attribute for all graphic
GC attribute affeciS U1c drawing of every graphic
primitives. In general, setting a
primitive call.
VDI-XIib
Equivalents
FrequenUy Used
GEM Functions
v_arc(handle, x. y, radius,
begin_anglc, cnd_angle
Xlib Equivalents
XDrawArc(display, drawable, gc, x, y, w, h. anglel. angle2)
Pag<
No.
134
XFiliArc(d.isplay, drawable. gc, x. y, w, h. angle! , angle2
172
XSetArcMode(display, gc, arc_ruode)
397
v_bar(handle, xyarray)
XFiiiReclangle(display, drawable, gc, x, y, w, h)
178
v_circle(handle, x. y, radius)
XDrawArc(display, drawabk gc, x, y. w. h. angle], angle2)
134
XFii!Arc(display, drawable, gc. x, y. w, h. anglel. angle2)
172
XSetArcMoJe(display, gc, arc_mode)
397
v_clsvwk
XCioseDisplay(display)
81
v_cllarc
XDrawArc(display, drawable, gc, x. y, w, h, angle l , anglc2)
134
v_cllipsc
v_cntcr_cur
XFillArc(display, drawable, gc, x, y. w. h. angle!, angle2)
172
XSetArcMOOe(display, gc, arc mode)
397
XDrawArc(display, drawable, gc,
x,
y, w, h, angle I, angle2)
134
XFiiiArc(display, drawable. gc, x, y, w, h. anglel. angle2)
172
XSetArcMode(display, gc. arc_mode)
397
no real �quivalent for this under X; for terminal emulation open
an xterm wiodow
v_exit_cur
no real equival.!nt for this under X; for terminal emulation open
an xterm window
''_gct_pixel
XGetPixd(ximage, x, y) gets a pixel from an IMAGE, not the
whole screen area
223
D-1
Appendix D
VDI-XIib
Ec,uivalents,
continued
Frequently Used
GEM Functions
v_gtelll(handlc,
x,
Page
No.
Xlib Equivalent•
y, string)
XDrawString(disp\ay, drawable. gc.
;lt,
XDrawString16(display, drawable. gc.
y, string, length_of_string)
x.
Jenglh_of_.�tring)
159
XDrawlmageString(display, drawable, gc,
x.
y, string,
141
length_of_string)
XDrawlmageStringl6(display, drawable. gc.
:a:,
y, string,
143
length_of_string)
The mosl important functions tltal specify a drawing in a GC are
XSetArcMode()
XSelTile()
XSeLCiipMask()
XSetTSOrigin()
XSeLClipOrigin()
XSclForeground()
XSeLClipRectangles()
XSetGraphicExposuresO
XSeiRcgionO
XSeLSubwindowModeO
XSetDasbes()
XSei.BackgroundO
XSell..ineAtlribules()
XSelFunction()
XSelFil!Rule()
XSelPlaneMask()
XSelFiJJStyle()
XSelState()
Gntpbic primitives (drawing functions) are
XDraw()
XDrawRectangles()
XDrawArc()
XDrawSegments()
XDrawArcs()
XFiiiArc()
XDrwaFilled()
XFiUArcs()
XDrawLine()
XFiiiPolygon()
XDrawLinesO
XFiURectangle()
XDrawPointO
XFil!Rectangles()
XDrawPoints()
XCiearArea()
XDrawRectangle()
XClearWindow()
See the Xlib Reference Manual for details about tbe functions.
D-2
157
y, string,
APPENDIX E
Atari Enhancements to
Internationalization Standards
Atari System V fully supports the X/Open Portability Guide, Issue 3 (xpg3)
Standard for internationalization of programming and character sets. Included
here is a table of Atari System V functions and d1e corresponding xpg3 function.
Most functions are part of the standard C library, the others are Atari
enhancements.
ATARI SYSTEM
v
xpg3 FUNCTION
DESCRIPTION
catgats (3C)
catgets
Read massage catalog
catopan(3C)
catopen, catclose
Open/close message catalog
ecvt(3C)
gcvt
Convert floating point number to string
Convert date and time to string
ctime(3C)
cty pe(3C)
isalnum
isalpha
iscntr1
isgraph
islower
isprint
ispunct
isspace
isupper
conv(3C)
tolower, touppe r
Character handling
Character translation
codesio(t) 2
Character code set compiler
gatda1e(3C)
Convert date and time format
gls(7)2
Character mapping STREAMS module
glscnv(t)2
Code set mapping test program
Enables character mapping module
glstty(1)2
localeconv(3C)
Get numeric formatting formats
1
Multibyte character handling
mbchar(3C) 1
mbstring(3C) 1
Multibyte string handling
nl_langinfo(3C)
nl_langinfo
Get local formats
parror(3C)
perror
Print system error messages
printf(3C)
printf
fprintl,
sprintf
Print formatted output
regaxp(S)
regexp
Regular expression matching
setlocale(3C)
settocale
Get environment variables
scanf(3C)
scanf
fscanf
sscanf
Scan formatted input
1
2
Conforms to ANSI x3.159 programming language C standard
Atari enhancement
E-1
Appendix E
ATARI SYSTEM
v
xpg3 FUNCTION
DESCRIPTION
strcoii(3C)
strcoll
String collation
strerror(3C)
strerror
Get error message string
strftime(3C)
strftime
Convert date and time to string
strtod
atof
Convert string to number
strxfrm(3C)
strxfrrn
string transformations
vprind(3C)
vprintf
vfprintf
vsprind
Print formatted output
string(3C)
strtod(3C)
Siring operabons
The standard headers are used to provide definitions and declarations for use
wiUl nationalized language functions:
ctype.b
langinfo(S) manual page
limits(4) manual page
Catagory names; see setlocale(3C) manual page
Language data types; see nl_types(S) manual page
Language constants; see
limits.h
Operating system limits; see
Iocale.b
nl_types.h
E-2
Sec ctype(3C) manual page
langinfo.h
Index
filesys, 3-18
shutdown, 3-13
Kernel Configu ration, 3-33
sysm68k, 3-39
Product Install, 3-13
tar, 3-9
Audio bell, 2-5
A
unix, 1-3
userdel, 3-5
usennod, 3-4
B
AccountiD, 3-1
Accounts
Backup commands, 3-7-3-10
Adding, 3-3
tar, 3-9
Disabling, 3-4
Bell settings, 2-5
Guest, 3-3
Setting passwords,3-5
xdm, 3-15
Communication services, 3-25
Configure Unix, 3-33
Console settings, 2-4
Bell adjustments, 2-5
boot Command, 3-38
Key click, 2-6
Boot preference change, 3-39
Keyboard adjustments, 2-5
Accounts and groups,3-1-3-6
Booting the system,1-2
Mouse adjusunents, 2-5
Adding a device driver, 4-12
Bourne shell, 3-16
Superuser, 3-2
Adding a new terminal type,
3-26---3-27
Adding a user account, 3-3
Adding new disk drives,
3-27-3-33
Administrative processes, 3-11
Alert dialogs, 4-7
Application development,
4-1--4-2
Libraries, 4-1--4-2
Application errors.
See Alert
dialogs
Application implementation,
4-6--4-10
Application packaging,
4-10--4-11
Atari boot preference, 3-41
Atari library, 4-6
Alert dialogs, 4-7
Help processes, 4-7
Input/output routines, 4-8
Internationalization, 4-7
Log ftles, 4-9
Routines, 4-9--4-10
Running subprocesses, 4-8
Wiindow construction, 4-6
Atari partition table, 3-28-3-33
Atari tools
Screen saver, 2-5
cpio Command, 3-8
cunix Command, 3-38
c
C shell, 3-16
Changing password, 2-3
Checking file systems, 3-20
codesio Command, 3-27
D
Daemon processes, 3-11
Data communication services,
3-25
Command, cpio, 3-8
date Command, 3-11
Command shells, 3-15
Date setting, 3-11
Commands, 3-24
boot, 3-38
codesio, 3-27
cunix,3-38
date, 3-11
dd,3-7
dd Command, 3-7
Default language, 1-3
Default run level, 3-13
Device drivers, 4-11--4-13
Disabling user accounts, 3-4
find, 3-4
Disk drives, adding, 3-27-3-33
fonnat, 3-28, 3-31
Disk partitions, 3-30
glscnv, 3-27
kill,3-11
ld, 3-38
mkfs, 3-32
mount,3-17,3-20,3-32
partinit, 3-28
E
Equipped Device Table, 1-2
Error. messages, 4-7
passwd, 1-3
pmand, 3-23
ps, 3-11
F
rsh, 3-10
File system types, 3-18
sacadm, 3-23
File systems, 3-16---3-21
Boot preference, 3-39-3-41
SETDOOT.PRG. 3-39-3-40
Checking, 3-20
Console configuration,
setcnv. 1-3
Disk space,3-20
2-4--2-6
File System, 3-18
setvtoc, 3-31
Mounting, 3-20
share, 3-32
Unmounting, 3-20
Index-/
11nd Conunand, 3-4, 3-8
Language locales, 4-5
fonnat Command, 3-28, 3-31
Language settings,1-3
ld Command,3-38
G
glscnv Command, 3-27
Group ID, 3-1
Guest account, 3-3
H
Hardware installation, 1-2
Hardware requirement�. 1-1
Help, 2-2
Help dialogs, 4-7
Libraries, 4-1--4-2
AtariLib, 4-2
OSF/Motif, 4-2
XFaceMaker 2. 4-2
p
partinit Command, 3-28
Partition table, 3-28-3-33
passwd Command, 3-5
Password changes, 2-3
Peripheral devices,3-21-3-26
Xlib. 4-1
pmand Command,3-23
Xtoolkit,4-1
Port monitor, 3-22
Library routines, 4-6
Pon monitor conf1guration, 3-23
Log files,4-9
Polling TOS/GEM applications,
Logging in to the system, 2-1
Login accounts, 1-4
Login screen, 1-4
Ipadmin Conunand,3-24
4-13-4-15
Preference files, 3-15
Printer connection,3-24
Product installwindow, 3-13
Programming notes, 4-2
ps Command, 3-ll
M
I
Input/output handling, 4-8
Install
Maintaining tile systems,
3-19-3-21
R
Menu bar settings,2-6
Reconfiguration, 3-37-3-39
New icon,3-14
mkfs Command, 3-32
Reconfigure Atari,3-33
Software updates, 1-4
Modem connection. 3-24
root account. 3-2
Monitoring disk space, 3-20
Root password, 1-3
New application, 3-13
Internationalization,3-13, 3-26,
4-3,4-7
mount Command, 3-17, 3-20,
3-32
K
Kernel configuration,3-33-3-37
Build kernel, 3-37
Change modules,3-34
Change parameters, 3-36
Install kernel, 3-37
Run levels, 3-11
Mounting fLie systems, 3-20
Running processes, 4-8
Mouse buttons, 2-1
Mouse settings, 2-5
Multiuser mode, 1-3
MWM,2- l
N
kill Command, 3-11
Network access. l-4
Kom shell, 3-16
NFS
options, 3-19
Nonvolatile memory, 3-39
Language additions,4-4---4-6
Language applications, 2-3
Language changes, 3-13
s
SAC command,3-22
sacadm Command, 3-23
SAF command,3-22
Key click settings, 2-6
Keyboard adjusnnents,2-5
L
rsh Command, 3-10
Run level change, 3-12
Mountable me systems, 3-17
Select kernel, 3-34
lndex-2
Public internet connection, 1-4
NVRAM, 3-39
Screen Saver,2-5
SCSI, definition,1-2
Security,3-6
Serial port configuration, 3-21
Serial port management. 3-21
Serial port modem, 3-24
Serial port printer, 3-24
0
OSF/Motif window manager,2- l
Service access controller,3-22
Service access facility,
3-21-3-22
r-
Set
Bell, 2-5
Date and time, 3-11
Default language, 1-3
Key click, 2-6
Keyboard. 2-5
Menu bar, 2-6
Mouse, 2-5
Root password, 1-3
Screen saver, 2-5
Reconfiguration, 3-33-3-39
Unpacking Atari System V, 1-1
Security, 3-6
Upgrading a Tt: 1-2
System installation, 1-2
uscnnod Command, 3-4
System processes, 3-11
UUCP suppor� 3-24
Etheme� 3-22
Port monitor, 3-22
Run level, 3-12
System reconfiguration, 3-33
Time of day, 1-3
X configuration window, 2-4
SETBOOT.PRG Command,
3-39-3-40
Setting account passwords, 3-5
User accounts, 3-3
System maintenance mode, 1-3
v
Variables, 3-10
Visual bell, 2-5
T
VTOC, creating, 3-31
Utr Command, 3-9
setvtoc Command, 3-31
Tenninal types, adding,
3-26-3-27
share Command, 3-32
Tune of day, 1-3
Window construction, 4-6
WISh 2 windowing sh II, 2-1
shutdown command, 3-13
Ttme setting, 3-11
Software updates, 1-4
Tools. 4-2
Supcruser account, 3-2
TOS boot preference, 3-40
sysm68k Command, 3-39
ttymon process, 3-22
System
Backups, 3-6-3-10
X
X configuration window, 2-4
Accounts, 3-1
Administrative tasks, 3-1
w
u
X fonts, 3-27
X Window System, 3-15
E nvironment, 3-10-3-16
UFS options, 3-19
xdm Conm1attd, 3-15
Groups, 3-1
Utunoutlling file systems, 3-20
XFM applications, 4-6
Index-3