1
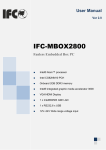
EBM-B100
EMW Wireless Ethernet Bridge
(V0.5)
User Manual
EMW Co., Ltd.
Head Office: 680-3 Gojan-dong, Namdong-gu, Incheon, Korea
R&D Center: 459-24 Gasan-dong, Geumchon-gu, Seoul, Korea
Tel: +82-2-2107-5500
Fax: +82-2-2107-5645
Website: www.emw.co.kr
EBM-B100 User’s Manual
www.emw.co.kr
Table of Contents
1. Product Overview ................................................................................................... 3
2. Components ........................................................................................................... 5
3. Product Installation ................................................................................................. 7
4. Product Features .................................................................................................. 13
5. Cautions ............................................................................................................... 27
6. Dimensions and Specifications............................................................................. 28
2
EBM-B100 User’s Manual
www.emw.co.kr
1. Product Overview
1.1 Introduction
Using binary code division multiple access (CDMA), the Wireless Ethernet Bridge
can send multi-channel code division multiple access CDMA signals through the
existing time division multiple access radio frequency (TDMA RF). Based on this,
EMW developed a small, low-power system using a 2.4 GHz industrial science
medical (ISM) band.
Binary CDMA wireless communication enables stable, high-speed communication
with low interference, excellent security, and quality of service (QoS).
This product is designed for Internet Protocol (IP) networks only in order to enable
the wireless transmission and reception of IP camera video, audio, and data. It is
used for the wireless connection of sections in a network that are difficult to connect.
An integrated wireless bridge model with an embedded 2.4 GHz directional antenna
and a non-directional antenna model can also be supplied. Power is provided
through USB or an external DC source. For wireless communication, 10/100 Mbps
Ethernet is used.
1.2 Applications
1) Disaster monitoring
- Danger alarms for typhoons, heavy snow, heavy rain, river flooding, water
quality/soil contamination, etc.
2) Internal environment monitoring of residences
- Intrusion monitoring
- Monitoring of children
- Home monitoring such as crime prevention/fire monitoring
3) Management of facilities
- Automatic management
- Remote control
- Fire detection
- Crime prevention and danger alarms
3
EBM-B100 User’s Manual
www.emw.co.kr
4) Real-time multimedia transmission
- Real-time transmission of video/audio, user-created contents (UCCs), and data
5) Crime prevention monitoring
- Residential area monitoring and crime prevention systems
- Prevention of theft and damage, crime prevention/perimeter monitoring
6) Sensor networking
- Sensor node information collection
- Multi wireless transmission
- Data sharing
- Internal voice calling
7) Construction site management
- Identification of construction progress and prevention of accidents
- Access control
- Installation of CCTVs in tower cranes
This is a solution to the camera re-installation and time problems that occur as the
crane rises.
- Connection between management offices and construction sites
8) Temporary wireless network
This device can be used in sites such as construction sites and temporary buildings
that require stable communication and an Internet network at low cost.
9) Thanks to the compact size and low power consumption, it can be applied to
smart grid applications, high-speed WPAN networking applications, wireless home
network applications, wireless digital video recording, and security applications
10) Provides a wireless dam water level management system where a wireless LAN
is difficult to install
11) Forest fire monitoring where wiring is impossible
12) Wireless security system for national borders and base camps
13) CCTV for protection of power generation facilities
14) CCTV for wireless traffic monitoring systems/emergency disaster monitoring on
the road
- Transmission of accident and disaster situations in unspecified locations on the
road
4
EBM-B100 User’s Manual
www.emw.co.kr
- Transmission of video data during movement Provision of road traffic
information
- HD video transmission Use of existing wired highway networks
2. Components
2.1 Main Body
Bracket Hole
* Monopole Type
* Patch Type
USB Setup
DC 5V
RJ-45 LAN
5
EBM-B100 User’s Manual
www.emw.co.kr
2.2 Accessories
Main Body
* Monopole Antenna
5V Adapter
User Manual
No.
Item Name
Qty
1
Main Body
2
2
Monopole Antenna
2
3
5V Adapter
2
4
User Manual
1
Remark
Only applied for monopole antenna
type
* Note: The patch-type product is not included for the monopole antenna.
6
EBM-B100 User’s Manual
www.emw.co.kr
3. Product Installation
3.1 Device Installation
3.1.1 Conditions for Monopole Antenna Installation
Figure 1-1. Monopole Type
- As the monopole antenna is non-directional, consider the distance between the two
products before others.
- The distance “N” may vary by the antenna characteristics and the RF output power.
See Chapter 6, “Dimensions and Specifications.”
* Note: The distance “N” is based on the measurement in an open site with no
obstacles.
3.1.2 Conditions for Patch-Type Antenna Installation
K°
K°
Figure 1-2. Patch-Type Antenna
7
EBM-B100 User’s Manual
www.emw.co.kr
- As the patch-type antenna is directional, it has a beam width property. Therefore,
coverage must be considered in addition to the distance between two products.
D
C
B
A
C
B
D
Figure 1-3. Patch-Type Beam Range
- The signal sensitivity for the coverage of the beam width is given in the following
table. The best sensitivity can be achieved at the center-to-center angle
(recommended at the time of installation).
Area
A
B
C
*Angle
-15~15
-30~-15/15~30
-45~-30/30~45
Sensitivity
Best
Good
Normal
D
-45 or lower/45 or
higher
Bad
* Note: These data are based on a beam width of 90°.
- The distance “N” and coverage “K” may vary by the antenna characteristics and the
RF output power. See Chapter 6, “Dimensions and Specifications.”
* Note: The distance “N” and angle “K” are based on the measurement in an open
site with no obstacles.
8
EBM-B100 User’s Manual
3.1.3 Installation Examples
Figure 2-1. Examples of Installation in an Urban Area
Figure 2-2. Examples of Installation in an Open Area
9
www.emw.co.kr
EBM-B100 User’s Manual
www.emw.co.kr
Figure 2-3. Examples of Bad Installation (Interference by Trees)
Figure 2-4. Examples of Bad Installation (Interference by Buildings)
10
EBM-B100 User’s Manual
www.emw.co.kr
3.2 Product Connection Diagram
LAN
DC
전전
Figure 3-1. Client-side (CCTV) Connection Diagram
Figure 3-2. Host-side (DVR, PC) Connection Diagram
11
EBM-B100 User’s Manual
www.emw.co.kr
3.3 Setting Program Installation
3.3.1 Conditions for Installation
- PC Specifications
Recommendation
Minimum
OS
Windows XP or higher
Windows XP
CPU
Core 1.6 GHz or higher
Core 1.0 GHz
RAM
1 GB or more
512 MB
HDD (Free Space)
100 MB or more
10 MB
3.3.2 Method of Installation
- .Net Framework version 3.5 or higher must be installed to run the dedicated GUI
program.
* It does not need to be installed in Windows 7 OS or higher because it is included
by default.
- After running the execution file, it is necessary to agree to the license and click the
Install button.
- Then, the file can be downloaded and the application installed.
Figure 3-3. .Net Framework Setup Screen
3.3.3 Running the Setting Program
- Once the .Net Framework is installed successfully, the setup program can be run
directly.
12
EBM-B100 User’s Manual
www.emw.co.kr
4. Product Features
4.1 Basic Operations
4.1.1 Setting a 1:1 Connection
Figure 4-1. Setting a 1:1 Connection
* The maximum transmission rate for this setting is 10 Mbps based on the QPSk
modulation method.
4.1.2 Setting 1:N Connections (Using a Hub)
H
UB
Figure 4-2. Setting 1:N Connections with a Hub
* The maximum transmission rate for each camera at this setting is 10 Mbps/camera
node count based on the QPSK modulation method.
Examples: Two-camera connection: 10/2 = 5 Mbps
Four-camera connection: 10/4 = 2.5 Mbps
13
EBM-B100 User’s Manual
www.emw.co.kr
4.1.3 Setting a 1:N Connection
Figure 4-3. Setting a 1:N Connection
* The maximum transmission rate for each camera in this setting is 10 Mbps/total
number of stations (Ethernet Bridges) based on the QPSK modulation method.
For example, when two cameras are connected, there are three stations (1 master +
2 slaves), 10/3 = 3 Mbps
When four cameras are connected, there are five stations (1 master + 4 slaves),
10/5 = 2 Mbps
* The maximum number of slaves that can be connected to one master is 250.
14
EBM-B100 User’s Manual
www.emw.co.kr
4.1.4 LED State Display
①
②
③
④
Reset S/W
Figure 4-4. LEDs
No.
LED
Description
1
Sync
2
Slave
The device works as slave.
3
Master
The device works as master.
4
Power
Power connection.
The master and slaves have been joined normally and
the network configuration has been completed.
4.1.5 Reset S/W
- Used to reset hardware and re-boot the device.
- Used to update the firmware through the USB port (dedicated GUI is needed)
* Note: The device settings can be initialized only by the setup program, and not the
Reset button (see 4.2.5, “Factory Reset”).
15
EBM-B100 User’s Manual
www.emw.co.kr
4.2 Function Settings
4.2.1 Connection Settings
Figure 4-5. Cable Connections for Function Setting
- Connect the PC with the device for setting through a USB cable. No separate DC
power source is needed, as power is supplied through the USB.
* Cable size: Mini USB 5P to USB A 4P Male
- If the Windows driver for USB is not installed, it must be downloaded from the
following website before starting installation.
* Download site: http://www.ftdichip.com/Drivers/VCP.htm
16
EBM-B100 User’s Manual
www.emw.co.kr
4.2.2 Program Running
- When the EthernetBridge_UI.exe file is run, the following main screen appears.
Figure 4-6. Main Screen of the Settings Program
4.2.3 Connection Settings
- Connection: The PC should be connected in accordance with the current settings, if
possible.
- Port Setup: A connection setting menu is available for the items listed below.
COM
Port
Item
User side
Parity
Baud Rate
Stop Bit
Data Bits
None
115200
1
8
Hand Shake
(Flow Control)
None
* Only the COM port can be changed in line with user settings. The rest must be set
as above.
17
EBM-B100 User’s Manual
www.emw.co.kr
Figure 4-7. COM Port Settings Check
- Clicking the Modify button allows setting changes to be made in the following
window.
Figure 4-8. Changing COM Port Settings
- Auto Connect: If unfamiliar with the virtual COM port, it may be possible to use an
auto connection. All the available ports are scanned and a valid port is connected.
- If the connection is successful, the following message appears.
Figure 4-9. Auto Connect Port Scan
Figure 4-10. Connection Successful
18
EBM-B100 User’s Manual
www.emw.co.kr
4.2.4 Login
- Privilege Setting (Log-In): To change the settings, client privilege must be obtained
by logging in.
Figure 4-11. Log-in
* The password is set to “0000” at the time of shipment from the factory.
- Super User privilege can be obtained by selecting the “Admin” Check Box, which
allows access to all hidden menus.
* The dealer can provide the Admin Password.
19
EBM-B100 User’s Manual
www.emw.co.kr
- Change Password: With this function, the login password can be changed.
Figure 4-12. Change Password
* If the password is forgotten, it can be set to “0000,” which is the factory shipment
state, through the Factory Reset menu.
* The password must be four digits long, ranging from 0 to 9. Other keys are not
inputted.
20
EBM-B100 User’s Manual
www.emw.co.kr
4.2.5 Configuration
- Summary: Check the content of the current settings.
* This function only shows the settings and it is not necessary to log in.
Figure 4-13. Summary
- Setup Wizard: The device can be set up quickly through this Wizard without manual
setup.
21
EBM-B100 User’s Manual
www.emw.co.kr
Figure 4-14. Setup Wizard
- Manual Setup: This is an advanced feature used to manually set each item.
Beginners should not use this feature because it requires expert knowledge about
each feature.
Figure 4-15. Manual Setup (Network)
-- Network Mode
A. Master: Master Mode Fix
B. Slave: Slave Mode Fix
C. Auto: Set to Master if there is no Master, and set to Slave if there is a Master.
-- Channel ID: A channel must be selected between 0 and 4 (2.4 GHz ISM Band)
CH
Freq. (GHz)
0
1
2
3
4
2.403–
2.419–
2.435–
2.451–
2.467–
2.417
2.433
2.449
2.465
2.481
* This is valid only if the Channel Mode is Fixed. It is automatically selected if the
Channel Mode is Auto.
22
EBM-B100 User’s Manual
www.emw.co.kr
-- Channel Mode
A. Auto: The whole available band is scanned and a channel with excellent
quality is automatically selected.
B. Fixed: Assigned to the channel defined in Channel ID by force.
-- Piconet ID: When two different Masters exist in a network, the network is
configured to that with the same PNID.
* If this is changed arbitrarily, the network may not be configured.
Figure 4-16. Manual Setup (Channel Avoidance)
-- Channel Avoidance: Select whether or not to reconfigure the network to another
channel with a better quality through Auto Scan If the quality of the current channel is
poor due to physical interference.
-- RSSI High: The maximum sensitivity for wireless reception is set and Channel
Avoidance is activated if the value is greater than this level.
-- RSSI Low: The minimum sensitivity for wireless reception is set and Channel
Avoidance is activated if the value is lower than this level.
-- PER: The allowed value for Packet Error Rate is set and Channel Avoidance is
activated if the value is greater than this level.
23
EBM-B100 User’s Manual
www.emw.co.kr
Figure 4-17. Manual Setup (Other)
-- RF Power: This item adjusts RF output power. The output gain is shown in the
following table.
RF
Power
Tx Gain
[dBm]
0x10
0x18
0x20
0x24
0x28
0x2C
0x30
0x34
0x38
0x3F
0.8
4.0
6.7
8.0
9.6
11.1
12.6
14.2
15.6
17.5
* An appropriate value is used depending on the installation environment and
distance.
-- Data Rate: The modulation method for data transmission can be changed. In the
case of Binary 3 and 4, the rate decreases, but interference decreases and
transmission distance increases.
-- Schedule Mode: In the case of a 1:1 setting, to achieve the maximum data transfer,
the camera is set as the client and the PC (DVR) as host. In the case of a 1:N setting,
Auto is set for automatic assignment according to the value of N.
* Recommendation: The 1:1 and 1:N Hub settings are the Host and Client. The 1:N
setting is Auto.
24
EBM-B100 User’s Manual
www.emw.co.kr
4.2.5 System Settings
- F/W Upgrade: The firmware can be updated to the latest version in the event of
revisions.
Figure 4-18. Debug Message Window for Firmware Update
A. Set to Debug Port and Click the Connect Button.
B. When it is connected normally, the FW Update button is enabled. Click this
button, select a file to update, and click OK.
C. When the following window appears, press the Reset button to carry out the
update.
D. Once the update is completed, the system is rebooted and the device is
automatically connected.
Figure 4-19. Firmware Update Guide Window
25
EBM-B100 User’s Manual
www.emw.co.kr
- Factory Reset: All the settings are reset to the initial factory state.
* Note: The factory reset values of each item are shown below.
Item
Value
Network
Channel
Channel
Piconet
RF
Schedule
Channel
RSSI
RSSI
Mode
ID
Mode
ID
Power
Mode
Avoidance
High
Low
Auto
0
Auto
0x0000
0x28
Auto
On
-17
-83
Figure 4-20. Factory Reset
26
PER
5
EBM-B100 User’s Manual
www.emw.co.kr
5. Cautions
① Install the power adapter and the product out of the reach of children
(prohibit children from touching them).
② Do not install the product in bathrooms, sinks, or other wet places.
③ Secure a place with good external signals before installation.
=> Check with a terminal (Debug screen).
④ Determine where and how to install the product.
⑤ Check the installed direction of the product: The antenna shape must be directed
to the serviced area.
⑥ Make sure that there are no obstacles (people, metal plates, walls, pillars, etc.)
within 1 m of the front of the product.
⑦ Check the support so that the product is fixed firmly.
⑧ Connect the DC power jack to the bottom of the product.
⑨ Wait for about 5 seconds after connecting the AC adapter jack to 220V.
⑩ When the power and status LEDs at the top of the product turn on, check for
normal operation.
27
EBM-B100 User’s Manual
www.emw.co.kr
6. Dimensions and Specifications
EBM-B100
Product Description
Ethernet Bridge
Binary CDMA Standard
ISO/IEC 24771 Koinonia Binary CDMA Compliant
Interface
5 Pin Mini USB (2-Ch Virtual Com Port) /
DC Jack (5V) / RJ-45 (Ethernet)
Dimension
120.0 X 66.0 X 27.0 mm
Weight
100 g
Operating Conditions
Temperature
Operating: -20-70℃
Relative Humidity
< 60%(storage) < 85%(operation)
Electrical Specifications
Frequency Range
ISM-Band (2400–2483.5 MHz)
Channel Bandwidth
16 MHz / 5 CH
Modulation
Binary, DQPSK, 16-QAM, 32-QAM, 64-QAM
RF Output Power
10 dBm
Receive Sensitivity
RSSI -60 dBm, SNR 20
Distance Range
400 m–2 Km (PER 1%>, Open Site)
※
The distance can be increased with a different
antenna type
Power Consumption
400 mA–450 mA (Typical)
Input Power Voltage
5.0V
44 MHz Embedded AMR7TDMI
1 Kbyte Boot ROM
64 Kbyte Zero-wait SRAM for Code
Medium Access Controller
64 Kbyte Internal SRAM for Data and Buffer
& Baseband Processor
512 Kbyte External SRAM
Hardware-Based MAC Access Protocol Management
Channel Probing and Dynamic Link Quality Control
CCA/Energy Level/RSSI Detection
28