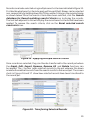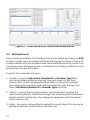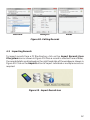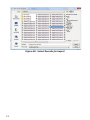
1
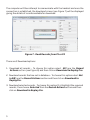
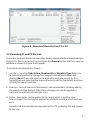
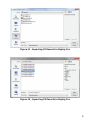
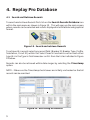
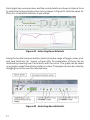
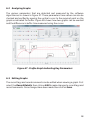
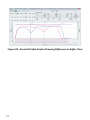
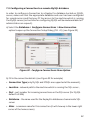
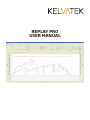
REPLAY PRO
USER MANUAL
Please register your details at our website to access product
support and software updates.
http://www.kelvatek.com/register.html
Contents
1.
Introduction
1
2.
Installing Replay Pro Software
2
3.
Connecting to the Profile Handset
4
3.1. Downloading records from P1 and P2
3.2. Amending P1 and P2 records
3.3. Importing records from P3
4
6
7
4.
Replay Pro Database
9
4.1. Searching and retrieving records
4.2. Editing records
4.3. Importing records
9
11
12
5.
Exporting Records from Replay Pro
14
6.
Graphs
16
6.1. Displaying graphs
6.2. Analysing graphs
16
18
7.
Database Connection
20
7.1. Introduction
7.2. Database Types
7.3. Configuring a connection to a remote MySQL database
20
20
22
1. Introduction
The Replay Pro software is an integral part of the Profile system. It enables
circuit breaker profile records to be downloaded and saved to a PC from a
PROFILE P1, P2 or P3 and also stored on a central server for company wide
access.
Replay Pro allows you to
• Download records from the Profile P1, P2 and P3 handsets
• Store and manipulate the records in a database
• Search and retrieve records from local or remote databases
• Import test results from record files
• Export test results to record files
• Overlay graphs on screen for analysis
You can reproduce the graphs using
• Print to a compatible printer
• Save the graph as .png file
1
2. Installing Replay Pro Software
There are two scenarios
1. New users or those with version 1.1.10 or later
(1.1.12 – 1.1.16 – 1.1.18 – 1.1.22 – 1.1.24 - )
2. Existing users with a version earlier than 1.1.10
For those in scenario two, they must first copy all records to a temporary folder
and uninstall the old software before manually deleting the Database folder. The
records that have been saved in a temporary folder can then be imported into the
new Replay Pro software once it has been installed.
The latest version of software can be downloaded from the Kelvatek
website: http://kelvatek.com/ (Figure 2) after registering as a customer. Clicking
on the Latest Replay Pro Software link will prompt the user to save the file.
Figure 2 - Kelvatek Download Page
2
After the file has been downloaded and installed, then a Replay Pro icon will
appear on the desktop as shown (Figure 3). This might require Administrator
privileges in Vista or Windows 7.
Figure 3 - Replay Pro Icon
Starting the software
Double clicking on the Replay Pro icon (Figure 3) will open the Replay Pro
application and the main screen will be displayed as shown in Figure 4. Note in
Vista or Windows 7, you may receive a message in a pop up window asking if you
want to allow an unknown publisher to make changes to your computer, just click
Yes to proceed.
Figure 4 - Replay Pro Main Screen
3
3. Connecting to Profile Handset
The first step in using Replay Pro is to download records to analyse from a P1, P2,
or P3 handset. These handsets are connected to a PC via a serial or USB port with
the cables provided.
3.1 Downloading records from a P1 or P2
First connect the handset to your computer using the serial cable provided.
The first time the software is run, the user may need to select the COM port for
Profile P2 or P1 as shown (Figure 5) screen shots.
Figure 5 - Selecting COMS Ports
To identify the USB COM Port that the serial cable is connected to, select Device
Manager within the Control Panel and click on the Ports option. Once the
USB COM Port is selected, the Profile P2 or P1 will default to this when it is next
powered up. To download records, click on the handset icon as shown in Figure 6.
Figure 6 - Connection to P1 or P2
4
The computer will then attempt to communicate with the handset and once the
connection is established, the download screen (see Figure 7) will be displayed
giving the details of records available for download.
Figure 7 - Read Records from P1 or P2
There are 3 Download options:
1. Download all records – To choose this option select All from the Record
Actions section (see Figure 8) and then click on Download to Replay Pro.
2. Download records that are not in database – To choose this option select Not in DB from the Record Actions section and then click on Download to
ReplayPro.
3. Download selected records - To choose this option first highlight the required records, then choose Selected from the Record Actions section and then click on Download to Replay Pro.
5
Figure 8 - Download Records from P1 or P2
3.2 Amending P1 and P2 Records
A record or multiple records can have their details amended before downloading to
Replay Pro. This is carried out by clicking on the Amend button and then a pop up
window as shown in Figure 9 will appear.
A record can be amended in 3 ways –
1. Location – here the Substation, Breaker ID and Breaker Type fields can be individually edited by typing the changes in the adjacent boxes and
clicking Next. These changes can be applied to multiple records by first
highlighting and selecting the required records, editing the details, and then clicking the same check box.
2. Analysis – here all the record parameters can be amended, including adding the new record tag feature. Note these changes can only be applied to
individual records and not multiple ones.
3. Notes – here notes can be applied to the record which is another new
feature. Again this can only be applied to individual records and not multiple ones.
Records that are amended can be exported to a P3 via Replay Pro and viewed by the user.
6
Location
Analysis
Notes
Figure 9 - Amend Options
It is possible to remove unwanted records from the handset before commencing
the download, by highlighting the records and clicking the Delete button.
3.3 Importing records from a P3
To import records from the P3 handset to Replay Pro, first connect the handset to
a PC using the USB cable provided and then click the icon highlighted in Figure 10.
Figure 10 - Importing Records
The P3 handset will then appear as a removable storage device as shown in
Figure 11. Clicking on the PROFILE P3 icon will open a folder where records can
be selected for importing to Replay Pro as shown in Figure 12.
7
Figure 11 - Importing P3 Records to Replay Pro
Figure 12 - Importing P3 Records to Replay Pro
8
4. Replay Pro Database
4.1 Search and Retrieve Records
To search and retrieve Records first click on the Search Records Database icon
within the main menu as shown in Figure 13. This will open up the main screen
where records can be selected and results displayed in both tabular and graphical
format.
Figure 13 - Search and retrieve Records
To retrieve ALL records select any record field (Breaker ID, Breaker Type, Profile,
Substation, Circuit ID) within the Select Search Constraints section and either
type ALL in the Type in Field name box or ALL from the list as indicated in Figure
14 below.
Records can also be retrieved within date ranges by selecting the Timestamp
option.
NOTE – Make sure the Timestamp check boxes are initially unchecked so that all
records can be searched.
Figure 14 - Retrieving All Records
9
Records can also be selected using multiple search criteria as indicated in figure 15.
First decide what search criteria to apply within each field. Names can be selected
non-sequentially by holding down the Ctrl key while clicking on the required name
as shown below. Once the search criteria have been selected, click the Search
database for Record matching search Criteria icon to display the records.
The text box adjacent to this will display the record search criteria that have been
applied. To remove the search criteria, click on the Reset selected search
constraints icon.
Figure 15 - Applying Multiple Search Criteria
Once records are selected, they can then be transferred to the record pot where
the Graph, Edit, Export, Remove, Remove All and Delete functions can
be applied. The + button adds selected records to the pot whereas the down
arrow button adds all records from the search results to the record pot. The screen
shots in Figures 16 and 17 show how selected records have been transfered to
the record pot.
Figure 16 - Transferring Selected Records
10
Figure 17 - Selected Records Transferred to Record Pot
4.2 Editing Records
Once records are added to the record pot they can be edited by clicking the Edit
button to reveal a pop-up window with three editing tags as shown in Figure 18.
Locations details such as substation name can be edited by selecting a name from
a pull down menu and apply to one or multiple records. Analysis details can only
be edited for one record at a time.
A record can be amended in 3 ways –
1. Location – here the Substation, Breaker ID and Breaker Type fields can be individually edited by selecting from a pull-down list and then
clicking Next. These can be applied to multiple records by first highlight
and selecting the required records, editing the details, and clicking on the Same Substation,Breaker ID or Breaker Type check box.
2. Analysis – here all the record parameters can be amended, including the
new record tag feature. Note these changes can only be applied to individual records and not multiple ones. Any changes to parameters with time values will be shown in red.
3. Notes – here notes can be edited or applied to a record. Again this can only be applied to individual records and not multiple ones.
11
Location
Analysis
Notes
Figure 18 - Editing Records
4.3 Importing Records
To import records from a PC file directory, click on the Import Records from
Filesystem icon as shown in Figure 19. Once a record is selected from a folder,
the record details are displayed on the right hand side of the window as shown in
Figure 20. Click on the Import button to import individual or multiple records as
required.
Figure 19 - Import Record Icon
12
Figure 20 - Select Records for Import
13
5. Exporting Records from Replay Pro
Records can be exported in the following formats (see Figure 22)
• CSV
This allows the test results to be exported to a spreadsheet as displayed in Figure
21
Figure 21 - Records Exported to Spreadsheet
•
V4 Profile Records
Select this option when transferring records between J Replay Pro and Replay Pro
basic.
•
V5 Profile Records
Select this option when transferring records between J Replay Pro and the Profile
P3 handset or for backup purposes.
The user can choose the folder to export the records to, by selecting Select
destination folder window as shown in Figure 22.
14
Figure 22 - Exporting Records from Replay Pro
15
6. Graphs
6.1 Displaying Graphs
To view a graph, first select a record or multiple records (up to nine graphs can
be simultaneously displayed) from the record pot (as indicated in Figure 23) and
then click the Graph button to a view a graph or multiple graphs as shown in
Figure 24.
Figure 23 - Selecting Records to Graph
Figure 24 - Graphs Displayed
16
Each graph has a unique colour and the record details are shown in tabular form
by selecting the appropriate colour box as shown in Figure 25. Note the value for
Mcon A is in red which indicates it was edited.
Figure 25 - Selecting Record Details
Along the top bar there are buttons which provide a range of toggle, zoom, print
and save functions (as shown in Figure 26). An explanation of these can be
obtained by hovering over the buttons with the cursor. The graph can be saved
as a graphic image file and also printed in colour. The graph can also be scaled by
dragging the cursor over the selected area.
Figure 26 - Selecting Record Details
17
6.2 Analysing Graphs
The various parameters that are detected and measured by the software
algorithm are in shown in Figure 27. These parameters time values can also be
checked and verified by moving the vertical cursor to the required point on the
graph as indicated for buffer. Figure 28 shows how two graphs can be overlaid
and the difference in buffer time measured using the cursor.
Figure 27 - Profile Graph Indicating Key Parameters
6.3 Editing Graphs
The record tags and record comments can be edited when viewing a graph. First
select the Record Details, then click on Edit to make changes to record tags and
record comments. Once changes have been made then click on Save.
18
Figure 28 - Overlaid Profile Graphs Showing Difference In Buffer Time
19
7.Database Connections
7.1 Introduction
Replay Pro can be set to store records in a local embedded database or on a
remote SQL compliant server. The local embedded database is initially set as
the Home Database Connection for storing test results but the user can switch
between database connections by marking the new one as Home Database. From
that moment all operations (importing/exporting/removals/edits) are performed
against the selected database. Only one active home connection is permitted.
7.2 Database Types
The software supports two types of database connections:
a) Local Connection (embedded mode)
b) Remote Connection to a SQL Server (Note: a “remote” SQL server can also be
installed on the same machine as the application; in this case the host URL will be
localhost)
Local Connection (embedded mode)
In this mode all data will be stored locally on the PC in a database embedded
within the application and stores results in a dedicated folder called
Database (do not modify contents of this folder as it can corrupt the data). It is the
default mode and is always available from the Connection Setup Dialog by
setting the Home Database to the one named Local. Note: this connection can’t
be removed from the list of available options, nor can it be modified. No additional
configurations are required to use ReplayPro with the embedded database
except that on Windows PC’s (Vista, 7) the application needs to be run as
Administrator (Figure 29) because it needs write access to the folder where it is
installed.
Figure 29 - Running Replay Pro as administrator
20
Remote SQL Server connection
ReplayPro can access a remote SQL compliant server for data storage. This
connection type is recommended when more than one person needs access to
the same data. The remote database can be installed on a network PC and access
to it shared by all ReplayPro users from the company.
Please note there is no authentication required from the user to access test
results, therefore any connected user can add/remove/view/modify data from
the connected database.
Database connections can be configured as indicated in Figure 31. More than
one remote SQL connection can be stored in the Database - Configure
onnections List however, only one can be set as Home Database. The user is
free to switch from one to another at any time. The database currently in use is
displayed in the lower left corner of main menu screen as shown in Figure 30.
Figure 30 - Alias for the Home Connection and Record Count
Figure 31 - Database Connection Setup
21
7.3 Configuring a Connection to a remote MySQL database
In order to configure a Connection to a Replay Pro database hosted on MySQL
server, make sure that the appropriate database and user has been configured
for remote access and that your PC has access to the machine which is running
the MySQL server (instructions for configuring MySQL will be made available to IT
administrators on request).
a) Select the Database > Configure Connections > New Connection
option to open up the Connection Setup Dialog (Ctrl + D) (see Figure 32)
Figure 32 - Configure Connections Menu Option
b) Fill in the connection details: (see Figure 33 for example)
• Connection Type (only MySQL and MSSQL are supported at the moment),
• Location – network path to the machine which is running the SQL server ,
• Port – port number for incoming connections on the SQL server (for MySQL
default is 3306)
• Database – the name used for the ReplayPro database schema inside SQL server
• Alias - a common name for this connection (it will show up in the lower right corner of the home screen)
22
Figure 33 - New Connection Dialog with completed details
c) Click Yes; the new connection should appear in the list next to existing ones as shown in Figure 34
Figure 34 - Configured Connections List
23
Product support
For servicing and repairs please contact our customer service despartments below.
Head Office
Kelvatek Ltd
31 Ferguson Drive
Knockmore Hill Industrial Park
Lisburn BT28 2EX
Northern Ireland
Telephone +44 (0)28 9260 1133
Fax +44 (0)28 9267 3313
Customer Services Centre
Kelvatek Ltd
Bermuda Innovation Centre
St David’s Way, Bermuda Park
Nuneaton, CV10 7SD
European Office
Kelvatek Ltd
Zum Brückenberg 31A
59872 Meschede
Germany
North America
Kelvatek Inc
4706 N. Ravenswood Avenue
Chicago, IL 60640
USA
Telephone +44 (0)28 9260 1133
Fax +44 (0)28 9267 3313
Telephone +49 (0)2903 399 389
Fax +49 (0)2903 399 469
Telephone 773-598-4126
Fax 773-275-1289
http://www.kelvatek.com
Power Centred