1
AMT mslruction Manual
~
1
}f1
(1
25122 AUTO RiflE
Jj
ARCADIA
MACHINE & TOOL, INC. - Covit1a.California 91722 U.S.A.
25/22
AMT LIGHTNING
GENERAL FEATURES AND NOMENCLATURE
HEIGHT: 6'12"
WEIGHT: 6 LBS.
OVERALL LENGTH: OPEN - 37'12"
STATEMENT
CLOSED 261/2"
OF LIABILITY
WARNING:
This rifle is classified as a dangerous weapon and is surrendered by
AMT with the understandi n9 that the purchaser assu mes all liabi Iity
resulti ng from unsafe handli ng or any action that constitutes a violation
of any applicable laws or regulations. AMT shall not be liable for
personal injury or loss of property or life resulting from the use of this
rifle under any circumstances, including intentional, reckless, negligent or accidental discharge.
Fu rther. AMT wi II not be liable for any alterations to the rifle or any parts
thereof. AMT will not condone or authorize any changes to be made
after the rifle has left the factory. If your AMT rifle is in need of service or
adjustment, follow the instructions in this manual under the section
marked "SERVICE".
Please read the warnings in this manual carefully. Be sure you understand the functions of this rifle before loading and firing it. Carefully
read the "SAFETY" section of this manual. Practice safe handling of this
rifle until you are throughly familiar with it.
PLEASE BE CAREFUL!
Page 1
6. Moving the safety to the" FIRE" position (red band visible) renders
the rifle ready to be fired. Squeezing the trigger fires the round in the
chamber. after which it is ejected and another round loaded into the
chamber. If you do not intend to fire the next shot immediately, return
the safety to the "SAFE" position until you are ready to fire agai n.
After firing the last shot, the bolt will not stay in the open position.
EXAMINE THE CHAMBER AND BE SURE IT IS EMPTY BY PULLING
THE BOLT TO THE REAR POSITION.
CLEARING
A JAM
In the event that a cartridge does not feed into the chamber, (jams), do
not force the bolt shut. This may cause the cartridge to fire and injure
the shooter or bystanders and damage the rifle. Following is the proper
procedure for clearing the jammed rifle.
1. Be sure that the muzzle is pointed in a safe direction.
2. Engage the safety.
3. Carefully remove the magazine.
4. Pull the bolt to its rear-most position and lock it open by pushing up
on the bolt lock. Do not look into the ejection port du ring this operation.
If drawing the bolt all the way back does not pull the cartridge along with
it, it may be necessary to use a small wood or plastic dowel, sharpened
on one end, to gently remove the cartridge from the chamber and
ejection port. Do not use a metal tool. This may detonate the cartridge or
mar the rifle.
5. Rei nsert magazi ne and repeat the steps necessary
cham ber and fire.
to load the
UNLOADING
After COmpJetion of the shooti ng session, the following procedu re
should be carried out exactly as described to unload the rifle.
Point the rifle in a safe direction.
1. Engage
the safety (red Iine not visi ble).
2. Remove magazine.
3. Pull the bolt fully to the rear position,
4. Check the chamber
to be certain
lock it there with the bolt lock.
it is empty.
P~ge1\
TAKE DOWN FOR CLEANING
BEFORE YOU START, BE ABSOLUTELY CERTAIN THAT THE RIFLE
IS UNLOADED. NEVER WORK ON A LOADED FIREARM!
1. Remove the magazine, pull the bolt fully to the rear position. make
sure there is not a cartridge in the chamber, let bolt close.
2. Remove barrel. band with 5/32 alien wrench.
3. Remove stock screw (5/32 alien wrench).
4. Move safety to middle position to clear stock. lift barrel and receiver
assembly out of stock.
5. Remove trigger guard by removing two pins LR 006. Cleaning of
trigger guard assembly can be done without any further disassembly.
6. To remove bolt, remove bolt stop pin LR 007, pull bolt fully to
the rear position. lift out bolt (front first) while holding bolt lever to the
rear. After removal of bolt. carefully let bolt lever return to the front of
the receiver. Remove bolt lever through ejection port. At this point. bolt,
bolt lever and receiver can be cleaned.
RE-ASSEMBLY
1. Install bolt lever through ejection
rear, install bolt rear first then push
lever to the rear position. After bolt
lever return to the closed position.
port into position, pull fully to the
front into place while holding bolt
has seated in place. slowly let bolt
Install bolt stop pin.
2. Trigger guard can now be installed. Put hammer in a cocked position,
make sure ejector is in its proper position (towards front of trigger guard
in slot). Install trigger guard, i.nto holes install cross pins LR 006.
3. Install barrel and receiver assembly into stock (rear receiver first)
making sure safety is in the middle position toclearstock, tighten stock
screw, install barrel band.
CLEANING
Frequency of cleaning
upon the frequency of use
Accumulation
of powder fouling and bullet lubricant in the
chamber area may effect the functioning
of the rifle, causing
misfiring.
If either of these conditions
develop, clean the
assuming that something
is wrong with it.
depends
of the rifle.
breech and
jamming or
rifle before
All areas of the breech, bolt, magazine, chamber and bore should be
scrubbed or wiped clean with a' cleaning patch wetted with a powder
solvent. After all areas have been thoroughly
cleaned, wipe again with
an oiled cloth.
Though this rifle is made of high-quality
stainless steel, a light coating
of surface rust may develop over a period of time. especially in areas of
high humidity. This is a very thin surface coating and can be removed
with a rust preventive solvent and a clean cloth.
P~ge5
SIGHT ADJUSTMENTS
AND SCOPE MOUNTING
Your AMT LIGHTNING RIFLE has been equipped with both open sights
and
grooves for mounting a 'scope sight. The adjustable rear sight
'(optional) is provided with elevation and windage adjustments. The
adjustment screws should be turned to move the sight blade in the
direction that you wish the bullet to strike. For example. turning the
windage adjustment screw clockwise moves the sight blade to the left
and the impact of the bullet to the left.
The fixed sights of the standard model have been set at the factory.
However,
should your rifleshoot low,the front sight may be reduced in
height to zero the rifle with the ammunition that you will be using.
Windage
ajustments on the standard model may be accomplished by
drifting the rear sight in the direction you wish the bullet to strike the
target.
The receiver of your AMT LIGHTNING is grooved for tip-off scope
mounting rings. These may be purchased from your dealer ifyou wish
to install a scope sight. Follow the installation instructions provided
with the mounting rings you purchase.
If it becomes necessary to remove the rear sight. this may be
accomplished by carefully tapping the sight out of its dovetail slot. A
reference mark on both the sight and receiver will enable you to realign
the sights when they are placed back into the dovetail slot
SERVICE
Prior to shipment, each LIGHTNING RIFLE is carefully inspected and
test fired to ensure that it is in proper operating condition. Should the
rifle require adjustment, repair or refinishing, we recommend that the
rifle be returned directly to the factory SERVICE DEPT. There is no
other way to be sure that work is performed in a properly equipped and
staffed facility. Fai lu re lo use the factory services could resultin void ing
your warranty.
All rifles returned are to be sent prepaid. All collect shipments will be
refused.
For best service, always enclose
a cover letter with lhe rifle furnishing
serial number, model of rifle and the nature of the problem or work
desired. A statement that the rifle is "defective" is not adequate and will
only result in unneeded delays. Try to be as specific as possible.
Federal
impossible
control
the shipment of firearms. It may be
to return a rifle directly to you. Check you
before shipment.
If this is the case, we recommend
be sent th roug h a federally Iicensed dealer.
regulations
for the factory
local regulations
that all firearms
be sure that both lhe magazine and the chamber are empty
before shipping. Any firearms received in a loaded condition must be
reported to federal authorities.
Please
Page 6
PARTS & ORDERING
All parts orders should be sent to the attention of the Parts Dept..
California residents include 6%% sales tax. Minumum parts order is
$1.00.
When ordering parts. specify Model name. Part name and Part number.
Also include the complete serial number of the firearm.
.Parts
designated by an asterick must be factory fitted. The price shown
does not include labor and tax, it applicable. These parts will be
replaced on an exchange basis only. The replaced parts will not be
returned to you.
If you wish to purchase an extra receiver. you must do so th rough a federally licensed dealer, as this unit is serialized and classified as a
"firearm" by the Federal Government.
25 Round Magazine. , . . . . . . . . . . . . . . $14.95
50 Round Magazine. . . . . . . . . . . . . . . . $24.95
Lightning Rifle Case. . . . . , . . . . . . . . . $19.95
ARCADIA MACHINE & TOOL, INC.
536 N. Vincent Ave.
Covina, California 91722
P"glJ 7
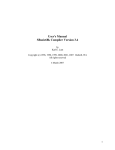
LROO1
LR047
LR045
1/
~
.w-
LT~"6
-.
.
I I
..\_.
'I.:r
"
LAOO2.B
W-
~
-
LRD37
LAO~:O"
LR042
J
L R 48
°
TO
"
~
,
.,.
,
;033
~
"
.
,,
~
~I~'-~.~
LAO"
.
-I
.
\
,LAO"
LROJ.9-E!
I
LR014
LR023 I
LR029.A
~
\
LROO4
\
LROO3
LR03
!~
~I
L.ROH
LR020
/( fi
LR002.A
LROll
LR041
LR016
>,
L.ROO9
LR021
LROO5
LR040
-{-.'
/:;>
LRO>4
r
.
"."""\"'-.'
-
"
~
LA013
.
-,-r'
"""
,
VI"
-
LR03~Ror
".,,~"
~...~..~~
'.'
""'."
~
AMT LIGHTNING
Part No.
LROO1
LROO2-A
LR002-B
LR003
LR004
LROOS
LROOO
LROO7
LR008
LA009
LA010
LR011
LR012
LR013
LR014
LR015
LRO16
LR01?
LR018
LR019
LA020
LR021
I
I
j
1
"
!I
:1
I
f'I
I
LR022
LR023
25/22
RIFLE PARTS
Part Name
Barre I
Magazine Lalch Pin
Ejeclor Pin
Trigger Pivot Pin
Hammer Pivot Pin
Disconneclor Pivot Pin
Trigger Guard Retaining Pin (2)
Bolt Stop Pin
Firing Pin Spring Stop Pin
Firing Pin Stop Pin
Recoil Spring Assembly
Firing Pin Spring
Estractor Spring
Magazine Lalch Plunger Spring
Hammer Spring
Sear Spring
Trigger Plunger Spring
Safety Plunger Spring
"Recoil Rod
"Recoil Rod Bushing
Safely Plunger
Trigger Plunger
LR025
Ejector
Hammer Bushings (2)
Magazine Lalch Plunger
Safety
LR026
LR027
Bolt Lock Spring
Barrel Band Screw
LR028
LR029-A
LR029-B
LR030
LR031
Firing Pin
Hammer Slrut
Hammer Slrut Spring
80lt Lock
Extractor Plunger
LR024
LR032
LR033
LR034
LA035
LR036
LR037
LR038
LR039
LR040
LR041
LA042
LR043
LR044
LR045
LR046
LR047
LR048
LA049
LR050
LR051
& PRICE LIST
Retail Price
$37.95
.75
.75
1.00
1.00
.75
1.50
.50
.50
.50
9.95
.50
.50
1.25
1.00
.50
.75
.50
1.00
1.25
1.50
3.50
2.75
3.95
1.00
.50
2.50
1.50
.50
2.75
.75
Retainer
'Receiver
Bolt
Trigger Guard
Barrel Band
""Boll Handle
Barrel Retainer Block
'''Disconnector
Trigger
'''Sear
Magazine Latch
'''Hammer
Extracto
89.00
58.50
67.00
8.95
6.00
5.50
9.95
8.75
8.00
14.00
r
tFront Site
Rear Site
Front Site Screw
Rear Site Screw
Barrel Retaining Block Screw (2)
Stock Assembly
Magazine
Adjustable Site
'Sold to FFL Dealers only
. UNot Sold Separately
'''Must be Installed at Factory
fSpecify Bull or Tapered BBL
1.00
6.00
6.00
.50
.50
1.00
52.00-
14.95
25.00
WARRANTY STATEMENT
BASED ON MAGNUSON, MOSS WARRANTY ACT, AMT
offers no expressed warranty on its product line. AMT does
recognize its obligation concerning Implied warranty. AMT
will continue to stand behind its products as it has in the
past. AMT products will be serviced for a period of one year
from date of retail purchase, for defects of material or workmanship, at no charge to the purchaser. Be sure to retain
your sales slip as proof of purchase date when making a
claim.
This instruction manual should always accompany this
firearm and be transferred with It upon change 01
ownership-