1
USER GUIDE
GUIDE DE L'UTILISATEUR
1
ENGLISH
TABLE OF CONTENTS
Important safety information
Overview
Parts included
Installation
• Double gang box
• Single gang box
• Main unit
Configuring Relay
• Logging into Wink
• Customizing Relay
Features
Warranty
Compliance
Troubleshooting
2
4
7
8
10
24
26
28
30
34
3
IMPORTANT SAFETY INFORMATION
instructions, and installed/or used in accordance with
appropriate electrical codes and regulations.
Carefully read all safety information before installing.
WARNING: RISK OF ELECTRIC SHOCK
•
Only use this device with copper or copper-clad wires.
•
Before installing, servicing, or removing Relay,
TURN OFF POWER AT CIRCUIT BREAKER.
•
Relay can ONLY be installed in a light load gang box
(a gang box that controls lights only.)
•
After power has been turned off, make sure the light
switch you are going to replace with Relay is powered
down before continuing installation.
NOTE: It is recommended to use a circuit tester
to make sure the circuit is off.
•
Relay can only be used in a single or double gang box
where a neutral wire is present. Do not install in a multigang box unit.
•
Relay is not compatible with a 3-way light switch.
•
Relay replaces single or double light switches not wired
to an AC outlet.
•
The included wire stripper has an exposed blade which
could potentially cause injury. Use with caution.
•
Use this device only for its intended purpose as
described in this user guide.
•
Installation involves handling high-voltage wires;
follow warnings and safety instructions carefully.
•
IF YOU ARE UNSURE ABOUT ANY OF THE
INSTRUCTIONS, CONSULT A QUALIFIED ELECTRICIAN.
CAUTIONS & REQUIREMENTS
4
•
Relay can ONLY connect to a 2.4GHz router
broadcasting with a 20 MHz bandwidth.
•
Relay must be installed in accordance with the installation
5
OVERVIEW
GET INSTANT ACCESS TO
YOUR CONNECTED HOME
ON A TOUCHSCREEN
THAT’S TAILORED TO YOU.
CONTROL SMART LIGHTS,
LOCKS, WINDOWS, A/Cs,
AND MORE, ALL FROM
WINK RELAY.
6
7
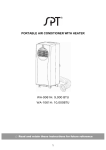
PARTS INCLUDED
WIRE
CONNECTOR**
USER GUIDE
SCREWDRIVER
MAIN UNIT
POWER BOX
SCREWS (2)
WIRE STRIPPER*
SNAP PL ATES (2)
** Wire stripper is provided in case your wires need to be trimmed
or stripped for proper installation.
** A push-in wire connector works as a ‘finger trap’ for wires;
simply push wires into an available pole to lock.
8
9
INSTALLATION
1
WARNING: RISK OF ELECTRIC SHOCK
Disconnect power to switch at the circuit breaker.
Test the existing light switch to make sure the circuit
breaker is off.
IF YOU ARE UNSURE ABOUT ANY OF THE INSTRUCTIONS,
CONSULT A QUALIFIED ELECTRICIAN.
2 Separate power box from main unit by gently pulling the
base of the power box up and away from the back of Relay.
3 Remove existing wall plate and light switch.
10
11
4 Identify the line, 1 load, 2 and neutral wires,
then disconnect from existing switch.
3
IF THERE ARE NO NEUTRAL WIRES, STOP AND CALL US
AT 1-844-WINKAPP.
5 Disconnect wires from existing switches.
6 Cut and strip wires, if necessary.
3
1
TO TRIM WIRES:
• Place wire in the trimming notch closest to the spring at the spot
it should be cut and press handle.
TO STRIP WIRES:
2
• Place insulated wire in the stripping notch that fits the wire gauge.
Press and hold handle closed. Rotate wire until a cut is made around
the insulation and pull insulation off the wire.
12
13
DOUBLE GANG BOX INSTALLATION (RECOMMENDED)
A double gang box is a double light switch that controls
two loads.
1
7 Connect wires from gang box to wires on the power box.
NOTE: Colors of wires may vary depending on your gang box.
Consult a qualified electrician if you are unsure about a wire.
Connect the line wire from the gang box (usually black)
to the black 2-pole connector on the power box. 1
2
3
Connect one of the load wires from the gang box
(usually black) to one of the red 2-pole connectors
on the power box. 2
Connect the other load wire from the gang box (usually black)
to the other red 2-pole connector on the power box. 3
Connect the neutral wire(s) from the gang box (usually
white) to the white 4-pole connector on the power box.
4
4
8 There are no bare copper (ground) wires on the power box,
however there will be ground wires in your wall; connect them
all using the green 4-pole wire connector (included.)
NOTE: Your ground wires may already be attached together
with a connector. If this is the case, you will not need to
complete this step. WARNING: Cap any loose wires.
14
15
9 Push all wires back into wall as far as possible.
10 Screw power box in place with the two (2) screws provided.
Depending on the size of your wall opening, the powerbox
may or may not fit completely inside the wall. Do not screw
the powerbox flush with the wall.
11 Turn power back on at circuit breaker.
12 On the front of the power box, you will see two buttons
and an LED light. If wired correctly, the LED light will
be solid green.
16
Press and hold the top button: the light attached to
load 1 should turn on. Press and hold the bottom button:
the light attached to load 2 should turn on. If the LED light
does not light up green, see Troubleshooting section.
17
SINGLE GANG BOX INSTALLATION
A single gang box is a single light switch that controls one load.
Since Relay has the ability to control two light loads, installation
in a gang box that has two loads running to it is preferred.
1
7 Connect wires from gang box to wires on power box.
NOTE: Colors of wires may vary depending on your gang box.
Consult a qualified electrician if you are unsure about a wire.
Connect the line wire from the gang box (usually black)
to the black 2-pole connector on the power box. 1
Connect one of the load wires from the gang box
(usually black) to one of the red 2-pole connectors
on the power box. 2
Connect the neutral wire(s) from the gang box (usually
white) to the white 4-pole connector on the power box.
2
3
3
8 There are no bare copper (ground) wires on the power box,
however there will be ground wires in your wall; connect them
all using the green 4-pole wire connector (included).
NOTE: Your ground wires may already be attached together
with a connector. If this is the case, you will not need to
complete this step. WARNING: Cap any loose wires.
18
UNUSED
19
9 Push all wires back into wall as far as possible.
10 Screw power box in place with the two (2) screws provided.
Depending on the size of your wall opening, the powerbox
may or may not fit completely inside the wall. Do not screw
the powerbox flush with the wall.
11 Turn power back on at circuit breaker.
12 On the front of the power box, you will see two buttons
and an LED light. If wired correctly, the LED light will
be solid green.
20
Press and hold the button the light was wired to: the light
should turn on. If the LED light does not light up green,
see Troubleshooting section.
21
INSTALLING THE MAIN UNIT
The main unit attaches to the power box in one of three
positions (left, center, right) using one of the three ports
on the back of the unit.
13 Once you have decided which position you want, place
the snap plates (included) over the unused ports and snap
them into place.
14 Gently hook and press the main unit's uncovered ports
onto the power box and snap it into place.
22
You are now ready to start configuring Relay!
23
CONFIGURING RELAY
Connecting Relay to Wink is easy. Follow the step-by-step
instructions that appear on the Relay screen.
LOGGING INTO WINK
1
Relay will automatically turn on once it’s connected to the
power box and power has been restored to the circuit breaker.
2 Instructions on Relay's screen will walk you through the
Wi-Fi pairing process.
NOTE: Relay must be connected to Wi-Fi to operate.
If Relay does not connect to your Wi-Fi network, see
Troubleshooting section.
3 Log in or create a Wink account.
CUSTOMIZING RELAY
After setting up your Wink Relay, you can customize Wink Relay
through the Wink app on your smartphone.
1 Connect your smartphone to your Wi-Fi network
(enter network name and password).
2 Download or launch the Wink app from the Apple App Store
or Google Play.
24
3 Create or sign into your Wink account.
4 Go to Relay in your Wink app where you can customize
your Relay.
For more information and further set up assistance,
please visit wink.com/relay
25
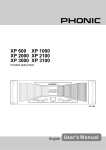
FEATURES
1
4.3" multi-touch LCD display.
2
2x smart switches trigger lights or user preset actions.
Designed to control up to two (2) light loads.
3
Microphone and speaker for intercom functionality.
4
Temperature and humidity sensor.
5
Proximity sensor:
Bluetooth® Low Energy (BLE) allows Relay
to recognize which user is present via their smartphone and activates their stored user profile.
5
1
2
NOTE: Runs the Wink app
(Wi-Fi®, Bluetooth®, and ZigBee® compatible.)
3
26
4
27
WARRANTY
LIMITED ONE-YEAR WARRANTY
Wink, Inc. ("Wink") Original Purchase Product Warranty
Wink warrants to the original purchaser ("Purchaser") of this Wink
product, for the period of one (1) year following the date on which
Purchaser purchases the product, that the product shall be free of
defects in design, assembly, material, or workmanship. Wink will
refund or replace, at its option, any defective product free of charge.
In order to qualify for this warranty, the Purchaser must provide the
defective product and a copy of the original receipt of purchase to
Wink for inspection. The receipt of purchase must indicate the product
purchased, price paid, date of purchase, and name of merchant.
To request service under this warranty, contact Wink at 1-844-WINKAPP or [email protected] and a Wink representative will provide
instruction on how to proceed.
THIS WARRANTY CONTAINS THE SOLE WARRANTY OF WINK.
THERE ARE NO OTHER WARRANTIES, EXPRESSED OR IMPLIED,
INCLUDING THE IMPLIED WARRANTY OR CONDITION OF
QUALITY, MERCHANTABILITY OR FITNESS FOR A PARTICULAR
PURPOSE, AND SUCH IMPLIED WARRANTIES, IF ANY, ARE
LIMITED IN DURATION TO THE TERM OF THIS WARRANTY. IN
NO EVENT SHALL WINK BE LIABLE FOR INCIDENTAL, SPECIAL,
DIRECT, INDIRECT OR CONSEQUENTIAL DAMAGES SUCH AS, BUT
NOT LIMITED TO, LOST BUSINESS OR PROFITS ARISING OUT OF
THE SALE OR USE OF ANY WINK PRODUCT, EVEN IF ADVISED OF
THE POSSIBILITY OF SUCH DAMAGES.
Some jurisdictions do not allow exclusions or limitations on implied
warranties or incidental, consequential or other damages, so the
above exclusions and limitations may not apply to you.
This warranty shall be null and void if Wink determines that the product
has been improperly installed, altered or tampered with in any way.
This warranty does not protect against normal use, wear and tear, or
damage due to abuse.
28
29
COMPLIANCE
FCC STATEMENTS
This device complies with Part 15 of the FCC Rules. Operation is
subject to the following two conditions: (1) this device may not cause
harmful interference, and (2) this device must accept any interference
received, including interference that may cause desired operation.
NOTE: This equipment has been tested and found to comply with
the limits for a Class B digital device, pursuant to Part 15 of the FCC
Rules. These limits are designed to provide reasonable protection
against harmful interference in a residential installation. This equipment
generates, uses and can radiate radio frequency energy and, if not
installed and used in accordance with the instructions, may cause
harmful interference to radio communications. However, there is no
guarantee that interference will not occur in a particular installation.
If this equipment does cause harmful interference to radio or television
reception, which can be determined by turning the equipment off and
on, the user is encouraged to try to correct the interference by one
of the following measures:
•
Reorient or relocate the receiving antenna.
•
Increase the separation between the equipment and receiver.
•
Connect the equipment into an outlet on a circuit different from
that to which the receiver is connected.
•
Consult the dealer or an experienced radio/TV technician for help.
30
CAUTION: Any changes or modifications not expressly approved by
the party responsible for compliance could void the user's authority
to operate this equipment.
FCC RADIATION EXPOSURE STATEMENTS:
This equipment complies with FCC radiation exposure limits set forth
for an uncontrolled environment. This equipment should be installed
and operated with minimum distance 20cm between the radiator and
your body.
NOTE: The country code selection is for non-US model only and is not
available to all US model. Per FCC regulation, all Wi-Fi product marketed
in US must fixed to US operation channels only.
31
INDUSTRY CANADA STATEMENTS
PRODUCT RATING
This device complies with Industry Canada licence-exempt RSS standard(s).
Operation is subject to the following two conditions: (1) this device may
not cause interference, and (2) this device must accept any interference,
including interference that may cause undesired operation of the device.
120VAC, 60Hz, 3A, 360W, Tungsten per each output
120VAC, 60Hz, 8A, 960W, General Purpose per each output
COPYRIGHT NOTICE
RADIATION EXPOSURE STATEMENTS
Copyright 2014 Wink, Inc.
This equipment complies with IC radiation exposure limits set forth for an
uncontrolled environment. This equipment should be installed and operated
with minimum distance 20cm between the radiator and your body.
Wink is a trademark of Wink, Inc.
No part of this manual may be reproduced
or modified without written consent from Wink, Inc.
Wi-Fi is a registered trademark of the Wi-Fi Alliance.
Bluetooth is a registered trademark of SIG, Inc.
ZigBee is a registered trademark of ZigBee Alliance.
32
33
TROUBLESHOOTING
ISSUE
SOLUTION
Won't power up
Check the wiring.
Not connecting
to Wi-Fi
Check your router settings:
1 Relay can ONLY connect to a 2.4GHz
router broadcasting with a 20 MHz bandwidth.
When using a dual band router: Dual band routers
operate in 2.4GHz and 5GHz modes simultaneously.
Relay CANNOT connect to the 5GHz network, it can
ONLY connect to the 2.4GHz network. Relay can
ONLY connect to the 2.4GHz router broadcasting with
a 20 MHz bandwidth, NOT when the 2.4GHz router is
broadcasting with a 40MHz bandwidth.
2 Check that security is set to WPA-PSK not WEP.
I have
extra wires
34
Check the wiring instructions.
CUSTOMER SERVICE
If you need any help, we have your back with a customer
support team that is available 7 days a week.
Email us at [email protected]
or call 1-844-WINK-APP to speak to a real person.
35