1
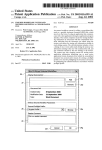
User Manual
For SmartRoom Managers
Table of Contents
1.0 Login 2.0 Confidentiality Agreement 3.0 Software Installation 4.0 Dashboard 5.0 Document Review and Index Maintenance 5.1 View by Index 5.1.1 Index View 5.1.2 First Page Preview 5.1.3 Additional Right-Click Controls 5.1.4 Uploading documents within the Index
View 5.1.5 Index Maintenance via Drag and Drop 5.1.6 File View 5.2 Document Viewer 5.3 View by List
5.3.1 Export to Excel 5.4 Search
5.4.1 Advanced Search 5.5 Print Queue 5.6 Save Queue
5.7 Q & A Messages 6.0 My SmartRoom 6.1 Account
6.1.1 Personal Information
6.1.2 Password
6.1.3 Language
6.1.4 Options
6.2 Alerts 6.3 List of SmartRooms 7.0 Reports 7.1 User Activity 7.2 My Activity 7.3 User Rights 7.4 Usage Reports
7.4.1 User Statistics
7.4.2 Document Completion Progress
7.4.3 Marked as Completed Documents
7.4.4 Document Review Analysis
7.4.5 Document Activity
7.4.6 Site Totals
7.4.7 User Invitation List
7.4.8 Security Rights
7.5 Audit Reports
7.5.1 Site Invitations
PRIVATE AND CONFIDENTIAL
7.5.2 User Management
7.5.3 User Logins
7.5.4 Client Machine Settings
7.5.5 Configuration Management
7.5.6 Folder Management
7.5.7 User Category Management
7.5.8 Document Management
7.5.9 Audit-level User Statistics
7.5.10 Instant Alert Management
7.6 Scheduled Reports
8.0 Help 8.1 User Guide 8.2 FAQ 8.3 Best Practices 8.4 Contact the SmartRoom Team 9.0 Additional Services 9.1 Managed Data Hosting 10.0 SmartRoom Management
10.1 New Index
10.1.1 Create Numeric Document Index
10.1.2 Create Alpha Numeric Document Index
10.2 Content 10.3 Security Profiles 10.4 Add / Edit Users
10.4.1 Invite Users
10.4.2 Manage Users
10.5 Q & A
11.0 SmartRoom Settings 11.1 Alerts
11.1.1 Standing Alerts
11.1.2 Instant Alerts
11.2 Customization 11.3 Q & A Settings 11.4 Site Defaults
11.4.1 Message Templates
11.4.2 Country Defaults
11.4.3 Document Numbering Defaults
1.0 Login
Follow the link provided in your invitation or go directly to https://bdr.bmcgroup.com to log into your
SmartRoom. Use the username and password provided in your invitation email. If you have forgotten or
misplaced your password, click on the Forgot Password? link to be sent a reminder.
Please note this will also unlock your account and send you a new password.
If you experience login problems please call or email our Customer Support Team using the contact
information provided on the login page.
1
PRIVATE AND CONFIDENTIAL
2.0 Confidentiality Agreement
You will be prompted to read and accept the confidentiality agreement each time you enter the SmartRoom.
Click
2
to enter your SmartRoom.
PRIVATE AND CONFIDENTIAL
3.0 Software Installation
First time users will need to download and install the latest version of the Java Runtime Environment (JRE)
in order to appropriately view, print, and/or save documents within the SmartRoom. Although most
workstations already have the appropriate software installed, the software can easily be downloaded and
installed from http://java.com.
If any issues occur after updating your Java Runtime Environment please check the site FAQ under the
Help section for further troubleshooting tips or you can reach out to us directly at 1-877-332-5739 or
[email protected].
3
PRIVATE AND CONFIDENTIAL
4.0 Dashboard
When enabled, the Dashboard provides the SmartRoom Manager the option to immediately review the
latest activity of the external users through the use of different graphs and table as shown below.
Any time that there is a change that is related to the below graphs or tables they will be updated each time
that the site is refreshed.
4
PRIVATE AND CONFIDENTIAL
5.0 Document Review and Index Maintenance
5.1 VIEW BY INDEX
5.1.1 Index View
‘View by Index’ will display the SmartRoom index under the ‘Index View’ pane. You are able to view the
index for each category by selecting from the drop down menu labeled ‘My Category View’.
You can expand and collapse individual folders and sub-folders by clicking on the
Using the buttons above the index, you can expand
in
or out
of the index. Print
or collapse
the index and export
icons.
all folders and sub-folders, zoom
the index to Microsoft ExcelTM.
Documents will be visible below the expanded folder with the symbol on the left of each document name
denoting file type.
Clicking on the document name will open the document in a separate window.
5
PRIVATE AND CONFIDENTIAL
5.1.2 First Page Preview
If enabled there is the option to view the first page of a document without opening the document. Users can
then open the document by clicking on the image that comes up.
SmartRoom Manager’s decide if they would like the First Page Preview enabled. Your SmartRoom may not
have this feature enabled by default.
6
PRIVATE AND CONFIDENTIAL
To ensure you can access this feature, if enabled, please check the box ‘Allow Preview File’ under My
SmartRoom > Account > Options tab.
To display the first page Preview, please perform the following:
1. Hovering your cursor over the document name while in the ‘Index View’ or ‘File View’.
5.1.3 Additional Right-Click Controls
Right clicking on the folder name will bring up the follow functionality:
7
Folder numbering options
Manage the document numbering within the folder
Send to Save Queue
This will send the selected to the Bulk Save Queue
Send to Print Queue
This will send the selected to the Bulk Print Queue
Create Q & A
Create a Q&A query referencing the folder
Upload Folders/Document
Upload file and/or documents using the drag and drop uploader
Create Alert
Create a personal, standing, or instant alert
Search
Perform a basic search of the folder
Advanced Search
Perform an advanced search of the folder
PRIVATE AND CONFIDENTIAL
Create Instant Alert
Create an instant alert to specified users
Create Standing Alert
Create standing alert in the selected folder level
Create Personal Alert
Create a personal alert folder level
Create Site Wide Standing Alert
Create a site wide alert in the SmartRoom
Create Site Wide Personal Alert
Create a site wide personal alert
More Actions:
Rename the folder
Add a folder below the current folder
Add as subfolder to the current folder
Delete the folder
Upload individual documents to the folder
Lock folder with its respective user rights
Right-clicking on the document name will bring up the follow functionality:
8
PRIVATE AND CONFIDENTIAL
Send to Save Queue
This will send the selected to the Bulk Save Queue
Send to Print Queue
This will send the selected to the Bulk Print Queue
Create Q & A
Create a Q&A query referencing the document
Create Alert
Create a personal, standing, or instant alert
Manage Notes
Add a Global or Personal Note to the document
More Actions
Rename File
9
PRIVATE AND CONFIDENTIAL
Rename the file
Edit File Description
Make changes to the document description
Delete File
Delete the document from the index
Change your review status of the document
View the file properties of the document
View a preview of the document
10
PRIVATE AND CONFIDENTIAL
5.1.4 Uploading documents within the Index View
Drag and Drop Uploading
Drag and Drop Uploading is a feature of the SmartRoom that eliminates the need for extra software or
navigation in order to upload documents directly to the index. This function applies to users with specific
document upload rights.
Right-click on the folder that you wish to upload to as shown below.
Once a destination folder has been selected the VDR Drop Zone window will open:
11
PRIVATE AND CONFIDENTIAL
If you do not have the proper Java software installed you will be prompted to add it. Please click on the link
stating ‘Click here’ and follow the instructions. You may need to contact your IT department depending on
what level of access rights you have to your workstation.
With the destination folder selected all you need to do is drag over the documents from your desktop or any
other folder located directly on your workstation into the SmartRoom Drop Zone window.
• Each Document Type will be presented with the File Type icon.
• There will be destination folder path on the top of the SmartRoom Drop Zone
• Items will be presented in SmartRoom Drop Zone in the following order:
Listed first are all the documents in the uploaded Folder, then all subfolders. All items in
subfolders will follow the same display rule.
• Items are presented in a Tree Structure.
• You have the ability to reorder files and folders to reflect the desired order and location that items
should be uploaded.
12
PRIVATE AND CONFIDENTIAL
After the files/documents are in their proper position, click ‘Upload’ to start the upload process.
Users are presented with right-click item menu on the File Tree. The options are:
File:
• Rename
• Remove
Folder:
• Rename
• Add New Folder
• Remove
13
PRIVATE AND CONFIDENTIAL
Note: a document must be added before any folder functions can be completed.
Once the upload is complete each item will be displayed as ‘Finished’ or ‘Failed’.
Once you close the VDR Drop Zone window the index will refresh and the new files will be available to the
users that have access to that parent folder.
14
PRIVATE AND CONFIDENTIAL
Please note that you can add multiple folders and files to the Drop Zone Window and rearrange accordingly
before selecting the ‘Upload’ button.
5.1.5 Index Maintenance via Drag and Drop
Drag and Drop within the index (DnD)
DnD is a function that allows complete manipulation of the index, including folders and files, without having
to leave the index or open other software.
In order to enable Drag and Drop (DnD) capability within the index users need to switch to DnD mode. The
DnD mode icon will be located in the same toolbar as other icons.
When DnD mode is activated,
document click is disabled on the index. So when you click on a document,
instead of viewing it, users will be able to select and drag it.
When DnD mode is enabled, the DnD mode icon replaces the View Mode icon. Click on the same icon to
get back to View Mode
Users can expand and collapse folders, export to ExcelTM, print, zoom in and zoom out, view folder and file
counts.
15
PRIVATE AND CONFIDENTIAL
Users are not able to view the indices of other security profiles in DnD Mode.
Files and/or Folders can be moved between folders using drag-and-drop. Users will activate a file or folder
drag by clicking a file(s)/folder(s) holding down the left mouse button while moving the mouse. To move a
folder/file below or above another folder, users will see a black line indicating as such.
To move a file into a folder or subfolder users will hover directly over the appropriate folder and this will
create the highlight shown below. When users hover long enough the hover over will also expand the folder
being hovered over to move into subfolders.
Users will see the mouse cursor change, and the name of the file/folder is displayed next to it.
16
PRIVATE AND CONFIDENTIAL
Items can be dropped inside or between the Index items.
File(s) can be selected to be moved from File View on a right side of the screen as well as from expandable
Index View.
While in the DnD mode users will be able to access the Drop Zone Window and upload documents.
17
PRIVATE AND CONFIDENTIAL
Alternately, users can upload individual documents as seen below.
To upload files simply browse to the location of up to 5 documents and then click the upload all button. This
will upload the files to the selected folder.
18
PRIVATE AND CONFIDENTIAL
In addition to the functions above, once DnD is enabled you will have the option to upload a parent folder to
the bottom of the index using the button shown below.
Once the button is selected please use the drag and drop button to upload documents as you normally
would. This offers fewer clicks then having to create a parent folder using the right-click ‘add folder’ function
5.1.6 File View
When clicking on a folder containing documents under ‘Index View’, the details of the documents in the
folder will be displayed in the ‘File View’ pane.
The details include: The document name, document file size, date it was uploaded, last time you viewed or
printed the document. Each of these columns can be sorted by clicking on the respective column heading.
Clicking on the document name will open the document in a separate window.
19
PRIVATE AND CONFIDENTIAL
5.2 DOCUMENT VIEWER
When opened, a document will appear in a separate window within the viewer.
Document Viewer Controls:
Navigate through the document
Side Scroll bar
Zoom in and out
Rotate the document
Print
Save
Word and phrase search
Download additional font packs
(Where necessary if viewing non-English documents)
20
PRIVATE AND CONFIDENTIAL
5.3 VIEW BY LIST
‘View by List’, will display a complete list of files available in the SmartRoom alongside their path or location.
You may sort the list of documents by the parameters at the top of each column.
Clicking on the options
box will bring up the options for creating a document note, printing, saving
and creating a Q&A inquiry for that document. This can also be done by right-clicking on the file name.
Clicking on the document name will open the document in a separate window.
5.3.1 EXPORT TO EXCEL
‘Export to Excel’ will bring up a dialogue box asking you to either open or save the Index as an ExcelTM file.
This file will show the documents available to you in an index structure. It will also denote different pieces of
information regarding the documents/folders.
The “Export List” tab gives you an option as to what excel version you would want the file to be saved.
21
PRIVATE AND CONFIDENTIAL
5.4 SEARCH
You may search for words or terms within each document by using the search box located on the top-right
corner of the site. Located search terms will be highlighted within the document. The accuracy of the search
function is affected by the quality of the source document and whether OCR (Optical Character Recognition)
has been applied to any hard copy documents that were scanned prior to uploading.
You are also given options to define your search as shown below.
5.4.1 ADVANCED SEARCH
In addition to the standard search, users have the ability to complete an advanced search by clicking the
Advanced Search link on the drop down. It is also possible to right click within the index on a specific folder
and select Search and then Advanced Search
You will be able to specify exactly what you are looking for based on the below screenshots. You have the
ability to add or remove clauses as necessary.
22
PRIVATE AND CONFIDENTIAL
5.5 PRINT QUEUE
If you send multiple documents to the print facility, you will be able to manage the Print Queue. A list of all
documents sent to the printer will be displayed and you may sort the list by any of the parameters in the
header. Clicking on the options
button will give you the option of pausing, moving or canceling
the document scheduled to print.
5.6 SAVE QUEUE
The save queue will show you how many documents remain to be downloaded to your chosen location.
5.7 Q & A MESSAGES
‘Q & A Messages’ enables you to access all your Q&A inquiries and responses as well as post new
inquiries. You may also sort the content list by clicking on any of the column headers.
When clicking on ‘Export’ a dialogue box will come up asking you if you wish to open or save your list of
Q&A inquiries into an ExcelTM document.
23
PRIVATE AND CONFIDENTIAL
We can send a general question or response to selected members of the SmartRoom by checking the box
alongside their name or to all users by checking
24
PRIVATE AND CONFIDENTIAL
.
6.0 My SmartRoom
6.1 ACCOUNT
6.1.1 Personal Information
Please check and edit your personal details here.
6.1.2 Password
You may change your password at any time. Remember that passwords must be 8 characters or more and
contain a combination of uppercase, lowercase and alpha numeric characters.
6.1.3 Language
The choice of languages available in your SmartRoom is determined by the Deal Management Team. If a
multi-language interface is available, you will be able to select your default language from the ‘My
Language’ section of the menu.
25
PRIVATE AND CONFIDENTIAL
6.1.4 Options
By checking the box ‘Hide Files in Combined Index’, you will only see folders when the index is displayed.
This feature may be useful when viewing a large index.
By checking the box ‘Allow Preview File’, you will turn on the document preview function for yourself. This
feature is useful when looking for a specific document.
Please note that the File Preview must be enabled in conjunction with the profile change in order for the
preview to be displayed.
6.2 ALERTS
6.2.1 Personal Alerts
You are able to set up an email alert to bring activity in the SmartRoom to your attention. This can also be
done by right clicking any folder or file within the index view.
To create a new alert click on
. To manage an existing alert click on the
next to the alert
you want to modify or delete.
Click on the
symbol next to the folder you wish to monitor.
In most cases this would include all folders in which case click on the
symbol next to ‘SmartRoom
Index’
1. Select the type of alerts you wish to set up, ‘Upload File’, ‘Delete’, ‘Read’.
2. Select the frequency you wish to receive these alerts, ‘Immediate’, ‘Hourly’, ‘Daily’.
26
PRIVATE AND CONFIDENTIAL
3. Check the ‘Consolidate’ box if you wish to receive the alerts in a single email.
4. Click on the
icon to save/create the alert.
5. Click on the
icon to cancel the alert.
To edit an existing alert, click on the
next to the alert. To delete an alert, click on the
next to it.
6.2.2 Manage Q & A Alerts
‘Manage Q & A Alerts’ allows you to set the frequency at which we receive Q&A alerts. Alerts signify that
we have received a new question or response.
6.3 LIST OF SMARTROOMS
‘List of SmartRooms’ will present a list of all of the SmartRooms you are currently a member of. You can
switch between SmartRooms by clicking on the project name or URL.
27
PRIVATE AND CONFIDENTIAL
7.0 Reports
7.1 USER ACTIVITY
Document Activity by User
These reports show us whether a specified user has viewed, printed or saved documents within a
specified time frame.
User name
Select a user from the drop down menu.
Show documents viewed by selected User
The report will show us the document index with a green tick
representing the documents the
selected user has viewed.
Show documents not viewed by selected user
The report will show us the document index with a red cross
representing the documents the
selected user has not viewed.
Custom
We can create a combined report which will show us the documents a user has or has not viewed,
printed or saved depending on the required combination of these actions.
Include Folders That Have No Documents
This check box will determine whether the folders that contain no documents will show up on the
document index of these reports.
28
PRIVATE AND CONFIDENTIAL
Show Folder Level Totals
This check box will determine whether the total number of documents for each folder and its subfolder
will be evident in the reports.
Login Activity
These reports give us an idea of the login activity of users in the SmartRoom
Detailed
A report will generate a list of each user, their name and category, the time and date of their last login
and the duration of their longest login.
Graph by Category
The report will be displayed as a bar chart that compares the total logins and the amount of time
spent in the SmartRoom by category.
Daily Graph
The report will be a line chart displaying the amount of logins to the SmartRoom per day.
Document Activity for One Category
A report of the documents viewed, printed or saved per selected category.
Show Folder Level Totals
This check box will determine whether the total number of documents for each folder and its subfolder
will be evident in the reports.
29
PRIVATE AND CONFIDENTIAL
Document Activity by Category - Detailed
A report of the documents viewed printed or saved by category.
Show Folder Level Totals
This check box will determine whether the total number of documents for each folder and its
subfolder(s) will be evident in the reports.
Document Activity by Category - Totals
A report of the total numbers of times a category has viewed, printed, or saved a document.
Category Report
A report of the total number of users per category and the number of users per category that have logged in,
not logged in, or logged in, but no activity.
There is the option to display this information numerically, Detailed, a Bar Chart or a Pie Chart.
Categories
One can choose to report on Active categories only, Suspended categories only or All categories.
There is also the option to include deleted users on the report.
30
PRIVATE AND CONFIDENTIAL
Document List
This report shows us a list of documents displaying the file type and size.
File Type
We have the option to display all documents, PDF documents only, or Non-PDF documents.
File Size
We also have the option to display documents under or equal to 10kb, Under or equal to 1mb, Over
1mb or Over or equal to 10mb in size.
The documents can be displayed as a list or in the Index Tree format.
7.2 MY ACTIVITY
These reports show us whether we have viewed, printed and/or saved documents within a specified
time frame.
Show documents I have viewed
The report will show us the document index with a green tick
representing the documents we have
viewed.
Show documents I have not viewed
The report will show us the document index with a red cross
not viewed.
31
PRIVATE AND CONFIDENTIAL
representing the documents we have
Custom
We can create a combined report which will show us the documents we have or have not viewed
printed or saved depending on the required combination of these actions.
Include Folders That Have No Documents
This check box will determine whether the folders that contain no documents will show up on the
document index of these reports.
Show Folder Level Totals
This check box will determine whether the total number of documents for each folder and its subfolder will
be evident in the reports.
7.3 USER RIGHTS
User Rights reports allow for SmartRoom Manager to run specific and detailed reports regarding the layout
of each user’s individual or categorical rights.
Show detailed rights by Category
This feature allows users both SmartRoom Manager and Admin to track precise details of the access
of users in the SmartRoom.
View/Print/Save/Title Only/Modify option – Creates a report that is specific to the rights selected
and displays those rights for the selected category.
Detailed Option:
Include ‘Allowed’ only - provides the number of documents a particular category has been provided
with either view, print, or save access to the document.
Include ‘Denied’ only - provides the number of documents the selected category has been denied
access to.
32
PRIVATE AND CONFIDENTIAL
Include ‘Allowed’ and ‘Denied’ - shows report for documents which have been allowed for and
restricted from viewing/ printing/ saving from the selected category.
Rights Matrix Report for all Categories
This report displays a table with all categories in a manner similar to the Security Rights settings.
Clicking the checkbox of either the View, Print, Save, Title Only and Modify displays which category
has been provided with these rights.
7.4 USAGE REPORTS
These reports show various usage information recorded by the individual users of the SmartRoom.
7.4.1 User statistics
You will be able to create usage reports by selecting an option from the drop down menu. These reports will
include the activities of all users in the SmartRoom and can be exported to ExcelTM.
33
PRIVATE AND CONFIDENTIAL
7.4.2 Document Completion Progress
This report lists each user’s name, their company and the number of documents they have changed to
‘Completed’. You can compare this to the number of documents in the SmartRoom.
7.4.3 Marked as completed documents
This report gives a description of each document marked ‘Completed’ by individuals, including the date and
time this occurred.
7.4.4 Document review analysis
Shows the popularity (by percentage) of all documents in the SmartRoom by displaying the number of
unique users who have viewed, completed, printed and saved each document.
34
PRIVATE AND CONFIDENTIAL
7.4.5 Document Activity
This report will list all users in the SmartRoom and their document activities (i.e. number of documents
viewed, printed, saved and notes made).
7.4.6 Site totals
This report provides us with site totals which may be useful for project analysis, review and updates.
Page count - displays the total number of pages of all documents, .PDF and non-PDF format.
Size (MB) - displays the total size of all documents.
# of docs larger than 10MB - displays the number of documents larger than 10 Mega Bytes. – The
maximum recommended size.
# of docs with zero pages - displays the number of documents without content.
Total Documents viewed in last 24 hours - displays the number of documents viewed by users in
the VDR in the past 24 hours.
Total Active Users - displays the number of users who have access to the SmartRoom.
Total Historical Users - displays the number of users who have had access.
Total number of Categories - displays the number of categories created in the SmartRoom.
Total Logins to Date - shows how many users have logged into the SmartRoom.
Total Logins in last 24 hours - shows how many users have logged in the past 24 hours.
35
PRIVATE AND CONFIDENTIAL
7.4.7 User invitation list
This list will show you the names of all the users that have been invited to the SmartRoom.
7.4.8 Security rights
Provides a user rights report for the selected category.
Select a category from the dropdown menu.
36
PRIVATE AND CONFIDENTIAL
Category Site settings
A
denotes the category has access to a feature in the ‘Category Site Settings’
A
denotes the category does not have access to the feature
SmartRoom Index
A
alongside a folder or document denotes the category has the rights specified by the column.
A
denotes they do not.
View
Ability to ‘View’ the folder/document
Print
Ability to ’Print’ the folder/document
Save
Ability to ‘Save’ the folder/document
Title only The category sees only the title of the document/folder
Modify
The category has the ability to modify/edit the contents of a folder/document.. (The
category will also need the relevant site editing rights.)
7.5 AUDIT REPORTS
We can run various audit reports to track site activity and any configuration changes.
7.5.1 Site Invitations
This report will produce a list of all sent invitations. The list will include the date, time and by whom they
were sent.
7.5.2 User Management
Any changes in the user category will be listed here. The list will include the date, time and by whom the
user’s category was changed.
7.5.3 User Logins
This will provide a report of all user login history. The list will include date, time, user category and the IP
address they logged in from.
7.5.4 Client Machine Settings
Details of a user’s local machine settings if they have run our Scanner Too software.
7.5.5 Configuration Management
A report on the site configuration settings changed and the time, date and name of user(s) who made the
changes.
37
PRIVATE AND CONFIDENTIAL
7.5.6 Folder Management
If you are interested in the history of a folder, use this report. Select the time period to report on and then
chose from the index which folder you are interested in. A report will be generated only if the folder has been
added/altered since the beginning of the SmartRoom. It will generate the folder path, folder name, and the
type of event (added, renamed etc.) as well as when and who made the change.
7.5.7 User Category Management
This will provide a detailed report on the creation and management of categories.
7.5.8 Document Management
If you are interested in the history of a document, use this report. Select the time period to report on and
then chose from the index which folder you are interested in. It will generate the document path, document
name, and the type of event (added, renamed etc.) as well as when and who made the change.
7.5.9 Audit-level User Statistics
This will provide a report on site activity which can be generated according to a selected time frame.
7.5.10 Instant Alert Management
This report will show all instant alerts that were previously sent. It will list the alert subject, its name, the
folder or file it refers to and the time and date it was sent.
7.6 SCHEDULED REPORTS
In the event that a report is too large or complex to be created and exported directly from the SmartRoom
the report can be sent to “Scheduled Reports”.
When a large report is requested, the SmartRoom will calculate the size and complexity of the report to
determine if it will take significant amount of time and bandwidth to run and display. If the report reaches or
surpasses certain benchmarks, the user will be prompted to send the report to “Scheduled Reports”.
38
PRIVATE AND CONFIDENTIAL
Upon selecting “Continue” from the above prompt the user will be brought to the scheduled report section to
see the status of the requested report.
Once the report has been generated and securely delivered to the SmartRoom, an email notification will be
provided to the user stating that the report is now ready to be accessed. Clicking on the report title will
prompt the user to export the report where it can be viewed without issue.
Users can retain these reports indefinitely or can delete them as necessary.
Only the user that created the scheduled report can access it. No other users will be aware that the report
exists.
39
PRIVATE AND CONFIDENTIAL
8.0 Help
8.1 USER GUIDE
Link to the current user guide.
8.2 FAQ
List of frequently asked questions and answer that you might find useful.
8.3 BEST PRACTICES
Link to the best practices guide.
8.4 CONTACT THE SMARTROOM TEAM
If you are unable to find the assistance you need within this user guide please contact our support team:
By Email:
[email protected]
By Telephone:
40
Asia:
852.800.930.643
Brazil:
0900 722 0545
Europe:
00 800 3325 7666
Japan:
0120 974 858
North America:
1 877 332 5739
PRIVATE AND CONFIDENTIAL
9.0 Additional Services
9.1 MANAGED DATA HOSTING
This area of the site allows users who are interested specific data hosting services to reach out to us with
any questions or requests.
41
PRIVATE AND CONFIDENTIAL
10.0 SmartRoom Management
10.1 NEW INDEX
10.1.1 Create Numeric Document Index
You have the ability to create a brand new index from within the site. Follow the on-screen instructions to
learn how to copy and paste your index from Microsoft WordTM or ExcelTM formats directly into the text box.
You will see it rendered in dynamic HTML on the site and ready to use in seconds if it was formatted
correctly. Click ‘Load Sample Index’ for an example of ideal formatting.
Please be aware that when your index is up and running (with documents included), creating a new index
will completely remove any existing index and all documents inside it. Therefore, it is a good idea to disable
the index function once you are happy with your design to prevent any accidental deleting.
42
PRIVATE AND CONFIDENTIAL
10.1.2 Create Alpha Numeric Document Index
An alpha numeric index can be created in the same way but we can change the style of the folder
numbering.
To adjust the folder numbering between numeric and alphanumeric use the Levels tool that is shown above.
The drop down box for each level will provide the available formatting options.
10.2 CONTENT
This will take you to the index with the Drag and Drop option enabled. Please reference section 4.0
Document Review and Index Maintenance of this document for further details.
10.3 SECURITY PROFILES
This will allow you to adjust the specific rights of the users within the SmartRoom. Please see separate
‘SUR Guide’ or reach out to your Project Manager for guidance.
43
PRIVATE AND CONFIDENTIAL
10.4 ADD / EDIT USERS
10.4.1 Invite Users
The ‘Invite Users’ tab allows you to invite new users individually or in bulk.
Populate all the fields as shown. The subject line and the body of the email invitation are retrieved from the
general template that may have been created in your deal templates. You may edit the text as you wish for
each invitation without affecting the stored template. The categories in the drop down menu have already
been pre-created by your Project Manager, so please contact them if you wish to add another category.
You can also make permanent changes to the existing template by checking the “Make default invite
template” box and then selecting “Send Invite”.
44
PRIVATE AND CONFIDENTIAL
By inserting one of the prompts from the list that comes up when hovering over the blue
at the top of the
invitation text, the system will add the user’s name according to the prompt saving you from having to
personalize each invitation.
Click
to send the invitation once all details are filled in.
To invite multiple users click on the
button.
Follow the onscreen instructions to upload your Microsoft ExcelTM file (download the template if necessary.)
User categories must be chosen from those that you have already established with your Project Manager.
45
PRIVATE AND CONFIDENTIAL
10.4.2 Manage Users
The ‘Manage Users’ tab will allow you to make several adjustment to existing members of the SmartRoom.
To change existing user’s category:
1. Check the box of the users whose category you wish to change. You can change more than one
user in the same category.
2. Select the category. Please note, categories would have been pre-determined with your Project
Manager.
3. Click on
. It will ask you for confirmation, then click
moved into their new category.
To delete users or amend their details:
Click on the options button and then select Edit User Profile.
From here you can adjust or delete the profile as necessary.
46
PRIVATE AND CONFIDENTIAL
. The users you selected will be
To send the users the site info:
Click on the options button and then select Send Site Info.
To unlock the users account:
Click on the options button and then select Unlock User. Please note that this can be done in bulk by
selecting the checkbox next to the users name under the ‘Manage Users’ tab and then click the
icon.
To send users a new password:
Click on the options button and then select Send New Password. Please note that this can be done in bulk
by selecting the checkbox next to the users name under the ‘Manage Users’ tab and then click the
47
PRIVATE AND CONFIDENTIAL
icon.
10.5 Q & A (WHEN ENABLED)
We create and manage the Q&A groups and the ‘Q&A Management Group’ in this section.
By checking ‘Q&A Management Group’ prior to clicking
, the group becomes the ‘Q&A Management
Group’. Please note we can only have one ‘Q&A Management Group’ per SmartRoom.
48
PRIVATE AND CONFIDENTIAL
11.0 SmartRoom Settings
11.1 ALERTS
11.1.1 Standing Alerts
‘Standing Alerts’ allow you to bring activity in the SmartRoom to the attention of all or selected users that
have access to the information that has changed.
To create a new alert click on
Click on the
.
symbol next to the folder you wish to monitor.
In most cases this would include all folders in which case click on the
symbol next to ‘SmartRoom’
1. Select the type of alerts you wish to set up, ‘Upload File’, ‘Delete’, ‘Read’.
2. Select the frequency you wish to receive these alerts, ‘Immediate’, ‘Hourly’, ‘Daily’.
3. Check the ‘Consolidate’ box if you wish to receive the alerts in a single email.
4. Select or filter the necessary recipients by profile or user. If you wish for the alert to go to all users,
check ‘All Users’.
5. Click on the
icon to save/create the alert.
6. Click on the
icon to cancel the alert.
To edit an existing alert, click on the
49
PRIVATE AND CONFIDENTIAL
next to the alert. To delete an alert, click on the
next to it.
11.1.2 Instant Alerts
‘Instant Alerts’ allow you the ability to send a one time, immediate alert to any specified number of
recipients within the SmartRoom.
Select the user(s) you would like to send an alert to by checking the box next to their name or select all
users by checking
.
Fill out the subject line and the alert body.
Click
50
. The message will be instantly sent to the selected recipients.
PRIVATE AND CONFIDENTIAL
11.2 CUSTOMIZATION (WHEN ENABLED)
This section allows you to upload different logos and adjust the site colors. You will be able to preview the
changes made before you save them to the SmartRoom.
Colors
You can adjust colors by entering a different hex code or by clicking on the
your desired color from the color grid and picker.
51
PRIVATE AND CONFIDENTIAL
color sample and selecting
Images
You upload images and replace what is currently on the site here. Please note, all images must be in JPG or
GIF format and no larger than 400x60 pixels in size.
1. To upload images, select the Logo, Header or Image you wish to add or replace
2. Browse for your selected image
3. Click
located at the bottom of the page.
4. You must select the following in order to use a custom left header image:
5. Click
52
PRIVATE AND CONFIDENTIAL
and then refresh the page in order to see the changes within the SmartRoom.
11.3 Q&A SETTINGS (WHEN ENABLED)
You can edit the Q&A settings and create the Q&A questions types in this section.
11.4 SITE DEFAULTS
11.4.1 Message Templates
By clicking on ‘Site Defaults’ you are able to change the access agreement, automated email
correspondence and welcome page information. These can be amended for each language by cutting and
pasting your selected text into the text box. Once saved, these templates are immediately updated and
made available (in real-time) within the SmartRoom.
11.4.2 Country Defaults
You are able to select the default country for the site here. This will determine the date, time format and time
zone. You may also select the default language for the site.
Click
53
to save your changes.
PRIVATE AND CONFIDENTIAL
54
PRIVATE AND CONFIDENTIAL
11.4.3 Document Numbering Defaults
‘Document Numbering Defaults’ enables us to adjust the default settings for document numbering.
‘Include folder numbers in front of document number’ - If this box is checked, the document’s folder
number will be evident before each documents name.
‘Auto re-number files when a new file is inserted/deleted.’ When checked, the files will re-number
themselves in their folder if a document is deleted or added. If this box is not checked and files are added,
the new document will acquire an extra digit to its document number.
‘The document level display’ allows us to alter the style of the document numbering. You can make
separate changes for each folder level and its number. These changes will be reflected in all document
names.
Choose from the drop down boxes for each level and then click
time.
55
PRIVATE AND CONFIDENTIAL
. These changes can be made at any