1
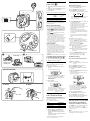
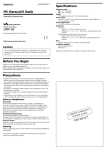
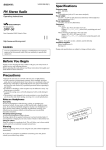
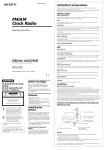
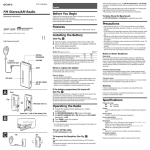
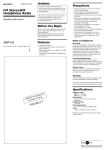
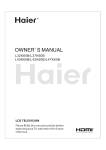
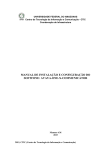
3-049-015-23(1)
FM Stereo/AM PLL
Synthesized Radio
Operating Instructions
FM/AM WALKMAN
SRF-M35
Precautions
• Operate the unit only on 3V DC with two size
AAA(R03) batteries.
• Avoid exposure to temperature extremes,
direct sunlight, moisture, sand, dust or
mechanical shock. Never leave in a car parked
in the sun.
• Should any solid object or liquid fall into the
unit, remove the batteries and have the unit
checked by a qualified personnel before
operating it any further.
• In vehicles or buildings, radio reception may
be difficult or noisy. Try listening near a
window.
• To clean the casing, use a soft cloth dampened
with a mild detergent solution.
• This product is not designed to be waterresistant, so you should take care to use the
unit when raining, snowing or in a watersplash place.
Notes on Headphones
Road safety
Sony Corporation © 2000 Printed in China
WARNING
You are cautioned that any changes or
modifications not expressly approved in this
manual could void your authority to operate
this equipment.
INFORMATION
This equipment has been tested and found to
comply with the limits for a Class B digital
device, pursuant to Part 15 of the FCC Rules.
These limits are designed to provide reasonable
protection against harmful interference in a
residential installation. This equipment
generates, uses, and can radiate radio frequency
energy and, if not installed and used in
accordance with the instructions, may cause
harmful interference to radio communications.
However, there is no guarantee that interference
will not occur in a particular installation. If this
equipment does cause harmful interference to
radio or television reception, which can be
determined by turning the equipment off and on,
the user is encouraged to try to correct the
interference by one or more of the following
measures:
– Reorient or relocate the receiving antenna.
– Increase the separation between the
equipment and receiver.
– Connect the equipment into an outlet on a
circuit different from that to which the
receiver is connected.
– Consult the dealer or an experienced radio/
TV technician for help.
Do not use headphones while driving, cycling, or
operating any motorized vehicle. It may create a
traffic hazard and is illegal in many areas. It can
also be potentially dangerous to play your
headphones at high volume while walking,
especially at pedestrian crossings. You should
exercise extreme caution or discontinue use in
potentially hazardous situations.
Preventing hearing damage
Avoid using headphones at high volume.
Hearing experts advise against continuous, loud
and extended play. If you experience a ringing in
your ears, reduce volume or discontinue use.
Caring for others
Keep the volume at a moderate level. This will
allow you to hear outside sounds and to be
considerate to people around you.
Warning
If there is lightning when you are using the unit,
take off the headphones immediately.
If you have any questions or problems
concerning your unit, please consult your nearest
Sony dealer.
Specifications
Time display: 12-hour system
Frequency range:
Band:
Frequency
Channel step
FM:
AM:
87.5 - 108 MHz
530 - 1 710 kHz
0.1 MHz
10 kHz
FM:
AM:
87.5 - 108 MHz
531 - 1 710 kHz
0.05 MHz
9 kHz
Output:
i jack (ø 3.5 mm stereo minijack)
Before You Begin
Power output
Thank you for choosing the Sony radio! It will
give you many hours of reliable service and
listening pleasure.
Before operating the radio, please read these
instructions throughly and retain them for future
reference.
Power requirements
18 mW + 18 mW (at 10 % harmonic distortion)
3V DC, two size AAA (R03) batteries
Dimensions:
Approx. 82 × 72 × 32 mm (w/h/d)
(3 1/4 × 2 7/8 × 1 5/16 inches) incl.
projecting parts and controls
Mass:
Approx. 99 g (3.5 oz) incl. batteries and the belt
holder
Features
• FM stereo /AM PLL (Phase Locked Loop)
Synthesized radio
• Up to 15 stations (10 for FM, 5 for AM) can be
preset for one-touch tuning
Notes on AM channel step
The AM channel step differs depending on the
areas.
The channel step of this unit is factory-set to
10 kHz.
Area
Channel step
North and South
American countries
10 kHz
Other countries
9 kHz
Accessories supplied:
Stereo headphones (1)
Belt holder (1)
Design and specifications are subject to change
without notice.
Y
ANT
ARR o)
W
TED
udi
LIMI rtable A
(Po
Installing the Batteries
(See Fig. A)
1
2
3
Slide and open the lid at the rear of the
radio.
Insert two size AAA(R03) batteries (not
supplied) with correct polarity.
Close the lid.
Playing the radio
Manual Tuning
1
2
3
VOL
Battery Life (approximate hours) (EIAJ*)
i
FM reception
AM reception
Sony
alkaline
size AAA
(LR03)
30
40
Sony
size AAA
(R03)
* When using FM1 or FM2 preset mode, you
may listen to the radio on either mode.
(See “preset Tuning”)
13
17
*Measured value by the standard of EIAJ
(Electronic Industries Association of Japan)
The battery life may shorten depending on the
operation of the unit.
4
Notes on batteries
• Do not charge the dry batteries.
• Do not carry the dry batteries with coins or
other metallic objects. It can generate heat if the
positive and negative terminals of the batteries
are accidentally contacted by a metallic object.
• When you are not going to use the unit for a
long time, remove the batteries to avoid
damage from battery leakage and corrosion.
• Do not use different types of batteries at the
same time.
• When you replace the batteries, replace all with
new ones.
PRESET 1–5
Size AAA (R03) × 2
B 1
2
Insert the # side of
the battery first.
Press TUNE/TIME SET + or – to tune in
to the desired station.
The FM channel step is set to 0.1 MHz and
the AM channel step is set to 10 kHz.
(North and South American model)
The FM channel step is set to 0.05 MHz* and
the AM channel step is set to 9 kHz.
(Other models)
When to replace the batteries
• When the batteries become weak, the sound
becomes weak or distorted. When the batteries
are completely exhausted, the power is turned
” in the display window
off and “
flashes. When the power is turned on with the
indication flashing, the power will be turned
off right away.
” starts flashing, replace both
When “
batteries with new ones.
• Replace the batteries within about 40 seconds
after removing the batteries. If you do not
replace them within 40 seconds, the preset
stations may be erased, the clock setting may be
cleared and “AM 12:00” flashes in the display.
• When the batteries are removed for a long
time, preset stations will be erased and “AM
12:00” will flash in the display. Store stations
and set the clock again.
A
Connect the supplied headphones to
the i (headphones) jack.
Press POWER to turn the radio on.
Press BAND to select the band.
Each press changes the band as follows:
* The FM frequency display is raised or
lowered by a step of 0.1 MHz. For example,
frequency 88.00 and 88.05 MHz is displayed
as “88.0 MHz.”
Two short beeps sound when the minimum
frequency of each band is received during
tunig.
5
Adjust the volume using VOL.
• To see the current time while listening to the
radio, press CLOCK. The current time will
appear for a few seconds and then the display
returns to the radio frequency.
• To turn off the radio, press POWER.
• To improve the radio reception
FM: Extend the headphones cord so that the
FM sensitivity will be increased, as it
serves as the FM antenna.
AM: Rotate the unit horizontally for optimum
reception. A ferrite bar antenna is built
into the unit.
• For FM, set FM SENS to LOCAL if interference
is prevalent and reception is too strong.
Under normal conditions, set it to DX.
Preset Tuning
To attach the battery compartment lid if
it is accidentally detached (see Fig. B)
1 Put in one side of the lid as illustrated.
2 Push the other side to attach.
You can preset 10 stations in FM (5 stations in
FM1, 5 stations in FM2) and 5 stations in AM.
Setting the Clock
Example: To set FM 90 MHz in Preset button 2
for FM2
The display will flash “AM 12:00” when the
batteries are first inserted.
1
Hold down CLOCK for more than 2
seconds.
Presetting a station
1
2
3
The hour flashes in the display.
Using the Belt Holder
4
Press POWER to turn the radio on.
Press BAND to select FM2.
Tune in to FM 90 MHz (See “Manual
Tuning”).
Hold down PRESET button 2 for more
than 2 seconds.
Two beeps sound and the preset number “2”
appears in the display.
2
Press TUNE/TIME SET + or – until the
correct hour appears in the display.
To set the current time rapidly, hold down
TUNE/TIME SET + or –.
3
Press CLOCK.
The minutes starts to flash.
To detach
To attach
Repeat step 2 and 3 to set the minute.
After setting the minute, press CLOCK again. The
clock starts operating and “ : ” starts flashing.
• 12-hour system:
“AM 12:00” = midnight
“PM 12:00” = noon
Changing
AM Channel Step
The AM channel step differs depending on areas.
The channel step of this unit is factory-set to
10 kHz to match the frequency allocation system
of the country as listed.
You can change the channel step.
Area
North and South
American countries
Other countries
1
2
Channel step
10 kHz
9 kHz
Press POWER to turn off the power.
While holding down BAND, keep
pressing PRESET 4 for more than 5
seconds. The AM channel step will be
changed.
If you proceed step 2 again, the channel
step changes again.
• When the AM channel step is changed, the
preset stations will be erased.
To preset another station, repeat these steps.
• To change the preset station, tune in to the
desired station and hold down PRESET 1 to 5.
The new station will replace the previous
station on the preset button.
Tuning in a preset station
Press POWER to turn the radio on.
Press BAND to select the band.
Press the desired preset tuning button.
Adjust the volume using VOL.
1
2
3
4
Using other Functions
To prevent Accidental
change –HOLD function.
Press HOLD. “ - ” is displayed, indicating that
all the functions of the buttons are locked.
To release the key protection, press HOLD again
to disappear “ - ”.
Note
If you press any button as long as “ - ” appears
in the display, five short beeps sound.