1
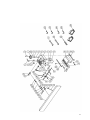
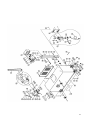
8" PARALLELOGRAM JOINTER SHEARTEC II
MJOIN8020-0130
OPERATING MANUAL
17101 Murphy Avenue. Irvine, California 92614
www.lagunatools.com
800.234.1976
Dear Woodworker:
Thank you for your purchase and welcome to the Laguna Tools group
of discriminating woodworkers. I understand that you have a choice of
where to purchase your machines and appreciate the confidence you
have in our products.
Every machine sold by Laguna Tools has been carefully designed and
well thought through from a woodworkers perspective. I cut on our
bandsaws, lathes, table saws and combination machines. Through my
hands-on experience, I work hard to make our machines better. I
strive to give you machines that inspire you to create works of art.
Machines that are a joy to run and work on. Machines that encourage
your performance.
Today, we offer high-performance machines with innovative solutions
that meet the needs of woodworkers and their ever-evolving craft.
I started Laguna Tools as a woodworker, I still am.
Thank you again for becoming a Laguna Tools customer.
Torben Helshoj
President and Founder - Laguna Tools
Imagination, Innovation and Invention at work.
2
Table of contents
Safety Rules
Page number
4
Warranty
5
Noise emission
6
Specification sheet
6
Receiving your jointer
6
Introduction to your jointer
6
What you receive with jointer
7
Parts of the jointer
7
Where to locate your jointer
9
Unpacking your jointer
9
Assembly and set up
9
Running & adjusting the jointer
11
Maintenance and troubleshooting
14
Exploded view drawings
17
3
Safety Rules
As with all machinery there are certain hazards involved with the
operation and use. Using it with caution will considerably lessen the
possibility of personal injury. However, if normal safety precautions are
overlooked or ignored, personal injury to the operator may result. If you
have any questions relative to the installation and operation, do not use
the equipment until you have contacted your supplying distributor.
Read carefully before operating the machine.
1. Keep the working area clean and be sure adequate lighting is
available.
2. Do not wear loose clothing, gloves, bracelets, necklaces or
ornaments. Wear face, eye, respiratory and body protection devices
as indicated for the operation or environment.
3. Be sure that the power is disconnected from the machine before
tools are serviced or an attachment is to be fitted or removed.
4. Never leave the machine with the power on.
5. Do not use dull, gummy or cracked cutting tools.
6. Be sure that the keys and adjusting wrenches have been removed
and all the nuts and bolts are secured.
4
Limited Warranty
New woodworking machines sold by Laguna Tools carry a one-year
warranty from the date of shipping. Laguna Tools guarantees all new
machines sold to be free of manufacturers’ defective workmanship,
parts, and materials.
We will repair or replace, without charge, any parts determined by
Laguna Tools, Inc. to be a manufacturer's defect. We require the
defective item/part to be returned to Laguna Tools. In the event the
item/part is determined to be
damaged due to lack of maintenance, cleaning or misuse/abuse, the
customer
will be responsible for the cost to replace the item/part, plus all related
shipping charges.
This limited warranty does not apply to natural disasters, acts of
terrorism, normal wear and tear, product failure due to lack of
maintenance or cleaning, damage caused by accident, neglect, lack of
or inadequate dust
collection, misuse/abuse or damage caused when repair or alterations
have
been made or attempted by others.
Laguna Tools, Inc. is not responsible for additional tools or
modifications sold or performed (other than from/by Laguna Tools, Inc.)
on any Laguna Tools, Inc. woodworking machine. Warranty may be
voided upon the addition of such noted tools and/or modifications,
determined on a case-by-case basis.
Normal user alignment, adjustment, tuning and machine settings are
not
covered by this warranty. It is the responsibility of the user to
understand
basic woodworking machinery settings and procedures and to properly
maintain the equipment in accordance with the standards provided by
the manufacturer.
Parts, under warranty, are shipped at Laguna Tools, Inc's cost either
by
common carrier, FedEx Ground service or similar method.
Technical support to install replacement parts is primarily provided by
phone, fax, or e-mail. The labour required to install replacement parts
is the responsibility of the user.
Laguna Tools is not responsible for damage or loss caused by a freight
company or other circumstances not in our control.
Only new machines sold to the original owner are covered by this
warranty.
For warranty repair information, call 1-800-332-4094.
Copyright 2010 Laguna Tools, Inc
** Warning – no portion of these materials may be reproduced without
written approval from Laguna Tools, Inc.
5
Noise emission
Notes concerning noise emission
Given that there exists a relationship between noise level and exposure times, it is
not precise enough to determine the need for supplementary precautions. The
factors affecting the true level of exposure to operators are clearly the amount of
time exposed, the characteristics of working environment other sources of dust and
noise etc. For example, adjacent machines in other words the level of ambient
noise. It is possible that exposure level limits will vary from country to country.
Specification sheet
Motor
Cutter head
Fence tilt
Dust chute diameter
Max cutting depth
Volts
Weight net/gross
3 hp
Shear tec
90 to 40 degrees
4 inches
1/64 inch
220V single phase
Receiving your machine.
Note. It is probable that your machine will be delivered by a third party. Before you
unpack your new machine, you will need to first inspect the packing, invoice, and
shipping documents, supplied by the driver.
Insure that there is no visible damage to the packing, or the machine. You need to
do this prior to the driver leaving. All damage must be noted on the delivery
documents and signed by you, and the delivery driver. You must then contact the
seller, [Laguna Tools] within 24 hours.
Introduction to jointer.
The jointer is designed to give you years of safe service. Read this owner’s manual
in its entirety before assembly or use.
The jointer is generally defined as a machine that cuts planks of wood flat, and
smooth. The machine achieves this by the plank being pushed along a flat table,
and passing the plank over a revolving cutter head.
There are many types of cutter head, and this machine uses an inserted cutter
type. The insert cutters main advantage is to reduce tear out of the grain, but the
finish is not as smooth as the parallel blade system. It is well within the capabilities
of a belt sander to give a professional finish to the jointed plank.
The parallel blade system, gives a finish without the lines that the insert cutter
system gives, but, is susceptible to tear out, especially on planks with knots. On
balance, it is better to use a machine with the insert cutters than the parallel
blades, as it greatly reduces the risks of having to scrap valuable wood, or
spending excessive time sanding tear out marks.
Additional instructions for the use of the jointer.
Like all machines, there is danger associated with the machine. Injury is frequently
caused by lack of knowledge or familiarity. Use this machine with respect. If normal
safety precautions are overlooked or ignored, serious personal injury may occur.
1. Kickback.
"Kickback" is when the work piece is thrown off the jointer table by the cutter head.
Always use push blocks and safety glasses to reduce the likelihood of injury from
“kickback.”. The "kickback zone" is the path directly through the end of the in feed
table. Never stand or allow others to stand in this area during operation. If kick
back occurs, severer injury may occur.
6
2. Cutter head alignment.
To reduce the possibility of kickback, keep the top edge of the out feed table
aligned with the cutter head insert at top dead centre (TDC).
3. Push blocks.
The cutter heads are extremely dangerous and you must never pass your hands
over the cutter head. Always use push blocks whenever surface planning.
4. Supporting the work.
Only make cuts if the work piece is stable and never attempt to cut unstable
planks, or injury may occur.
6.Cutting depth.
Never exceed the maximum cutting depth as stated in the specification for your
machine. It is far better to take several small cuts rather than large cuts.
7. Direction of cut
Jointing against the grain or jointing end grain is dangerous and could produce
chatter or excessive chip out. Always joint with the grain.
8.Guards.
Guards are designed to reduce the risk of injury. Always use the guards. If it is
imperative to use the machine without the guards, [Rabbeting] always replace the
guards.
9.Cutting direction.
Only cut from the in feed table to the out feed table, and always complete the cut.
Do not stop the wood progress until the job has cleared the cutter head completely.
Only cut with the grain or at a slight angle to the grain.
10. Stock.
Your safety will be greatly enhanced if you only use good lumber. Only work with
lumber after you have inspected it completely. Staples, Nails Loose knots and any
other metal in the plank will damage your cutter head and could case injury and or
fire. If you have any question about a piece of lumber, do not use it.
What you will receive with the jointer.
1
3
1. Spare cutter teeth.
2. Spare cutter screws.
3. Tools.
4. Push block.
2
4
Parts of the jointer.
The jointer doe’s not have many parts. The major parts are discussed in this
manual. If you are not familiar with the jointer, take the time to read this section and
become familiar with the machine.
7
3
1
4
6
7
2
9
8
5
1. Out feed Table.
2. In feed Table.
3. Fence.
4. Cutter head Guard.
5. Electrical cable.
6. Table height adjusting handles.
7. Body.
8. Mobility kit.
9. Start and stop switches.
Out feed Table.
The function of the out feed table is to support the job once it has been machined
by the cutter head. The out feed table must be adjusted level with the cutter head
teeth at top dead centre [TDC].
In feed Table.
The in feed table is adjusted to suit the depth of cut that is required.
Note. Never exceed the maximum depth of cut specified for your machine. It is far
safer to take many small cuts rather than one large cut.
Fence.
The fence is used to keep the job square to the cutter head and is also used to
produce angle cuts on the edges of panels. The fence can be adjusted from 90 to
45 degrees.
Cutter head Guard.
The guard is there to protect you. Always adjust the guard to expose only the
minimum amount of cutter to suit the job width.
Electrical cable.
Note. The machine may not be supplied with a plug as the plug type will depend
on your electrical supply.
Table height adjusting handles.
The hand wheels adjusts the tables to the required height.
Body.
The body of the machine supports the table etc. It is manufactured from heavy
gauge steel and provides a heavy base that is designed for rigidity.
Mobility kit.
The mobility kit allows the machine to be moved to various locations within your
work area.
8
Start & stop switches.
The switches are used to start and stop the machine.
Serial and data plate.
This plate is mounted on the back of the machine.
Where to locate your Machine.
Before you unpack your machine, select the area where you will use your machine.
There are no hard and fast rules for its location, but, below are a few guidelines.
1. There should be an area around the machine suitable for the length of wood that
you will be machining.
2. Adequate lighting. The better the lighting, the more accurate and safely
you will be able to work
3. Solid floor. You should select a solid flat floor, preferably concrete or
something similar.
4. Close to power source and dust collection.
Unpacking your machine.
To unpack your machine, you will need tin snips, knife and a wrench.
1. Using the tin snips, cut the banding that is securing the machine to the
Pallet [if fitted].
WARNING: EXTREME CAUTION MUST BE USED BECAUSE THE
BANDING WILL SPRING AND COULD CAUSE INJURY.
2. Remove the box from the Jointer. The parts will be packed at the side of the
plainer.
Note. The machine is heavy, and if you have any doubt about the
described procedure, seek professional assistance. Do not attempt any
procedure that you feel is unsafe or that you do not have the physical capability of
achieving.
Note. To remove the plainer from the box you will need 2 or more people.
3. Slide the plainer so that it overhangs the pallet. Tip the plainer so that it touches
the floor. Slide the pallet from under the jointer, and lower the jointer to the floor.
Assembly & set up.
Mobility kit.
Mobility clamp screw
Mobility wheel
The mobility wheels come pre-fitted to the base of the machine.
The wheels are locked by tightening the clamp screws on the outside of the body.
9
Fitting the on / off switch.
Fit the on / off assembly to the side of the body as shown.
On / off switch housing
The jointer is now fully assembled but before the machine is connected to the
electrical supply the following checks and adjustments must be carried out.
1. Move the jointer to the location that it will be used.
2. Check that the cutter head can rotate freely and that the teeth do not contact
either the in or the out feed tables.
3. Check that the guard is covering the cutter head and that is free to move and
spring back once released.
4. Check that all tools have been removed from the machine.
Connecting the electrical supply.
Note. A qualified electrician must carry out the
installation.
Ensure that the main supply corresponds with
that of the machine [Single phase 220 V].
It is recommended that you use a 30-amp mains
breaker.
If you need a longer cable than that
supplied on the machine, you can connect a
new cable into the internal power termination.
Note. The machine is not normally supplied with
an electrical plug, as the type of plug will be
dependent on the installation.
Electrical cable
Connecting the dust collection.
Connect a 4” flexible hose
between the dust hose connector
and your dust collector.
Once fitted pull on the hose to
ensure that the connection is
tight.
Note. You will need a dust
collection system with a minimum
of 1000 cubic feet per minuet
capacity. The stronger the dust
collection the better, as the
machine is capable of producing
a lot of waste.
Dust hose connector
10
Running and adjusting the machine.
Cleaning the machine.
The machine is shipped with the none painted surfaces protected from rust by a
film of grease.
The grease must be removed with WD40 or similar, as it attracts saw dust and dirt.
The surfaces should then be coated with a Teflon lubricant or similar. Teflon tends
to dry and will not attract saw dust and dirt.
Key switch
Test Run.
Now that the assembly is complete it
is time to conduct a test run.
During the test run you will check the
following points.
1. Motor starts and runs smoothly.
2. That the stop button, function
correctly.
Before you run the machine check
the following.
1. All the tools have been removed
from the machine.
2. That the guard is in place.
Off button
On button
3. You are wearing the appropriate
safety equipment.
5. You have read and understood the instruction manual.
Note. If any of the below functions fail to operate correctly, the fault must be
corrected prior to continuing to the next test. Any investigation to find or correct a
fault must be conducted with the power disconnected.
1. Turn the power on, with the key switch.
2. Start the machine by pressing the green start button.
The machine should run smoothly with little or no vibration.
3. Press the red stop button. The machine should slow down and stop.
Note. The red stop button has to be re-set by twisting until it pops out. If the
machine fails to start, check that the stop button is re-set in the out position.
Adjustments.
Note. The machine has had all its functions calibrated at the factory but due to
shipping conditions some movement may have taken place. This is unavoidable
and it is therefore recommended that the following checks are made prior to
starting production. As the machine is used some functions may move and it is
therefore good practice to know the process for adjusting the machine prior to
production.
Adjusting the drive belt.
Motor
Adjuster
Cutter head pulley
11
Adjust the belt so that there is approx 3/16 in deflection when pressed with
moderate finger pressure.
The drive belt should be checked after running the machine for approximately 10
hours. The belt beds into the pulleys, and will slacken off slightly. If is not adjusted,
slippage may accrue and this will cause early belt failure. There should be a 3/16”
deflection when the belt is pressed with moderate finger pressure.
Note. To access the motor and drive belt, remove the side and top panel.
Note. Disconnect the power to the machine prior to conducting machine
adjustments or repairs.
Setting the out feed table to the cutter head.
The out feed table must be level with the teeth of the cutter head when the teeth is
at top dead centre [T.D.C.]
Out feed table
Straight edge
Cutter head
1. Rotate the cutter head so that the teeth are at the T.D.C. position.
2. Place a straight edge on the out feed table over the cutter head and check that
the teeth just touch the straight
edge.
Note. This has to be checked at
both sides of the table.
Setting the in feed table.
1. Place a straight edge so that it
is equal on both the in feed and
out feed tables.
2. Bring the in feed table up so that
the straight edge is even on both
tables.
3. Check that the table is lined up
with the scale at “0”.
Scale
Fitting teeth to the Sher tec cutter
head.
The carbide cutter head [Sher Tec]
has multiple teeth which have 4
cutting edges. The teeth can be
rotated as follows, when they are
blunt or damaged.
Note. You will notice that each
cutter tooth has a registration dot to
enable you to ensure that the teeth
are moved round in the same
direction.
1. Loosen the tooth with the special
allen key.
2. Lift the tooth and rotate to the new cutting face.
Registration dot
12
Note. Take special care to clean the tooth and its mating surface. Any dirt or
sawdust that is trapped under the tooth will cause it to be at a different height to the
other teeth, and degrade the surface finish when you start machining. This will
result in you having to take all the teeth out and clean the teeth and the mating
surfaces again. This is very frustrating and a waste of time. Take your time and
ensure that you are very thorough with cleaning.
3. Lower the tooth into the cutter head and clamp with the allen key.
Note. Only move all the teeth to a new cutting edge. Do not move less than all the
teeth.
Note. The carbide cutter head will has several advantages over the parallel blade
type cutter head.
1. The teeth are carbide and will last longer than high speed steel parallel blades.
2. There is less chance of tare out.
The disadvantage is that they are initially more expensive and the surface finish is
slightly wavy. This is caused because the
Angle clamp handle
teeth have a very slight radius. This
waviness is easily removed by a light
sanding.
Adjusting the fence.
The fence has 2 adjustable stops. One
for 45 degrees, and the other stop for the
90 degree position.
The fence is clamped in the angle
position with the angle clamp handle. To
adjust the fence, loosen the clamp
handle, move to the required position,
and re clamp.
The stops do not come pre set, and to
Forward back handle
set, follow the guide lines below.
Clamp handle
To move the fence across the jointer
table, loosen the clamp handle, move the fence with the forward back handle to the
required position, and re clamp.
Adjusting the 45 degree stop
90 degree stop
45 degree stop
1. Adjust the fence to 45 degrees using a set square, and lock in position.
2. Adjust the stop screw so that it touches the back of the fence, and lock in
position with the lock nut.
13
3. Unlock the fence and move. Move the fence back to the 45 degree stop and lock
in position. Check that the fence is at 45 degrees. If the fence is not at 45 degrees,
readjust.
Adjusting the 90 degree stop
2. Move the flip stop to the
position shown.
1. Adjust the fence to 90
degrees using a set square,
and lock in position.
3. Adjust the stop screw so that
it touches the flip stop, and lock
in position with the lock nut.
4. Unlock the fence and move.
Move the fence back to the 90
degree stop and lock in
Flip stop
position. Check that the fence
is at 90 degrees. If the fence is not at 90 degrees, readjust.
Stop screw
Maintenance
As with any machine, to ensure optimal performance you must conduct regular
maintenance.
Daily checks.
1. Clean the machine and lubricate unpainted surfaces with a Teflon lubricant.
Wipe off any excess and buff with a dry polishing cloth. This will reduce the likely
hood of rust forming and reduce the friction on the tables as the wood is machined.
2. Check cutter teeth for chips and dullness.
3. Generally inspect the machine for damage and loose or warn parts.
Weekly checks.
1. Clean the cutter head.
2. Check cutter teeth for chips and dullness.
3. Generally inspect the machine for damage and loose or warn parts.
4. Check the dust extraction for blockages and any large bits that could cause
blockages.
Monthly checks.
1. Check the motor drive belt for wear, splits and cuts.
2. Clean the motor compartment and the motor to ensure that the motor cooling
fins work efficiently.
3. Generally inspect the machine for damage and loose or warn parts.
Note. It is recommended that you use a Teflon based lubricant.
Drive belt replacement.
Note. Disconnect the power to the machine.
1. Remove the side cover.
2. Loosen the motor adjustor.
3. Remove the drive belt.
4. Fit the new belt.
5. Re-tension the belt. There should be a 3/16” deflection when the belt is pressed
with moderate finger pressure. Tighten the motor clamping bolts.
6. The drive belt should be checked after running the machine for approximately 10
hours. The belt bed into the pulleys, and will slacken off slightly. If it is not adjusted
slippage may accrue and this will cause early belt failure. There should be a 3/16”
deflection when the belt is pressed with moderate finger pressure.
7. Refit the side cover before running the machine.
14
Lubricating the machine.
Note. All the bearings are sealed for life and do not require lubrication. If a bearing
is noisy, do not try to re lubricate but replace it.
Note. It is recommended that you use a Teflon based lubricant as it tends to dry
and therefore will attract less saw dust and dirt.
Troubleshooting and fault finding.
Problem
Cause
Motor will not start
1. Short circuit
or fuses or circuit
breakers blow.
2. Start capacitor faulty.
3. Motor thermal
protection circuit breaker
faulty, or motor is at fault.
4. Open circuit in motor
or loose connections.
Fuses or circuit
breakers blow.
Motor will not develop
full power or
motor speed slows with
load, overheats, or stalls.
1. Motor drawing
excessive current
2. Cutter head or motor
jammed
3. Short circuit
1. Motor run capacitor at
fault.
Corrective action
2. Repair or replace short
circuit item.
3. Fit new capacitor.
4. Replace thermal
protection circuit breaker
in motor or
replace motor.
5. Replace or repair
motor or loose
connection
1. Repair or replace
motor.
2. Remove jam.
3. Repair or replace short
circuit item.
1. Replace the capacitor.
2. Machine overloaded.
2. Take smaller cuts.
3. Motor overheating.
1. V-belt loose.
3. Clean motor taking,
care to make sure that all
the cooling fins are clean.
6. Repair or replace
motor / loose
connections.
1. Tighten V-belt
2. V-belt worn out.
2. Replace V-belt
Loud noise coming from
machine.
1. Drive belt are
damaged.
2. Replace drive belt
Tables are hard to
adjust.
Excessive snipe.
(gouge in the end
of the board that is
uneven with the rest
of the cut).
1. Table spindles are
tight.
1. Out feed table is too
low.
1. Clean and lubricate
spindles.
1. Re set out feed table
with cutter head.
2. Operator pushing
down on trailing end of
job.
2. Eliminate downward
pressure on trailing end
of job.
3. Job is not supported
as it leaves the out feed
table.
1. Taking too deep cut.
3. Support the job as it
leaves the out feed table.
6. Short circuit in motor
or loose connections.
Cutter head slows or
belt squeals when
cutting,
Job stops or slows in
1. Take a smaller cuts.
15
during cut.
Chipping or marks
(consistent pattern).
2. Pitch or build up on
tables.
1. Knots or conflicting
grain direction in wood.
2. Nicked, chipped or dull
carbide tooth.
3. Taking too deep cut.
Furry finish on the grain.
Lines or ridges that run
along the board
Chatter marks across the
face of the board.
Uneven blade or teeth
marks, wavy or surface.
Shiny finish.
1. Wood has high
moisture content or
surface wetness.
2. Blunt teeth.
2. Clean the tables and
cutter head components
1. Inspect job for knots
and grain direction; only
use good material.
2. Replace/rotate
affected tooth.
3. Take smaller cuts.
Take small cuts on hard
woods.
1. Check moisture
content and allow to dry.
2. Rotate the teeth.
1. Nicked or chipped
teeth.
1. Teeth not at even
heights.
1. Replace or rotate
teeth.
1. Clean interface
between teeth and cutter
head.
2. Teeth not installed
evenly.
2. Check that there is no
dirt etc under the teeth
and that they are evenly
tight.
3. Replace cutter head
bearings.
1. Rotate/replace teeth.
3. Worn cutter head
bearings.
1. Teeth are blunt.
2. Too fine a cut.
Chip Marks Random
pattern.
1. Chips not removed
from cutter head.
Board edge is concave
or convex after
jointing.
1. Job not held with even
pressure on in feed
and out feed table during
cut.
2. Job started too
uneven.
3. Board has excessive
bow or twist along its
length.
4. Insufficient number of
passes.
2. Increase the depth of
cut.
1. Use a dust collection
system. Or a stronger
dust collection system
1. Hold job with even
pressure as it moves
over the cutter head.
2. Take small cuts to
remove the extreme high
spots before doing a full
pass.
3. Surface plane one face
so there is a good
surface to position
against the fence.
4. It may take 3 to 5
passes to achieve a
Good edge, depending
on starting condition of
board and depth of cut.
16
17
18
19
PARTS LIST FOR MJOIN8012-0130
Key
1
2
3
4
5
6
7
8
9
10
11
12
13
14
15
16
17
18
19
20
21
22
23
24
26
27
28
29
30
31
32
33
Part No.
230037-901
006001-091
130019-903
050108-000
250372-615
360074-901
360078-000
003103-104
009004-200
290007-901
009010-200
050091-000
360676-901
009005-200
000003-201
003602-101
172285-905
050094-000
130018-903
130008-903
050092-000
230015-901
360038-901
009022-100
009104-200
360075-901
003103-102
380135-901
050098-000
006001-073
011002-104
380082-902
Descriptions
BOLT
FLAT WASHER
PLATE STOP
CLAMP
KNOB FENCE TILT
CRANK
PIN
CAP SCREW
HEX. NUT
BOLT SHOULDER 10*6
HEX. NUT
FENCE
STUD PIVOT
HEX. NUT
HEX. SCREW
FLAT HD SOC. SCREW
FLAT WASHER
SHAFT LOCK
SQUARE NUT
NUT HANDLE
TILT PLATE
STUD PIVOT
HANDLE SHAFT
HEX. NUT
HEX. NUT
BOLT
CAP SCREW
BOLT
CLAMP
FLAT WASHER
SPRING PIN
KEY
13*28*3.0t
1/4''-20NC*1-1/4''
1/4''-20NC
1/2''-20NF
5/16''-18NC
5/16''-18NC*1-1/4''
5/16''-18NC*1-1/2''
13*35*5.0t
3/8"-16NC
1/2''-12NC
1/4''-20NC*1/2''
10.2*25*4.0t
4*14
Q't
y
1
1
1
1
2
1
1
2
2
1
2
1
2
5
1
1
1
1
1
1
1
4
2
4
1
1
1
2
1
6
1
1
34 003105-103 CAP SCREW
35 050095-901 BEARING HOUSING
Key
36
37
38
39
Part No.
030208-000
012003-008
003202-101
050096-901
40 922842-000
40.1 922843-000
40.2 038201-702
040703-000
210114-000
41 360076-901
42 009007-200
43 173004-000
44 230118-000
45 051125-000
46 380147-901
47 017002-000
49 090020-000
50 010002-000
51 011004-104
52 280013-901
53 360077-901
54 011003-106
55 922848-000
.1 003105-102
.2 003106-102
.3 003201-102
.4 006306-100
.5 006309-100
.6 012003-008
.7 009005-200
.8 051119-000
3/8''-16NC*1-1/2''
Descriptions
6204-2NSE
5*5*22
5/16''-18NC*3/8''
BALL BEARING
KEY
SET SCREW
PULLEY
SHEARTEC 2
CUTTERHEAD ASSEMBLY
SHEARTEC 2
CUTTERHEAD
TORX SCREW
TORX WRENCH
KNIFE
STUD PIVOT
HEX. NUT
BELT GUARD
T-NUT
RIBBET
STUD PIVOT
BALL
CUTTERHEAD GUARD
RETAINING RING
SPRING PIN
SPRING
BLADE GUARD SHAFT
SPRING PIN
TABLE ASS'Y
CAP SCREW
CAP SCREW
SET SCREW
LOCK WASHER
LOCK WASHER
KEY
HEX. NUT
BASE
2
2
Q't
y
2
1
3
1
1
1
#10-32UNF*12.5
T-25
15*15*2.5t
3/8''-24UNF
CSA/UL
ø6
STW-11
6*36
5*28
3/8''-16NC*1-1/4''
1/2''-12NC*1-3/4''
1/4''-20NC*3/8''
9.8*17.8
13*22.7
5*5*22
5/16''-18NC
10
2
5
2
2
1
1
1
1
2
1
1
1
1
1
2
1
4
4
4
4
4
2
8
1
21
.9
.10
.11
.12
.13
051124-000
050391-000
050104-000
050105-000
360080-000
Key
.14
.15
.16
.17
.18
56
57
58
60
61
62
63
.1
.2
.3
.4
.5
64
65
66
67
68
69
70
71
72
73
.1
.2
Part No.
380025-901
380150-000
230039-901
003104-101
006001-041
920553-000
006002-056
003304-201
230010-000
002301-201
003003-203
922846-000
006001-091
003007-201
172985-000
170125-000
922858-000
003105-102
110005-000
009006-200
006002-061
002301-201
571984-000
006307-100
360026-901
014008-000
900056-000
012202-002
601015-000
TABLE INFEED
TABLE OUTFEED
CLAMP
CLAMP
SCREW ELEVATION
Descriptions
#N/A
GIB
SET SCREW
CAP SCREW
FLAT WASHER
HANDWHEEL
FLAT WASHER
PAN HD SCREW
STUD PIVOT
RIVET
HEX. SCREW
STAND ASS'Y
FLAT WASHER
HEX. SCREW
STAND
MOTOR BRACKET
COVER
CAP SCREW
DOOR LATCH
HEX. NUT
FLAT WASHER
RIVET
POINTER
LOCK WASHER
STUD PIVOT
V-BELT
MOTOR
KEY
MOTOR
5/16''-18NC*1/2''L
8.2*22*3.0t
8.5*23*2.0t
5/16''-18NC*1/2''
2*5
5/16''-18NC*3/4''
13*28*3.0t
1/2''-12NC*1''
3/8''-16NC*1-1/4''
3/8''-16NC
8.8*15.5*1.6t
2*5
10.2*18.5
M52
2HP*1PH
5*5*30
2HP.1PH
1
1
2
2
2
Q't
y
2
2
8
2
2
2
6
2
1
2
4
1
4
4
1
1
1
2
1
1
4
1
1
3
3
2
1
1
1
22
.3
.4
74
.1
.2
.3
.4
050099-901
003203-101
937572-000
821007-028
021369-000
MOTOR PULLEY
SET SCREW
MAGNETIC SWITCH ASSY
MAGNETIC SWITCH
STRAIN RELIEF
453012-007 POWER CORD
473003-010 MOTOR CORD
Key
75
77
78
76
79
85
86
87
89
91
92
92
110
111
112
113
114
115
116
117
118
119
120
121
122
123
124
Part No.
000303-103
003103-102
006304-100
021316-000
922845-000
040005-000
040201-000
040204-000
250052-615
003301-201
006002-032
006002-032
172356-902
051127-901
003104-103
360082-901
280015-901
380086-901
230156-615
009102-200
004001-101
250400-000
003005-206
003302-202
006002-001
170127-901
003403-102
PAN HD SCREW
CAP SCREW
LOCK WASHER
STRAIN RELIEF
SWITCH BRACE
HEX. WRENCH
OPEN WRENCH
OPEN WRENCH
DUST CHUTE
PAN HD SCREW
FLAT WASHER
FLAT WASHER
COVER
BLOCK ASM DEPTH
CAP SCREW
SHAFT
SPRING
HOUSING PLUNGER
KNOB PLUNGER
HEX. NUT
LOCK KONB
WHEEL
HEX. SCREW
PAN HD SCREW
FLAT WASHER
PLATE
PAN HEAD SCREW
3/8"-16NC*3/8"
2HP*1PH
2HP*1PH
PGA13.5-11B
SJT 14AWG*3C*3200mm
SJT14AWG*3C*1450mm
Descriptions
M5*0.8P*10
1/4"-20NC*1/2"
6.5*12.8
MG16A-10B-ST
5mm
8*10
12*14
1/4"-20NC*1/2"
6.6*13*1.0t
6.6*13*1.0t
0-1/2"
5/16"-18NC*3/4"
22*1/4"-20NC
3/8"-16NC(14.2B*11.5H)
5/16"-18NC*3/4"
3/8"-16NC*2-1/2"
1/8"-40NC*3/8"
4.3*10*1.0t
1/4"-20NC*1/2"
1
2
1
1
2
1
1
Q't
y
2
4
4
1
1
1
1
1
1
4
4
2
2
1
3
1
1
1
1
4
2
4
4
2
2
1
2
23
125
126
127
128
003105-101
006306-100
000002-104
008005-100
CAP SCREW
LOCK WASHER
HEX. SCREW
HEX. NUT
3/8"-16NC*3/4"
9.8*17.8
M6*1.0P*20
M6*1.0P(10B*5H)
2
2
2
2
24