1
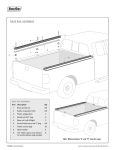
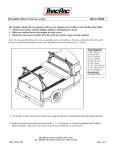
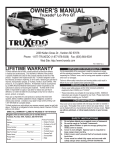
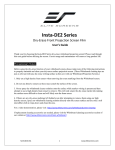
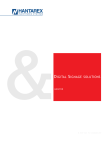
10/4/05, 200
P/N 1116240 Rev A
994 Jefferson Street, Fall River, MA 02721
Phone: 1-508-677-4130 Fax: (508) 677-4136
Customer Service: 1-800-501-1587
Web Site : http://www.tracrac.com
3”
1
2
3
6
5
4
10
11
12
8
7
9
2
13
35
29
34
30
14
31
15
3
33
16
23
TracRac, Inc. Limited WARRANTY:
17
32
Thanks for purchasing a TracRac, Inc. product. We proudly make our products in the USA — and we stand behind them. We thoroughly inspect every
product before shipment, and warrant them to the original purchaser to be free from defects in materials and workmanship for a period of 24 months
from the date of purchase.
28
22
21
25
27
In the unlikely event that trouble develops during the warranty period, please: Contact TracRac for a return authorization number and instructions
18
24
26
If our inspection shows defective materials or workmanship, we will repair or replace the product (at our discretion) at no charge. We will return the
product to you at our expense.
19
Proof of purchase is required.
Certain restrictions apply:
This warranty does not apply to normal wear and tear.
Any damage caused by careless, unsafe, excessive use, improper handling, improper installation or alteration are not covered. Overloading beyond
rated capacity, accidents, or repairs attempted by anyone other than TracRac personnel or our Authorized Dealers are not covered.
This warranty applies in lieu of any other warranties, expressed or implied (including implied warranties of merchantability and fitness for a particular
purpose). Variations of its terms are not authorized.
TOOLS REQUIRED:
1. 9/16” Ratchet or Wrench
2. Large Flat Screwdriver
3. 1/8” Allen Wrench
The foregoing obligation is TracRac’s sole liability under this or any other implied warranty, and under no circumstances shall TracRac be liable for
any special, indirect, incidental or consequential damage, whether arising out of breach of warranty, breach of contract or otherwise.
Some states do not allow limitations on how long an implied warranty lasts or the exclusion or limitations of incidental or consequential damages, so the above
limitation or exclusion may not apply to you. This warranty gives you specific legal rights and you may also have other rights which vary from state to state.
Purchased from:
Model (SKU) #:
Date of purchase:
This warranty is valid only in the United States of America
To activate your warranty — and to take advantage of our special promotions, new product releases, & product upgrades — please complete the
attached Customer Satisfaction Survey and submit it immediately to TracRac Inc.
Remember: Your Warranty is not in effect unless we receive your completed card within 10 days from your date of purchase. Thanks!
20
TracTonneau_IM-F1-A01
TRACRAC REPLACEMENT PARTS
1
2
3
4
5
6
7
8
9
10
11
12
___*___
___*___
___*___
1115372
1702602
1115354
___*___
1114872
1703000
1115353
1703344
1701595
TracTonneau Replacement Cover
Black Header
Header Seal, Notched
Header End Plugs (Set of Two)
Square Nut, 3/8"
Header Insert Safety Clip
Safety Strap
Header Guide
Cap Screw, 3/8" x 1 1/2"
Header Safety Strap
Blind Rivet, 1/8" x 3/16"
End Plug, 1" OD
13
14
15
16
17
18
19
20
21
22
23
24
___*___
1702992
1703260
1703345
___*___
1703332
1703643
___*___
___*___
1114773
1703650
1702610
Black Bow
Spring Plunger, 5/8" x 1.94"
Tension Control Bracket
Spring Pin, 1/8" x 5/16"
Shur-Bond™ VELCRO® Fasteners
Hitch Pin, 1/16" x 1 5/16"
Set Screw, 1/4” x 3/8”
Side Rail, Passenger’s Side
Side Rail, Driver’s Side
Flat Spring, 5/8" x 3 7/8"
Latch Main Frame
Clevis Pin, 3/16" x 1 1/4"
25 1703639 Toggle
26 1700419 Nylon Lock Nut, 5/16"
27 1703265 Toggle Cap
28 1702611 Cotter Pin, 3/64" x 19/32"
29 1702926 Cap Screw, 5/16" x 7/8"
30 1702801 Header Stop
31 1703301 Side Rail End Plug, Left
32 1116263 Side Rail End Seal, 3”
33 1703300 Side Rail End Plug, Right
34 1116265 Side Rail Cab Seal, 4 1/2”
35 1116264 Side Rail Top Gap Seal, 2 5/8”
* Please specify length or make and model of vehicle.
SIDE RAIL & COVER INSTALLATION
bracket
spring
plunger
cap screw,
3/8” x 1 1/2”
safety
straps
top gap seal
set
screw
LATCHING & UNLATCHING COVER
STEP 7: Unroll cover toward tailgate and rest bows on side
rails. Rotate header into header stops and press
down to lock toggle into header.
TENSION
CONTROL
pull cover over rails
header seal
bottom
view
cover
assembly
end
plug
header stop
header
header
guide
STEP 8: Secure Shur-Bond™ fasteners on one side rail,
by pressing along full length of rail. Pull cover
tight across pickup bed, and secure Shur-Bond™
fasteners on opposite side rail.
cover
toggle
rubber
seal
driver’s
side rail
NOTE: If tailgate has a
key lock, cover is secured until tailgate is
unlocked and opened.
square nut, 3/8”
passenger’s
side rail
OF
NT B O X
O
FR U C K
TR
lock toggle into header
STEP 9: To release cover, pull back on toggle. Roll cover
toward cab to open. For best results, leave cover
fastened to side rails while opening.
STEP 10: Secure cover open by
hooking safety straps to
front loops.
safety
straps
header
seal
inside
tailgate
STEP 1: Open tailgate and slide the side rails onto the inside
track of the TracRac rails.
tracrac rail
tractonneau
side rail
STEP 4: Install header guides
into front header with
3/8” x 1 1/2” cap
screws and 3/8”
square nuts as shown.
Nuts have been
pre-installed into
slot in header guide.
Finger tighten.
cap screw,
3/8” x 1 1/2”
header guide
end view
open tailgate
STEP 2: Locate cab seal between side rails and front of pickup
box. Peel backing and adhere cab seal to box.
cover secured open
NOTE: In cold weather conditions or with some accessories, it may be
preferable to close the cover before closing the tailgate. Header seal
may be placed across top of tailgate if preferred.
square
nut, 3/8”
COVER TENSION ADJUSTMENT
EVER-TITE™
AUTOMATIC
TENSION
CONTROL
front header
side rail
STEP 5: Set cover assembly behind cab with header seal
on top of rail.
FRONT OF
TRUCK BOX
header
seal on top
of rail
front of
pickup box
cab seal
cover
side rail
side
rail
STEP 3: Press side rails
into cab seal,
compressing seal
1/4”. Install set
screws into clinch
nuts on side rails
and tighten.
cab
seal
STEP 6: Slide header guides into side rail flanges on each
side of header. Tighten cap screws securely.
COVER TOO LOOSE
CORRECT TENSION
ROTATE CLOCKWISE
DURING WARMEST
PART OF DAY
no less than 1/16”
NOTE: Adjust tension in small increments.
Slight adjustments will gain significant results.
TROUBLE SHOOTING
1/4”
Questions?
clinch nut
set screw
front header
adjust HERE with
flat screwdriver
cover assembly
header guide
cap screw
changes.
STEP 11: Set tension during warmest part of day. With cover closed, release VELCRO® brand loop from both side rails near
cab. Check compression of both spring plungers against the front header per diagram. Roll cover open and make
adjustments. Close cover and recheck adjustment. Repeat until satisfactory tension has been achieved.
spring plunger
side
rail
inside box rail
plunger compensates for material expan• Spring
sion and contraction caused by temperature
cover tension after installation, seasonally,
• Check
and after extreme temperature changes.
best performance, adjust tension regularly
• toForprotect
your cover against wind wear.
spring plunger
front header
press edges
NOTE: Secure ShurBond™ VELCRO ®
brand fasteners along
entire length of both
side rails before driving vehicle, to prevent
wind lift.
side rail flange
Call our friendly customer service staff
at TracRac Toll Free:
1-800-501-1587
HEADER WILL NOT LATCH:
Make sure the header seal is not caught between side rail and header.
FABRIC COVER IS TOO TIGHT OR TOO LOOSE: See Step 11 to adjust tension.
* VELCRO® is a registered trademark of the Velcro companies.