Download (User Manual - PC version)

Transcript
AVG ZEN
User Manual
Document revision 2014.01 (3/25/2014)
C opyright AVG Technologies C Z, s.r.o. All rights reserved.
All other trademarks are the property of their respective owners.
1
Contents
........................................................................................................................ 3
1. Introduction
........................................................................................................................
4
2. Zen
Installation Requirements
4
2.1 Operation..........................................................................................................
Systems Supported
..........................................................................................................
4
2.2 Recommended
Hardware Requirements
........................................................................................................................
5
3. Zen
Installation Process
5
3.1 Welcome..........................................................................................................
Dialog
..........................................................................................................
6
3.2 Destination
Folder
........................................................................................................................
7
4. Zen
User Interface
7
4.1 Category..........................................................................................................
tiles
..........................................................................................................
7
4.1.1 PCs
..........................................................................................................
7
4.1.2 Android
de v ic e s
11
4.2 Devices..........................................................................................................
ribbon
..........................................................................................................
11
4.3 Messages
button
.......................................................................................................... 12
4.4 Status button
12
4.4.1 T ..........................................................................................................
hre e use r m ode s
13
4.5 Settings..........................................................................................................
button
........................................................................................................................
15
5. Step-by-step
guides
15
5.1 How to ..........................................................................................................
accept invitations?
15
5.2 How to ..........................................................................................................
add devices to your network?
16
5.3 How to ..........................................................................................................
change device name or type?
16
5.4 How to ..........................................................................................................
connect to existing Zen network??
17
5.5 How to ..........................................................................................................
create a new Zen network?
17
5.6 How to ..........................................................................................................
install AVG products?
18
5.7 How to ..........................................................................................................
leave a network?
18
5.8 How to ..........................................................................................................
remove devices from your network?
19
5.9 How to ..........................................................................................................
view and/or manage AVG products?
........................................................................................................................
20
6. FAQ
and Support
2
1. Introduction
This user manual provides comprehensive documentation for AVG Zen. Please note that this manual
only describes the PC version of this product.
AVG, a world-famous developer of safeguarding software, now makes on more step toward its customers and
full satisfaction of their security needs. New AVG Zen effectively connects the devices from desktop to mobile,
the data, and the people behind them together in one simple package with the aim of making our complicated
digital lives much simpler. Through one application, AVG Zen makes it easy for users to see the security and
privacy settings of all their devices from a single place.
The idea behind AVG Zen is to place the individual with all of these devices back in control of their data and
their security as we believe that through control comes choice. In fact, AVG is not here to tell you that sharing
or tracking are bad in and of themselves; instead, we want to arm our customers with the information that will
allow them to control what they share and if they are tracked, and to make their own informed decisions. A
choice to have the freedom to live their lives in the way they want to, and to bring up their family or apply for a
job without fear of their privacy being invaded.
Another great thing about AVG Zen is that it gives our customers a consistent user experience across all
devices so that even beginners can quickly learn how to manage and secure their multiple devices with ease.
At least that is one thing that is getting simpler in an increasingly complex world. But lastly, and most
importantly, AVG Zen is designed to give real people peace of mind as they go about their daily lives. As the
Internet becomes the center of our connected world, AVG Zen is there to connect the dots.
This documentation contains description of specific AVG Zen features. Should you require information about
other AVG features, please consult the user guide to Internet Security edition, which contains all the
necessary details. You can download the guide from the AVG website.
This documentation of contains description of specific AVG Zen features. Should you require information
about other AVG products, please consult thematic user guides, containing all necessary details. You can
download these guides from the AVG website.
3
2. Zen Installation Requirements
2.1. Operation Systems Supported
The AVG Zen is intended for use with the following operating systems:
Windows XP Home Edition SP2
Windows XP Professional SP2
Windows XP Professional x64 Edition SP1
Windows Vista (x86 and x64, all editions)
Windows 7 (x86 and x64, all editions)
Windows 8 (x32 and x64)
(and possibly higher service packs for specific operating systems)
2.2. Recommended Hardware Requirements
Recommended hardware requirements for AVG Zen are:
Intel Pentium 4 or later
128 MB of RAM memory
500 MB of free hard drive space
4
3. Zen Installation Process
To install AVG Zen on your computer, you need to get the latest installation file. We recommended getting the
latest installation file online. You can download the file from the AVG website.
There are two installation packages available for your product - for 32bit operating systems (marked as x86)
and for 64bit operating systems (marked as x64). Be sure to use the correct installation package for your
specific operating system.
Once you have downloaded and saved the installation file on your hard drive, you can launch the installation
process. The installation is a sequence of dialog windows with a brief description of what do at each step. In
the following, we offer an explanation for each dialog window:
3.1. Welcome Dialog
The installation process always starts with this window. In here you select the language used in the AVG
Zen application.
If you want to change the destination folder of your installation, click the Customize your installation link
and do so in the newly opened dialog.
Furthermore, you can read the AVG Software Licence Agreement and the AVG Privacy and
Personalization Policy. Simply click the appropriate link and the whole text will be displayed to you in a new
window.
If you agree with this terms, proceed with the installation by clicking the Agree and Install button.
5
After successful installation, computer restart is required. You can perform restart from the final dialog of the
installation (by clicking the Restart now button) or put it off till later. However, please note that without
computer restart, some AVG products may not be correctly displayed in Zen user interface and the application
as whole may not function properly!
3.2. Destination Folder
This dialog is optional, triggered by clicking the Customize your installation link in the previous dialog of the
installation.
In it, you can set the destination folder folder for your installation. If you are not satisfied with the default
location where AVG Zen should be installed (i.e. to the program files folder located on drive C:), you can type a
new path manually into the text box, or use the Browse link (next to the text box). Using the link displays the
drive structure and allows you to select the respective folder.
Now click the Agree and Install button to start the installation process itself.
After successful installation, computer restart is required. You can perform restart from the final dialog of the
installation (by clicking the Restart now button) or put it off till later. However, please note that without
computer restart, some AVG products may not be correctly displayed in Zen user interface and the application
as whole may not function properly!
6
4. Zen User Interface
This is the main dialog of your AVG Zen user interface. In every other dialog, there is always a
button in
upper-left corner – clicking it returns you back to this main screen (in some consequent dialogs this button
only takes you one step back, i.e. to the previous dialog of the series).
This dialog consists of several distinct sections:
Category tiles
Devices ribbon
Messages button
Status button
Settings button
4.1. Category tiles
7
The Category tiles allow you to install AVG software products, to view their state and to simply open their user
interface. Zen network administrator can also use them to view AVG products installed on remote devices.
Use the Devices ribbon to cycle through all remote devices available in your Zen network.
Inside every tile, there is a circle, which colors depends on the state of products within this category (you
should strive to keep it green). For some categories, you may only see just a semi-circle, which means that
you already have a product from this category, but there is another product left to install.
Although you always see the same set of tiles no matter what kind of device you view, the content of the tiles
may differ depending on the type of monitored device (PC or Android device).
4.1.1. PCs
PROTECTION
AVG Internet Security – this security software provides multiple layers of protection for everything you do
online, which means you don’t have to worry about identity theft, viruses, or visiting harmful sites. AVG
Protective Cloud Technology and AVG Community Protection Network are included, meaning we collect the
latest threat information and share it with our community to make sure you receive the best protection. You
can shop and bank online safely, enjoy your life on social networks, or surf and search with confidence of a
real-time protection.
Overview of states
if AVG Internet Security is not installed, this tile remains gray and the text below says "Not protected",
but you can click it to simply install this AVG application.
if there are too many problems to pay attention to (like when the whole AVG Internet Security is
disabled), the circle inside this tile is displayed in red and the text below says "Not protected". In case
you only face a few minor problems, the tile is displayed in green, but the text below say "Partially
protected". In both cases, you will see a number in orange circle (in the upper-right corner of the tile)
showing the number of issues that you might want to pay attention to. Use the Messages button to view
a list of problems and to possibly solve them.
if there are no problems with AVG Internet Security the circle inside this tile is displayed in green and the
text below says "Protected".
What happens after you click this tile:
if AVG Internet Security is not installed yet – a new dialog is opened, allowing you to install AVG
Internet Security. Read more about installing AVG products.
if you are viewing your own devices with AVG Internet Security installed – AVG Internet Security user
interface is opened.
if you are (as administrator) viewing a remote device with AVG Internet Security installed – opens a
dialog containing a brief overview of AVG Internet Security state on remote device. However, this
dialog is purely informative and you are not able to change anything. Read more about viewing remote
devices.
PERFORMANCE
AVG PC TuneUp – with this application, you can restore the full performance capabilities of your operating
system, games and programs. AVG PC TuneUp can also automatically run important maintenance tasks,
such as cleaning up your hard disk and registry for you, or you can run them yourself manually. AVG PC
TuneUp will quickly recognizes whether there are any problems on your system and offers simple solutions.
You can also use AVG PC TuneUp to customize the appearance of your Windows system to your personal
8
requirements.
Overview of states
if AVG PC TuneUp is not installed, this tile remains gray and the text below says "Not protected", but you
can click it to simply install this AVG application.
Partially tuned up if there are too many problems to pay attention to (like when the whole AVG Internet
Security is disabled), the circle inside this tile is displayed in red and the text below says "Not protected".
In case you only face a few minor problems, the tile is displayed in green, but the text below say
"Partially protected". In both cases, you will see a number in orange circle (in the upper-right corner of the
tile) showing the number of issues that you might want to pay attention to. Use the Messages button to
view a list of problems and to possibly solve them.
Tuned up if there are no problems with AVG Internet Security the circle inside this tile is displayed in
green and the text below says "Protected".
What happens after you click this tile:
if AVG PC TuneUp is not installed yet – a new dialog is opened, allowing you to install AVG PC
TuneUp. Read more about installing AVG products.
if you are viewing your own devices with AVG PC TuneUp installed – AVG PC TuneUp user interface
is opened.
if you are (as administrator) viewing a remote device with AVG PC TuneUp installed – opens a dialog
containing a brief overview of AVG PC TuneUp state on remote device. However, this dialog is purely
informative and you are not able to change anything. Read more about viewing remote devices.
PRIVACY & IDENTITY
This category consists of two different parts – AVG PrivacyFix (security browser add-on) and Identity
Protection (a component of AVG Internet Security application). In order to get a full (if possible green) circle
within this tile, you have to have both applications installed.
AVG PrivacyFix – this browser add-on helps you understand and control data collection. It checks your
privacy exposure on Facebook, Google and LinkedIn, and with one click, takes you to settings where you can
fix it. More than 1,200 trackers are kept from following your movements online. Also, you can see which
websites reserve the right to sell your personal data and easily request that they delete what they hold on you.
Finally, you are alerted to privacy risks as you visit sites and know when policies change.
AVG Internet Security – Identity Protection component – this component (a part of AVG Internet Security
application) gives your computer real-time protection against new and even unknown threats. It monitors all
processes (including hidden) and hundreds of different behaviour patterns, and can determine if something
malicious is happening within your system. For this reason, it can reveal threats not even yet described in the
virus database.
Overview of states
if none of the above applications is installed, this tile remains gray and the text below says "Not set up",
but you can click it to simply install these AVG applications.
if only one of these two applications is installed, there will only be a semi-circle inside this tile. It's color
depends on the state of installed application – it can be either green ("Active"), or red ("Disabled").
if both applications are installed, with one being active and one disabled, the circle inside this tile will
consist of two halves - the green one and the yellow one.
if both applications are installed and active, you will see a complete green circle inside this tile.
9
Congratulations, your privacy and identity are fully protected!
After you click this tile, a new dialog opens, consisting of two additional tiles – for AVG Identity Protection and
for AVG PrivacyFix. These tiles are as interactive and clickable as are primary tiles in the main user interface
of your AVG Zen application.
if one or both of these applications are not yet installed, you can click the Get It FREE button to
remedy that. Read more about installing AVG products.
if at least one of these applications is installed, you can click its tile to open its user interface.
if you are (as administrator) viewing a remote device with these applications installed – opens a dialog
containing a brief overview of these two applications' state on remote device. However, this dialog is
purely informative and you are not able to change anything. Read more about viewing remote devices.
SUPPORT
(the circle inside this tile is green, when support is available, while the text below says "Covered")
Clicking this tile opens a new dialog containing a few browser links to the most common support resources.
To read about the support options offered by AVG, click here.
You might want to check the following related topics:
How to install AVG products?
How to view and/or manage AVG products?
4.1.2. Android devices
This manual only deals with PC related aspects of AVG Zen; however, as administrator you are quite likely to
also have some Android™ devices in your network. In such case, don't be surprised to see a different content
in Category tiles of these devices.
PROTECTION
AVG AntiVirus for Android™ – this app protects you from harmful viruses, malware, spyware and text
messages and helps keep your personal data safe. With this app you’ll receive effective, easy-to-use virus and
malware protection, as well as a real-time app scanner, phone locator, task killer, app locker, and local device
wipe to help shield you from threats to your privacy and online identity. Real-time security scanner protection
keeps you protected from downloaded apps and games.
PERFORMANCE
AVG Memory & Cache Cleaner – this app lets you quickly erase and clear your browser, call and text
histories, as well as identify and remove unwanted cached app data from both the device’s internal memory
and the SD card. It significantly optimizes the storage space to help your Android™ device perform better and
run smoother.
PRIVACY & IDENTITY
AVG PrivacyFix (for Android) – this app provides you a simple way to manage your online privacy settings
through your mobile device. It gives you access to one main dashboard that quickly and easily shows you
what and with whom you’re sharing data on Facebook, Google and LinkedIn. If you want to change something,
one simple click takes you directly to where you can change your settings. New WiFi tracking protection
10
enables you to pre-set WiFi networks you know and approve and stop your device from being tracked over
other networks.
4.2. Devices ribbon
This part of AVG Zen user interface displays all devices available in your Zen network. If you are a single user,
or you are only connected to someone's Zen network, you will only see one device, your current one. However,
as network administrator you may even have so many devices to view, that you might need to use the arrow
buttons to cycle through them all.
Select the device that you want to view by clicking its tile. You will see the Categories section changing
appropriately, displaying the state of AVG products on chosen device. You may also notice a number number
in orange circle appearing in the upper-right corner of some tiles. Tis means that there are issues with AVG
products on this device that you might want to pay attention to. Click the Messages button to so and to obtain
more info.
As Zen network administrator you may also want to add new devices to your network. To do so, click the
button on the right side of the ribbon.
You might want to check the following related topics:
How to add devices to your network?
How to remove devices from your network?
4.3. Messages button
This button is located above the Devices ribbon and to the left of the Status button. However, it only appears if
there are any problems with AVG products on your current device. The number in orange circle shows the
number of issues that you might want to pay attention to (this orange circle may even contain an exclamation
mark as a warning that some AVG application is utterly disabled).
After clicking this button, a new dialog appears:
11
This dialog displays the list of issues sorted out by product category. Issues are displayed in different colors
(red, yellow or green), allowing to recognize urgent problems from less pressing ones. Some issues can also
be handled directly from this dialog - such issues appear with a special action button next to them.
If you are an administrator with more than one device in your network, this dialog looks a little bit different.
There is an overview of devices on its left side, allowing you to view only messages related to this particular
device. However, if you want to view messages for all devices in one ordered list, you can choose the ALL
DEVICES options (it's the uppermost one in the overview).
For example, when you see the text "FIREWALL NEEDS RESTART - To activate Firewall please restart
your computer", you can click the Restart now button. Right afterwards, your computer will be restarted
in order to activate the Firewall component.
4.4. Status button
This button displays your current user mode. As Zen network administrator you will usually see your
MyAccount email that you have used to connect to the network.
12
4.4.1. Three user modes
Basically, there are three user modes in AVG Zen. The text shown on the Status button depends on which
one you are currently using:
Single user (the Status button shows Connect) - you have just installed AVG Zen. You are neither
AVG MyAccount administrator, nor are you connected to any network, so you can only view and
manage AVG products installed on this device.
Connected user (the Status button shows Connected) - you have used a pairing code, thus
accepting an invitation to someone's network. All AVG products on your device can now be viewed
(not managed) by this network's administrator. As for yourself, you can still view and manage AVG
products installed on this device (as if you were a single user). If you no longer want to stay in a
network, you can easily leave it.
Administrator (the Status button shows current AVG MyAccount name) - you have logged in using
your MyAccount (perhaps you have previously created a new one). This means that you have access
to all AVG Zen features. You can add devices to your network, remotely view AVG products installed
on them and, if necessary, remove them from your network.
You might want to check the following related topics:
How to accept invitations?
How to connect to existing Zen network?
How to create a new Zen network?
How to leave a network?
4.5. Settings button
Clicking this tiny button (to the right from the Status button) triggers a small pop-up dialog.
You can either click the Devices settings option to open the Device Settings dialog, allowing you to change
the name and type of your device (as well as other devices in your Zen network, if there are any and if you are
this network's administrator). This dialog also allows you to remove devices from your network.
13
Also, you can click the About AVG Zen option to view the info about your software product or even to read
the License Agreement.
You might want to check the following related topics:
How to change device name or type?
How to remove devices from your network?
14
5. Step-by-step guides
This chapter contains a few step-by-step guides describing the most common operations in Zen environment.
5.1. How to accept invitations?
1. If you use AVG products on more than one device, or perhaps you are not skilled enough and want
someone to monitor your AVG products and help you fix any problems, you might want to add your PC or
Android™ mobile to some existing Zen network. First, however, you have to be invited by your future
network administrator, so please ask him to send you an invitation email. After you receive it, open it and
find an invitation code within.
2. Install AVG Zen (if you haven't already done so).
3. Click the Status button (with the text that says Connect) and confirm by clicking Continue button in the
small pop-up dialog.
4. Select the Connect with an invitation code pane on the left side of the newly opened subdialog.
5. Use the copy/paste method to copy the invitation code from email to appropriate text box in Zen subdialog
(or retype it manually).
The copy/paste method is a common procedure, allowing you to input anything copiable (text, pictures,
etc.) to Windows Clipboard, and then paste it elsewhere. It works as follows:
i. Highlight a piece of text, in this case your invitation code in an email. You can do that by holding down
the left mouse button, or the Shift key.
ii. Press Ctrl+C on your keyboard (please note that at this stage, there will be no visible evidence of the text
being successfully copied).
iii. Move to the desired location, in this case the Zen Join Network dialog, and click the text box in which
you want to paste the text.
iv. Press Ctrl+V.
v. The pasted text, in this case your invitation code, appears. Done.
6. Click the Connect button. After a small while, you will become a part of the Zen network of your choice. For
you personally, nothing really changes (only the text on your Status button will change to Connected).
However, your device will be monitored by network's administrator from now on, allowing him to identify
possible problems and help you fix them. Still, if you wish to leave this network, you can easily do so at any
time.
5.2. How to add devices to your network?
1. In order to add a new device to your Zen network, you have to invite it first. To do so, click the
on the right side of the Devices ribbon.
button
Please note that only administrators can send invitations and devices to their networks. So if you are not
currently connect to any Zen network, do so, or create yourself a new one.
2. A new dialog appears. Choose the type of device that you want to add (i.e. PC or Android™ mobile) by
highlighting the appropriate tile and click the Continue button.
15
3. Another dialog appears. Choose a way to send the invitation (currently, only Email is available) by
highlighting the appropriate tile and click the Continue button.
4. Another dialog appears. Enter the email that is used on the new device and click the Continue button.
5. The invitation email is sent. The device is now displayed on the Devices ribbon as pending. This means your
invitation awaits acceptation.
While your invitation remains in pending state, you can choose to Resend Invitation Link, or to Cancel
Invitation entirely.
6. Immediately after your invitation is accepted, you can change the name and type of newly added device
(however, you can also do this anytime in the future). Now, the device is a part of your Zen network and you
are able to remotely view AVG products installed on it. Congratulation, you have become a true Zen
administrator!
5.3. How to change device name or type?
1. Click the Settings button, then choose Devices Settings in the pop-up dialog.
2. The settings you see apply to your currently selected device. A list of devices currently available in your
network (i.e. those that have accepted invitations) is displayed in a column of tiles on the left side of the
Devices Settings dialog. Simply click the individual tiles to switch between them.
3. The Device Name text box displays the name of your currently selected device. You can delete it and
replace with any name of your liking.
4. Below, you can set the Type of your currently selected device (Phone, Tablet, Laptop or Desktop). Simply
click an appropriate tile.
5. Click the Save button to confirm your changes.
5.4. How to connect to existing Zen network??
1. If you are not currently logged in to any AVG MyAccount, click the Status button (with the text that says
Connect) and confirm by clicking Continue button in the small pop-up dialog.
If you are already connected to some AVG MyAccount, you have to log out first, in order to connect to a
different one. Click the Status button (with your current AVG MyAccount name on it) and confirm by
clicking Log Out button in the small pop-up dialog.
2. Select the Connect to a existing Zen network pane on the left side of the newly opened subdialog.
3. Insert your AVG MyAccount user name and password. If you don't have your own AVG MyAccount yet,
simply create yourself a new one. If you want to be logged in as administrator, in order to be able to view
AVG products on remote devices in this Zen network, keep the Connect as admin box checked.
Otherwise, you will only act as connected user.
If you have forgotten your password, click the Forget password? link (under the password text box). This
will redirect you to the webpage, allowing you to recover your lost password.
16
4. Click the Connect button. The connection process should be done in a few seconds. After successful
connection, you should see your MyAccount name displayed on the Status button.
5.5. How to create a new Zen network?
In order to create (and administer) a new Zen network, you have to create your personal AVG MyAccount first.
Basically, there are two ways to do it - either using your web browser, or directly from the AVG Zen application
itself.
From browser:
1. Use your browser to open the https://myaccount.avg.com/ website.
2. Click the Create AVG MyAccount button.
3. Enter your login email, set your password, retype it and click the Create account button.
4. A link for activating your AVG MyAccount will be sent to you (to the email address that you have used in
step 3). You'll need to click this link to finish your MyAccount creation. If you don't see this email in your
inbox, it may have ended up in your spam folder.
From AVG Zen:
1. If are not currently logged in to any AVG MyAccount, click the Status button (with the text that says
Connect) and confirm by clicking Continue button in the small pop-up dialog.
If you are already connected to some AVG MyAccount, you have to log out first, in order to connect to a
different one. Click the Status button (with your current AVG MyAccount name on it) and confirm by
clicking Log Out button in the small pop-up dialog.
2. Make sure that the Create a new Zen network pane on the left side of the newly opened subdialog is
selected.
3. Enter your login email and set your password (check the Show password box below if you want to see
hidden characters), then click the Connect button.
4. After a few seconds, you will be connected to newly created network with administrator rights. This means
that you can add devices to your network, remotely view AVG products installed on them and, if
necessary, remove them from your network.
5.6. How to install AVG products?
1. AVG products can be easily installed via Zen. To do so, click a Category tile of your choice (the tile will be
gray indicating that you have no product from this category yet, or perhaps half green, which means that
you already have a product from this category, but there is another product left to install).
Please note that you can only install AVG products on your current device (i.e. PC or Android™ mobile that
you are currently working with). Zen network administrators can only view products installed on devices in
their network, but can not manage them or even install new ones.
17
2. If you want to start the product installation right away, all you have to do is click the Get It FREE button.
The product will then be installed automatically with default settings.
If you want to take control over the installation process, click the little arrow button (to the right from the Get
It FREE button) and click Custom installation. This way, you will view the installation as a series of
dialogs, allowing you to change the destination folder, installed components etc.
The installation processes for various AVG products are in detail described in stand-alone user manuals.
Feel free to download them from the AVG website.
3. As the installation goes on, you should see the green circle appear inside the chosen Category tile. After
successful installation, the green circle inside the tile becomes full (in some categories is may also be just
a semi-circle, indicating that there are other products within this category that can be installed). Please
note that the circle (or semi-circle) may also switch to a different color immediately after the installation;
this means that there are some issues within the product that require your attention.
4. You will get a confirmative message (appearing right under the Category tiles) that the installation has
ended successfully.
5.7. How to leave a network?
1. If you are a part of some Zen network and wish to leave it, it is very easy to do so. First, click the Status
button (with the text that says Connected) and click the Leave This Network button in the small pop-up
dialog in order to proceed.
2. Now you have to confirm that you really want to leave the Zen network. To do so, click the Leave button.
3. After a few seconds you will be permanently disconnected. Your former network's administrator will no
longer be able to manage AVG products on your PC or Android™ mobile. The text on your Status button
will change to Connect (i.e. to its initial state).
5.8. How to remove devices from your network?
1. If you no longer want some device to a be a part of your Zen network, you can easily remove it. Click the
Settings button, then choose Devices Settings in the pop-up dialog.
2. On the left side of the Devices Settings dialog, there is a list of devices currently available in your network
displayed in a column of tiles. Switch to the device that you want to remove by clicking the tile with its
name on it.
3. You will see the Remove from Network link next to the lower edge of the dialog. Click it.
Note, that there is no such link in settings for the device that you are currently using. This device is
considered to the core of your network and can therefore not be removed.
4. Now you have to confirm that you really want to remove this device from the Zen network. To do so, click
the Remove button.
5. The device will be permanently removed after a few seconds. You will no longer be able to manage AVG
products on it; removed device will also disappear from the Devices ribbon in your User Interface.
18
5.9. How to view and/or manage AVG products?
If you want to view and manage your own device
In fact, all you have to do is to click an appropriate Category tile. This opens AVG product's user interface,
allowing you to explore and configure as much as you wish. For example, clicking the PROTECTION tile
opens AVG Internet Security user interface etc. If a category consists of more than one product, you will have
to click its tile and then select an appropriate sub-tile (like AVG PrivacyFix under PRIVACY & IDENTITY
category).
AVG products viewable and manageable via Zen are in detail described in stand-alone user manuals. Feel
free to download them from the AVG website.
In case there are any pressing issues that require your attention, you may also click the Messages button.
The newly opened dialog contains a list of problems and difficulties; some of them can even be handled
directly from this dialog - such issues appear with a special action button next to them.
If you want to view a remote device (administrators only)
This is also pretty easy. Choose the device that you want to view from the Devices ribbon and click an
appropriate Category tile. Afterwards, a new dialog is opened, containing a brief overview of state(s) of AVG
product(s) in this category. Please note that this dialog is purely informative and you are unable to change
anything.
As administrator, you may also use the Messages button to view the problems with AVG products that have
arisen on remote devices. After clicking the button, you will see a new dialog with an overview of devices on its
left side, allowing you to view warning messages related to this particular device.
19
6. FAQ and Support
User support for is easily accessible at any time via the SUPPORT category tile.
The new dialog you open contains browser links to the most common support resources.
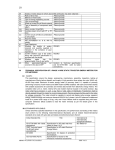
CATEGORY NAME
Visit support
AVG Community
Knowledge Base
Remove a virus
BUTTON TEXT
DESCRIPTION
Visit Support
This page gives you access to
professional AVG user support.
You can ask questions regarding
licenses, installation, viruses and
specific product features.
Learn & Share
AVG Forums are a great way to
get advice from other AVG user
(but you can also give a piece of
advice yourself). Feel free to share
your knowledge in this community
of AVG customers.
Get Answers
Some questions about AVG
products are more frequent than
the others. On this page, you will
find answers to the most common
ones. Feel free to try it - perhaps,
the solution to your problem awaits
you right there.
Remove virus
AVG offers a number of free
software tools able to remove a
specific virus from your computer.
You can download them from this
page.
20