1
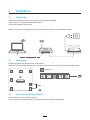
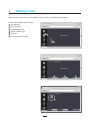
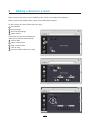
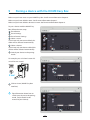
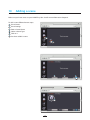
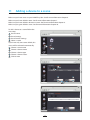
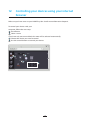
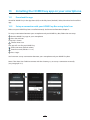
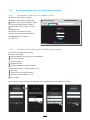
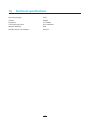
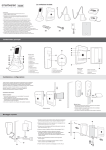
EN
HOME Easy Box
User manual
Versie 1.0 / 2014
Content
1Introduction . . . . . . . . . . . . . . . . . . . . . . . . . . . . . . . . . . . . . . . . . . . . . . . . . . . . . . . . . . . . . . . . . . . . . . . . . . . . 3
2
Intended use . . . . . . . . . . . . . . . . . . . . . . . . . . . . . . . . . . . . . . . . . . . . . . . . . . . . . . . . . . . . . . . . . . . . . . . . . . . . 4
3
Preventive measures and safety instructions . . . . . . . . . . . . . . . . . . . . . . . . . . . . . . . . . . . . . . . . . . . . 5
3.1
Safety symbols used . . . . . . . . . . . . . . . . . . . . . . . . . . . . . . . . . . . . . . . . . . . . . . . . . . . . . . . . . . . . . . . . . . . . . 5
3.2Notifications . . . . . . . . . . . . . . . . . . . . . . . . . . . . . . . . . . . . . . . . . . . . . . . . . . . . . . . . . . . . . . . . . . . . . . . . . . . . . 5
4
Preparations for use . . . . . . . . . . . . . . . . . . . . . . . . . . . . . . . . . . . . . . . . . . . . . . . . . . . . . . . . . . . . . . . . . . . . . 6
4.1Unpacking . . . . . . . . . . . . . . . . . . . . . . . . . . . . . . . . . . . . . . . . . . . . . . . . . . . . . . . . . . . . . . . . . . . . . . . . . . . . . . . 6
4.2
Package contents . . . . . . . . . . . . . . . . . . . . . . . . . . . . . . . . . . . . . . . . . . . . . . . . . . . . . . . . . . . . . . . . . . . . . . . . 6
5Installation . . . . . . . . . . . . . . . . . . . . . . . . . . . . . . . . . . . . . . . . . . . . . . . . . . . . . . . . . . . . . . . . . . . . . . . . . . . . . . 7
5.1Connecting . . . . . . . . . . . . . . . . . . . . . . . . . . . . . . . . . . . . . . . . . . . . . . . . . . . . . . . . . . . . . . . . . . . . . . . . . . . . . . 7
5.2Positioning . . . . . . . . . . . . . . . . . . . . . . . . . . . . . . . . . . . . . . . . . . . . . . . . . . . . . . . . . . . . . . . . . . . . . . . . . . . . . . 7
5.3
Switch the HOME Easy Box on . . . . . . . . . . . . . . . . . . . . . . . . . . . . . . . . . . . . . . . . . . . . . . . . . . . . . . . . . . . . 7
6
Getting access to your HOME Easy Box . . . . . . . . . . . . . . . . . . . . . . . . . . . . . . . . . . . . . . . . . . . . . . . . . . 8
6.1
By using your Windows computer . . . . . . . . . . . . . . . . . . . . . . . . . . . . . . . . . . . . . . . . . . . . . . . . . . . . . . . . 8
6.2
Login to your HOME Easy Box . . . . . . . . . . . . . . . . . . . . . . . . . . . . . . . . . . . . . . . . . . . . . . . . . . . . . . . . . . . . 8
7
Adding a room . . . . . . . . . . . . . . . . . . . . . . . . . . . . . . . . . . . . . . . . . . . . . . . . . . . . . . . . . . . . . . . . . . . . . . . . . . 9
8
Adding a device to a room . . . . . . . . . . . . . . . . . . . . . . . . . . . . . . . . . . . . . . . . . . . . . . . . . . . . . . . . . . . . . 10
9
Pairing a device with the HOME Easy Box . . . . . . . . . . . . . . . . . . . . . . . . . . . . . . . . . . . . . . . . . . . . . . . 11
10
Adding a scene . . . . . . . . . . . . . . . . . . . . . . . . . . . . . . . . . . . . . . . . . . . . . . . . . . . . . . . . . . . . . . . . . . . . . . . . . 12
11
Adding a device to a scene . . . . . . . . . . . . . . . . . . . . . . . . . . . . . . . . . . . . . . . . . . . . . . . . . . . . . . . . . . . . . 13
12
Controlling your devices using your internet browser . . . . . . . . . . . . . . . . . . . . . . . . . . . . . . . . . . 14
13
Installing the HOME Easy App on your smartphone . . . . . . . . . . . . . . . . . . . . . . . . . . . . . . . . . . . . 15
13.1
Download the app . . . . . . . . . . . . . . . . . . . . . . . . . . . . . . . . . . . . . . . . . . . . . . . . . . . . . . . . . . . . . . . . . . . . . . 15
13.2
Set up a connection with your HOME Easy Box using Auto Scan . . . . . . . . . . . . . . . . . . . . . . . . . . 15
13.3
Set up connection with your HOME Easy manually . . . . . . . . . . . . . . . . . . . . . . . . . . . . . . . . . . . . . . . 16
14
Frequently asked questions . . . . . . . . . . . . . . . . . . . . . . . . . . . . . . . . . . . . . . . . . . . . . . . . . . . . . . . . . . . . 17
14.1
Why adding a room? . . . . . . . . . . . . . . . . . . . . . . . . . . . . . . . . . . . . . . . . . . . . . . . . . . . . . . . . . . . . . . . . . . . . 17
14.2
What is a scene? . . . . . . . . . . . . . . . . . . . . . . . . . . . . . . . . . . . . . . . . . . . . . . . . . . . . . . . . . . . . . . . . . . . . . . . . 17
14.3
What is a task? . . . . . . . . . . . . . . . . . . . . . . . . . . . . . . . . . . . . . . . . . . . . . . . . . . . . . . . . . . . . . . . . . . . . . . . . . . 17
14.4
What is a device? . . . . . . . . . . . . . . . . . . . . . . . . . . . . . . . . . . . . . . . . . . . . . . . . . . . . . . . . . . . . . . . . . . . . . . . 17
15Troubleshooter . . . . . . . . . . . . . . . . . . . . . . . . . . . . . . . . . . . . . . . . . . . . . . . . . . . . . . . . . . . . . . . . . . . . . . . . 18
15.1
Why can’t I delete a room? . . . . . . . . . . . . . . . . . . . . . . . . . . . . . . . . . . . . . . . . . . . . . . . . . . . . . . . . . . . . . . 18
15.2
Why can’t I delete a device? . . . . . . . . . . . . . . . . . . . . . . . . . . . . . . . . . . . . . . . . . . . . . . . . . . . . . . . . . . . . . 18
15.3
Why can’t I delete a scene? . . . . . . . . . . . . . . . . . . . . . . . . . . . . . . . . . . . . . . . . . . . . . . . . . . . . . . . . . . . . . . 18
Appendix IEG verklaring van overeenstemming . . . . . . . . . . . . . . . . . . . . . . . . . . . . . . . . . . . . . . . . . . . . . . . . . . . 19
2
1
Introduction
Dear customer,
Thank you for purchasing the HOME Easy Box. This manual contains all the information necessary in
order to quickly familiarize yourself with the product. We kindly ask you to go through this information
carefully before working with the product.
This manual is intended for the end user of the HOME Easy Box. You can find the information you need
in the manual through the table of contents.
This is the original manual. There’s also a quick start manual available.
Keep this manual!
For more information or to order manuals, please contact:
Smartwares Safety & Lighting B.V.
P.O. Box 117, 5126 ZJ Gilze
The Netherlands
E-mail: [email protected]
www.smartwares.eu
3
2
Intended use
The HOME Easy Box is a device which makes it possible to control different compatible devices wireless,
using your smartphone or computer.
The manufacturer cannot be held responsible for any damage caused by improper, incorrect or
unreasonable use. Read and understand this manual completely.
4
3
Preventive measures and safety instructions
3.1
Safety symbols used
Warning! A warning indicates the risk of (serious) damage to the user or the product if the user
does not carry out the procedures with care.
Please note! A comment makes the user aware of possible problems.
! Tip: A tip makes the user aware of convenient functions and additional options.
3.2
•
•
•
•
•
Notifications
Warning! Do not install the product in any place that might be exposed to extreme heat or cold.
Warning! Before beginning assembly, check to make sure there are no electrical wires or water
pipes running through the wall where you want to drill.
Warning! By removing the plug from the power outlet, you immediately cut off power to the
product; then contact the Smartwares service desk when:
the product’s hardware components are open, drilled through, damp or have suffered a hard fall;
the adapter’s power cable is frayed or open, so that the metal is showing;
the adapter housing is damaged;
the adapter has come in contact with moisture or liquid;
the glass of the camera is cracked or broken;
Warning! It is not permitted to open the product yourself or to have it opened, neither is it
permitted to repair the product yourself or to have it repaired. This will void the warranties.
Please let any maintenance be carried out by certified maintenance personnel.
Warning! Only use original accessories from the manufacturer.
Warning! Keep the product out of reach of children.
Warning! Disconnect the device from all power sources before cleaning it.
Warning! Use a clean, dry cloth to clean the product.
Warning! Do not use any abrasive agents, corrosive cleaning products or any substances that
contain bleach or solvents to clean the product.
Warning! Remove the adapter from the power outlet during storms, lightning and whenever the
product will not be used for a longer period of time.
Please note! Install the product as indicated in this manual. If in doubt, consult a recognised
technician and always take account of local installation codes and regulations.
Please note! The product must not be discarded as unsorted municipal waste, it must be disposed
of separately.
Please note! Find out about the options in your region for disposing of the product after use. Do
not throw away electrical appliances or components, but see whether the product (components)
can be turned in, recycled or reused.
Please note! Wireless systems can be affected by interference from wireless telephones,
microwave ovens and other wireless devices that operate in the 2.4 GHz range. Keep the product
at least 3 metres away from any possible sources of interference during installation and operation.
5
4
Preparations for use
4.1
Unpacking
Unpack the HOME Easy Box carefully.
Check the package contents as described below. If any item is missing, please contact your reseller.
!
4.2
Tip: We recommend that you retain the original carton and packing materials in case it ever
becomes necessary to return your product for service. This is the only way to safely protect the
product against damage in transit. If you do dispose of the carton and the packing materials,
please remember to recycle with due care to the environment.
Package contents
The following items are included in the received package:
1 x HOME Easy Box
1 x Adapter
1 x Internet cable
1 x Quick installation Guide
6
5
Installation
5.1
Connecting
Connect the HOME Easy Box to your router, using the internet cable.
Connect the 12V adapter to the HOME Easy Box.
Connect the adapter to the mains.
Make sure you have a computer in your local network, to get access to the HOME Easy Box.
POWER
5.2
LAN
RF
Positioning
Position the HOME Easy Box centrally in the house.
Make sure that the compatible devices are placed with more than one meter space in between them.
DEVICES
> 1m
5.3
Switch the HOME Easy Box on
At the back you will find a power switch.
Put the switch in ON position. After a short period three LED lights will light up.
7
6
Getting access to your HOME Easy Box
6.1
By using your Windows computer
Make sure your Windows computer is part of the same local area network as the HOME Easy Box. See for
more information chapter 5.
Run HOME_easy_start.exe on your Windows computer.
(You can find this on www.smartwares.eu).
After running it the following screen will appear:
6.2
Login to your HOME Easy Box
After running HOME_easy_start.exe on your Windows computer, you can login to your HOME Easy Box,
using:
Username:
Password:
Admin
11111111
8
7
Adding a room
Make sure you have access to your HOME Easy Box. See for more information chapter 6.
To add a room, follow the next steps:
1 Go to Rooms
2 Go to Settings
3 Enter Room Name
4 Select a Room Type
5 Click on +
6 You have added a room
1
2
3
6
9
4
5
8
Adding a device to a room
Make sure you have access to your HOME Easy Box. See for more information chapter 6.
Make sure you have added a room. See for more information chapter 7.
To add a device to a room, follow the next steps:
1 Go to Rooms
2 Go to Settings
3 Go to Device Settings
4 Select a room
If you have only one room added, this
room will be selected automatically.
5 Click on New
6 Select a device Type
7 Enter a device name
8 Click on Save
9 You have added a device to a room
1
2
3
4
6
5
9
10
7
8
9
Pairing a device with the HOME Easy Box
Make sure you have access to your HOME Easy Box. See for more information chapter 6.
Make sure you have added a room. See for more information chapter 7.
Make sure you have added a device to a room. See for more information chapter 8.
To pair a device with the HOME Easy
Box, follow the next steps.
1 Go to Rooms
2 Go to Settings
3 Go to Device Settings
4 Select a room
If you have only one room added, this
room will be selected automatically.
5 Select a device
If you have only one device added, this
device will be selected automatically.
6 Switch your device in the pairing
mode
1
2
For example: press the learn button of a
switch for two seconds
3
4
5
2 sec
7
!
Click on Learn (HOME Easy Box
interface)
Tip: information about how to
switch your device in the pairing
mode, can be found in the
manual of your device).
7
11
10
Adding a scene
Make sure you have access to your HOME Easy Box. See for more information chapter 6.
To add a scene follow the next steps.
1 Go to Scenes
2 Go to Settings
3 Enter a Scene Name
4 Select a Scene Type
5 Click on +
6 You have added a scene
1
2
3
6
12
4
5
11
Adding a device to a scene
Make sure you have access to your HOME Easy Box. See for more information chapter 6.
Make sure you have added a room. See for more information chapter 7.
Make sure you have added a device to a room. See for more information chapter 8.
Make sure you gave added a scene. See for more information chapter 10.
To add a device to a scene follow the
next steps.
1 Go to Scenes
2 Go to Settings
3 Go to Device Settings
4 Select a scene
If you have only one scene added, this
scene will be selected automatically.
5 Choose a room name
6 Choose a device name
7 Choose a device type
8 Choose a device status
9 Click on new
1
2
3
4
5
6
13
7
9
8
12
Controlling your devices using your internet
browser
Make sure you have access to your HOME Easy Box. See for more information chapter 6.
To control your devices with your
computer, follow the next steps.
1 Go to Rooms
2 Select a room
If you have only one room added, this room will be selected automatically.
3 Choose the device you want to control
4 Use the control buttons to control your device
2
1
3
4
14
13
Installing the HOME Easy app on your smartphone
13.1
Download the app
Search for ‘HOME Easy’ in the App Store (iOS) or the Play Store (Android). Select, download and install the
app.
13.2
Set up a connection with your HOME Easy Box using Auto Scan
Make sure your HOME Easy Box is installed correctly. See for more information chapter 5.
To set up a connection between your smartphone and your HOME Easy Box, follow the next steps.
1 Run the HOME Easy app on your smartphone
2 Press the wifi icon
A pop up is shown
3 Choose Auto Scan
The app will scan for your HOME Easy
4 Enter Username (default admin)
5 Enter Password (default 111111)
6 Press Login
You have now set up a connection between your smartphone and your HOME Easy Box.
Note: if the Auto Scan failed to connect with the Gateway, try to set up a connection manually
(see paragraph 13.3).
2
3
6
15
13.3
13.3.1
Set up connection with your HOME Easy manually
Find out the IP address of your HOME Easy Box
To find out the IP address of your
HOME Easy Box, follow the next steps.
1 Make access to your HOME Easy Box
(see for more information chapter 6)
2 Write down the IP address of your
HOME Easy Box
The address can be found in the
address line of your internet browser.
An example of an IP address is:
192.168.1.10
13.3.2
192.168.2.10
2
Set up connection entering the HOME Easy Box IP address
To set up the connection manually,
follow the next steps.
1 Run the HOME Easy app on your smartphone
2 Press the wifi icon
A pop up is shown
3 Choose Manual
4 Enter the HOME Easy Box IP address
(to find the IP address, see paragraph 13.3.1)
5 Press OK
6 Enter Username (default admin)
7 Enter Password (default 111111)
8 Press Login
You have now set up a connection between your smartphone and your HOME Easy Box.
2
3
5
16
8
14
Technical specifications
Operating voltage
5VDC
Current500mA
Frequency433.92Mhz
Transmitting distance
up to 30 Meters
Network interface
RJ45
Standby Power Consumption
max 2W
17
15
Frequently asked questions
15.1
Why adding a room?
If you want to add devices to your HOME Easy Box, you first have to add a room. But why?
The reason for adding a room first, is it makes it easy for you to categorize and find back your devices.
When you are physically in a room (for example in your living) and you want to control a device, it’s far
more easy for you to find the right one. Just select your living and then choose the device you want to
control. That easy!
15.2
What is a scene?
A scene is a selection of actions to control devices. A scene makes it for example possible to switch off all
the lights at the same time. Very convenient, when you leave your house.
Another example is switching on the lights in the bathroom and bedroom, switch off all the other lights
and roll down all the curtains. This can be convenient when you are preparing for sleep.
It’s basically up to your own fantasy what kind of scenes you configure. Just be creative!
15.3
What is a task?
A task is a programmed action to control a device. A task makes it for example possible to close the
curtains everyday at 8:00 PM. You can program another task to open the curtains at 7:00 AM.
15.4
What is a device?
In this manual the word ‘device’ means a product that can be wireless controlled by the HOME Easy Box.
This can be motorized curtains, 220V switches, thermostats and so on.
Go for an overview of the most used compatible devices to www.smartwares.eu.
18
16
Troubleshooter
16.1
Why can’t I delete a room?
If there is a device added to a room, it’s not possible to delete the room. First delete all the devices in the
room. Then delete the room.
16.2
Why can’t I delete a device?
If the device has been added to a scene or added to a task, it’s not possible to delete it in the rooms
menu. First delete the device in the scene and/or task menu.
16.3
Why can’t I delete a scene?
If there is a device added to a scene, it’s not possible to delete the scene. First delete all the devices in the
scene. Then delete the scene.
19
EC DECLARATION OF CONFORMITY
GB
Smartwares hereby declares that the device complies with the essential requirements and other relevant
provisions of Directive 1999/5/EC. Go to www.elro.eu for the declaration of conformity or scan the QR code.
D
Hiermit erklärt Smartwares, dass sich das Gerät in Übereinstimmung mit den grundlegenden Anforderungen und
den übrigen einschlägigen Bestimmungen der Richtlinie 1999/5/EG befindet. Die Konformitätserklärung finden Sie
auf www.elro.eu oder scannen Sie den QR-Code.
NL
Hierbij verklaart Smartwares dat het toestel in overeenstemming is met de essentiële eisen en de andere relevante
bepalingen van richtlijn 1999/5/EG. Ga naar www.elro.eu voor het document van conformiteit of scan de QR code.
F
Par la présente Smartwares déclare que l'appareil est conforme aux exigences essentielles et aux autres
dispositions pertinentes de la directive 1999/5/CE. Pour le document de conformité, visitez www.elro.eu ou
scannez le code QR.
PL
Niniejszym Smartwares oświadcza, ze wyrób jest zgodny z zasadniczymi wymogami oraz pozostałymi stosownymi
postanowieniami Dyrektywy 1999/5/WE. Certyfikat zgodności można pobrać ze strony www.elro.eu, lub
zeskanować kod QR. W celu pobrania deklaracji zgodności przejdź do witryny www.elro.eu lub zeskanuj kod QR.
E
Por medio de la presente Smartwares declara que el equipo cumple con los requisitos esenciales y cualesquiera
otras disposiciones aplicables o exigibles de la Directiva 1999/5/CE. Para ver el documento de conformidad, visite
www.elro.eu o digitalice el código QR.
GR
Με το παρών η Smartwares δηλώνει ότι η συσκευή είναι σύμφωνη με τις σημαντικές απαιτήσεις και τις άλλες
σχετικές διατάξεις της οδηγίας 1999/5/EG. Πηγαίνετε στο www.elro.eu για το έγγραφο συμμόρφωσης ή σαρώστε
τον κωδικό QR.
CZ
Smartwares tímto prohlašuje, že toto zařízení odpovídá základním požadavkům a dalším ustanovením směrnice
1999/5/ES. Dokument o shodě najdete na stránce www.elro.eu nebo k němu přejděte naskenováním QR kódu.
H
A Smartwares ezennel kijelenti, hogy a készülék megfelel az 1999/5/EK irányelvek alapvető követelményeinek és
más vonatkozó előírásainak. Lépjen tovább a www.elro.eu oldalra a megfelelőségi nyilatkozathoz, vagy szkennelje
be a QR kódot.
RO
Smartwares declară prin prezenta că echipamentul se află în conformitate cu cerinţele esenţiale şi alte prevederi
relevante ale Directivei 1999/5/CE. Pentru declaraţia de conformitate mergeţi la www.elro.eu sau scanaţi codul QR.
TR
İşbu belge ile Smartwares bu cihazın 1999/5/EC Direktifinin temel gerekliliklerine ve diğer ilgili hükümlerine uygun
olduğunu beyan eder. Uygunluk belgesi için www.elro.eu adresine gidin veya QR kodunu tarayın.
HR
Smartwares ovime izjavljuje da uređaj udovoljava svim osnovnim zahtjevima i ostalim relevantnim odredbama
direktive 1999/5/EZ. Dokument o sukladnosti potražite na www.elro.eu ili skenirajte QR kôd.
I
Smartwares dichiara con la presente che l'apparecchio è conforme alle esigenze essenziali e alle altre disposizioni
pertinenti della direttiva 1999/5/CE. Per il documento di conformità, visitare www.elro.eu o eseguire lo scan del
codice QR.
QR code
Authorized representative: Mr. Ad Netten
Quality Manager
Date: 01.02.2013
20