1
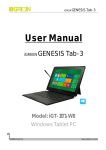
iGREEN GENESIS Tab-2 User Manual iGREEN GENESIS iGT-10N1-3G GREEN Planet Co. Tab-2 www.igreen-co.com 1 iGREEN GENESIS Tab-2 Table of Contents ......................................................................................................................................... 2 Outlook Description..................................................................................................................................... 3 Power Button Usage.................................................................................................................................... 4 Touch-Screen Navigation .......................................................................................................................... 4 Using microSD Card .................................................................................................................................... 4 Getting Started ............................................................................................................................................. 5 Launcher ........................................................................................................................................................6 Screen Lock ....................................................................................................................................................7 Pre-loaded Applications.............................................................................................................................8 Application Management ........................................................................................................................... 11 Phone............................................................................................................................................................. 12 Message ........................................................................................................................................................13 People............................................................................................................................................................ 14 Voice Search ................................................................................................................................................15 Clock ..............................................................................................................................................................16 Play Store......................................................................................................................................................18 Browser and Chrome.................................................................................................................................. 21 Calendar .......................................................................................................................................................22 Camera ......................................................................................................................................................... 24 Calculator ....................................................................................................................................................25 Email ............................................................................................................................................................ 26 Explorer ........................................................................................................................................................28 Music ........................................................................................................................................................... 30 Video ..............................................................................................................................................................31 Gallery...........................................................................................................................................................33 Gmail ............................................................................................................................................................. 34 Maps, Local, and Latitude......................................................................................................................... 37 Google Talk ..................................................................................................................................................40 Google ........................................................................................................................................................... 41 Wi-Fi .............................................................................................................................................................. 43 Accounts ......................................................................................................................................................45 Settings ........................................................................................................................................................46 راﻫﻨﻤﺎي ﻓﺎرﺳﯽ......................................................................................................................................................................... 49 GREEN Planet Co. www.igreen-co.com 2 iGREEN 1 GENESIS Tab-2 Outlook Description 1 2 3 4 5 6 7 HDMI Port USB Port SD Card Slot Microphone Headphone Power Key (ON/OFF) Home Key 8 9 10 11 12 13 14 GREEN Planet Co. Volume Down (-) Volume Up (+) SIM Card Slot Rear Camera Front Camera Speaker (Left) Speaker (Right) www.igreen-co.com 3 iGREEN GENESIS Tab-2 2 Power Button Usage Turn On: Press the power button and hold for 2 seconds. Turn Off: Press the power button and hold for 2 seconds →tap Power off → tap OK Turn on/off airplane mode: Press the power button and hold for 2 seconds →tap airplane mode Sleep Mode On/Off: Press & release the power button quickly to turn sleep mode on and off. 3 Touch-Screen Navigation The touch-screen allows for quick, easy and convenient navigation for all applications. Throughout the User Guide, you are instructed to use the following tap or touch navigation methods: Tap: quick tap & release on an item on the screen. Finger slide: touch & slide your finger across the screen and then release. Touch & hold: touch and hold in place approx 2 seconds, and then release to display an options window. Note: To avoid scratching or crushing, do not place objects on the touch screen surface. 4 Using micro SD Card · Insert your card into the micro SD slot until it clicks into place. When ready for use, it’s OK. · Remove micro SD Card · Close all applications or documents which have been opened on the card. Press Settings → Storage → SD Card →Un-mount Storage → OK. Note: Don’t insert and remove the SD card repeatedly in a short time, as this may cause damage to the card. GREEN Planet Co. www.igreen-co.com 4 iGREEN GENESIS Tab-2 5 Getting Started Charge the device Note: You can also charge the battery using the USB cable. . Plug the power adapter into an electrical wall outlet named DC, and then connect to the device to fully charge the battery before use (approx. 4hour). · While charging, the battery indicator light is red. When fully charged, the battery indicator light is off Turn the device on Press the power button and hold for 2 seconds. Start Wi-Fi Network · Turn on Wi-Fi Since many features require a Wi-Fi connection, we recommend you set up your Wi-Fi network now. Press Settings,→ Wi-Fi Check Wi-Fi to turn on. · Connect to Wi-Fi The device automatically scans and lists all local Wi-Fi Network found. A indicates that the secure networks require login name/password to connect. 1、Tap the desired network to which you want to connect, → enter the Network Password if applicable, → tap Connect. 2、Tap back key to return to the Home screen. Note: If your Wi-Fi network is set as hidden, it won’t be found by the auto scan. Tap “+”on the top of the screen and follow the prompts to add your network GREEN Planet Co. www.igreen-co.com 5 iGREEN GENESIS Tab-2 6 Launcher 1. 2. 3. 4. 5. 6. 7. Backspace Home Display the program is running Wi-Fi signal icon Phone signal Battery Time GREEN Planet Co. www.igreen-co.com 6 iGREEN GENESIS Tab-2 7 Screen Lock Can be set to automatically lock screen or quickly press the power button to manually lock screen. Lock screen displays the following: You can drag the lock to any direction to unlock your device. GREEN Planet Co. www.igreen-co.com 7 iGREEN GENESIS Tab-2 8 Pre-loaded Applications Phone Contact with others in speech communication Message Send SMS or MMS to people you desired People Save a person’s information Voice Search Search for something that you speak out Voice Search Search for something that you speak out GREEN Planet Co. www.igreen-co.com 8 iGREEN GENESIS Tab-2 Clock Use as alarm clock with scheduled alarms. Play Store Downloaded applications quickly & easily. Browser Access the Internet and “surf the web” whenever desired. Calendar Calendar with ability to set events. Sound recorder For recording your voices Camera Capture image of the screen. Calculator Do calculation. Email Send/Receive email using your existing email addresses. Explorer Explorer application for viewing and managing files and apps. Use to install Android apps, and to backup files to your SD card. Music Play and manage audio files. Video Player Play and manage video files. Gallery View and manage photo files. GREEN Planet Co. www.igreen-co.com 9 iGREEN GENESIS Tab-2 Gmail For sending and receiving mails by Gmail server Maps For discovering the world with street and satellite data from the Google Earth Dev Tools Android debug tools Places A shortcut for finding places using Navigation service Latitude lets you and your friends view each others’ locations on maps and share status messages with each other Settings Multiple settings for personalizing and enhancing your Device. Apk Installer Used for installation the android application in SD card or NANDFLASH the android application Google You can do searching by voice or text Chrome Access the Internet and “surf the web” whenever desired. Downloads To download the application from the website Movie-Studio Play and manage video files. Search To find out the application you want to run GREEN Planet Co. www.igreen-co.com 10 iGREEN Talk GENESIS Tab-2 To stay in contact with your Gmail friends ☆ To move an icon to the Desktop screen, touch & hold on the icon, and then release it when it appears on the Desktop screen. ☆Touch, hold and slide icons onto “×” to remove them from the Desktop screen. 9 Application Management Install Android Applications Purchased or free Android applications that you have downloaded to your computer can be installed quickly & easily on your Tablet using the ApkInstaller application. 1. Copy the .apk files that you want to install onto a SD card or USB device, → insert or connect to your Device. 2. Tap the Apk-Installer application icon. 3. Tap Install and locate the folder (Internal Memory or TF Card) in which the .apk application files were saved. 4. Tap on a .apk file → Install. The application is installed and the application icon is added to the Applications screen. 5. Tap Open to launch the application now, or tap Done to return to the Apk-Installer screen. Download Android Applications direct from a Website You can download Android applications directly from websites, and then quickly and easily install them on your device. 1. Tap the Browser application icon to launch the internet browser. 2. Enter the desired website URL, and tap the download link for the application you want to install on your device. 3. After the download is complete, touch & hold on the download file (in the Download history screen), → tap Open → Install. Download Android Applications direct from Play Store Please refer to the Chapter of “Play store” GREEN Planet Co. www.igreen-co.com 11 iGREEN GENESIS Tab-2 Uninstalling Android Applications You can also quickly and easily uninstall the Android applications that you have installed. 1. Press Settings → Applications 2. Tap the application you want to uninstall, → Uninstall. 3. Tap OK to confirm the Uninstall. You can also use Apk-Installer to uninstall the Android applications 1. Tap the Apk-Installer application icon. 2. Tap Manage 3. Tap one .apk from the application list and tap Uninstall 4. Tap OK to confirm to uninstall the .apk 10 Phone Press the phone icon View the history call records Contacts Delete the wrong number Dialing phone numbers Settings Find contacts Make the phone call GREEN Planet Co. www.igreen-co.com 12 iGREEN GENESIS Tab-2 View the contacts, see as follows: Find contacts Add contacts More choices More choice Contacts to display Show all contacts or customize Import/export Import from storage / Export to storage /Share visible contacts Accounts Choose Auto-sync app data or not Settings Set the ringtone and other settings 11 Message Open message 1.Press the message icon on the screen. 2. Create new message or open the chat which is ongoing. Send message 1. Pressing “New massage” at the top of the screen to compose new massage. GREEN Planet Co. www.igreen-co.com 13 iGREEN GENESIS Tab-2 2. Touch To to input the phone numbers that you want to send the message to. Input the phone number directly using the virtual keyboard You can also enter already entities of the mobile phone number the contact's name. 3. Touch Type message to start editing your message. You can input some text information to make a SMS. You can add subject or insert pictures or video to make a MMS. 4.Touch the arrow icon to send the message. 12 People Open people 1. Touch the people icon on the desk to open people 2. At the top of the screen ,you will see GROUPS, ALL, FAVOURITES 3. Four buttons on the right top screen can help you manage the people. check of People 1. Open the "people". 2. You want to see the details , touch of the contact on the left side. 3. All kinds of contact will show the appropriate details right side. add contacts 1. To add a group ,touch GROUPS and according to the tips . Type Group’s name and person’s name 2. To add a person’s message, touch ALL and .Type the contact’s name ,phone ,email ,according to what you need. You can add contacts on mobile phones, and with Google account, Microsoft Exchange ActiveSync account or support the accounts in other contact synchronization correspondent synchronization. If which you give is not in the "contact" listed in some email addresses to send reply E-mail or forwarding mail. the system will add this email address to the contact. The "contact" will attempt to put a new address and existing contact merged into one entry. You can also manually manage the process. GREEN Planet Co. www.igreen-co.com 14 iGREEN GENESIS Tab-2 13 Voice Dialer Press the icon to open the following window, 14 Voice Search Press the icon to open the following window, GREEN Planet Co. www.igreen-co.com 15 iGREEN GENESIS Tab-2 Tap mic to enter the speaking mode Speak out what you want to search, then it will analysis the content. If your device can recognize the word, it will start searching the internet automatically. 15 Clock Alarm You can use your device as an alarm clock by setting multiple alarms. 1. 2. 3. 4. 5. Add Alarm Tap the Clock application icon. Press to add alarm Set up your alarm as desired. Tap Turn on alarm to activate the alarm. Tap Done or tap Revert to reset your alarm again. Note: - This clock icon displayed at the bottom of screens indicates that one or more alarms have been set and are active. - GREEN Planet Co. www.igreen-co.com 16 iGREEN To set the countdown Display the current time To view an alarm GENESIS Tab-2 Stopwatch Night mode &settings Tab to add a alarm To do more settings, touch settings to open the following window, and make your choice. GREEN Planet Co. www.igreen-co.com 17 iGREEN GENESIS Tab-2 16 Play Store The App Play Store has many applications that you can quickly and easily download to your MID. Before using APP Play Store, you have to make sure you device have a internet connection (Please refer to the Chapter of Wi-Fi ) Download Applications 1. Tap the App Play Store application icon and tap Accept on the bottom of the screen. Note: The first time, you are prompted for your App Market login information. If you have not yet registered an account, tap New. Otherwise, tap Exiting and enter your login information and then tap Done The first you enter your account, you are required to set your credit card, like follows: GREEN Planet Co. www.igreen-co.com 18 iGREEN GENESIS Tab-2 Tap set up credit card button to open the following window, you can edit your information according to the introductions If you wouldn’t set the credit card, tap Not now button to enter the play store directly. . 2. You can select applications from the default Featured group, or tab Apps/Games on bottom of the screen on the left to choose from the application list by categories, or you can also search applications by name by tapping the icon . GREEN Planet Co. www.igreen-co.com 19 iGREEN GENESIS Tab-2 3. Tap any application you want to download, → Download → Accept &download. When download process started, the icon will be displayed on the status bar. When the icon is displayed on the status bar, the app is downloaded successfully. 4. Slide down the status bar and tap the “Successfully installed” → tap Open to launch it now or tap Uninstall. 5. Press Back key to return to the Play Store screen to download other applications App Market Function Menu Press Menu key to display the App Market Function Menu. Search Tap to enter the keys of the application you want to search. My Apps This page displays the apps installed on your device that can be also found in the APP Market Uninstall apps (With Installed displayed on right of the item) 1. Tap the app you want to uninstall. 2. Tap Uninstall. 3. Tap “OK” when display a dialog. Update apps (For FREE displayed on right of the item) 1. Tap the app you want to update 2. Tap Download → Accept &Download Settings You can see some settings, such as: Filtering level and Notifications settings. Filtering level Set the filtering rules as desired Notifications Set whether a notification prompt when application is downloaded. Help If you have some doubts, please refer to this part. GREEN Planet Co. www.igreen-co.com 20 iGREEN GENESIS Tab-2 17 Browser and Chromium Using Browser to surf the web . Opening Browser: Tap the browser icon on the Home screen the Web browser. Website of current page , and then you can open Network Status You can browse the web by Wi-Fi or Ethernet. Browser options: You can tap the button(make up of three dots)to make more choice: Options Refresh/stop(Browser) Refresh the current page/stop opening the current page New Tab(Browser Chrome) New incognito tab(Browser, Chrome Enter the latest added tab. Enter the incognito tab Share page(Browser) Find on page(Browser, Chrome) Request desktop site(Browse,) Share your favorite pages with your friends Looking for something in the current page. You can select or unselect the options Save for offline reading(Browser) Page info(Browser) save the current content for offline reading Display the current web page information Settings(Browser, Chrome) Book marks(Chrome) Other devices(Chrome) For some other Settings Books let you revisit your favorite web pages with one touch Sign in to Chrome to contact with other devices Help (Chrome) Useful tips that you can refer to GREEN Planet Co. www.igreen-co.com 21 iGREEN GENESIS Tab-2 18 Calendar Tap the Calendar application icon. For the first time using the Calendar, you need to add an Exchange account or a Gmail account. Enter the account address and password information, click Next and follow the prompts to complete the account configuration. Then you can use the Calendar. Open Calendar Events from each account you’ve added to your device and configured to synchronize calendars is displayed in Calendar. There are different views you can choose in Calendar by pressing Menu key and touch Agenda View, Day View, Month View, Week View. Agenda View Touch here to add new agenda Touch to view the details of an agenda GREEN Planet Co. www.igreen-co.com 22 iGREEN GENESIS Tab-2 Day View Show much more settings Week View Month View Drag up or down to view earlier or later months. Touch an event to view its details GREEN Planet Co. www.igreen-co.com 23 iGREEN GENESIS Tab-2 Creating an Event 1. 2. 3. 4. In any view of Calendar, press Menu key -> More -> New event . Add details about the event Press Menu and touch Show extra options to add details about the event Scroll to the bottom of the event details screen and tap Done. Edit /Delete/View an Event To edit an event, touch and hold the event, then touch Edit event. Edit event details, then when you’re done, touch Done. To delete an event, touch and hold the event, then touch Delete event. To view an event, touch and hold the event, then touch View event. 19 Camera Tap the Camera application icon. Take Pictures 1. 2. 3. 4. 5. In Camera tap into photos mode, tap to change from front and rear camera; tap to take the picture. The picture will be saved automatically. Sliding to the left to enter the Gallery to scan the picture. Press Back to the Camera. Press Back to exit the Camera and back to the Home screen. Take Videos 1. 2. 3. 4. 5. Tap switch to video, and you can take videos. Tap to begin and tap to stop. The video will be saved. Sliding to the left to enter the Gallery to play the video. Press Back to the Camera. GREEN Planet Co. www.igreen-co.com 24 iGREEN 6. 7. GENESIS Tab-2 Tap switch back to camera. Press Back to exit the Camera and back to the Home screen. Panorama Photography 1. 2. 3. 4. 5. 6. Tap switch to panorama photography. Tap to begin and tap to stop. The picture will be saved. Move your machine slowly to receive panorama. schedule ,if you move too fast ,there will be a red block. Tap switch back to camera. Press Back to exit the Camera and back to the Home screen. shows filming Photo options On the preview of the camera, tap , you can see some icons on the preview, such as , touch it you can open the settings. 20 Calculator 1. Tap the Calculator application icon on home screen to launch it. 2. Tap the numbers and sign of operation to do the calculation. 3. Tap CLEAR to clear the result one by one, tap and hold CLEAR to clear all. tap and hold to clear all data. GREEN Planet Co. www.igreen-co.com 25 iGREEN GENESIS Tab-2 21 Email POP3 and SMTP accounts are supported. Add Email accounts You can enter one or more personal email addresses that you would like to access through your Tablet. 1. Tap the Email application icon. 2. On the Your Accounts screen, tap Next. 3. Tap in the Email address entry field, → enter your email address. 4. Tap in the Password entry field, → enter your email password. 5. Tap Done. 6. Manual Setup (optional): The server settings are automatically populated based on your email account provider (i.e., gmail.com, etc). However, if you need to change the server settings tap Manual Setup and make necessary changes. 7. Tap Next. 8. Optional: Enter a name for the account. 9. Enter name for outgoing message, → tap Done. Note: - After setup, if you are unable to connect to a free email account, check with your email provider to make sure their servers support free accounts on Post Office Protocol (POP) or Simple Mail Transfer Protocol (SMTP). Email Inbox 1. Tap the Email application icon. 2. If you set up only one email account, it opens immediately. If you set up multiple accounts, they are listed in the Accounts screen. 3. Tap on the desired email account, → tap Inbox. 1. Open Email Message On the Inbox screen, tap on an email to open it. GREEN Planet Co. www.igreen-co.com 26 iGREEN GENESIS Tab-2 2. For attachments, tap Open to launch appropriate application, or tap Save to save attachment to a SD card. 3. To replay, tap Reply or Reply all. a. Tap in the Compose Mail entry field to enter your reply message. b. Tap SEND to send immediately, SAVE DRAFT to save without send or Delete to discard without saving or sending. 4. To delete the email immediately, tap Delete. Compose New Email Message 1. On the Inbox screen, touch 2. Tap in the To entry field and then enter the recipient’s email address. 3. Optionally, if you want to add Cc or Bcc recipients, touch settings → Add Cc/Bcc, and then enter the recipient’s email address. 4. Tap in the Subject entry field to enter your desired subject title. 5. Tap in the Compose Mail area to enter your personal message. 6. If desired, touch to attach a file. 7. When ready to send the email, touch SEND Edit Email Account 1. Tap the Email application icon. 2. On the Inbox screen, touch settings 3. Set your desired preferences to customize your email account. 4. Touch back to return to the Inbox screen. Delete Email Accounts If you have multiple accounts, and you delete the account designated as the default account, the next email listed is automatically set as the default. 1. 2. 3. 4. 5. Tap the Email application icon. On the Inbox screen, touch settings Touch the account you want to delete. In the right Account options window, tap Remove account. Tap OK to confirm the deletion. Set Default Email Account You must always have one account designated as the default account, so if you GREEN Planet Co. www.igreen-co.com 27 iGREEN GENESIS Tab-2 have multiple email accounts, you can select any one as the default. 1. Tap the Email application icon. 2. On the Inbox screen, touch settings. 3. Tap Default Account to select it. If you delete the account that was designated as the default account, the next email listed is automatically designated as the default. 22 Explorer Tap the File Browser application icon to view the files on all storage devices (Internal memory, SD card, USB), and to quickly & easily install Android application on your Tablet. Check the file in SD Card Check the file in internal memory Check the file in USB device Functions of icons introduction Display the root directory of Explorer. GREEN Planet Co. www.igreen-co.com 28 iGREEN GENESIS Tab-2 Go the parent directory of the current folder. Tap it once, you can multi select the items displayed. Tap it to do some operation for the selected item, such as copy, delete, move, paste, rename. Tap it to build a new folder. Tap it to go to the previous page. Tap it to go to the next page. Delete files Tap and hold on the folder/file you want to delete, → tap Delete Install android application Using Explorer to install android application. Before doing this please copy the .apk files into SD card or your internal memory. 1. Tap the File Browser application icon to view the files 2. Tap one .apk that you want to install on your devices GREEN Planet Co. www.igreen-co.com 29 iGREEN GENESIS Tab-2 23 Music 1. 2. Transfer music using USB Transfer music files from a computer to your memory card. With a memory card inserted, and your tablet showing the home screen, connect a USB data cable from you tablet micro USB port to a USB port on you computer. Your tablet should show in the status bar. Tap then your tablet shows a USB connected message above the status bar, touch the message to open the storage dialog. You can’t use the files on you memory card while it is connected. 3. Touch Turn on USB storage. 4. Tap “OK” to confirm the dialog. 5. Drag and drop you music to a folder on the memory card. 6. When you’re done, select the “Turn off USB storage”. 1. Play Music Tap the Music application icon. 2. Tap any audio file from Albums/Artists/Songs/Playlists/ to play it. 3. To stop the music, tap the Pause icon. 4. To leave the music playing and return to previous screens, press Back key to return to the Home screen. Touch here you can make more settings, as follows: GREEN Planet Co. www.igreen-co.com 30 iGREEN GENESIS Tab-2 24 Video Play Video 1. Tap the My Video application icon. 2. Touch any video from the video list. 3. Tap on the playing video screen, the options displayed on the screen below. Change the size of the video screen Add to bookmark Modify the backlight Volume - Quick media play course Play the video in small window Volume + Other options Add to bookmark Touch to record the current play course during a video is playing. Next time you open this video, you can choose to play from the bookmark or from the very beginning. Play the video in small window Tap the button to enter small window mode, see as the following picture, GREEN Planet Co. www.igreen-co.com 31 iGREEN GENESIS Tab-2 Minimize window To close the window, you can tap and hold the window until there is a”X” in the middle of the window,the tap the “X” to close the window. Other options Delete Book Mark And Play from beginning During playing a video which has been added a bookmark touch it and the video will play from the beginning. Delete bookmark During playing a video which has been added a bookmark touch it and the bookmark added to it will be deleted. Play mode During playing a video, touch play mode you can choose: Single After the current video is over, the playing is stopped. Repeat one The current video will be played in repetition. Repeat all All the videos will be played in repetition. Help Show some help information about the video player Return Back to the playing video view GREEN Planet Co. www.igreen-co.com 32 iGREEN GENESIS Tab-2 25 Gallery Opening Gallery and viewing your albums 1. Touch the Gallery icon in the Launcher or on the Home screen OR 2. Open Gallery from Camera by touching the thumbnail image at the top right Note: - If you have a great many pictures or videos on your SD card or USB storage, it may take Gallery a few minutes when you open it to discover and organize them. Working with albums Open Gallery and touch the album whose contents you want to view Albums open displaying the pictures and videos they contain in a chronologically ordered grid. The name of the album is shown at the top of the screen. You can touch a picture or video to view it Get the details of an album 1. Open the main Gallery window 2. Touch the albums you want details about Delete an album 1. Open the main Gallery window 2. Touch and hold the albums you want delete for a second 3. Touch the at the top of the screen Working with pictures View and browse pictures Open Gallery album and touch a picture Watch a slideshow of your pictures GREEN Planet Co. www.igreen-co.com 33 iGREEN GENESIS Tab-2 1. Open Gallery album and touch a picture 2. Touch the settings at the top of the screen to see the controls of the picture. You can see “Slideshow” on the list. Touch it to see pictures in a slideshow 1. 2. Edit/crop a picture Open Gallery album and touch a picture Touch the settings at the top of the screen to see the controls of the picture. You can see “edit/crop” on the list.. Touch edit->edit the picture Touch crop-> crop the picture 1. 2. Get details about a picture Open Gallery album and touch a picture Touch the settings at the top of the screen to see the controls of the picture. You can see “Details” on the list. Touch Details to get more information about the picture Set the picture as wallpaper 1. Open Gallery album and touch a picture 2. Touch the settings at the top of the screen to see the controls of the picture. You can see “Set picture as” on the list. 3. Touch Set picture as and touch Wallpaper then crop on the top of the screen 26 Gmail Opening Gmail and your Inbox Open Gmail Touch Gmail icon on the Home screen or in the Launcher. When you open Gmail, the current Google Account is displayed at the top of the Inbox. If you have more than one account, you touch the current account to switch accounts Open your Inbox when Gmail is running GREEN Planet Co. www.igreen-co.com 34 iGREEN GENESIS Tab-2 The Gmail interface is divided into two parts, the left one lists all the mail types, such as Inbox, Priority Inbox ,Starred ,Chats ,Outbox etc. The right side presents the details. So when reading a message, you can easily back to inbox by touching the Inbox on the left side . You can also touch back until you return to your Inbox. Switching accounts Gail displays conversations, messages, and settings from one Google Account at a time. If you have more than one account, you can open the Accounts screen to view how many unread messages you have in each account and to switch accounts. 1. From your Inbox, touch the current account at the top right of the screen. Each account is listed, along with the number of unread messages in your Inbox Tab to refresh Tab to search an email Tab to create a new mail 2. Touch the account that contains the email you want to read. Note: Here we only have one account. Read a message Touch a conversation that contains the messages you want to read. The message header shows who sent the message, when, who it was sent to, and other information. Icons indicate whether the message has an attachment and the sender’s Google When reading messages in a conversation, you can use the buttons at the top of the screen to archive the entire conversation GREEN Planet Co. www.igreen-co.com 35 iGREEN GENESIS Tab-2 Touch the topic on the left side to open the next or previous conversation in the Inbox. Work with an attachment Gmail can display some kinds of attached images ( .png, jpeg, depending on your device) in a message. Others have a Preview or Download button you can use. Depending on the applications installed on your device, you may also be able to download and read a variety of kinds of files, including spreadsheets (.xls), word-processing documents (.doc), or PDF files (.pdf). Other applications may add support for opening other kinds of file. Attachments you download are stored on your device’s USB storage or SD card. Image files are added to albums in Gallery. Composing and sending a message 1. Compose and send a message When viewing the Inbox, touch settings and touch Compose Tab to transmit Tab to reply the email 2. Enter all the information that is needed for a message and touch SEND to send the message. Attach a photo to a message GREEN Planet Co. www.igreen-co.com 36 iGREEN GENESIS Tab-2 1. Touch settings on the view of composing message and touch 2. Touch to choose a picture to attach as an attachment for the message Replying to or forwarding a message 1. Touch the reply icon reply. Or touch the arrow on the view of the conversation that you want to to display the Forward icon for forwarding a message. 27 Maps, Local, and Latitude Maps Google Maps for Android includes the Maps application as well as the Latitude, Navigation, and Places components, each available within Maps and as a separate shortcut in the Launcher. Open maps Touch Maps icon in the Launcher or on the Home screen. Note: - And for the first time you open Maps you should use Wi-Fi to download the maps data. Move the map Drag the map with your finger Zoom on the map Touch the plus or minus side of the Zoom control OR 2. Double-tap a location on the map with one finger zoom in that location top once with two fingers to zoom out OR 3. Touch an area with two fingers at once and spread them apart to zoom in; pinch them together to zoom out. 1. GREEN Planet Co. www.igreen-co.com 37 iGREEN location GENESIS Tab-2 Getting walking/transit/driving direction layers Search nearby places Finding your friends with Google Latitude Google Latitude lets you and your friends view each others’ locations on maps and share status messages with each other. Join Latitude - While viewing a map touch settings and touch Join Latitude. The first time you join Latitude you’re prompted to accept or reject the Google privacy policy. Open Latitude After you join Latitude, you can open it to find your friends and view their updates. While viewing a map, touch settings and touch Latitude Invite friends to share their locations After you join Latitude, you can start to share your location with your friends. Only friends whom you have explicitly invited or accepted can see your location. 1. Open Latitude touch settings and touch Add friends 2. Touch Select from Contacts or Add via email address in the menu that opens. If you touched Select from Contacts, a scrolling list of all your contacts opens. Check all of the contacts you want to invite. GREEN Planet Co. www.igreen-co.com 38 iGREEN GENESIS Tab-2 If you touched Add via email address, you can enter one or more email addresses, separated by commas, of the friends you want to invite. 3. Touch Add friends at the bottom of the screen. If your friends already use Latitude, they receive an email request and a notification on Latitude. If they have not yet joined Latitude, they receive an email inviting them to sign into Latitude with their Google Account. Respond to an invitation When a friend invites you to share your location in Latitude, you can respond in the following ways. Accept and share back You and your friend can see each other’s locations. Accept, but hide my location You can see your friend's location, but they can’t see yours. Don’t accept No location information is shared between you and your friend. View your friends locations You can view your friends’ locations on a map or in a list. Your friends’ locations are shown when you open Maps. Each friend is represented by their picture from Contacts with an arrow that points to their approximate location. If a friend has chosen to share city-level locations, their picture doesn’t have an arrow and appears in the middle of the city. Manage connections with your friends Touch a friend’s contact details balloon in Map view or touch a friend in List view to open the friend’s profile. In the Profile screen, you can communicate with your friend and set privacy options. Show on map Shows the friend’s location on the map. Chat using Google Talk Open a Google Talk chat window with that friend. Send email Opens Gmail with a message addressed to the friend. Directions get directions to the friend’s location. Hide from this friend Stop sharing your location with this friend in Latitude, in a list or on a map. To share your location with this friend again, touch Unhide from this friend. Share only city level location Share only the city you are in, not your street- level location. Your friend sees your picture in the middle of the city you are in. To share more precise locations again, touch Best available location. GREEN Planet Co. www.igreen-co.com 39 iGREEN GENESIS Tab-2 Remove Remove the friend from your list and stop sharing locations altogether. Control what you share You have control over how and when your friends can find you in Latitude. Only the last location sent to Latitude is stored with your Google Account. If you turn off Latitude or are hiding, no location is stored. Open Latitude, touch your own name, and touch Edit privacy settings. You can set the following privacy options. Detect your location Let Latitude detect and update your location as you move. The update frequency is determined by several factors, such as your device’s battery charge level and how recently your location has changed. Set your location Set the location shared with others as an address you enter; or, from Contacts, pick a spot on a map, or resume having Latitude share your actual location. Hide your location Hide your location from all your friends. Sign ou t of Latitude Disable Latitude and stop sharing your location or status. You can always join Latitude again 28 Google Talk Touch the widgets “Google talk” on the home screen, or tap the Google talk application icon. The first time you open Google, the below page is displayed GREEN Planet Co. www.igreen-co.com 40 iGREEN GENESIS Tab-2 If you don’t have a Google account, tap new to create one. Edit your information according to the prompt. when you finish creating the account, it will login automatically. If you already have a Google account, tap exiting and input your account and password to login. When you login successfully, you will see the following window, Search Google Talk Invite a friend to chat More options Tap here to edit your status message Tap here to choose your status More options Display options Choose the methods to sort friends by Sign out Tap to sign out, but you can tap your account to sign in again Settings Make some private settings according to your appetite Help connect to the internet for help Send feedback Display some Google legal 29 Google Touch the widgets “Google ” on the home screen. or tap the application icon to open the following window. GREEN Planet Co. Google www.igreen-co.com 41 iGREEN GENESIS Tab-2 Tap the left red block to input the content by keyboard to start searching Tap the microphone icon to speak out the content to start searching Tap the “three dot” icon to open the menu Settings: Tap settings to open the following window, This window is divided by two parts: The right part is to show the details. The left part is to show the main terms Google now; Set Sticky Notes, such as the weather location, when to appear the card and so on Voice; Set the language, choose the time when speech output, choose whether hide the recognized offensive results or not, choose whether do Hotword detection or not. Tablet search; Set the range for searching according to what you need Privacy and accounts; Some settings associated with your account. GREEN Planet Co. www.igreen-co.com 42 iGREEN GENESIS Tab-2 30 Wi-Fi Connecting to Wi-Fi networks 1. Press Settings -> Wi-Fi 2. Check Wi-Fi item on the top of the screen to turn it on 3. Touch a network to connect to it - If the network is open, you are prompted to confirm that you want to connect to that network by touching Connect. - If the network is secured, you’re prompted to enter a password or other credentials. (Ask your network administrator for details.) Receive notifications when open networks are in range By default, when Wi-Fi is on, you receive notifications in the Status bar when your device detects an open Wi-Fi network. 1. Turn on Wi-Fi, if it’s not already on 2. In the Wi-Fi settings screen, check Network notification. You can uncheck this option to stop receiving notification. Add a Wi-Fi network 1. 2. 3. 4. 5. Turn on Wi-Fi, if it’s not already on. If you’re adding a Wi-Fi network when first setting up your device, Wi-Fi is turned on automatically. In the Wi-Fi settings screen, touch Add network (at the top of your screen). Enter the SSID (name) of the network. If the network is secured, touch the Security menu and then touch the type of security deployed on the network. Enter any required security credentials. Touch Save. The device connects to the wireless network. Any credentials that you entered are saved, so you are connected automatically the next time you come within range of this network. Forget a Wi-Fi network You can make the device forget about the details of a Wi-Fi network that you added— for example, if you don’t want the device to connect to it automatically or GREEN Planet Co. www.igreen-co.com 43 iGREEN GENESIS Tab-2 if it is a network that you no longer use. 1. Turn on Wi-Fi, if it’s not already on. 2. In the Wi-Fi settings screen, touch & hold the name of the network. 3. Touch Forget in the dialog that opens. Wi-Fi Settings screen In addition to the settings described in this section, you can press Menu and Advanced Wi-Fi settings as described in “Advanced Wi-Fi” Wi-Fi Check to turn on Wi-Fi so you can connect to Wi-Fi networks. When connected to a network, displays the network’s name. Wi-Fi networks Displays a list of Wi-Fi networks you’ve previously configured and those detected when the device last scanned for Wi-Fi networks. Add Wi-Fi network Opens a dialog where you can add a Wi-Fi network by entering its SSID (the name it broadcasts) and security type. Advanced Wi-Fi settings screen Network notification Check to receive a notification when an open Wi-Fi network becomes available. Keep Wi-Fi on during sleep Opens a dialog where you can set whether and when the Wi-Fi radio disconnects. Disabling sleep uses more battery power. MAC address The Media Access Control (MAC) address of your device when connecting to Wi-Fi networks. IP address The Internet Protocol (IP) address assigned to the device by the Wi-Fi network you are connected to (unless you used the IP settings to assign it a static IP address). GREEN Planet Co. www.igreen-co.com 44 iGREEN 31 GENESIS Tab-2 Accounts Adding and removing accounts Add an account Open the Accounts & Sync Settings screen: Press Settings -> Accounts 2. Touch + Add account . 3. Touch the kind of account you want to add 4. Follow the steps displayed on the screen to enter the required and optional information about the account. 1. Remove an account Open the Accounts & Sync Settings screen: Press Settings -> Accounts 2. Touch the account to delete 3. Touch Settings on the top of the screen and then touch Remove account on the dropdown menu. 4. Confirm that you want to remove the account 1. Configuring account sync and display options Sync information manually Open the Accounts Settings screen: Press Settings -> Accounts 2. Touch the account whose data you want to sync. 3. Touch Menu on the top of the screen and touch Sync now on the dropdown menu. 1. Change an account’s sync settings Open the Accounts Settings screen: Press Settings -> Accounts 2. Touch the account whose sync settings you want to change 3. Check or uncheck the kinds of information you want to sync to the device. 1. GREEN Planet Co. www.igreen-co.com 45 iGREEN GENESIS Tab-2 32 Settings GREEN Planet Co. www.igreen-co.com 46 iGREEN Wireless & networks Wi-Fi Bluetooth Data usage More Turn on HDMI HDMI Resolution Screen Zoom Silent mode HDMI Volume Sound Call ringtone &vibrate System Display Wallpaper Touch to set the wall paper Access to my locstion Location sources Downloaded On SD card Running All Backup &restore Backup &reset volume. Tap & slide and then tap OK. Choose phone ringtone and whether vibrate when ring Select to enable a sound when making a selection. Tap & slide to adjust the screen brightness as desired, and then tap OK. Daydream Font size Wireless display Apps Turn on Wi-Fi. Turn on/off Bluetooth and manage it. Turn on Mobile data to check the data usage Touch to set VPN ,portable hotspot ,Wi-Fi direct and Mobile network Turn on HDMI before using HDMI Set the resolution before using HDMI Zoom in/out the display of tablet on TV Silence all sounds except media & alarms. To adjust the Media volume, Alarm volume and Notification Brightness Sleep Location access GENESIS Tab-2 Factory data reset Choose how long before going asleep when no operation happened Choose pictures as Daydream Choose the appropriate font size Turn on Wi-Fi to look for nearby wireless displays Turn on the button to let apps that have asked your permission use your location information. Wi-Fi &mobile network location Program downloaded from your tablet. Manage and remove installed applications from your SD card View and control currently running services. Manage all the programs in your tablet You can choose to backup your data or not Tap to reset the device to its initial factory state, erasing all data and downloaded applications. Tap Reset Tablet to GREEN Planet Co. www.igreen-co.com 47 iGREEN proceed with reset, or press Back key to cancel and return to previous screen. WARNING! The following will be erased during the factory Reset: ~ Google account ~ System and application data and settings ~ Downloaded applications The factory reset will NOT erased: ~ Current system software and bundled applications ~ SD card files, such as music or photos Backup &reset Screen security Security Language & input Passwords Device administration Credential storage Language Spell checker Personal dictionary Keyboard & input methods Speech Mouse / Track-pad Date & time GENESIS Tab-2 Automatic date &time Set date Select time zone Set time Use 24-hour format Choose date format About tablet You can choose a appropriate mode to unlock your screen and you can choose to show your owner info on lock screen or not You can choose to make passwords visible Choose to allow installation of non-Market apps Include trusted credentials and Install from SD card Select the language and region according to your location. Pitch on to enable spell checker You can add words to a personal dictionary, words that may not be included in the default dictionary. Choose a appropriate input from the list Include voice speech and text-to speech output Tap & slide and then tap OK Use network-provided values Set the date manually when Automatic is not checked Select the time zone when Automatic is not checked Set the time when Automatic is not checked You can choose to use 24-hour format or 12-hour format. You can select the date format. View updates Status (Battery, Wi-Fi, etc), Legal information, Model number, Android version, Kernel version and Build number. GREEN Planet Co. www.igreen-co.com 48 GENESIS Tab-2 iGREEN راﻫﻨﻤﺎي ﺗﺒﻠﺖ : ﺻﺪا ،ﺗﺼﻮﯾﺮ و ﺣﺴﺎﺳﯿﺖ ﺻﻔﺤﻪ ﻟﻤﺴﯽ ،ﺟﺰو اوﻟﯿﻦ و ﻣﻬﻤﺘﺮﯾﻦ ﻓﺎﮐﺘﻮرﻫﺎي ﻫﺴﺘﻨﺪ ﮐﻪ ﮐﺎرﺑﺮان ﺑﺎ آﻧﻬﺎ ﺑﻪ ﺻﻮرت ﻣﺴﺘﻘﯿﻢ در ارﺗﺒﺎط ﺧﻮاﻫﻨﺪ ﺑﻮد .ﮐﯿﻔﯿﺖ ﺑﺎﻻي ﺻﻔﺤﻪ ﻧﻤﺎﯾﺶ اﻣﺮﯾﺴﺖ اﻟﺰاﻣﯽ ،ﺑﻨﺎﺑﺮاﯾﻦ در ﻫﻨﮕﺎم ﺧﺮﯾﺪ ﺗﺒﻠﺖ اﯾﻦ ﻓﺎﮐﺘﻮر را در اوﻟﻮﯾﺖ ﻗﺮار دﻫﯿﺪ .ﻫﻤﭽﻨﯿﻦ ورودي اﺻﻠﯽ دﺳﺘﻮرات ﺑﻪ دﺳﺘﮕﺎه ﺷﻤﺎ از ﻃﺮﯾﻖ ﺻﻔﺤﻪ ﻟﻤﺴﯽ آن ﻣﯽ ﺑﺎﺷﺪ و ﺗﻮﺟﻪ ﺑﻪ ﺣﺴﺎﺳﯿﺖ اﯾﻦ ﺻﻔﺤﻪ ﻟﻤﺴﯽ ) ،(Touchﯾﮏ اﻣﺮ ﺑﺴﯿﺎر ﺿﺮوري ﺑﻪ ﺷﻤﺎر ﻣﯽ رود .ﮐﯿﻔﯿﺖ و ﻋﻤﻠﮑﺮد ﻧﺎﻣﻨﺎﺳﺐ ﺻﻔﺤﻪ ﻟﻤﺴﯽ ﻣﯽ ﺗﻮاﻧﺪ در ﻃﻮل ﻣﺪﺗﯽ ﮐﻮﺗﺎه ﺑﺎﻋﺚ دﻟﺰدﮔﯽ و ﺣﺲ ﺑﺪ ﺷﻤﺎ ﻧﺴﺒﺖ ﺑﻪ دﺳﺘﮕﺎه ﺷﻮد . ﮐﯿﻔﯿﺖ ﻧﻤﺎﯾﺸﮕﺮ :ﻏﺎﻟﺒﺎ ﻓﺎﮐﺘﻮر اوﻟﯿﻪ ﮐﻪ ﺑﺮاي ﻣﺸﺨﺼﺎت ﯾﮏ ﻧﻤﺎﯾﺸﮕﺮ ﻣﻄﺮح ﻣﯽ ﺷﻮد ﻣﯿﺰان رزوﻟﻮﺷﻦ آن ﻣﯽ ﺑﺎﺷﺪ ﮐﻪ ﺗﺮاﮐﻢ ﭘﯿﮑﺴﻞ ﻫﺎ را ﺑﻪ ﺷﮑﻞ )ﻃﻮل x ﻋﺮض( ﺑﻪ ﻧﻤﺎﯾﺶ در ﻣﯽ آورد .دوﻣﯿﻦ ﻓﺎﮐﺘﻮر ،ﻣﯿﺰان ﺗﺮاﮐﻢ ﭘﯿﮑﺴﻞ ﻫﺎ در ﯾﮏ ﻓﻀﺎي ﻣﺸﺨﺺ ) (PPIﻣﯽ ﺑﺎﺷﺪ ﮐﻪ ﻫﺮ ﭼﻪ ﺗﺮاﮐﻢ و ﺗﺠﻤﻊ ﭘﯿﮑﺴﻞ ﻫﺎ در واﺣﺪ اﯾﻨﭻ ﻣﺮﺑﻊ ﺑﯿﺸﺘﺮ ﺑﺎﺷﺪ ،ﺻﻔﺤﻪ ﻧﻤﺎﯾﺸﮕﺮ از دﻗﺖ و وﺿﻮح ﺗﺼﻮﯾﺮ ﺑﺎﻻﺗﺮي ﺑﺮﺧﻮردار ﺧﻮاﻫﺪ ﺑﻮد .ﻓﺎﮐﺘﻮر ﺳﻮم ﺗﻌﯿﯿﻦ ﮐﻨﻨﺪه ﮐﯿﻔﯿﺖ ﻧﻤﺎﯾﺸﮕﺮ ،ﻧﻮع ﺗﮑﻨﻮﻟﻮژي ﺑﻪ ﮐﺎر رﻓﺘﻪ در ﺳﺎﺧﺘﺎر ﻧﻤﺎﯾﺸﮕﺮ ﻣﯽ ﺑﺎﺷﺪ .اﻣﺮوزه ﺻﻔﺤﻪ ﻧﻤﺎﯾﺸﮕﺮ ﺗﺒﻠﺖ ﻫﺎ ،در ﭼﻬﺎر ﻧﻮع ﻣﺘﺪاول ﺧﻼﺻﻪ ﺷﺪه اﻧﺪ ﮐﻪ وﯾﮋﮔﯽ آﻧﻬﺎ ﻣﺨﺘﺼﺮا در ﻗﺎﻟﺐ ﺟﺪول ذﯾﻞ ﺑﺎ ﯾﮑﺪﯾﮕﺮ ﻣﻘﺎﯾﺴﻪ ﺷﺪه اﻧﺪ: LCD ﮐﯿﻔﯿﺖ ﭘﺎﯾﯿﻦ TFT ﮐﯿﻔﯿﺖ ﻣﺘﻮﺳﻂ IPS ﮐﯿﻔﯿﺖ ﺑﺎﻻ OLED ﮐﯿﻔﯿﺖ ﺑﺎﻻ ﮐﻨﺘﺮاﺳﺖ ﭘﺎﯾﯿﻦ ﻣﺘﻮﺳﻂ ﺑﺎﻻ ﺑﺎﻻ زاوﯾﻪ دﯾﺪ ﮐﻢ زﯾﺎد زﯾﺎد زﯾﺎد ﻣﺼﺮف ﺻﻔﺤﻪ ﻧﻤﺎﯾﺶ ﻣﺼﺮف اﻧﺮژي ﺑﺎﻻ ﻣﺼﺮف اﻧﺮژي ﭘﺎﯾﯿﻦ ﻣﺼﺮف اﻧﺮژي ﻣﺘﻮﺳﻂ ﻣﺼﺮف اﻧﺮژي ﺑﺴﯿﺎر ﭘﺎﯾﯿﻦ ﺗﺎﻣﯿﻦ ﻧﻮر زﻣﯿﻨﻪ اﻃﺮاف ﺻﻔﺤﻪ ﺑﮏ ﻻﯾﺖ ﭘﯿﮑﺴﻞ ﻫﺎ ﭘﯿﮑﺴﻞ ﻫﺎ ﮐﯿﻔﯿﺖ ﺗﺼﻮﯾﺮ ﺣﺴﺎﺳﯿﺖ ﺻﻔﺤﻪ ﻟﻤﺴﯽ :ﯾﮑﯽ از ﻣﻬﻤﺘﺮﯾﻦ ﻓﺎﮐﺘﻮرﻫﺎي ﮐﯿﻔﯽ ﺑﺮاي ﯾﮏ ﺗﺒﻠﺖ ،ﺣﺴﺎﺳﯿﺖ ﺻﻔﺤﻪ ﻟﻤﺴﯽ آن ﻣﯽ ﺑﺎﺷﺪ .ﺗﮑﻨﻮﻟﻮژي ﻫﺎي ﻣﺨﺘﻠﻔﯽ ﺑﺮاي ﺻﻔﺤﻪ ﻟﻤﺴﯽ وﺟﻮد دارﻧﺪ ﮐﻪ ﻫﺮ ﯾﮏ داراي ﻣﺰاﯾﺎ و ﻣﻌﺎﯾﺐ ﺧﺎص ﺧﻮد ﻫﺴﺘﻨﺪ .ﻋﻤﺪه ﻣﺪل ﻫﺎي ﺻﻔﺤﺎت ﻟﻤﺴﯽ ﺑﻪ دو دﺳﺘﻪ ي ﻣﻘﺎوﻣﺘﯽ و ﺧﺎزﻧﯽ ﺗﻘﺴﯿﻢ ﻣﯽ ﺷﻮﻧﺪ.در ﺻﻔﺤﺎت ﻟﻤﺴﯽ ﻣﺪل ﻣﻘﺎوﻣﺘﯽ ،ﮐﺎرﺑﺮ ﻣﯽ ﺗﻮاﻧﺪ ﺑﺎ ﻫﺮ ﺟﺴﻤﯽ ﺻﻔﺤﻪ ﻧﻤﺎﯾﺸﮕﺮ را ﻣﻮرد ﺗﻤﺎس ﻗﺮار دﻫﺪ ﮐﻪ از ﻣﺰاﯾﺎي آن ﻣﯽ ﺗﻮان ﺑﻪ اﺳﺘﻔﺎده از ﻗﻠﻢ ،دﺳﺖ و ﯾﺎ ﻫﺮ وﺳﯿﻠﻪ دﯾﮕﺮي ﺑﺮاي ارﺗﺒﺎط اﺷﺎره ﻧﻤﻮد و از ﻣﻌﺎﯾﺐ آن ﻧﯿﺰ ﻣﯽ ﺗﻮان ﺑﻪ دﻗﺖ ﭘﺎﯾﯿﻦ ﻋﻤﻠﮑﺮد و اﻋﻤﺎل ﻓﺸﺎر ﺑﯿﺸﺘﺮ ﺑﺮ روي ﺻﻔﺤﻪ ﻟﻤﺴﯽ اﺷﺎره ﮐﺮد .ﺻﻔﺤﻪ ﻟﻤﺴﯽ ﻣﺪل ﺧﺎزﻧﯽ ،داراي ﺗﻌﺪادي ﺧﺎزن در اﻃﺮاف ﻗﺎب ﻧﻤﺎﯾﺸﮕﺮ ﻣﯽ ﺑﺎﺷﺪ ﮐﻪ ﺑﻪ وﺳﯿﻠﻪ ﮐﺎﻧﺎل ﻫﺎي ارﺗﺒﺎﻃﯽ ﻧﺎﻣﺮﯾﯽ ﺑﺮروي ﺻﻔﺤﻪ ﻧﻤﺎﯾﺸﮕﺮ ﺑﺎ ﯾﮑﺪﯾﮕﺮ در ارﺗﺒﺎط ﻣﯽ ﺑﺎﺷﻨﺪ .اﯾﻦ ﮐﺎﻧﺎل ﻫﺎي ارﺗﺒﺎﻃﯽ ،ﺑﺎ ﮐﻤﺘﺮﯾﻦ ﺗﻤﺎس اﻧﮕﺸﺖ ﺑﺮ روي ﺻﻔﺤﻪ ﻟﻤﺴﯽ ،ﻣﯿﺰان اﺧﺘﻼف ﺑﺎر را ﺗﺸﺨﯿﺺ داده و ﻣﮑﺎن دﺳﺖ ﺷﻤﺎ را ﺑﺮروي ﺻﻔﺤﻪ ﻧﻤﺎﯾﺸﮕﺮ ﻣﺸﺨﺺ ﻣﯽ ﻧﻤﺎﯾﻨﺪ .از ﻣﺰاﯾﺎي ﺻﻔﺤﺎت ﺧﺎزﻧﯽ ﻣﯽ ﺗﻮان ﺑﻪ دﻗﺖ ﺑﺎﻻ ،ﺳﺮﻋﺖ ﺑﯿﺸﺘﺮ و ﺗﺸﺨﯿﺺ ﭼﻨﺪ ﻧﻘﻄﻪ ي ﻫﻤﺰﻣﺎن در ﻣﻘﺎﯾﺴﻪ ﺑﺎ ﻧﻤﻮﻧﻪ ﺻﻔﺤﺎت ﻣﻘﺎوﻣﺘﯽ اﺷﺎره ﻧﻤﻮد و از ﻣﻌﺎﯾﺐ آن ﻣﯽ ﺗﻮان ﺑﻪ ﻋﺪم ﺗﺸﺨﯿﺺ ﺗﻤﺎس ﺳﺎﯾﺮ اﺟﺴﺎم اﺷﺎره ﮐﺮد. اﻣﺮوزه ﺑﺎ ﺗﻮﺟﻪ ﺑﻪ اﻫﻤﯿﺖ ﺣﺴﺎﺳﯿﺖ و دﻗﺖ در ﻋﻤﻠﮑﺮد ﺻﻔﺤﺎت ﻟﻤﺴﯽ ﺑﺮاي ﺗﺸﺨﯿﺺ ﭼﻨﺪﯾﻦ ﻧﻘﻄﻪ ﺗﻤﺎس ﺑﻪ ﺻﻮرت ﻫﻤﺰﻣﺎن ،ﺑﺮاي ﺑﺴﯿﺎري از ﺑﺮﻧﺎﻣﻪ ﻫﺎ و ﺑﺎزي ﻫﺎي ﻣﺨﺼﻮص ﺗﺒﻠﺖ ﻫﺎ ،ﺷﺎﻫﺪ ﻣﻘﺒﻮﻟﯿﺖ ﻋﻤﻮﻣﯽ اﺳﺘﻔﺎده از ﺻﻔﺤﺎت ﻟﻤﺴﯽ ﺧﺎزﻧﯽ ﻫﺴﺘﯿﻢ .در ﺣﺎل ﺣﺎﺿﺮ ﺻﻔﺤﺎت ﻟﻤﺴﯽ اﺳﺘﺎﻧﺪارد 7اﯾﻨﭻ داراي ﻗﺎﺑﻠﯿﺖ ﺗﺸﺨﯿﺺ ﻫﻤﺰﻣﺎن 5ﻧﻘﻄﻪ ﺗﻤﺎس و ﺻﻔﺤﺎت ﻟﻤﺴﯽ اﺳﺘﺎﻧﺪارد 10اﯾﻨﭻ داراي ﻗﺎﺑﻠﯿﺖ ﺗﺸﺨﯿﺺ ﻫﻤﺰﻣﺎن 10ﻧﻘﻄﻪ ﺗﻤﺎس ﻣﯽ ﺑﺎﺷﻨﺪ. زاوﯾﻪ دﯾﺪ :در ﺣﺎل ﺣﺎﺿﺮ ﯾﮑﯽ از ﭘﺎراﻣﺘﺮﻫﺎي ﺟﺎﻧﺒﯽ ﺑﺮاي ﺗﻌﯿﯿﻦ ﮐﯿﻔﯿﺖ ﺗﺼﻮﯾﺮ ﻧﻤﺎﯾﺸﮕﺮﻫﺎ ،وﺿﻮح ﺗﺼﻮﯾﺮ در ﺣﺎﻟﺖ دﯾﺪ زاوﯾﻪ دار ﻧﺴﺒﺖ ﺑﻪ ﺳﻄﺢ ﺻﻔﺤﻪ ﻧﻤﺎﯾﺸﮕﺮ ﻣﯽ ﺑﺎﺷﺪ ﮐﻪ در ﻧﻤﺎﯾﺸﮕﺮﻫﺎي ﺑﺎ ﮐﯿﻔﯿﺖ ،اﯾﻦ وﺿﻮح ﺗﺼﻮﯾﺮ ﺗﻘﺮﯾﺒﺎ ﻫﻤﺎﻧﻨﺪ ﺣﺎﻟﺖ دﯾﺪ ﻋﻤﻮد ﺣﻔﻆ ﺧﻮاﻫﺪ ﺷﺪ .ﺻﻔﺤﺎت ﻧﻤﺎﯾﺸﮕﺮ LEDو IPSﺑﺎ زاوﯾﻪ دﯾﺪ 178درﺟﻪ ﺑﻬﺘﺮﯾﻦ ﺻﻔﺤﺎت از ﻧﻈﺮ زاوﯾﻪ دﯾﺪ ﻣﯽ ﺑﺎﺷﻨﺪ. ﮐﯿﻔﯿﺖ ﺻﺪا :ﯾﮑﯽ از ﻣﻬﻤﺘﺮﯾﻦ ﻓﺎﮐﺘﻮرﻫﺎ ﺑﺮاي اﺳﺘﻔﺎده از ﺑﺮﻧﺎﻣﻪ ﻫﺎي ﻣﺎﻟﺘﯽ ﻣﺪﯾﺎ ﺑﺮ روي ﺗﺒﻠﺖ ﻫﺎ ،ﮐﯿﻔﯿﺖ ﺻﺪاي ﺧﺮوﺟﯽ دﺳﺘﮕﺎه ﻣﯽ ﺑﺎﺷﺪ .ﻋﻼوه ﺑﺮ ﺗﻌﺪاد و ﻧﻮع ﺑﻠﻨﺪﮔﻮ ﻫﺎ ،ﻣﮑﺎن اﺳﺘﻘﺮار ﺑﻠﻨﺪﮔﻮ از ﻧﮑﺎت ﻣﻮﺛﺮ ﺑﺮروي ﮐﯿﻔﯿﺖ ﺻﺪاي ﺧﺮوﺟﯽ ﺑﻪ ﺷﻤﺎر ﻣﯽ رود .ﭘﺲ در ﻫﻨﮕﺎم ﺧﺮﯾﺪ ،ﺑﯿﺶ از آﻧﮑﻪ ﺑﻪ ﺑﻠﻨﺪي ﺻﺪاي دﺳﺘﮕﺎه ﺗﻮﺟﻪ داﺷﺘﻪ ﺑﺎﺷﯿﺪ ،ﺑﻪ ﮐﯿﻔﯿﺖ ﺻﺪاي ﺧﺮوﺟﯽ آن دﻗﺖ ﻧﻤﺎﯾﯿﺪ. ﭘﺮدازﻧﺪه ﻣﺮﮐﺰي ،ﭘﺮدازﻧﺪه ﮔﺮاﻓﯿﮑﯽ و ﺣﺎﻓﻈﻪ اﺻﻠﯽ ) : (SoCﻋﺒﺎرت SoCﻣﺨﻔﻒ واژه System on a Chipﻣﯽ ﺑﺎﺷﺪ .در دﺳﺘﮕﺎه ﻫﺎي ﻫﻤﺮاه اﻣﺮوزي از ﯾﮏ SoCﺑﻪ ﺷﮑﻞ ﮐﻠﯽ اﺳﺘﻔﺎده ﻣﯽ ﺷﻮد .اﯾﻦ ﭼﯿﭗ ﺷﺎﻣﻞ ﭘﺮدازﻧﺪه ﻣﺮﮐﺰي ،ﭘﺮدازﻧﺪه ﮔﺮاﻓﯿﮑﯽ و ﺣﺎﻓﻈﻪ اﺻﻠﯽ ﻣﯽ ﺑﺎﺷﺪ ﮐﻪ اﻣﮑﺎن ﺑﻪ ﮐﺎرﮔﯿﺮي ﺣﺎﻓﻈﻪ اﺻﻠﯽ ﺑﻪ ﺻﻮرت ﺟﺪاﮔﺎﻧﻪ ﻧﯿﺰ وﺟﻮد دارد . ﭘﺮدازﻧﺪه ﻣﺮﮐﺰي ﯾﺎ CPUوﻇﯿﻔﻪ ﭘﺮدازش ﮐﻠﯿﻪ ﻓﺮﻣﺎن ﻫﺎ و داده ﻫﺎي ﯾﮏ دﺳﺘﮕﺎه را ﺑﺮ ﻋﻬﺪه دارد .ﻓﺮﮐﺎﻧﺲ ﺑﺎﻻﺗﺮ ﭘﺮدازﻧﺪه و ﺗﻌﺪاد ﻫﺴﺘﻪ ﻫﺎي ﺑﯿﺸﺘﺮ آن ،راﺑﻄﻪ ﻣﺴﺘﻘﯿﻤﯽ ﺑﺎ ﻗﺪرت ﻣﺤﺎﺳﺒﺎﺗﯽ دﺳﺘﮕﺎه دارد .ﺗﺒﻠﺖ ﻫﺎي اﻣﺮوزي از ﭘﺮدازﻧﺪه ﻫﺎي ﺗﮏ ﻫﺴﺘﻪ اي ،دو ﻫﺴﺘﻪ اي و ﭼﻬﺎر ﻫﺴﺘﻪ اي و ...ﺑﻬﺮه ﻣﯽ ﺑﺮﻧﺪ ﮐﻪ در ﻣﯿﺎن آﻧﻬﺎ ﭘﺮدازﻧﺪه ﻫﺎي دو ﻫﺴﺘﻪ اي از ﻧﺴﺒﺖ ﻋﻤﻠﮑﺮد ﺑﻪ ﻗﯿﻤﺖ ﺑﻬﺘﺮي ﺑﺮﺧﻮردار ﻣﯽ ﺑﺎﺷﻨﺪ .ﻓﺮﮐﺎﻧﺲ ﮐﺎري ﭘﺮدازﻧﺪه ﻫﺎي ﻣﺮﮐﺰي ﻧﯿﺰ ﺑﻪ ﻃﻮر ﻣﻌﻤﻮل از 1ﮔﯿﮕﺎﻫﺮﺗﺰ ﺑﻪ ﺑﺎﻻ ﻣﯽ ﺑﺎﺷﻨﺪ ﮐﻪ ﺗﻌﯿﯿﻦ ﮐﻨﻨﺪه ﺳﺮﻋﺖ ﭘﺮدازش آن ﺧﻮاﻫﺪ ﺑﻮد .اﻣﺎ ﭘﺮدازﻧﺪه ﮔﺮاﻓﯿﮑﯽ ﯾﺎ GPUوﻇﯿﻔﻪ ﭘﺮدازش ﺗﺼﻮﯾﺮ و ﻋﺎﻣﻞ اﺻﻠﯽ در اﺟﺮا ﺑﺎزي ﻫﺎ ﺑﺮ روي دﺳﺘﮕﺎه ﻣﯽ ﺑﺎﺷﺪ .ﺿﻤﻦ اﯾﻨﮑﻪ ﺣﺎﻓﻈﻪ اﺻﻠﯽ ﯾﺎ RAMﺑﻪ ﻋﻨﻮان واﺳﻂ ﻣﯿﺎن ﭘﺮدازﻧﺪه اﺻﻠﯽ ،ﭘﺮدازﻧﺪه ﮔﺮاﻓﯿﮑﯽ و ﺣﺎﻓﻈﻪ ﻫﺎي ﺳﯿﺴﺘﻢ ﻋﻤﻞ ﻧﻤﻮده و وﻇﯿﻔﻪ ﺑﺎرﮔﯿﺮي داده ﻫﺎ را از ﭘﺮدازﻧﺪه ﺑﺮ ﻋﻬﺪه دارد .ﺣﺠﻢ ،ﺳﺮﻋﺖ و ﭘﻬﻨﺎي ﺑﺎﻧﺪ اﯾﻦ ﺣﺎﻓﻈﻪ ) DDR2ﯾﺎ (DDR3راﺑﻄﻪ ﻣﺴﺘﻘﯿﻤﯽ ﺑﺎ ﻋﻤﻠﮑﺮد ﺣﺎﻓﻈﻪ اﺻﻠﯽ دارد. GREEN Planet Co. www.igreen-co.com 49 GENESIS Tab-2 iGREEN اﻣﮑﺎن ﭘﺨﺶ ﻓﺎﯾﻞ ﻫﺎي HDو :Full HDﻓﺎﯾﻞ ﻫﺎي ﺗﺼﻮﯾﺮي ﺑﺎ ﮐﯿﻔﯿﺖ HDداراي رزوﻟﻮﺷﻦ 1680x1050ﭘﯿﮑﺴﻞ و ﻓﺎﯾﻞ ﻫﺎي ﺗﺼﻮﯾﺮي ﺑﺎ ﮐﯿﻔﯿﺖ Full HDداراي رزوﻟﻮﺷﻦ 1920x1080ﭘﯿﮑﺴﻞ ﻣﯽ ﺑﺎﺷﻨﺪ .ﻫﻤﺎن ﻃﻮر ﮐﻪ ﭘﯿﺶ ﺗﺮ در راﺑﻄﻪ ﺑﺎ رزوﻟﻮﺷﻦ ﻣﺘﺪاول در ﺻﻔﺤﺎت ﻧﻤﺎﯾﺸﮕﺮ 7و 10اﯾﻨﭽﯽ ﺗﻮﺿﯿﺢ داده ﺷﺪ ﻣﯽ ﺗﻮان دﯾﺪ ﮐﻪ اﯾﻦ ﺻﻔﺤﺎت ﻧﻤﺎﯾﺸﮕﺮ داراي رزوﻟﻮﺷﻦ ﮐﺎري ﭘﺎﯾﯿﻦ ﺗﺮي ﻧﺴﺒﺖ ﺑﻪ ﻓﺎﯾﻞ ﻫﺎي Full HDﻣﯽ ﺑﺎﺷﻨﺪ .اﻣﺎ ﺗﺒﻠﺖ ﻫﺎي ﻗﺪرﺗﻤﻨﺪ 7و ﯾﺎ 10اﯾﻨﭽﯽ ﺑﺎ ﺗﻐﯿﯿﺮ ﺳﺎﯾﺰ ﻧﻤﺎﯾﺸﯽ ﻓﺎﯾﻞ و ﺑﻬﺮه ﮔﯿﺮي از ﻗﺪرت ﭘﺮدازﺷﯽ ﺑﺎﻻﺗﺮ اﻣﮑﺎن ﭘﺨﺶ اﯾﻦ ﻓﺎﯾﻞ ﻫﺎ را دارﻧﺪ .اﻣﮑﺎن ﭘﺨﺶ ﻓﺎﯾﻞ ﻫﺎي Full HDﯾﮏ ﺑﺮﺗﺮي و ﻣﻌﯿﺎر ﺳﻨﺠﺶ ﺑﺮاي ﺗﺒﻠﺖ ﻫﺎي ﻗﺪرﺗﻤﻨﺪ ﻣﯽ ﺑﺎﺷﺪ. اﺑﻌﺎد و وزن ﺗﺒﻠﺖ :ﯾﮑﯽ دﯾﮕﺮ از ﻓﺎﮐﺘﻮرﻫﺎي ﻣﻬﻢ و ﺗﺎﺛﯿﺮﮔﺬار در ﺧﺮﯾﺪ ﺗﺒﻠﺖ اﺳﺘﺎﻧﺪارد ،ﺗﻨﺎﺳﺐ اﺑﻌﺎد ﺑﯿﺮوﻧﯽ دﺳﺘﮕﺎه و وزن آن ﻣﯽ ﺑﺎﺷﺪ .ﮐﯿﻔﯿﺖ ﻇﺎﻫﺮي دﺳﺘﮕﺎه ،ﻗﺎﺑﻠﯿﺖ ﺣﻤﻞ آﺳﺎن و ﺳﻬﻮﻟﺖ در اﺳﺘﻔﺎده از آن ،راﺑﻄﻪ ﻣﺴﺘﻘﯿﻤﯽ ﺑﺎ اﺑﻌﺎد ﺑﯿﺮوﻧﯽ ﺗﺒﻠﺖ و ﺧﺼﻮﺻﺎ ﺗﻨﺎﺳﺐ آن ﺑﺎ وزن ﺧﺎﻟﺺ دﺳﺘﮕﺎه دارد .ﭘﺲ ﺑﻬﺘﺮ اﺳﺖ اﺑﺘﺪا ﺑﺎ ﺗﻮﺟﻪ ﺑﻪ ﺳﻠﯿﻘﻪ و ﮐﺎرﺑﺮد ﺧﻮد ،اﻗﺪام ﺑﻪ ﺗﻌﯿﯿﻦ ﭘﯿﺶ ﻓﺮض ﺑﺮاي ﺳﺎﯾﺰ ﺻﻔﺤﻪ ﻧﻤﺎﯾﺸﮕﺮ ﻣﻮرد ﻧﯿﺎز ﺧﻮد ﻧﻤﻮده و ﺳﭙﺲ ﻧﺴﺒﺖ ﺑﻪ اﻧﺘﺨﺎب ﺑﻬﯿﻨﻪ ﺗﺮﯾﻦ ﺗﺒﻠﺖ از ﻧﻈﺮ وزن ،ﻇﺎﻫﺮ ،اﻣﮑﺎﻧﺎت و ...اﻗﺪام ﻧﻤﺎﯾﯿﻢ. ﻃﻮل ﻋﻤﺮ و ﻋﻤﻠﮑﺮد ﺑﺎﻃﺮي :ﯾﮑﯽ دﯾﮕﺮ از ﻣﻮارد ﺣﺴﺎس در ﻣﻮرد ﺗﻬﯿﻪ ﺗﺒﻠﺖ اﺳﺘﺎﻧﺪارد ،ﻣﺪت زﻣﺎﻧﯽ اﺳﺖ ﮐﻪ ﺑﺎﻃﺮي ﯾﮏ ﺗﺒﻠﺖ در ﺣﺎﻟﺖ آﻣﺎده ﺑﻪ ﮐﺎر ) (Stand Byﯾﺎ در زﻣﺎن اﺳﺘﻔﺎده ،ﻗﺎدر ﺑﻪ ﭘﺎﺳﺨﮕﻮﯾﯽ ﺧﻮاﻫﺪ ﺑﻮد ،اﯾﻦ ﻣﻮﺿﻮع ﺑﻪ ﭼﻨﺪ ﻧﮑﺘﻪ ﺟﺎﻧﺒﯽ )ﻧﻮع ﺻﻔﺤﻪ ﻧﻤﺎﯾﺶ ،ﻣﯿﺰان ﺷﻔﺎﻓﯿﺖ آن ،ﻧﻮع ﺳﺨﺖ اﻓﺰار داﺧﻠﯽ و (...ﻣﺮﺗﺒﻂ اﺳﺖ .اﻣﺎ ﺑﯽ ﺷﮏ اﺳﺘﻔﺎده از ﺑﺎﻃﺮي ﻫﺎي ﻣﺘﻨﺎﺳﺐ و اﺳﺘﺎﻧﺪارد ﺑﺎ ﻗﺎﺑﻠﯿﺖ ذﺧﯿﺮه ﺳﺎزي ﻃﻮﻻﻧﯽ اﻧﺮژي ،ﺷﻤﺎ را از ﺷﺎرژﻫﺎي ﭘﯽ در ﭘﯽ در ﻃﻮل ﻣﺪت اﺳﺘﻔﺎده روزاﻧﻪ ﺑﯽ ﻧﯿﺎز ﺧﻮاﻫﺪ ﺳﺎﺧﺖ .ﺑﺮاي ﺣﻔﻆ ﮐﯿﻔﯿﺖ و ﻋﻤﻠﮑﺮد ﺑﺎﻃﺮي ﺗﺒﻠﺖ ،ﺗﻮﺻﯿﻪ ﻣﯽ ﺷﻮد ﻗﺒﻞ از رﺳﯿﺪن ﻣﯿﺰان ﺷﺎرژ ﺑﺎﻃﺮي ﺑﻪ ﻣﺮز 20درﺻﺪ ،ﻧﺴﺒﺖ ﺑﻪ ﺷﺎرژ ﻣﺠﺪد آن اﻗﺪام ﻧﻤﺎﯾﯿﺪ و ﻗﺒﻞ از اﺳﺘﻔﺎده ﻣﺠﺪد، ﻣﻨﺘﻈﺮ ﺑﻤﺎﻧﯿﺪ ﺗﺎ ﻣﯿﺰان ﺷﺎرژ دﺳﺘﮕﺎه ﺑﻪ 100درﺻﺪ ﺧﻮد ﺑﺮﺳﺪ .ﻫﻤﭽﻨﯿﻦ ﺑﻬﺘﺮ اﺳﺖ ﻫﻢ زﻣﺎن ﺑﺎ ﺷﺎرژ ﺑﺎﻃﺮي از دﺳﺘﮕﺎه اﺳﺘﻔﺎده ﻧﮑﻨﯿﺪ و ﻫﻤﯿﺸﻪ ﺗﻮﺟﻪ داﺷﺘﻪ ﺑﺎﺷﯿﺪ ﮐﻪ از ﺷﺎرژر اﺻﻠﯽ ﺑﺮاي ﺷﺎرژ ﺗﺒﻠﺖ ﺧﻮد اﺳﺘﻔﺎده ﻧﻤﺎﯾﯿﺪ. اﻣﮑﺎﻧﺎت ﺟﺎﻧﺒﯽ ﻣﺘﻨﺎﺳﺐ :ﻫﻤﺎﻧﮕﻮﻧﻪ ﮐﻪ از ﯾﮏ ﮔﻮﺷﯽ ﺗﻠﻔﻦ ﻫﻤﺮاه ﺑﺮاي ﮐﺎرﺑﺮدﻫﺎي ﺟﺎﻧﺒﯽ دﯾﮕﺮ ﻧﯿﺰ اﺳﺘﻔﺎده ﻣﯽ ﺷﻮد ،ﺗﺒﻠﺖ ﻫﺎي ﭘﯿﺸﺮﻓﺘﻪ اﻣﺮوزي ﻧﯿﺰ ﻋﻼوه ﺑﺮ ﻗﺎﺑﻠﯿﺖ اﺟﺮاي ﺑﺮﻧﺎﻣﻪ ﻫﺎي ﻋﻤﻮﻣﯽ ﻃﺮاﺣﯽ ﺷﺪه ﺑﺮاي آﻧﻬﺎ ،ﻗﺎدر ﺑﻪ اﻧﺠﺎم ﺑﺮﻧﺎﻣﻪ ﻫﺎ و ﻗﺎﺑﻠﯿﺖ ﻫﺎي ﺧﺎص دﯾﮕﺮي ﻧﯿﺰ ﻣﯽ ﺑﺎﺷﻨﺪ .ﺗﺒﻠﺖ ،ﯾﮏ ﺳﯿﺴﺘﻢ ﮐﺎﻣﭙﯿﻮﺗﺮي ﻫﻤﺮاه ﺑﻪ ﺷﻤﺎر ﻣﯽ رود ﮐﻪ دارا ﺑﻮدن اﻣﮑﺎﻧﺎت ﺟﺎﻧﺒﯽ ﻣﺮﺗﺒﻂ ،ﻣﻮﺟﺐ اﻓﺰاﯾﺶ ﻗﺎﺑﻠﯿﺖ ﻫﺎ و ﮐﺎرآﯾﯽ آن ﺧﻮاﻫﺪ ﺷﺪ. ﻗﺎﺑﻠﯿﺖ :3Gﻧﺴﻞ ﺳﻮم ارﺗﺒﺎﻃﺎت ﯾﺎ Third Generationﮐﻪ ﺑﻪ اﺧﺘﺼﺎر ﺑﻪ آن 3Gﮔﻔﺘﻪ ﻣﯽ ﺷﻮد ،ﻗﺎﺑﻠﯿﺘﯽ را ﺑﺮاي دﺳﺘﮕﺎه ﻫﺎي ارﺗﺒﺎﻃﯽ ﻧﻈﯿﺮ ﺗﻠﻔﻦ ﻫﺎي ﻫﻤﺮاه و ﺗﺒﻠﺖ ﻫﺎ اﯾﺠﺎد ﻣﯽ ﻧﻤﺎﯾﺪ ﮐﻪ در آن ﮐﺎرﺑﺮ ﻋﻼوه ﺑﺮ ارﺗﺒﺎط ﺻﻮﺗﯽ و ﻣﺘﻨﯽ ،ﻗﺎدر ﺑﻪ ارﺳﺎل و درﯾﺎﻓﺖ ﺗﺼﻮﯾﺮ و ارﺗﺒﺎط اﯾﻨﺘﺮﻧﺘﯽ ﭘﺮ ﺳﺮﻋﺖ ﻧﯿﺰ ﺧﻮاﻫﺪ ﺑﻮد .ﯾﮑﯽ از ﻣﺰاﯾﺎي ﺟﺎﻧﺒﯽ ﺗﺒﻠﺖ ﻫﺎي اﺳﺘﺎﻧﺪارد اﻣﺮوزي ،ﻗﺎﺑﻠﯿﺖ ﭘﺸﺘﯿﺒﺎﻧﯽ از ﺳﯿﺴﺘﻢ 3Gﻣﯽ ﺑﺎﺷﺪ و اﯾﻦ ارﺗﺒﺎط ﻣﯽ ﺗﻮاﻧﺪ ﺑﻪ دو ﺷﮑﻞ ﻣﺴﺘﻘﯿﻢ ) (Sim Card Slotو ﻏﯿﺮ ﻣﺴﺘﻘﯿﻢ ) (Dongle USBﺻﻮرت ﭘﺬﯾﺮد. اﺳﺘﺎﻧﺪاردﻫﺎي ﻣﺨﺘﻠﻔﯽ ﻧﻈﯿﺮ WCDMAو HSPA+و CDMAﺑﺮاي 3Gﺗﻌﺮﯾﻒ ﺷﺪه اﺳﺖ وﻟﯽ ﺗﺠﻬﯿﺰات اﭘﺮاﺗﻮر ﻧﺴﻞ ﺳﻮم ﮐﺸﻮرﻣﺎن داراي ﺑﯿﺸﺘﺮﯾﻦ ﺳﺎزﮔﺎري ﺑﺎ اﺳﺘﺎﻧﺪارد WCDMAﺗﺤﺖ ﻓﺮﮐﺎﻧﺲ ﮐﺎري 900MHzو 2100MHzﻣﯽ ﺑﺎﺷﺪ .ﻟﺬا ﺗﻮﺻﯿﻪ ﻣﯽ ﺷﻮد اﮔﺮ ﺧﻮاﻫﺎن ﺑﻬﺮه ﻣﻨﺪي از اﻣﮑﺎﻧﺎت اﭘﺮاﺗﻮر 3Gﻫﺴﺘﯿﺪ ،دﺳﺘﮕﺎﻫﯽ اﻧﺘﺨﺎب ﻧﻤﺎﯾﯿﺪ ﮐﻪ ﺑﺎ ﻓﺮﮐﺎﻧﺲ ﺗﺤﺖ اﺳﺘﺎﻧﺪارد WCDMAﺳﺎزﮔﺎري داﺷﺘﻪ ﺑﺎﺷﺪ .ﺷﺎﯾﺎن ذﮐﺮ اﺳﺖ ﮐﻪ ﺗﮑﻨﻮﻟﻮژي HSPA+و زﯾﺮ ﺷﺎﺧﻪ ﻫﺎي آن ﯾﻌﻨﯽ HSDPAو HSUPAﻧﻮع ﭘﯿﺸﺮﻓﺘﻪ ﺗﺮﺗﮑﻨﻮﻟﻮژي WCDMAﻣﯽ ﺑﺎﺷﻨﺪ ﮐﻪ ﻗﺎﺑﻠﯿﺖ ﻓﻌﺎﻟﯿﺖ در اﯾﻦ ﺷﺒﮑﻪ را دارﻧﺪ. ﻗﺎﺑﻠﯿﺖ ﺑﺮﻗﺮاري ﺗﻤﺎس ﺗﻠﻔﻨﯽ :اﻣﮑﺎن Callﯾﺎ ﺑﺮﻗﺮاري ﺗﻤﺎس ﺗﻠﻔﻨﯽ ،در اﻏﻠﺐ ﺗﺒﻠﺖ ﻫﺎي داراي اﺳﻼت ﺳﯿﻢ ﮐﺎرت وﺟﻮد دارد ﮐﻪ در آن ﮐﺎرﺑﺮ ﻣﯽ ﺗﻮاﻧﺪ از ﻃﺮﯾﻖ ﺳﯿﻢ ﮐﺎرت ﺧﻮد )ﮐﻪ اﻟﺰاﻣﺎً 3Gﻧﯿﺴﺖ( ارﺗﺒﺎط ﺗﻠﻔﻨﯽ ﺑﺮﻗﺮار ﮐﻨﺪ و در اﯾﻦ ﺣﺎﻟﺖ ﺗﺒﻠﺖ ﻫﻤﺎﻧﻨﺪ ﺗﻠﻔﻦ ﻫﻤﺮاه ﻋﻤﻞ ﺧﻮاﻫﺪ ﻧﻤﻮد .ﺑﻪ ﻫﻤﯿﻦ دﻟﯿﻞ ،ﺗﺒﻠﺖ ﻫﺎﯾﯽ ﮐﻪ داراي اﺳﻼت ﻣﺴﺘﻘﯿﻢ ﺟﻬﺖ ﻧﺼﺐ ﺳﯿﻢ ﮐﺎرت ﻣﯽ ﺑﺎﺷﻨﺪ ،از ﻗﯿﻤﺖ ﺑﺎﻻﺗﺮي ﺑﺮﺧﻮردار ﻫﺴﺘﻨﺪ. دورﺑﯿﻦ :ﺑﻬﺮه ﻣﻨﺪي از دورﺑﯿﻦ ﭘﺮﻗﺪرت ﺑﺎ ﻗﺎﺑﻠﯿﺖ ﻋﮑﺲ ﺑﺮداري و ﻓﯿﻠﻢ ﺑﺮداري ،ﯾﮑﯽ از اﻣﮑﺎﻧﺎت وﯾﮋه ﺑﺮاي ﺗﺠﻬﯿﺰات ﻗﺎﺑﻞ ﺣﻤﻞ ﻧﻈﯿﺮ ﺗﺒﻠﺖ و ﺗﻠﻔﻦ ﻫﻤﺮاه ﺑﻪ ﺷﻤﺎر ﻣﯽ رود ﮐﻪ ﺷﻤﺎ را از ﺣﻤﻞ ﺗﺠﻬﯿﺰات ﺗﺼﻮﯾﺮ ﺑﺮداري ﺑﻪ ﺻﻮرت ﻣﺠﺰا ﻣﻌﺎف ﺧﻮاﻫﺪ ﺳﺎﺧﺖ .وﺟﻮد ﻓﻼش ،اﻣﮑﺎن ﻋﮑﺲ ﺑﺮداري و ﻓﯿﻠﻢ ﺑﺮداري در ﻣﺤﯿﻂ ﻫﺎي ﺗﺎرﯾﮏ را ﺑﺮاي ﺷﻤﺎ اﻣﮑﺎن ﭘﺬﯾﺮ ﺧﻮاﻫﺪ ﺳﺎﺧﺖ .اﻣﺎ در ﻧﻈﺮ داﺷﺘﻪ ﺑﺎﺷﯿﺪ ﮐﻪ ﺗﺒﻠﺖ ﻧﻤﯽ ﺗﻮاﻧﺪ ﻫﻤﺎﻧﻨﺪ ﯾﮏ دورﺑﯿﻦ ﺣﺮﻓﻪ اي اﻗﺪام ﺑﻪ ﺗﺼﻮﯾﺮ ﺑﺮداري ﻧﻤﺎﯾﺪ .ﭼﺮا ﮐﻪ ﻓﻠﺴﻔﻪ اوﻟﯿﻪ و اﺻﻠﯽ ﺗﻌﺒﯿﻪ دورﺑﯿﻦ ﺑﺮروي ﺗﺒﻠﺖ ﻫﺎ ،اﻣﮑﺎن ﺗﻬﯿﻪ اﺳﮑﻦ از ﺗﺼﺎوﯾﺮ و ﻣﺪارك ،ﺟﻬﺖ ذﺧﯿﺮه ﺳﺎزي ﺑﻮده اﺳﺖ. ﻣﮑﺎن ﯾﺎب ﺟﻬﺎﻧﯽ :GPSﻗﺎﺑﻠﯿﺖ ﻣﮑﺎن ﯾﺎﺑﯽ ﺑﺮاي اﻓﺮادي ﮐﻪ ﺑﯿﺸﺘﺮ در ﺣﺎل ﺳﻔﺮ )درون ﺷﻬﺮي ،ﺑﺮون ﺷﻬﺮي( ﻫﺴﺘﻨﺪ ﻣﯽ ﺗﻮاﻧﺪ ﮔﺰﯾﻨﻪ ﻣﻨﺎﺳﺒﯽ ﺑﺎﺷﺪ ﺗﺎ ﺗﺒﻠﺖ ﺷﻤﺎ را ﻫﻤﺎﻧﻨﺪ ﯾﮏ دﺳﺘﮕﺎه ﻧﺎوﺑﺮي ،ﻗﺎدر ﺑﻪ ﺗﻌﯿﯿﻦ ﻣﺴﯿﺮ و ﻣﮑﺎن ﻧﻤﺎﯾﺪ. درﮔﺎه :HDMIوﺟﻮد راﺑﻂ HDMIﯾﺎ Mini-HDMIاﯾﻦ اﻣﮑﺎن را ﺑﻪ ﺷﻤﺎ ﺧﻮاﻫﺪ داد ﺗﺎ در ﺻﻮرت ﻧﯿﺎز ﺗﺼﻮﯾﺮ ﺧﺮوﺟﯽ دﺳﺘﮕﺎه ﺧﻮد را ﺑﻪ ﺗﻠﻮﯾﺰﯾﻮن و ﯾﺎ ﻣﺎﻧﯿﺘﻮر ﻣﺘﺼﻞ ﮐﻨﯿﺪ ﺗﺎ ﺑﺘﻮاﻧﯿﺪ از ﺗﺒﻠﺖ ﺧﻮد ﺑﺮاي ﻧﻤﺎﯾﺶ اﻃﻼﻋﺎت در اﺑﻌﺎد ﺑﺰرگ ﺗﺮ اﺳﺘﻔﺎده ﻧﻤﺎﯾﯿﺪ. درﮔﺎه :USBدرﮔﺎه USBﯾﺎ mini USBاﻣﮑﺎن اﺗﺼﺎل ﺳﺮﯾﻊ و آﺳﺎن دﺳﺘﮕﺎه ﻫﺎي ﺟﺎﻧﺒﯽ را ﺑﻪ ﺷﻤﺎ ﺧﻮاﻫﺪ داد .اﻏﻠﺐ ﺗﺒﻠﺖ ﻫﺎ ﺑﻪ ﺻﻮرت ﻣﺴﺘﻘﯿﻢ از درﮔﺎه ورودي و ﺧﺮوﺟﯽ USBﺑﻬﺮه ﻧﻤﯽ ﺑﺮﻧﺪ و ﺑﺎ ﺗﻮﺟﻪ ﺑﻪ ﻣﺤﺪودﯾﺖ اﺑﻌﺎدي ﺗﺒﻠﺖ ﻫﺎ از درﮔﺎه ﻫﺎي Micro-USBو Mini-USBدر آﻧﻬﺎ اﺳﺘﻔﺎده ﻣﯽ ﺷﻮد ﮐﻪ ﺑﺎ اﺳﺘﻔﺎده از ﮐﺎﻧﮑﺘﻮرﻫﺎي ﻣﺒﺪل ﻣﯽ ﺗﻮان اﯾﻦ درﮔﺎه ﻫﺎ را ﺑﻪ USBدر ﺳﺎﯾﺰ ﻣﺘﻌﺎرف ﺗﺒﺪﯾﻞ و از آن اﺳﺘﻔﺎده ﻧﻤﻮد. GREEN Planet Co. www.igreen-co.com 50 GENESIS Tab-2 iGREEN اﺗﺼﺎل :Wi-Fiواي ﻓﺎي ﺑﻪ اﺗﺼﺎل ﺑﯽ ﺳﯿﻤﯽ اﻃﻼق ﻣﯽ ﺷﻮد ﮐﻪ اﻣﮑﺎن ﺗﺒﺎدل اﻃﻼﻋﺎت ﺑﯿﻦ دﺳﺘﮕﺎه ﻫﺎﯾﯽ ﮐﻪ داراي اﯾﻦ ﺗﮑﻨﻮﻟﻮژي ﻫﺴﺘﻨﺪ را ﺑﻪ ﮐﺎرﺑﺮ ﻣﯽ دﻫﺪ .راﯾﺞ ﺗﺮﯾﻦ ﮐﺎرﺑﺮد Wi-Fiﺑﺮاي اﺗﺼﺎل ﺑﻪ اﯾﻨﺘﺮﻧﺖ ﺗﻮﺳﻂ ﻣﻮدم ﻫﺎي ﺑﯽ ﺳﯿﻢ اﺳﺖ ﮐﻪ ﮐﺎرﺑﺮ را ﻗﺎدر ﻣﯽ ﺳﺎزد ﺗﺎ ﺑﺎ دﺳﺘﮕﺎه ﺧﻮد ﺑﻪ ﺷﺒﮑﻪ ﺟﻬﺎﻧﯽ اﯾﻨﺘﺮﻧﺖ ﻣﺘﺼﻞ ﺷﻮد .ﻧﺴﺨﻪ ﻫﺎي ﺟﺪﯾﺪﺗﺮ Wi-Fi ﮐﻪ ﺷﺎﻣﻞ ﺳﺮي ﻫﺎي Nو Gاﺳﺖ داراي ﻧﺮخ اﻧﺘﻘﺎل داده ﺑﺎﻻﺗﺮي ﻧﺴﺒﺖ ﺑﻪ ﻧﺴﺨﻪ ﻫﺎي ﻗﺪﯾﻤﯽ ﻣﯽ ﺑﺎﺷﻨﺪ. اﺗﺼﺎل :Bluetoothاﻣﺮوزه اﺗﺼﺎل دﺳﺘﮕﺎه ﻫﺎي ﻫﻤﺮاه ﺗﻮﺳﻂ ﺗﮑﻨﻮﻟﻮژي ارﺗﺒﺎط ﺑﯽ ﺳﯿﻢ ﺑﻠﻮﺗﻮث اﻣﺮي راﯾﺞ و ﻓﺮاﮔﯿﺮ اﺳﺖ .ﻟﺰوم وﺟﻮد ﺑﻠﻮﺗﻮث در دﺳﺘﮕﺎه ﺷﻤﺎ ،اﻣﺮﯾﺴﺖ اﺟﺘﻨﺎب ﻧﺎﭘﺬﯾﺮ و ﻧﺴﺨﻪ ﻫﺎي ﺟﺪﯾﺪﺗﺮ از اﯾﻦ ﺗﮑﻨﻮﻟﻮژي در ﻫﺮ دو دﺳﺘﮕﺎه ﻓﺮﺳﺘﻨﺪه و ﮔﯿﺮﻧﺪه ﻣﯽ ﺗﻮاﻧﺪ ﻧﺮخ اﻧﺘﻘﺎل داده ﺑﯿﺸﺘﺮي را ﺑﺮاي ﺷﻤﺎ ﻣﻬﯿﺎ ﮐﻨﺪ .ﺷﺎﯾﺎن ذﮐﺮ اﺳﺖ ﮐﻪ ﺗﮑﻨﻮﻟﻮژي ﻫﺎي ﺟﺪﯾﺪي ﻧﻈﯿﺮ NFCدر ﺣﺎل ﺟﺎﯾﮕﺰﯾﻦ ﺷﺪن اﯾﻦ ﻗﺎﺑﻠﯿﺖ ﻣﯽ ﺑﺎﺷﻨﺪ. ﻧﺴﺨﻪ ﺳﯿﺴﺘﻢ ﻋﺎﻣﻞ :ﻧﺴﺨﻪ ﺳﯿﺴﺘﻢ ﻋﺎﻣﻞ ﯾﮑﯽ از ﻣﻮاردي اﺳﺖ ﮐﻪ ﻣﯽ ﺑﺎﯾﺴﺘﯽ در ﻫﻨﮕﺎم ﺧﺮﯾﺪ ﺑﻪ آن ﺗﻮﺟﻪ ﮐﻨﯿﺪ .زﯾﺮا در وﯾﺮاﯾﺶ ﻫﺎي ﺟﺪﯾﺪﺗﺮ ﺳﯿﺴﺘﻢ ﻋﺎﻣﻞ ﻫﺎي دﺳﺘﮕﺎه ﻫﺎي ﻫﻤﺮاه ،ﻧﻘﺎط ﺿﻌﻒ ﻗﺒﻠﯽ از ﺑﯿﻦ ﻣﯽ روﻧﺪ و ﻧﻘﺎط ﻗﻮت ﻧﯿﺰ ﭘﺮ رﻧﮕﺘﺮ ﻣﯽ ﺷﻮﻧﺪ .اﻟﺒﺘﻪ ﺑﺎﯾﺴﺘﯽ اﺷﺎره ﮐﺮد ﮐﻪ ﺑﯿﺸﺘﺮ دﺳﺘﮕﺎه ﻫﺎ ﻗﺎﺑﻠﯿﺖ ارﺗﻘﺎي ﻧﺴﺨﻪ ﺳﯿﺴﺘﻢ ﻋﺎﻣﻞ را دارا ﻫﺴﺘﻨﺪ .ﺑﻪ ﻃﻮر ﮐﻠﯽ دو ﻧﻮع ﺳﯿﺴﺘﻢ ﻋﺎﻣﻞ ﻣﺘﻌﺎرف از ﺳﻮي ﮐﻤﭙﺎﻧﯽ ﻫﺎي ﮔﻮﮔﻞ ) (Androidوﻣﺎﮐﺮوﺳﺎﻓﺖ ) (Windowsﺑﺮاي ﺗﺒﻠﺖ ﻫﺎ در ﻧﻈﺮ ﮔﺮﻓﺘﻪ ﺷﺪه اﺳﺖ ﮐﻪ از ﻟﺤﺎظ ﮐﺎرآﯾﯽ ،ﺳﯿﺴﺘﻢ ﻋﺎﻣﻞ وﯾﻨﺪوز )ﺧﺼﻮﺻﺎً (Win8 PROﻋﻤﻠﮑﺮدي ﻧﺰدﯾﮏ ﺗﺮ ﺑﻪ راﯾﺎﻧﻪ ﻫﺎي ﻣﺮﺳﻮم دارد و ﻣﻬﻢ ﺗﺮﯾﻦ ﺑﺮﺗﺮي اﯾﻦ ﻧﻮع ﺗﺒﻠﺖ ﻫﺎي وﯾﻨﺪوزي ،اﺟﺮاي ﻧﺮم اﻓﺰارﻫﺎ ﺑﺎ ﺗﻤﺎم ﻗﺎﺑﻠﯿﺖ ﻫﺎي ﻣﺘﺪاوﻟﺸﺎن اﺳﺖ .ﺑﻪ ﻫﻤﯿﻦ ﺟﻬﺖ ﺗﺒﻠﺖ ﻫﺎي ﻣﺠﻬﺰ ﺑﻪ ﺳﯿﺴﺘﻢ ﻋﺎﻣﻞ وﯾﻨﺪوز ،ﻣﯽ ﺑﺎﯾﺴﺖ داراي ﻣﺸﺨﺼﺎت ﺳﺨﺖ اﻓﺰاري ﻗﻮي ﺗﺮي ﺑﺎﺷﻨﺪ ﮐﻪ ﻣﻮﺟﺐ اﻓﺰاﯾﺶ ﻗﯿﻤﺖ ﺗﻤﺎم ﺷﺪه آﻧﻬﺎ در ﻣﻘﺎﯾﺴﻪ ﺑﺎ ﺗﺒﻠﺖ ﻫﺎي اﻧﺪروﯾﺪي ﺧﻮاﻫﺪ ﺷﺪ .از ﺳﻮي دﯾﮕﺮ ﺳﯿﺴﺘﻢ ﻋﺎﻣﻞ اﻧﺪروﯾﺪ ﺑﻪ واﺳﻄﻪ ﻣﺎﻫﯿﺖ ﮐﺪﻧﻮﯾﺴﯽ ﺑﺎز ،داراي ﺑﺮﻧﺎﻣﻪ ﻫﺎ و ﻧﺮم اﻓﺰارﻫﺎي ﻣﺘﻨﻮع ﺗﺮ و ﺳﺎده ﺗﺮي اﺳﺖ ﮐﻪ ﻣﻮﺟﺐ ﻓﺮاﮔﯿﺮ ﺷﺪن آن در ﻣﯿﺎن ﻣﺤﺼﻮﻻت ﭘﺮﺗﺎﺑﻞ اﻣﺮوزي ﺷﺪه اﺳﺖ . ﺣﺎﻓﻈﻪ داﺧﻠﯽ و ﺧﺎرﺟﯽ :ﺗﻮﺟﻪ ﺑﻪ ﻣﯿﺰان ﺣﺎﻓﻈﻪ داﺧﻠﯽ دﺳﺘﮕﺎه و ﻣﺎﮐﺴﯿﻤﻢ ﺣﺎﻓﻈﻪ ﺧﺎرﺟﯽ ﻗﺎﺑﻞ ﭘﺸﺘﯿﺒﺎﻧﯽ در اﺑﺘﺪاي ﺧﺮﯾﺪ ﯾﮏ دﺳﺘﮕﺎه ﺗﺒﻠﺖ ﻧﮑﺘﻪ اي اﺳﺖ ﮐﻪ ﮐﺎرﺑﺮان ﻣﯽ ﺗﻮاﻧﻨﺪ ﻧﺴﺒﺖ ﺑﻪ ﻣﯿﺰان ﻣﺼﺮف ﺧﻮد ،دﺳﺘﮕﺎه ﻣﻮرد ﻧﻈﺮ را اﻧﺘﺨﺎب ﻧﻤﺎﯾﻨﺪ .ﻧﮑﺘﻪ اي ﮐﻪ در راﺑﻄﻪ ﺑﺎ ﺣﺎﻓﻈﻪ داﺧﻠﯽ در ﺗﻤﺎﻣﯽ ﻣﻮارد وﺟﻮد دارد ،ﮐﻤﺘﺮ ﺑﻮدن ﺣﺎﻓﻈﻪ داﺧﻠﯽ ﻗﺎﺑﻞ دﺳﺘﺮﺳﯽ ﺗﻮﺳﻂ ﮐﺎرﺑﺮ ﻧﺴﺒﺖ ﺑﻪ ﻋﺪدي ﮐﻪ ﺗﻮﻟﯿﺪﮐﻨﻨﺪه اﻇﻬﺎر ﮐﺮده اﺳﺖ ﻣﯽ ﺑﺎﺷﺪ .زﯾﺮا ﺑﺨﺸﯽ از ﺣﺎﻓﻈﻪ داﺧﻠﯽ دﺳﺘﮕﺎه ﺑﺮاي اﺟﺮا ﺳﯿﺴﺘﻢ ﻋﺎﻣﻞ و ﻓﺮﻣﺎن ﻫﺎي ﮐﺎرﺑﺮان ﺑﻪ ﺻﻮرت ﭘﯿﺶ ﻓﺮض ﺑﻪ ﺻﻮرت ﻏﯿﺮ ﻗﺎﺑﻞ اﺳﺘﻔﺎده ﺑﺮاي ﮐﺎرﺑﺮان در ﻣﯽ آﯾﺪ. ﻟﻮازم ﺟﺎﻧﺒﯽ ﺗﺒﻠﺖ ﻫﺎ :در ﻫﻨﮕﺎم ﺧﺮﯾﺪ ﻫﺮ دﺳﺘﮕﺎه ﺗﺒﻠﺖ ،ﺗﻌﺪادي از ﻟﻮازم ﺟﺎﻧﺒﯽ آن دﺳﺘﮕﺎه ﺑﻪ ﺻﻮرت ﭘﯿﺶ ﻓﺮض در داﺧﻞ ﺑﺴﺘﻪ ﻣﺤﺼﻮل ﻗﺮار داده ﺷﺪه اﻧﺪ .اﯾﻦ در ﺣﺎﻟﯿﺴﺖ ﮐﻪ ﺷﻤﺎ ﻗﺎدر ﺧﻮاﻫﯿﺪ ﺑﻮد ﺗﺎ ﻟﻮازم ﺟﺎﻧﺒﯽ دﯾﮕﺮ را ﺑﻪ ﺻﻮرت ﺟﺪاﮔﺎﻧﻪ ﺗﻬﯿﻪ ﮐﻨﯿﺪ .ﺗﻮﺻﯿﻪ ﻣﯽ ﺷﻮد ﮐﻪ ﭘﺲ از ﺧﺮﯾﺪ دﺳﺘﮕﺎه از ﻣﺤﺎﻓﻆ ﺻﻔﺤﻪ ﻧﻤﺎﯾﺸﮕﺮ و ﮐﯿﻒ ﻣﻨﺎﺳﺐ ﺗﺒﻠﺖ ﻧﯿﺰ ،ﺑﺮاي ﺗﻀﻤﯿﻦ ﺳﻼﻣﺖ و ﻃﻮل ﻋﻤﺮ دﺳﺘﮕﺎه اﺳﺘﻔﺎده ﻧﻤﺎﯾﯿﺪ .از دﯾﮕﺮ ﻟﻮازم ﺟﺎﻧﺒﯽ ﻣﯽ ﺗﻮان ﺑﻪ ﻫﺪﻓﻮن ﺳﯿﻢ دار ﯾﺎ ﺑﺪون ﺳﯿﻢ ،ﺣﺎﻓﻈﻪ ﺧﺎرﺟﯽ ،ﻣﯿﻨﯽ ﮐﯿﺒﻮردﻫﺎ و ﻏﯿﺮه اﺷﺎره ﮐﺮد. ﮔﺎراﻧﺘﯽ :اﻏﻠﺐ ﻣﺎ در ﻫﻨﮕﺎم ﺗﻬﯿﻪ دﺳﺘﮕﺎه ﻫﺎي اﻟﮑﺘﺮوﻧﯿﮑﯽ ،ﺑﻪ دﻟﯿﻞ ذوق و اﺷﺘﯿﺎق اوﻟﯿﻪ ﺧﺮﯾﺪ ،ﺗﻮﺟﻪ ﮐﻤﺘﺮي ﺑﻪ ﻣﻘﻮﻟﻪ ﮔﺎراﻧﺘﯽ و ﺧﺪﻣﺎت ﭘﺸﺘﯿﺒﺎﻧﯽ ﻣﺤﺼﻮل ﻣﻮرد ﻧﻈﺮ دارﯾﻢ .اﻣﺎ ﭘﺲ از ﻣﺪﺗﯽ و ﺑﻨﺎ ﺑﺮ ﺷﺮاﯾﻂ ﻣﺼﺮف ،ﻣﻤﮑﻦ اﺳﺖ دﺳﺘﮕﺎه ﺧﺮﯾﺪاري ﺷﺪه دﭼﺎر اﺷﮑﺎل و ﯾﺎ آﺳﯿﺐ ﻓﻨﯽ ﮔﺮدد .ﻟﺬا اﮔﺮ در ﻫﻨﮕﺎم ﺧﺮﯾﺪ ﺑﻪ ﮔﺎراﻧﺘﯽ ﻣﺤﺼﻮل و اﻋﺘﺒﺎر آن ﺗﻮﺟﻪ ﻧﻤﺎﯾﯿﻢ ،ﻫﻤﯿﺸﻪ ﯾﮏ ﭘﺸﺘﯿﺒﺎن و ﺣﺎﻣﯽ ﺑﺮاي ﺧﺮﯾﺪ ﺧﻮد در ﻧﻈﺮ ﮔﺮﻓﺘﻪ اﯾﻢ. ﭘﺸﺘﯿﺒﺎﻧﯽ و ﺑﻪ روزرﺳﺎﻧﯽ ﻧﺮم اﻓﺰاري :ﯾﮑﯽ دﯾﮕﺮ از ﻧﮑﺎت ﻣﻬﻢ ﺑﺮاي ﮐﺎرﺑﺮان ﺣﺮﻓﻪ اي ﺗﺒﻠﺖ ﻫﺎ ،داﻧﻠﻮد و ﺑﻪ روزرﺳﺎﻧﯽ ﻧﺮم اﻓﺰارﻫﺎ و ﺳﯿﺴﺘﻢ ﻋﺎﻣﻞ ﺗﺒﻠﺖ ﻣﯽ ﺑﺎﺷﺪ .اﻏﻠﺐ ﺗﺒﻠﺖ ﻫﺎي ﻣﺘﻔﺮﻗﻪ ،ﻓﺎﻗﺪ وب ﺳﺎﯾﺖ و ﭘﺎﯾﮕﺎه داده ﻣﺸﺨﺼﯽ ﻫﺴﺘﻨﺪ و ﺣﺘﯽ ﮔﺎﻫﺎً در ﺻﻮرت وﺟﻮد وب ﺳﺎﯾﺖ ،اﻃﻼﻋﺎﺗﯽ ﺑﺮاي ﭘﺸﺘﯿﺒﺎﻧﯽ و ﺑﻪ روزرﺳﺎﻧﯽ دﺳﺘﮕﺎه وﺟﻮد ﻧﺪارد .ﭘﺲ اﮔﺮ ﻗﺼﺪ آﭘﺪﯾﺖ ﻧﺮم اﻓﺰاري دﺳﺘﮕﺎه ﺧﻮد را در آﯾﻨﺪه دارﯾﺪ ،ﺣﺘﻤﺎ ﻗﺒﻞ از ﺧﺮﯾﺪ ،ﺑﻪ وب ﺳﺎﯾﺖ ﺳﺎزﻧﺪه ﺗﺒﻠﺖ ﻣﻮرد ﻧﻈﺮ ﺧﻮد ﻣﺮاﺟﻌﻪ ﻧﻤﺎﯾﯿﺪ. ﺷﺮﮐﺖ ﭘﺮدﯾﺲ ﺻﻨﻌﺖ ﺳﯿﺎره ﺳﺒﺰ ﺧﯿﺎﺑﺎن ﺳﻤﯿﻪ ،ﺑﯿﻦ ﺳﭙﻬﺒﺪ ﻗﺮﻧﯽ و اﺳﺘﺎد ﻧﺠﺎت اﻟﻬﯽ ،ﺷﻤﺎره 215 ﺗﻠﻔﻦ 88911378 :ﻓﺎﮐﺲ88808171 : GREEN Planet Co. www.igreen-co.com 51 52