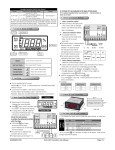
1
HWAS-290G / 290GN User Manual ﺑﺮاي ﺗﻐﻴﻴﺮ زﺑﺎن دﺳﺘﮕﺎه از ﺗﺎﻳﻮاﻧﻲ ﺑﻪ اﻧﮕﻠﻴﺴﻲ ﻟﻄﻔﺎ روي ﮔﺰﻳﻨﻪ دوم را زده ﺗﺎ وارد ﻣﻨﻮ ﺷﻮﻳﺪ ﺳﭙﺲ ﺑﺎ دﻛﻤﻪ ﭘﺎﻳﻴﻦ ﺑﺮ روي ﻣﻨﻮي رﻓﺘﻪ و ﺑﺎ دﻛﻤﻪ وارد ﺷﻮﻳﺪ ﺳﭙﺲ ﺑﺮ روي ﮔﺰﻳﻨﻪ اول را زده و ﺳﭙﺲ ﺑﺮ زده و ﺳﭙﺲ Englishرا اﻧﺘﺨﺎب ﻛﻨﻴﺪ ﺗﺎ زﺑﺎن دﺳﺘﮕﺎه ﺗﻐﻴﻴﺮ ﻛﻨﺪ ﺗﻌﺮﻳﻒ رﻳﻤﻮت و ﺳﻨﺴﻮر ﻫﺎ: در ﻣﻨﻮي دﺳﺘﮕﺎه وارد ﮔﺰﻳﻨﻪ security ﺷﺪه و رﻣﺰ 123456را وارد ﻛﻨﻴﺪ ﺳﭙﺲ ﮔﺰﻳﻨﻪ دوم ﻳﻌﻨﻲ wired/wireless deviceرﻓﺘﻪ و ﺳﭙﺲ ﮔﺰﻳﻨﻪ دوم ﻳﻌﻨﻲ Register wireless deviceرا اﻧﺘﺨﺎب ﻛﺮده و ﺑﺮاي ﺗﻌﺮﻳﻒ رﻳﻤﻮت ﻗﻔﻞ ﺑﺎز رﻳﻤﻮت را زده و ﻋﺪد ﺻﻔﺮ را ﺑﺰﻧﻴﺪ ﺗﺎ ﺗﻌﺮﻳﻒ ﺷﻮد و ﺑﺮاي ﺗﻌﺮﻳﻒ ﺳﻨﺴﻮرﻫﺎ ﺳﻨﺴﻮر ﻣﻮرد ﻧﻈﺮ را ﺗﺤﺮﻳﻚ ﻛﻨﻴﺪ و ﺳﭙﺲ ﺷﻤﺎره زون دﻟﺨﻮاه از 1ﺗﺎ 16را زده و ﺗﺎﻳﻴﺪ ﻛﻨﻴﺪ ) زون 1ﻣﺮﺑﻮط ﺑﻪ زون ﭼﺎﻳﻢ ﻳﺎ دﻳﻨﮓ داﻧﮓ در ﺻﻮرت ﻧﻴﺎز ,زون 2ﺗﺎ 4زون 24ﺳﺎﻋﺘﻪ ﻣﺨﺼﻮص دود و ﮔﺎز و زون 5ﺗﺎ 11زون ﻣﻌﻤﻮﻟﻲ و زون 12و 13زون ﭘﺎرت ﻳﺎ داﺧﻠﻲ و زون 14و 15زون ﺗﺎﺧﻴﺮي ﻣﻲ ﺑﺎﺷﻨﺪ( ﺗﻌﺮﻳﻒ ﺷﻤﺎره ﺗﻠﻔﻦ ﻫﺎ از 1ﺗﺎ 6و ﺗﻌﺮﻳﻒ smsﻫﺎ ﺑﺮاي ﻫﺮ زون و ﺿﺒﻂ ﭘﻴﻐﺎم در زﻳﺮﻣﻨﻮﻫﺎي ﻗﺴﻤﺖ securityو ﺳﭙﺲ Alarm settingﻣﻲ ﺑﺎﺷﺪ ﺳﺎﻳﺮ ﺗﻨﻈﻴﻤﺎت در ﻗﺴﻤﺖ Parameter setting ﻣﻲ ﺑﺎﺷﺪ Simple operation flow 1. Insert the simcard to the slot of the back cover and push it down tight. 2. Turn the switch beside the simcard slot to ON to enable the built-in battery 3. Plug the adaptor 4. the panel is turned on, the screen lights 5. Panel screen shows the time/date. Enter the current time in the sequence of hour-minute (24 hours mode) , and then press the down key and enter thecurrent date in the sequence of year-month-date. Then press ok key to save it. Register the wireless remote/sensor once received the product, please test it first. Because the accessories have registered already. All the following operation are done in the disarmed state Metal GSM Alarm System User Manual 6. Register remote: Press key — panel shows “alarm system” — press key — panel shows “enter the password” — enter the default password 123456 (it could be modified) — press — press down key to choose “wired/ wireless device”— press — choose “register wireless device” — press . It shows trigger the wireless device --- press the disarm key of the remote, it shows “choose the zone” — choose the remote zone— press to save it. Test the registered remote: In the disarm and non-calling state, press the arm key of the remote, the panel sounds and display armed. It means the remote is registered and could control the panel. 7. Register door sensor/ pir: Press key — panel shows “alarm system”—press key — panel shows “enter the password” — enter the default password123456 (it could be modified) — press — press down key to choose “wired/wireless device” — press — choose “register wireless device” —press It shows trigger the wireless device — trigger the door sensor or pir to transmit the wireless code to panel — panel gets the code and it shows “choose the zone” —choose the zone number — press to save it. Test door sensor: Use the remote to arm the panel, and then trigger the door sensor you have registered. Panel alarms and activates the siren, and that means the sensor is registered. Alarm number setting alarm tel number:when the host sound an alarm ,it will send sms to tel number that you setted before or dail a call to notify the user 8. Alarm number is the number that panel would auto dial or text when it alarms.Press key — panel shows “alarm system”— press key — panel shows“enter the password” — enter the default password 123456 (it could be modified) press and choose “alarm setting” — press and choose“alarm no. setting” — press , and it shows “alarm no.1” enter the number you plan to set —press to save it. Zone explanation Remote control zone this zone is for remote control only. Doorbell zone it is an independent zone for the sensor or button working as the doorbell. User could set a time period for the zone, and during the set period, once the sensor/button of this zone is triggered, it would make a doorbell sound. 24 hours zone sensor in this zone would alarm either in armed or disarmed state. It is armed 24 hours. Normal zone Sensor in this zone would alarm in armed state. Stay zone: the sensors in this zone would not alarm when user stay arms the panel. They only work when user away arms the panel. Delay zone Sensor in this zone would arm after a preset delay timer, so that user has enough time to leave the area. Also when the user comes back, the sensor would not alarm immediately, so that the user has enough time to disarm the panel. Thanks for choosing our product, please kindly read this manual carefully before installing it Overview 1.Function and specification . . . . . . . . . . . . . . . . . . ..........................1 Function and specification Function: 1. Dot matrix lcd display, chord ringtone, voice record and menu operation 2.Panel interface introduction . . . . . . . . . . . . . . . . .......................... 2 2.16 zones, 16 wired, 240 wireless connections, 16 NC/ NO output (binding with zones) 3. 6 alarm numbers, auto dial and/ or group text are optional 3.Accessory introduction . . . . . . . . . . . . . . . . . . . . .......................... 4 4. Alarm number and text content are programmable on the panel 5. Record different voices for different zones or alarms, the voice would be auto played when alarming 4.Accessory installation . . . . . . . . . . . . . . . . . . . .......................... 6 5.Alarm system menu and function . . . . . . . . . . ..........................7 6.Alarm system menu explanation . . . . . . . . . . . ..........................8 6. Remote control: remote speak, remote arm/disarm, remote turn on/off the siren 7. Exclusive sensor or button doorbell zone, which could work with various sensors and buttons with exclusive chord ringtone. 8. Timed auto arm/disarm 9. Main fails alarm 7.Telephone system menu introduction . . . . . . . . . . ..........................9 10. Built-in siren with external siren optional 11. 4.2V/1000mAh rechargeable lithium battery lasts for 48 hours when power fails 8.Zone explanation and text command . . . . . . . . . ......................... 10 12. Standard RS48 interface, 64pcs node repeater expandable (mode B) 9.Recording and record binding . . . . . . . . . . . . . . . .........................11 Specification: 10.Wired ports binding with zones . . . . . . . . . . . . . . .........................11 11.Relay output binding with zones . . . . . . . . . . . . . .........................11 12.Wireless detectors triggering Wireless frequency: 315/433 MHz (optional) Gsm frequency: 850/900/1800/1900mhz Working voltage: DC 12V-2A Backup battery: 1000mah/4.2v lithium rechargeable Backup hours: 48h Working conditions: temperature -20-60℃ humidity≦9 5 % Recording duration: 180seconds . . . . . . . . . . . . . .........................12 13.Alarm handling and remote operation . . . . . . . . .........................12 14.Installation and usage notice . . . . . . . . . . . . . . . .........................12 Back cover: Quick reference It could match all the following sensors: 1. Encoding IC: 2262/ 2260 timing resistor: 4. 7M 2. Encoding IC: 1527 timing resistor: 430K 3. CPU encoding, conform to the above 2 rules 4. The wireless transmitting frequency is same as that of the panel 1 Power input Panel interface introduction Detector power input Relay series connection gsm antenna Navigation key Rs485 MODBUS (only for model B) IN0-IN15 wired input Siren LCD Arm Disarm Enter key Backspace Numeric key Keyhole Battery switch Power connection Battery socket Key explanation: Navigation left-right key: left-inbox, right- write text he battery switch is default off to save power, please turn it on otherwise the panel could not work when power fails. Navigation up-down key: up –missed call, down- answered call key: enter the menu and confirm ESC key: cancel, delete and backspace key Arm key: press it to away arm, long press it to stay arm Disarm key: Press it and then input the password to disarm # key: long press it to switch between audible/silent mode; in the SMS writing mode, press it to switch input method. * key: during words input, it is used to access punctuation marks; during time input, it is used to access colon. Numeric key: it is to input numbers. The relay output (could work as a switch to control external device, like, lights, etc. max load is 1000w Arm/disarm state How to insert the sim card Battery indicator gsm signal China mobile Time/date Menu back and ESC 1. Slightly press it down, and push the slot to the right 3. Insert the simcard accordingly 2. Lift the slot 3 key correspond to the “menu” and “back” on the screen disarmed armed 2 stay armed 5. Push it down and a slight sound could be heard 3 4. Push down the slot Accessories Working voltage: 12V DC Static current: 0.1 uA Working current: < 20mA Frequency: 315/433MHz Transmitting distance: ≥ 200m (in the open air) Detection gap ≥ 20mm Indoor use only. Do not fall. Alarm LED Transmitting LED Away arm Disarm Stay arm SOS Low voltage LED Door sensor main part Magnet bar door sensor siren Indoors only, do not fall. The main part is installed on the door frame, and the magnet part is installed on the door. Installation height: 1.8-2.5m remote Detecting range: 7-13m Input voltage: 5v DC Working voltage: 12V DC Static current: 0 uA Horn level: 110db Operating Voltage: 9V Working current: < 20mA Working current: 180ma Static current: 30uA Transmitting frequency: 315/433MHz Transmit Frequency: 433/315 MHz Transmitting distance: ≥ 50m (in the open air) Installation angle: ±1 5°against the wall Away arm: arm all the sensors Transmit Distance: 100m (in the open air) Stay arm: arm all the sensors in the external zones Do not face the sunshine directly SOS: ask urgent help Do not face cold or heat directly Disarm: disarm the panel or stop the alarming Do not face the strong airflow pir sensor Do not face the fluttering curtain directly Other commonly used sensors: 1. Wired/Wireless Smoke detector: (optional) power The Smoke detector is used to detect potentially dangerous smoke emissions at home. Once the detector detects the presence of smoke as a danger and possible fire risk it will transmit an alarm Power supply: signal to the control panel and also activate its own integral local siren. Input voltage: 220v AC 2. Wired/Wireless Combustible Gas detector: (optional) Input frequency: 50 Hz The combustible gas detector will detect potentially dangerous gas emissions within its location. Output voltage: 12V DC It should be fitted in any area where there is a possibility or risk of gas leaks or emissions. Once the combustible gas detector detects unacceptable levels of combustible gas it will transmit an Load current: 2A alarm signal to the control panel and also activate its own integral local siren. It could also work Working temperature: - 1 0℃- - 7 5℃ with the auto shut-off valve. 3. Wired/wireless shock sensor The shock sensor is used to detect the strength of the shock. Fix the shock sensor on the object you want to protect, and it would alarm and transmit the alarm signal to the control panel when The above product picture is only for illustration, the actual product may have nothing to do with the picture 4 the strength of the shock exceeds the preset value. 5 Alarm system menu and function introduction Accessory Installation Alarm System 1. Door sensor install Alarm number setting— 6 group alarm numbers are programmable Alarm Setting: door frame door Alarm mode— call, text, or both Zone text setting— user could set the text content for each zone. Alarm voice setting— 180 seconds voice each zone could have a different recording Sounder/silent alarm: user could turn on/off the inside siren Group message: the alarm and command texts could be sent together or in one- way Enable the wired zone— choose to enable or neglect the wired zone Make sure the space between is less than 10mm Mount the wireless transmitter and the magnet respectively on the door frame and the door (usually in the upper edge of the door and frame). Clean the position where install the door sensor. Stick the double sided tape with adhesive or screw them firmly. The transmitter and magnet should be parallel and the interval distance less than 10mm Pir sensor installation Wired/ wireless setting: wall Register wireless device— program wireless remote and various sensor to the panel Delete wireless device— Delete the wrong or lost remote/sensors Delete all the wireless devices— clear all the wireless devices in the panel Output binding to zones— the wired relay output could bind with a specific zone The number of BUS node setting: Set BUS node numbers, from 1 to 64 (for model B only) BUS zone setting: set the node on/ off (for model B only) BUS node relay control: set the node relay no. 0- 7 on/ off (for model B only) Test the sensor— the panel would sound a dingdong whenever you trigger a registered sensor. 暖气片 Password setting— set the password of the panel (the default one is: 123456) Do not face the cold and heat directly Do not face the sunshine directly Do not install it near the electric cable Delay setting— set the arm delay, alarm delay time. Alarm duration— set the siren sounds time when the panel alarms Timed auto arm/disarm— set the auto arm/disarm time Away arm with siren on— the siren would sound when away arm the panel, so that user could hear the arm sound in a distance Do not face the fluttering curtain directly Do not install it outdoors B 1 Position A is better than B according to the performance of infrared 2 Put the sensor at position A where it could protect doorway, aisle and window, a wider range. A wall no.2 d win Doorbell zone period setting— set the doorbell zone working in the set period 2 min ( there is no warning tone by default) Arm/disarm with text report— user could get the text report of the panel state l wa ln o. 1. Walk directly facing the pir lens, the sensitivity is low; walk perpendicular to the pir lens, the sensitivity is high. 2. Install it at the aisle, entrance and indoors. 6 Reset— panel goes back to factory default setting 3 How to choose the installation place: A. On the NO. 4 wall (not shown in the pic) facing the door B. On the no. 3 wall facing the door arming Main power fail alarm— the panel would alarm when the main power goes out Gsm no signal warning— the panel would sound if it detects there is no gsm signalfor ow .1 sensor battery is in low voltage. Delay arm with beep— the panel would sound beep when the panel is delay Doorbell music setting— choose the music played when the doorbell zone is triggered Event log: w no all Parameter setting: Do not face the airflow Low voltage warning tone— the panel would sound beep when the registered Alarm history— it shows the entire arm, disarm and alarming logs Memory state— it shows the number of registered sensor of each zone 7 Alarm system menu detail explanation Delay arm with beep Alarm Setting the panel would sound beep when the panel is delay arming. During this time, the panel would not alarm even if the sensor is triggered. Default delay timer is 15 seconds. Alarm number setting— 6 group alarm numbers are programmable Alarm mode— call, text, text and call, or local siren only; It is default to text/call the first no, if you need to text/ call all the numbers, please activate Main power fail alarm— the panel would alarm and send text to user when the main power goes out (this is default off) Please remember to turn on the battery switch. Doorbell zone period setting set the doorbell zone working in the set time period,3 periods could be set. the group message. Zone text setting— a. User could edit the text content for each zone. Once this time is set, the panel would make a dingdong sound when the b. The default text is in this format: “zone 5 3 alarm” it means the sensor 3 of zone 5 is alarming Alarm voice setting a. The voice would auto play when alarm. Doorbell music setting— choose the music played when the doorbell zone is triggered/ use up-down b. 180 seconds voice (could be in multiple segments) each zone could have a different recording. Press record key to start recording and then backspace key to save it. Then you could bind the recording to each zone. When alarm, panel would first play the recording of the user address and then that of the alarm zone. Sounder/silent alarm setting: user could choose to turn on/off the inside siren when alarm Enable this function is to make panel send text to all the alarm numbers when alarm. The Group message sensor in the doorbell zone is triggered during this period. Press * to get “:” default setting is to send text to the first no. only. key to choose the music. Gsm no signal warning— the panel would make a 2mintues long sound, if it detects there is no gsm signal for 2mintues.DC Arm/disarm with text report— user could get the text report of the panel state. E.g. if user uses the remote arm the panel, after that, he could get a text “remote no. 2 arms” Reset— Press this to make panel go back to factory default setting, but it would not delete the registered device. Event log Wired/wireless device setting Alarm history— it shows the latest 20 events happened in the panel, it includes all the arm, disarm Enable the wired zone The panel has 6 NC wired connections, when they are open, panel would alarm. Each wired connection could be enabled or disabled separately. and alarming information with zone number, detector no and time stamp.Memory state— check the registered sensor numbers of each zone Register wireless device It could work with 16pcs remotes. It has 15 zones, and each zone could work Telephone system menu overview with 16pcs sensors. Trigger the sensor you plan to register, panel would get its code and you choose a zone to save it; if the sensor is already registered, Phone book trigger it and the panel would show its number. Text Delete wireless device:Choose the sensor you plan to delete, press key. Delete all the wireless devices— clear all the wireless devices. — once a zone is triggered, the relay would be driven accordingly. Output binding to zone Call Tools E.g. if you want zone 2 alarm and then relays closed. You could set it as follows: output bind to zone/zone 2/relay 0 (closed)/relay 1(closed)/at last, press backspace key to save it. Relay load: Sensor test: Time/date 7A 125V AC / 5A 250V AC / 20A 14V DC Lang. Chinese/English It is to test whether the sensor is registered. The panel would display the sensor phone set number if the sensor was registered. Preferred input method Airplane mode Parameter setting Password setting: set the password of the panel (default 123456) Delay setting: arm/ alarm delay timer: 0-120s; the delay timer is only for the Alarm duration set the siren sounds time when the panel alarms, it could be set Lcd backlight delay zones. Default is 15s. within 0-300s, default one is 60s. group auto arm/disarm time could be set; Press * to get “:” Timed auto arm/disarm Away arm with siren on— it requires connecting an external siren. The siren would sound once when user away arms the panel. Low voltage warning tone— the panel would sound beep when the registered sensor battery is in low voltage.(only for the wireless sensor has low voltage transmitting function) 8 set Network setting Security setting External link Factory reset Default password: 1122 Phone profile 9 Zone explanation and text command Recording and recording binding Recording Planning Zone explanation Remote control zone Doorbell zone Normal zone this zone is for remote control only. it is an independent zone for the sensor or button working as the doorbell. User could set a time period for the zone, and during the set period, once the sensor/ button of this zone is triggered, it would make a doorbell sound. Beyond this period, it would not work even if being triggered. Sensor in this zone would alarm in armed state. 24 hours zone sensor in this zone would alarm either in armed or disarmed state. It is armed 24 hours. It is suitable for smoke sensor, gas sensor and water leakage sensor, etc. Delay zone Sensor in this zone would arm after a preset delay timer, so that user has enough time to leave the area. Also when the user comes back, the sensor would not alarm immediately, it would also allow user some time to enter the premise without triggering the alarm. The sensor in other zones would not be subject to this. e. g. we normally set the door sensor in the entry door to delay zone. When user goes out, press the arm key, the door sensor has 15seconds delay, so user could go out during the 15 seconds without worrying triggering the alarm. The door sensor would be armed after 15 seconds. When users comes back,the door sensor is triggered and would not alarm immediately, it would wait 15s before it alarms. User could disarm the panel a. The panel could have a max. 180 seconds recording. You could record them in several segments. The recording would auto play when the panel alarms, so that user could know the alarm place and which zone triggering the alarm. b. The recording played after alarm could be divided into 2 parts, one is the main message, the other is the zone message. c. The main message could be an address, like, “room No ? Building NO? alarm” or “computer room ?? NO.? area alarming” so that user could know where the alarm is when he has installed more than one panel. Zone message would suggest which zone alarm, like “zone 2 fire alarms” “zone 3 gas leakage alarms” etc. User could make records, make difference in the recording file names, and then bind them to different zones according to his needs. Operation Steps a. Recording: Enter the menu “alarm system” — choose “alarm setting”—choose “alarm voice setting” — press key go to the recording interface ,Press — choose the “new recording” — press to start recording. b. Bind the recording to zones: Enter the menu “alarm system” — choose“alarm setting”--- choose “alarm voice setting” — press key go to therecording interface — Press — choose 'list” — choose the voice file you just recorded, press — choose “use” — it shows the main message or zone numbers — press the up/down key to choose — at last press key to save it. within the 15s. Stay zone sensors would not alarm if being triggered in stay arm state. e.g. if we put the living room pir into stay arm zone, put the pir in the yard to normal Wired zone enabling and binding with zones zone. When you are at home, you could stay arm the system, so when you walk around and trigger the living room pir, it would not alarm.Only when stranger trigger the pir in the yard, and then it would trigger the alarm. Text command The panel could connect 16pcs wired sensors. After connecting the wired sensors, user has to enable it on the panel and then binding it to zones in following steps: Enter “alarm system” menu ---- choose “wired/wireless setting” - - -choose “enable wired zone” --- press key- - - it shows wired port 0 to 15 - - - choose the port which you have connected wired sensor --- press - - - choose enable. At last, choose the zone you plan to allocate the sensor to. Away arm— send text “<password>, arm;” e.g. send <123456>, arm; Disarm— send text “<password>, disarm;” e.g. send <123456>, disarm; Check the state— send text “<password>, check;” e.g. send <123456>, check; Reset the default password— send text “recovery password forced;” Control the relay output, send text “<password>, relay, <num>, <state>;” a. <123456> , relay, <0> , <0>, the first 0 means the relay NO. the second 0 means open (1 means closed) b. <123456> , relay, <1> , <1>, the first 1 means the relay NO. the second 1 means closed (0 means open) Bind relay to specific zones The panel has 14 relay outputs. The relays could be controlled by a text command, and they also could be bound to specific zones. If one relay is bound to a zone, that means, once the sensor in this zone is alarming, the relay would be driven. When the alarm is disarmed, the relay would go back to its original state. How to bind: enter “alarm system” — choose “wired/wireless setting” — choose 'output binding to zones”— press key — choose the zone No — press key. One relay could be bound to multiple zones, and one zone could bind multiple relays too. < password> is the panel password, <num> is the relay No. (0 or 1), <state> is the relay state 10 11 How to trigger different wireless sensors Door sensor— Put the main part and magnet together and then separate them, the red led flashes, and that means it is triggered. Pir sensor— Turn on the sensor switch or you simply move in front of the sensor, its red led flashes, and that means it is triggered.Smoke sensor— Press the key on the sensor, the led flashes and the sensor sounds beep, that means it is triggered.Gas sensor— Press the test key on the sensor, its led flashes, and that means it is triggered.Water leakage sensor— there are 4 screws under the product, use your hand or a conductor short circuits any of the 2 diagonal screws, the led flashes, and that means it is triggered. Wireless temperature sensor — Press the OK key (the one in the middle of the 3) and hold it for 2 seconds, the number on the lcd slightly flashes, and that means it is triggered and transmitting code. Trigger the wireless sensor means the wireless sensor transmits the wireless code. The panel could receive and save this code. After that, the sensor could work with the panel. Different sensors have different triggering ways. Alarm handling and remote operation Alarm handling: when the panel alarms, it would auto dial the preset alarm numbers in sequence. Once user gets the alarm call, he could pick up the phone and press * key to confirm the alarm and hear the recording. Then panel would not dial the next numbers. If user does not press *, panel would continue to dial the next number and it would repeat the whole process in 3 circles. User could press 9 to rehear the recording. After the panel alarms, user picks up the phone, and then he could remotely control the panel by the keys on the phone. Press 1 to listen in; press 2 to speak; press 4 to turn off the listen in and speak; press 3 to sound the siren; press 6 to turn off the siren; press 7 to arm; press 8 to disarm; press 9 to hear the alarm recording again; Press 5 to hang up. User also could dial the panel number and remote control it. Call the panel, the panel would pick up the phone and says: please input the password. User enters the password (default is 123456), and then he could remote control the panel: Press 1 to listen in; press 2 to speak; press 4 to turn off the listen in and speak; press 3 to sound the siren; press 6 to turn off the siren; press 7 to arm; press 8 to disarm; press 9 to hear the alarm recording again; Press 5 to hang up, or user could hang it up directly. Installation and usage notice 1. Indoor use and not waterproof, please do not install it outdoors. 2. Do not put it near metal case, TV set, PC or other objects with strong electromagnet interference. 3. Turn off the panel before you insert or take off the simcard. 4. Make sure the power supply is well fitted and cooled. 5. Keep a regular check of the sim card. (make sure it has enough balance) 6. Keep a regular test of the panel performance. 12