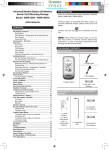
1
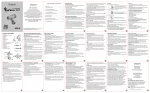
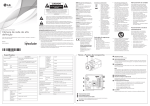
www.OregonScientificStore.com
Dear Customer,
Thank you for purchasing the ATC9K by Oregon Scientific.
At Oregon Scientific, we understand that
adventure sports enthusiasts as well as everyday enthusiasts
take great pride and satisfaction in recording and viewing
first person footage captured by our hands free action cam.
For this reason, the ATC9K was designed and engineered with
extreme precision, in order to allow you to take the adventure
home with you. Review the following pages for technical
information, tips and troubleshooting which will allow you to
maximize your experience with the ATC9K.
PLAY HARD, RECORD EVERYTHING!
OREGON SCIENTIFIC and associated trademarks and trade dress are owned by
OREGON SCIENTIFIC, Inc.
© 2010 OREGON SCIENTIFIC, Inc. All Rights Reserved.
I . Quick Start .................................................................................... 1
II . Camera Precautions ................................................................... 1
III . Technical Specifications ............................................................ 3
IV . Computer System Requirements ............................................. 3
V . Package Contents ........................................................................ 4
VI . Product Appearance .................................................................. 5
VII . Camera Operations ................................................................. 6
VIII . Using the Remote Control ..................................................... 7
IX . LCD Screen Display .................................................................. 7
X . Camera Settings .......................................................................... 8
XI . Power Supply ........................................................................... 12
XII . MicroSD Card Insertion / Removal ...................................... 13
XIII . Connecting to a Computer ................................................... 13
XIV. Connecting to a Monitor ....................................................... 20
XV . Troubleshooting ...................................................................... 22
UK
Oregon Scientific ATC9K
I) Quick Start
Turning the ATC9K On
Press the On/Off Button
.
A start up screen will be shown on the LCD.
Recording Video Footage
1. Aim the ATC9K at what you would like to record.
2. To start recording press the Movie shutter button
at the top of the camera.
3. Press the movie shutter button
again to stop recording. An animation showing
a circular motion will appear, which indicates the footage is being saved.
Shooting Photos
1. Aim the ATC9K at what you would like to take a picture.
2. Press the Photo capture button
at the top of the camera.
3. The LCD display will be frozen for a while, indicates that the scene had been
captured.
II) Camera Precautions
Notice the following guidelines when using your camera
• The ATC9K is shock resistant, not shock proof.
• For your safety, do not press the buttons on the camera during sports activities.
• Do not place the camera in areas prone to dust or damp for extended periods
of time. This may cause a fire or an electrical shock.
• Do not leave the camera in places exposed to extremely high temperatures,
such as under direct sunlight, for extended periods of time. This may affect
the camera housing and internal components.
• Clean the lens with a soft cloth to remove fingerprints or dust.
• If the rechargeable battery is mishandled, it can burst, cause a fire or even
chemical burns. Observe the following cautions.
• Do not disassemble.
• Do not crush and do not expose the rechargeable battery to any shock or force
such as hammering, dropping or stepping on it.
• Do not short circuit and do not allow metal objects to come into contact with
the battery terminals.
• Do not expose to extreme temperatures below 0°C (32°F) or above 40°C (104°F).
• Do not incinerate or dispose of in fire.
• Do not handle the damaged or leaking rechargeable battery.
• Be sure to charge the rechargeable battery using a genuine ATC9K battery
charger or charge it via the main unit.
• Keep the rechargeable battery out of the reach of small children.
--
Keep the rechargeable battery dry.
Replace only with the same type recommended by Oregon Scientific.
Dispose of used the rechargeable battery promptly as described in the instructions.
Turn the camera off before removing the rechargeable battery or the microSD
card. The card and the data may be damaged if the microSD card is inserted
or removed while the camera is still on.
• Remove the rechargeable battery and the microSD card before storing the
camera for long periods of time. Keep it in a well-ventilated place to prevent
mould.
• Under the following circumstances, have the camera repaired by qualified
personnel:
a) The plug is damaged or worn.
b) The device has been dropped and/or the housing has been damaged.
c) Liquid has entered the camera.
Disclaimer:
Oregon Scientific will not, under any circumstances, be responsible for injuries or
property damage incurred during participation of any high-risk sports or
activities not endorsed or recommended by Oregon Scientific. Should the camera
malfunction under these circumstances, it will not be covered under warranty.
The warranty covers manufacturing defects only.
Notes on copyright:
Users are asked to note that the transfer of memory containing photos or data
protected under copyright laws is only permissible within the restrictions imposed.
Users assume all responsibility in the event that copyrights are violated by the use
of this camera.
Waterproof Feature
The ATC9K camera is waterproof up to 20m (60ft). Oregon Scientific will not
assume any responsibility for camera malfunction caused by liquid entering the
camera as a result of misuse by the user.
Liquid may get inside the camera if the battery cover is not firmly
closed
• If the camera gets wet, wipe the liquid off as soon as possible with a dry cloth.
• Other camera accessories may not be waterproof.
Don’t use the camera in extreme temperatures as this may cause the
camera to malfunction.
--
UK
•
•
•
•
III) Technical Specifications
• Sensor resolution 5M pixels CMOS.
• Supports Micro SD/SDHC Class 4 card or above and compatible up to 32GB
(not included).
• Movie storage:
1080p = 1920x1080 pixels (16:9), 30 fps, ~12 Mbit/s data rate, approximately
9 minutes of video per 1G Byte
720p = 1280x720 pixels (16:9), 60 fps, ~12 Mbit/s data rate, approximately
10 minutes of video per 1G Byte
720p = 1280x720 pixels (16:9), 30 fps, ~8 Mbit/s data rate, approximately 15
minutes of video per 1G Byte
WVGA = 848x480 pixels (16:9), 60 fps, ~8Mbit/s data rate, approximately 15
minutes of video per 1G Byte
The recording durations will be varied which depends on the recording objects
and environment.
• 320 x 240 Color LCD screen
• Focusing range 3m~infinity
• Movie images MOV
• USB Interface (2.0)
• Monitor Interface HDMI (1.3)
• Rechargeable battery (included)
• Dimensions 40mm diameter. x 103mm length
• Operation system WinXP/Vista /7 or Apple Mac X 10.6 or above
IV) Computer System Requirements
Minimum System Requirements
• Windows Environment: 3.0 Ghz Intel Pentium D (dual-core) or faster
• Mac Environment: Dual 2.0 GHz PowerMac G5 or faster; 2.0 GHz Intel Core
Duo or faster
• Windows XP (Service Pack 2 or later), Windows Vista, Windows7 or Apple
Mac X 10.6 or above
• 2GB RAM
• 1G Free hard disk space
• 1GB or greater video card
• Quicktime 7
• 1024x768 resolution video support (32 bit)
• 16 bit Windows compatible sound device
* In some cases, the frame rate may be automatically reduced to maximize the
memory usage.
--
UK
V) Package Contents
Thank you for purchasing the ATC9K Action Camera, this package should contain
the:
1. Main Camera Unit with Camera Grip
2. Carrying Bag
1
3. Software Installation CD
4
4. Remote Control
10
5. Rechargeable Battery
2
6. Long Silicon Strap
5
16
7. Long Velcro Strap
3
17
8. Helmet Grip
9. Handlebar Mount
13
10.Base Mount and Tripod Mount
14
15
11.Rubberized Patch
12.Velcro Patch
12
11
13.USB Cable
8
14.HDMI Cable
15.User Manual
9
16.Screw
17.Nut
7
Items sold separately
6
(Items sold separately)
18.GPS Module
19.External Battery Charger
18
19
--
VI) Product Appearance
Main Unit
12
12
11
8
7
3
2
3
1
4
5
2
1
4
10
9
11
8
10
9
6
7
6
5
1
Play/Pause button
Play/Pause/Confirm
2
Left button
Left
3
Menu button
Settings menu
4
Right button
Right
5
Power On-Off
Power on/off unit
6
Movie Shutter button
Record start/stop
7
Photo Capture button
Take photo
8
USB Connection
Connect to the computer
9
HDMI Connection
Connect to the TV
10 microSD card slot
Insert microSD card
11 Battery Compartment
Insert rechargeable battery
12 GPS Module slot
Insert GPS Module
Remote Control Unit
1
2
3
4
5
6
1 Play/Pause button
Play/Pause/Confirm
2 Left button
Left
3 Right button
Right
4 Menu button
Settings menu
5 Movie Shutter button
Record/Stop button
6 Photo Capture button
Take photo
--
Turning the Camera On
Press the On/Off button
on the LCD screen.
. A start up screen will be shown
Turning on for the first time
1. The system will ask you to set the Date/Time/Timezone when the
camera is turned on for the first time or the rechargeable battery is
reinstalled.
to select your options. Press
to confirm your
2. Press
selections.
Recording Videos
1.Aim at what you want to record.
2.To start recording press the “Movie shutter button”
at the top of the camera.
3.The Laser Pointer at the front of the camera will be turned on for a more accurate
adjustment of the target. Users can set the turn on time of the Laser Pointer
in User Settings. (Do Not look directly to the Laser Pointer or aim at others’
eyes)
4.The Laser Pointer will be turned off according to the user selected time. Then
the camera will start recording (one sound effect with red LED light flashing).
The Movie shutter icon will blink on the top left corner of the screen while the
time elapsed will be shown at the bottom of the screen.
5.To stop recording press the “Movie shutter button”
at the top of the camera
again.
Taking Photos
1.Aim at what you want to capture.
2.Press the “Photo capture button”
at the top of the camera.
3.A shutter sound and the red LED will blink once to
indicate that a photo was taken. A preview will be shown
on the LCD screen briefly.
Playback
1.Press the “Play/Pause”
, then the screen will switch to playback mode.
2.Press “Left” and “Right” button
to select the video or photo that you
want to playback.
--
UK
VII) Camera Operations
3.During video playback, press “Play/Pause”
, to pause or resume playback,
press “Left” and “Right” button
to activate fast
forward and fast reverse.
4.To exit the playback mode, press “Movie shutter” button
or “Photo Capture” button
.
Delete a Video or Photo
1.Press the “Menu” button
during playback mode,
select the video or file you want to delete with “Left” and
“Right” button
.
2.Then press “Play/Pause”
to confirm deletion after the
dialogue box pops up.
V III) Using the Remote Control
1.Ensure you are pointing the remote control sensor towards the front of the
camera. Press either the “Movie shutter” button
or “Photo Capture”
button
.
2.The red LED will flash to show recording or photo capturing has started.
3.The buttons on the remote control carries the same functions as those found on
the back of the camera.
IX) LCD Screen Display
Video Resolution
EV
Video/Photo Quality
Photo Resolution
No SD Card Inserted
(Remove Red Line if inserted)
Night Mode On
(disappear when Off)
Privacy Mode On
(disappear when Off)
Cont’ Shots On
(disappear when Off)
GPS On
(disappear when Off or no
module)
White Balance Setting
G Sensor On
(disappear when Off)
Battery
(4 states)
Lapse Time (when recording and playback)
Remaining Time (when viewing)
--
Display the photo resolution setting.
Display the EV value.
Display the quality setting of the videos & photos.
Indicate that there is no microSD card inserted. The red line will disappear when a
microSD card is inserted.
Privacy Mode is on. It will disappear when it is disabled in the user settings.
GPS function is on. It will disappear when the camera is not equipped with the
GPS module or it is disabled in the user settings.
GPS function is on but the GPS module is either searching or establishing connections
with satellites. The process will take minutes to complete but the duration depends
on the surroundings of your location as well as weather conditions.
G-Sensor function is on. It will disappear when it is disabled in the user settings.
Night Mode is on. It will disappear when it is disabled in the user settings.
Continuous shots function is on. It will disappear when it is disabled in the user
settings.
Self timer function is on. It will disappear when it is disabled in the user settings.
Display the white balance setting.
Display the battery status.
X) Camera Settings
There are 5 main camera settings which are Video, Photo, G-Sensor, GPS and
General Settings. The GPS setting is activated only when the GPS module (sold
separately) is attached onto the camera.
1. To enter into Settings, press “Menu” button
in the live
view mode.
2. You can scroll through these categories by pressing “Left”
and “Right” buttons
.
.
3. To enter the category, press “Play/Pause” button
.
4. To select a setting, press “Play/Pause” button
5. To select options under a setting, press “Left” and “Right”
buttons
.
.
6. To confirm an option, press “Play/Pause” button
again.
7. To exit settings, press “Menu” button
--
UK
Display the video resolution setting.
Video Settings
1. Resolution
You can set your video resolution here.
Full HD/30
1920x1080, 30 fps
HD/60
1280x720, 60 fps
HD/30
1280x720, 30 fps
WVGA
848x480, 60 fps
2. Quality
You can select Fine, Good or Normal.
3. EV
The Exposure values range from +2.0 to -2.0. You can set the appropriate value
to suit your shooting environment.
4. White B. (White Balance)
Based on different surroundings, you can select Auto, Daylight, Cloudy,
Fluorescent and Tungsten to adapt a correct color tone of the video.
5. Contrast
According to your preference, you can adjust the contrast level with Standard,
Soft, Hard.
6. Sharpness
According to your preference, you can adjust the sharpness with Standard, Soft,
Hard.
7. Effect
You can add effects to the video too. Just select Vivid, Negative, Black and
White, Sepia or Art.
8. Duration
To record a video with a time limit, select a duration here.
Photo Settings
1. Resolution
You can set your photo resolution here with either 3megapixels or 5megapixels.
2. Quality
You can select Fine, Good or Normal.
3. Night Mode
You can turn it on in order to have a boost of exposure during the night.
4. EV
The Exposure values range from +2.0 to -2.0. You can set the appropriate value
to suit your shooting environment.
--
G-Sensor Settings
1. Operate
You can turn on or off the G-Sensor here. Power consumption can be reduced
by turning off the G-Sensor.
2. Data Display
You can display G-Sensor related data on the videos and photos via HDMI
output by turning on this setting.
GPS Settings
GPS Module is sold separately. Please refer to the corresponding manual for
these settings.
General Settings
1. Laser Pt. (Laser Pointer)
This setting allows you to have either 5 or 10 seconds to adjust the direction of
the camera using the laser pointer before the capturing of videos after you
press the “Movie Shutter” button
.
2. Volume
You can adjust the sound volume here.
3. Privacy
With Privacy mode on, all LED and Audio indicators will be turned off.
- 10 -
UK
5. White B. (White Balance)
According to different environment, you can select Auto, Daylight, Cloudy,
Fluorescent and Tungsten to adapt a correct color tone of the photo.
6. Contrast
According to your preference, you can adjust contrast level with Standard,
Soft, Hard.
7. Sharpness
According to your preference, you can adjust sharpness with Standard, Soft,
Hard.
8. Effect
You can add effects to the video too. Just select Vivid, Negative, Black and
White, Sepia or Art.
9. Timer
You can set a countdown time before the shutter captures automatically.
10. Cont’ Shots (Continuous Shots)
You can set the camera to either take 3 or 5 continuous shouts with this setting.
4. Time Stamp
Date and time will be stamped on the videos and photos with this setting being
turned on.
5. LCD Sleep
This setting controls the sleep time of the LCD screen. While the LCD is
sleeping, power consumption is reduced.
6. Auto Off
Sometimes you may want the camera to turn off automatically during idle.
Set your preference here to do so.
7. Date
Set your date here.
8. Time
Set your time here.
9. Timezone
Set your timezone here.
10. Language
Set your system language here.
11. Light Freq. (Light Frequency)
In order to avoid flickering in the video while shooting indoors, you need to adjust
this setting to match the frequency of light source with that of the shutter.
12. Format
You can format the microSD card inserted in the camera with this setting.
13. Factory Set. (Factory Settings)
Restore back to the factory default settings.
14. Version
Display the current system version.
Firmware update
1. Visit Oregon Scientific website atc.oregonscientific.com/ to download the latest
firmware.
2. Unzip the package and copy the
unzipped file to the root folder of
the microSD card.
3. Insert the microSD card to the
ATC9K and turn it on.
4. To confirm the update, press
.
The camera will be switched off.
5. Press
to restart the camera.
- 11 -
UK
XI) Power Supply
Battery Replacement
1. Unlock the rear of the unit by lifting the latch.
2. Insert the rechargeable battery into the battery slot as
indicated until it clicks in place.
3. If you want to release the rechargeable
battery, turn the battery hinge downwards until it
comes out from the slot.
4. Close the battery door firmly before closing the latch.
NOTE: When the battery is low, the battery low icon
will appear on the LCD screen
and the red LED will light up.
Recharge the Battery by External Charger (sold separately)
1.Plug the charger to the power supply and slot the battery into the
charger as indicated on the charger.
2. The LED on the charger will light up as the battery starts to recharge.
3. The LED will be turned off when the battery is fully charged.
Recharge the Battery via USB
1.Turn the camera off, then plug the camera with the
rechargeable battery to a computer with the USB
cable provided.
2.The red LED will light up to show the battery is
charging.
3.The red LED will be turned off when the
battery is fully charged.
NOTE: The rechargeable battery will be fully charged in 2-3 hours.
- 12 -
X II) MicroSD Card Insertion / Removal
Insert
1.Turn the camera off.
2.Unlock the end latch to open the camera.
3.Ensure the microSD card terminals are facing down,
then insert it carefully and completely until it clicks
in place.
4.Close the camera and lock the latch.
Remove
1.Turn the camera off.
2.Unlock the end latch to open the camera.
3.Push the card until it clicks, then pull the card out.
4.Close the camera and lock the latch.
NOTE:
-
Ensure the card is inserted correctly.
Do not touch the connect terminals on the back of the microSD card.
The card may be damaged if it is not fully inserted.
The card and the data may be damaged if the microSD card is inserted or removed while
the camera is on.
- Do not touch the flat cable as this may seriously affect the camera performance and
functions.
- The camera supports microSD/SDHC Class 4 cards or above and compatible up to
32GB. MicroSD cards with lower classes may cause performance drop during recording.
XIII) Connecting to a Computer
You can upload your recorded video footages and
photos to a PC by connecting the ATC9K to your PC using the PC Application.
You may download the latest version in atc.oregonscientific.com.
1.Turn the ATC9K on.
2.Connect the ATC9K to a PC via the USB cable.
3.The ATC9K will be connected as a USB Mass Storage Device.
4.You can then manage your videos and photos by
launching the PC application.
- 13 -
1.To start, choose your own account to login with your password or simply create a
new account if you are using the PC application for the first time.
You can always access your profile information by
clicking the top-right icon after you login to the
application.
2. User accounts and profiles are password protected.
A password hint question and answer fields will
be added in case users forget their passwords.
Import Videos and Photos
1.After the users log into their accounts the PC
program will ask the users automatically whether
they would like to import videos and photos onto the
computer if the camera is on and is connected to the
PC via USB.
2.Users will have to option to either keep or delete the source files after
importing.
(1)
- 14 -
(2)
UK
User Profile
Video and Photo Viewer
1. The Viewer will display both videos and photos.
2. When the viewer is showing video files, the following screen will be shown:
I. A video player
II. A video timeline with a dragger which you can manually drag the position
o reveal certain instances of the video.
III. A volume control slider. The audio will be muted when the speaker icon
under the volume slider is pressed
. The icon will be changed as
indicated.
IV. Video control buttons – Start of the video, Fast Reverse,
Play, Fast Forward and end of the video.
V. Multiple clicks on Fast Reverse
and Fast Forward
triggers x2,
x4, x8 speeds of reverse and forward.
VI. A timer showing the video duration and lapsed time.
VII. A line showing the title of the video.
VIII. An information icon
which shows the general
information of the video when it’s been clicked.
Users are able to edit the title and description of the
video. Moreover, users are able to import KML to the
corresponding video which is imported from the
local drive instead of the camera.
IX. A full screen button .
X. A snapshot button
.
- 15 -
I. A photo viewer
II. The name of the photo.
III. An information icon
which shows the general information of the photo
when it has been clicked. Users are able to edit the title and description of the
photo. Moreover, users are able to import KML to corresponding photo which
is imported from local drive instead of the camera.
IV. The index of the photo
V. A previous button
VI. A next button
VII. A full screen button .
VIII. A rotation button
which users can rotate photos in 0, 90, 180 and 270
degrees. The changes in rotation will save as settings but will not affect the
original file.
Google Map
1.If the GPS module (Sold Separately) is inserted to the camera
and the GPS module is turned ON, the camera
will sync the GPS data on to a .MAP file. This part of
operation will be covered in the corresponding user manual.
2.If the GPS module is not inserted, the Google Maps
functions will not be activated. However, you can
always import your own KML to activate the GPS
information in Google Maps.
3.The Google Maps function requires an internet
connection. If the connection is barred or disconnected, the
Google Maps function will not be operational until
the internet connection is restored.
- 16 -
UK
3. When the viewer is operated for photo files, the
following will be shown:
File Management
1.Within the File Management, videos and photos are displayed separately
into 2 lists.
2.All videos and photos imported will be displayed within the “Library” tab.
3.The videos and photos that were imported last time (no matter the files are
assigned to album or not) are displayed in the “Last Import” tab.
4.Users are able to create
, delete
and rename (rollover and click
in
front of the album name) albums.
5.Same files can fall into different albums.
6.Files deleted via the “Library” and “Last Import” tabs are deleted physically
while files deleted via other album tabs are just tags removal but not
physically deleted.
7.Users can import manually by clicking the arrow icon
and either import
from the camera or from local drives.
8. The search icon
triggers the search function with the following criteria:
I. Keyword search of title
Multiple keywords are allowed with their entries separated by commas.
II. Keyword search of description
Multiple keywords are allowed with their entries separated by commas.
III. Filename
Multiple keywords are allowed with their entries separated by commas.
IV. Video Duration
With options: Any durations; Less than/More than 0.5min; 1min; 2min; 5min;
10min; 20min; 30min (if user chooses “Any durations”, the second pulldown
menu won’t be shown.)
- 17 -
VI. Date
With options: anytime, past 24 hours, past week, past month, past year,
specific date (if user is not choosing a specific date, the second and third
pulldown menu won’t be shown.)
9. Video File Listing shows:
I. The total number of videos and file size of an individual tab.
II. A pulldown menu for users to sort the files by title,
filename, file size, duration and date (time).
III. Thumbnails of the first frames of every individual video
for you to playback
IV. Details of the videos.
V. An edit info icon
VI. A trash icon
to edit the title and descriptions of videos.
to delete files or remove tags.
VII. Multiple item selections are allowed by ctrl-click or shift-click.
VIII. You can drag and drop from lists to albums on the left hand side.
10. Photo File Listing shows:
I. The total number of photos and file size of an individual tab.
- 18 -
UK
V. Album
With options: all, library and albums that the user created.
IV. Details of the photos.
V. An edit info icon
VI. A trash icon
to edit the title and descriptions of photos.
to delete files or remove tags.
VII. Multiple item selections are allowed by ctrl-click or shift-click.
VIII. You can drag and drop from lists to albums on the left hand side.
Data Graphs
1.Data graphs are plotted by the data in the .MAP file.
2.There are 3 kinds of data graphs; speed vs time, acceleration vs time and distance
vs time represented by 3 buttons; SPD vs T, ACC vs T and DST vs T.
3.Graphs are not available when handling photos.
4.The white lines shown are corresponding average values. (not applicable to
Distance)
- 19 -
1. This viewer is a pseudo-sphere showing resolved
accelerations with directions and magnitudes,
which are represented by the black line.
2. The length of the lines is magnitude.
3. The motions and the length variations of the line
will follow the data from the .MAP file.
Application Update
While you are connecting to the internet, the PC application will check for any
updates automatically. You can either accept it or update the application manually by
pressing the update icon at the top right corner.
XIV) Connecting to a Monitor
You can playback your recorded video footages and
photos on a high definition enabled monitor using the
HDMI cable provided.
1.Turn the ATC9K and the monitor off.
2.Connect your ATC9K to your monitor using the HDMI cable.
3.Turn the monitor and ATC9K on.
Playback
1.Select the video or photo you want to play by pressing “Left” and “Right”
button
.
2.Press “Play/Pause” button
to play.
3. During video playback, press “Play/Pause”
,
to pause or resume playback, press “Left” and
“Right” button
to activate fast forward
and fast reverse.
4.To exit to thumbnail view, press “Menu” button
.
- 20 -
UK
G Sensor Viewer
Delete Video or Photo
1.Press “Menu” button
to activate the
submenu.
2.Select “Delete”.
3.Confirm the deletion by pressing “Play/Pause” button
.
Switch between Video and Photo
1.Press “Menu” button
to activate the submenu.
2.Select “View Videos” or “View Photos” by
press the “Right” button
.
3.Confirm by pressing “Play/Pause” button
.
Slideshow
1.Press “Menu” button
to activate the submenu when you are in the photo
thumbnail view.
2.Select “Slideshow” by press the “Right” button
.
.
3.Confirm by pressing “Play/Pause” button
4.To exit the slideshow, press “Menu” button .
- 21 -
There’s no display
• Does the rechargeable battery properly installed?
• Does the rechargeable battery need replacing?
After the ATC9K is connected to my PC, it cannot find the new drive
in the ‘My Computer’ folder
• Ensure each end of the ATC9K USB cable is properly and firmly connected.
• Ensure your USB port is working properly. Try connecting another USB
device into the port. If the other device does not work, the USB port may
have a malfunction. In this case, contact your system manufacturer or the
manufacturer of your USB card.
I can’t capture video footage
• Ensure there is enough space in the microSD card; the display will tell you
how much time left is available for video recording.
• Ensure the microSD card is not locked.
The remaining time is not accurate
• The remaining time is an estimate.
• The remaining time depends not only on the time recorded, but on the color
density of the video footage. Under conditions with high contrast, such as
outdoors, the actual time available will be less than under low-contrast
conditions, such as indoors.
I can’t play the video footage on my television
• Ensure each end of the HDMI cable is properly and firmly connected to
ATC9K and to your television.
• Ensure the ATC9K and television are both turned on.
The sound is very low or there is no sound
• Ensure to increase the volume of the speaker in the volume setting.
• The ATC9K is specifically designed for extreme sports and is waterproof,
it is for this reason that we have made the microphone less sensitive.
The LED keeps flashing while the rechargeable battery is charging
• For some special circumstances, the mentioned situation means the
rechargeable battery is fully charged.
- 22 -
UK
XV) Troubleshooting
Further Help
We make every effort to ensure the accuracy and appropriateness of the
information provided on our products. We encourage you to contact our
Technical Support Team at [email protected] with any problems
and/or suggestions, or, call our Customer Service Department
at 0871 222 1966. Our service representatives will be happy to help you.
Please note that the Technical Support Team cannot issue or authorize
any RMA’s or replacements. For an RMA or replacement please
contact our Customer Service Department.
Trademarks
HDMI, the HDMI logo and High-Definition Multimedia Interface are
trademarks or registered trademarks of HDMI Licensing LLC.
Microsoft, Windows, Windows Vista and Window7 are either registered
trademarks or trademarks of Microsoft Corporation in the United States and/or
other countries.
Macintosh, Mac OS and iMovie are trademarks or registered trademarks of Apple
Inc..
Intel and Pentium are trademarks or registered trademarks of Intel Corporation.
SDHC and SDHC logo are trademarks of SD-3C, LLC.
Oregon Scientific (UK) Ltd.
Unit 1, Switchback, Gardner Road,
Maidenhead, Berkshire SL6 7RJ.
Hotline number: 0871 222 1966
E-mail: [email protected]
www.oregonscientific.co.uk
- 23 -
Changes or modifications to this unit not expressly approved by the party responsible
for compliance could void the user’s authority to operate the equipment.
CAUTION
LASER RADIATION WHEN OPEN
DO NOT STARE INTO BEAM OR VIEW DIRECTLY
WITH OPTICAL INSTRUMENTS
INFORMATION FOR USERS
In accordance with European Directives 2002/95/CE, 2002/96/CE and 2003/108/CE
on the restriction of the use of dangerous substances in electric and electronic
equipment as well as their waste disposal.
The barred symbol of the rubbish bin shown on the equipment indicates that,
at the end of its useful life, the product must be collected separately from other waste.
Therefore, any products that have reached the end of their useful life must be given
to waste disposal centres specializing in separate collection of waste electrical and
electronic equipment, or given back to the retailer at the time of purchasing new similar
equipment, on a one for one basis.
The adequate separate collection for the subsequent start-up of the equipment sent to
be recycled, treated and disposal of in an environmentally compatible way contributes
to preventing possible negative effects on the enviropment and health and optimises the
recycling and reuse of components making up the apparatus.
Abusive disposal of the product by the user involves application of the administration
sanctions according to the laws in force.
- 24 -
UK
WARNING: