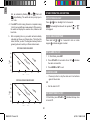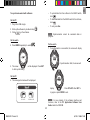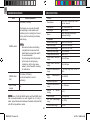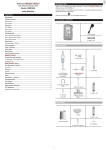
1
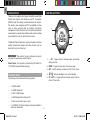
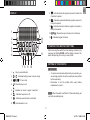
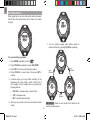
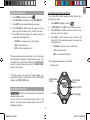
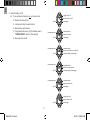
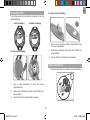
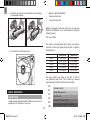
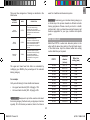
Auto Toggle Data View During Exercise.................... 14
Pause And Resume Exercise .................................... 14
Save Exercise Data ................................................... 15
Exceed Heart Rate Limit ............................................ 15
View Exercise Data During Exercise ......................... 15
Viewing Exercise Record ............................................. 17
View Exercise Record In Summary Record Page ..... 17
View Exercise Record In Lap Record Page............... 18
Delete Memories........................................................ 19
Knowing Your Fitness Index........................................ 19
Other Operation And Setting ....................................... 20
Activate Backlight ...................................................... 20
Lock / Unlock Keypad ................................................ 20
Set Alarm On / Off ..................................................... 20
Silence Alarm ............................................................ 20
Set Beep Tone On / Off ............................................. 20
Replace Battery ......................................................... 21
Install Bike Mount ...................................................... 21
Useful Reference........................................................... 22
Target Zone ............................................................... 22
Bike Wheel Size......................................................... 23
Connecting With PC Application Software................. 24
PC Requirements ...................................................... 24
Synchronising SE833 Watch With PC Application
Software..................................................................... 24
Water Resistance ......................................................... 26
Specifications................................................................ 26
Precautions ................................................................... 27
About Oregon Scientific ............................................... 28
EU-Declaration Of Conformity ..................................... 28
FCC (US) / IC (Canada) Statement ............................... 28
Declaration Of Conformity ......................................... 29
MODEL: SE833
USER MANUAL
CONTENTS
Introduction ................................................................... 2
Package Items ........................................................... 2
Control Buttons............................................................. 2
Display ........................................................................... 3
Starting Your Watch (First Time) ................................. 3
Setting Up Your Watch ................................................. 3
Set User Profile.......................................................... 4
Set Watch Profile ....................................................... 5
Set Exercise Profile ................................................... 5
Wearing Chest Belt ....................................................... 8
Pairing Device ............................................................... 9
Pair With SZ909 Chest Belt (Or Other
ANT-system Chest Belts) .......................................... 9
Pair With ANT-system Foot Pod / Bike Pod .............. 9
Input Bike Wheel Size (For Bike Pod) ....................... 10
Remove Paired Device .............................................. 10
Calibrating Paired Device............................................. 11
Calibrate By Running Or Walking .............................. 11
Calibrate By Inputting Parameter............................... 12
Conducting Exercise .................................................... 12
Available Memory For Exercise ................................. 13
Device Search Before Exercise ................................. 14
EN
www.OregonScientificStore.com
Heart Rate Monitor with Speed and
Distance plus PC Connection
1
SE833 EN 11.indd 1
6/1/09 10:06:43 AM
EN
INTRODUCTION
CONTROL BUTTONS
Thank you for selecting the Oregon ScientificTM Heart Rate
Monitor with Speed and Distance plus PC Connection
(SE833). Apart from being an advanced heart rate monitor,
this watch is also designed with PC compatibility to allow
users to store exercise data for analysis and fitness
management. Other functions such as speed and distance
measurement, exercise timer with laps and exercise profiles
are available for users to optimize their workout.
1
5
4
2
2.4GHz-ANT Sports System is used in this watch to achieve
reliable transmission linkage with other devices such as
chest belt, foot pod or bike pod.
3
IMPORTANT This watch is for sport purposes only and is
not meant to replace any medical device.
1.
Patent Notice: This product is protected by US Patent No.
7,237,446 (European Patent pending).
2. MODE : Toggle modes; return to previous page
- / SP : Toggle options; decrease value; pause/stop
during exercise
3. SET : Confirm settings; set alarm on/off in Time mode
PACKAGE ITEMS
4.
The package should include the following items:
5. ST / LAP / + : Toggle options; increase value; mute/unmute in Time mode
•
1 x SE833 watch
•
1 x SZ909 chest belt
•
1 x AD112 USB dongle
•
1 x AD108 application software CD
•
1 x bike mount (with 2 nylon cords)
•
2 x CR2032 3V lithium batteries (already installed in
watch and chest belt)
SE833 EN 11.indd 2
/
: Activate backlight; lock / unlock keypad
2
6/1/09 10:06:46 AM
EN
DISPLAY
1
3.
: Indicates speed and distance signal is received or
foot pod is paired
11.
: Indicates bike and cadence signal is received or
bike pod is paired
: Resolutions per minute (unit of cadence)
: Indicates keypad is locked
OPERATING MODES
STARTING YOUR WATCH (FIRST TIME)
After removing the watch from the package, activate it by
pressing and holding MODE until the display is shown. The
watch will prompt you to set your user profile.
11
SETTING UP YOUR WATCH
9 10
IMPORTANT
: Key to press indicator
or
•
To ensure accurate calculations with your exercise, you
are strongly required to set the watch and user profiles
before exercising.
•
Remember to set the profiles after every battery
replacement or reset.
: Indicates battery power is low or empty
/
: 12 hour clock
4.
: Press the key to exit
5.
: Indicates up / down or upper / lower limit
6.
10.
13.
13
12
7 8
2.
: Indicates heart rate signal is received or heart rate
chest belt is paired
12.
2
3
4
5
6
1.
9.
NOTE When the watch is left idle for 30 seconds during set
up, it will automatically exit.
: Indicates beep tone is off
7.
: Indicates exercise timer is activated
8.
: Indicates alarm is on
3
SE833 EN 11.indd 3
6/1/09 10:06:52 AM
EN
SET USER PROFILE
When prompted to set user profile after starting the watch
the first time, the screen below will be shown. Go directly
to step 4.
7. You can continue setting other profiles (watch or
exercise profiles) by pressing ST/LAP/+ repeatedly.
For normal setting procedure:
1. Press MODE repeatedly to select
.
2. Press ST/LAP/+ repeatedly to select “SET USER”.
3. Press SET to enter user profile setting options.
press
ST/LAP/+
press
ST/LAP/+
4. Press ST/LAP/+ to select option, then press SET to
confirm.
5. Continue setting your user profile according to the
following order: year of birth, month of birth, day of
birth, weight unit and weight value, by pressing the
following buttons:
•
ST/LAP/+ to increase value or select option
•
-/SP to decrease value
•
SET to confirm selected option
press
ST/LAP/+
6. After your user profile is set, the screen below will be
shown.
IMPORTANT Reset the user profile if the watch will be
4
SE833 EN 11.indd 4
used by another person.
6/1/09 10:06:58 AM
1. Press MODE repeatedly to select
EN
SET WATCH PROFILE
SET EXERCISE PROFILE IN WATCH
You can set the 3 default exercise profiles (Cardio, Run,
Cycling) in the watch.
.
2. Press ST/LAP/+ repeatedly to select “SET WATCH”.
3. Press SET to enter watch profile setting options.
4. Press ST/LAP/+ or -/SP to select the option to set: set
alarm, set time, set date, set unit, set alert*, set view**.
5. Press SET and start setting the selected option by
pressing the following buttons:
•
ST/LAP/+ to increase value or select option
•
-/SP to decrease value
•
SET to confirm selected option
* During exercise, when the heart rate is out of the target
zone, the watch will send out visual and sound alert. You
can select to turn on/off the sound alert in the “SET ALERT”
option. For details of target zone, refer to “TARGET ZONE”
section in this manual.
1.
Press MODE repeatedly to select
2.
In “SET PROG”, press SET to enter exercise options.
3.
Press ST/LAP/+ or -/SP to select the exercise to set:
set cardio, set run, set cycling.
4.
Press SET to confirm selection, then continue to set
the profile* of the selected exercise by pressing the
following buttons:
.
•
ST/LAP/+ to increase value or select option
•
-/SP to decrease value
•
SET to confirm selected option
* The profile setting sequence is as follows:
1. Warm up time
** During exercise, the watch will toggle display your
exercise information. You can select to turn on/off the toggle
display in the “SET VIEW” option.
to decrease
value
to increase
value
warm up time
SET EXERCISE PROFILE
to exit
IMPORTANT Reset the exercise profile if the watch will be
used by another person.
to next page
You can select to set the default exercise profiles in the
watch or to upload custom exercise profiles from the PC
application software.
5
SE833 EN 11.indd 5
6/1/09 10:07:00 AM
EN
2. Interval training on/off
2a
to toggle on or off
interval training on/off
If you set interval training to on, you have to set:
v Number of interval (2-5)
to next page
to exit
v Interval work time for each interval
press SET
v Rest time for each interval
v Target heart rate zone (1-5) [For details, refer to
“TARGET ZONE” section in this manual]
to increase value
to decrease value
number of interval
to next page
to exit
v Recovery timer on/off
press SET
to increase value
to decrease value
interval work time for each interval
to confirm setting; to next page
to exit
press SET
to decrease value
to increase value
rest time for each interval
to exit
to confirm setting; to next page
press SET
to increase value
to decrease value
target heart rate zone
to exit
press SET
to next page
press SET
to toggle on or off
to exit
recovery timer on/off
to next page
6
SE833 EN 11.indd 6
6/1/09 10:07:04 AM
v Exercise distance or exercise time
v Target heart rate zone (1-5) [For details, refer to
“TARGET ZONE” section in this manual]
v Exercise time
v Target heart rate zone (1-5) [For details, refer to
“TARGET ZONE” section in this manual]
v Recovery timer on/off
to toggle on or off
interval training on/off
v Recovery timer on/off
to next page
to exit
to toggle on or off
interval training on/off
press SET
to next page
to exit
to toggle by distance or by time
press SET
exercise by distance or by time
to next page
to exit
to increase value
to decrease value
EN
2b If you set interval training to off, you have to set (for
Cardio setting only):
exercise time
press SET
to confirm setting; to next page
to exit
exercise distance; exercise time
to confirm setting; to next page
to exit
to increase value
to decrease value
to increase value
to decrease value
press SET
target heart rate zone
press SET
to next page
to exit
to decrease value
to increase value
target heart rate zone
press SET
to exit
to toggle on or off
recovery timer on/off
to exit
press SET
to next page
to toggle on or off
recovery timer on/off
2c If you set interval training to off, you have to set (for
Run and Cycling setting only):
v Exercise by distance or by time
SE833 EN 11.indd 7
to next page
to exit
to next page
7
6/1/09 10:07:10 AM
EN
UPLOAD CUSTOM EXERCISE PROFILE FROM PC
APPLICATION SOFTWARE
2.
You can upload up to 3 exercise profiles from the PC
application software to your watch with customised setting.
But you cannot modify the settings of the uploaded exercise
profiles through the watch, you can only modify them
through the software.
Strap the chest belt across your chest. To ensure an
accurate heart rate signal, adjust the strap until the belt
sits snugly below your pectoral muscles.
For more details about uploading custom exercise profiles
from software to the watch, refer to “SYNCHRONISING
SE833 WATCH WITH PC APPLICATION SOFTWARE” in
this manual.
For more details about modifying the custom exercise
profiles in the software, refer to “CREATE OR MODIFY
USER PROFILE / DEVICE SETTING” in the PC Application
Software User Guide inside the CD-ROM.
NOTE If no custom exercise profile is uploaded from the
software to the watch, the watch will only display its default
exercise profiles.
TIPS
WEARING CHEST BELT
1.
Wet the conductive pads on the underside of the chest
belt with a few drops of water or a conductive gel to
ensure solid contact.
conductive pads
8
SE833 EN 11.indd 8
•
The position of the chest belt affects its performance.
Move the chest belt along the strap so that it falls above
your heart.
•
Avoid areas with dense chest hair.
•
In dry, cold climates, it may take several minutes for the
chest belt to function steadily. This is normal and should
improve with several minutes of exercise.
•
To maintain the best performance of your chest belt,
please handle it with care according to the following:
-
Do not wrap the chest belt in a wet towel nor with
other wet materials.
-
Do not store the chest belt in a hot (about 50°C)
6/1/09 10:07:13 AM
Do not place or wash the chest belt under running
water, instead clean it with a wet cloth.
-
Do not place the conductive rubber face down on a
metal table or surface.
-
Properly dry the chest belt immediately after use.
•
One way is to strap the belt across your chest, and wait
until the watch displays
EN
and humid (about 90%) environment.
-
and
PAIRING DEVICE
IMPORTANT To ensure accurate calculations with your
exercise, you should pair the watch with SZ909 chest belt.
This chest belt allows pairing of both heart rate and foot pod
functions.
(only with SZ909)
•
i.
The watch can also pair with other chest belts and devices
such as foot pod and bike pod that use the ANT Sports
System. However, other chest belts can only allow pairing
of heart rate function.
Hold the chest belt firmly with your thumbs touching
the conductive pads that normally contact your
chest.
ii. Rub your thumbs back and forth across the
conductive pads a few times until the watch displays
the screens above.
1. Press MODE repeatedly to select
. The watch
will show how many and which devices are paired
(if any). If no device is paired, the watch will show “0
DEVICE PAIRED”.
NOTE Only with SZ909 chest belt can you pair both HR belt
and foot pod. If you pair with other ANT-system chest belt,
only HR belt can be found.
2. Press SET to enter “PAIR DEVICE”. Press SET to start
pairing.
NOTE For SZ909 chest belt, pairing is only considered
successful when both HR belt and foot pod are found.
PAIR WITH SZ909 CHEST BELT (OR OTHER
ANT-SYSTEM CHEST BELTS)
PAIR WITH ANT-SYSTEM FOOT POD / BIKE POD
You have 2 ways to pair the watch with chest belt.
9
SE833 EN 11.indd 9
The other way is as follows:
You can purchase foot pod or bike pod separately to pair
with your watch, as long as they use the ANT system. For
6/1/09 10:07:16 AM
EN
NOTE If the watch is already paired with SZ909 chest belt,
and you want to pair with another chest belt, you have to
first delete the SZ909 chest belt before you are able to pair
with another chest belt. This principle also applies to bike
pod and foot pod.
information on pairing, refer to their User Guides.
•
When the foot pod is paired successfully, the watch will
display
INPUT BIKE WHEEL SIZE (FOR BIKE POD)
The watch will not show “WHEEL SIZE” if no bike pod is
paired. For details of bike wheel size, refer to “BIKE WHEEL
SIZE” section in this manual.
•
If your watch is paired with bike pod, you will be asked to
input the wheel size values.
When the bike pod is paired successfully, the watch will
display
1. Press MODE repeatedly to select
.
2. Press SET.
3. Press ST/LAP/+ repeatedly to select “WHEEL SIZE”.
4. Press SET.
5. Input the bike wheel size by pressing ST/LAP/+ to
increase values or -/SP to decrease values.
6. Press SET to confirm.
REMOVE PAIRED DEVICE
NOTE If pairing is weak and unstable:
The watch will not show “DEVICE REMOVE” if no device
is paired.
•
Shorten the distance between the device and watch.
•
Re-adjust the position of the device.
1. Press MODE repeatedly to select
•
Check the batteries. Replace them when necessary.
2. Press SET.
3. Press
ST/LAP/+
repeatedly
to
.
select
“DEVICE
10
SE833 EN 11.indd 10
6/1/09 10:07:17 AM
EN
REMOVE”.
distance for calibration.
4. Press SET.
Ø If calibration is successful, the watch will display
5. Press ST/LAP/+ to select which device to delete.
6. Press SET to confirm selection.
or
CALIBRATING PAIRED DEVICE
The watch will not show “CAL DEVICE” if no device is
paired.
You can calibrate by running, walking or inputting parameter.
The parameter is the same value after you have successfully
calibrated by running or walking.
Run parameter
If you want to calibrate the device immediately after pairing,
go directly to step 4. Otherwise, start from the beginning.
NOTE The Run parameter and Walk parameter is the
value to enter when calibrating by inputting parameter.
CALIBRATE BY RUNNING OR WALKING
1. Press MODE repeatedly to select
Walk parameter
Ø If calibration fails, the watch will display
.
2. Press SET.
3. Press ST/LAP/+ repeatedly to select “CAL DEVICE”.
4. Press SET.
5. Press ST/LAP/+ to select “CAL BY RUN” or “CAL BY
WALK”.
6. Press SET to confirm selection.
7. The watch will conduct a device search first, as
indicated by flashing
and
. Wait until
flashing, then press SET to start calibration.
stops
NOTE The SZ909 chest belt should be calibrated both
by running and walking.
8. Ensure to complete walking or running the selected
11
SE833 EN 11.indd 11
6/1/09 10:07:22 AM
EN
CALIBRATE BY INPUTTING PARAMETER
There are 2 options for exercise: AUTO and PROG.
You can only know your parameter if you have already
successfully calibrated by running or walking beforehand.
This is because the parameter is the same value displayed
after you have successfully calibrated by running or walking.
By inputting parameter, you will be spared the time of
calibrating by running or walking again.
•
AUTO refers to conducting exercise without using the
set exercise profile.
•
PROG refers to conducting exercise by using the set
exercise profile (refer to “SET EXERCISE PROFILE”
section in this manual).
1. Press MODE repeatedly to select
To conduct exercise:
.
1.
2. Press SET.
Press MODE to select
•
3. Press ST/LAP/+ repeatedly to select “CAL DEVICE”.
.
To exercise without exercise profile, select
4. Press SET.
5. Press ST/LAP/+ to select “PARA INPUT”.
6. Press SET to confirm selection.
available lap
memory
7. Input parameter for Walk by pressing ST/LAP/+ to
increase values or - / SP to decrease values. The
parameter is the same value after you have successfully
calibrated by walking.
8. Press SET to confirm.
•
9. Input parameter for Run by pressing ST/LAP/+ to
increase values or - / SP to decrease values. The
parameter is the same value after you have successfully
calibrated by running.
To exercise with exercise profile, press ST/LAP/+ to
select
10. Press SET to confirm.
available lap
memory
CONDUCTING EXERCISE
IMPORTANT To ensure accurate calculations with your
exercise, you should pair the watch with SZ909 chest belt or
other devices such as bike pod. However, if without pairing,
the chest belt will only receive heart rate signal.
SE833 EN 11.indd 12
12
Press SET, then press -/SP or ST/LAP/+ to select
which exercise profile to use.
6/1/09 10:07:25 AM
EN
NOTE Available lap memory refers to the lap
memory available to do exercise. See “AVAILABLE
MEMORY FOR EXERCISE” for more details.
2. Press SET to confirm selection.
or
3. Wait for the watch to search for device first before
pressing SET to start exercise. See “DEVICE SEARCH
BEFORE EXERCISE” for more details.
4. During exercise, you can view your exercise data
by manually pressing SET repeatedly or automatic
toggling. See “AUTO TOGGLE DATA VIEW DURING
EXERCISE” for more details. To know what exercise
data are shown, see “VIEW EXERCISE DATA DURING
EXERCISE” for more details.
and the watch will display the screens below if you press
SET to exercise. You cannot start exercise unless you
overwrite old lap memories.
5. If you need to take a break during exercise, press -/SP.
You can resume exercise by pressing ST/LAP/+. See
“PAUSE AND RESUME EXERCISE” for more details.
2SEC
6. After you completed your exercise, you can save the
exercise data. See “SAVE EXERCISE DATA” for
more details.
Press SET to overwrite old lap memories. After overwriting,
the available lap memory will resume and the screens will
display
AVAILABLE MEMORY FOR EXERCISE
The watch must have available memory to allow for exercise.
If you want to exercise but there is no available lap memory,
the watch will prompt you to overwrite first before you can
exercise.
When the available lap memory is used up, AUTO and
or
PROG screens will show
13
SE833 EN 11.indd 13
6/1/09 10:07:30 AM
EN
DEVICE SEARCH BEFORE EXERCISE
4. Press ST/LAP/+ or -/SP repeatedly to select “SET
VIEW”.
Before you start exercise, allow the watch a few seconds
to search for device first. This is to ensure you can receive
comprehensive calculations (such as your lap, calorie, heart
rate, distance, step, speed and cadence) during exercise.
But if you start exercise without device search, you will only
receive heart rate readings.
When you are in the
device icons (
,
no heart rate values.
and heart rate values
by pressing SET.
5. Press SET.
6. Press ST/LAP/+ to select “TOGGLE ON”.
7. Press SET to confirm selection.
NOTE If you have not set the above setting, you can
still view your exercise data by manually pressing SET
repeatedly during exercise.
screen below, you will find that the
, or
) are flashing and there are
Wait until
or
stops flashing
appear. Then you can start exercise
PAUSE AND RESUME EXERCISE
If you need to take a break during exercise, press -/SP. Do
not press MODE, otherwise your exercise data will be lost.
During the long pause, the watch will lost connection with
the device. Hence, once you resume exercise, allow the
watch a few seconds to search for device first by pressing
AUTO TOGGLE DATA VIEW DURING EXERCISE
During exercise, if you want the watch to automatically toggle
the exercise data, go to Setting Mode to do the setting.
1. Press MODE repeatedly to select
SET. You will find that the device icons (
,
, or
) are
or
flashing and there are no heart rate values. Wait until
stops flashing and heart rate values appear. Then you
can resume exercise by pressing ST/LAP/+.
.
2. Press ST/LAP/+ repeatedly to select “SET WATCH”.
3. Press SET.
SE833 EN 11.indd 14
14
6/1/09 10:07:34 AM
•
1. Press -/SP to stop the watch from counting. Do not
press MODE, otherwise your exercise data will be lost.
2. Press and hold -/SP to save and exit.
When paired with HR chest belt (except SZ909
chest belt)
calorie
exercise
time
heart rate
EXCEED HEART RATE LIMIT
EN
SAVE EXERCISE DATA
lap
exercise
time
heart rate
During exercise, if the upper or lower heart rate limit is
exceeded, the watch will warn by beeping and displaying
•
When paired with HR chest belt + foot pod (or
paired with SZ909 chest belt only)
or
distance
speed
heart rate
NOTE This feature is only available when exercising with
exercise profile. It is not available when exercising in AUTO
sub-mode.
VIEW EXERCISE DATA DURING EXERCISE
During exercise, you can view your exercise data either
by automatic toggling or manually pressing SET to toggle
screens.
step
speed
heart rate
lap
calorie
exercise
time
Exercise data for AUTO exercise
The diagrams below illustrate what exercise data will show
during exercise when paired with different devices.
15
SE833 EN 11.indd 15
6/1/09 10:07:41 AM
EN
•
When paired with bike pod
•
When using Running profile
distance
speed
heart rate
distance
speed
heart rate
lap
speed
heart rate
RPM
calorie
exercise
time
cadence
lap
step
heart rate
Exercise data for PROG exercise
The diagrams below illustrate what exercise data will show
during exercise when using different exercise profiles.
•
calorie
remaining time
heart rate
interval
heart rate
•
When using Cycling profile
When using Cardio profile
distance
speed
calorie
remainning time
heart rate
heart rate
interval
heart rate
interval
heart rate
calorie
remaining time
RPM
cadence
lap
lap
speed
heart rate
heart rate
16
SE833 EN 11.indd 16
6/1/09 10:07:51 AM
•
EN
VIEWING EXERCISE RECORD
For Auto
NOTE Memory Mode will not display when no exercise
record is stored.
total laps
total distance
exercise time
To view exercise records:
1. Press MODE repeatedly to select
. Your watch
will display the number of exercise records.
minimum
heart rate
maximum
heart rate
average
heart rate
calorie
%fat burnt
2. Press SET.
3. View your exercise records by pressing the following
buttons:
•
ST/LAP/+ to select option
•
-/SP to select option
•
SET to enter Summary Record page or Lap Record
page and view record details
•
MODE to return to previous page
average cadence
maximum cadence
•
total steps
maximum speed
average speed
For Cardio
In each exercise record, it may either include a Summary
Record page only or a Summary Record page plus a Lap
Record page.
total laps
exercise time
VIEW EXERCISE RECORD IN SUMMARY RECORD
PAGE
calorie
%fat burnt
The diagrams below illustrate what exercise record details
will show for different exercise profiles. Press SET to toggle
screens.
minimum
heart rate
maximum
heart rate
average
heart rate
time above HR zone
time below HR zone
time in HR zone
17
SE833 EN 11.indd 17
6/1/09 10:08:00 AM
EN
•
VIEW EXERCISE RECORD IN LAP RECORD PAGE
For Running
The diagrams below illustrate what exercise record details
will show for different exercise profiles. Press SET to toggle
screens.
total laps
total distance
exercise time
minimum
heart rate
maximum
heart rate
average
heart rate
calorie
%fat burnt
total steps
maximum speed
average speed
•
•
For Auto
minimum
heart rate
maximum
heart rate
average
heart rate
time above HR zone
time below HR zone
time in HR zone
average
cadence
maximum
cadence
For Cycling
average
speed
maximum
speed
total laps
total distance
exercise time
minimum
heart rate
maximum
heart rate
average
heart rate
calorie
%fat burnt
average
cadence
maximum
cadence
•
For Cardio
minimum
heart rate
maximum
heart rate
average
heart rate
time above HR zone
time below HR zone
time in HR zone
time above HR zone
time below HR zone
time in HR zone
average speed
maximum speed
18
SE833 EN 11.indd 18
6/1/09 10:08:12 AM
EN
DELETE MEMORIES
For Running
•
You cannot select memory to delete, but have to delete all
memories.
minimum
heart rate
maximum
heart rate
average
heart rate
. Your watch
1. Press MODE repeatedly to select
will display the number of exercise records.
2. Press ST/LAP/+. Your watch will ask if you are going to
clear memory.
3. Press and hold SET until the watch displays
time above HR zone
time below HR zone
average speed
maximum speed
time in HR zone
For Cycling
•
minimum
heart rate
maximum
heart rate
average
heart rate
KNOWING YOUR FITNESS INDEX
time above HR zone
time below HR zone
time in HR zone
average
cadence
maximum
cadence
Your watch will generate a fitness index based on your
aerobic exercise (by running 1 mile or 1.60 km).
IMPORTANT Ensure your watch is already paired with
heart rate chest belt before doing the fitness test.
average speed
maximum speed
.
1.
Press MODE to select
2.
Press ST/LAP/+ repeatedly to select “FITNESS
TEST”.
3.
Press SET. The watch will conduct a device search
19
SE833 EN 11.indd 19
6/1/09 10:08:21 AM
EN
first, as indicated by flashing
and
OTHER OPERATION AND SETTING
. Wait until
stops flashing. The watch will also prompt you to
run 1 mile.
ACTIVATE BACKLIGHT
Press
4. Press SET to start running. Ensure to complete running
1 mile for accurate fitness measurement. While running,
the watch will display the exercise time, distance and
heart rate.
5.
/
to turn backlight On for 5 seconds.
NOTE The backlight function will not operate if “
” or “
”
is displayed.
LOCK / UNLOCK KEYPAD
After completing the run, your watch will automatically
calculate and show your fitness index. The higher the
index, the fitter you are. The diagrams below provide a
general guide as to what your fitness index means.
Press and hold
/
for 2 seconds to lock or unlock
keypad.
indicates keypad is locked.
FITNESS INDEX FOR MEN
SET ALARM ON / OFF
60
Age
50
FA
I
40
OD
AG
R
1. In Time Mode, press SET.
GO
AV
ER
2. Press ST/LAP/+ to turn alarm On or Off.
the alarm is turned On.
E
30
3. Press MODE or SET to exit.
20
22
27
32
Fitness Index
37
SILENCE ALARM
42
•
FITNESS INDEX FOR WOMEN
•
50
AV
E
RA
FA
I
40
R
Press any button to stop the alarm and it will activate
again 24 hours later.
OR
60
Age
indicates
Set the alarm to Off.
GO
GE
OD
SET BEEP TONE ON / OFF
30
In Time Mode, press ST/LAP/+.
is turned Off.
20
15
20
SE833 EN 11.indd 20
25
30
Fitness Index
35
indicates the beep tone
40
20
6/1/09 10:08:25 AM
EN
REPLACE BATTERY
To replace chest belt battery:
If the battery power of your watch or chest belt is low, the
watch will display:
watch low battery
chestbelt low battery
or
To replace watch battery:
1.
Use a coin to open the battery compartment lid by
turning it anticlockwise.
2.
Remove the old battery and insert a new CR2032, 3V
lithium battery.
3.
Secure the lid by turning the coin clockwise.
INSTALL BIKE MOUNT
1. Clasp the bike mount onto a bike or exercise machine.
1.
Use a small screwdriver to open the battery
compartment lid.
2.
Remove the old battery and insert a new CR2032, 3V
lithium battery.
3.
Secure the lid by screwing it back into place.
21
SE833 EN 11.indd 21
6/1/09 10:08:30 AM
EN
2. Insert the nylon cord to secure the bike mount according
to the diagrams below.
•
Maximum Heart Rate (MHR)
•
Upper heart rate limit
•
Lower heart rate limit
MHR is expressed in beats per minute. You can get your
MHR from an MHR test, or you can estimate it by using the
following formula:
220 - age = MHR
The watch is pre-programmed with 5 target zone options,
each with its lower and upper heart rate limit, as listed in
the table below.
3. Fix the watch onto the bike mount.
Zone 1
Zone 2
Zone 3
Zone 4
Zone 5
Lower Limit
50% x MHR
60% x MHR
70% x MHR
80% x MHR
90% x MHR
Upper Limit
60% x MHR
70% x MHR
80% x MHR
90% x MHR
100% x MHR
The most popular zone range is from 50% to 80% of
your Maximum Heart Rate. This is where you achieve
cardiovascular benefits, burn fat and become fitter.
50%
60%
USEFUL REFERENCE
70%
TARGET ZONE
80%
To help achieve maximum health benefits from your workout
programme, it is important to know your:
90%
22
SE833 EN 11.indd 22
100%
Moderate Activity
Weight Management
Aerobic Zone
Anaerobic Threshold Zone
Red Line Zone ( maximum capacity )
6/1/09 10:08:37 AM
TRAINING
CATEGORY
MHR%
DESCRIPTION
65-78%
This is the lowest training
intensity level. It is good for
beginners and those who want to
strengthen their cardiovascular
systems.
Aerobic
Exercise
65-85%
Increases strength and
endurance. It works within the
body’s oxygen intake capability,
burns more calories and can
be maintained for a long period
of time.
Anaerobic
Exercise
78-90%
Generates speed and power.
It works at or above the body’s
oxygen intake capability,
builds muscle and cannot be
maintained for a long period
of time.
Health
Maintenance
week for a healthier cardiovascular system.
WARNING Determining your individual training category is
a critical step in the process towards an efficient and safe
training programme. Please consult your doctor or health
professional to help you determine exercise frequency and
duration appropriate for your age, condition and specific
goals.
BIKE WHEEL SIZE
Match the ETRTO or wheel size diameter printed on the
wheel with the wheel size setting at the right hand column
of the table below. Input the relevant wheel size setting
number after bike pod is paired.
The upper and lower heart rate limits are calculated by
multiplying your MHR by the percentages of the selected
training category.
For example:
A 40-year-old training for basic health maintenance:
•
His upper heart rate limit [220 - 40(age)] x 78%
•
His lower heart rate limit [220 - 40(age)] x 65%
EN
There are three categories of training as described in the
table below.
IMPORTANT Always warm up before exercise and select
the training category that best suits your physique. Exercise
regularly, 20 to 30 minutes per session, three to four times a
ETRTO
Wheel size
diameter
(inches)
Wheel size
setting (mm)
25-559
23-571
35-559
37-622
47-559
20-622
52-559
23-622
25-622
28-622
32-622
42-622
47-622
26 x 1.0
650 x 23C
26 x 1.50
700 x 35C
26 x 1.95
700 x 20C
26 x 2.0
700 x 23C
700 x 25C
700 x 28
700 x 32C
700 x 40C
700 x 47C
1884
1909
1947
1958
2022
2051
2054
2070
2080
2101
2126
2189
2220
23
SE833 EN 11.indd 23
6/1/09 10:08:42 AM
EN
NOTE Wheel sizes on this table are for reference only as
wheel size depends on the wheel type and air pressure.
SYNCHRONISING SE833 WATCH WITH PC
APPLICATION SOFTWARE
You can either upload data from the software to the SE833
watch or download data from the SE833 watch to the
software.
CONNECTING WITH PC APPLICATION SOFTWARE
The AD108 PC Application Software is a software designed
for users in order to benefit from all features of their SE833
watch. You can use the software to upload and download
data to/from your SE833 watch, and to organize and view
the downloaded data on your computer. Additionally, you
can also use the software to create or modify the settings
of your watch.
Data to upload from software to watch:
•
up to 3 customised exercise profiles (the custom exercise
profiles will be added in addition to the default exercise
profiles in the watch)
•
new or modified user data or device settings (once
uploaded, the current user data and device settings in
the watch will be overwritten)
Software features include:
•
Up to 50 multi-user accounts
•
Up to 3 custom exercise profiles for upload to watch
•
Display of exercise records in summaries and graphs
•
Creation and modification of user data and settings
Data to download from watch to software:
PC REQUIREMENTS
Make sure your PC has the following configuration before
installing the software:
•
Operating system: Microsoft Windows 2000, XP SP2 or
Vista
•
Processor: Intel® Pentium® III 1GHz or faster (minimum);
Pentium 4 2GHZ or faster (recommended)
•
RAM: 512MB (minimum); 1GB (recommended)
•
Hard disk free space: Min. 512MB
•
Screen Display Area: 1024 x 600 pixels
SE833 EN 11.indd 24
•
all exercise records (exercise records will be saved and
accumulated in the software)
•
new or modified user data or device settings (once
downloaded, the current user data and device settings
in the software will be overwritten)
NOTE For more details about the exact data being uploaded
or downloaded, refer to “UPLOAD AND DOWNLOAD
DATA” in the PC Application Software User Guide inside
the CD-ROM.
24
6/1/09 10:08:42 AM
•
To upload data from the software to the SE833 watch,
click
.
On the PC
•
To download data from the SE833 watch to the software,
click
.
•
To exit, press Esc.
1. Plug in the USB dongle.
.
2. Start up the software by double-clicking
3. Click
EN
To synchronise watch with software:
on the software.
NOTE Synchronisation cannot be cancelled while in
progress.
On the watch
4. Press MODE repeatedly to select
On the watch
.
7. If synchronisation is successful, the screen will display
. If synchronisation fails, the screen will
5. The screen
to start synchronising.
will be displayed. Press SET
On the PC
6. The message box below will be displayed.
display
. Press ST/LAP/+ then SET to
try again or press MODE to exit.
UPLOAD
DOWNLOAD
NOTE For more details of the software interface and
functions, refer to the PC Application Software User
Guide inside the CD-ROM.
25
SE833 EN 11.indd 25
6/1/09 10:08:47 AM
EN
WATER RESISTANCE
Item
SE833 watch
AD112 USB
dongle
CLOCK
50 metres (164 feet)
Time format
12/24 hour format with hour /
minute / second
This means you can use the watch
for swimming or other water sport
activities (such as surfing) but it must
not be used for snorkeling and deep
water diving.
Date format
Year range
DD / MM or MM / DD
2009 - 2058
Alarm
Alarm with daily, weekday or
weekend settings
TRAINING
Exercise time range
Rest time range
Warm up time range
Recovery timer range
Target heart rate zone
NOTE
•
•
SZ909 chest
belt
SPECIFICATIONS
Water resistance
Ensure the buttons and battery
compartment are secured and
intact before exposing the watch
to excessive water.
Avoid pressing the buttons while
in the water or during heavy
rainstorms, as this may cause
water to enter the watch, leading
to malfunction.
10 metres (32.8 feet)
Not recommended to use for
swimming.
No
00:00:00 to 99:59:59
00:00:00 to 99:59:59
00:00:00 to 00:15:00
0 or 5 minutes
Zone 1 to 5
Lower heart rate limit
range
30 to 220 bpm
Upper heart rate limit
range
80 to 240 bpm
Distance measurement
range
0 to 60.99 unit (unit is km or
mile)
Step
range
0 to 999999
measurement
Maximum lap count
99
Cadence measurement
range
1 to 1999 rpm
Number
training
of
interval
2 to 5
NOTE Even if both the SE833 watch and the SZ909 chest
Calorie range
0 to 9999 kcal
belt are water-resistant, as radio signals do not carry in
water, signal transmission between the watch and chest belt
will still be impossible in water.
Fat burn
range
0 to 100%
percentage
Fitness Index range
1 to 99
26
SE833 EN 11.indd 26
6/1/09 10:08:48 AM
POWER
Watch
1 x CR2032 3V lithium battery
SZ909 chest belt
1 x CR2032 3V lithium battery
OPERATING ENVIRONMENT
Operating temperature
For watch
0°C to 40°C
(32°F to 104°F)
For SZ909 chest belt
5°C to 40°C
(41°F to 104°F)
Storage temperature
For watch and SZ909 chest
belt
-20°C to 60°C
(-4°F to 140°F)
PRECAUTIONS
To ensure you use your product correctly and safely, read
these warnings and the entire user manual before using the
product:
•
Use a soft, slightly moistened cloth. Do not use
abrasive or corrosive cleaning agents, as these may
cause damage. Use lukewarm water and mild soap to
clean the watch thoroughly after each training session.
Never use the product in hot water or store it when
wet.
•
Damage to the product may occur if the keys are
pressed underwater.
•
Hot steam may cause damage to the product. Do not
wear it in steaming shower, spa or hot tub.
The product should be rinsed thoroughly with fresh
water after being in contact with salt water.
•
Do not subject the product to excessive force, shock,
dust, temperature changes, or humidity. Never expose
the product to direct sunlight for extended periods.
Such treatment may result in malfunction.
•
Do not bend or stretch the transmitter part of the chest
belt.
•
Do not tamper with the internal components. Doing
so will terminate the product warranty and may cause
damage. The main unit contains no user-serviceable
parts.
•
Do not scratch hard objects against the LCD display as
this may cause damage.
•
Take precautions when handling all battery types.
•
Remove the batteries whenever you are planning to
store the product for a long period of time.
•
When replacing batteries, use new batteries as
specified in this user manual.
•
The product is a precision instrument. Never attempt
to take this device apart. Contact the retailer or our
customer service department if the product requires
servicing.
•
Do not touch the exposed electronic circuitry, as there
is a danger of electric shock.
•
Check all major functions if the device has not been
used for a long time. Maintain regular internal testing
and cleaning of your device. Have your watch serviced
by an approved service center annually.
•
When disposing of this product, ensure it is collected
EN
•
27
SE833 EN 11.indd 27
6/1/09 10:08:48 AM
EN
separately for special treatment and not as normal
household waste.
•
Due to printing limitations, the displays shown in this
manual may differ from the actual display.
•
The contents of this manual may not be reproduced
without the permission of the manufacturer.
EU-DECLARATION OF CONFORMITY
Hereby, Oregon Scientific, declares that this Heart Rate
Monitor with Speed and Distance plus PC Connection (model
SE833) is in compliance with the essential requirements and
other relevant provisions of Directive 1999/5/EC. A copy of
the signed and dated Declaration of Conformity is available
on request via our Oregon Scientific Customer Service.
NOTE The technical specifications for this product and the
contents of the user manual are subject to change without
notice.
COUNTRIES RTTE APPROVED COMPLIED
All EU countries, Switzerland CH
and Norway N
NOTE Features and accessories will not be available in all
countries. For more information, please contact your local
retailer.
FCC (US) / IC (CANADA) STATEMENT
This device complies with Part 15 of the FCC Rules.
Operation is subject to the following two conditions: (1) This
device may not cause harmful interference, and (2) This
device must accept any interference received, including
interference that may cause undesired operation.
ABOUT OREGON SCIENTIFIC
Visit our website (www.oregonscientific.com) to learn more
about Oregon Scientific products.
If you’re in the US and would like to contact our Customer
Care department directly, please visit:
WARNING Changes or modifications not expressly
www2.oregonscientific.com/service/support.asp
approved by the party responsible for compliance could void
the user’s authority to operate the equipment.
For international inquiries, please visit:
www2.oregonscientific.com/about/international.asp
28
SE833 EN 11.indd 28
NOTE This equipment has been tested and found to comply
with the limits for a Class B digital device, pursuant to Part
15 of the FCC Rules. These limits are designed to provide
reasonable protection against harmful interference in a
residential installation.
6/1/09 10:08:49 AM
•
Reorient or relocate the receiving antenna.
•
Increase the separation between the equipment and
receiver.
•
Connect the equipment into an outlet on a circuit
different from that to which the receiver is connected.
•
Consult the dealer or an experienced radio / TV
technician for help.
EN
declare that the product
This equipment generates, uses and can radiate radio
frequency energy and, if not installed and used in accordance
with the instructions, may cause harmful interference to
radio communications. However, there is no guarantee
that interference will not occur in a particular installation.
If this equipment does cause harmful interference to radio
or television reception, which can be determined by turning
the equipment off and on, the user is encouraged to try
to correct the interference by one or more of the following
measures:
Product No.:
SE833
Product Name:
Heart Rate Monitor with Speed and
Distance plus PC Connection
Manufacturer:
IDT Technology Limited
Address:
Block C, 9/F, Kaiser Estate,
Phase 1,41 Man Yue St.,
Hom, Kowloon,
Hung
Hong Kong
is in conformity with Part 15 of the FCC Rules. Operation is
subject to the following two conditions: 1) This device may
not cause harmful interference. 2) This device must accept
any interference received, including interference that may
cause undesired operation.
This Class B digital apparatus complies with Canadian
ICES-003.
DECLARATION OF CONFORMITY
The following information is not to be used as contact for
support or sales. Please visit our website at
www2.oregonscientific.com/service for all enquiries.
We
Name:
Oregon Scientific, Inc.
Address:
19861 SW 95th Ave.,Tualatin,
Oregon 97062 USA
Telephone No.:
1-800-853-8883
29
SE833 EN 11.indd 29
6/1/09 10:08:49 AM