1
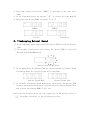
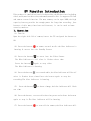
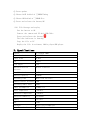
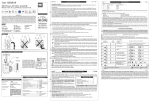
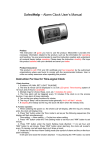
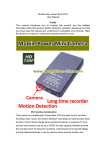
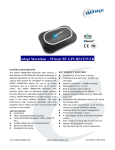
Mlutifunction Clock DVR
User Manual
Profile
This manual introduce how to operate this product and the details
information about this product. Before you start to operate it, please
be sure that you read this manual and understand it completely and
correctly.Wish it can bring to reasonable and favotable.
1、Structure
2、Introduction
◇ Date and Time Display
◇ Alarm Function and Snooze Function,the interval(1-60minutes)
◇ Voice Broadcast the present time.
◇ Tempreture Display
◇ Natural Sound Broadcast(Interval 10-60minutes)
3、Time:
◇ In the status of time display,press and click the button,SET to reset
Year.There is “2010” flashing on LCD,press the button,UP or DOWN to
choose the Year.
◇ Press the button,SET to reset Month-Day-Hour-Minute one by one
Time Mode
Year Reset
Month Reset
Date Reset
Hour Reset
Minute Reset
◇ When the resetting finishes,press and release the button,”MODE” to
get out.
4、Alarm Reset
◇ In the status of Time,press and release the button,MODE to Alarm Reset
Mode
◇ Press and release the button,SET one time to reset the Hour
Press and release the button,SET two times to reset the minute
Press and release the button,SET three times to Reset the Snooze
Mode(Time Interval,1-60mnutes)
Press and release the button,SET four times to reset Alarm Ring,press
the button,UP or the button,DOWN to choose.
Alarm Mode
Snooze Mode Time Interval
Hour Reset
Minute Reset
Alarm Ring
◇ Press and release the button,“MODE” to get out,the present time
display on LCD.
◇ In the status of Alarm,press and release the button,UP to turn on or
turn off Alarm.When the Snooze Function on,the “
Alarm Off
On
Alarm On
” will flash.
Snooze
◇ Press and release the button,“MODE” to get back to the time reset
mode.
◇ In the time mode,press the button,”UP” to choose the time mode(12
or 24),press the button,DOWN to choose ℃ or ℉
12Mode
24Mode
Celsius
Fahrenheit
5、Timekeeping,Natural Sound
◇ In the time mode,press and release the button,TALK to talk the present
time.
◇ In any mode status,press and release the button,TIME to reset the
Natural Sound(10-60minutes)
Natural Sound Time Reset
◇ In any mode,press the button,TALK for three senconds to Natural Sound
Listenning Mode,the interval time will countdown.
Natural Sound Mode
Natural Sound Stop
◇ In the mode of Natural Sound Mode,press and release the button,TALK
to pause,press and release again to choose the next Natural Sound.Press
and release the button,MODE to get out.
Notice:On the Display,there are two signes,one is PM and the other is
“ ”.Pleasepay attention to the following picture:
DV Function Introduction
This product is a multifuctional clock provides the DV functions including
video,audio,motion detection,webcamera,movable disc.It supports TF Card
and remote control function. The max, memory can be upto 32GB,the high
capacity battery provide the enough power for long time recording. Just
because of this many functions and features, it can be used as home
security monitor.
1、Operation
(1)Turn On
Open the right side lid of camera,insert the TF card,push the button to
ON.
(2)Press the button,
on remote control untile the blue indicator is
burning.It enters into the Standby Status.
(3)Press the button,
to enter into the Video Status.
The Blue Indicator is off after it flashes three time.
Press the button,
again to stop video.
The Blue Indicator is burning.
(4)Press the button,
to recourd audio,the blue indicator will be off
after it flashes three times.Press the button again to stop the
recording.The blue indicator is burning.
(5) Press the button,
to shoot a image,the blue indicator will flash
one time.
(6)Press the button, to start this function,press and release the button
again to stop it.The blue indicator will be burning.
(7)Press the button,
to turn off the camera,the blue indicator will
be off.
(8)Push the button to ON,connect the camera and PC,then,press and release
the button,
on remote control.
(9)Webcamera
Install the software in CD
Push the button to ON
Press the button,
to turn on the camera
Connect Camera and PC with original cable
(10)Charge
Push the button to off
Connect the camera and power source
The red indicator is burning
During charging,the red indicator is burning
When it is full,the red indicator is off
Notice,PC also can provide the power to it.
(11)Reset
Because of the wrong operation or any other unknown reasons,there is
no any feedback from the camera,please push the button to OFF and push
it to ON again.
(12)Low Power
When it is low power,the blue indicator will flash quickly.
(13)UPDate
◇ When the programe lost,please install the drive proramme in CD
◇ Click the STK02NU
◇ Press update
◇ Choose 0x35 behind of ①DRAM Timing
◇ Choose 8M behind of ②DRAM Size
◇ Press and release the button,OK
(14)File Storage and replay
Pus the button to ON
Connect the camera and PC with USB Cable
Press and release the button,
The blue indicator is burning
Copy the file to PC
Replay the file in software, Media player/KM player
2、Specifications
Pixels
Video Resolution
5.0 Mega CMOS
1280*720
Video Form
H.264
FPS
30fps
View Angle
140°
Motion Detection
Direct 6 meters
Distance
Low Illumination
1LUX
Battery Capacity
2400MA
Recording Time
More than 24 hours
Remote Control Distance 18m
Recording Audio Area
40㎡
Power Consumption
150MA/3.7V
Store Tempreture
-20-80℃
Operation Tempreture
-10-60℃
Operation Humidity
15-85%RH
Memory
TF Card
Max.
32GB
Software
Media player/KMplayer
Data Transfer Interface USB1.1/2.0
Operation System
2000/XP/Visat32
Memory Consumption
1GB/40min
Charge Time
About 4 hours
Notice
Place of using:It can not be used in the ileagle place,before use it,please
pay attention to the law.
Software Update:The factory will improve the software in order to improve
the service and using feels of this products.Please try to contact your
seller to get the neweast software.
Working Tempreture:Please use it in the suitable tempreture which the man
can bear.
Working Humidity:Please do not use it in humidity place.
LUX:Please use it in the place with enough light,please do not make the
lens straigh to strong light source.
Clearance:Please do not use it in the derty place,please clear it with
soft cloth and clear it smothly.Please do not use it in strong magnetic
field or strong electic field.