1
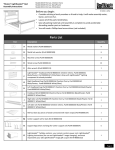
“Riviera” LightHeaded™ Bed
Assembly Instructions
Model #20204 Twin size, Cheshire Cherry
Model #20321 Twin size, Black
Model #20324 Twin size, White
Before you begin:
www.LightHeadedBeds.com
04-2014 | LGPv2
• Consider enlisting a family member or friend to help; it will make assembly easier,
faster, and more fun.
• Layout all of the parts listed below.
• Save all packing materials until assembly is complete to avoid accidentally
discarding smaller parts or hardware.
• You will need a Phillips head screw driver (not included)
Parts List
Part
Description
Quantity
A
Metal washer (Part# 80000107)
8
B
Metal lock washer (Part# 80000108)
8
C
Machine screw (Part# 80000109)
8
D
Wood screw (Part# 80000110)
24
E
Allen wrench (Part# 80000111)
1
LightHeaded™ headboard (Part# 80000587 Cheshire Cherry; Part# 80000557 Black;
Part# 80000562 White) ships with LightHeaded™ lighting component kit already
installed.
1
G
Right headboard leg (Part# 80000548 Cheshire Cherry; Part# 80000559 Black; Part#
80000564 White)
1
H
Left headboard leg (Part# 80000589 Cheshire Cherry; Part# 80000558 Black; Part#
80000563 White)
1
F
I
Footboard (Part# 80000590 Cheshire Cherry; Part# 80000555 Black; Part# 80000560
White)
1
J
Right side rail (Part# 80000591 Cheshire Cherry; Part# 80000150 Black; Part#
80000144 White)
1
K
Left side rail (Part# 80000592 Cheshire Cherry; Part# 80000151 Black; Part#
80000145 White)
1
L
Roll-out slats (12 pieces of wood connected with nylon straps) (Part# 80000118)
1
M
LightHeaded™ TechBox (contains remote control, power cord, instructions for use and
image changing, and most importantly your coupon code for $20) (see separate
LightHeaded™ Lighting Assembly Instructions) (Part# 80000152)
1
Page 1
“Riviera” LightHeaded™ Bed
Assembly Instructions
Model #20204 Twin size, Cheshire Cherry
Model #20321 Twin size, Black
Model #20324 Twin size, White
www.LightHeadedBeds.com
Step 1
04-2014 | LGPv2
1. Open the hinged top of your LightHeaded™ headboard, then remove the protective
foam insert and attached paper and discard.
2. Your LightHeaded™ light component is pre-assembled in the headboard and ready to
use. Please refer to your LightHeaded™ Lighting Assembly Instructions in the TechBox
for information on how to connect power to your light, insert LightHeaded™ Images,
general use, and troubleshooting if necessary.
Step 2
1. With the help of your assistant, gently lay your LightHeaded™
headboard panel face down on a soft surface with the hinged top in
the open position.
2. Align left leg (G) with the left side headboard post (F).
3. Align the cutout in the top of the leg with the corresponding cutout
in the bottom of the headboard post. The 4 holes in the leg should
align with the 4 threaded inserts in the back of your headboard
panel.
H
F
4. Select 4 metal washers (A), 4 metal lock washers (B), and 4 machine
screws (C). Using the Allen wrench supplied (E), tighten screws into
legs through the lock washer then washer.
5. Repeat these steps for the right leg (H).
Box Spring & Mattress
or
Mattress only
It’s your choice!
Your LightHeaded™ bed can be assembled to use a box
spring and mattress set or a mattress only. Don’t worry,
you can change it at any time with a couple simple
steps and no tools.
Step 3
1.
If you’re using a box spring and mattress, hook your
wooden side rails (J,K) onto the bottom two metal pins
in the vertical slot on the headboard and footboard
legs.
2.
If you’re using a mattress only, hook your wooden side
rails (J,K) onto the top two metal pins in the vertical slot
on the headboard and footboard legs.
Step 3-1
Step 3-2
Page 2
“Riviera” LightHeaded™ Bed
Assembly Instructions
Model #20204 Twin size, Cheshire Cherry
Model #20321 Twin size, Black
Model #20324 Twin size, White
www.LightHeadedBeds.com
04-2014 | LGPv2
L
D
Step 4
Rollout wooden slats (L) onto your side rails so that the
two end slats lock into place with the wood blocks near
the headboard and footboard.
Step 5
Secure each slat into the side rails with the wood screws (D) using a
Phillips head screwdriver (not included).
You have now completed the bed assembly.
Display in your headboard. Store in your footboard.
Your LightHeaded Bed comes with a built-in image
storage on the inside of your footboard. This
specially designed area allows you to organize and
safely store up to 25 interchangeable LightHeaded
graphic images.
Please refer to the Lighting Assembly Instructions in
your TechBox. Locate the page titled Using Your
LightHeaded Bed to easily remove one graphic
image and replace it with another.
Place the image which you just removed from the
Headboard into the storage area in the Footboard
and your image will be ready for the next time you
want to personalize your LightHeaded Bed.
On/Off switch
On the back of your LightHeaded headboard, located just below
the hinged top, is an On/Off switch which can be used to toggle
the light component on or off. Please refer to your user manual
in the TechBox for additional information.
Light component positioning hole
If, after review of the Lighting Assembly Instructions contained in the
TechBox, you find that your LightHeaded™ Image does not slide in
and out of the headboard with little to no resistance, we’ve provided
a 1" diameter hole located in the center of the headboard back panel.
With your finger, simply apply gentle pressure to the back of the light
component to reposition it, and your LightHeaded™ Image will slide
effortlessly in and out of your headboard.
Page 3
Model #20204 Twin size, Cheshire Cherry
Model #20321 Twin size, Black
Model #20324 Twin size, White
“Riviera” LightHeaded™ Bed
Assembly Instructions
Trundle
www.LightHeadedBeds.com
Underbed storage
An optional Twin Trundle bed is
available for purchase at
LightHeadedBeds.com
04-2014 | LGPv2
An optional Underbed Storage Unit is
available for purchase at
LightHeadedBeds.com. Use 1 or 2
for additional storage as needed.
Congratulations! Your LightHeaded™ bed is assembled and you are
ready for the real fun.
•
Hop online and surf our website LightHeadedBeds.com where you can
apply your $20 gift coupon toward your first LightHeaded™ Image and
personalize your bed.
•
Create your own custom images or select from our massive gallery of
amazing images including your favorite Disney®, Marvel®, and other
super characters.
One Year Limited Warranty
LightHeaded™ Beds warrants that for a period of one year from the date of purchase, this product will be free
from defects in material and workmanship. LightHeaded™ Beds, at its option, will repair or replace the
product or any component of the product found to be defective during the warranty period. Replacement will
be made with a new or remanufactured product or component. If the product is no longer available,
replacement may be made with a similar product of equal or greater value. This is your exclusive warranty.
This warranty is valid for the original retail purchaser from the date of initial retail purchase and is not
transferable. Keep the original sales receipt. Proof of purchase is required for warranty service. LightHeaded™
Beds dealers, service centers, or retail stores selling LightHeaded™ Beds products do not have the right to
alter, modify, or in any way change the terms and conditions of this warranty.
This warranty does not cover normal wear and tear of parts or damage resulting from any of the following:
negligent use or misuse of the product, use on improper voltage or current, use contrary to the operating
instructions, electronics disassembly, repair or alteration by anyone other than LightHeaded™ Beds authorized
service representatives.
What Are the Limits on LightHeaded™ Beds Liability?
LightHeaded™ Beds shall not be liable for any incidental or consequential damages caused by the breach of
any express, implied, or statutory warranty or condition. Except to the extent prohibited by applicable law,
any implied warranty or condition of merchantability or fitness for a particular purpose is limited in duration
to the duration of the above warranty. LightHeaded™ Beds disclaims all other warranties, conditions or
representations, express, implied, statutory or otherwise. LightHeaded™ Beds shall not be liable for any
damages of any kind resulting from the purchase, use or misuse of, or inability to use the product including
incidental, special, consequential or similar damages or loss of profits, or for any breach of contract,
fundamental or otherwise, or for any claim brought against purchaser by any other party.
How to Obtain Warranty Service
We suggest you complete and return the product registration card that was included with your bed. This will
help us to promptly facilitate verification of the date of your original purchase. If you have any questions
regarding this warranty or would like to obtain warranty service, please call (435) 565-4490 and a friendly
Customer Service Representative will assist you.
Page 4
Model #20294Chestnut finish
Model #20187Cheshire Cherry finish
Model #20172Chocolate finish
LightHeaded Beds™ Universal Twin Trundle
Bed Assembly Instructions
Model #20233 Satin Black
Model #20177Satin White
www.LightHeadedBeds.com
Before you begin:
08-2013 | No LGP
• Make sure your bed’s side rails are attached to the headboard and footboard posts in the upper
position to accommodate this Trundle Bed. This will be the side rail’s highest setting.
• Please assemble this Trundle Bed with 2 people.
• Layout all of the parts listed below.
• Save all packing materials until assembly is complete to avoid accidentally discarding smaller parts or
hardware.
• You will need a Phillips head screw driver (not included)
Contact Us | (435) 565-4490 | [email protected]
|www.lightheadedbeds.com | Assembly videos on YouTube
Use a with 6” thick mattress.
Parts List
Part
Description
Part
Quantity
Front Panel (Part #80000270
A
Cheshire Cherry; #80000271
Chocolate; #80000272 Chestnut;
#80000273 Black; #80000274
White)
Description
F
1
Flat washer for Hex head
machine screws
Quantity
8
G Lock washer
8
H 1” Wood screws for slats
24
Back Panel (Part #80000458
B
C
Cheshire Cherry; #80000459
Chocolate; #80000460 Chestnut;
#80000461 Black; #80000462
White)
Roll-out slats (mattress
support) (Part #80000280)
1
1
I
¾" Wood screws for casters
16
2
J
Casters (#80000281)
4
8
K
Allen wrench
1
End cross braces (#80000275
D
E
Cheshire Cherry; #80000276
Chocolate; #80000277 Chestnut;
#80000278 Black; #80000279
White)
1-1/4” Hex head machine
screws
Step 1
1.
2.
3.
Attach a caster (J) to one end of a cross brace (D) using 2
short (3/4”) wood screws (I).
Repeat step one to attach another caster to the other
end of the same cross brace.
Repeat steps one and two to attach casters to the second
cross brace.
J
D
I
Page 1
LightHeaded Beds™ Universal Twin Trundle
Bed Assembly Instructions
Model #20294Chestnut finish
Model #20187Cheshire Cherry finish
Model #20172Chocolate finish
Model #20233 Satin Black
Model #20177Satin White
www.LightHeadedBeds.com
08-2013 | No LGP
Step 2
K
1.
Place front panel (A) with cleat near the bottom. Thread
together 1 machine screw (E), 1 flat washer (F), and 1 lock
washer (G). Place one assembled cross brace (with casters
facing down) to the right of wood cleat on the right end of
front panel (see detail drawing). Use Allen wrench (K) to
tighten.
Attach the other end of the assembled cross brace to the back
panel (B) using an identical assembly of 1 machine screw, 1
flat washer, and 1 lock washer as in above instruction.
Repeat steps one and two above to attach the left end cross
brace to front and back panels.
2.
3.
Step 3
E
B
F
G
A
H
Spread the mattress support roll-out slats (C)
on the top of the wood cleat and secure with
wood screws (H) through each slat.
You have now completed the Twin Trundle Bed assembly and
can install your 6” mattress and slide under your twin size
LightHeaded Bed™ .
C
For Full size beds (additional assembly adjustments)
NOTE:
Picture shows bed upside down for reference only. Do not turn your bed upside
down.
1.
2.
3.
4.
5.
If you have a full size LightHeaded Bed™ you will need to hook the bed’s side rails
to the top two metal pins in the vertical slots on the headboard and footboard
legs. This will be the side rail’s highest setting.
Next you need to move the center support rail and legs to the left or right setting
so you can roll the twin trundle beneath the full size bed. Turn the legs to separate
them from the center support rail. You will need to use two legs to correspond
with the bed’s side rails on the higher setting. (Reference your bed instructions for
more detail).
Shift the center support rail to align with the threaded t-nuts on the underside of
the wood slats. You can use the left of center or right of center holes depending on
how you want to set up your trundle bed.
Attach the support legs (long and short combined) through the holes in the center
support rail and into the threaded t-nuts on the underside of the slats.
You have now completed the additional assembly adjustments for your full size
bed and you can now install your 6” mattress and slide under your full bed.
One Year Limited Warranty
LightHeaded™ Beds warrants that for a period of one year from the date of purchase, this product will be free from defects in material and workmanship. LightHeaded™ Beds, at
its option, will repair or replace the product or any component of the product found to be defective during the warranty period. Replacement will be made with a new or
remanufactured product or component. If the product is no longer available, replacement may be made with a similar product of equal or greater value. This is your exclusive
warranty.
This warranty is valid for the original retail purchaser from the date of initial retail purchase and is not transferable. Keep the original sales receipt. Proof of purchase is required
for warranty service. LightHeaded™ Beds dealers, service centers, or retail stores selling LightHeaded™ Beds products do not have the right to alter, modify, or in any way change
the terms and conditions of this warranty.
This warranty does not cover normal wear and tear of parts or damage resulting from any of the following: Negligent use or misuse of the product, use on improper voltage or
current, use contrary to the operating instructions, electronics disassembly, repair or alteration by anyone other than LightHeaded™ Beds authorized service representatives.
What are the Limits on LightHeaded™ Beds Liability?
LightHeaded™ Beds shall not be liable for any incidental or consequential damages caused by the breach of any express, implied, or statutory warranty or condition. Except to the
extent prohibited by applicable law, any implied warranty or condition of merchantability or fitness for a particular purpose is limited in duration to the duration of the above
warranty. LightHeaded™ Beds disclaims all other warranties, conditions or representations, express, implied, statutory or otherwise. LightHeaded™ Beds shall not be liable for
any damages of any kind resulting from the purchase, use or misuse of, or inability to use the product including incidental, special, consequential or similar damages or loss of
profits, or for any breach of contract, fundamental or otherwise, or for any claim brought against purchaser by any other party.
How to Obtain Warranty Service
We suggest you complete and return the product registration card that was included with your bed. This will help us to promptly facilitate verification of the date of your original
purchase. If you have any questions regarding this warranty or would like to obtain warranty service, please call (435) 565-4490 and a friendly Customer Service Representative
will assist you.
Page 2


![HomeSullivan 40885B622W(3A)[BED] Instructions / Assembly](http://vs1.manualzilla.com/store/data/006934806_1-7eed6b9cc56669436b551357ae7c9d0a-150x150.png)