1
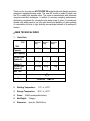
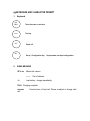
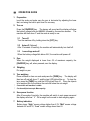
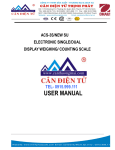
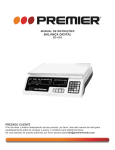
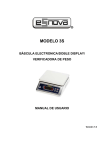
AGT/SUPER SS
ELECTRONIC SINGLE/DUAL DISPLAY
WEIGHING/COUNTING SCALE
USER MANUAL
Thank you for choosing our AGT-SUPER SS single/double side display electronic
waterproof weighing/counting scale. The new SU model is made of plastic and
the 3S is made from stainless steel. The scale is manufactured with advanced
computer-controlled techniques. It exhibits hi accuracy weighing performance,
whilst being convenient for carrying but also being cheap in price. It is sturdy and
durable, and widely used in not only retail stores and weighing of ration packing
of commodities, but also in high humidity surroundings because of its waterproof
function.
Ⅰ. MAIN TECHNICAL INDEX
1.
Basic Data
TYPE
AGT-S-030
3kg
AGT-S-075
7.5kg
AGT-S-150
15kg
ITEM
Max.
Capacity
Min. Capacity
1.5/3kg
3/7.5kg
Division size
(Option 0)
Division size
(Option 1)
Division size
(Option 2)
Max. Tare
1/2g
2/5g
5/10g
0.5/1g
1/2g
2/5g
0.2/0.5g
0.5/1g
1/2g
20e
100% Max. Cap.
Accuracy
III
Pan Size
3S/NEW SU
19×23 cm
2.
Working Temperature :
-5℃ to +35℃
3.
Storage Temperature:
-25℃ to +50℃
4.
Power: 6V4Ah rechargeable battery.
5.
Net Weight:
6. Dimension:
7.5/15kg
3.6kg/pc
4pcs/ctn, 58x35x30cm
Ⅱ. KEYBOARD AND CHARACTER PROMPT
1.
Keyboard
ON/
ZERO
Turns the scale on and zero.
TARE
Tare key.
OFF
Power off.
SET
2.
Set up / Configuration key.
Set parameter and input configuration.
SIGNS MEANING
SP x.xx
Means the version
------ Out of ballance
-L-
Low battery - charge immediately.
FULL Charging complete.
nnnnnn
cell.
Overload zero of load cell. Please re-adjust or change load
III. OPERATION GUIDE
1. Preparation
Level the scale and make sure the pan is horizontal by adjusting the base
feet, and using the built-in spirit level for accuracy.
2. Turn on
Press the [ON/ZERO] key. The buzzer will sound and the display will show
the battery voltage level and 888888, followed by the machine number. The
machine will then show „0‟ and the scale is ready to use.
2.1 Turn off
Turn the machine off by holding down the [OFF] key.
2.2 Auto-off (Optional)
After 10 minutes of inactivity, the machine will automatically turn itself off.
2.3 Low voltage auto-off
When the battery voltage falls below 5.6V, the machine will power-off.
3. Zero
When the weight displayed is lower than 4% of maximum capacity, the
[ON/ZERO] key, will, when pressed, zero the display.
4. Weighing
Put weight on pan.
5. Tare weighing
Place container or item on scale and press the [TARE] key. The display will
then tare off and will show „0‟, and the tare LED light will be on. To clear the
tare, press the [TARE] key, and the LED light will turn off. Place the objects
to be weighed into the container the scale will show the net weight.
* Cannot tare until machine is stable.
* Can do multiple tares upto Max capacity.
6. Save power function
After 40 seconds of inactivity, the machine will switch to auto power save and
the display will show “ 0 ”. Put a weight on the scale to start weighing again.
7.
Battery indication
Battery lamp: “High” means voltage higher than 6.3V, “Mid” means voltage
between 6V and 6.3V, “Low” means voltage lower than 6V.
8.
Charge
The power is supplied by an internal rechargeable lead acid battery
(6V/4Ah). When the display shows “-bAtLo-”, please connect the machine to
a mains supply and charge immediately. The time of full charging is 12
hours.
9.
Set parameters
Press [SET + TARE] key for 3 seconds. The display will now enter into
the parameter menu. Press [TARE] key to choose and [ON/ZERO] to
confirm and move to next item.
PRE-Dispaly precision: 0 is default option, 1 is double precision
and 2 is super prcision.
UNT-weighing unit: 0 means g, 1 means kg, 2 means lbs.
BRT-display brightness 1-3 (bright – dim)
ZER-zero tracking 0~4 (0-4 divisions)
dlS-reverse display (lcd backlight) 0 means front display only 1
means both displays active.
Fit-stability 0~3
(0 fast 3 slowest 1 default)
SAV power saving function 1 is on 0 is off
Out Audible alarm 0 is alarm at target weight and 1 is alarm greater
Or lower than target weight.
SPd Display update speed 0 is slow 1 is fast.
Weighing Alarm And Counting
1. Set Weighing Alarm
With display showing 0 at the same time press [SET] and [REZERO] display
shows rAng.
2. Press [ON/ZERO] to confirm, the under LED is lit, to set lower limit press
[SET] key to change digit and [TARE] key to change value press [ON/ZERO]
key to confirm lower limit. Over LED is lit set upper limit using [SET] and
[TARE] key, Press [ON/ZERO] key to confirm.
3.After setting machine will turn off and then auto turn back on, Under LED
will remain lit until target weight is reached. Accept LED will be lit and
buzzer will sound. Above target weight Over LED will be lit.
4. To remove target weight with the machine at 0 at the same time press the
[SET] and [ON/ZERO] key display will show rAng press [ON/ZERO] key 3
times machine will turn off and auto switch on.
Set Counting
1. Place the number of items on the pan then at the same time press [SET]
and the [ON/ZERO] key display shows PCS, press [ON/ZERO] key to
confirm display shows 00000 press [SET] key to change digit and [TARE]
key to change the value, press [ON/ZERO] key to confirm, remove items
from the pan the machine will switch of and auto switch on, place items on
pan to resume count.
2. to clear count at the same time press [SET] and [TARE] key, press
[ON/ZERO] key 9 times ( machine scrolls through parameter settings)
machine then switches off then auto switches on.
SCALE MAINTENANCE
1.
Take care not to overload the scale. Do not place heavy things on the
scale violently. The damage for overloading is not within the range of the
guarantee.
2. Do not use sharp objects to operate the keypad. If the rubber is damaged it
will influence the performance of the waterproof seal.
3. Keep the scale clean in order to maintain performance.
4. There is a lead seal on the bottom of the scale. Users are not allowed to
remove the seal. If the seal is damaged the guarantee is void.
5. a. You must charge the battery at least once every 3 months during periods of
scale inactivity.
b. Please take care to correctly connect the battery terminals (ie, black to black,
red to red).
c. If the battery life seems short, even after frequent charging, please replace
with a new battery.